JSON Web Tokens (JWT)
In this lab, we are going to see how to use JSON Web Tokens with your APIs.
Creation
JSON Web Tokens are an open-industry standard method for representing claims securely between two parties. More info at https://jwt.io.
Use the following sites:
-
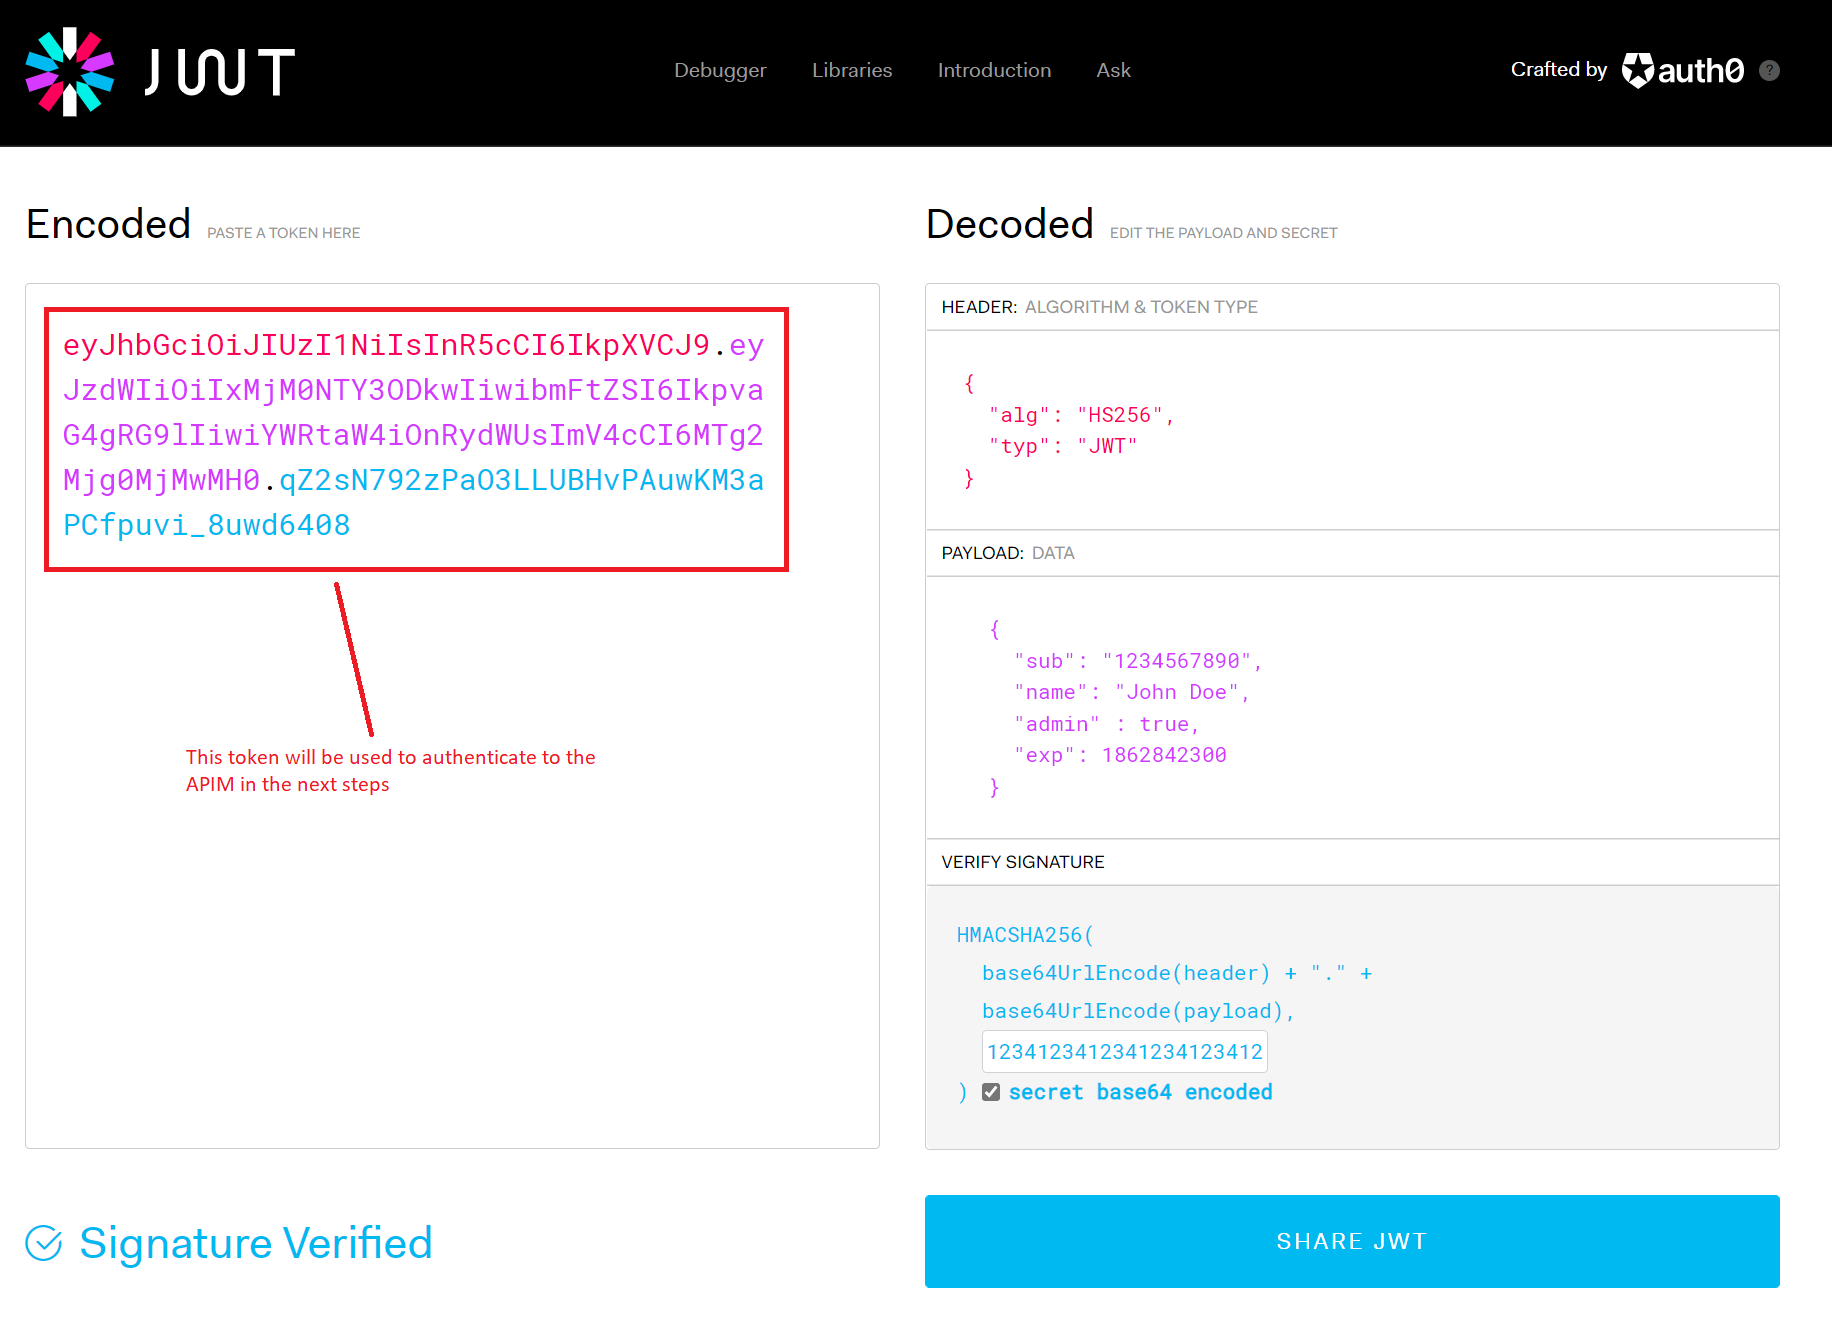
https://www.unixtimestamp.com to get a future date using the Epoch Unix Timestamp at least one hour from the current time as the JWT will not work otherwise (e.g. 01/11/2029 =
1862842300) -
https://jwt.io to create a JWT with payload. In the JWT Encoder section generate an example with these changes:
- Change the algorithm to HS256. This should update the Header as per the image below.
-
Use the following Payload format and replace the
expvalue with your newly-created Unix timestamp:{ "sub": "1234567890", "name": "John Doe", "admin" : true, "exp": 1862842300 } - In the Sign JWT area enter a 256-bit secret (minimum 32 characters). We used
12341234123412341234123412341234as an example, which is a rather weak secret but serves the demo purpose. - Copy the Encoded JWT token - you’ll need it for testing in APIM.
-
Your configuration should be similar to this now:
Validation
- Back in APIM, open the Swagger Petstore API and select All operations.
-
In the Code View add an inbound
validate-jwtpolicy with the signing key.Important: The APIM
<key>element expects a base64-encoded value of your secret. If your jwt.io secret is12341234123412341234123412341234, use its base64 encoding:MTIzNDEyMzQxMjM0MTIzNDEyMzQxMjM0MTIzNDEyMzQ=<policies> <inbound> <base /> <validate-jwt header-name="Authorization" failed-validation-httpcode="401" failed-validation-error-message="Unauthorized"> <issuer-signing-keys> <key>MTIzNDEyMzQxMjM0MTIzNDEyMzQxMjM0MTIzNDEyMzQ=</key> </issuer-signing-keys> </validate-jwt> </inbound> ... </policies> -
Invoke the Find pet by ID method on the API from the Test tab (use pet ID
1). Observe the401Unauthorized error.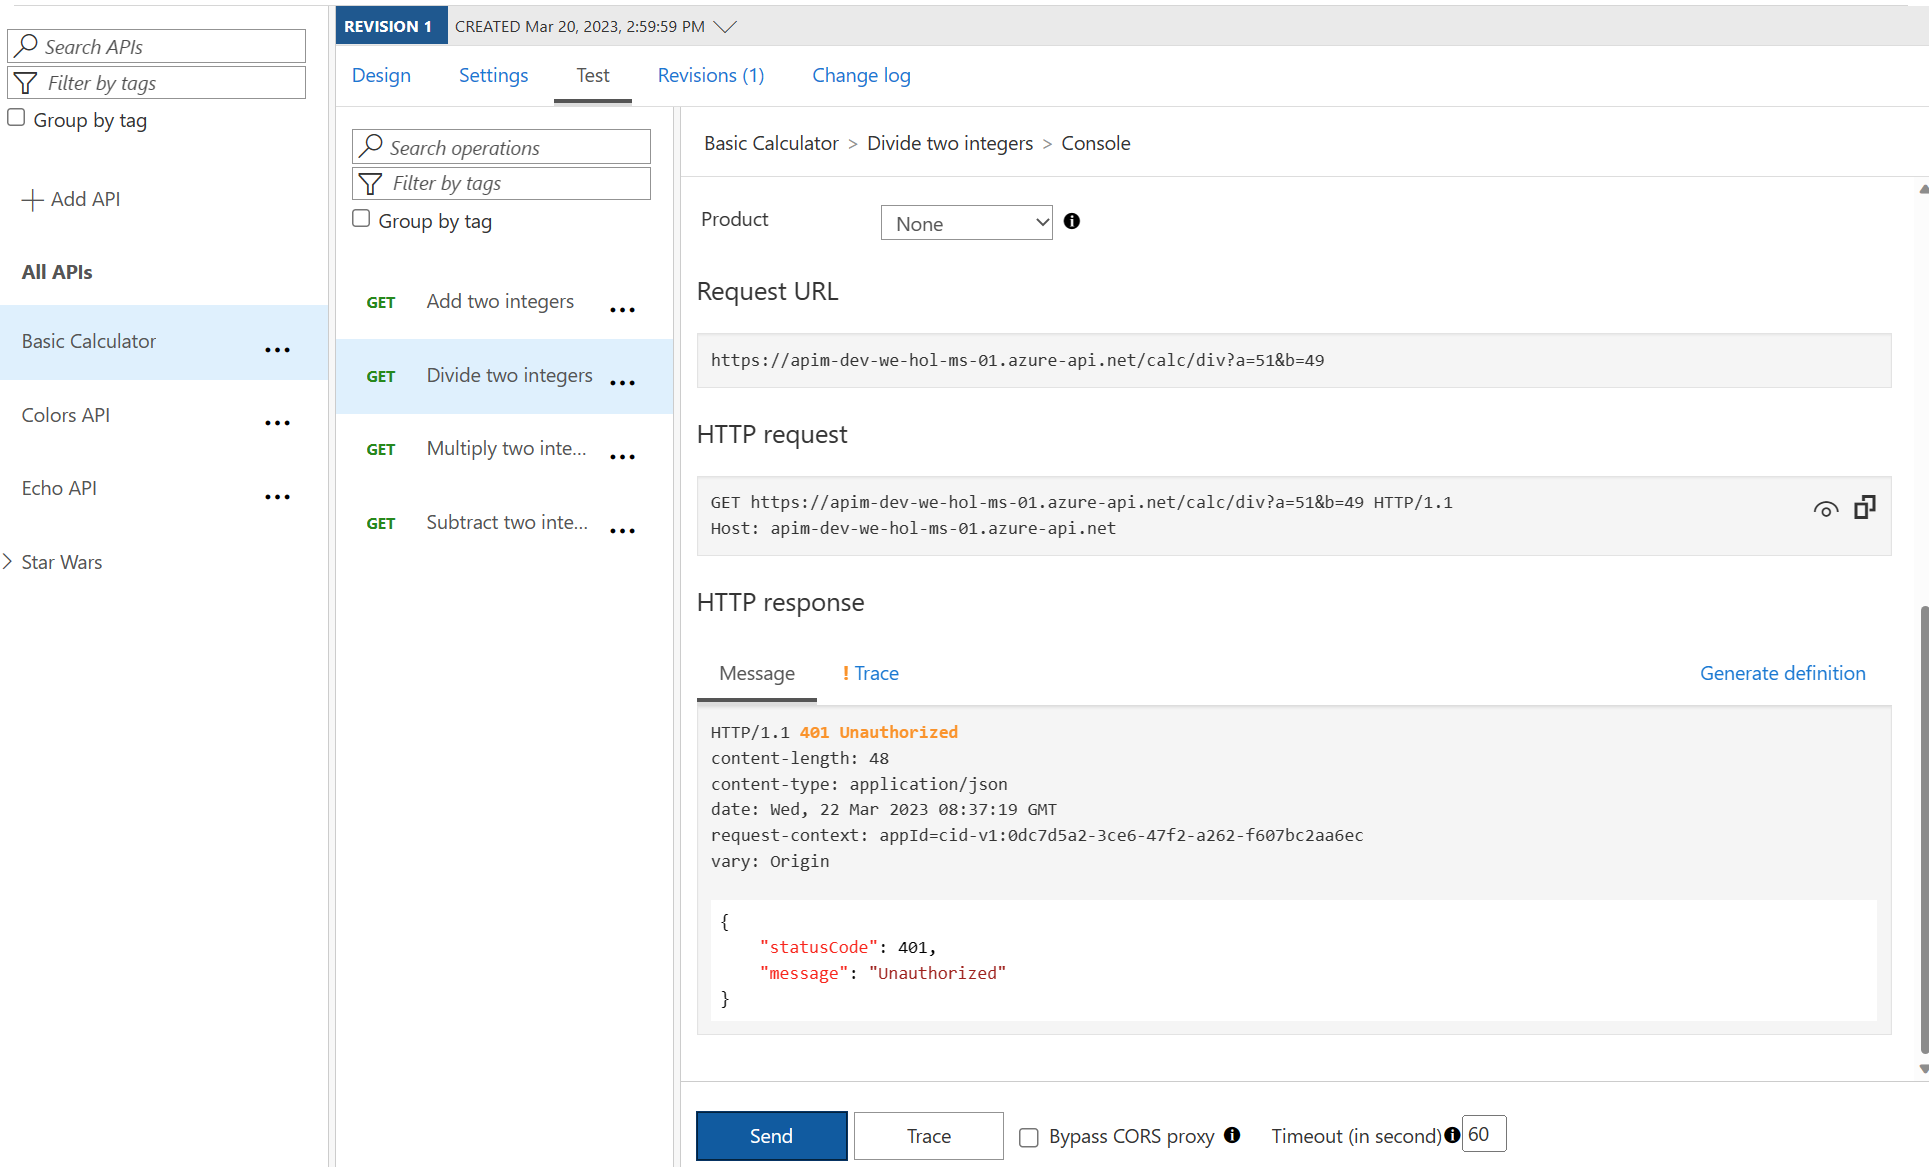
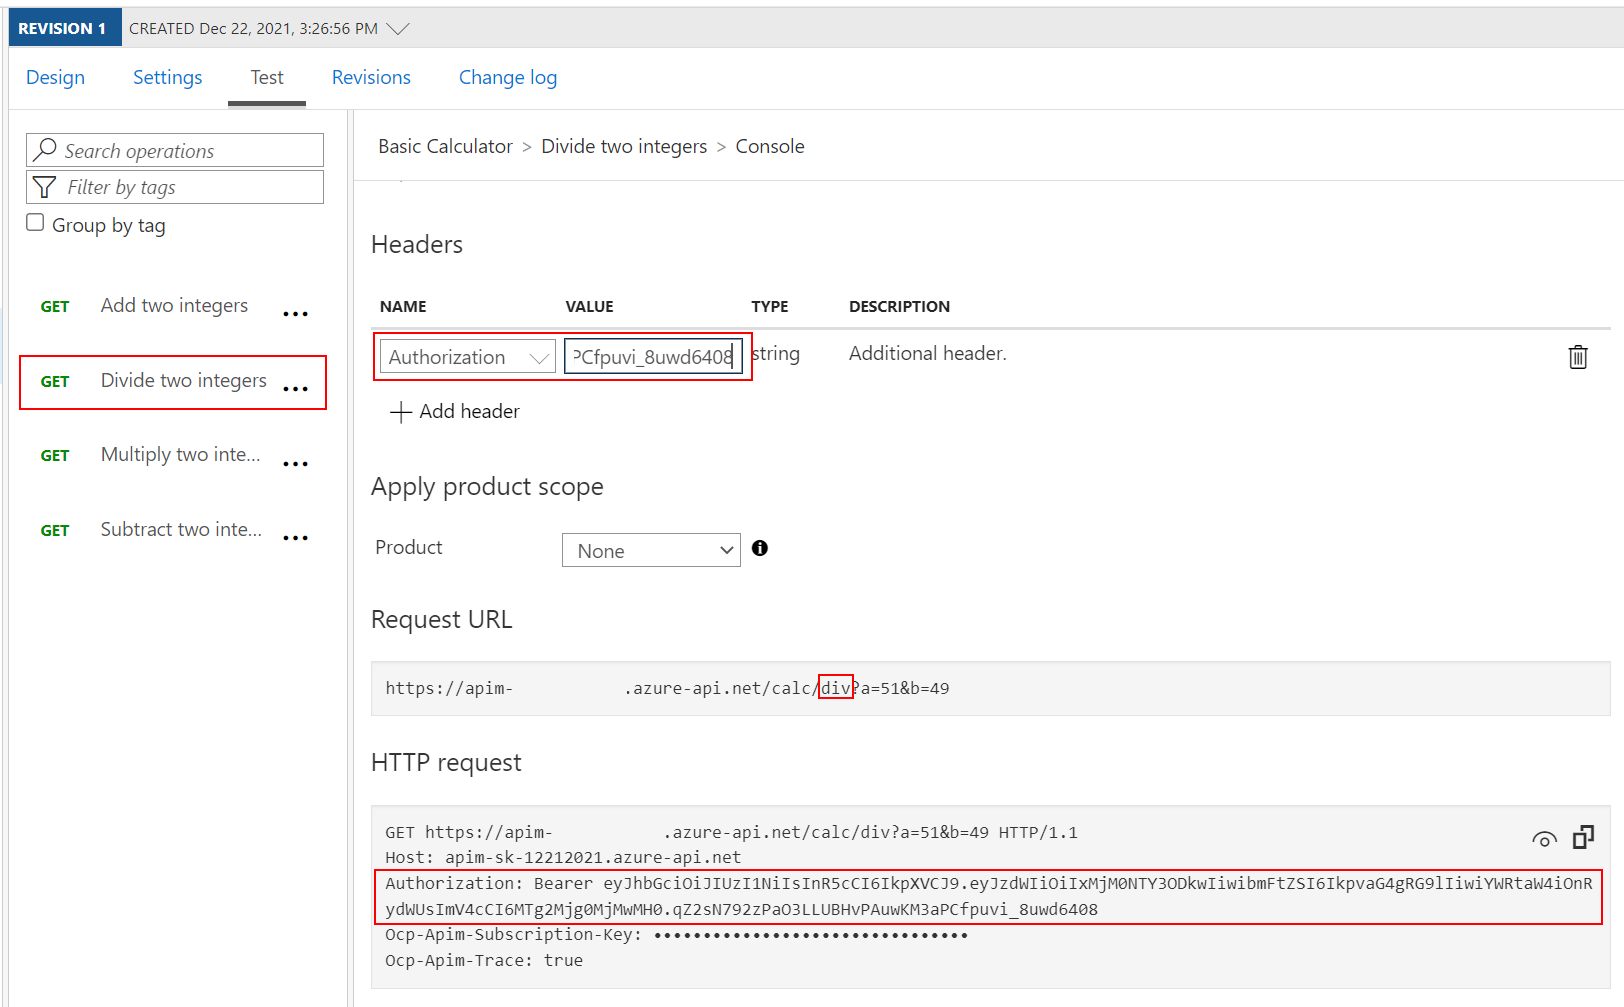
- Now add the following
Authorizationheader to the test:- Name:
Authorization - Value:
Bearer <jwt token>- Replace
<jwt token>with the encoded value from https://jwt.io above
- Replace
Note the bearer token in the Request payload.
- Name:
-
Execute the test once more to see a
200Success.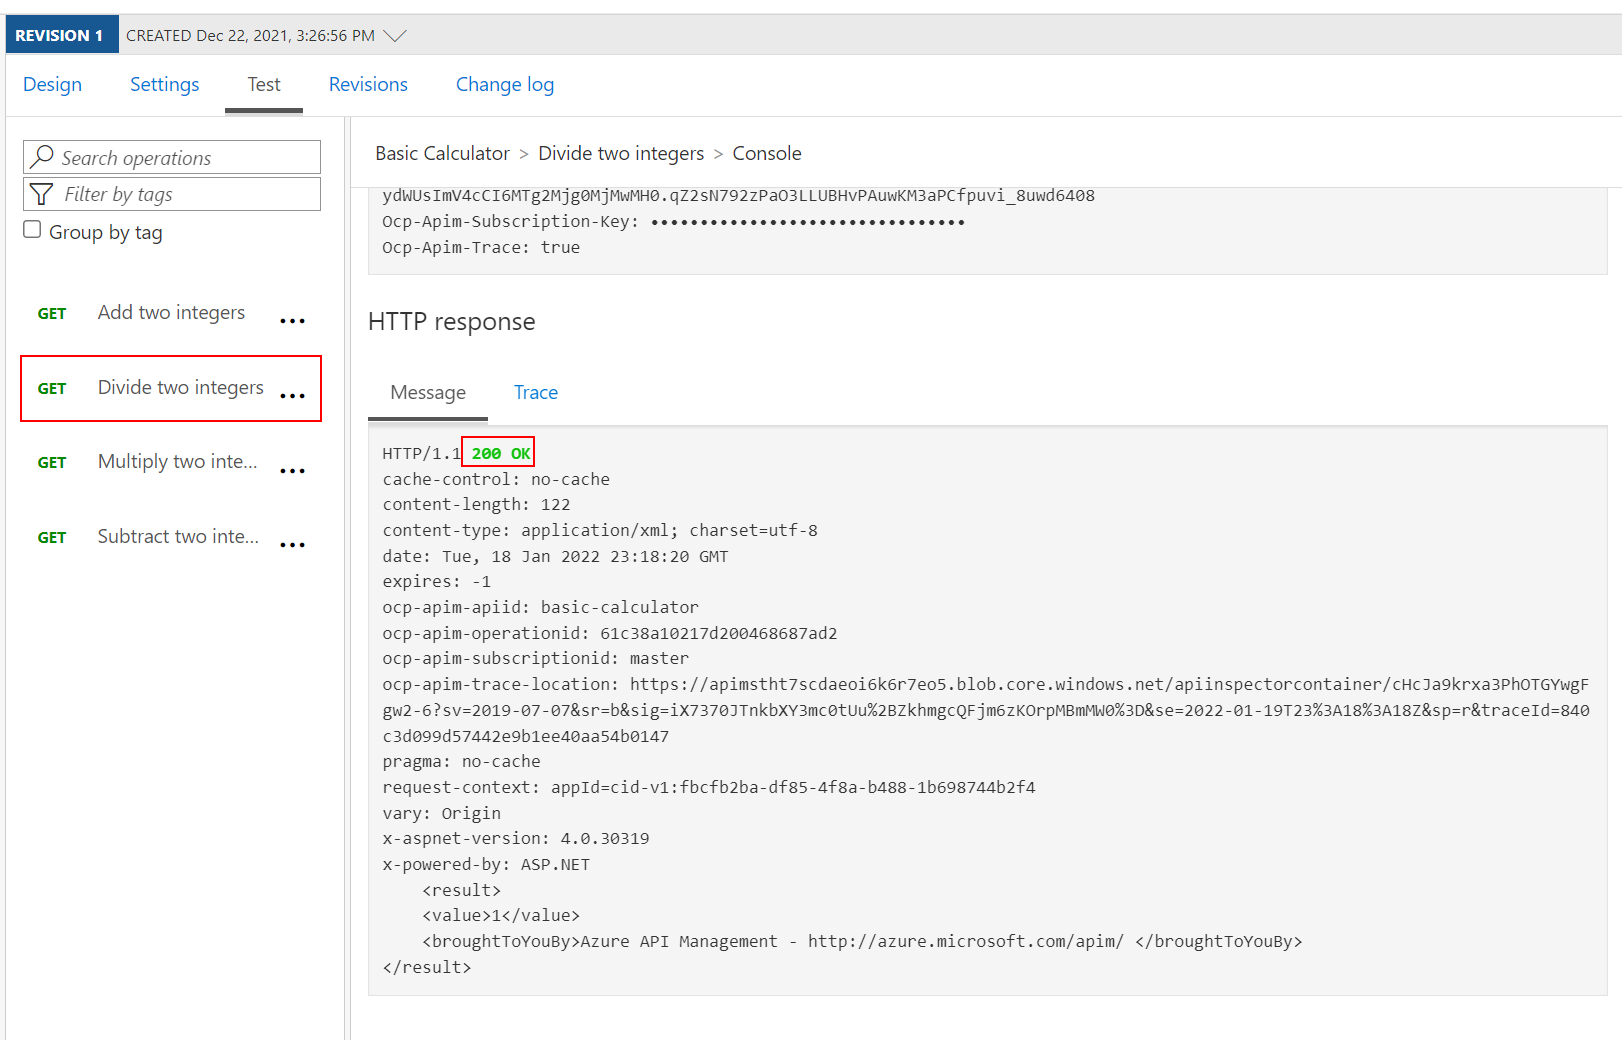
Check that a Claim Exists
Not only is it important that a JWT is valid, but, as we use it for authorization, we must also assert that the token contains expected claims before granting access to our APIs.
- Open the Swagger Petstore API and select All operations.
-
Modify the inbound
validate-jwtpolicy to not only validate the JWT but ensure that a specificadminclaim exists. Recall that we setadmin:truein our JWT token on https://jwt.io above.<policies> <inbound> <base /> <validate-jwt header-name="Authorization" failed-validation-httpcode="401" failed-validation-error-message="Unauthorized"> <issuer-signing-keys> <key>MTIzNDEyMzQxMjM0MTIzNDEyMzQxMjM0MTIzNDEyMzQ=</key> </issuer-signing-keys> <required-claims> <claim name="admin" match="any"> <value>true</value> </claim> </required-claims> </validate-jwt> </inbound> ... </policies> -
Invoke the Find pet by ID method with the
Authorizationheader as above and observe the200success. We have not fundamentally changed the test scenario as we only restricted the claims to something that we already had in our payload. -
Now change the
required-claimswith a claim that does not exist (e.g.adminx)<policies> <inbound> <base /> <validate-jwt header-name="Authorization" failed-validation-httpcode="401" failed-validation-error-message="Unauthorized"> <issuer-signing-keys> <key>MTIzNDEyMzQxMjM0MTIzNDEyMzQxMjM0MTIzNDEyMzQ=</key> </issuer-signing-keys> <required-claims> <claim name="adminx" match="any"> <value>true</value> </claim> </required-claims> </validate-jwt> </inbound> ... </policies> - Invoke the Find pet by ID method with the
Authorizationheader once more and observe the401Unauthorized error as the token specifiesadminbut the policy requiresadminx.
Extract Claim and Pass to Backend
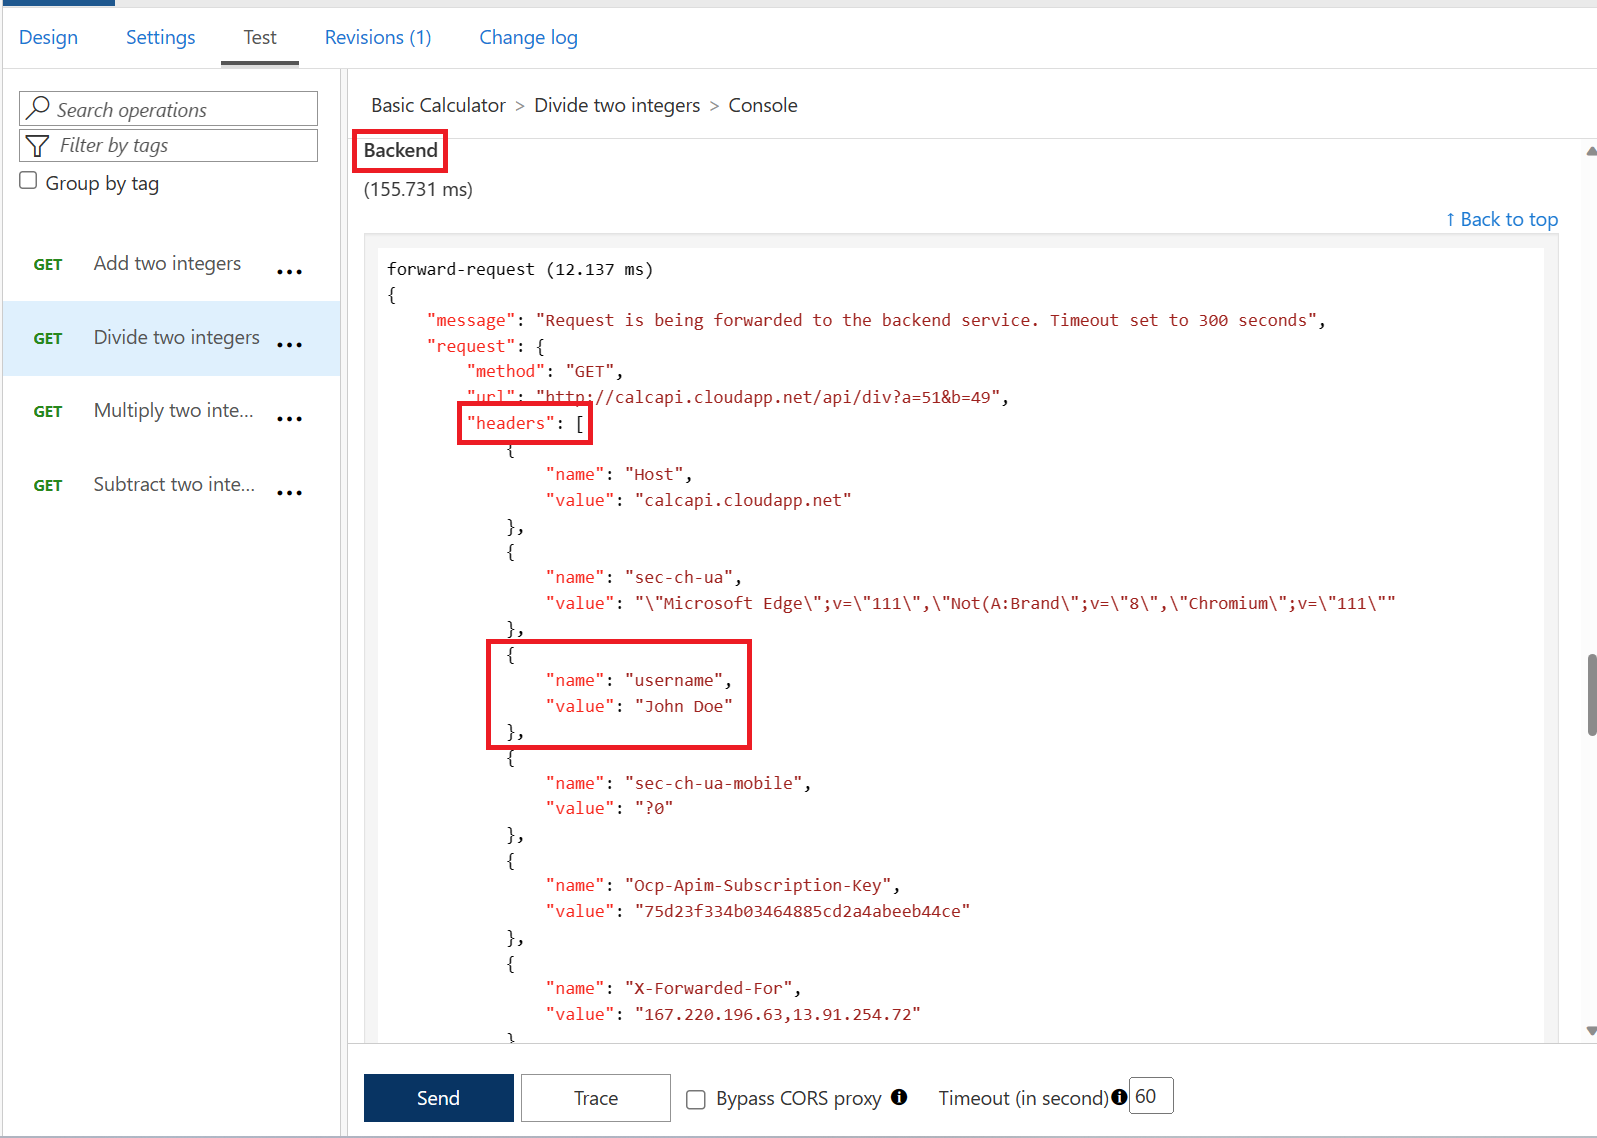
It may often be necessary to pass (specific) claims onto the backend API to inform further processing. One such way - and this can be tailored to an API’s individuality - is to extract a claim and place it into a designated header the backend expects.
Let’s add the username contained inside the JSON Web Tokens into a specific header.
- Open the Swagger Petstore API and select All operations.
- Append the inbound policy section to extract the
nameclaim and place it into a header underneath thevalidate-jwtpolicy. -
Change the claim back from
adminxtoadminas we are interested in a successful test again.<policies> <inbound> <base /> <validate-jwt header-name="Authorization" failed-validation-httpcode="401" failed-validation-error-message="Unauthorized"> <issuer-signing-keys> <key>MTIzNDEyMzQxMjM0MTIzNDEyMzQxMjM0MTIzNDEyMzQ=</key> </issuer-signing-keys> <required-claims> <claim name="admin" match="any"> <value>true</value> </claim> </required-claims> </validate-jwt> <set-header exists-action="override" name="username"> <value>@{ Jwt jwt; context.Request.Headers.GetValueOrDefault("Authorization","scheme param").Split(' ').Last().TryParseJwt(out jwt); return jwt.Claims.GetValueOrDefault("name", "?"); }</value> </set-header> </inbound> ... </policies> - Invoke the Find pet by ID method with the
Authorizationheader once more and observe the200Success. -
Use the Trace feature to inspect what was passed to backend. You should see the new header and the correct value from the claims.
Improvements
Based on what you have learned thus far, consider how you can improve your policies. For example, you may not want to hard-code the issuer-signing-key and instead use a Named Value that you can more easily administer and change outside of an API’s policies. If you have time in this exercise, go ahead and give it a try.