Transformation policies
Transformation - replace string
The find-and-replace policy finds a substring in a request or response and replaces it with a different string.
- Open the Colors API, then open the
Get random coloroperation. - Enter the Policy code editor in the Outbound processing section.
- Place the cursor after the
<base />element in the<outbound>section. -
Press Show snippets, then select the Find and replace string in body transformation policy.
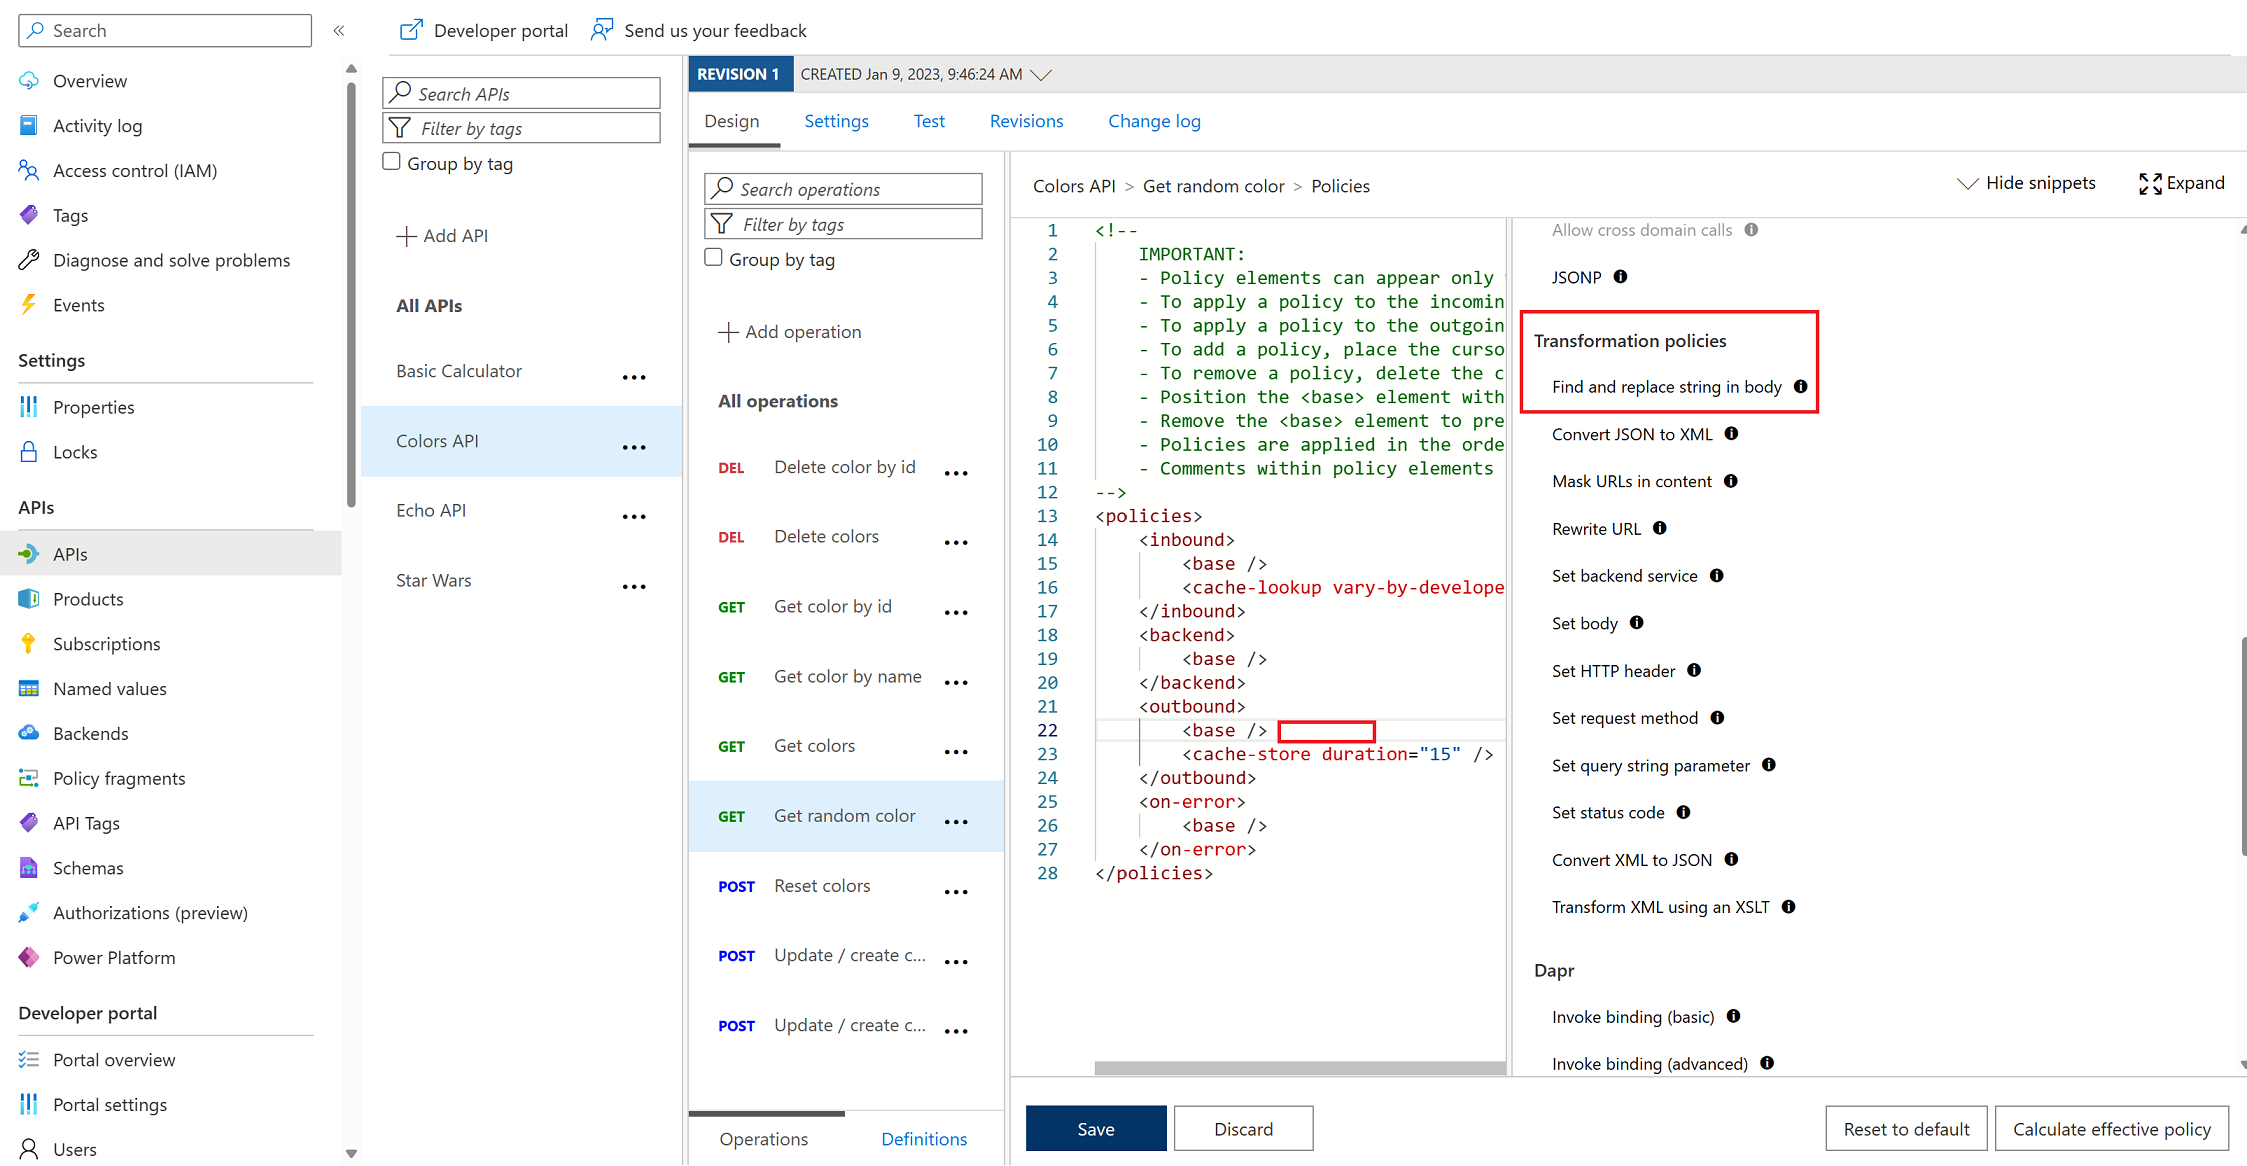
- Fill in the
fromandtovalues accordingly:
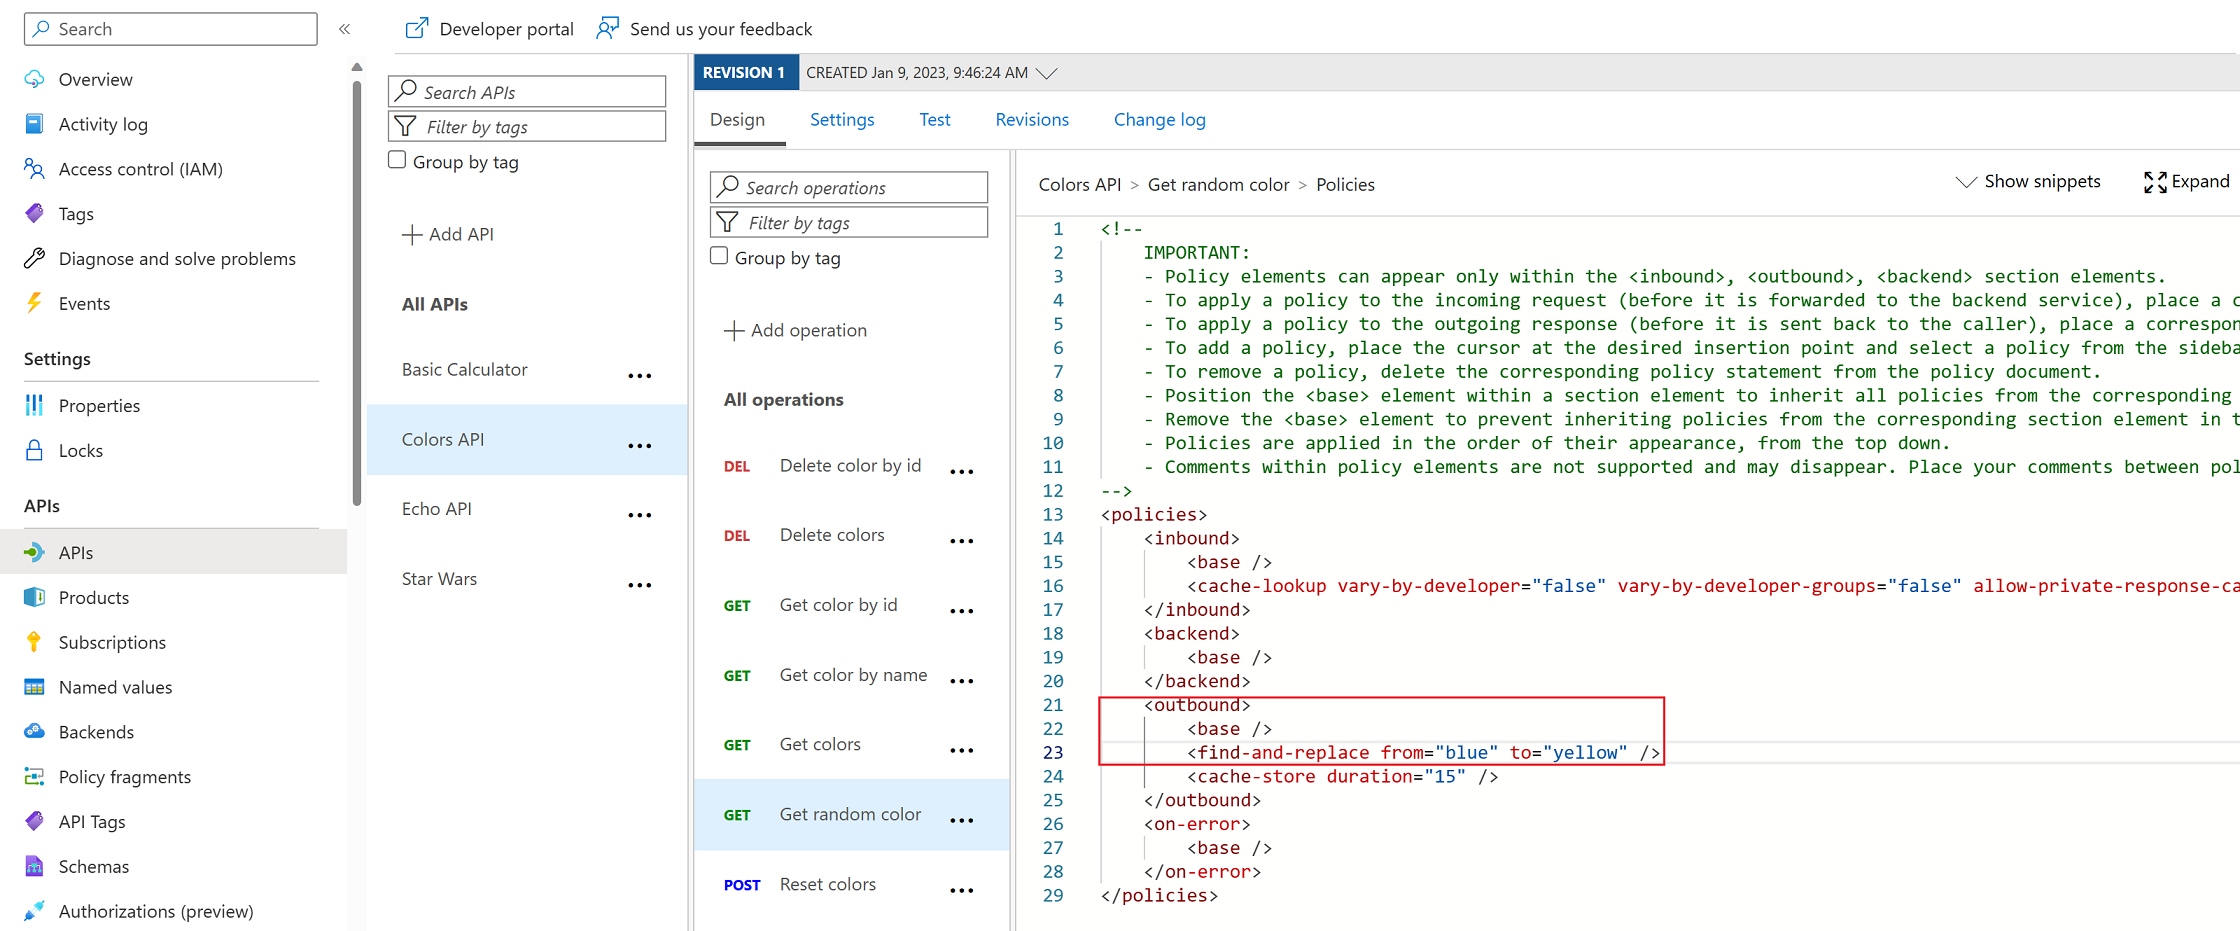
<outbound>
    <base />
    <find-and-replace from="blue" to="yellow" />
    <cache-store duration="15" />
</outbound>
-
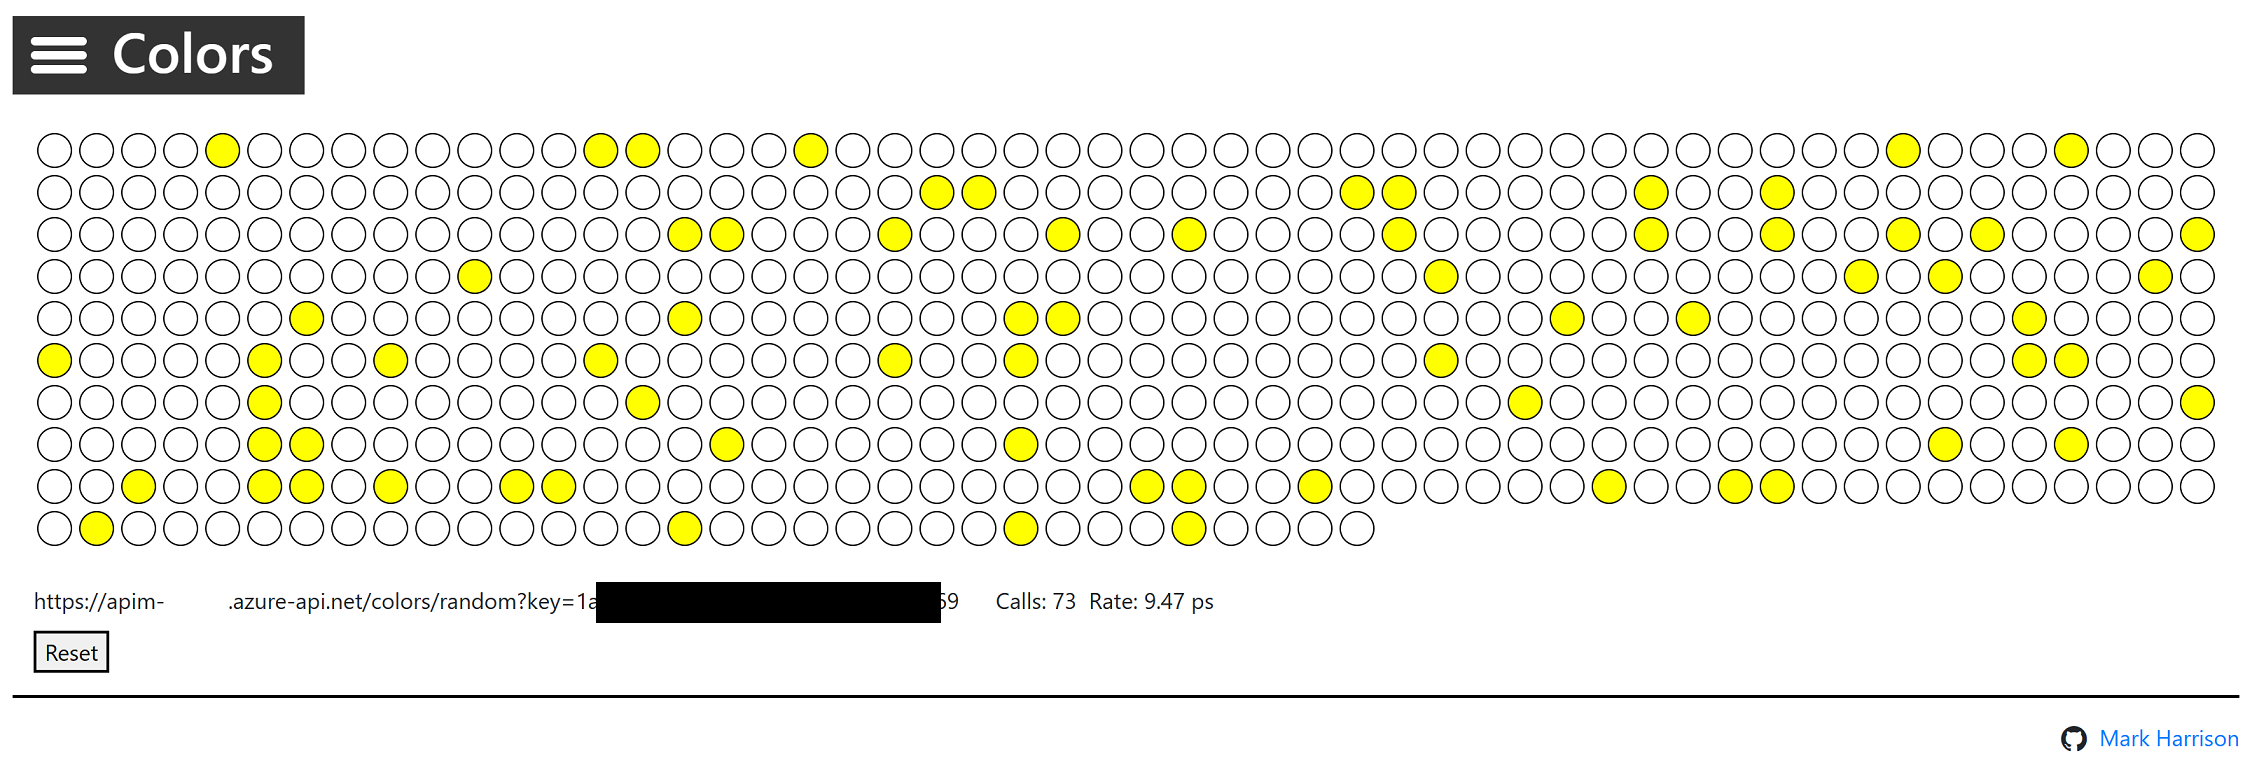
Save the policy, then invoke the API using the Unlimited subscription key.
Transformation - conditional
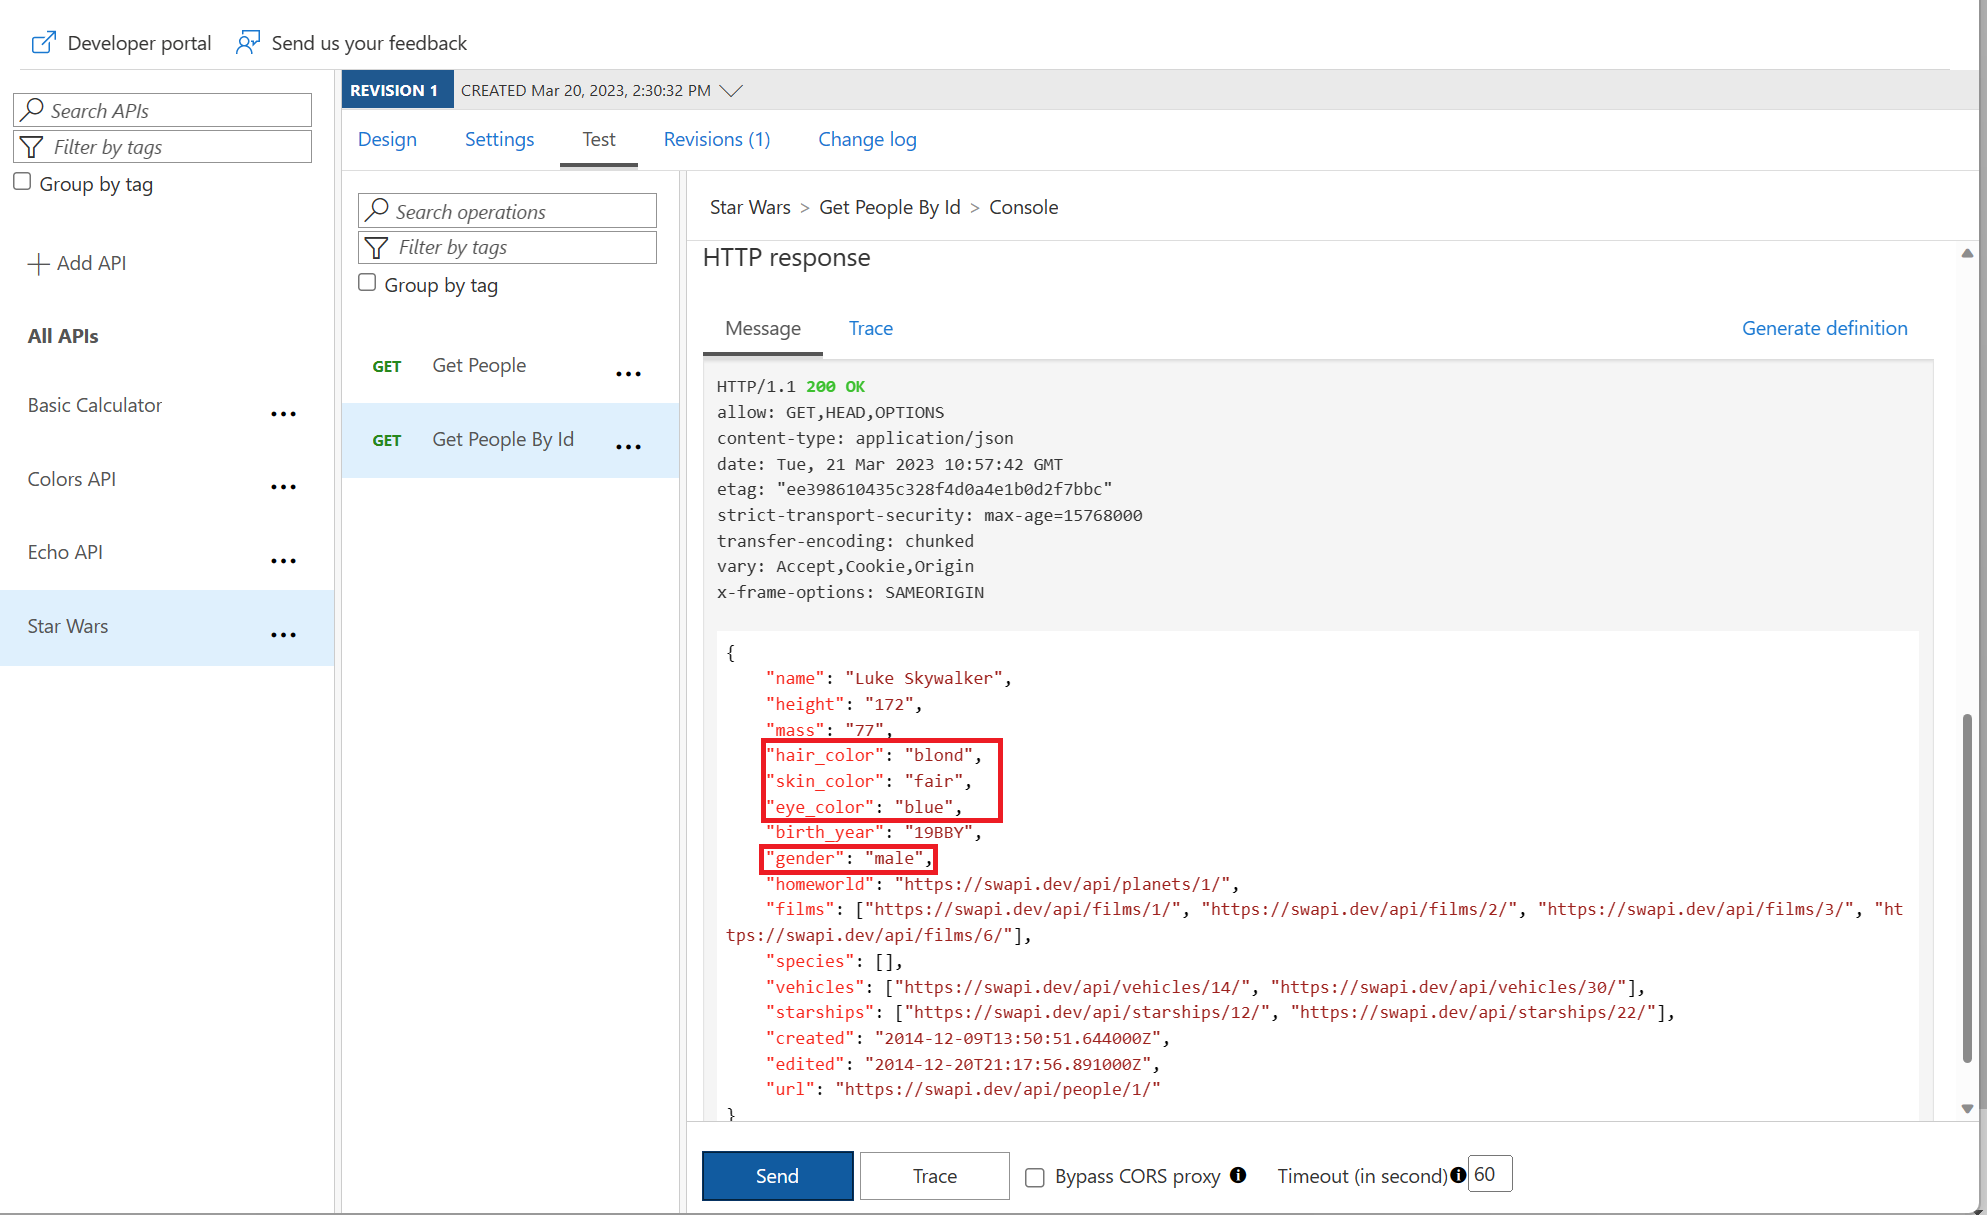
Policies can be applied very granularly. In this example, you are modifying the Star Wars API to return a limited set of information if the caller is using the Starter subscription. Other products, such as the Unlimited subscription, will receive the full response.
The context variable that is implicitly available in every policy expression provides access to the Response and Product below.
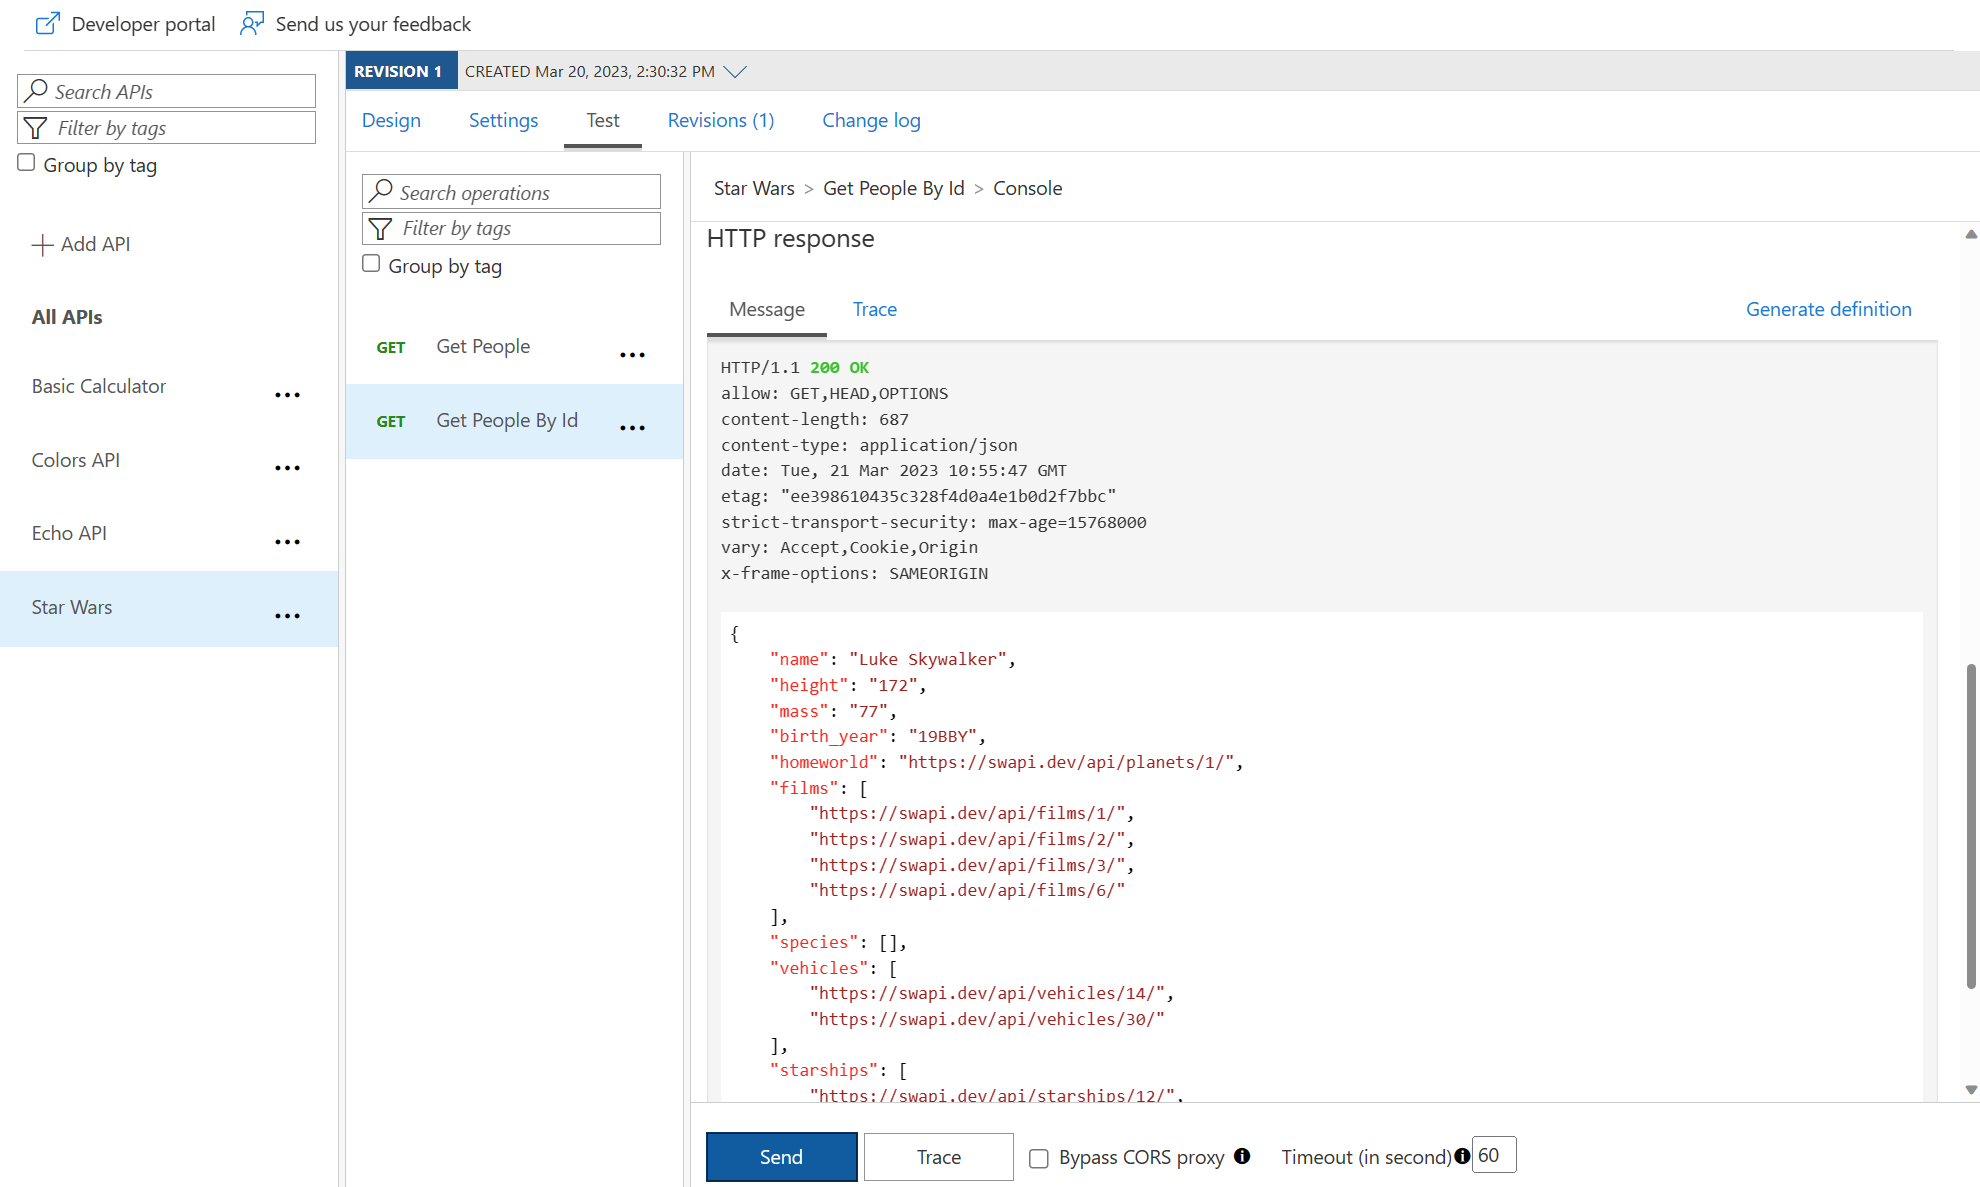
- Open the Star Wars API, then open the Get People By Id operation.
-
Similarly to the Colors API, we will add the outbound policy to conditionally change the response body. Replace the existing entries in the operation with the entire
<policies>code below.
Note that the inboundAccept-Encodingheader is set todeflateto ensure that the response body is not encoded as that causes the JSON parsing to fail.<policies> <inbound> <base /> <set-header name="Accept-Encoding" exists-action="override"> <value>deflate</value> </set-header> </inbound> <backend> <base /> </backend> <outbound> <base /> <choose> <when condition="@(context.Response.StatusCode == 200 && context.Product?.Name != "Unlimited")"> <set-body>@{ var response = context.Response.Body.As<JObject>(); foreach (var key in new [] {"hair_color", "skin_color", "eye_color", "gender"}) { response.Property(key).Remove(); } return response.ToString(); } </set-body> </when> </choose> </outbound> <on-error> <base /> </on-error> </policies> -
Test the API on the Test tab with id 1 and apply the appropriate Starter or Unlimited product scope. Examine the different responses.
-
With Starter or None product scope:
-
With Unlimited product scope. Notice the four properties in red that are not included in the Starter scope response.
Transformation - JSON to XML
A frequent requirement is to transform content to maintain compatibility with legacy applications. In this lab, the modern Swagger Petstore API returns JSON, but imagine you have a legacy identity system that expects user profile data in XML format. Use APIM’s transformation policy to convert the JSON response to XML.
- Open the Get user by user name operation on the Swagger Petstore API.
-
Add an outbound policy to transform the response body to XML.
<outbound> <base /> <json-to-xml apply="always" consider-accept-header="false" /> </outbound> -
Test the API with username
user1and examine the response. Note that it’s now XML.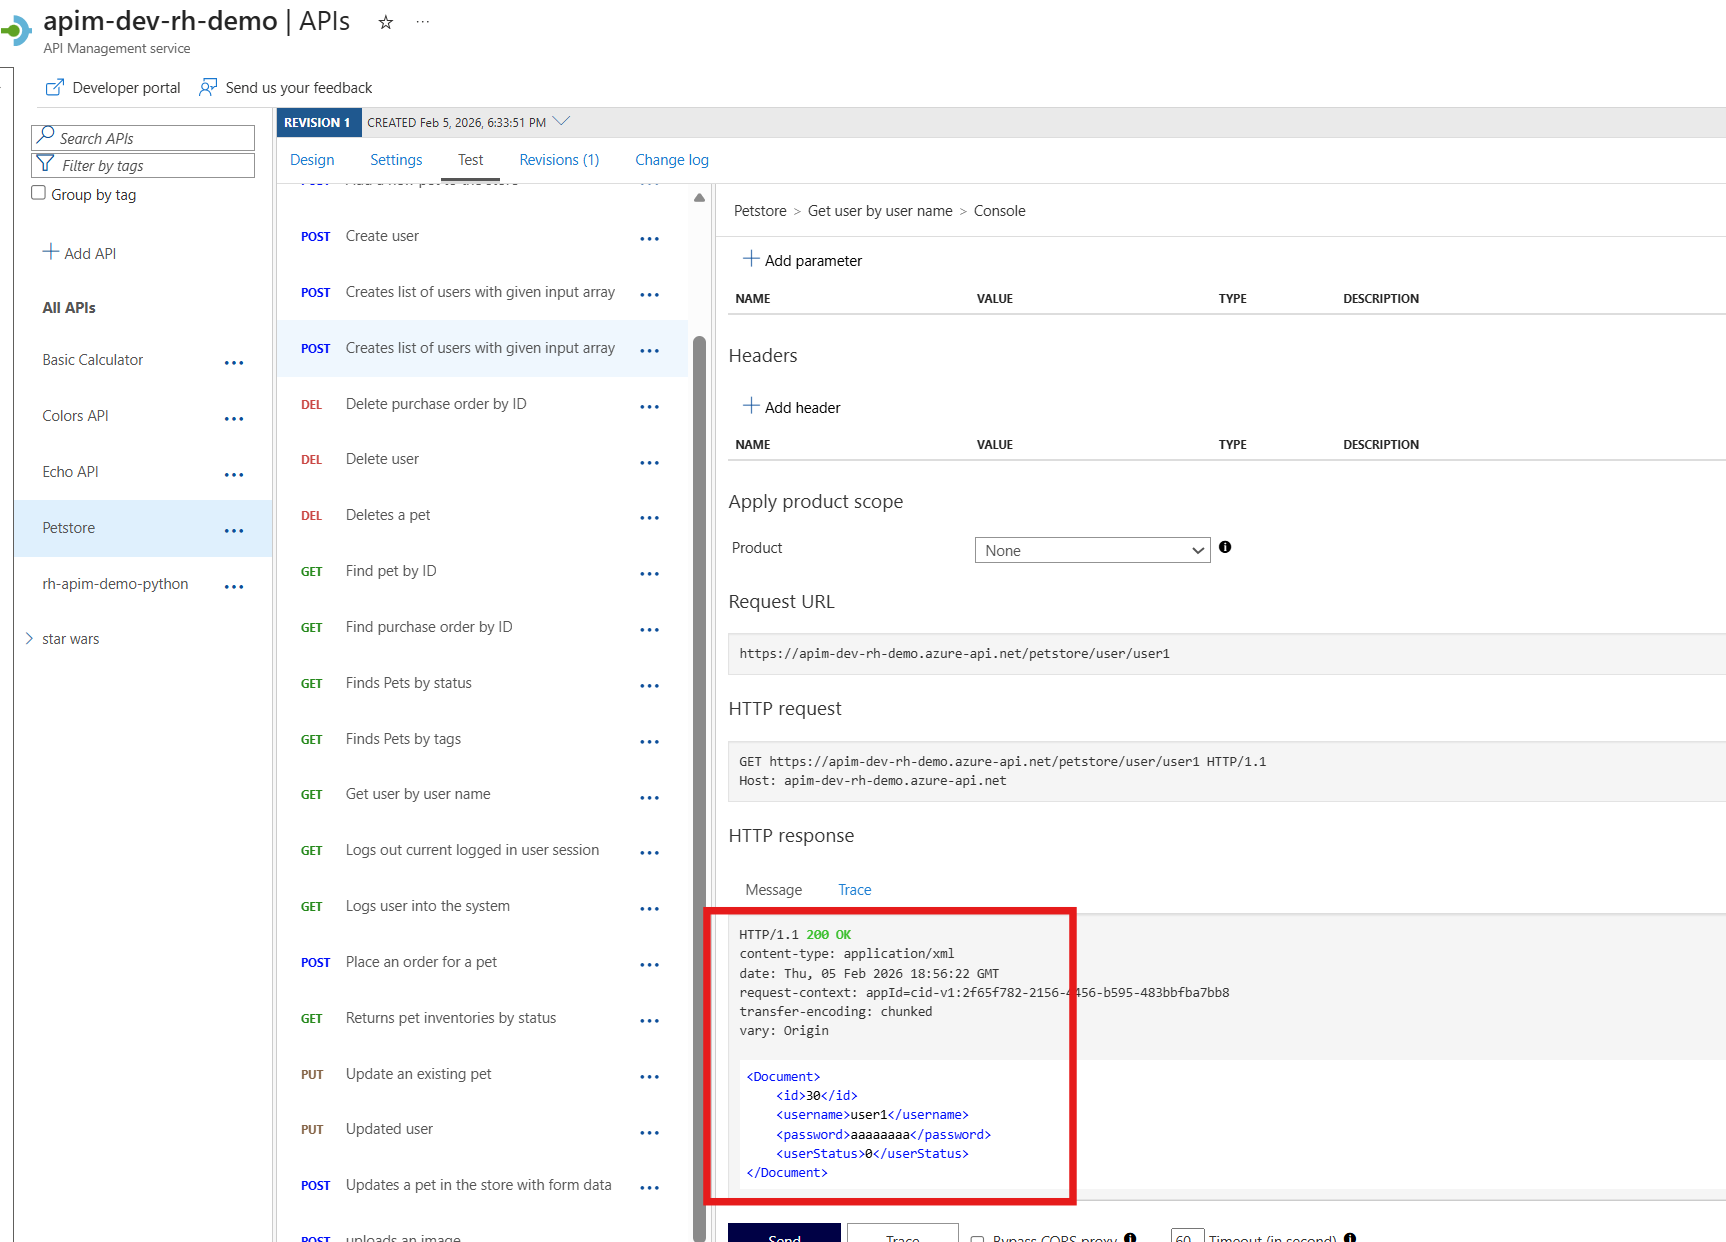
Transformation - Delete response headers
A frequent requirement is to remove headers, especially ones that return security-related or superfluous information. To demonstrate this pattern, we’ll first add a custom header to simulate sensitive backend info, then remove it.
- Continue with the Get user by user name operation on the Swagger Petstore API.
-
First, add an outbound policy to add a custom header to the response.
<outbound> <base /> <json-to-xml apply="always" consider-accept-header="false" /> <set-header name="x-backend-name" exists-action="override"> <value>petstore-backend</value> </set-header> </outbound> -
Test the API with username
user1and verify thex-backend-nameheader appears in the response.
-
Now update the policy to also delete the header, demonstrating how you would remove sensitive headers:
<outbound> <base /> <json-to-xml apply="always" consider-accept-header="false" /> <set-header name="x-backend-name" exists-action="override"> <value>petstore-backend</value> </set-header> <set-header name="x-backend-name" exists-action="delete" /> </outbound> - Test again and verify the
x-backend-nameheader is no longer in the response.
Transformation - Amend what’s passed to the backend
Query string parameters and headers can be easily modified prior to sending the request on to the backend.
-
Open the Find pets by status operation in the Swagger Petstore API and add inbound policies to modify the query string and headers.
<inbound> <base /> <set-query-parameter name="x-product-name" exists-action="override"> <value>@(context.Product?.Name ?? "none")</value> </set-query-parameter> <set-header name="x-request-context-data" exists-action="override"> <value>@(context.Deployment.Region)</value> </set-header> </inbound> -
Test the call by using either the Starter or Unlimited product, status of ‘available’. Click on Trace button and then inspect the result on the Trace tab. If Tracing is not enabled, press Enable Tracing.

