MLADS 2019 - Train an AI model for the Vision AI DevKit
Welcome to MLADS - train an AI model for use with the Vision AI DevKit
What you will do
- Setup a Vision AI DevKit camera
- Train a model using Customvision.ai and deploy the model to the camera
- Train a model using Azure Notebooks and the Azure Machine Learning service
- Create an Azure IoT Hub with an IoT Edge device for controlling network traffic between the camera and the cloud
What you will need
-
Active Azure account
-
Azure Machine Learning Workspace
Setup the Vision AI DevKit camera
- The Vision AI DevKit camera you were provided should be displaying three blinking red LEDs on the front of the camera, indicating the camera is running in Wi-Fi APN mode.
- Connect your laptop to the camera’s Wi-Fi APN. The APN for your device can be found on a sticker on the bottom of the camera. The name will be in the format ‘MSIOT_xxxxxx’ (xxxxxx is the last 6 characters of the device’s Wi-Fi mac address, e.g. MSIOT_BD097D). Note: since there are 30 of these devices running in the lab, ensure you select the correct one.
- If you have an existing IoT Hub and IoT device for use in this lab, access the Azure portal and retrieve the connection string for the configured IoT device. You will use this string during setup.
- Once connected to the camera, use your browser to open setupaicamera.ms. Follow the instructions on the screen and complete the whole OOBE flow. Connecting device to internet is not enough, it has to be associated with IoT Hub as well.
- During the setup process, connect the camera to MSFTGUEST Wifi. (No password is required).
Note: After camera setup is complete, you can stream the live camera video output using a browser window or and application such as VLC / Open VC player. Your laptop will need to be connected to the same Wi-Fi network (MSFTGUEST) as the camera to display the video stream.
Train an AI model using CustomVision.ai
You will build a custom AI model to detect when someone is wearing a hard hat, using the Azure Custom Vision service.
Setup up a new Custom Vision project
-
Login to Azure Custom Vision service at https://customvision.ai.
-
Create a new project, using these recommended settings:
- Give it a name like
Simulated HardHat Detector - Project Type - [Classification]
- Use the existing resource group
- Classification Type - [Multiclass (Single tag per image)]
- Domain - [General(compact)] NOTE: Ensure you do not select the
Generaloption - Export Capabilites - Vision AI Dev Kit
- Give it a name like
Upload and tag your training data
Some training images have already been collected for you for the hard hat use case.
- Download the .zip file containing the sample images from: https://1drv.ms/u/s!AkzLzaBpSgoMo9hXX4NPjd8QrfhQLA?e=M3ehCL
- Uncompress the zip file to a local directory
- Upload images to custom vision in batches, one batch per tag (images containing HardHat in the name, then NoHardHat), adding the appropriate tag during upload.
Train your custom model
To train your model using the uploaded training images, go to your Custom Vision project and click on Train.
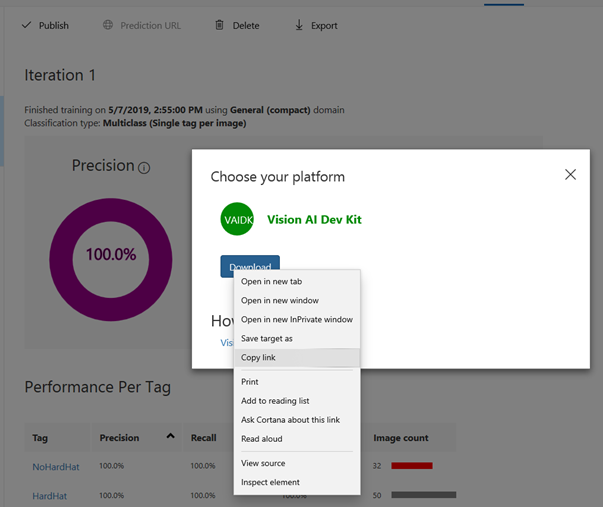
To export your model, select the Performances tab, then click the Export button. Choose the Vision AI Dev Kit option to download your model. Instead of download press the right button of your mouse in order to see options. Select Copy link. It is a link that points to a zip file of your model.
Deploy your custom model to your camera
To deploy your custom model, we will first store your model in a publicly accessible location and then update the configuration of the VisionSample module to use this new model. We will use a cloud blob store to store the model, but any publically accessible file storage system will work.
Upload your trained model zip file
We’ll start by creating a new storage account and then upload your model to it.
- Login to http://portal.azure.com.
- Search for
Storageand selectStorage accounts. - Use your existing Azure account and resource group.
- Create a new storage account with a unique name (NOTE: upper case characters are not allowed).
- Select the
West-US 2region. - Click on
Review+Create(other default options should be correct). - Wait until provisioning is complete and navigate to your new storage account.
- From the
overviewtab, click onBlobs. - Click
Add a new container, give it a name likehardhatmodeland make sure to selectContainer (anonymous read access for containers and blobs)for thePublic access level. - Click on the container just created, then click the
Uploadbutton and select the zip file you downloaded from the Azure Custom Vision service. - Copy the URL of the uploaded file for later use.
Update the configuration of the VisionSample module to use your custom model
- Login to http://portal.azure.com and go to the IoT Hub resource you created earlier.
- Click the
IoT Edgetab, then click on IoT edge device namedvisionkit. - Click on the
AIVisionDevKitGetStartedModulename, then clickModule Identity Twin. - Update the zip file with the URL you saved earlier to “ModelZipUrl”: ““, then click
Save.
After a few minutes, your device should now be running your custom model!
Test your new model
- Put on a hard hat on and smile at the camera!
- Verify the camera correctly classifies you as wearing a hard hat.
Train and deploy an AI model using Azure Notebooks and Azure Machine Learning
What you will do
- Spin up a VM to your machine learning workspace
- Upload data to train the model
- Convert the model to a format that runs in Vision AI Dev Kit
- Create a container
- Create a new deployment.json that specifies the new module for the deployment
- Deploy the module to Vision AI Dev Kit
What you will need
- Vision AI DevKit camera
- Azure Machine Learning workspace
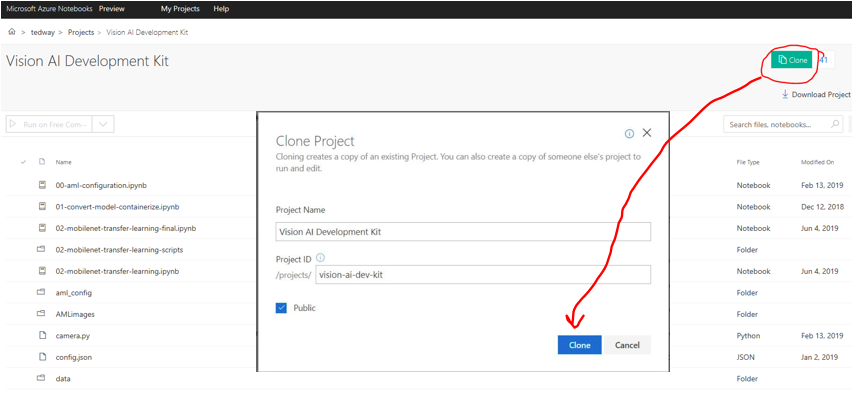
Clone the Azure notebook
- Login to this existing Vision AI DevKit notebook and clone it
Prepare your environment
- Change the aml_config/config.json file to match the subscription details for your Azure ML Workspace
- In case you want to use your own data go to the data folder and create a folder with your data, e.g. my_data.
- In the my_data folder, copy your data. Each folder name is the label of the images in that folder. For example, the soda_cans folder looks like this:
- soda_cans
- coke
- ice
- pepsi
- In the my_data folder, copy your data. Each folder name is the label of the images in that folder. For example, the soda_cans folder looks like this:
- IMPORTANT: You MUST have 35 images or more per folder to have enough data for training.
Run the notebook
-
Open the 02-mobilenet-transfer-learning-final.ipynb notebook
-
Set the Kernel to Python 3.6
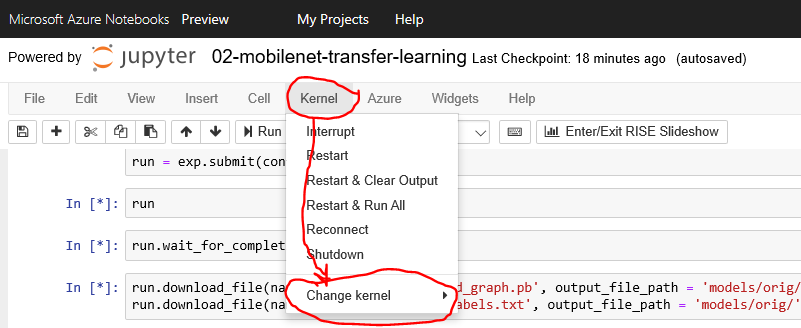
- Run the notebook by running each cell individually

- In case you don’t want to run a cell you can change it to markdown

Note: some cells contains two options, please make certain the option you don’t use is set as markdown.
Configure your IoT Hub details
- Change the cell content to reflect your IoT Hub, using the format:
Iot_hub_name="youriothub"
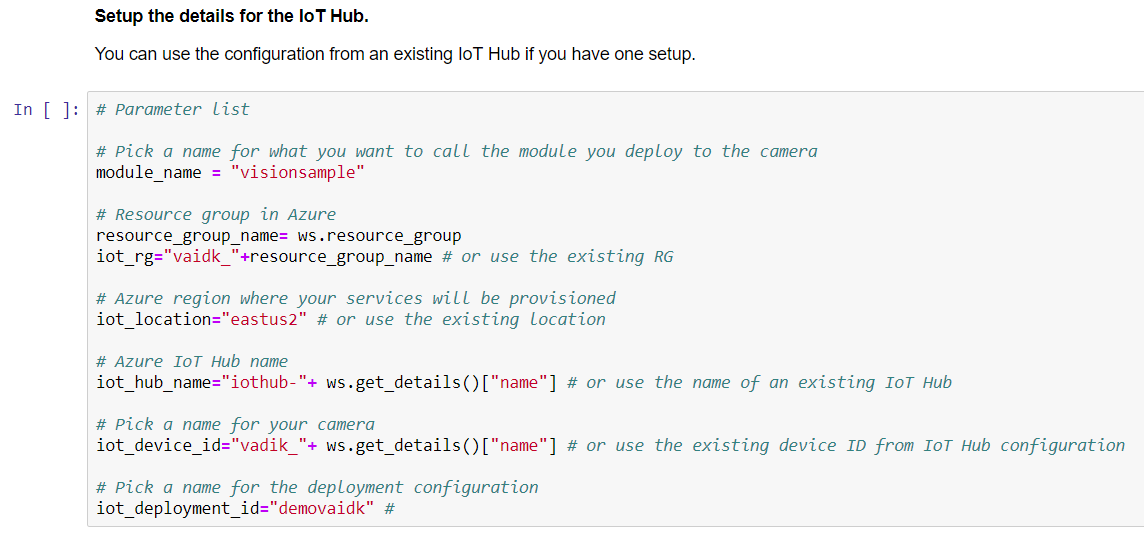
-Complete the notebook by deploying the model to your IoT Hub and test it out!