Setup Visual Studio Code environment for Vision ML
What you will do
- Install a Visual Studio Code (VS Code) dev environment for Windows, Linux or MacOS
- Setup and Configure VS Code for container deployment
- Clone Vision AI Dev Kit GitHub repository using VS Code sample
What you will need
- VS Code
- Python 3.7 by Anaconda
- Vision AI DevKit extension for VS Code
- Azure account with configured Azure IoT Hub
- Azure user account with configured Azure IoT Hub
Windows users
Setup and Configure VS Code for container deployment
-
If not already available, install VS Code (Download) and Python 3.7 by Anaconda (using default options). (Download)
-
Once installed, open the Anaconda Prompt from Start Menu\Programs\Anaconda3 (64-bit)
-
Open VS Code. Click the Extensions icon in the Activity Bar (left side) and install Vision AI Dev Kit extension. It bundles together several other needed extensions:
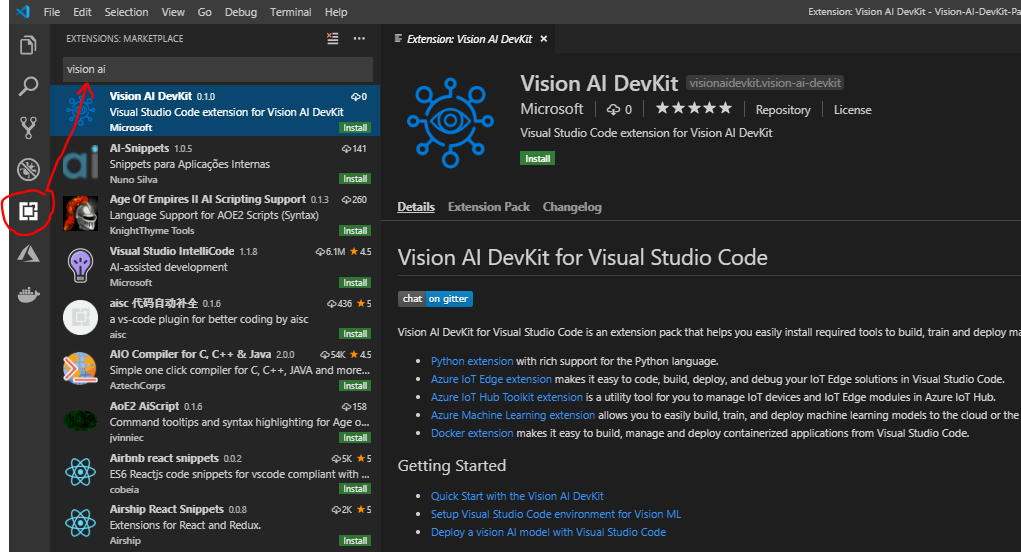
- For more information on installing extensions in VS Code, see Managing Extensions in Visual Studio Code
-
Install the Azure ML SDK (Instructions) and required packages.
- Note: When installing the Azure Machine Learning SDK or related Python packages, there are some Python packages which depend on specific versions of other Python packages. If these (dependency) Python packages versions are too high, the installation will fail. To work around this issue, there is a requirements.txt in GitHub under VisionSample\MachineLearning\scripts folder that can be used to specify correct versions. Please copy the file in the VisionAIDevKit root folder (ex. c:\visionaidevkit\requirements.txt) which has stricter versions defined. Below is the content of the file if you prefer creating it locally.
Recommended requirements.txt contents:
azure-cli-core==2.0.60 azure-mgmt-containerregistry==2.7.0 azure-mgmt-resource==2.1.0 azureml-contrib-iot==1.0.18 azureml-core==1.0.18 easydict==1.9 numpy==1.16 tensorflow==1.13.1 wheel==0.30.0 -
Use the Anaconda Prompt (base) as an administrator, then execute the following command lines:
pip install --upgrade -r requirements.txt -
Restart Visual Studio Code in the Python 3.7 runtime environment, by executing the following command in an Anaconda Prompt (base) window:
codeThis will enable VS code to inherit the environment variables of the Python 3.7 runtime environment.
-
Open the command palette in VS Code (Ctrl-Shift-P), then enter
Python: Select Interpreterto select your Python interpreter (Python 3.7)
-
In the VS Code command pallette, enter
Azure: Sign Into sign in to your Azure account and select your subscription.
-
Create a new workspace in VS Code as described in Get started with Azure Machine Learning for Visual Studio Code. You can also use 00-aml-configuration.py script described in the next section to create a new workspace.
Linux and MacOS users
Linux/iOS - these instructions are in draft form and are still being improved
For Linux these have been tested for Ubuntu or Ubuntu VM version 18.04.
Install and configure required tools
-
Install the build tools.
sudo apt-get install build-essential checkinstall sudo apt-get install libreadline-gplv2-dev libncursesw5-dev libssl-dev \ libsqlite3-dev tk-dev libgdbm-dev libc6-dev libbz2-dev sudo apt-get install libffi-dev -
Download Python 3.7.2.
cd /usr/src sudo wget https://www.python.org/ftp/python/3.7.2/Python-3.7.2.tgz -
Extract tgz
sudo tar xzf Python-3.7.2.tgz -
Compile.
cd Python-3.7.2 sudo ./configure --enable-optimizations sudo make altinstall -
Add alias into ~/.bashrc
alias python='/usr/local/bin/python3.7m' -
Install pip:
 curl https://bootstrap.pypa.io/get-pip.py -o get-pip.py
 sudo python get-pip.py
 sudo pip install --upgrade pip
Setup and Configure VS Code for container deployment
-
Install VS Code (Download Here)
- Open VS Code. Click the Extensions icon in the Activity Bar (left side) search and install the Vision AI DevKit extension:
- For more information on installing extensions in VS Code, see Managing Extensions in Visual Studio Code
- Install the Azure ML SDK (Instructions) and required packages.
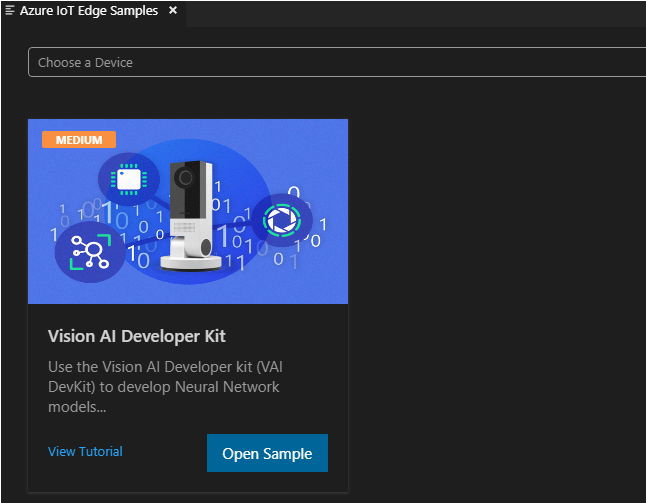
Clone GitHub
- Open command palette (“View” -> “Command palette”)
- Select “Azure IoT Edge Show Sample Gallery”
- Click Vision AI Developer Kit -> Open Sample
- Select local folder to use to store the sample solution