Create and Deploy a Custom Vision AI Module Using Azure Custom Vision Service and Azure IoT Edge
What you will do
- Build a vision AI model with Azure Custom Vision service for that detects if a person is wearing a yellow hard hat for workplace safety applications.
- Deploy the vision AI module to the Vision AI DevKit camera using Azure IoT Edge and module twin update.
What you will need
- Active Azure account (Create a free account here)
- Default AIVisionDevKitGetStartedModule running in Vision AI Dev Kit
- To use the Custom Vision service, you will need to create Custom Vision Training and Prediction resources. This is done when creating a new project in customvision.ai. In case there are issues in setting up a new project, please try creating the resource manually in Azure portal
- Configured Vision AI DevKit camera (Instructions)
- Monitor supporting HDMI input and an HDMI cable (do not use any cable adapters), or an RTSP supporting video player application
- Yellow hard hat (See next section!)
Create a vision AI model with Azure Custom Vision service
In this tutorial, you will build a vision AI model for a workplace safety scenario that detects if a person is wearing a hard hat or not. Don’t have a yellow hard hat to be able to test the functionality after you are done? You can also take pictures and use your own data to build the Vision AI model. Take 30+ pictures for a selected object from different angles and distances instead of using the pictures for hard hat model. You can also use the camera to take pictures (you’ll need to install Python and GitHub).
Image classification vs. object detection
There are two ways to train your model - image classification and object detection.
Image classification: Analyzes the whole frame as a picture and doesn’t draw bounding boxes. Can only identify one object per frame. Easy to train.
Object detection: Can identify multiple objects per image and draws bounding boxes around them. Takes a little bit more time to train as the training requires identifying the object per uploaded image. If you choose to use the object detection model with hard hat data, remember to include both the wearer’s head and hard hat as the object when applicable (not only the hat).
Setup a new Azure Custom Vision project
-
Login to the Azure Custom Vision Service at https://www.customvision.ai.
-
Create a new project, using these recommended settings:
- Training and prediction resources
- Under ‘resource group’, click ‘create new’
- SKU - F0 (or S0)
- Training and prediction resources
-
Create a new project, using these recommended settings:
- Give it a name such as
Simulated HardHat Detector - Project Type - select between [Classification] and [ObjectDetection]
- Use the existing resource group
- Classification Type - [Multiclass (Single tag per image)]
- Domain - [General(compact)] NOTE: Ensure you do not select the
Generaloption - Export Capabilites - Vision AI Dev Kit
- Give it a name such as
Upload and tag your training data
- Download the training images here - TrainingData.zip.
- Uncompress the zip file to a local directory
- Upload images to Custom Vision in batches:
- For the image classification model, use one batch per tag (images containing HardHat in the name, then NoHardHat), adding the appropriate tag during each upload.
- For the object detection model, each picture needs to be tagged separately. They can all be uploaded to customvision.ai at the same time.
Train and export your custom model
- Go to your Custom Vision project and click on
Train. - Select the
Performancestab and then click theExportbutton - Choose the
Vision AI DevKitoption to download your new custom model. Don’t download yet, please read the deployment options first
Deploy your custom model to your device
To deploy your custom model, we will first store your model in a publicly accessible location and then update the configuration of the VisionAIDevKitGetStartedModule, (used in the Quick Start) to use the model you just trained. We will place the model files in a cloud blob store. (A public OneDrive link would work as well.)
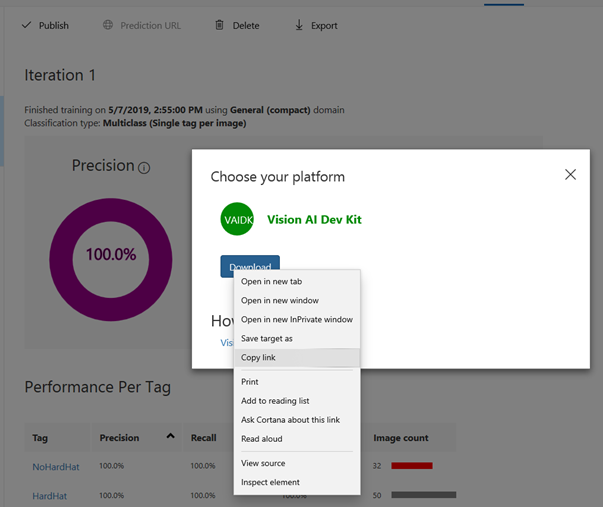
Option 1 - Use the model directly from customvision.ai
Instead of downloading the model from customvision.ai, press the right button of your mouse in order to see options. Select Copy link. It is a link that points to a zip file of your model.
This is the fastest way to deploy the model to your camera. Please note that this link will expire, so this method should be used primarily when doing fast iterations to further develop your Vision AI model.
Option 2 - Store and use model from your own storage
Download the model from customvision.ai. Don’t unzip it.
We’ll start by creating a new storage account and then upload your model to it. You can also store the zip file to OneDrive.
- Login to http://portal.azure.com.
- Search for
Storageand selectStorage accounts. - Use your existing Azure account and resource group.
- Create a new storage account with a unique name (NOTE: upper case characters are not allowed).
- Select the
West-US 2region. - Click on
Review+Create(other default options should be correct). - Wait until provisioning is complete and navigate to your new storage account.
- From the
overviewtab, click onBlobs. - Click
Add a new container, give it a name likehardhatmodeland make sure to selectContainer (anonymous read access for containers and blobs)for thePublic access level. - Click on the container just created, then click the
Uploadbutton and select the zip file you downloaded from the Azure Custom Vision service. - Copy the URL of the uploaded file for later use.
Update the configuration of the VisionSample module to use your custom model
- Login to http://portal.azure.com and go to the IoT Hub resource you created earlier.
- Click the
IoT Edgetab, then click on IoT edge device namedvisionkit. - Click on the
AIVisionDevKitGetStartedModulename, then clickModule Identity Twin. - Update the zip file with the URL you saved earlier to “ModelZipUrl”: ““, then click
Save.
After a few seconds, your device should now be running your custom model! If it doesn’t, try editing the module twin (for example, press space then delete the space) and save again.
Test your new model
- Put on a hard hat on and smile at the camera!
- Verify the camera correctly classifies you as wearing a hard hat.
Note that the sample picture size in the example is small and the purpose of the tutorial is to show how easy it is to get started with Vision AI Dev Kit and Custom Vision! This model only has roughly 50 source pictures, and doesn’t yet do a 100% accurate recognition.
Learn more
For additional information on developing your image classification model, see Getting started improving your classifier.