How to deploy a secure n-tier web app
Many applications will consist of more than just a single component. For example, you may have a frontend which is publicly accessible that connects to a backend database, storage account, key vault, another VM, or a combination of these, which make up what’s known as an n-tier application. It’s important that applications like this are architected so that access is limited to privileged individuals and any component that is not intended for public consumptions is locked down to the greatest extent available for your use case.
In this blog post, we’ll walk through setting up a web app with a secure, network-isolated communication to a backend web app. All traffic will be isolated within your virtual network using virtual network integration and private endpoints. This configuration can be used for a number of use cases and it’s architecture can be extended or modified, for example in this blog post where a web app securely connects to a backend cognitive service that detects the language of input text. For more information on n-tier applications including additional scenarios and multi-region considerations, see Multi-region N-tier application. Also, see the Reliable Web App Pattern for additional context and details on deploying more complex scenarios.
This scenario is intentionally kept simple to focus on the key concepts of the architecture and configuration since they are reusable and can easily be replicated across many application patterns. We’ll also be diving into secure source code deployment best practices which is a key part of web app management.
This post is organized into the following steps:
- Create network infrastructure
- Create backend web app
- Create frontend web app
- Deploy application source code
Architecture
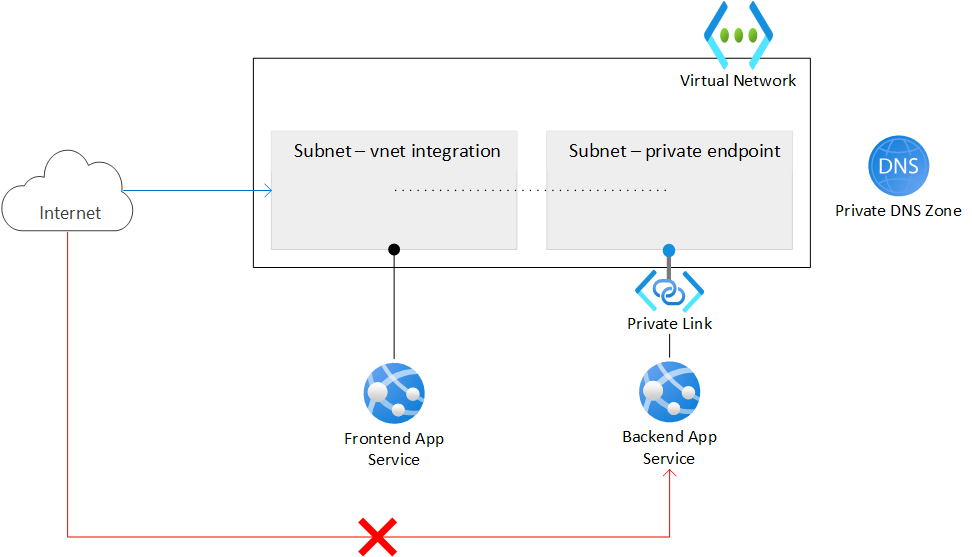
Workflow
The architecture is shown in the diagram above.
- Frontend web app. This architecture uses two web apps - a frontend that is accessible over the public internet, and a private backend web app. The frontend web app is integrated into the virtual network in the subnet with the feature regional VNet integration and it is configured to consume a DNS private zone.
- Backend web app. The backend web app is only exposed through a private endpoint via another subnet in the virtual network. Direct communication to the backend web app is explicitly blocked. The only resource or principal that is allowed to connect to the backend is the frontend web app using the private endpoint.
Note that virtual network integration and private endpoints are now available all the way down to the Basic SKU. App Services using the Free tier don’t support this at this time.
Getting started
This is the second article in a series focusing on App Service patterns. If you missed the first one on secure multi-region deployments, you can find it here.
This guide will use the Azure CLI to set up the environment and deploy the web apps. Additional configurations will be done using the Azure portal as it is easier to demonstrate what is going on there. Keep in mind that everything that is being done in this blog post can be done using the Azure CLI, Azure PowerShell, Azure portal, and Azure Resource Manager (ARM) templates. A complete ARM template that deploys the core resources in this post is given at the end of this post.
An Azure account with an active subscription is required. Create an account for free.
Create network infrastructure
First, set up a Resource Group with a Virtual Network. The virtual network should have at least two subnets: one for the virtual network integration and one for the private endpoint. The address-prefix size must be at least /28 for both subnets; small subnets can affect scaling limits and the number of private endpoints. Go with /24 for both subnets if you are not under constraints. Be sure to replace the placeholders for resource group name and virtual network name.
az group create --name <resource-group-name> --location eastus
az network vnet create --resource-group <resource-group-name> --location eastus --name <vnet-name> --address-prefixes 10.0.0.0/16
For the subnets, there are two settings that you need to pay attention to. This is often set by the portal or scripts, but here it is called out directly. A delegation of “Microsoft.Web/serverfarms” informs the subnet that it’s reserved for virtual network integration.
az network vnet subnet create --resource-group <resource-group-name> --vnet-name <vnet-name> --name vnet-integration-subnet --address-prefixes 10.0.0.0/24 --delegations Microsoft.Web/serverfarms
az network vnet subnet create --resource-group <resource-group-name> --vnet-name <vnet-name> --name private-endpoint-subnet --address-prefixes 10.0.1.0/24
The last part of the network infrastructure is the Private DNS Zone. Private DNS Zones are used to host the DNS records for private endpoints allowing clients to find the backend services by name. We’ll be creating the private endpoint using the portal, so the Private DNS Zone will be created automatically for us. Go here for a primer on Azure Private Endpoints and go here for how DNS Zones are used with private endpoints.
Create two instances of a web app
You’ll need two instances of a web app for this tutorial. You’ll need to use at least the Basic SKU in order to be able to use virtual network integration and private endpoints. You’ll take care of the vnet integration and additional configurations later on - first you’ll get the apps deployed. You’ll first deploy a single App Service plan. You’ll then deploy two web apps in that App Service plan.
Run the following command to create the App Service plan. Replace the placeholders for App Service plan name and resource group name.
az appservice plan create --name <app-service-plan-name> --resource-group <resource-group-name> --is-linux --location eastus --sku P1V2
Once the App Service plan is created, run the following commands to create the web apps. Replace the placeholders with your globally distinct web app names and your App Service plan name. If you’re following along in this tutorial, you’ll be deploying a Node.js app later on, so we’ll set the runtime now. Feel free to change this value based on the app you want to deploy. Run az webapp list-runtimes for a list of the possible runtimes you can choose from.
az webapp create --name <frontend-web-app-name> --resource-group <resource-group-name> --plan <app-service-plan-name> --runtime "NODE:18-lts"
az webapp create --name <backend-web-app-name> --resource-group <resource-group-name> --plan <app-service-plan-name> --runtime "NODE:18-lts"
Disable basic auth for the web apps
Consider disabling basic auth on App Service, which limits access to the FTP and SCM endpoints to users that are backed by Azure Active Directory (AAD). Disabling basic auth will require additional steps to configure continuous deployment. We’ll go through this as well later on in this post.
To disable FTP access to the site, run the following CLI command. Replace the placeholders with your resource group and site name. Be sure to run this command for each of your apps.
az resource update --resource-group <resource-group-name> --name ftp --namespace Microsoft.Web --resource-type basicPublishingCredentialsPolicies --parent sites/<web-app-name> --set properties.allow=false
To disable basic auth access to the WebDeploy port and SCM site, run the following CLI command. Replace the placeholders with your resource group and site name.
az resource update --resource-group <resource-group-name> --name scm --namespace Microsoft.Web --resource-type basicPublishingCredentialsPolicies --parent sites/<web-app-name> --set properties.allow=false
For more information on disabling basic auth including how to test and monitor logins, see Disabling basic auth on App Service.
Configure virtual network integration for the frontend web app
The virtual network integration feature allows outbound traffic to flow directly into the virtual network. We’ll use the portal to configure this as well as the private endpoint in the next step.
- In the Azure portal, go to your frontend web app and then go to the Networking page.
-
Select VNet Integration.
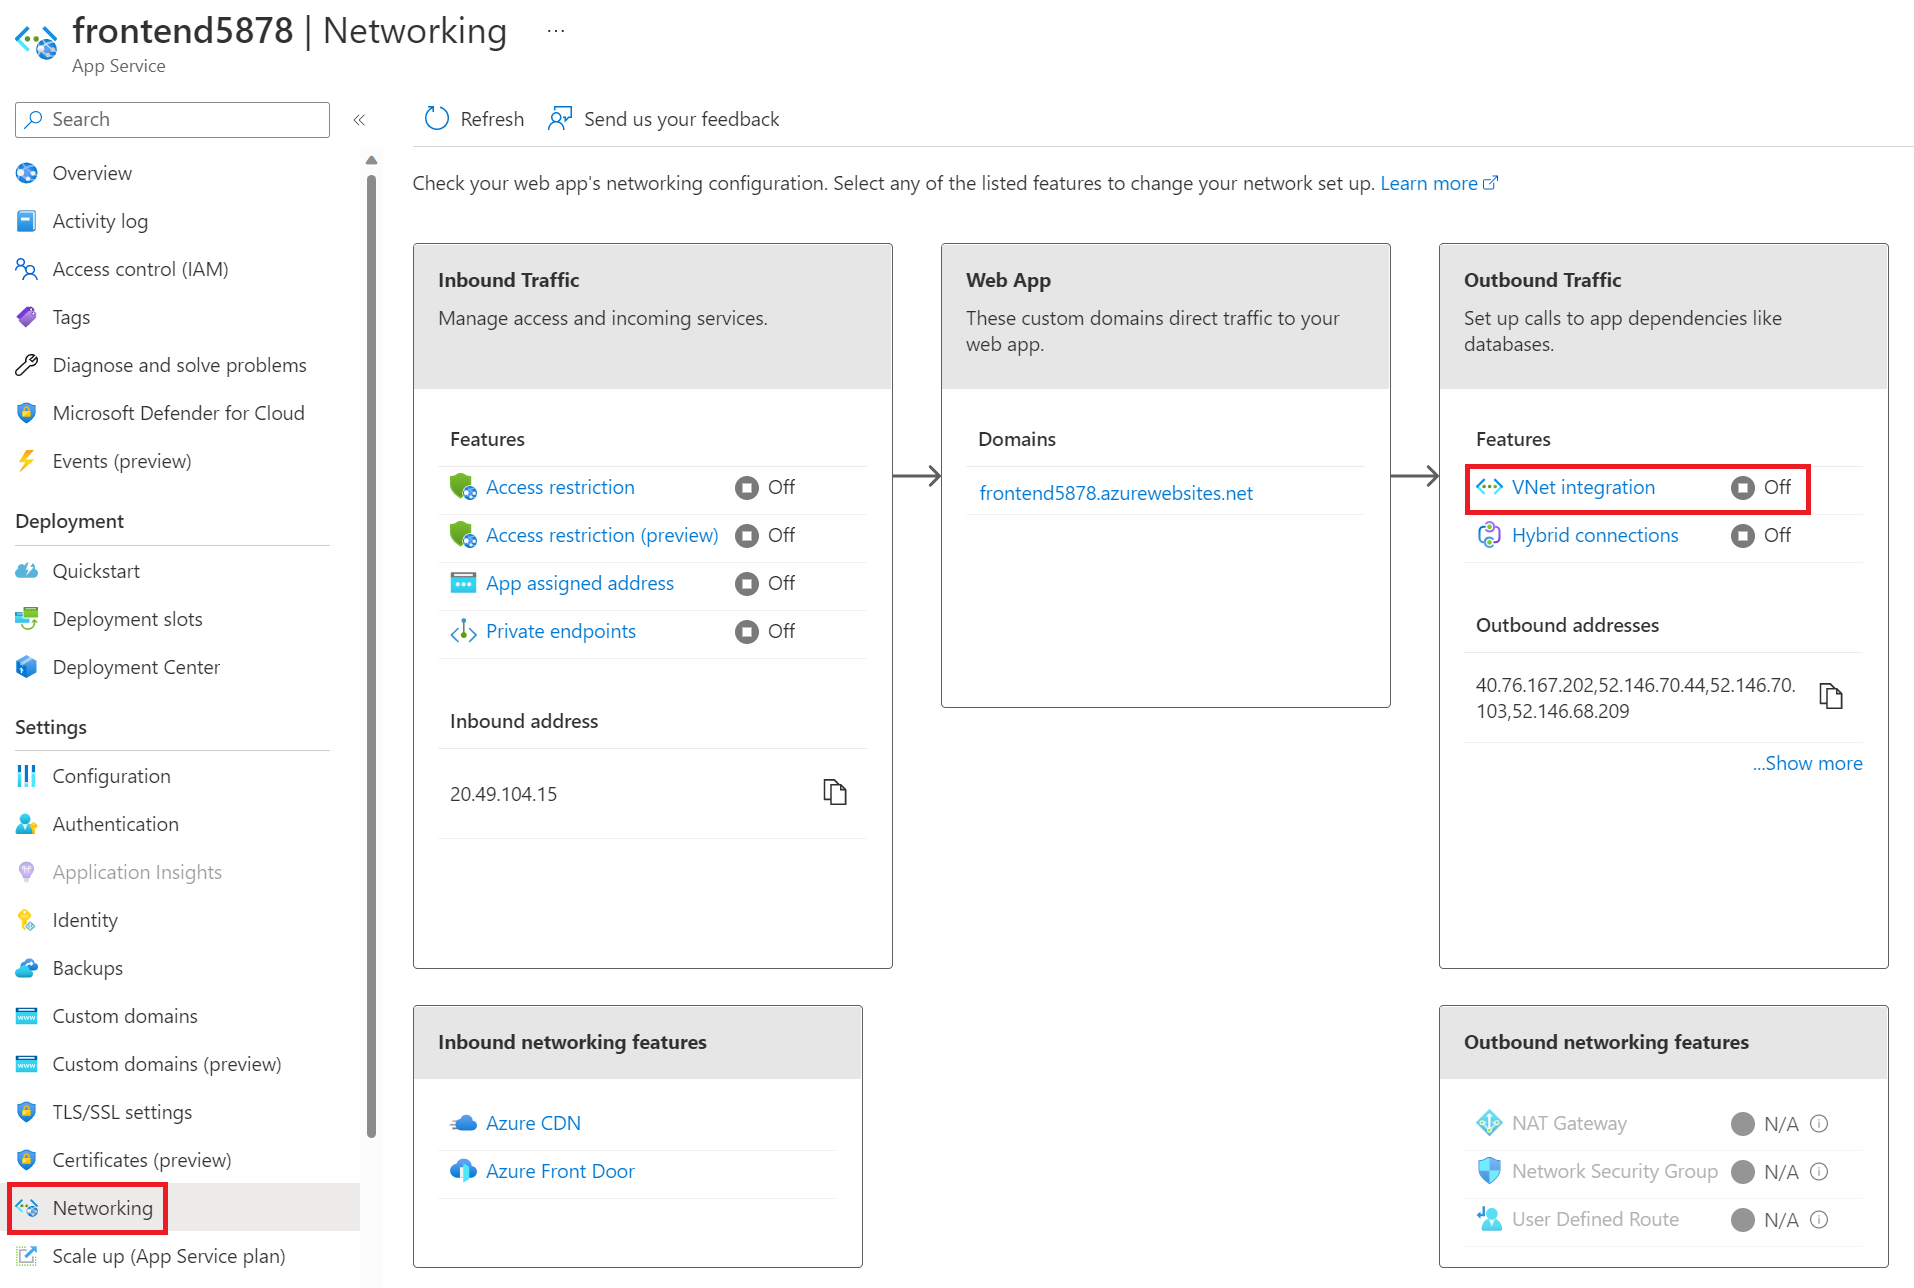
- Select + Add VNet.
- Select the virtual network you created earlier.
- For Subnet, select “Select Existing” and then select the “vnet-integration-subnet”.
- Select OK to save your configuration.
You can now browse to the web app and all outbound traffic from the frontend web app will be routed through the virtual network.
Create the private endpoint for the backend web app
The last part of the core infrastructure setup is to create the private endpoint to allow secure communication between your frontend and your backend. Adding a private endpoint by default disables all public access to your app. By enabling a private endpoint on your backend web app, all inbound traffic will therefore use the private endpoint to reach it. The only resources that are allowed to use the private endpoint to connect to your backend web app are the ones in your virtual network.
- In the Azure portal, go to your backend web app and then go to the Networking page. Under Inbound address, you’ll see the public IP that was automatically delegated to your web app. Note that when you add the private endpoint, this will change to a private IP from your Azure virtual network address space.
-
Select Private endpoints.
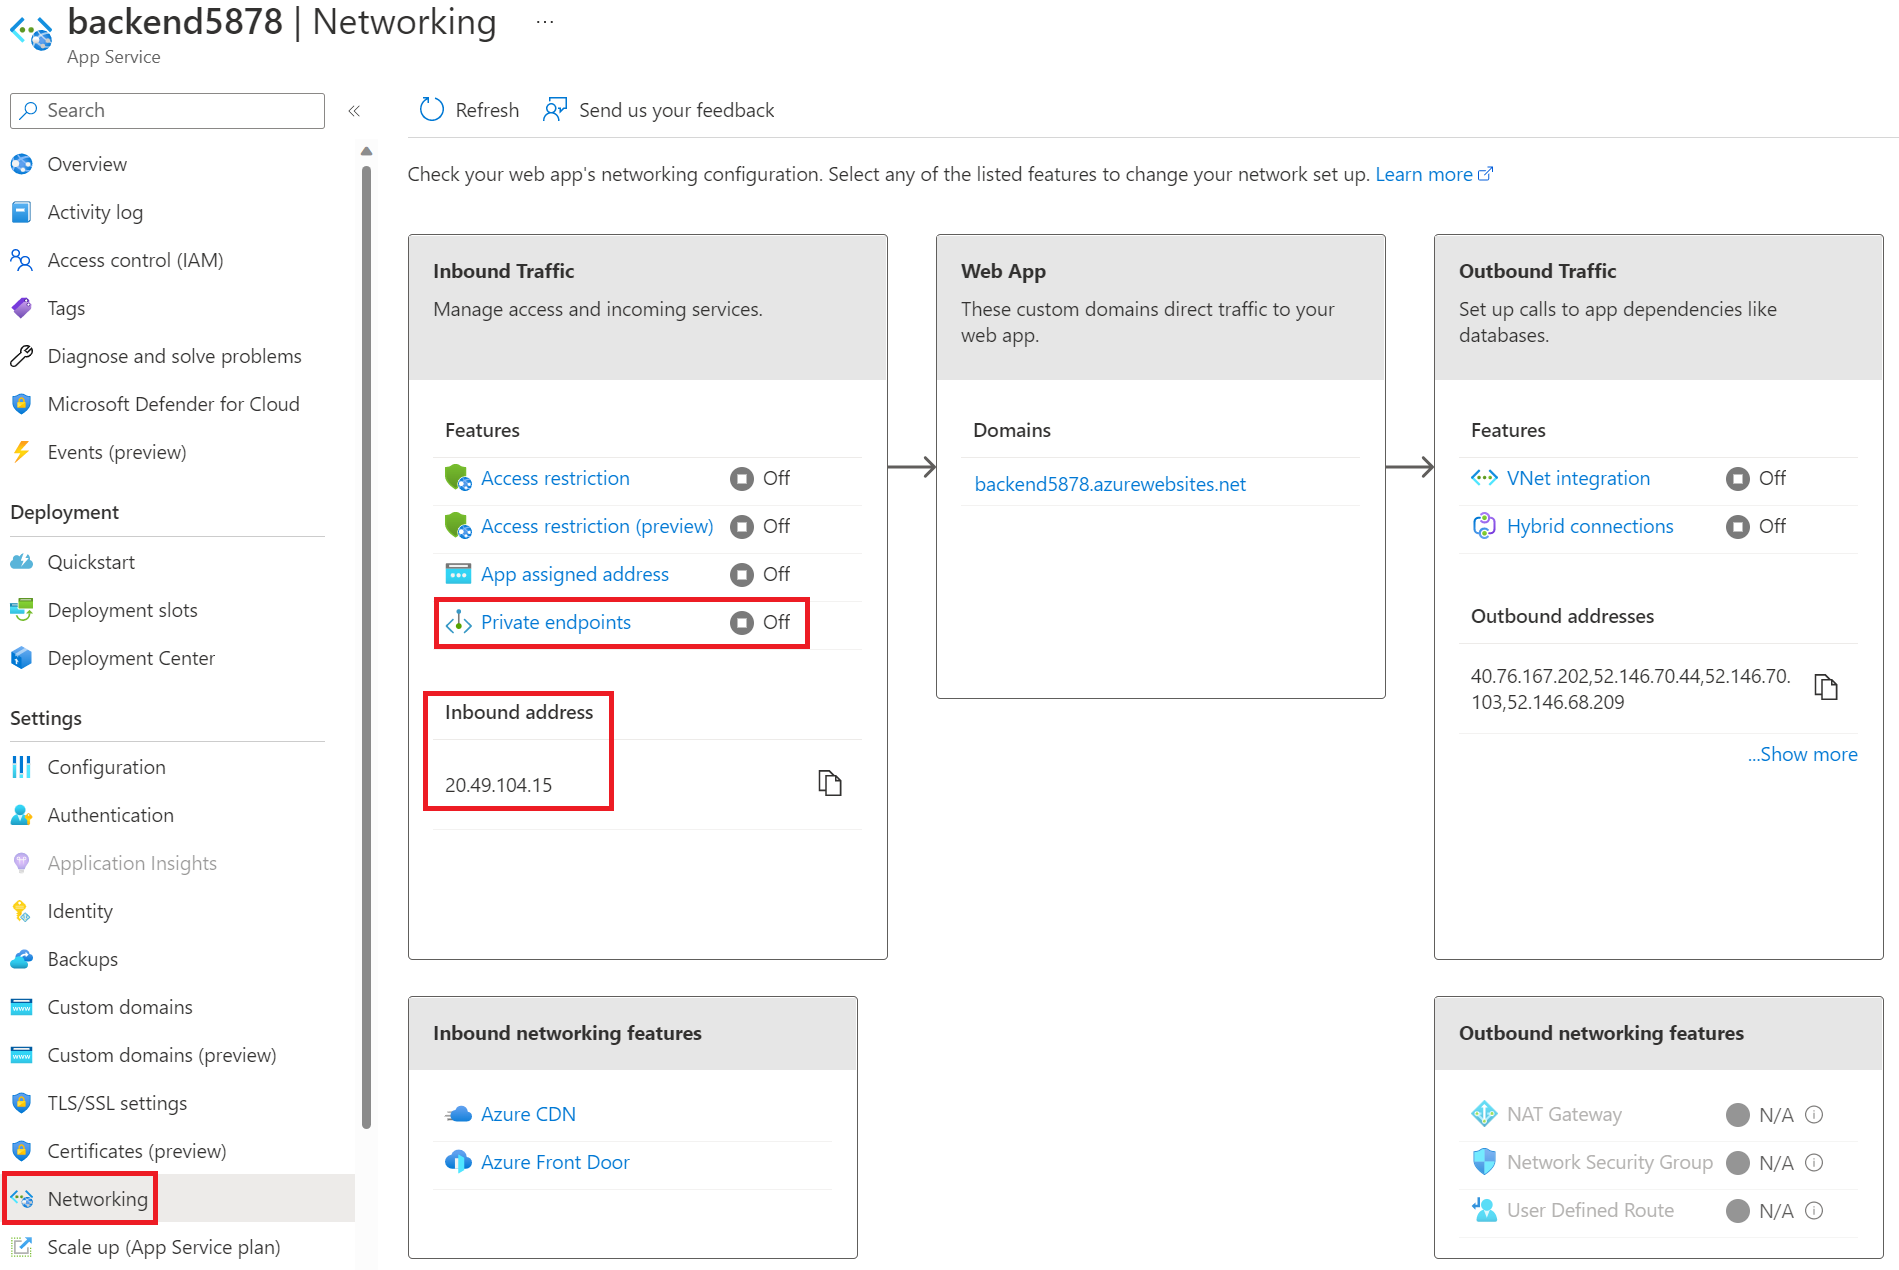
- Select + Add.
- Give your private endpoint a name, select the virtual network you created earlier, and select the “private-endpoint-subnet”.
- Make sure Integrate with private DNS zone is set to “Yes”. If you want to set up your own Private DNS Zone, you can find details for that here.
- Select OK to save your configuration.
Creating the private endpoint from the portal is the simplest method as it does a number of actions in the background for you including linking the zone to your virtual network. If you create the Private DNS Zone manually, you will need to create the link manually.
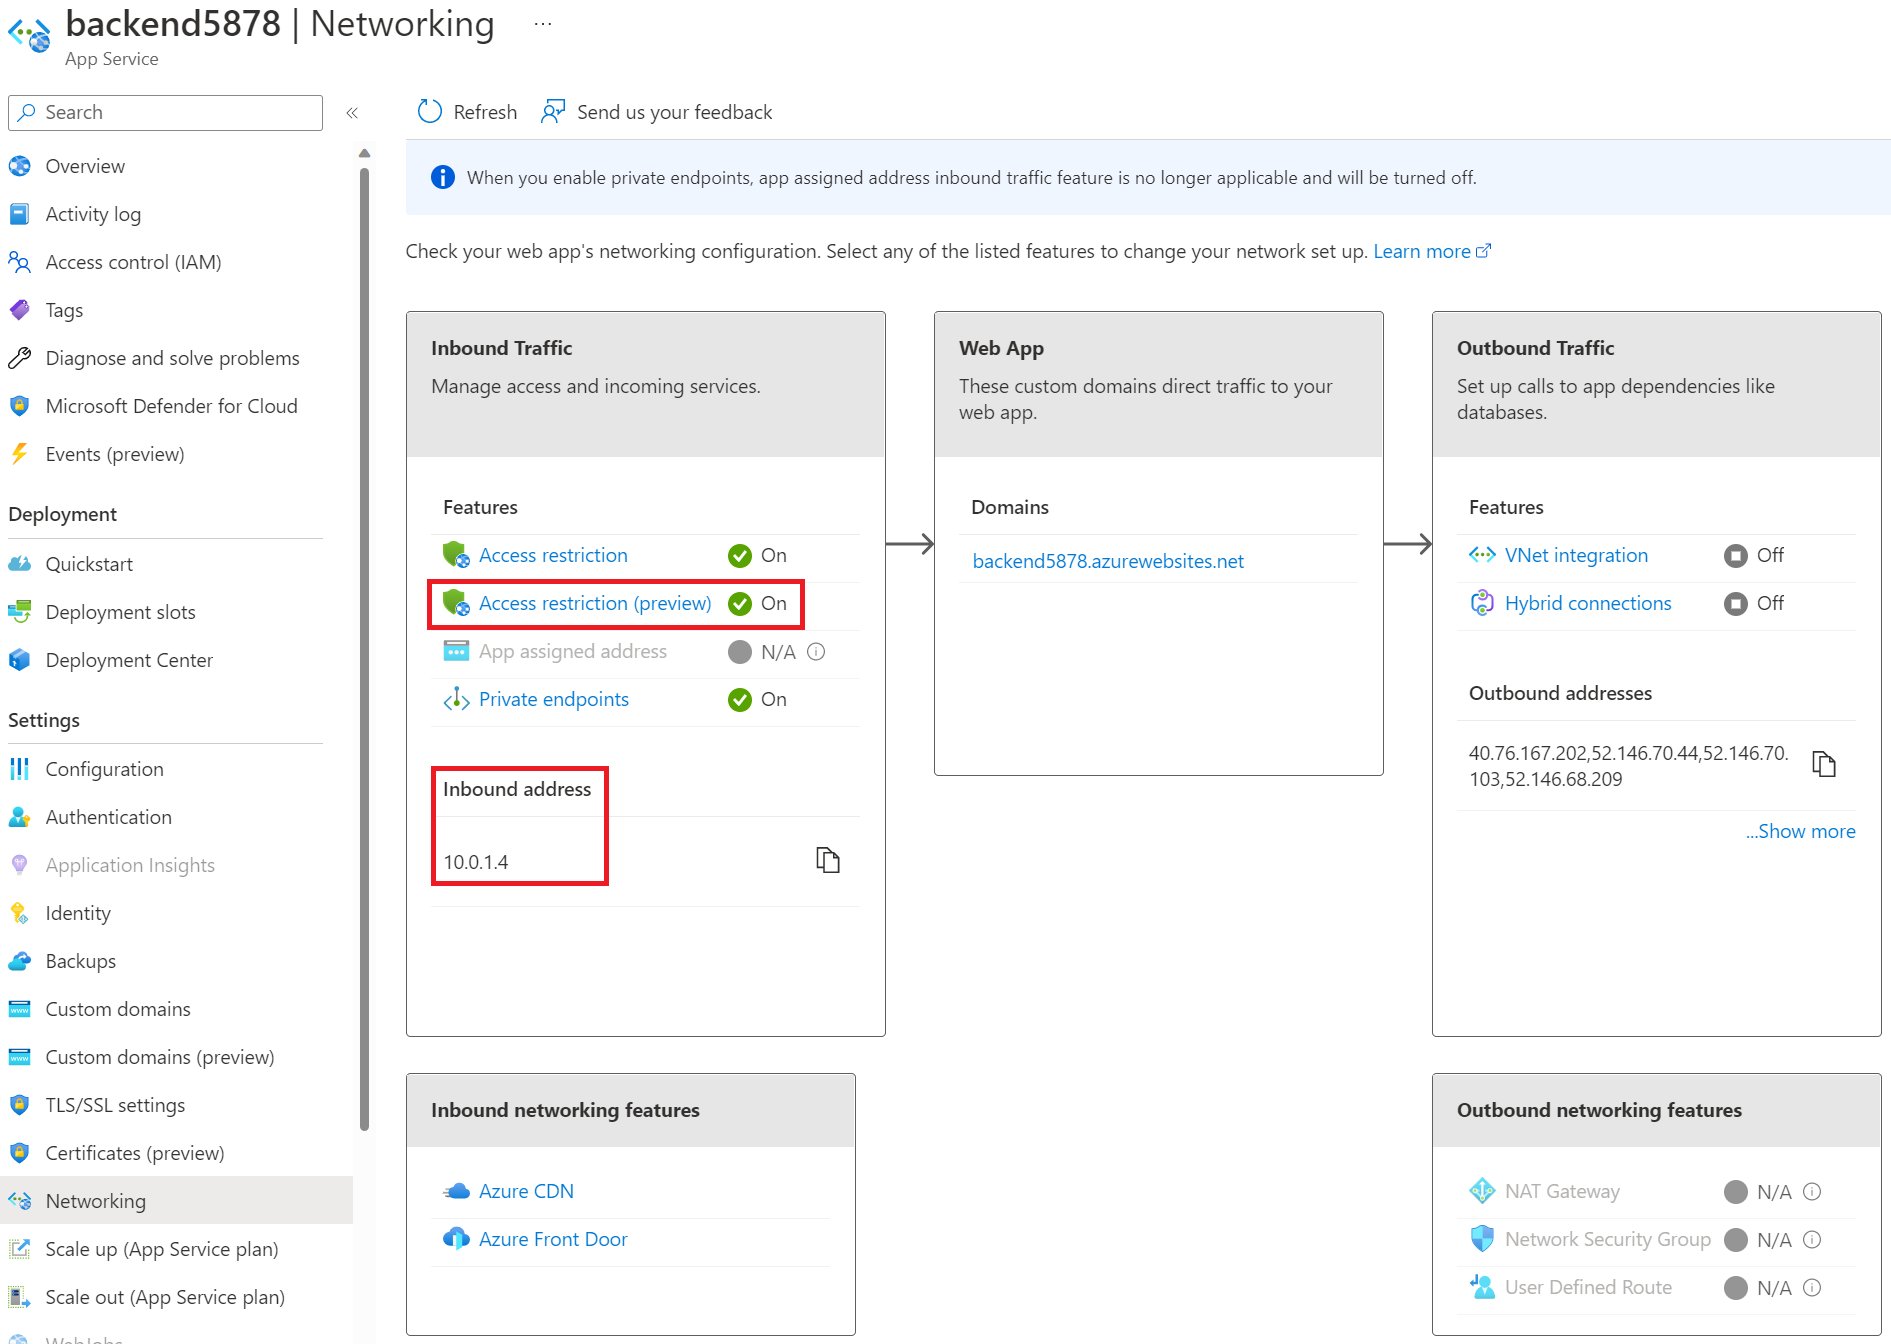
If you go back to the Networking page for your backend web app, you’ll see that the inbound address has changed to a private IP address from your virtual network. You’ll also see that access restrictions have turned on. If you view the Access restriction (preview), you see public access has been disabled. Disabling public network access blocks all incoming traffic except the traffic that comes from private endpoints.

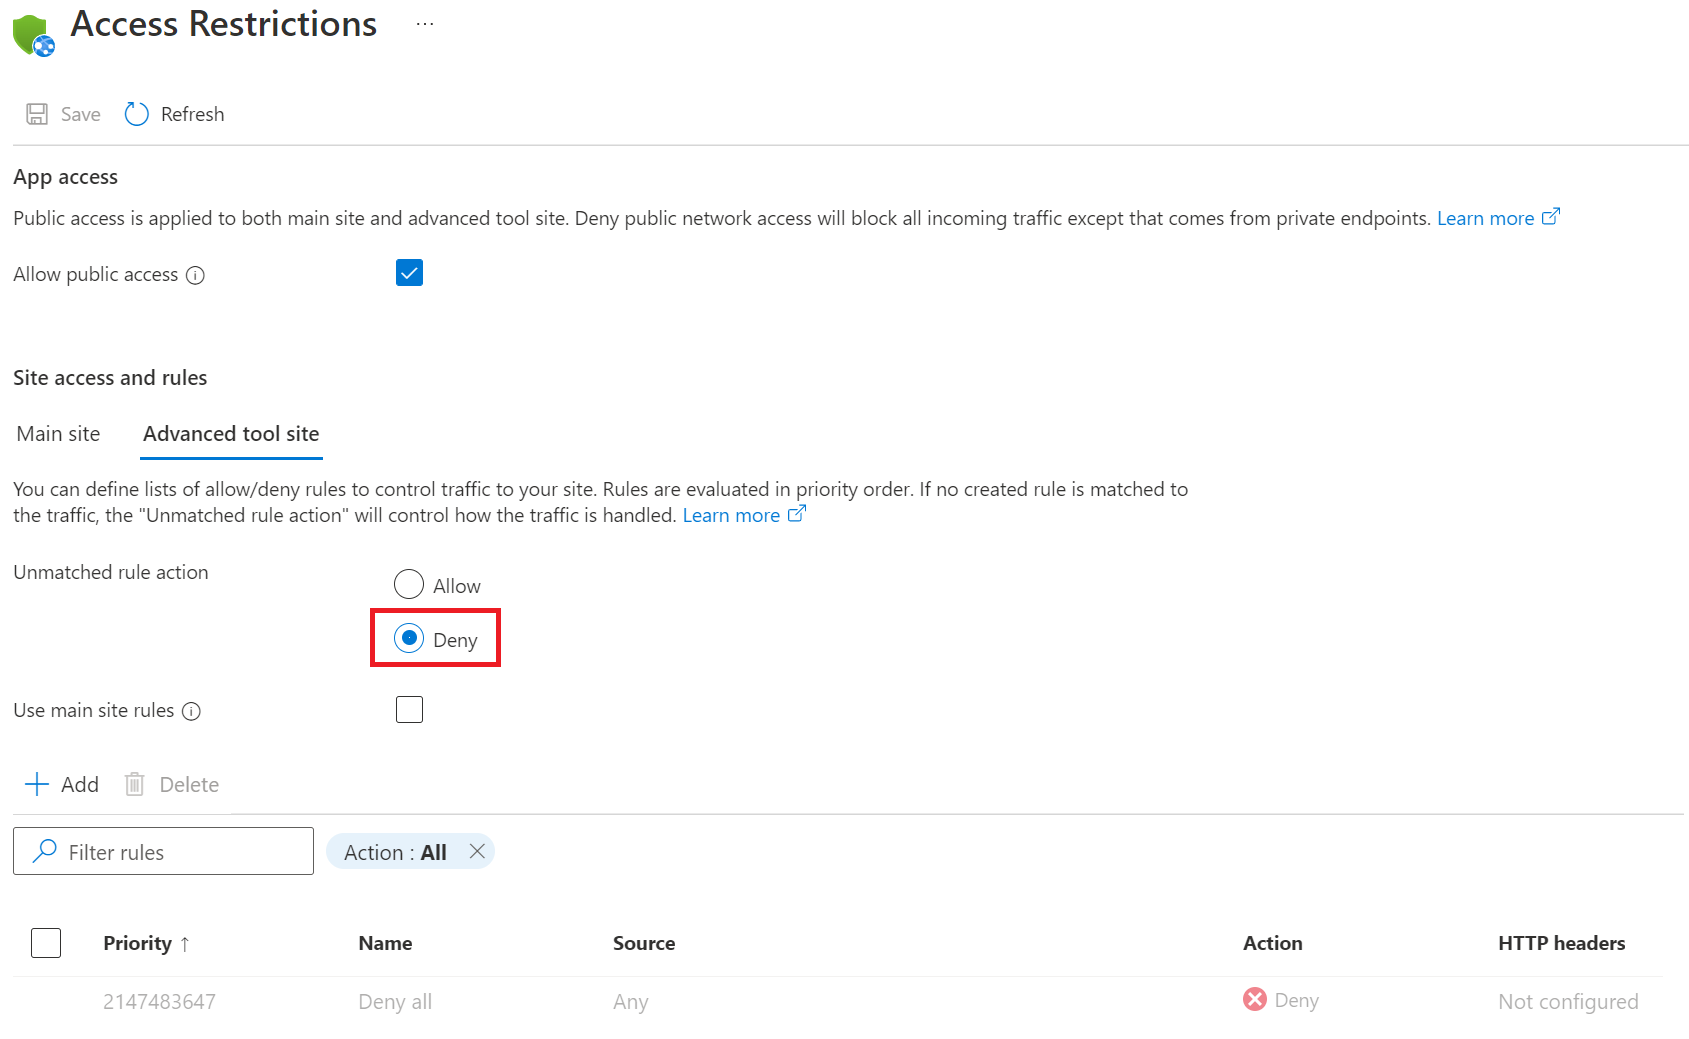
Lock down SCM/advanced tool site
Earlier on when you were creating the web apps, you disabled basic authentication to the WebDeploy port and SCM site. You’ll want to also disable all public access to the SCM site. This has already been done for the backend web app when you added the private endpoint. You will only need to do this for the frontend web app. Doing this, however, limits how code can be deployed to your app. Later on, we’ll walk through how to give a service principal access to deploy your source code. To disable public access, navigate to the Access restriction (preview) page for your frontend web app and select the Advanced tool site tab. For the Unmatched rule action, select “Deny”, then Save, and Continue. You can’t deny all public access using the checkbox at the top because that will deny public access to your frontend’s main site as well. Doing this would prevent your users from being able to access your frontend which is not what we want.
Checkpoint
At this point, all of the baseline infrastructure has been deployed and you are ready to deploy your source code. We’ll walk through how to do that securely in the next part of the blog post, but first, let’s validate our connections and app access.
Starting with the backend, try navigating directly to your backend’s endpoint. This can be found on the Overview page for the backend web app and should be in the format https://backend-web-app-name.azurewebsites.net. If you’ve configured things correctly, public access should be blocked and you should get an error page.
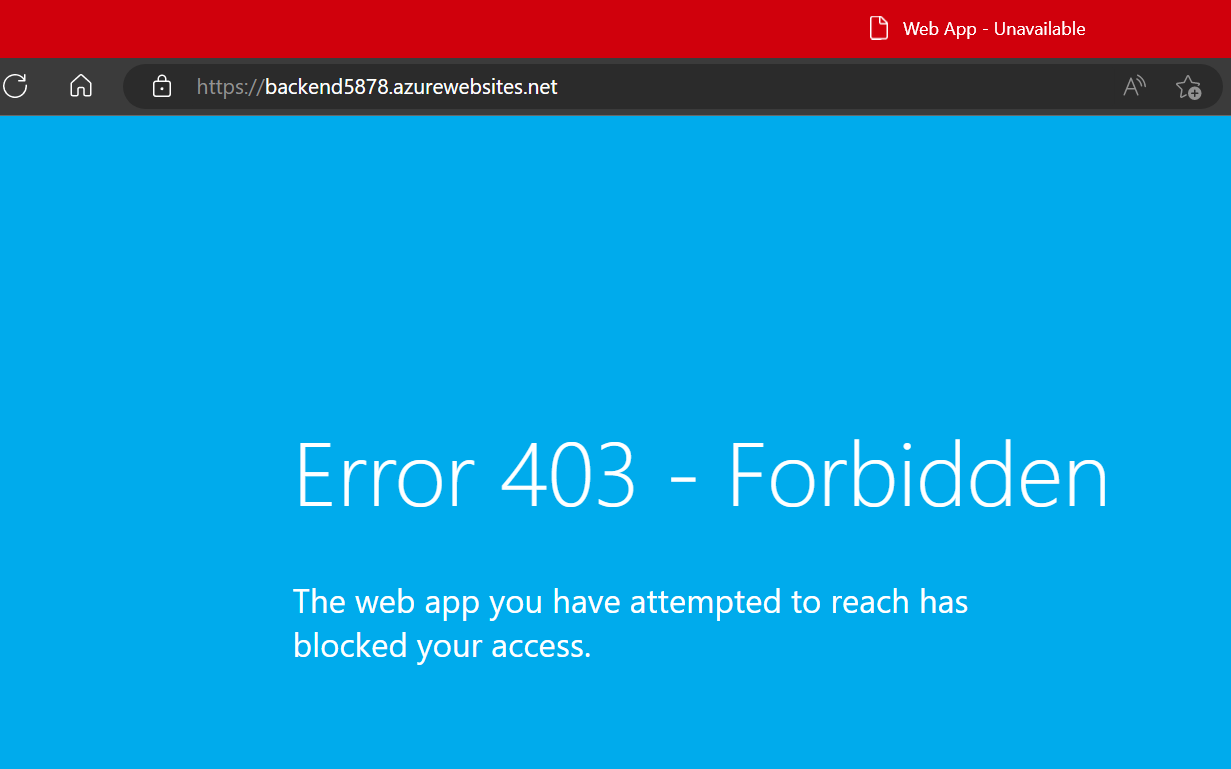
You should see a similar error page when trying to navigate to the backend’s SCM site. The endpoint for that is in the format https://backend-web-app-name.scm.azurewebsites.net.
To validate the frontend, we’ll need to ensure it is publicly accessible and that it can reach the backend only using the private endpoint.
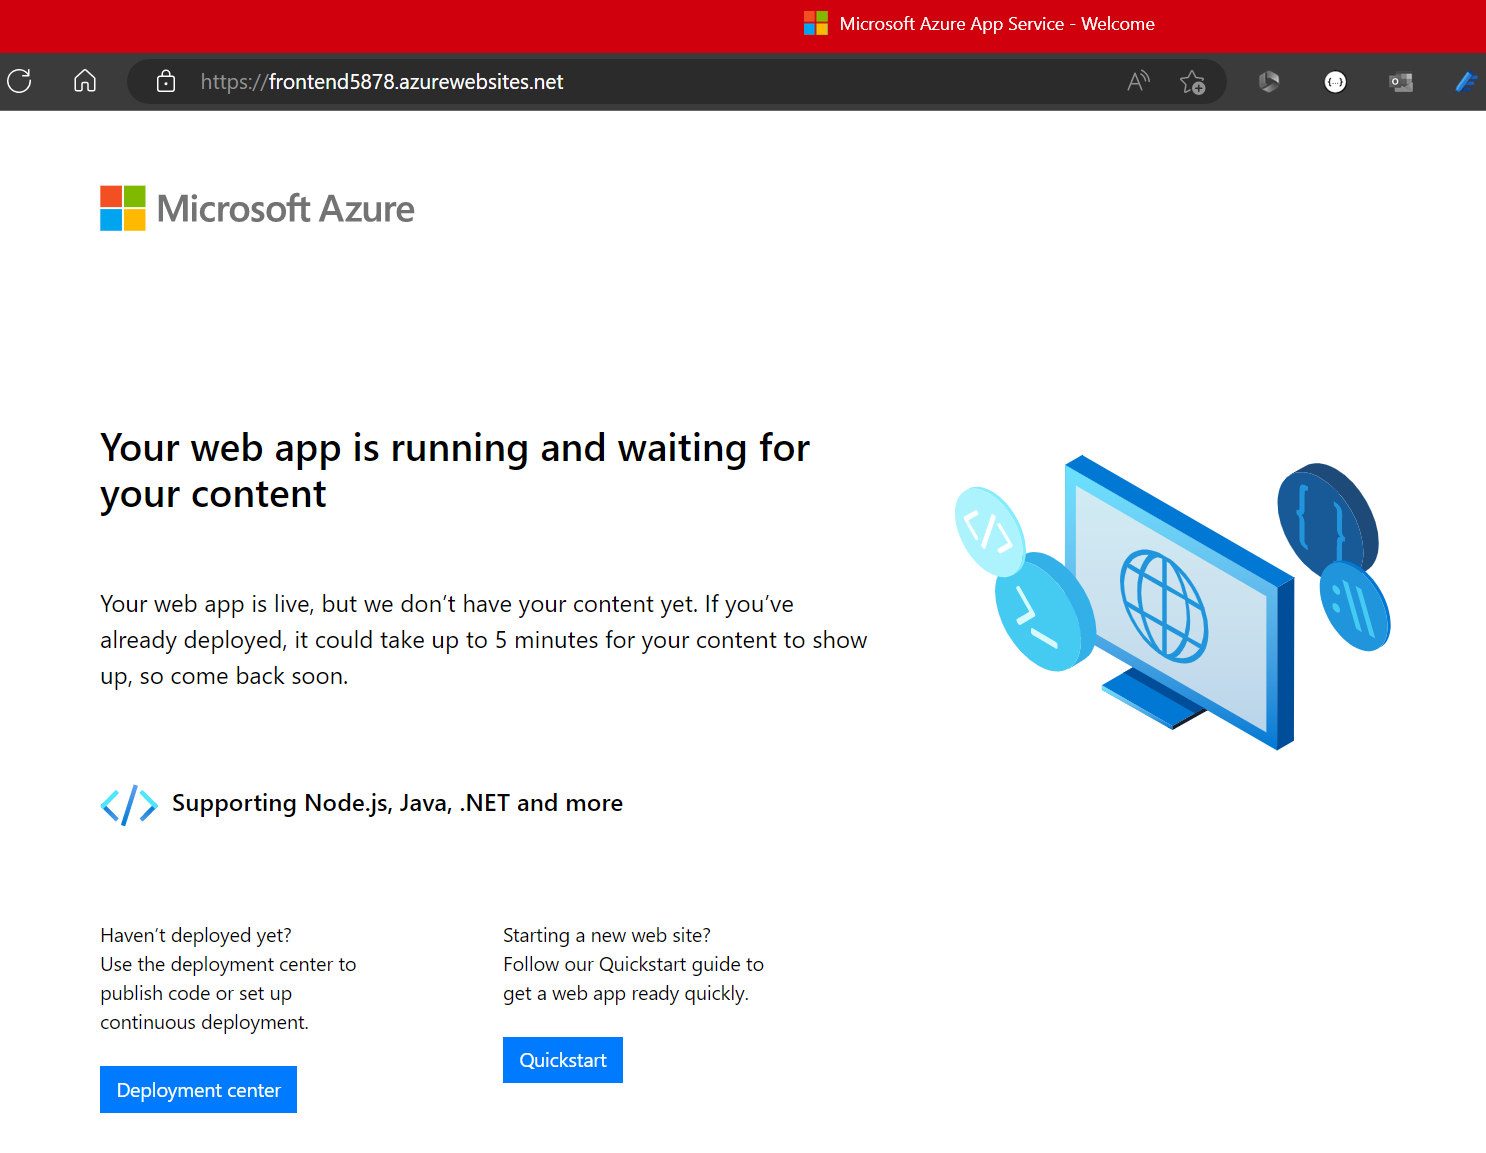
Try navigating to your frontend’s endpoint. You should see content similar to what is shown below. This means your frontend is publicly accessible and ready for your source code as intended. Try navigating to your frontend’s SCM site as well and confirm that access is denied.
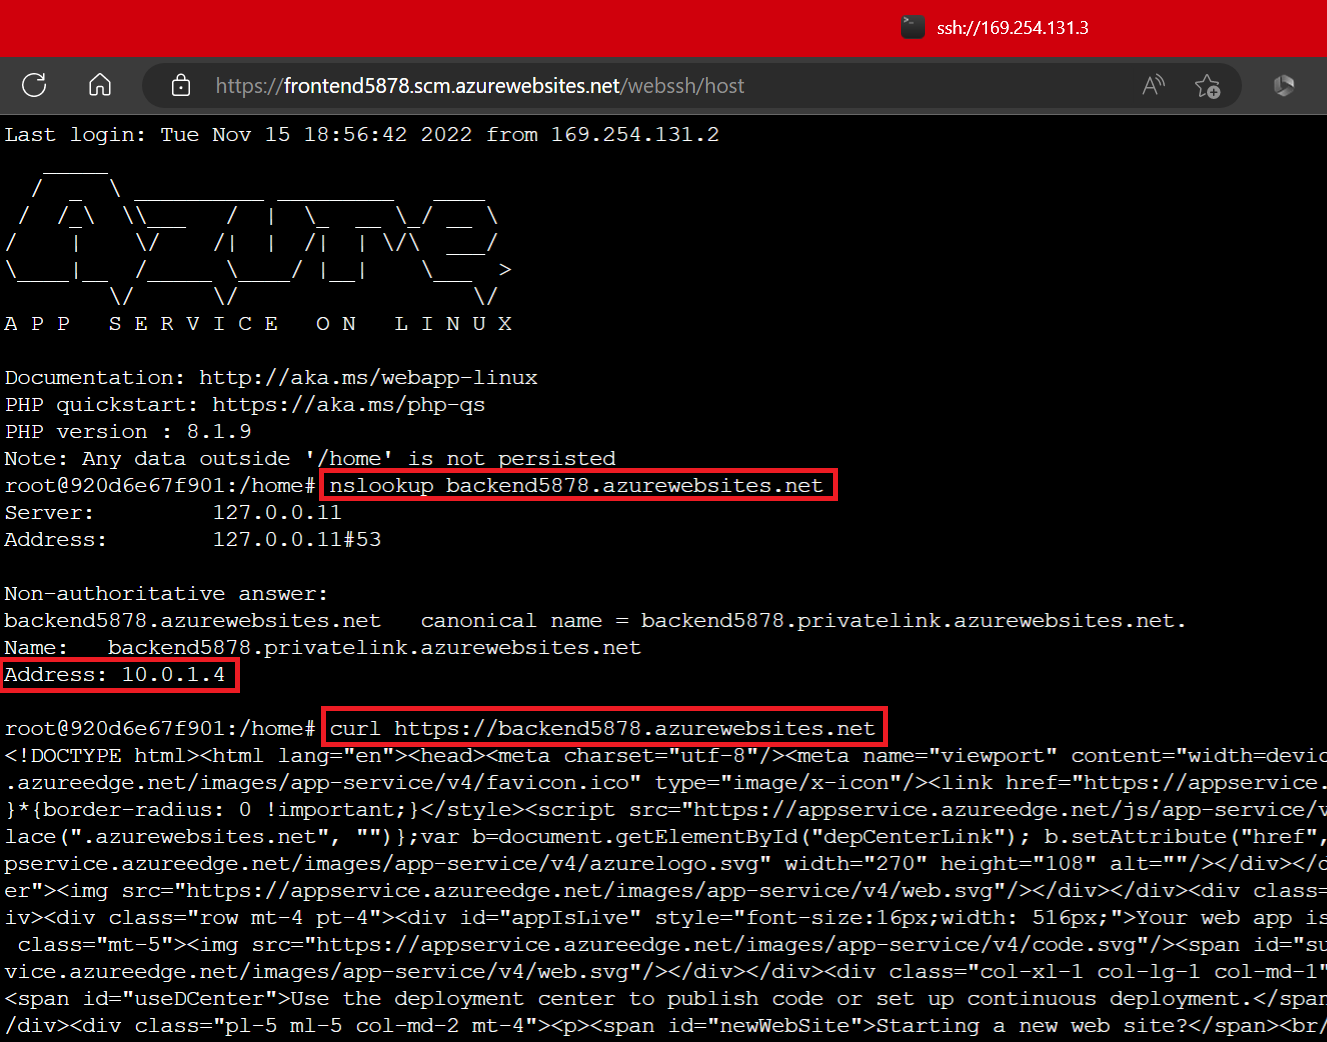
To validate the connection between the frontend and the backend, you’ll need access to the SCM site. For this, the simplest method if you’ve been following along is you can add a temporary rule to your frontend’s access restrictions that allows access from your IP. See the below screenshot for an example. For source, use your IP address.

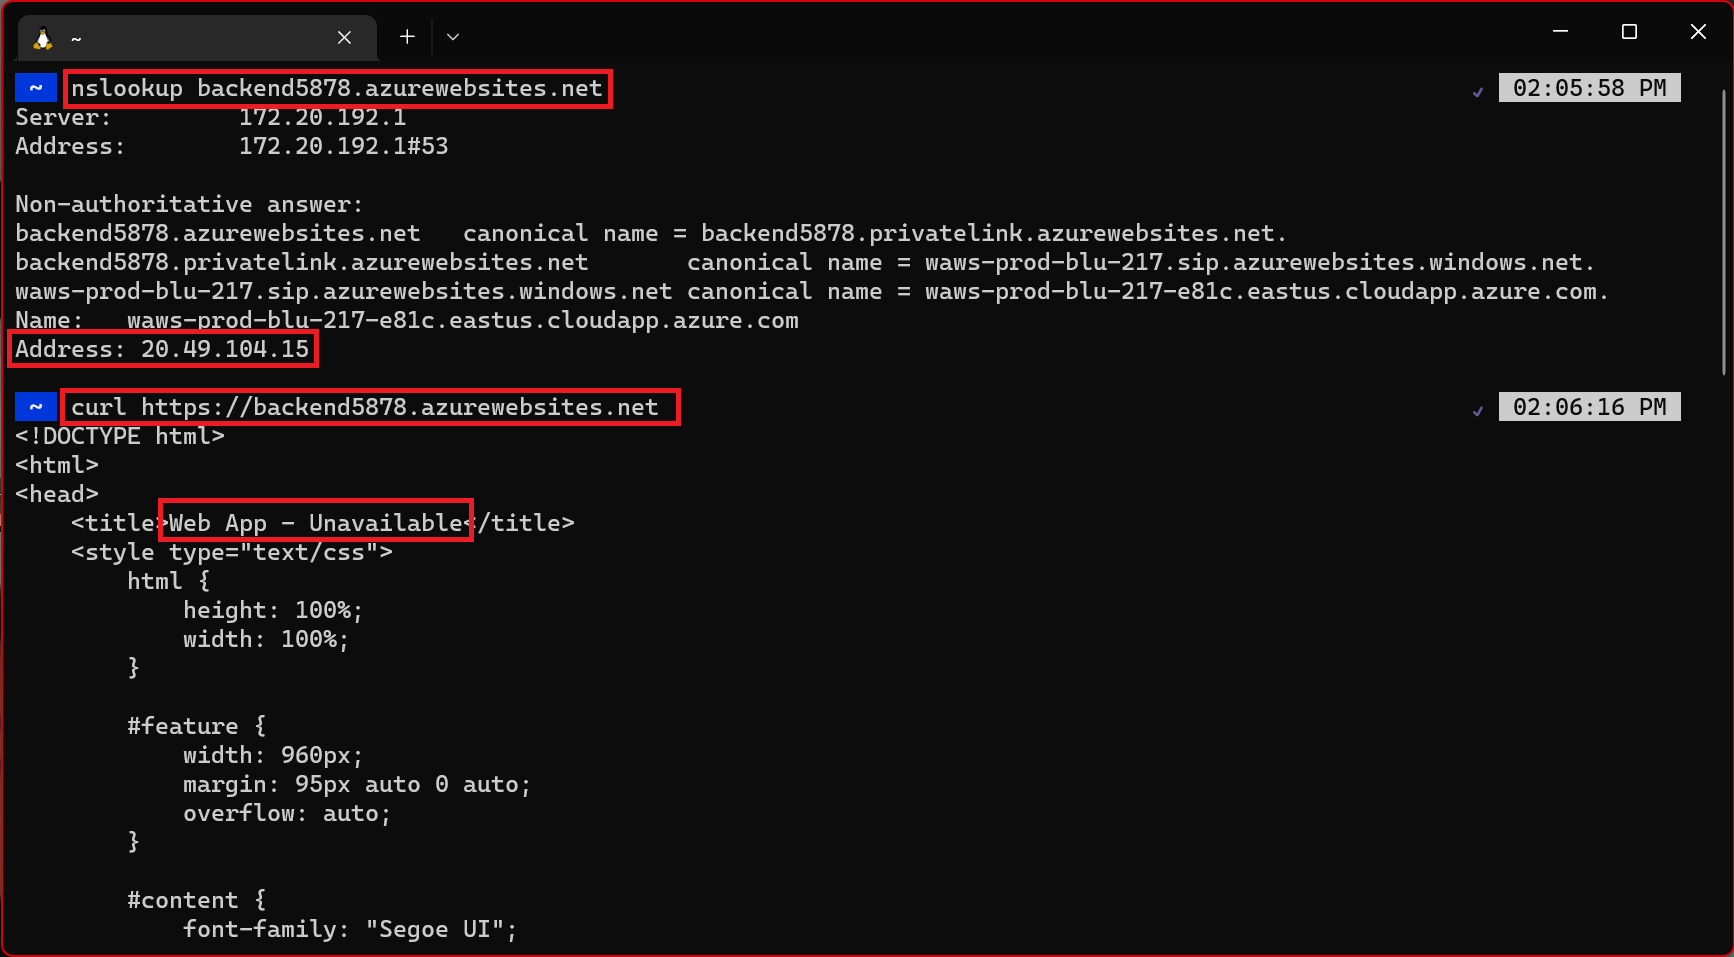
Navigate to the SCM site for your frontend by going to https://frontend-web-app-name.scm.azurewebsites.net/. If you can’t access it, make sure you’ve added the rule for your IP as shown above. Select SSH from the menu bar at the top. Doing this creates an SSH session on your frontend’s instances. Once that loads, you’re going to do an “nslookup” on your backend to confirm that it can be reached from the frontend using the private endpoint. Type “nslookup backend-web-app-name.azurewebsites.net”. Under the “Non-authoritative answer”, it should resolve the private IP address you noted earlier. You can also do a “curl” on your backend’s endpoint to display the backend’s current site contents. For now, curl will display the HTML for the empty web app.
Repeat the same nslookup and curl commands from another terminal (one that is not an SSH session from your frontend’s instances). The nslookup will return the public IP for the backend web app. Since we blocked public access to the backend web app, if you try to reach the public IP, you will get an access denied error which means this site will not be accessible from the public internet, which is what we want. The nslookup doesn’t resolve the private IP because that can only be reached from within the virtual network using the private endpoint and only the frontend web app is within the virtual network. If you try to do a curl on the backend from an external terminal, you’ll see the HTML returns “Web App - Unavailable”, which is the HTML for the error page you saw earlier when you tried navigating to the backend in your browser.
Now that you’ve validated your connections, you’re all set to deploy some code. Make sure you remove the rule that allows access to your frontend’s SCM site if you no longer need it.
Source code management
A number of best practices were described in the previous blog post, which went over how to manage source code across multiple regions. Those same concepts can be applied here. For completeness, we’ll go over the important parts to get your n-tier app up and running.
Prerequisites for source code deployment
We’ll be using a two Node.js apps hosted on GitHub. If you don’t already have a GitHub account, create an account for free.
- Go to the Node.js backend sample app. This is a simple Hello World app.
- Select the Fork button in the upper right on the GitHub page.
- Select the Owner and leave the default Repository name.
- Select Create fork.
- Repeat the same process for the Node.js frontend sample app. This is a basic web scraping app that I built specifically for this blog post.
At this point, your source code is all set up and ready to be deployed to your apps.
Create staging slots and configure continuous deployment
Configuring continuous deployment for production apps is not recommended because it makes testing and validation more complicated. Instead, use a combination of staging slots and slot swap to move code from your testing/staging environment to production.
We’ll create deployment slots for each of our apps and then walk through how to slot swap to get the code into production.
- Go to one of your apps.
- In the left pane, select Deployment slots.
- Select + Add Slot.
- Input “stage” for Name and to keep things simple, we’ll clone the settings from the production slot by selecting the app’s name from the Clone settings from: dropdown.
- Select Close at the bottom of the slot configuration pane.
- Select the newly created stage slot.
Cloning settings to a slot doesn’t clone every possible setting. In this case, depending on how you’ll be using the slots, you’ll need to disable basic auth for both app slots, create another private endpoint for the backend slot, and implement virtual network integration for the frontend slot. The process for this is the same as before. Pay attention to the access restrictions on the SCM sites if you do recreate the private endpoint as that will disable public access to it and prevent GitHub from reaching your staging slots. You’ll need to allow public access to the Advanced tools site as was done in the previous blog post.
To disable basic auth for the slots, make sure you update the --parent parameter as shown in the below example. Repeat the same command for “ftp” and for your other app as you did previously.
az resource update --resource-group <resource-group-name> --name scm --namespace Microsoft.Web --resource-type basicPublishingCredentialsPolicies --parent sites/<web-app-name>/slots/<slot-name> --set properties.allow=false
Now that the staging slots are properly configured and locked down, you can configure continuous deployment.
-
In the left pane, select Deployment Center and make sure you’re on the Settings tab.
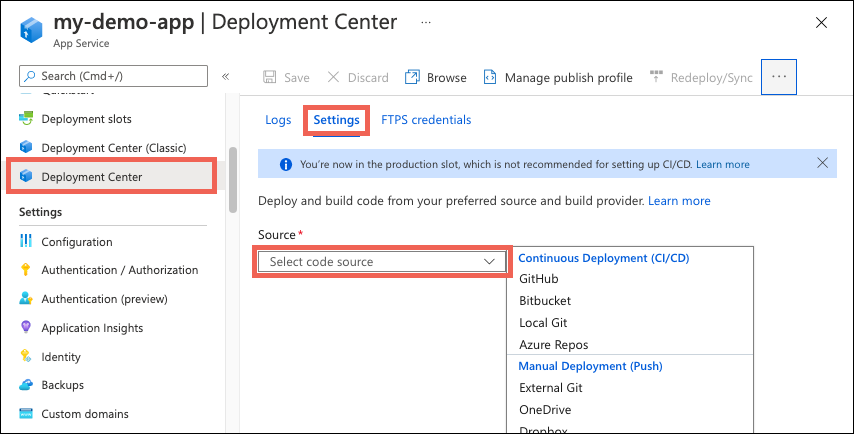
- For Source, select “GitHub”.
- If you’re deploying from GitHub for the first time, select Authorize and follow the authorization prompts.
-
After you authorize your Azure account with GitHub, select the Organization, Repository, and Branch to configure CI/CD as shown below. If you can’t find an organization or repository, you might need to enable more permissions on GitHub. For more information, see Managing access to your organization’s repositories.
Setting Description Organization <your GitHub username>Repository nodejs-backend Branch main - Leave the remaining defaults and select Save. You can track the deployment and commits in the Logs tab in the Deployment Center to monitor progress.
- Repeat the above steps for your other app.
Since you locked down the SCM sites and disabled basic auth for your apps, the default method for deploying code with GitHub Actions isn’t going to work. You’ll see that the deployment failed if you review the logs. This is because the default method uses a publishing profile. Instead, you have two options to authenticate with App Service for GitHub Actions - using a service principal or OpenID Connect. We have a detailed doc that goes through how to do this for each of your options - Deploy to App Service using GitHub Actions. We also have guidance for Azure DevOps using Azure Pipelines. Additionally, for more info on this topic as well as additional examples, we have a series of blog posts that walk through scenarios you may be interested in.
For this blog post, we’ll walk through how to authenticate with App Service for GitHub Actions using a service principal.
Configure authentication with App Service for GitHub Actions with a service principal
-
Run the following command to create the service principal. Replace the placeholders with your subscription ID, resource group name, and frontend and backend app names. The output is a JSON object with the role assignment credentials that provide access to your App Service apps. Copy this JSON object for the next step. It will include your client secret which will only be visible at this time. It is always a good practice to grant minimum access. The scope in this example is limited to the specific frontend and backend web apps and not the entire resource group.
az ad sp create-for-rbac --name "myApp" --role contributor --scopes /subscriptions/<subscription-id>/resourceGroups/<group-name>/providers/Microsoft.Web/sites/<frontend-web-app-name> /subscriptions/<subscription-id>/resourceGroups/<group-name>/providers/Microsoft.Web/sites/<backend-web-app-name> --sdk-auth -
You need to provide your service principal’s credentials to the login action as part of the GitHub Action workflow you will be using. These values can either be provided directly in the workflow or can be stored in a GitHub secret and referenced in your workflow. Saving the values as GitHub secrets is the more secure option.
- Open one of your GitHub repositories and go to Settings > Security > Secrets and variables > Actions > New repository secret.
- Paste the entire JSON output from the Azure CLI command from the initial step into the secret’s value field. Give the secret the name
AZURE_CREDENTIALS. When you configure the workflow file later, you use the secret for the inputcredsof the Azure Login action. -
Create the following secrets.
Name Value AZURE_APP_ID <application/client-id>AZURE_PASSWORD <client-secret>AZURE_TENANT_ID <tenant-id>AZURE_SUBSCRIPTION_ID <subscription-id> - Repeat this process for your other repository.
Create the GitHub Actions workflow
Now that you have a service principal that can access your App Services, you need to edit the default workflow that was created for your apps when you configured continuous deployment so that it uses your service principal to authenticate instead of the publishing profile. For sample workflows, see the “Service principal” tab in Deploy to App Service. If you’ve been following along, use the below workflow.
- Open your backend app’s GitHub repository and go to the
nodejs-backend/.github/workflows/directory. You’ll see the autogenerated workflow. -
Select the “pencil” button in the top right to edit the file. Replace the contents with the below, which assumes you created the GitHub secrets earlier for your credential, update the placeholders under “env”, and then commit directly to the main branch. This commit will trigger the GitHub Action to run again and deploy your code, this time using the service principal to authenticate.
name: Build and deploy Node.js app to Azure Web App on: push: branches: - main workflow_dispatch: env: AZURE_WEBAPP_NAME: <web-app-name> # set this to your application's name NODE_VERSION: '18.x' # set this to the node version to use AZURE_WEBAPP_PACKAGE_PATH: '.' # set this to the path to your web app project, defaults to the repository root AZURE_WEBAPP_SLOT_NAME: stage # set this to your application's slot name jobs: build: runs-on: ubuntu-latest steps: - uses: actions/checkout@v2 - name: Set up Node.js version uses: actions/setup-node@v1 with: node-version: ${{ env.NODE_VERSION }} - name: npm install, build run: | npm install npm run build --if-present - name: Upload artifact for deployment job uses: actions/upload-artifact@v2 with: name: node-app path: . deploy: runs-on: ubuntu-latest needs: build environment: name: 'stage' url: ${{ steps.deploy-to-webapp.outputs.webapp-url }} steps: - name: Download artifact from build job uses: actions/download-artifact@v2 with: name: node-app - uses: azure/login@v1 with: creds: | { "clientId": "${{ secrets.AZURE_APP_ID }}", "clientSecret": "${{ secrets.AZURE_PASSWORD }}", "subscriptionId": "${{ secrets.AZURE_SUBSCRIPTION_ID }}", "tenantId": "${{ secrets.AZURE_TENANT_ID }}" } - name: 'Deploy to Azure Web App' id: deploy-to-webapp uses: azure/webapps-deploy@v2 with: app-name: ${{ env.AZURE_WEBAPP_NAME }} slot-name: ${{ env.AZURE_WEBAPP_SLOT_NAME }} package: ${{ env.AZURE_WEBAPP_PACKAGE_PATH }} - name: logout run: | az logout - Repeat this process for for the frontend app. The workflow can be found in
nodejs-frontend/.github/workflows/.
After a couple minutes, the deployments to the two app’s staging slots will finish. Your backend web app slot is locked down, but you can update the access restrictions for it if you want to validate that the code was deployed. Alternatively, you can skip that and go straight to the frontend app slot and test from there.
Navigate to your frontend in a browser. The URL should look like https://frontend-web-app-name-stage.azurewebsites.net. The frontend app is a simple web scraper that will display the HTML body of a website. All it’s doing is calling the backend app and if it can reach the backend, it will display the site contents of the backend web app. I designed this site to work specifically with the provided backend web app. The web scraper will work with other sites, but the HTML it will return will be messy. Get your backend slot’s URL and paste that into the textbox. Hit “Go”, and after a couple seconds, you should see “Hello from the backend web app!” which is the site contents for the backend. If the app crashes, that means your access restrictions or private endpoint are misconfigured. If you didn’t set up the private endpoint and virtual network infrastructure for your slots, you can skip this testing as you’ve already validated it works in production. If all goes well, you’re ready to slot swap into production.
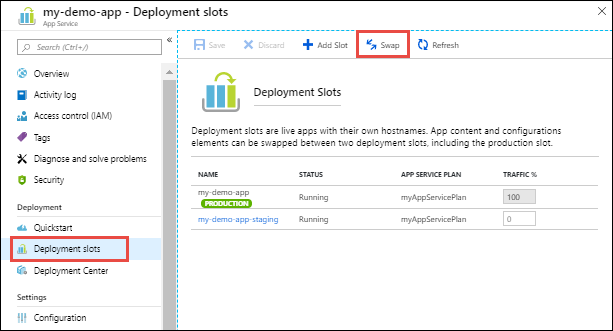
Slot swap
Once you’re done testing and validating, you can perform a slot swap from your staging site to your production site for each of your apps. During a slot swap, the App Service platform ensures the target slot doesn’t experience downtime.
To perform the swap:
-
Go to your app’s Deployment slots page and select Swap. The Swap dialog box shows settings in the selected source and target slots that will be changed.
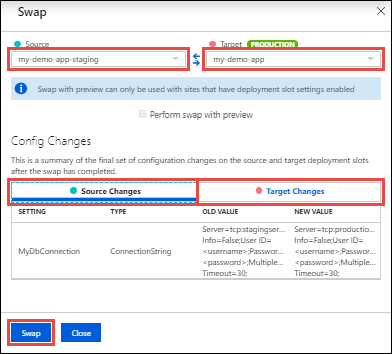
-
Select the desired Source and Target slots. Also, select the Source Changes and Target Changes tabs and verify that the configuration changes are expected. When you’re finished, you can swap the slots immediately by selecting Swap.
-
Repeat the process for your other app.
After a few minutes, you can navigate to your production frontend app to validate the slot swap succeeded. You should copy and paste your production backend app’s URL into the textbox and confirm you get the message “Hello from the backend web app!”. If you do, congrats, you completed the tutorial! If the app crashes, go back through this post to ensure your connections are configured properly.
At this point, your apps are up and running and any changes you make to your source code will automatically trigger an update to both of your staging apps. You can then repeat the slot swap process described above when you’re ready to move that code into production.
Clean up resources
After you’re done, you can remove all the items you created. Deleting a resource group also deletes its contents.
Deploy from ARM/Bicep
All of the resources in this post can be deployed using an ARM/Bicep template. A sample template is shown below, which creates empty apps following the security best practices outlined in this post. You’ll need to configure the slots and deployment source as well as the service principal once the template resources are created. To learn how to deploy ARM/Bicep templates, see How to deploy resources with Bicep and Azure CLI.
@description('Name of the VNet')
param virtualNetworkName string = 'vnet-ntier'

@description('Name of the Web Farm')
param serverFarmName string = 'serverfarm-ntier'

@description('Backend name must be unique DNS name worldwide')
param site1_Name string = 'backend-${uniqueString(resourceGroup().id)}'

@description('Frontend name must be unique DNS name worldwide')
param site2_Name string = 'frontend-${uniqueString(resourceGroup().id)}'

@description('CIDR of your VNet')
param virtualNetwork_CIDR string = '10.200.0.0/16'

@description('Name of the subnet')
param subnet1Name string = 'PrivateEndpointSubnet'

@description('Name of the subnet')
param subnet2Name string = 'VnetIntegrationSubnet'

@description('CIDR of your subnet')
param subnet1_CIDR string = '10.200.1.0/24'

@description('CIDR of your subnet')
param subnet2_CIDR string = '10.200.2.0/24'

@description('Location for all resources.')
param location string = resourceGroup().location

@description('SKU name, must be minimum P1v2')
@allowed([
  'P1v2'
  'P2v2'
  'P3v2'
])
param skuName string = 'P1v2'

@description('SKU size, must be minimum P1v2')
@allowed([
  'P1v2'
  'P2v2'
  'P3v2'
])
param skuSize string = 'P1v2'

@description('SKU family, must be minimum P1v2')
@allowed([
  'P1v2'
  'P2v2'
  'P3v2'
])
param skuFamily string = 'P1v2'

@description('Name of your Private Endpoint')
param privateEndpointName string = 'PrivateEndpoint1'

@description('Link name between your Private Endpoint and your Web App')
param privateLinkConnectionName string = 'PrivateEndpointLink1'

var webapp_dns_name = '.azurewebsites.net'
var privateDNSZoneName = 'privatelink.azurewebsites.net'
var SKU_tier = 'PremiumV2'

resource virtualNetwork 'Microsoft.Network/virtualNetworks@2020-06-01' = {
  name: virtualNetworkName
  location: location
  properties: {
    addressSpace: {
      addressPrefixes: [
        virtualNetwork_CIDR
      ]
    }
    subnets: [
      {
        name: subnet1Name
        properties: {
          addressPrefix: subnet1_CIDR
          privateEndpointNetworkPolicies: 'Disabled'
        }
      }
      {
        name: subnet2Name
        properties: {
          addressPrefix: subnet2_CIDR
          delegations: [
            {
              name: 'delegation'
              properties: {
                serviceName: 'Microsoft.Web/serverfarms'
              }
            }
          ]
          privateEndpointNetworkPolicies: 'Enabled'
        }
      }
    ]
  }
}

resource serverFarm 'Microsoft.Web/serverfarms@2020-06-01' = {
  name: serverFarmName
  location: location
  sku: {
    name: skuName
    tier: SKU_tier
    size: skuSize
    family: skuFamily
    capacity: 1
  }
  kind: 'app'
  properties: {
    reserved: true
  }
}

resource webApp1 'Microsoft.Web/sites@2020-06-01' = {
  name: site1_Name
  location: location
  kind: 'app'
  properties: {
    serverFarmId: serverFarm.id
  }
}

resource ftpPolicy1 'Microsoft.Web/sites/basicPublishingCredentialsPolicies@2022-03-01' = {
  name: 'ftp'
  kind: 'string'
  parent: webApp1
  location: location
  properties: {
    allow: false
  }
}

resource scmPolicy1 'Microsoft.Web/sites/basicPublishingCredentialsPolicies@2022-03-01' = {
  name: 'scm'
  kind: 'string'
  parent: webApp1
  location: location
  properties: {
    allow: false
  }
}

resource webApp2 'Microsoft.Web/sites@2020-06-01' = {
  name: site2_Name
  location: location
  kind: 'app'
  properties: {
    serverFarmId: serverFarm.id
    virtualNetworkSubnetId: resourceId('Microsoft.Network/virtualNetworks/subnets', virtualNetwork.name, subnet2Name)
    vnetRouteAllEnabled: true
  }
}

resource ftpPolicy2 'Microsoft.Web/sites/basicPublishingCredentialsPolicies@2022-03-01' = {
  name: 'ftp'
  kind: 'string'
  parent: webApp2
  location: location
  properties: {
    allow: false
  }
}

resource scmPolicy2 'Microsoft.Web/sites/basicPublishingCredentialsPolicies@2022-03-01' = {
  name: 'scm'
  kind: 'string'
  parent: webApp2
  location: location
  properties: {
    allow: false
  }
}

resource webApp1Config 'Microsoft.Web/sites/config@2020-06-01' = {
  parent: webApp1
  name: 'web'
  properties: {
    ftpsState: 'AllAllowed'
  }
}

resource webApp2Config 'Microsoft.Web/sites/config@2020-06-01' = {
  parent: webApp2
  name: 'web'
  properties: {
    ftpsState: 'AllAllowed'
    scmIpSecurityRestrictionsDefaultAction: 'Deny'
  }
}

resource webApp1Binding 'Microsoft.Web/sites/hostNameBindings@2019-08-01' = {
  parent: webApp1
  name: '${webApp1.name}${webapp_dns_name}'
  properties: {
    siteName: webApp1.name
    hostNameType: 'Verified'
  }
}

resource webApp2Binding 'Microsoft.Web/sites/hostNameBindings@2019-08-01' = {
  parent: webApp2
  name: '${webApp2.name}${webapp_dns_name}'
  properties: {
    siteName: webApp2.name
    hostNameType: 'Verified'
  }
}

resource privateEndpoint 'Microsoft.Network/privateEndpoints@2020-06-01' = {
  name: privateEndpointName
  location: location
  properties: {
    subnet: {
      id: resourceId('Microsoft.Network/virtualNetworks/subnets', virtualNetwork.name, subnet1Name)
    }
    privateLinkServiceConnections: [
      {
        name: privateLinkConnectionName
        properties: {
          privateLinkServiceId: webApp1.id
          groupIds: [
            'sites'
          ]
        }
      }
    ]
  }
}

resource privateDnsZones 'Microsoft.Network/privateDnsZones@2018-09-01' = {
  name: privateDNSZoneName
  location: 'global'
  dependsOn: [
    virtualNetwork
  ]
}

resource privateDnsZoneLink 'Microsoft.Network/privateDnsZones/virtualNetworkLinks@2018-09-01' = {
  parent: privateDnsZones
  name: '${privateDnsZones.name}-link'
  location: 'global'
  properties: {
    registrationEnabled: false
    virtualNetwork: {
      id: virtualNetwork.id
    }
  }
}

resource privateDnsZoneGroup 'Microsoft.Network/privateEndpoints/privateDnsZoneGroups@2020-03-01' = {
  parent: privateEndpoint
  name: 'dnsgroupname'
  properties: {
    privateDnsZoneConfigs: [
      {
        name: 'config1'
        properties: {
          privateDnsZoneId: privateDnsZones.id
        }
      }
    ]
  }
}