Deploying a site with secure backend communication
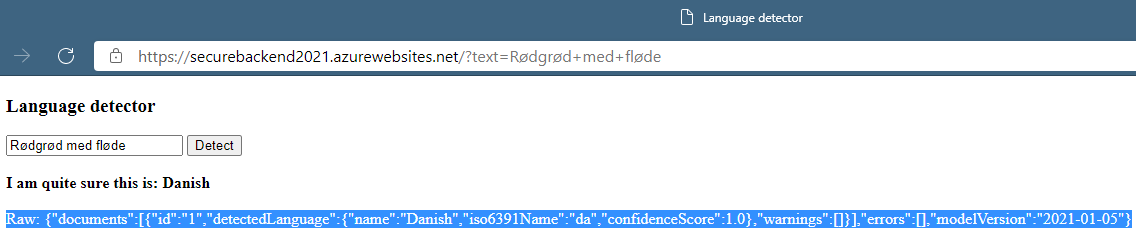
“Rød grød med fløde” - hmm, what language is that? Keep reading if you want to find out.
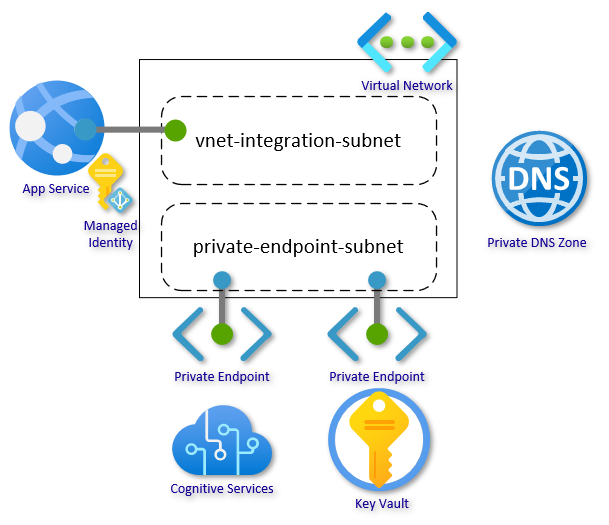
In this article I will walk you through setting up a Web App with secure, network-isolated communication to backend services. The Web App will allow you to type in a text, and using Cognitive Services Language Detection, you can detect the language of the given text. The authentication key for Cognitive Services will be stored in Key Vault, and App Service will authenticate with Key Vault using Managed Identity. All traffic will be isolated within your Virtual Network using virtual network integration and private endpoints.
The scenario is intentionally kept simple to focus on the architecture and configuration; but with a practical purpose I find it more easy to relate to. The backend services can be extended with the many other services supporting Private Endpoint like Azure SQL, Cosmos DB, App Configuration, and even other App Service Web Apps or Functions by following the same pattern.
This guide is organized into four steps:
- Create network infrastructure
- Set up backend services
- Create network integrated Web App
- Connect “the dots”
In closing, there are sections on alternative approaches, advanced scenarios, and FAQ.
Getting Started
This is the second article in a series focusing on network security. If you missed the first one, you can find it here, and it includes a more detailed getting started section covering setting up the scripting environment.
This article will also use the Azure CLI executed in bash shell on WSL to set up the environment. It could be done using teh Azure portal, Resource Manager templates or Azure PowerShell. CLI was chosen as I find it easier to follow and explain the individual steps and configurations needed.
Remember in the scripts to replace all the resource names that need to be unique. This would be the name of the Web App, Key Vault, Cognitive Services account, and custom domain. You may also change location if you want something closer to home. All other changes are optional.
1. Create Network Infrastructure
First, set up a Resource Group with a Virtual Network. The virtual network should have at least two subnets: one for the virtual network integration and one for the private endpoints. The address-prefix size must be at least /28 for both subnets; small subnets can affect scaling limits and the number of private endpoints. Go with /24 for both subnets if you are not under constraints.
az group create --name securebackendsetup --location westeurope
az network vnet create --resource-group securebackendsetup --location westeurope --name securebackend-vnet --address-prefixes 10.0.0.0/16
For the subnets, there are two settings that we need to pay attention to. This is often set by the portal or scripts, but here it is called out directly. Delegation “Microsoft.Web/serverfarms” informs the subnet that it is reserved for virtual network integration:
az network vnet subnet create --resource-group securebackendsetup --vnet-name securebackend-vnet --name vnet-integration-subnet --address-prefixes 10.0.0.0/24 --delegations Microsoft.Web/serverfarms
az network vnet subnet create --resource-group securebackendsetup --vnet-name securebackend-vnet --name private-endpoint-subnet --address-prefixes 10.0.1.0/24
The last part of the network infrastructure is the Private DNS Zones. These zones are used to host the DNS records for private endpoints allowing the clients to find the backend services by name. We need a zone for Key Vault and a zone for Text Analytics (Cognitive Services). Go here for a primer on Azure Private Endpoints and go here for how DNS Zones fits into private endpoints.
Create the Private DNS Zones for Key Vault and Cognitive Services:
az network private-dns zone create --resource-group securebackendsetup --name privatelink.cognitiveservices.azure.com
az network private-dns zone create --resource-group securebackendsetup --name privatelink.vaultcore.azure.net
Link the zones to the virtual network:
az network private-dns link vnet create --resource-group securebackendsetup --name cognitiveservices-zonelink --zone-name privatelink.cognitiveservices.azure.com --virtual-network securebackend-vnet --registration-enabled False
az network private-dns link vnet create --resource-group securebackendsetup --name vaultcore-zonelink --zone-name privatelink.vaultcore.azure.net --virtual-network securebackend-vnet --registration-enabled False
… and now the core network setup is done. We can now create our backend resources.
2. Set Up Backend Services
In this section, we will set up the Key Vault and the Cognitive Services (CS) account and store the access key for CS in Key Vault. We will also create the private endpoints and configure the services to block public traffic. First create the services:
az keyvault create --resource-group securebackendsetup --name securekeyvault2021 --location westeurope --sku standard --enable-rbac-authorization
az cognitiveservices account create --resource-group securebackendsetup --name securecstext2021 --location westeurope --kind TextAnalytics --sku F0 --custom-domain securecstext2021
Then we need to add the access key from CS as a secret in Key Vault. There are several ways to do this: directly in the Portal or using the CLI. What matters here is that the Identity (in this case, you) must have permissions to write secrets to Key Vault. We are using a new permission model in Key Vault, where the data plane permissions are set as RBAC permissions. In this mode, no default data plane permissions are set when creating the Key Vault.
I am storing properties in variables for reuse in later steps. The --output tsv will ensure that the values do not have quotes. The --query parameter will allow me to return only a specific property.
Note: The syntax for using variables depends on your choice of OS, shell and scripting language.
Assign permissions for you (the signed in user) to write secrets. You can optionally use a service principal or other users if you have delegated responsibility:
my_id=$(az ad signed-in-user show --query objectId --output tsv)
kv_resource_id=$(az keyvault show --name securekeyvault2021 --query id --output tsv)
az role assignment create --role "Key Vault Secrets Officer" --assignee-object-id $my_id --scope $kv_resource_id
Then get the key from CS and store as a secret in Key Vault. We extract the URI of the secret as we need this in a later step. You can perhaps copy the secret in your notes if you plan on finishing later. The secret set command will display the secret in the shell if you are not querying a specific property. An alternative to tsv is to use --output none.
Tip: In bash shell, which I am using, you can see the values of a variable by using the echo command, e.g.
echo $kv_secret_uri
cs_key1=$(az cognitiveservices account keys list --resource-group securebackendsetup --name securecstext2021 --query key1 --output tsv)
kv_secret_uri=$(az keyvault secret set --vault-name securekeyvault2021 --name cskey --value $cs_key1 --query id --output tsv)
Next, let’s create the Private Endpoints to connect the backend services to the virtual network. We already have the needed Key Vault Resource ID $kv_resource_id in a variable from a previous step:
az network private-endpoint create --resource-group securebackendsetup --name securekeyvault-pe --location westeurope --connection-name securekeyvault-pc --private-connection-resource-id $kv_resource_id --group-id vault --vnet-name securebackend-vnet --subnet private-endpoint-subnet
… and create a DNS Zone Group. This will create the DNS record for the private endpoint in the DNS Zone (and remove it if the private endpoint is deleted):
az network private-endpoint dns-zone-group create --resource-group securebackendsetup --endpoint-name securekeyvault-pe --name securekeyvault-zg --private-dns-zone privatelink.vaultcore.azure.net --zone-name privatelink.vaultcore.azure.net
Do the same for the Cognitive Services account:
cs_resource_id=$(az cognitiveservices account show --resource-group securebackendsetup --name securecstext2021 --query id --output tsv)
az network private-endpoint create --resource-group securebackendsetup --name securecstext-pe --location westeurope --connection-name securecstext-pc --private-connection-resource-id $cs_resource_id --group-id account --vnet-name securebackend-vnet --subnet private-endpoint-subnet
az network private-endpoint dns-zone-group create --resource-group securebackendsetup --endpoint-name securecstext-pe --name securecstext-zg --private-dns-zone privatelink.cognitiveservices.azure.com --zone-name privatelink.cognitiveservices.azure.com
Finally, let’s block public traffic. For CS, this property is not exposed in the official command, but we know our way around. You may need to fiddle a bit with the syntax for the az rest command if you are using an alternative shell/OS combination:
az rest --uri $cs_resource_id?api-version=2017-04-18 --method PATCH --body '{"properties":{"publicNetworkAccess":"Disabled"}}' --headers 'Content-Type=application/json'
az keyvault update --name securekeyvault2021 --default-action Deny
Everything is locked down now and you cannot even get to the Key Vault secrets through the Azure portal. In the Key Vault Networking blade, you can add the public IP of your client if you need to view or update the secrets.
3. Create Network Integrated Web App
Now we get to creating the actual Web App. To use virtual network integration, we need at least the Basic SKU. The virtual network integration feature allows outbound traffic to flow directly into the virtual network:
az appservice plan create --resource-group securebackendsetup --name securebackendplan --sku P1V2
az webapp create --resource-group securebackendsetup --plan securebackendplan --name securebackend2021 --https-only
az webapp vnet-integration add --resource-group securebackendsetup --name securebackend2021 --vnet securebackend-vnet --subnet vnet-integration-subnet
Now, store the name of your CS account for the code to query. Replace securecstext2021 with the name of your account:
az webapp config appsettings set --resource-group securebackendsetup --name securebackend2021 --settings CS_ACCOUNT_NAME=securecstext2021
As a last step in this section, we need to generate a Managed Identity, grant this identity read secrets permissions on the Key Vault, and reference the secret in an App Setting. We will reuse the Resource ID variable from a previous step. Go back up if you missed that. The identity command can directly assign permissions as part of the command, so we will grant the Web App “Key Vault Secrets User” (read) permissions:
az webapp identity assign --resource-group securebackendsetup --name securebackend2021 --scope $kv_resource_id --role  "Key Vault Secrets User"
az webapp config appsettings set --resource-group securebackendsetup --name securebackend2021 --settings CS_ACCOUNT_KEY="@Microsoft.KeyVault(SecretUri=$kv_secret_uri)"
You can now browse to the Web App and all outbound traffic from the Web App will be routed through the virtual network.
4. Connect “The Dots”
All the infrastructure is now in place and we just need a bit of code to glue it all together.
I will be using php as it can run on both Windows and Linux App Service Plans, is easy to read, and allows for a single-file solution. Please do not mind the missing error handling, retry logic, etc. as this is a proof-of-concept. Copy the following code into a file called index.php and run these commands:
zip default.zip index.php
az webapp deployment source config-zip --resource-group securebackendsetup --name securebackend2021 --src ./default.zip
The code for index.php:
<?php
if (!empty($_GET['text'])) {
    $text = urldecode($_GET['text']);
    $payload = [
        'documents' => array([
            'id' => '1',
            'text' => $text
        ])
    ];
    $json_payload = json_encode($payload);
    $cs_key = getenv('CS_ACCOUNT_KEY');
    $cs_name = getenv('CS_ACCOUNT_NAME');

    $options = array(
        'http'=>array(
          'method'=>"POST",
          'header'=>"Ocp-Apim-Subscription-Key: " . $cs_key . "\r\n" .
                    "Content-Type: application/json\r\n" .
                    "Accept: application/json\r\n" .
                    "Connection: close\r\n" .
                    "Content-length: " . strlen($json_payload) . "\r\n",
          'content'=>$json_payload
        )
      );

    $context = stream_context_create($options);
    $cs_text_api_url = 'https://' . $cs_name . '.cognitiveservices.azure.com/text/analytics/v3.0/languages';
    $detection_result = file_get_contents($cs_text_api_url, false, $context);
}
?>
<!DOCTYPE html>
<html lang="en">
<head>
    <meta charset="utf-8"/>
    <title>Language detector</title>
    <script src="https://ajax.googleapis.com/ajax/libs/jquery/2.1.3/jquery.min.js"></script>
    <script src="script.js"></script>
</head>
<body>
<h3>Language detector</h3>
<form action="" method="get">
    <input type="text" name="text" value="<?php echo $text;?>"/>
    <button type="submit">Detect</button>
</form>
<br/>
<?php
    if (!empty($detection_result)) {
        $json_result = json_decode($detection_result);
        $detected_language = $json_result->documents[0]->detectedLanguage->name;
        $confidence_score = $json_result->documents[0]->detectedLanguage->confidenceScore;
        if ($confidence_score > 0.9) {
            echo '<div><strong>I am quite sure this is: ' . $detected_language . '</strong></div><br/>';
        } elseif ($confidence_score == 0) {
            echo '<div><strong>I have no clue - type in some more text</strong></div><br/>';
        } elseif ($confidence_score < 0.3) {
            echo '<div><strong>Here is a wild guess: ' . $detected_language . '</strong></div><br/>';
        } else
        {
            echo '<div><strong>I could be wrong, but it sounds a bit like: ' . $detected_language . '</strong></div><br/>';
        }

        echo '<span style="color:white">Raw: ' . $detection_result . '</span><br/>';
    }
?>
</body>
</html>
You are now ready to test the service.
In Closing
What language is “Rød grød med fløde”? With this new solution, you should be able to use the AI engine to determine that it is Danish - my native language. It is a well known challenge for foreigners to pronounce, and you can probably find videos of this online. You may also have noticed in the code, that I added the “classic” same font color debug output for convenience.
As a bonus challenge, you can try to extend the solution to be able to translate into English and find out what it means. You should find what you need for that here.
Alternative Approaches and Advanced Scenarios
In this section, I will discuss some alternative approaches and advanced scenarios.
Service endpoints
Service endpoint is an alternative Azure Networking technology you can use to secure your network traffic. Essentially, you register specific service endpoints like Microsoft.KeyVault on the subnet where traffic originates from - in this case the virtual network integration subnet. With this registration, Azure will append metadata to the traffic towards the specific service to allow the service to restrict which subnet to accept traffic from, and block all other traffic. Unlike private endpoint, it still uses the public IP of the service for routing, and therefore doesn’t need the setup of Azure Private DNS Zones.
FAQ
Q: Can I apply the same steps to a Function App?
You will need a Premium Elastic plan to use virtual network integration with Function Apps. Further, if you would like to also have the storage account that Functions uses for code and state, you will need to initially create it with the storage publicly available. The steps and limitations for that are documented here.