Deploying a secure, resilient site with a custom domain
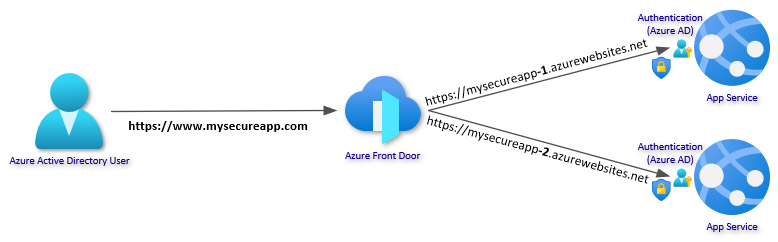
In this article I will walk you through setting up a secure, resilient site with Azure App Service using some new features that have recently been released or are very close to release. The image below shows the basic architecture. One or more instances of your Web App in multiple regions with Azure AD authentication. Azure Front Door (AFD) will provide global load balancing and custom domain with certificates, and the Web Apps will be isolated to only receive traffic from the specific AFD instance.
This guide is organized into five steps:
- Create a basic Web App with Azure AD Authentication
- Add Azure Front Door
- Add Custom Domain and Certificate
- Restrict traffic from Front Door to Web App
- Increase resiliency with multiple geo-distributed Web Apps
In closing, there are sections on alternative approaches, advanced scenarios, and an FAQ section.
Getting started
You can complete most of this guide using the Azure portal, but there are some advanced features that require scripting. I will be using Azure CLI throughout the walk-through, however Azure PowerShell or Azure Resource Manager templates will work as well. I am using bash through Windows Subsystem for Linux (WSL) to run the commands. If you are using a PowerShell or Cmd prompt, small syntax tweaks may be needed.
If you are new to scripting, you will find overview and instructions on installing Azure CLI here. You can also use Azure Cloud Shell from the portal. It even has a nice file editor that you can use for some of the steps, so no local install is needed.
1. Basic Web App with Azure AD Authentication

First, setup a Resource Group and a Web App with Azure AD Authentication. Choose a unique name for your Web App and feel free to change name of the resource group and location. If you have preferences for App Service Plan or other options, you can configure this as well.
az group create --name securewebsetup --location westeurope
az appservice plan create --resource-group securewebsetup --name securewebplan --sku B1
az webapp create --resource-group securewebsetup --plan securewebplan --name securewebapp2021 --https-only # Web App name must be globally unique
Debug page (optional)
To help debug the application, you can create a file called default.cshtml with the following content
@using System.Web.Configuration
@using System.Net;
<html>

<head>
  <title>Debug page</title>
</head>

<body style="background-color: #00E60A;">
  @{
    var pubIp = new System.Net.WebClient().DownloadString("https://api.ipify.org");
  }
  <h3>Debug information</h3>
  <ul>
    <li><strong>Request Url</strong><span>: @Request.Url</span></li>
    <li><strong>Outbound public IP</strong><span>: @pubIp</span></li>
    <li><strong>Inbound client IP</strong><span>: @Request.ServerVariables["REMOTE_ADDR"]</span></li>
  </ul>
  <strong>Headers</strong>
  <ul>
    @foreach (var h in Request.Headers)
    {
      <li><strong>@h</strong><span>: @Request.Headers[h.ToString()]</span></li>
    }
  </ul>
</body>

</html>
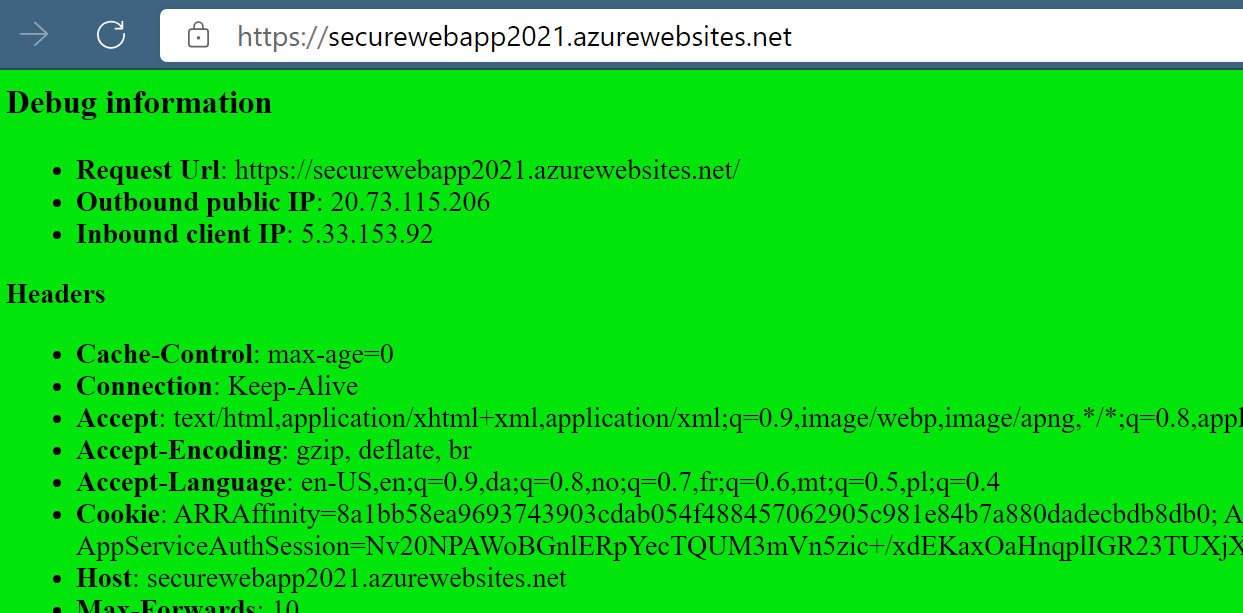
Zip the file and push it to the Web App. Afterwards you should see a site with a green background and some Debug information:
zip debug.zip default.cshtml
az webapp deployment source config-zip --resource-group securewebsetup --name securewebapp2021 --src ./debug.zip
Debug page on Linux (optional)
If you are using App Service on Linux with Code deployment, you can use a php debug file. Create a file named index.php with the following content:
<html>

<head>
  <title>Debug page</title>
</head>

<body style="background-color: #00E60A;">
  <?php
    $requestPageUrl = (isset($_SERVER['HTTPS']) ? "https" : "http") . "://" . $_SERVER["HTTP_HOST"] . $_SERVER["REQUEST_URI"];
    $pubIp = file_get_contents('https://api.ipify.org');
  ?>
  <h3>Debug information</h3>
  <ul>
    <li><strong>Request Url</strong><span>: <?php echo $requestPageUrl; ?></span></li>
    <li><strong>Outbound public IP</strong><span>: <?php echo $pubIp ?></span></li>
    <li><strong>Inbound client IP</strong><span>: <?php echo $_SERVER['REMOTE_ADDR']; ?></span></li>
  </ul>
  <strong>Headers</strong>
  <ul>
    <?php
      foreach (getallheaders() as $name => $value) {
        echo "<li><strong>$name</strong><span>: $value</span></li>";
      }
    ?>
  </ul>
</body>

</html>
Zip the file and push it to the Web App. Afterwards you should see a site with a green background and some Debug information:
zip debug.zip index.php
az webapp deployment source config-zip --resource-group securewebsetup --name securewebapp2021 --src ./debug.zip
Authentication setup
App Service provides a simple way to setup authentication. The feature is sometimes referred to as Easy Auth. There is a new version just released and for this setup some of the new options are needed. The new Authentication feature is available in the Azure portal, but a few advanced configuration options are not yet exposed in the portal, so let’s look under the hood using the REST API.
You have to get the Resource ID of the Web App. It was returned when you created the Web App in the previous steps, and you can also find it in the portal under Properties. This goes for any resource.

Ensure that you can read the settings first. Pay attention to the api-version. You should see a lot of json returned when running this command:
az rest --uri /subscriptions/REPLACE-ME-SUBSCRIPTIONID/resourceGroups/REPLACE-ME-RESOURCEGROUP/providers/Microsoft.Web/sites/REPLACE-ME-APPNAME?api-version=2020-09-01 --method get
All the Authentication settings are defined in a json structure. There are many options to fine tune the configuration, but the snippet below is an extraction of the required settings needed for this scenario. Copy this into a file called auth.json:
{
    "properties": {
        "platform": {
            "enabled": true
        },
        "globalValidation": {
            "unauthenticatedClientAction": "RedirectToLoginPage",
            "redirectToProvider": "azureActiveDirectory"
        },
        "httpSettings": {
            "requireHttps": true
        },
        "login": {
            "preserveUrlFragmentsForLogins": true,
            "allowedExternalRedirectUrls": [
                "https://REPLACE-ME-WEBAPP-NAME.azurewebsites.net/"
            ]
        },
        "identityProviders": {
            "azureActiveDirectory": {
                "enabled": true,
                "registration": {
                    "openIdIssuer": "https://sts.windows.net/REPLACE-ME-TENANTID/v2.0",
                    "clientId": "REPLACE-ME-APPID",
                    "clientSecretSettingName": "REPLACE-ME-SECRETNAME"
                },
                "validation": {
                    "allowedAudiences": [
                        "https://REPLACE-ME-WEBAPP-NAME.azurewebsites.net"
                    ]
                }
            }
        }
    }
}
The file has some placeholders that you need to fill in with your own values. You will generate these values in the next few steps. You have already come across the first two REPLACE-ME-WEBAPP-NAME occurrences. This value should be replaced with the name of your Web App (in my case this was “securewebapp2021”).
You can find the value for REPLACE-ME-TENANTID by running az account show and looking in the homeTenantId property.
Next, create an App registration in Azure AD. An App registration is a way to tell Azure AD that this Web App is allowed to authenticate users in the directory and that it can do so only using specific urls. The display name can be anything. The reply-url is your base url combined with a special callback path: https://securewebapp2021.azurewebsites.net/.auth/login/aad/callback
az ad app create --display-name securewebapp2021 --reply-urls https://securewebapp2021.azurewebsites.net/.auth/login/aad/callback
Replace REPLACE-ME-APPID in auth.json with the the appId from the returned output.
For the last placeholder REPLACE-ME-SECRETNAME, this will be the name of an App Setting in your Web App that contains the secret. The App Setting can reference a Key Vault secret if you prefer. You can pick any name. I will choose AAD_CLIENT_SECRET. To add the secret, run the following command (with the AppId from the previous step). If you leave out the password parameter, it will auto-generate a complex password:
az ad app credential reset --id REPLACE-ME-APPID --password "reP!@ce-w!th.VeRys3cr3tC0d!"
Add the value of the generated password to the App Settings of the Web App:
az webapp config appsettings set --resource-group securewebsetup --name securewebapp2021 --settings "AAD_CLIENT_SECRET=reP!@ce-w!th.VeRys3cr3tC0d!"
Finally, let’s update the Web App with the Authentication configuration (make sure you save your auth.json file and append /config/authsettingsV2 to the Resource ID):
az rest --uri /subscriptions/REPLACE-ME-SUBSCRIPTIONID/resourceGroups/REPLACE-ME-RESOURCEGROUP/providers/Microsoft.Web/sites/REPLACE-ME-APPNAME/config/authsettingsV2?api-version=2020-09-01 --method put --body @auth.json
If you browse to the site now, you should be redirected to consent to the App permissions and login to your Azure AD tenant. If you deployed the debug site, you will notice some extra headers prefixed with X-MS-CLIENT-PRINCIPAL.
2. Add Azure Front Door
Azure Front Door is a global, scalable entry-point that uses the Microsoft global edge network to create fast, secure, and widely scalable web applications. With Front Door, you can transform your global consumer and enterprise applications into robust, high-performing personalized modern applications with contents that reach a global audience through Azure.
Azure Front Door (Standard and Premium) combines the existing features of Front Door (Classic) with integrated CDN and WAF capabilities as well as some new advanced options to use private endpoints as origin (backend) and onboard Managed Certificates using TXT records, which can be helpful in a migration scenario.

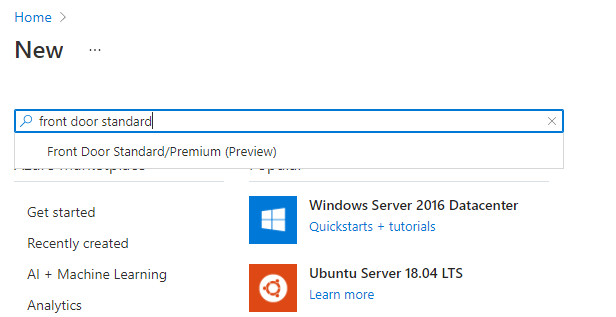
Open the Azure portal. Create a new resource, search for Front Door, and select “Front Door and CDN profiles”
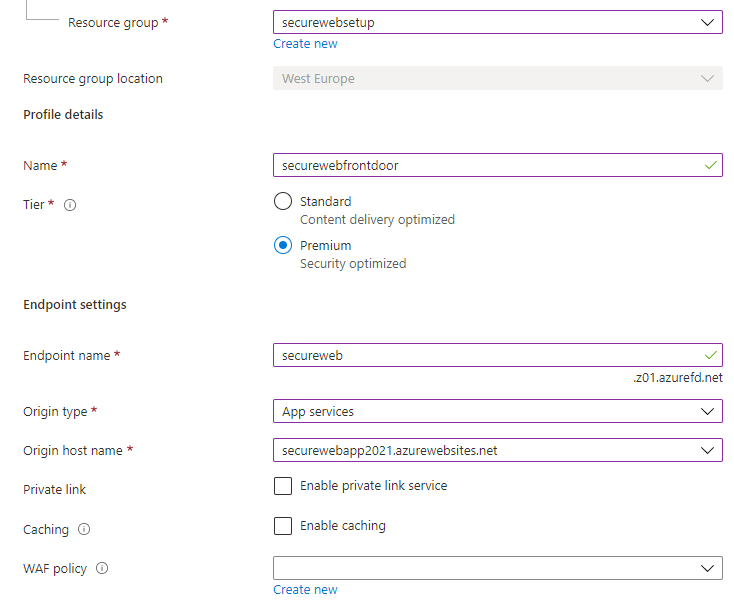
Use the Quick Create and under Basics, use the existing resource group. Give it a name and endpoint name, and select your App Service Web App. If you want to try out the private endpoint feature or WAF capabilities later, you should select the Premium tier. Once it is created, it typically takes 5-10 minutes to replicate globally. Go grab a coffee and come back when this is complete.
Alter authentication settings
After a good coffee, try to browse to the Front Door URL. In my case: https://secureweb.z01.azurefd.net. It appears to be working, but notice the address bar. It redirected you directly back to your Web App. To fix that you need to do a few things. First, update the App registration in Azure AD to allow authentication request coming from the new url. You can add multiple reply-urls by separating them with a space, but if you only want to allow authentication through Front Door, you can just replace it.
az ad app update --id REPLACE-ME-APPID --reply-urls https://secureweb.z01.azurefd.net/.auth/login/aad/callback https://securewebapp2021.azurewebsites.net/.auth/login/aad/callback
Second, it is time to look at one of the new features of Authentication in App Service. Open up the auth.json file again and in the login section under allowedExternalRedirectUrls, add the Azure Front Door url. You should also add it in the AAD validation section under allowedAudiences (remember the comma in both settings).
Finally, in auth.json, configure the Authentication framework to look for the original address. In forward proxies like Front Door, the address is typically sent in an http header called X-Forwarded-Host, which is covered by the Standard convention. The forwardProxy section goes to httpSettings. The final json file looks like this:
{
    "properties": {
        "platform": {
            "enabled": true
        },
        "globalValidation": {
            "unauthenticatedClientAction": "RedirectToLoginPage",
            "redirectToProvider": "azureActiveDirectory"
        },
        "httpSettings": {
            "requireHttps": true,
            "forwardProxy": {
                "convention": "Standard"
            }
        },
        "login": {
            "preserveUrlFragmentsForLogins": true,
            "allowedExternalRedirectUrls": [
                "https://securewebapp2021.azurewebsites.net",
                "https://secureweb.z01.azurefd.net"
            ]
        },
        "identityProviders": {
            "azureActiveDirectory": {
                "enabled": true,
                "registration": {
                    "openIdIssuer": "https://sts.windows.net/REPLACE-ME-TENANTID/v2.0",
                    "clientId": "REPLACE-ME-APPID",
                    "clientSecretSettingName": "AAD_CLIENT_SECRET"
                },
                "validation": {
                    "allowedAudiences": [
                        "https://securewebapp2021.azurewebsites.net",
                        "https://secureweb.z01.azurefd.net"
                    ]
                }
            }
        }
    }
}
Save the file and run the az rest command again to update the settings:
az rest --uri /subscriptions/REPLACE-ME-SUBSCRIPTIONID/resourceGroups/REPLACE-ME-RESOURCEGROUP/providers/Microsoft.Web/sites/REPLACE-ME-APPNAME/config/authsettingsV2?api-version=2020-09-01 --method put --body @auth.json
You should now be able to access the Web App through Front Door and be authenticated. If you added the debug page, you should also see a few additional headers. One being X-Forwarded-Host that contains the url of the Front Door and the other being X-Azure-FDID which contains the unique ID of your Front Door instance (make a note of this as it will be used in step 4).
3. (Optional) Add Custom Domain and Certificate

With Azure Front Door, it’s easy to add a custom domain and certificate. If you do not already have a custom domain, you can purchase one from Azure App Service Domains. For this demo, I will be using a domain called reddoglabs.com purchased through App Service Domains and I will be using Azure DNS to host the public DNS records. Note that any domain registrar and public DNS provider can be used. If you are using an Azure DNS Zone in the same subscription, you have the added benefit of having Front Door add the needed records for you.
For the certificate, you can bring your own certificate or you can use the Managed Certificate option. With the latter, Front Door will take care of enrolling and renewing the certificate - I like that so I do not forget to update my certificate when it expires.
My DNS is in another subscription, so I will have to add it myself, but it will also explicitly show the steps needed.
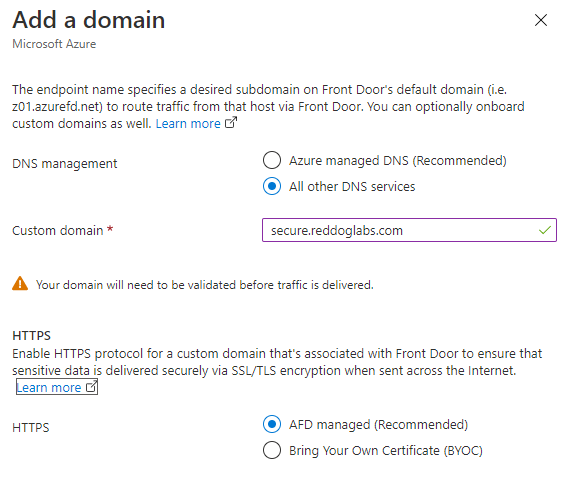
After you added the domain, you need to prove that you own it. The new Front Door gives you a nice overview of the steps needed.
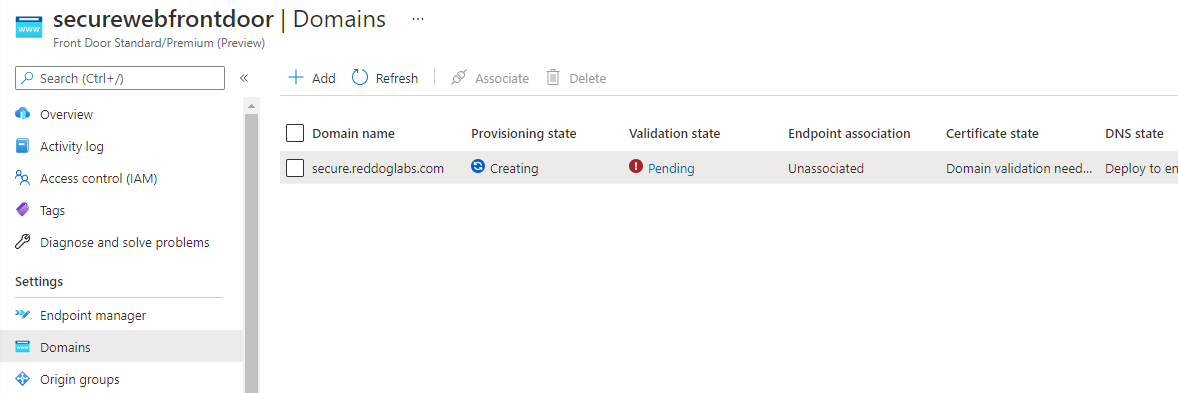
When clicking the Pending link in the Validation state column, you will get instruction for adding a TXT record to validate your domain ownership.
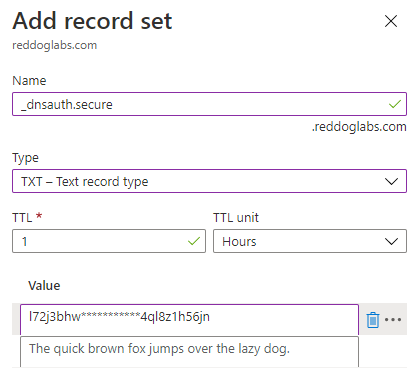
Time for another cup of coffee. The validation of the TXT record and the replication of the settings can take 5-10 minutes again.
Alter authentication settings
Azure AD App registration and App Service Authentication need to be aware of the new url. You can either append or overwrite with the new url depending on whether you want the other urls to work as well. Update the App registration with the this command (here I am appending):
az ad app update --id REPLACE-ME-APPID --reply-urls https://secure.reddoglabs.com/.auth/login/aad/callback https://secureweb.z01.azurefd.net/.auth/login/aad/callback https://securewebapp2021.azurewebsites.net/.auth/login/aad/callback
Modify the auth.json file and update the Authentication settings.
{
    "properties": {
        ...
        "login": {
            "preserveUrlFragmentsForLogins": true,
            "allowedExternalRedirectUrls": [
                "https://secure.reddoglabs.com",
                "https://securewebapp2021.azurewebsites.net",
                "https://secureweb.z01.azurefd.net"
            ]
        },
        "identityProviders": {
                ...
                "validation": {
                    "allowedAudiences": [
                        "https://secure.reddoglabs.com",
                        "https://securewebapp2021.azurewebsites.net",
                        "https://secureweb.z01.azurefd.net"
                    ]
                }
            }
        }
    }
}
az rest --uri /subscriptions/REPLACE-ME-SUBSCRIPTIONID/resourceGroups/REPLACE-ME-RESOURCEGROUP/providers/Microsoft.Web/sites/REPLACE-ME-APPNAME/config/authsettingsV2?api-version=2020-09-01 --method put --body @auth.json
Associate and map custom domain
The final steps are to go back to the Domains overview in Front Door and associate the custom domain with the endpoint,

and add a CNAME DNS record to map the actual domain:
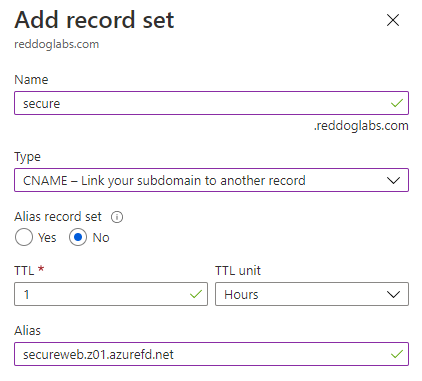
Allow another 5-10 minutes to replicate the settings globally, and you should now be able to access an authenticated Web App through Front Door using a custom domain and certificate.
4. Restrict traffic from Front Door to Web App

At this point, you are still able to access the Web App directly. In this step, you will restrict access to the Web App so traffic will only be allowed through Front Door. To do this, another new feature will be used. Access restrictions in App Service recently added the ability to create rules based on Service Tags and filter by http headers. Azure CLI support for the new features is still under construction, but since you are familiar with using REST calls by now, let’s do that.
Create a json file named restrictions.json with the the following content and replace the placeholder with the specific Front Door ID found in step 2. It is also visible in the Overview section of the Front Door instance in the Azure portal:
{
  "properties": {
    "ipSecurityRestrictions": [
      {
        "action": "Allow",
        "ipAddress": "AzureFrontDoor.Backend",
        "tag": "ServiceTag",
        "priority": 100,
        "headers": {
          "X-Azure-FDID": [
            "REPLACE-ME-FRONTDOORID"
          ]
        }
      }
    ]
  }
}
After you added the Front Door ID in the json file, run the following script to deploy the restriction (notice the change in the URI: /web instead of /authsettingsV2):
az rest --uri /subscriptions/REPLACE-ME-SUBSCRIPTIONID/resourceGroups/REPLACE-ME-RESOURCEGROUP/providers/Microsoft.Web/sites/REPLACE-ME-APPNAME/config/web?api-version=2020-09-01 --method put --body @restrictions.json
Now, if you access the site directly, you should immediately see the blue 403 - Forbidden error.
5. Increase resiliency with multiple geo-distributed Web Apps
To improve resiliency of your App and protect against regional outages, you can deploy your app to multiple regions. Let’s add an instance in West US. You can reuse most of the scripts, but of course you need to change the name in all lines. Since direct access to the Web App is already blocked, you can either remove or ignore the direct Web App url reference in auth.json.
To make it easier to notice which site is accessed, you can change the background color of the debug page in the alternative site by changing the last two digits of the body background-color to FF (light blue) and create a new zip file:
az appservice plan create --resource-group securewebsetup --name securewebplan-westus --sku B1 --location westus
az webapp create --resource-group securewebsetup --plan securewebplan-westus --name securewebapp2021-westus
az webapp update --resource-group securewebsetup --name securewebapp2021-westus --https-only

zip debug-blue.zip default.cshtml
az webapp deployment source config-zip --resource-group securewebsetup --name securewebapp2021-westus --src ./debug-blue.zip

az webapp config appsettings set --resource-group securewebsetup --name securewebapp2021-westus --settings "AAD_CLIENT_SECRET=reP!@ce-w!th.VeRys3cr3tC0d!"

az rest --uri /subscriptions/REPLACE-ME-SUBSCRIPTIONID/resourceGroups/REPLACE-ME-RESOURCEGROUP/providers/Microsoft.Web/sites/REPLACE-ME-WESTUS-APPNAME/config/authsettingsV2?api-version=2020-09-01 --method put --body @auth.json

az rest --uri /subscriptions/REPLACE-ME-SUBSCRIPTIONID/resourceGroups/REPLACE-ME-RESOURCEGROUP/providers/Microsoft.Web/sites/REPLACE-ME-WESTUS-APPNAME/config/web?api-version=2020-09-01 --method put --body @restrictions.json
After the Web App is configured, open the Front Door instance in the Azure portal and add the new Web App as origin (backend) in the current origin group and update it:
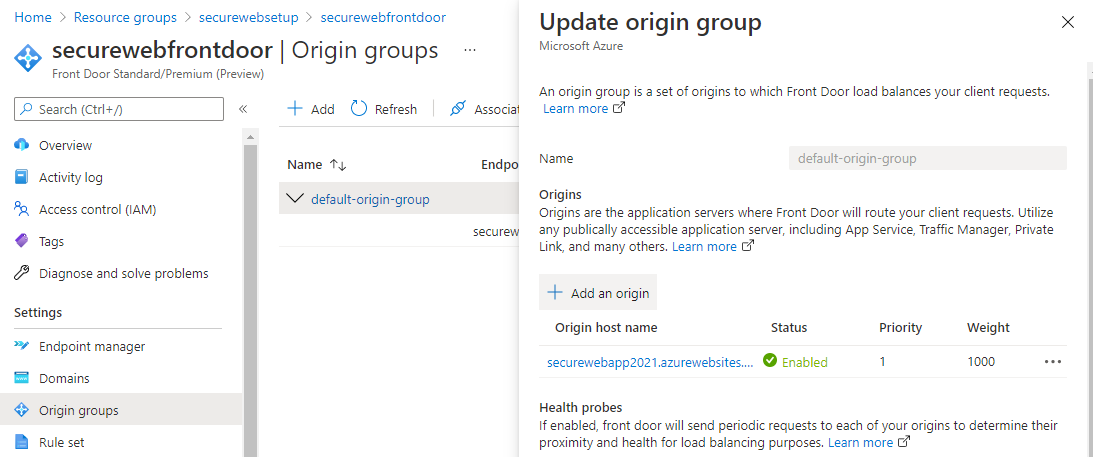
Front Door default load balancing behavior is to round robin traffic between the fastest and the next fastest origins within the configured latency sensitivity, but you can modify that. If you refresh enough times, you should be seeing the page change color (and the Request url in the debug page change).
Alternative approaches and advanced scenarios
In this section, I will discuss some alternative approaches and advanced scenarios.
Application Gateway
Instead of Front Door, or in addition to Front Door, you can use Azure Application Gateway to add WAF capabilities and advanced routing and rewrite logic. It can also be used to provide regional load balancing. Application Gateway currently does not support Managed Certificate, so you will have to bring your own certificate.
Application Gateway deviates from the standard http header used for the forwarded host. It uses a header called X-Original-Host. For the Authentication configuration in auth.json, you will have to change the convention to Custom and specify X-Original-Host as the customHostHeaderName. The rest of the settings and steps should be identical.
"forwardProxy": {
    "convention": "Custom",
    "customHostHeaderName": "X-Original-Host"
}
Private endpoint
To secure the incoming traffic to the Web App(s), the access restriction feature was used. If you prefer private endpoints, this is also possible. The next generation Azure Front Door supports setting up a private endpoint from your Front Door instance directly to your Web App. For App Service, private endpoints require the Premium tier, so you need to scale up the App Service Plan. Besides that, the only change will be the setup of origin in Front Door, which is where you can request the creation of a private endpoint, and then from the Web App(s) you can approve it.
The step of uploading the debug page will require some additional setup. The SCM site will also only be available through the private endpoint. You will have to run the script from within a network with line-of-sight and proper DNS resolution for the private endpoint.
Custom domain for SCM Site
While not directly related to the Authentication part, you may want/need to expose the SCM site through a proxy if you want access through a custom domain or if you want to expose a private endpoint enabled SCM site externally. A post on how to do that was recently published.
Custom health probe path
If you have a custom health probe path, you can configure the Authentication layer in App Service to allow unauthenticated traffic on specific paths. These paths are configured in the auth.json file in excludedPaths under globalValidation. An example of excluding the debug page if accessed directly will look like this:
"globalValidation": {
    "unauthenticatedClientAction": "RedirectToLoginPage",
    "redirectToProvider": "azureActiveDirectory",
    "excludedPaths": [
        "/default.cshtml"
    ]
}
You can now browse directly to that page (but will be asked for authentication if you just go to /)
FAQ
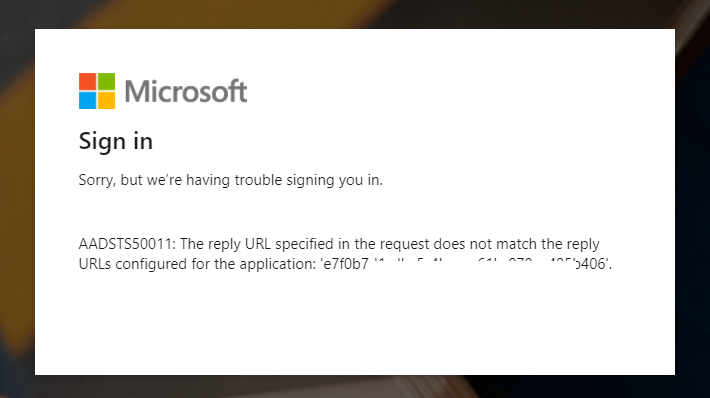
Q: On sign in, I get error AADSTS50011: The reply URL specified … What is wrong?
Most likely this is because the address does not match the reply-url configured for the Azure AD App registration.
Q: I am using custom routing rules in Front Door. Anything I should pay attention to?
Make sure you have a routing rule for .auth/* in addition to your content rules.
Q: I do not have permissions to create App registrations in my Azure AD tenant, what to do?
If your organization locked down the ability to create App registrations, you will need to find someone in your organization with these permissions. It can either be the tenant admin or delegated with the built-in Application developer og Application administrator roles; or a custom Application registration creator role specific for this purpose.
Alternatively you can use another identity provider such as Facebook, GitHub, Twitter or any custom provider using the OpenIdConnect specification.