How to use gRPC-Web with Blazor WebAssembly on App Service
gRPC is a modern protocol which uses HTTP/2 to streamline messaging between clients and back-end servers and is an efficient way to connect services that require high-performance communication. However, HTTP/2 gRPC is not compatible with modern browsers and requires the use of gRPC-Web to communicate between a browser application and a gRPC server. gRPC-Web enables this scenario by having the browser send normal HTTP requests and acting as a proxy in front of the gRPC server to translate the requests to the browser. With gRPC-Web, you can create a .NET server app hosted on App Service using gRPC-Web middleware which operates as a translator between the browser application and the .NET server app. This translation maps incoming gRPC-Web requests to the appropriate .NET classes in the server app, and translates the server app’s return values into gRPC-Web responses that are sent back to the browser. If you would like to learn more about gRPC-Web, visit the gRPC blog.
In the following example, we’ll be using a .NET 5 Blazor WebAssembly application and replacing the existing JSON calls with gRPC-Web by enabling the gRPC-Web middleware in the startup configuration.
Create Blazor WebAssembly App
In Visual Studio, you will create a Blazor WebAssembly application that we can add gRPC-Web to.
Open Visual Studio and Create a new project and search for Blazor app. Highlight Blazor app, click Next, name your application and click Create.
Choose .NET 5.0 in the drop-down, highlight the Blazor WebAssembly App option and check the ASP.NET Core hosted option under the Advanced column before clicking the Create button.
Once your application is created, you will have a Client, Server, and Shared project under your solution.
Install packages
Before you add any code to your projects, you need to make sure the correct packages are installed on your Client, Server, and Shared projects.
Starting on the Shared project Right-click the project and go to Manage Nuget packages. Browse for and install the following packages in the Shared project:
- Google.Protobuf
- Grpc.Net.Client
- Grpc.Tools
Next, follow the same process for the Shared project and go to your Server project to install these packages:
- Grpc.AspNetCore
- Grpc.AspNetCore.Web
Then, go to your Client project and install the following:
- Grpc.Net.Client.Web
You can verify that each of the packages are installed by viewing the .csproj file of each project. You should see an added package reference for the ones you’ve installed.
Add Proto file and Service to the Shared project
Grpc works with Proto files which are written in protocol buffer language that define your messaging. To learn more about the language please visit this guide.
To add a proto file, Right-click the Shared project and go to Add, then New item. You can choose a Class file and name it weather.proto and hit Add. Visual Studio will pick up that it is a gRPC file as you will see a gRPC icon next to the file.
Remove the boiler plate code in the file and replace it with the following:
syntax = "proto3";
// replace namespace with your own
option csharp_namespace = "BlazorGrpcWebApp.Shared";
package WeatherForecast;
import "google/protobuf/timestamp.proto";

service WeatherForecasts {
	rpc GetWeather (WeatherForecast) returns (WeatherReply);
}

message WeatherReply {
	repeated WeatherForecast forecasts = 1;
}

message WeatherForecast {
	google.protobuf.Timestamp dateTimeStamp = 1;
	int32 temperatureC = 2;
	string summary = 3;
}
Next we will add the Weather Service class. This class will contain the same code and logic that is currently in the WeatherForecastController.cs file, which provides us with our weather data. Right-click the project and add a new class item naming it WeatherService.cs.
Add the following using statements and code to the class:
using Grpc.Core;
using Google.Protobuf.WellKnownTypes;

public class WeatherService : WeatherForecasts.WeatherForecastsBase
{
	private static readonly string[] Summaries = new[]
	{
		"Freezing", "Bracing", "Chilly", "Cool", "Mild", "Warm", "Balmy", "Hot", "Sweltering", "Scorching"
	};

	public override Task<WeatherReply> GetWeather(WeatherForecast request, ServerCallContext context)
	{
		var reply = new WeatherReply();
		var rng = new Random();

		reply.Forecasts.Add(Enumerable.Range(1, 10).Select(index => new WeatherForecast
		{
			Date = DateTime.Now.AddDays(index),
			TemperatureC = rng.Next(20, 55),
			Summary = Summaries[rng.Next(Summaries.Length)]
		}));

		return Task.FromResult(reply);
	}
}
Now that you have your WeatherService added, you will notice that some of the objects won’t be recognized from the proto file. To remedy this, we’ll need to include a reference to the proto file in the Shared .cproj file ItemGroup so it can be recongized. Add the following to your ItemGroup in the .csproj file:
<ItemGroup>
	<SupportedPlatform Include="browser" />
	// Add .proto file reference
	<Protobuf Include="weather.proto" />
</ItemGroup>
Configure gRPC-Web in the Server
To configure the application to take advantage of gRPC-Web you need to register the gRPC service in your Startup.cs file. This enables you to use dependency injection to consume the service across the app. Add the following code to your ConfigureServices method in the Server Startup.cs file:
public void ConfigureServices(IServiceCollection services)
{
	// add gRPC service
	services.AddGrpc();
	services.AddControllersWithViews();
	services.AddRazorPages();
}
Next, you’ll add the gRPC-Web middleware to the apps configuration and register the gRPC service. This must be added after UseRouting and before UseEndpoints in the Configure method.
app.UseRouting();

// must be added after UseRouting and before UseEndpoints
app.UseGrpcWeb();

app.UseEndpoints(endpoints =>
{
	// map to and register the gRPC service
	endpoints.MapGrpcService<WeatherService>().EnableGrpcWeb();
	endpoints.MapRazorPages();
	endpoints.MapControllers();
	endpoints.MapFallbackToFile("index.html");
});
Configure gRPC-Web with the .NET client
In order to configure gRPC-Web to use in our Client project, you’ll need to add a gRPC channel that provides a connection to a gRPC server using the HttpClient object.
Add the following code to the Program.cs file in your Client project:
using Grpc.Net.Client
using Grpc.Net.Client.Web;
using Microsoft.AspNetCore.Components;

builder.Services.AddSingleton(services =>
{
	var httpClient = new HttpClient(new GrpcWebHandler(GrpcWebMode.GrpcWeb, new HttpClientHandler()));
	var baseUri = services.GetRequiredService<NavigationManager>().BaseUri;
	var channel = GrpcChannel.ForAddress(baseUri, new GrpcChannelOptions { HttpClient = httpClient });
	return new WeatherForecasts.WeatherForecastsClient(channel);
});
Now that gRPC-Web is configured in the client project, we need to adjust the code in the FetchData.razor file so we can test the gRPC calls. The injected HttpClient will no longer be needed, but we will replace that with the Weather Forecasts Client so we can retrieve the weather data. Replace the current code in the FetchData.Razor with the code below.
@page "/fetchdata"
// replace using statement with your namespace
@using BlazorGrpcWebApp.Shared
@inject WeatherForecasts.WeatherForecastsClient WeatherForecastsClient

<h1>Weather forecast</h1>
<p>This component demonstrates fetching data from the server.</p>

@if (forecasts == null)
{
	<p><em>Loading...</em></p>
}
else
{
	<table class="table">
	<thead>
	<tr>
	<th>Date</th>
	<th>Temp. (C)</th>
	<th>Summary</th>
	</tr>
	</thead>
	<tbody>
	@foreach (var forecast in forecasts)
	{
		<tr>
		<td>@forecast.Date.ToShortDateString()</td>
		<td>@forecast.TemperatureC</td>
		<td>@forecast.Summary</td>
		</tr>
	}
	</tbody>
	</table>
}

@code
{
	private IList<WeatherForecast> forecasts;
	protected override async Task OnInitializedAsync()
	{
		forecasts = (await WeatherForecastsClient.GetWeatherAsync(new WeatherForecast())).Forecasts;
	}
}
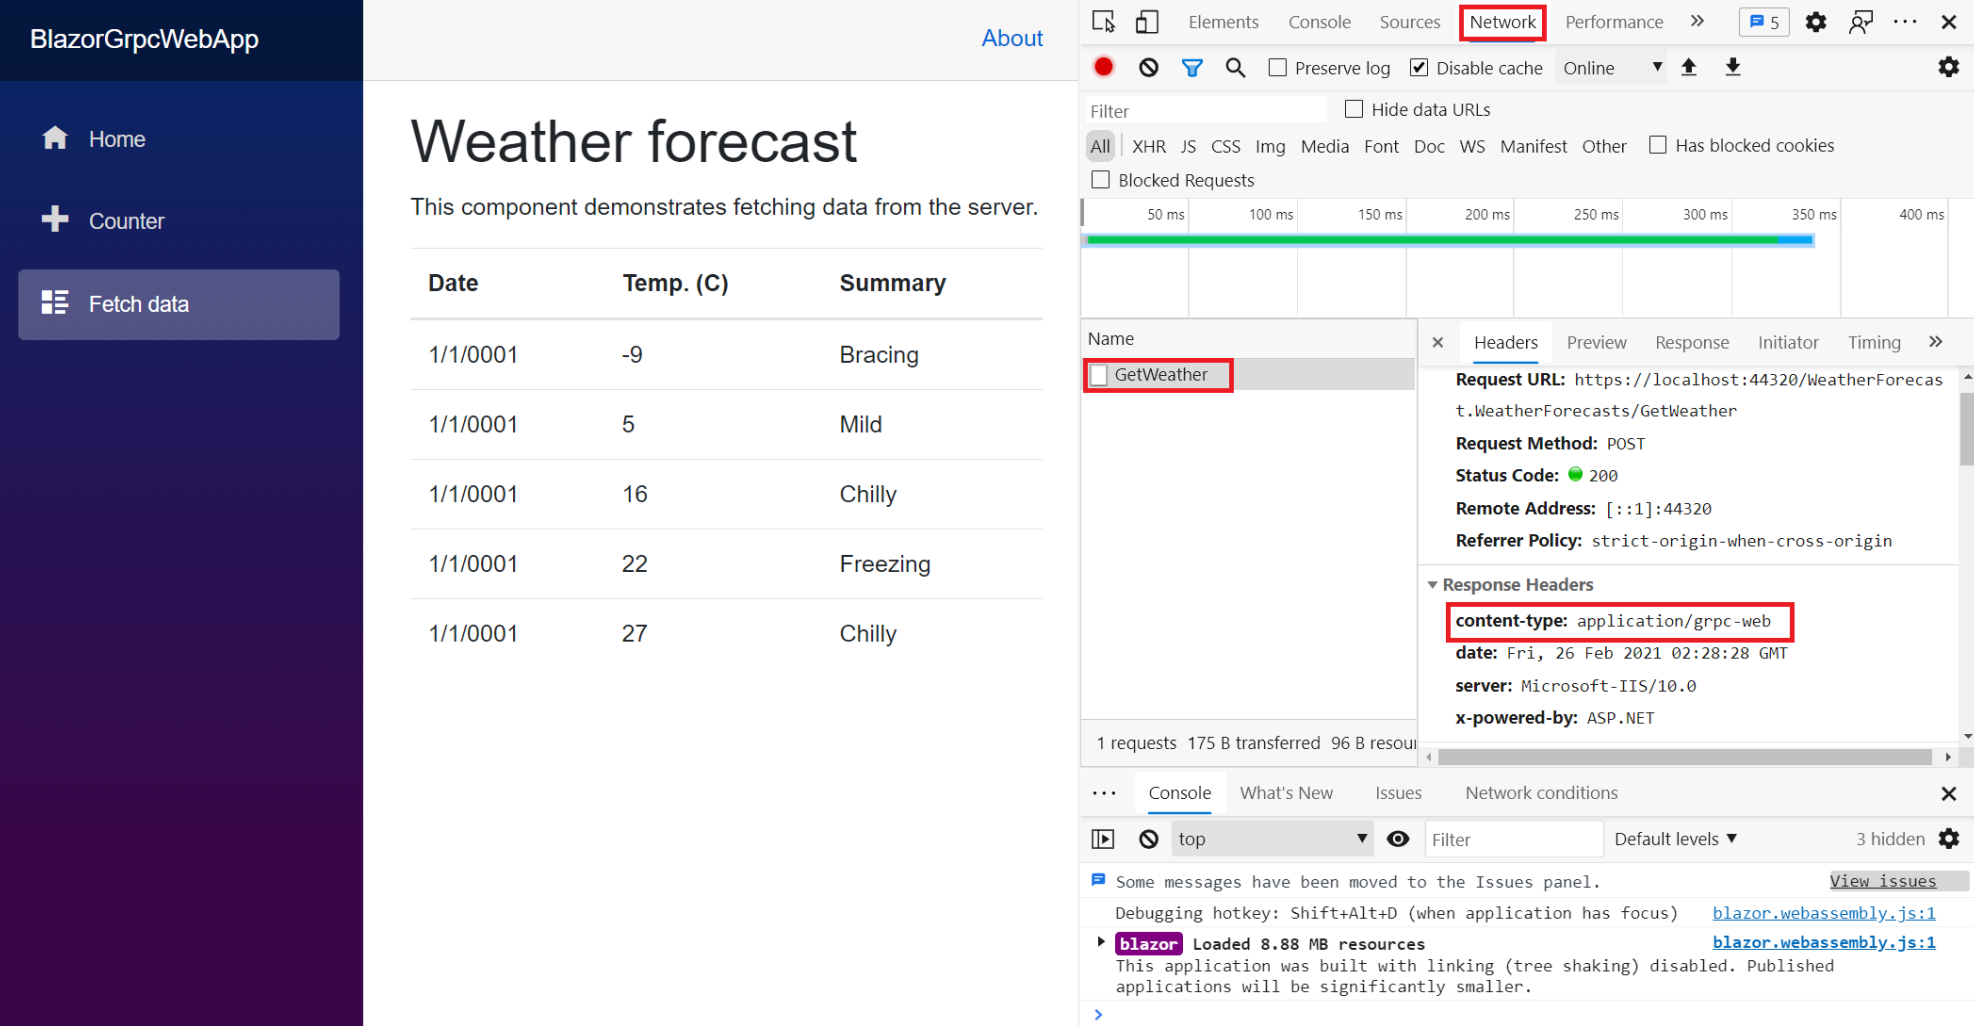
Once the FetchData.razor file is updated to output the weather data we can verify that we are using gRPC-Web by running our application locally Right-click anywhere on the application and go to Inspect. Find the Network tab and then visit the Fetch data page. The Weather forecast data will load and you will see the name of our method GetWeather show up. Click on the GetWeather name to view the Response Headers which show the content-type being application/grpc-web.
Deploying to App Service
Since we are using a Blazor WebAssembly application that is hosted on ASP.NET Core the deployment process is slightly different. You can still deploy to App Service as you typically would, but you’ll need to Publish the Server project. The hosted deployment serves the Blazor app to browsers from its hosted ASP.NET Core app that runs on a web server. Your Server app will have reference to the Client app DLLs as the apps are deployed together with the Client app being published in the wwwroot folder. Learn more about hosted deployments in the Blazor documentation.
Once your application is published you can verify that gRPC-Web is working using the same process from above by inspecting the Network in the browse. Your Request URL will now point to your App Service URL (myappname.azurewebsites.net) and the content-type: will still be application/grpc-web.