How to deploy a highly available multi-region web app
High availability and fault tolerance are key components of a well-architected solution. It’s always best to prepare for the unexpected and having an emergency plan that can shorten downtime and keep your systems up an running automatically when something fails can help you do that.
When you deploy your application to the cloud, you choose a region in that cloud where your application infrastructure is based. Regions are essentially data centers is various parts of the world. In a world where unpredictable severe weather events, natural disasters, or human errors are inevitable, there’s the imminent possibility of events that may disturb the functionality of a region or take it down altogether for a period of time. If your application is deployed to a single region, and the region becomes unavailable, your application will also be unavailable. This may be unacceptable under the terms of your application’s SLA. If so, deploying your application and its services across multiple regions is a good idea. A multi-region deployment can use an active-active or active-passive configuration. An active-active configuration distributes requests across multiple active regions. An active-passive configuration keeps warm instances in the secondary region, but doesn’t send traffic there unless the primary region fails. For multi-region deployments, we recommend deploying to paired regions. For more information on this topic, see Architect Azure applications for resiliency and availability.
In this blog post, we’ll walk through deploying a highly available multi-region web app. We’ll start with deploying the necessary infrastructure, and then move into managing the application source code. We’ll have a look at some of the different offerings Azure provides to enable this architecture as well as go over best practices and recommendations. We’ll keep the scenario simple by restricting our application components to just a web app, but the info shared here can definitely be expanded and applied to many other infrastructure patterns. For example, if your application connects to an Azure database offering or storage account, a quick search through the Azure docs will reveal built-in solutions as active geo-replication for SQL databases and redundancy options for storage accounts. For a reference architecture for a more detailed scenario, see Highly available multi-region web application.
Architecture

Workflow
The architecture is shown in the diagram above.
- Primary and secondary regions. This architecture uses two regions to achieve higher availability. The application is deployed to each region. During normal operations, network traffic is routed to the primary region. If the primary region becomes unavailable, traffic is routed to the secondary region.
- Front Door. Front Door routes incoming requests to the primary region. If the application running in that region becomes unavailable, Front Door fails over to the secondary region.
There are several general approaches to achieve high availability across regions. This reference focuses on active/passive with hot standby. It replicates the infrastructure in the secondary region, however traffic only goes to the primary region. If something happens in the primary region, traffic will automatically divert to the secondary region.
Recommendations and considerations
Your requirements might differ from the architecture described here, however you can use the recommendations and considerations in this section as a starting point as they apply to almost all multi-region scenarios. The considerations come from the Microsoft Azure Well-Architected Framework, which is a set of guiding tenets that can be used to improve the quality of a workload.
Regional pairing
Deciding on your primary region is relatively straightforward - pick the region that supports the features you’re using and is closest to you/your customers to reduce latency. When deciding on your secondary region, consider using the region Azure paired with your primary.
Resource groups
Consider placing the primary region, secondary region, and Front Door into separate resource groups. This lets you manage the resources deployed to each region as a single collection.
Front Door configuration
- Routing. Front Door supports several routing mechanisms. We will be using priority routing in the scenario here as described in the workflow. Other routing mechanisms can direct traffic based on pre-defined weighting or lowest latency. Consider cost when choosing a routing mechanism because for example if you decide to use priority routing, you can scale down your application in your secondary region and only scale up when traffic is directed to it.
- Tier. Azure Front Door is offered in a variety of flavors including the Standard and Premium tiers as well as Azure Front Door (classic). For a comparison of the various tiers, see the Front Door tier overview. We will be using the standard tier in the scenario here.
- Load balancing options. Azure provides multiple load balancing options to help direct traffic for your applications. Choosing the most appropriate one for your scenario can be based on a number of factors including traffic type, cost, features, and limitations. To help you decide, see the Decision tree for load balancing in Azure. We will be using Azure Front Door for this scenario because we are deploying an internet facing web application (HTTP/HTTPS) deployed to multiple regions hosted on App Service.
- Reliability. Azure Front Door automatically fails over if the primary region becomes unavailable. When Front Door fails over, there is a period of time (usually about 20-60 seconds) when clients cannot reach the application. The duration is affected by the frequency of health probes and sample size configuration. For more information on Front Door reliability, see Azure Front Door reliability.
Infrastructure deployment
Consider configuring a continuous deployment mechanism to manage your application source code as well as application infrastructure. Since you’re deploying resources in different regions, you’ll need to independently manage those resources. To ensure the resources are in sync and assuming you want essentially identical applications and infrastructures in each region, infrastructure as code (IaC) such as Azure Resource Manager templates or Terraform should be used with deployment pipelines such as Azure DevOps pipelines or GitHub Actions. This way, if configured appropriately, any change to resources or source code would trigger updates across all regions you’re deployed to. See Continuous deployment to Azure App Service for recommendations on how to manage your source code. We’ll go over in detail how to do this for a multi-region deployment later on in this post.
Security
For this scenario, you’ll want to ensure the only principal that can access your applications is Front Door. Front Door’s features work best when traffic only flows through Front Door. You should configure your origin to block traffic that hasn’t been sent through Front Door. Otherwise, traffic might bypass Front Door’s web application firewall, DDoS protection, and other security features. We’ll configure this as part of the tutorial later on in this post.
Additionally, for scenarios using App Services, consider locking down the SCM/advanced tools site as this site will not likely need to be reached through Front Door. You’ll likely want to set up access restrictions that only allow you to conduct your testing as well as enable continuous deployment from your tool of choice. We’ll go into more detail on how to do this during the tutorial later on in this post.
Lastly, for scenarios using App Services, consider disabling basic auth on App Service, which limits access to the FTP and SCM endpoints to users that are backed by Azure Active Directory (AAD). Disabling basic auth will require additional steps to configure continuous deployment. We’ll go through this as well later on in this post.
Cost optimization
Choose the Azure Front Door tier that meets your data transfer, routing, and security requirements. See Azure Front Door pricing for more details.
Additionally, if you’re using an active/passive multi-region deployment, consider scaling down your App Services in the secondary region and configuring autoscale rules to handle the traffic when traffic is re-directed there. For more details, see the App Service scaling docs.
Infrastructure deployment tutorial
In this tutorial, you’ll deploy the scenario shown in the workflow which includes two web apps behind Azure Front Door with access restrictions that only give Front Door direct access to the apps. We’ll use the Azure CLI to create the initial web apps and we’ll use the portal to create the Azure Front Door.
Prerequisites
An Azure account with an active subscription. Create an account for free.
Create two instances of a web app
You’ll need two instances of a web app that run in different Azure regions for this tutorial. We’ll use the region pair East US/West US as our two regions and create two quick empty web apps. Feel free to choose you’re own regions or use existing web apps if you already have some deployed.
I’m going to use a single resource group for all resources to make management and clean-up simpler, however consider using separate resource groups for each region/resource as this will further isolate your resources.
Run the following command to create your resource group. Replace the placeholder for “resource-group-name”.
az group create --name <resource-group-name> --location eastus
Run the following commands to create the App Service plans. Replace the placeholders for App Service plan name and resource group name.
az appservice plan create --name <app-service-plan-east-us> --resource-group <resource-group-name> --is-linux --location eastus
az appservice plan create --name <app-service-plan-west-us> --resource-group <resource-group-name> --is-linux --location westus
Once the App Service plans are created, run the following commands to create the web apps. Replace the placeholders and be sure to pay attention to the --plan parameter so that you place one app in each plan (and therefore each region).
az webapp create --name <web-app-east-us> --resource-group <resource-group-name> --plan <app-service-plan-east-us>
az webapp create --name <web-app-west-us> --resource-group <resource-group-name> --plan <app-service-plan-west-us>
Make note of the default host name of each web app so you can define the backend addresses when you deploy the Front Door in the next step. It should be in the format <web-app-name>.azurewebsites.net. This can be found by running the following command or by navigating to the app’s Overview page in the Azure portal.
az webapp show --name <web-app-name> --resource-group <resource-group-name> --query "hostNames"
Disable basic auth for the web apps
To disable FTP access to the site, run the following CLI command. Replace the placeholders with your resource group and site name. Be sure to run this command for each of your apps.
az resource update --resource-group <resource-group-name> --name ftp --namespace Microsoft.Web --resource-type basicPublishingCredentialsPolicies --parent sites/<web-app-east-us> --set properties.allow=false
To disable basic auth access to the WebDeploy port and SCM site, run the following CLI command. Replace the placeholders with your resource group and site name.
az resource update --resource-group <resource-group-name> --name scm --namespace Microsoft.Web --resource-type basicPublishingCredentialsPolicies --parent sites/<web-app-east-us> --set properties.allow=false
For more information on disabling basic auth including how to test and monitor logins, see Disabling basic auth on App Service.
Create Azure Front Door
I’m going to use the portal to create the Front Door since it will help us visualize the various components, however the CLI or templates can just as easily be used.
Front Door will be configured with priority routing where East US will be our primary region and West US will be the secondary. We’ll use the standard tier which gives us the option to use a Web Application Firewall (WAF) policy for enhanced security.
- From the home page or the Azure menu in the portal, select + Create a resource. Search for ”Front Door and CDN profiles”. Then select Create.
-
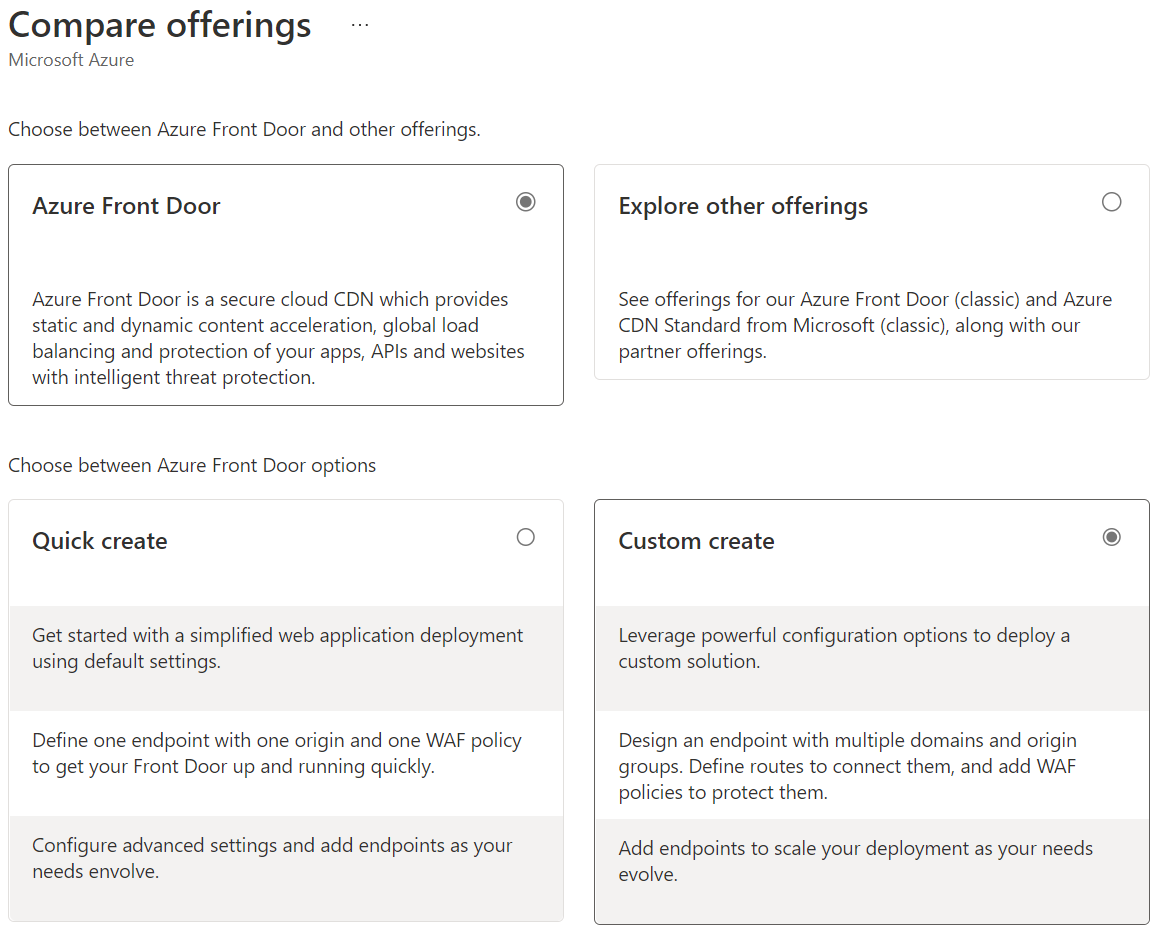
On the Compare offerings page, select Custom create. Then select Continue to create a Front Door.
-
On the ”Basics” tab, enter the following information:
Setting Description Subscription select your subscription Resource group <resource-group-name>Name <unique-name>Tier Standard - In the “Endpoint” tab, select Add an endpoint and give your endpoint a globally unique name.
- Next, select + Add a route to configure routing to your Web App origin.
-
On the Add a route page, enter the following information and select Add to add the route to the endpoint configuration.
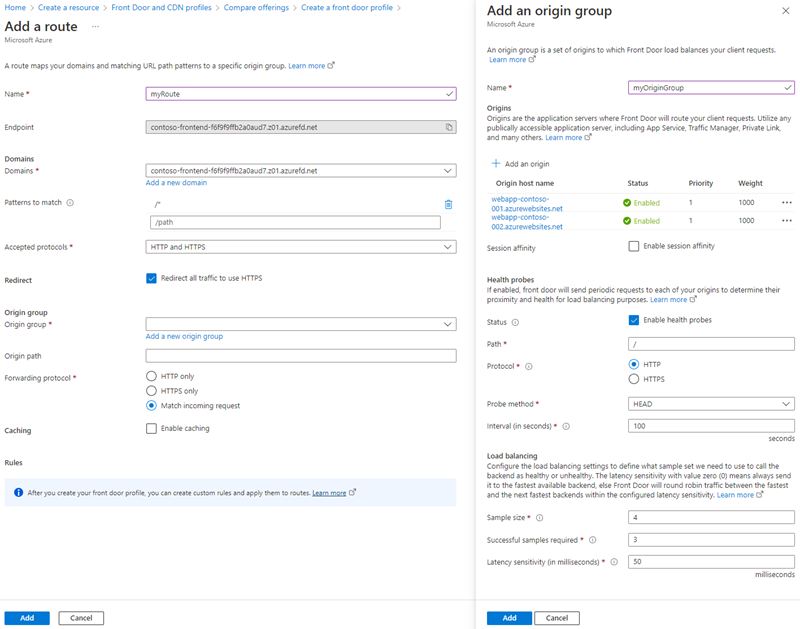
Setting Description Name Enter a name to identify the mapping between domains and origin group. Domains A domain name has been auto-generated for you to use. If you want to add a custom domain, select Add a new domain. This example will use the default. Patterns to match Set all the URLs this route will accept. This example will use the default, and accept all URL paths. Accepted protocols Select the protocol the route will accept. This example will accept both HTTP and HTTPS requests. Redirect Enable this setting to redirect all HTTP traffic to the HTTPS endpoint. Origin group Select Add a new origin group. For the origin group name, enter myOriginGroup. Then select + Add an origin. For the first origin (primary region), enter the name of one of the web apps you’re using for this tutorial for the Name and then for the Origin Type select App Services. For the Host name, select the hostname you queried/found in the portal earlier. Leave the rest of the default values the same. Select Add to add the origin to the origin group. Repeat the steps to add the second web app as an origin, however when adding the second origin, set the Priority to “2”. This will direct all traffic to the primary origin unless the primary goes down. Once both web app origins have been added, select Add to save the origin group configuration. Origin path Leave blank. Forwarding protocol Select the protocol that will be forwarded to the origin group. This example will match the incoming requests to origins. Caching Select the check box if you want to cache contents closer to your users globally using Azure Front Door’s edge POPs and the Microsoft network. Rules Once you’ve deployed the Azure Front Door profile, you can configure Rules to apply to your route. - Select + Add a policy to apply a Web Application Firewall (WAF) policy to one or more domains in the Azure Front Door profile.
- On the Add security policy page, enter a name to identify this security policy. Then select domains you want to associate the policy with. For WAF Policy, you can select a previously created policy or select Create New to create a new policy. Select Save to add the security policy to the endpoint configuration.
- Select Review + Create, and then Create to deploy the Azure Front Door profile. It will take a few minutes for configurations to be propagated to all edge locations.
Restrict access to web apps to the Azure Front Door instance
Traffic from Azure Front Door to your application originates from a well known set of IP ranges defined in the AzureFrontDoor.Backend service tag. By using a service tag restriction rule, you can restrict traffic to only originate from Azure Front Door.
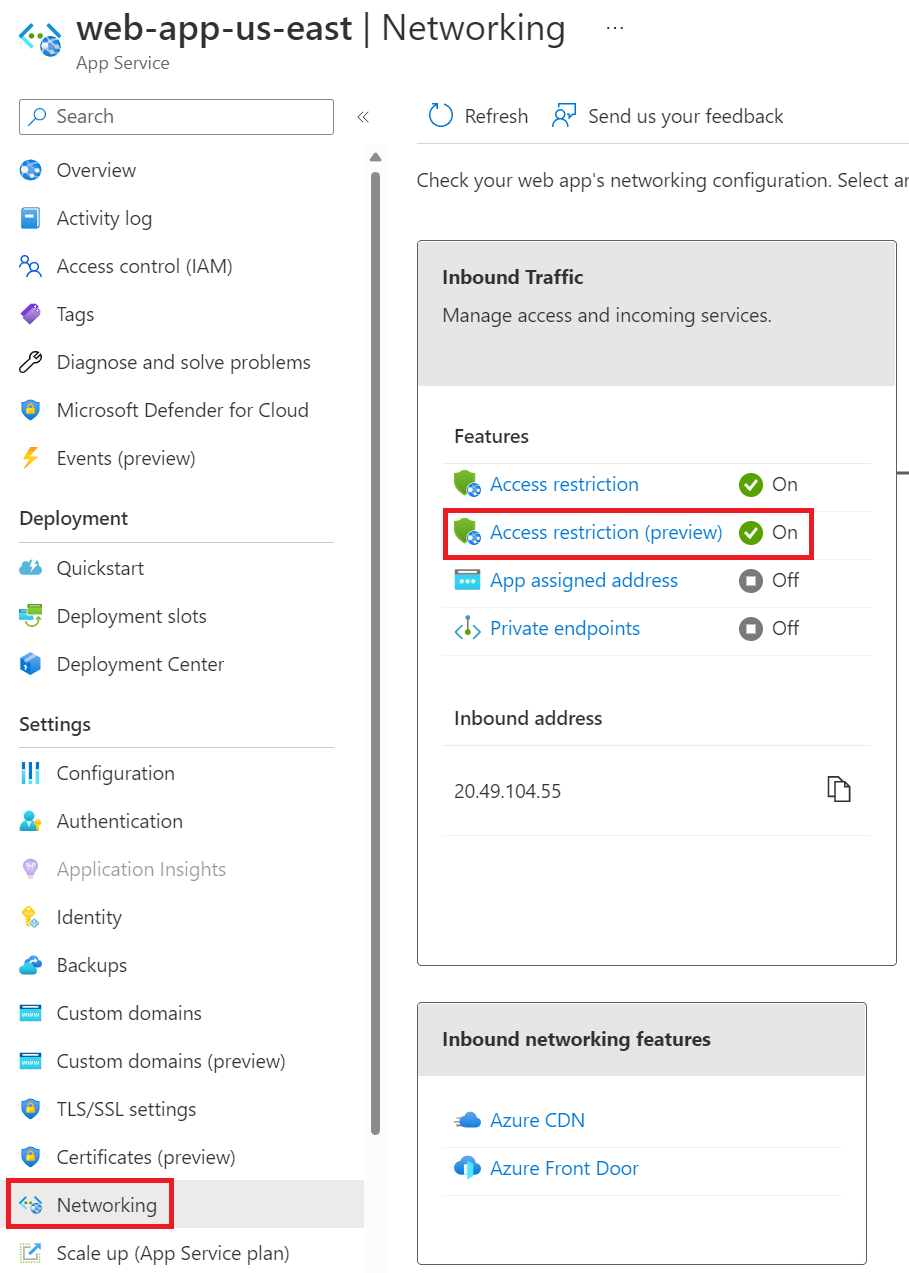
Before setting up the App Service access restriction, take note of the Front Door ID which can be found on the Overview page for the Front Door instance in the Essentials section. This will be needed to ensure traffic only originates from your specific Front Door instance by further filtering the incoming requests based on the unique http header that your Azure Front Door sends.
For your first web app, navigate to the Access restriction (preview) page.
For the Main site add the following rule. Insert the Front Door ID which you copied earlier under X-Azure-FDID.
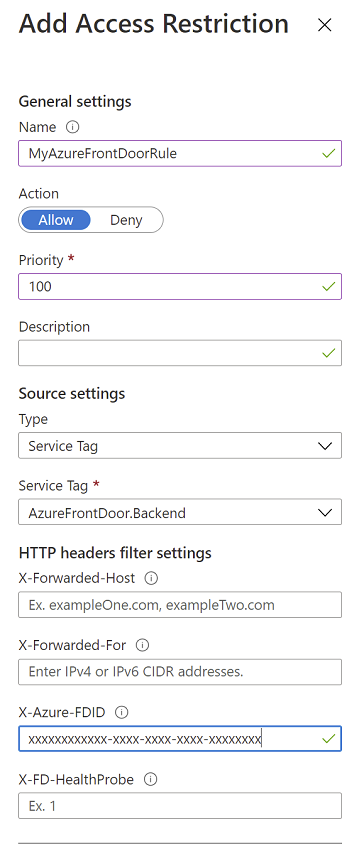
Be sure to repeat these same steps for the other web app.
Lock down SCM/advanced tool site
Earlier on when you were creating the web apps, you disabled basic authentication to the WebDeploy port and SCM site. You’ll want to also disable all public access to the SCM site. Doing this, however, limits how code can be deployed to your app. Later on, we’ll walk through how to give a service principal access to deploy your source code. To disable public access, navigate to the Access restriction (preview) page for your app and select the Advanced tool site tab. For the Unmatched rule action, select “Deny” and then Save. Repeat this process for the other app.
You can optionally configure access restrictions to the SCM site as well for the app if you need to give other principals access. To do so, navigate to the Advanced tool site tab and add any needed rules. The access restrictions you apply to the SCM site will depend on how you’re managing and deploying your source code and conducting your testing.
Verify Azure Front Door
To confirm access to your apps is restricted to Front Door, try navigating to your apps directly using their endpoints. If you are able to access them, review their access restrictions and ensure access is limited to only Front Door.
Now that a couple minutes have passed since the Front Door instance has been created, it should be ready and deployed globally. In a browser, enter the endpoint hostname for the Front Door. This endpoint can be found on the Overview page for your Front Door. If everything has been configured correctly, you should be reaching your app in your primary region.
You can test failover by stopping the app in your primary region and then navigating to your Front Door endpoint again. Note that there may be a delay between when the traffic will be directed to the second web app depending on your health probe frequency. You may need to refresh the page a couple times. Try stopping the second web app as well and you should see an error page. This proves it redirected to the secondary region.
Managing source code
At this point, you’ve provisioned all of the resources you need to run a highly available multi-region web app. All that’s left is deploying the actual web app source code as well as understanding how to keep the app updated across the various regions over time as changes and updates are made. As mentioned in the infrastructure deployment section, just like for your infrastructure, it’s a good idea to use a CI/CD tool to manage your source code as well so any changes you make can automatically get deployed across all instances of your app. If you don’t configure continuous deployment, you’ll need to manually update each app in each region every time there is a code change.
App Service supports continuous deployment from GitHub and Azure Repos. For this tutorial, we’ll use GitHub and a repo that already meets the requirements for continuous deployment with App Service. Feel free to use an app of your choosing, but be sure it meets the defined requirements.
We’re going to go over the following concepts in this next section including:
- Configuring the deployment source for each app
- Keeping the apps updated over time across multiple regions
- Best practices for making source code updates by using deployment slots, slot swap, and updating Azure Front Door’s route/origin groups
Prerequisites for source code deployment
We’ll be using a .NET 6.0 sample app from GitHub. If you don’t already have a GitHub account, create an account for free.
- Go to the .NET 6.0 sample app.
- Select the Fork button in the upper right on the GitHub page.
- Select the Owner and leave the default Repository name.
- Select Create fork.
At this point, your source code is all set up and ready to be deployed to your apps.
Configure the deployment source
You’ll need to update your app’s stack settings to match the source code if you’ve been following along in this tutorial.
- Go to one of your apps.
- In the left pane, select Configuration and then select the General settings tab.
- Under Stack settings, set the Stack to “.NET” and the .NET version to “.NET 6 (LTS)”.
- Select Save and then Continue to confirm the update.
- Repeat the above steps for your other app.
As mentioned earlier, since you locked down the SCM site and disabled basic auth, the default method for deploying code with GitHub Actions isn’t going to work. This is because the default method uses a publishing profile. Instead, you have two options to authenticate with App Service for GitHub Actions - using a service principal or OpenID Connect. We have a detailed doc that goes through how to do this for each of your options - Deploy to App Service using GitHub Actions. We also have guidance for Azure DevOps using Azure Pipelines. Additionally, for more info on this topic as well as additional examples, we have a series of blog posts that walk through scenarios you may be interested in.
For this blog post, we’ll walk through how to authenticate with App Service for GitHub Actions with the most secure option, which is OpenID Connect. You can choose to use a service principal which follows the same general process but omits a couple steps.
Configure authentication with App Service for GitHub Actions with OpenID Connect
-
Run the following command to create the Active Directory application.
az ad app create --display-name myAppThis command will output JSON with an
appId. Copy this, you’ll need it in the next step. -
Run the following command to create a service principal. Replace the
appIdplaceholder with the value you copied in the previous step.az ad sp create --id <appId> - You’ll now need to create a new role assignment for your newly created service principal so that it has access to your resources. You’ll need to grant access at the subscription level and give it the “Contributor” role. You can scope the role assignment down further based on your use case. To create this role assignment, search for “Subscriptions” in the search box at the top of the portal and select your subscription.
- Select Access Control (IAM) in the left-hand menu.
- Select + Add at the top and then Add role assignment.
- Select the Contributor role and then go to the Members tab.
- Select + Select members and then find your service principal.
- Select Review + assign.
- Once the service principal has the needed role assignment, create a new federated identity credential for your active directory application. For detailed guidance, see Add federated credentials.
- In the portal, search for in the search box and then go to App Registrations and then select the app you created earlier.
- Select Certificates & secrets in the left-hand menu.
- In the Federated credentials tab, select Add credential.
-
Select the credential scenario GitHub Actions deploying Azure resources. Generate your credential by entering your credential details.
Field Description Example Organization Your GitHub organization name or GitHub username. contoso Repository Your GitHub Repository name. dotnetcore-docs-hello-world Entity type The filter used to scope the OIDC requests from GitHub workflows. This field is used to generate the subject claim. Branch GitHub branch name The name of the environment, branch, or tag. master Name Identifier for the federated credential. myCredential
- You need to provide your application’s Client ID, Tenant ID, and Subscription ID to the login action as part of the GitHub Action workflow we will be working on. These values can either be provided directly in the workflow or can be stored in GitHub secrets and referenced in your workflow. Saving the values as GitHub secrets is the more secure option.
- Open your GitHub repository and go to Settings > Security > Secrets and variables > Actions > New repository secret.
-
Create the following secrets. To find the values for Client ID and Tenant ID, go back to App Registrations in the portal and select the app you created earlier. The values will be under the Essentials on the Overview page.
Name Value AZURE_CLIENT_ID <application/client-id>AZURE_TENANT_ID <directory/tenant-id>AZURE_SUBSCRIPTION_ID <subscription-id>
Deploy the code
You’re now ready to deploy the code. However, configuring continuous deployment for production apps is not recommended because it makes testing and validation more complicated. Instead, use a combination of staging slots and slot swap to move code from your testing environment to production.
We’ll create deployment slots for each instance of our app and then walk through how to slot swap to get the code into production.
- Go to one of your apps.
- In the left pane, select Deployment slots.
- Select + Add Slot.
- Input “stage” for Name and to keep things simple, we’ll clone the settings from the production slot by selecting the app’s name from the Clone settings from: dropdown.
- Select Close at the bottom of the slot configuration pane.
- Select the newly created stage slot.
-
In the left pane, select Deployment Center and make sure you’re on the Settings tab.
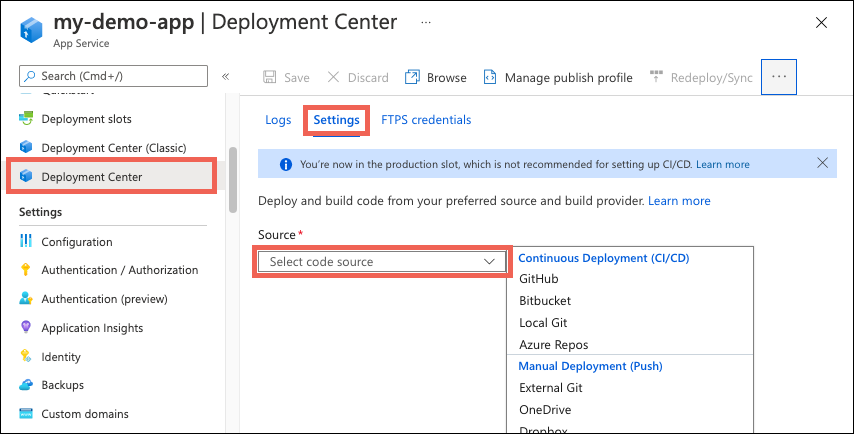
- For Source, select “GitHub”.
- If you’re deploying from GitHub for the first time, select Authorize and follow the authorization prompts.
-
After you authorize your Azure account with GitHub, select the Organization, Repository, and Branch to configure CI/CD as shown below. If you can’t find an organization or repository, you might need to enable more permissions on GitHub. For more information, see Managing access to your organization’s repositories.
Setting Description Organization <your GitHub username>Repository dotnetcore-docs-hello-world Branch master - Leave the remaining defaults and select Save. You can track the deployment and commits in the Logs tab in the Deployment Center to monitor progress.
- Repeat the above steps for your other app.
Create the GitHub Actions workflow
If you wait a couple minutes and review the deployment logs, you’ll see that the deployment to your apps failed. This is happening for two reasons - the default workflow created in the previous step when you were configuring continuous deployment with GitHub Actions uses a publishing profile to authenticate and you disabled this level of access, and the access restrictions for the SCM site for your staging slot deny all traffic. You first need to update the unmatched rule action for the Advanced tool site just for your staging slots to “Allow”. You’ve already disabled basic auth to your SCM site so access to it is already restricted to Azure AD authenticated principals. Allowing traffic using the access restrictions allows GitHub to reach your app and deploy your code. If you’re using GitHub Enterprise or another privately hosted source code repo, you can define specific access restrictions for your IP ranges instead. You then need to edit the GitHub Actions workflow as shown below so that it uses your OpenID Connect credentials instead of the publish profile. For sample workflows, see the OpenID Connect tab in Deploy to App Service. If you’ve been following along, use the below workflow.
- Open your GitHub repository and go to the
dotnetcore-docs-hello-world/.github/workflows/directory. You’ll see two autogenerated workflows, one for each app you created. Repeat the next step for each of them. -
Select the “pencil” button in the top right to edit the file. Replace the contents with the below, which assumes you created the GitHub secrets earlier, update the placeholder for
AZURE_WEBAPP_NAMEfor your apps, and then commit directly to the master branch. This commit will trigger the GitHub Action to run again and deploy your code, this time using OpenID Connect to authenticate.name: .NET Core on: push: branches: - master workflow_dispatch: permissions: id-token: write contents: read env: AZURE_WEBAPP_NAME: <web-app-name> # set this to your application's name AZURE_WEBAPP_PACKAGE_PATH: '.' # set this to the path to your web app project, defaults to the repository root DOTNET_VERSION: '6.0.x' # set this to the dot net version to use jobs: build: runs-on: ubuntu-latest steps: # Checkout the repo - uses: actions/checkout@main - uses: azure/login@v1 with: client-id: ${{ secrets.AZURE_CLIENT_ID }} tenant-id: ${{ secrets.AZURE_TENANT_ID }} subscription-id: ${{ secrets.AZURE_SUBSCRIPTION_ID }} # Setup .NET Core SDK - name: Setup .NET Core uses: actions/setup-dotnet@v1 with: dotnet-version: ${{ env.DOTNET_VERSION }} # Run dotnet build and publish - name: dotnet build and publish run: | dotnet restore dotnet build --configuration Release dotnet publish -c Release -o '${{ env.AZURE_WEBAPP_PACKAGE_PATH }}/myapp' # Deploy to Azure Web apps - name: 'Run Azure webapp deploy action using publish profile credentials' uses: azure/webapps-deploy@v2 with: app-name: ${{ env.AZURE_WEBAPP_NAME }} slot-name: 'stage' # replace with your slot name package: '${{ env.AZURE_WEBAPP_PACKAGE_PATH }}/myapp' - name: logout run: | az logout
After a couple minutes, once the deployments to the staging slots complete, if you try accessing your slot’s endpoint directly, you’ll receive an “Error 403 - Forbidden” because the access restrictions were cloned from the production site. There are a couple strategies that can be used to review the staging site and then eventually get it into production. To quickly validate that your staging site is working, you can temporarily update its access restrictions by adding your IP to the allow list for example and then attempt to reach it’s endpoint again. Be sure to remove that rule once you are done validating. Alternatively, if you don’t plan on using slot traffic routing as described in the next section, you can update the access restrictions to meet your testing specifications.
Since your Front Door is still pointing to your production apps, if you go to your Front Door’s endpoint now, you’ll still see the initial empty apps that were created earlier. You have a couple options here - you can either slot swap and your new code will move into production all at once, or you can try a variation of A/B testing using slot traffic routing. We’ll go over both of these features.
Slot traffic routing
Traffic routing with slots allows you to direct a pre-defined portion of your user traffic to each slot. Initially, 100% of traffic is directed to the production site. However, you have the ability, for example, to send 10% of your traffic to your staging slot. So when users try to access your app, 10% of them will automatically be routed there. No changes are needed on your Front Door instance to accomplish this. To learn more about slot swaps and staging environments in App Service see Set up staging environments in Azure App Service.
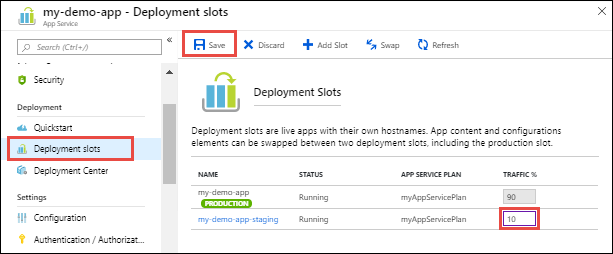
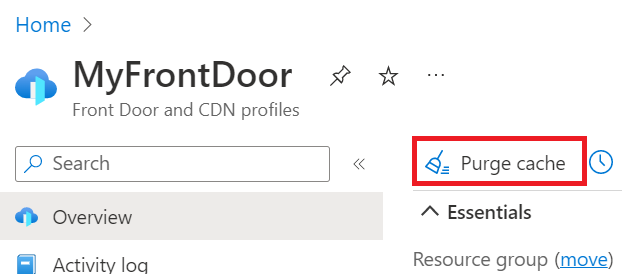
If you want to validate this feature as part of this tutorial, it will take some trial and error. The best way to validate it would be to send 100% of the traffic to the staging slot and then go the Front Door endpoint. You may need to clear your browser’s cache, refresh the page, or purge Front Door’s cache if you’re still not seeing your deployed changes.
Slot swap
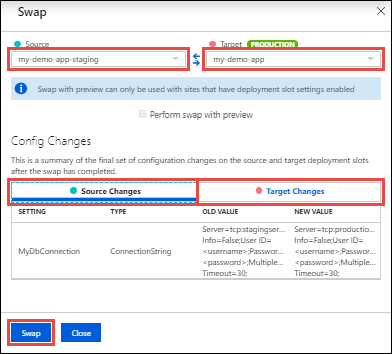
Once you’re done testing and validating, you can perform a slot swap from your staging site to your production site. You’ll need to do this for both instances of you app. During a slot swap, the App Service platform ensures the target slot doesn’t experience downtime.
To perform the swap:
-
Go to your app’s Deployment slots page and select Swap. The Swap dialog box shows settings in the selected source and target slots that will be changed.
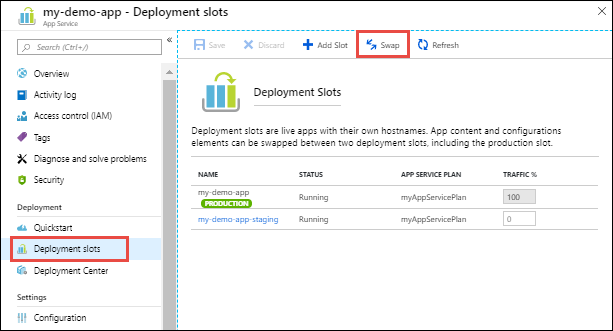
-
Select the desired Source and Target slots. Also, select the Source Changes and Target Changes tabs and verify that the configuration changes are expected. When you’re finished, you can swap the slots immediately by selecting Swap.
-
Repeat the process for your other app.
After a few minutes, you can navigate to your Front Door’s endpoint to validate the slot swap succeeded. Ensure you reset the slot traffic routing if needed. You may need to clear your browser’s cache, refresh the page, or purge Front Door’s cache if you’re still not seeing your deployed changes.
At this point, your apps are up and running and any changes you make to your source code will automatically trigger an update to both of your staging apps. You can then repeat the slot swap process described above when you’re ready to move that code into production.
Additional guidance
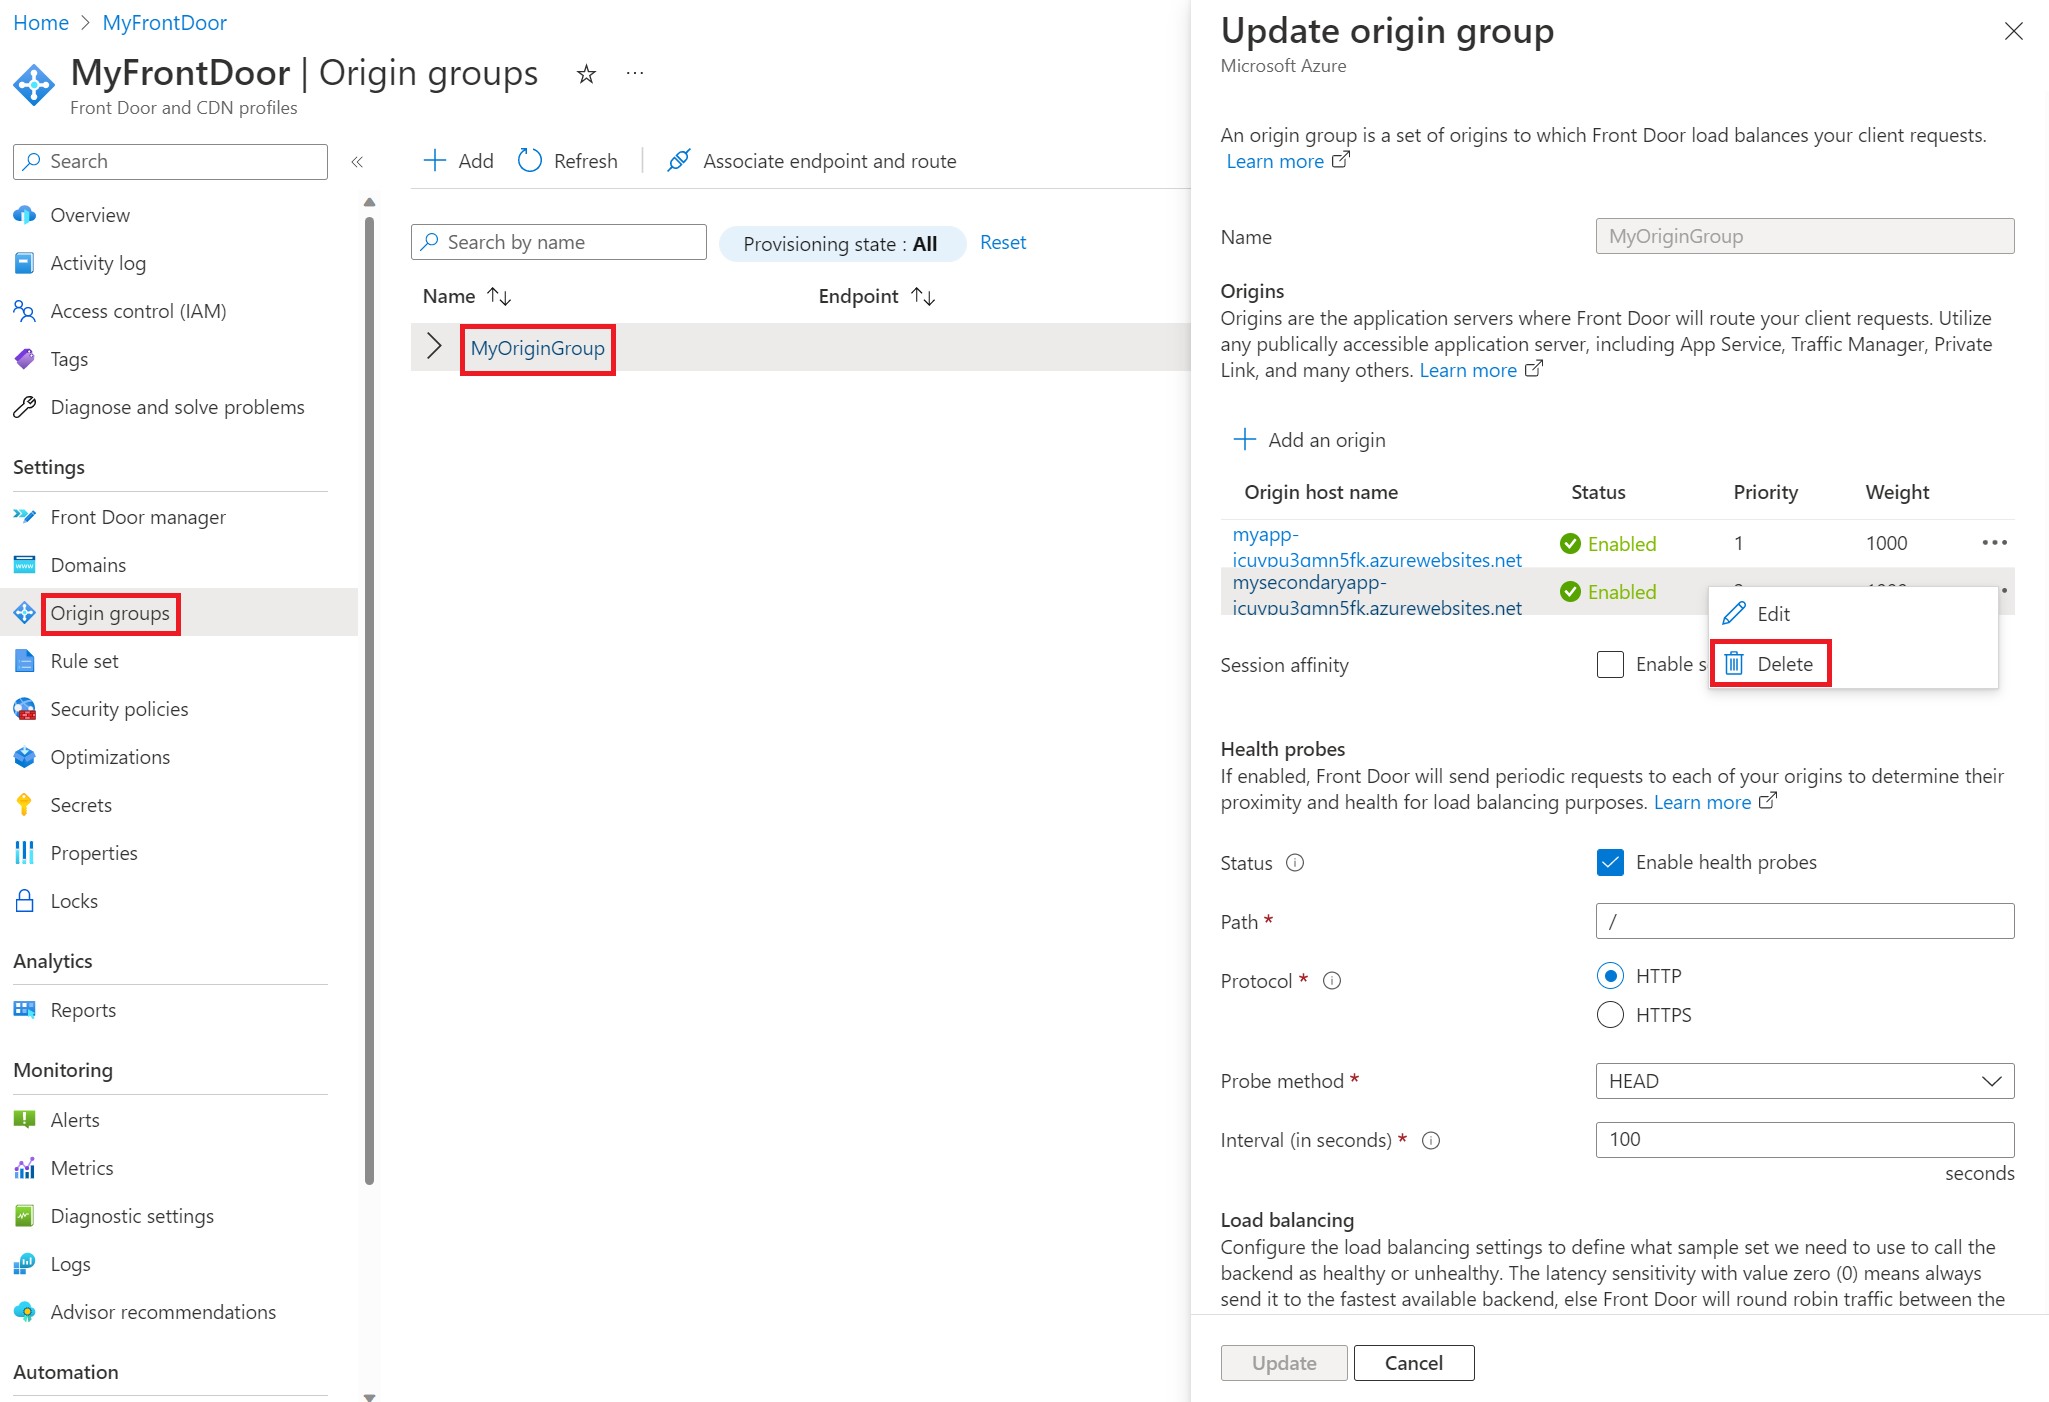
If you’re concerned about potential disruptions or issues with continuity across regions, as in some customers seeing one version of your app while others see another, or if you’re making significant changes to your apps, you can temporarily remove the site that’s undergoing the slot swap from your Front Door’s origin group and all traffic will be directed to the other origin. To do this, navigate to the Update origin group pane as shown below and Delete the origin that is undergoing the change. Once you’ve made all of your changes and are ready to serve traffic there again, you can return to the same pane and select + Add an origin to re-add the origin.
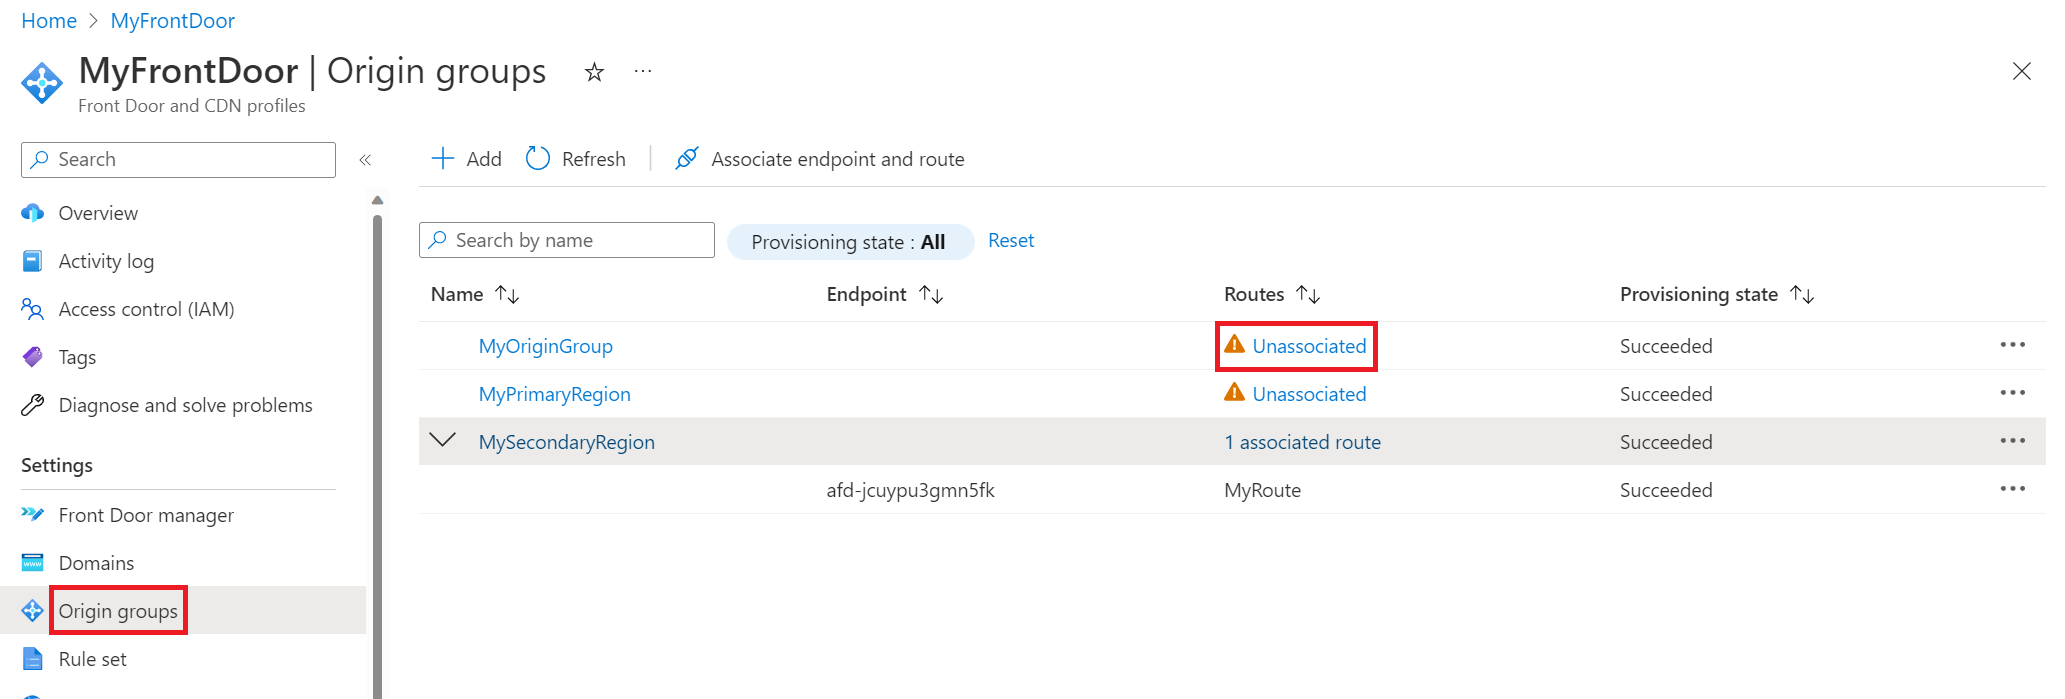
If you’d prefer to not delete and then add re-add origins, you can create additional origin groups for your Front Door instance. You can then associate the route to the origin group pointing to the intended origin. For example, you can create two new origin groups, one for your primary region and one for your secondary region. When your primary region is undergoing a change, associate the route with your secondary region and vice versa when your secondary region is undergoing a change. When all changes are complete, you can associate the route with your original origin group which contains both regions. This method works because a route can only be associated with one origin group at a time. However, if you have many regions and apps, it will get messy since you’ll need one origin group per region and potentially additional origin groups if you have multiple apps.
To demonstrate working with multiple origins, in the screenshot below, there are three origin groups. “MyOriginGroup” consists of both web apps, and the other two origin groups each consist of the web app in their respective region. In the example here, the app in the primary region is undergoing a change, so before I started that change, I associated the route with “MySecondaryRegion” so all traffic would be sent to the app in my secondary region during the change period. You can update the route by selecting “Unassociated” which will bring up the Associate routes pane.
Clean up resources
After you’re done, you can remove all the items you created. Deleting a resource group also deletes its contents. If you don’t intend to use this Azure Front Door, you should remove these resources to avoid unnecessary charges.
Next steps
If you’re interested in learning about another web app pattern for n-tier web applications, see the next post in this series called How to deploy a secure n-tier web app.
Zone redundancy is another infrastructure pattern that can provide high availability by replicating your services and data across availability zones to protect against single points of failure. For a detailed reference architecture on this for App Service, see Highly available zone-redundant web application.
Deploy from ARM/Bicep
All of the resources in this post can be deployed using an ARM/Bicep template. A sample template is shown below, which creates empty apps and staging slots behind Front Door following the security best practices outlined in this post. You’ll need to configure the deployment source as well as the service principal once the template resources are created. To learn how to deploy ARM/Bicep templates, see How to deploy resources with Bicep and Azure CLI.
@description('The location into which regionally scoped resources should be deployed. Note that Front Door is a global resource.')
param location string = 'canadacentral'

@description('The location into which regionally scoped resources for the secondary should be deployed.')
param secondaryLocation string = 'canadaeast'

@description('The name of the App Service application to create. This must be globally unique.')
param appName string = 'myapp-${uniqueString(resourceGroup().id)}'

@description('The name of the secondary App Service application to create. This must be globally unique.')
param secondaryAppName string = 'mysecondaryapp-${uniqueString(resourceGroup().id)}'

@description('The name of the SKU to use when creating the App Service plan.')
param appServicePlanSkuName string = 'S1'

@description('The number of worker instances of your App Service plan that should be provisioned.')
param appServicePlanCapacity int = 1

@description('The name of the Front Door endpoint to create. This must be globally unique.')
param frontDoorEndpointName string = 'afd-${uniqueString(resourceGroup().id)}'

@description('The name of the SKU to use when creating the Front Door profile.')
@allowed([
  'Standard_AzureFrontDoor'
  'Premium_AzureFrontDoor'
])
param frontDoorSkuName string = 'Standard_AzureFrontDoor'

var appServicePlanName = 'AppServicePlan'
var secondaryAppServicePlanName = 'SecondaryAppServicePlan'

var frontDoorProfileName = 'MyFrontDoor'
var frontDoorOriginGroupName = 'MyOriginGroup'
var frontDoorOriginName = 'MyAppServiceOrigin'
var secondaryFrontDoorOriginName = 'MySecondaryAppServiceOrigin'
var frontDoorRouteName = 'MyRoute'

resource frontDoorProfile 'Microsoft.Cdn/profiles@2021-06-01' = {
  name: frontDoorProfileName
  location: 'global'
  sku: {
    name: frontDoorSkuName
  }
}

resource appServicePlan 'Microsoft.Web/serverFarms@2020-06-01' = {
  name: appServicePlanName
  location: location
  sku: {
    name: appServicePlanSkuName
    capacity: appServicePlanCapacity
  }
  properties: {
    reserved: true
  }
  kind: 'app'
}

resource secondaryAppServicePlan 'Microsoft.Web/serverFarms@2020-06-01' = {
  name: secondaryAppServicePlanName
  location: secondaryLocation
  sku: {
    name: appServicePlanSkuName
    capacity: appServicePlanCapacity
  }
  properties: {
    reserved: true
  }
  kind: 'app'
}

resource app 'Microsoft.Web/sites@2020-06-01' = {
  name: appName
  location: location
  kind: 'app'
  identity: {
    type: 'SystemAssigned'
  }
  properties: {
    serverFarmId: appServicePlan.id
    httpsOnly: true
    siteConfig: {
      detailedErrorLoggingEnabled: true
      httpLoggingEnabled: true
      requestTracingEnabled: true
      ftpsState: 'Disabled'
      minTlsVersion: '1.2'
      ipSecurityRestrictions: [
        {
          tag: 'ServiceTag'
          ipAddress: 'AzureFrontDoor.Backend'
          action: 'Allow'
          priority: 100
          headers: {
            'x-azure-fdid': [
              frontDoorProfile.properties.frontDoorId
            ]
          }
          name: 'Allow traffic from Front Door'
        }
      ]
      scmIpSecurityRestrictionsDefaultAction: 'Deny'
    }
  }
}

resource ftpPolicy 'Microsoft.Web/sites/basicPublishingCredentialsPolicies@2022-03-01' = {
  name: 'ftp'
  kind: 'string'
  parent: app
  location: location
  properties: {
    allow: false
  }
}

resource scmPolicy 'Microsoft.Web/sites/basicPublishingCredentialsPolicies@2022-03-01' = {
  name: 'scm'
  kind: 'string'
  parent: app
  location: location
  properties: {
    allow: false
  }
}

resource appSlot 'Microsoft.Web/sites/slots@2020-06-01' = {
  name: '${appName}/stage'
  location: location
  kind: 'app'
  identity: {
    type: 'SystemAssigned'
  }
  properties: {
    serverFarmId: appServicePlan.id
    httpsOnly: true
    siteConfig: {
      detailedErrorLoggingEnabled: true
      httpLoggingEnabled: true
      requestTracingEnabled: true
      ftpsState: 'Disabled'
      minTlsVersion: '1.2'
      ipSecurityRestrictions: [
        {
          tag: 'ServiceTag'
          ipAddress: 'AzureFrontDoor.Backend'
          action: 'Allow'
          priority: 100
          headers: {
            'x-azure-fdid': [
              frontDoorProfile.properties.frontDoorId
            ]
          }
          name: 'Allow traffic from Front Door'
        }
      ]
    }
  }
  dependsOn: [
    app
  ]
}

resource ftpPolicySlot 'Microsoft.Web/sites/slots/basicPublishingCredentialsPolicies@2022-03-01' = {
  name: 'ftp'
  kind: 'string'
  parent: appSlot
  location: location
  properties: {
    allow: false
  }
}

resource scmPolicySlot 'Microsoft.Web/sites/slots/basicPublishingCredentialsPolicies@2022-03-01' = {
  name: 'scm'
  kind: 'string'
  parent: appSlot
  location: location
  properties: {
    allow: false
  }
}

resource secondaryApp 'Microsoft.Web/sites@2020-06-01' = {
  name: secondaryAppName
  location: secondaryLocation
  kind: 'app'
  identity: {
    type: 'SystemAssigned'
  }
  properties: {
    serverFarmId: secondaryAppServicePlan.id
    httpsOnly: true
    siteConfig: {
      detailedErrorLoggingEnabled: true
      httpLoggingEnabled: true
      requestTracingEnabled: true
      ftpsState: 'Disabled'
      minTlsVersion: '1.2'
      ipSecurityRestrictions: [
        {
          tag: 'ServiceTag'
          ipAddress: 'AzureFrontDoor.Backend'
          action: 'Allow'
          priority: 100
          headers: {
            'x-azure-fdid': [
              frontDoorProfile.properties.frontDoorId
            ]
          }
          name: 'Allow traffic from Front Door'
        }
      ]
      scmIpSecurityRestrictionsDefaultAction: 'Deny'
    }
  }
}

resource secondaryFtpPolicy 'Microsoft.Web/sites/basicPublishingCredentialsPolicies@2022-03-01' = {
  name: 'ftp'
  kind: 'string'
  parent: secondaryApp
  location: secondaryLocation
  properties: {
    allow: false
  }
}

resource secondaryScmPolicy 'Microsoft.Web/sites/basicPublishingCredentialsPolicies@2022-03-01' = {
  name: 'scm'
  kind: 'string'
  parent: secondaryApp
  location: secondaryLocation
  properties: {
    allow: false
  }
}

resource secondaryAppSlot 'Microsoft.Web/sites/slots@2020-06-01' = {
  name: '${secondaryAppName}/stage'
  location: secondaryLocation
  kind: 'app'
  identity: {
    type: 'SystemAssigned'
  }
  properties: {
    serverFarmId: secondaryAppServicePlan.id
    httpsOnly: true
    siteConfig: {
      detailedErrorLoggingEnabled: true
      httpLoggingEnabled: true
      requestTracingEnabled: true
      ftpsState: 'Disabled'
      minTlsVersion: '1.2'
      ipSecurityRestrictions: [
        {
          tag: 'ServiceTag'
          ipAddress: 'AzureFrontDoor.Backend'
          action: 'Allow'
          priority: 100
          headers: {
            'x-azure-fdid': [
              frontDoorProfile.properties.frontDoorId
            ]
          }
          name: 'Allow traffic from Front Door'
        }
      ]
    }
  }
  dependsOn: [
    secondaryApp
  ]
}

resource secondaryFtpPolicySlot 'Microsoft.Web/sites/slots/basicPublishingCredentialsPolicies@2022-03-01' = {
  name: 'ftp'
  kind: 'string'
  parent: secondaryAppSlot
  location: secondaryLocation
  properties: {
    allow: false
  }
}

resource secondaryScmPolicySlot 'Microsoft.Web/sites/slots/basicPublishingCredentialsPolicies@2022-03-01' = {
  name: 'scm'
  kind: 'string'
  parent: secondaryAppSlot
  location: secondaryLocation
  properties: {
    allow: false
  }
}

resource frontDoorEndpoint 'Microsoft.Cdn/profiles/afdEndpoints@2021-06-01' = {
  name: frontDoorEndpointName
  parent: frontDoorProfile
  location: 'global'
  properties: {
    enabledState: 'Enabled'
  }
}

resource frontDoorOriginGroup 'Microsoft.Cdn/profiles/originGroups@2021-06-01' = {
  name: frontDoorOriginGroupName
  parent: frontDoorProfile
  properties: {
    loadBalancingSettings: {
      sampleSize: 4
      successfulSamplesRequired: 3
    }
    healthProbeSettings: {
      probePath: '/'
      probeRequestType: 'HEAD'
      probeProtocol: 'Http'
      probeIntervalInSeconds: 100
    }
  }
}

resource frontDoorOrigin 'Microsoft.Cdn/profiles/originGroups/origins@2021-06-01' = {
  name: frontDoorOriginName
  parent: frontDoorOriginGroup
  properties: {
    hostName: app.properties.defaultHostName
    httpPort: 80
    httpsPort: 443
    originHostHeader: app.properties.defaultHostName
    priority: 1
    weight: 1000
  }
}

resource secondaryFrontDoorOrigin 'Microsoft.Cdn/profiles/originGroups/origins@2021-06-01' = {
  name: secondaryFrontDoorOriginName
  parent: frontDoorOriginGroup
  properties: {
    hostName: secondaryApp.properties.defaultHostName
    httpPort: 80
    httpsPort: 443
    originHostHeader: app.properties.defaultHostName
    priority: 2
    weight: 1000
  }
}

resource frontDoorRoute 'Microsoft.Cdn/profiles/afdEndpoints/routes@2021-06-01' = {
  name: frontDoorRouteName
  parent: frontDoorEndpoint
  dependsOn: [
    frontDoorOrigin // This explicit dependency is required to ensure that the origin group is not empty when the route is created.
  ]
  properties: {
    originGroup: {
      id: frontDoorOriginGroup.id
    }
    supportedProtocols: [
      'Http'
      'Https'
    ]
    patternsToMatch: [
      '/*'
    ]
    forwardingProtocol: 'HttpsOnly'
    linkToDefaultDomain: 'Enabled'
    httpsRedirect: 'Enabled'
  }
}

output appServiceHostName string = app.properties.defaultHostName
output secondaryAppServiceHostName string = secondaryApp.properties.defaultHostName
output appServiceSlotHostName string = appSlot.properties.defaultHostName
output secondaryAppServiceSlotHostName string = secondaryAppSlot.properties.defaultHostName
output frontDoorEndpointHostName string = frontDoorEndpoint.properties.hostName