Disabling basic auth on App Service
App Service provides access for FTP and WebDeploy clients to connect using the basic auth credentials found in the site’s publish profile. These APIs are great for browsing your site’s file system, uploading drivers and utilities, and deploying with MsBuild. However, enterprises often need to meet security requirements and would rather disable this basic auth access, so that employees can only access the organization’s App Services through API’s that are backed by Azure Active Directory (AAD).
This article shows how to disable basic authorization, monitor any attempted or successful logins, and how to use Azure Policy to ensure any new sites have basic authentication disabled. Also, the API to disable or enable basic auth is backed by AAD and RBAC, so you can narrow which users or roles are able to re-enable basic auth for a site.
Disabling Access
The following sections assume you have owner-level access to the site. The corresponding CLI commandlet is under development at the time of writing.
FTP
To disable FTP access to the site, run the following CLI command. Replace the placeholders with your resource group and site name.
az resource update --resource-group <resource-group> --name ftp --namespace Microsoft.Web --resource-type basicPublishingCredentialsPolicies --parent sites/<site-name> --set properties.allow=false
Once you have replaced the placeholders, select the text and press Ctrl + S (for Send). On the right side panel, you can see the response code and body. To confirm that FTP access is blocked, you can try to authenticate using an FTP client like FileZilla. To retrieve the publishing credentials, go to the overview blade of your site and click Download Publish Profile. Use the file’s FTP hostname, username, and password to authenticate, and you will get a 401 Unauthenticted.
WebDeploy and SCM
To disable basic auth access to the WebDeploy port and SCM site, run the following CLI command. Replace the placeholders with your resource group and site name.
az resource update --resource-group <resource-group> --name scm --namespace Microsoft.Web --resource-type basicPublishingCredentialsPolicies --parent sites/<site-name> --set properties.allow=false
To confirm that the publish profile credentials are blocked on WebDeploy, try publishing a web app using Visual Studio 2019.
Create a custom RBAC role
The API in the previous section is backed Azure Role-Based Access Control (RBAC), which means you can create a custom role to block users from using the API and assign lower-priveldged users to the role so they cannot enable basic auth on any sites. To configure the custom role, follow the instructions below.
- Open the Azure portal
- Open the subscription that you want to create the custom role in
- On the left navigation panel, click Access Control (IAM)
- Click + Add and click Add custom role in the dropdown
- Provide a name and description for the role.
- For Baseline permissions you can clone one of your organization’s existing roles, or one of the default roles
- Click the Permissions tab, and click Exclude permissions
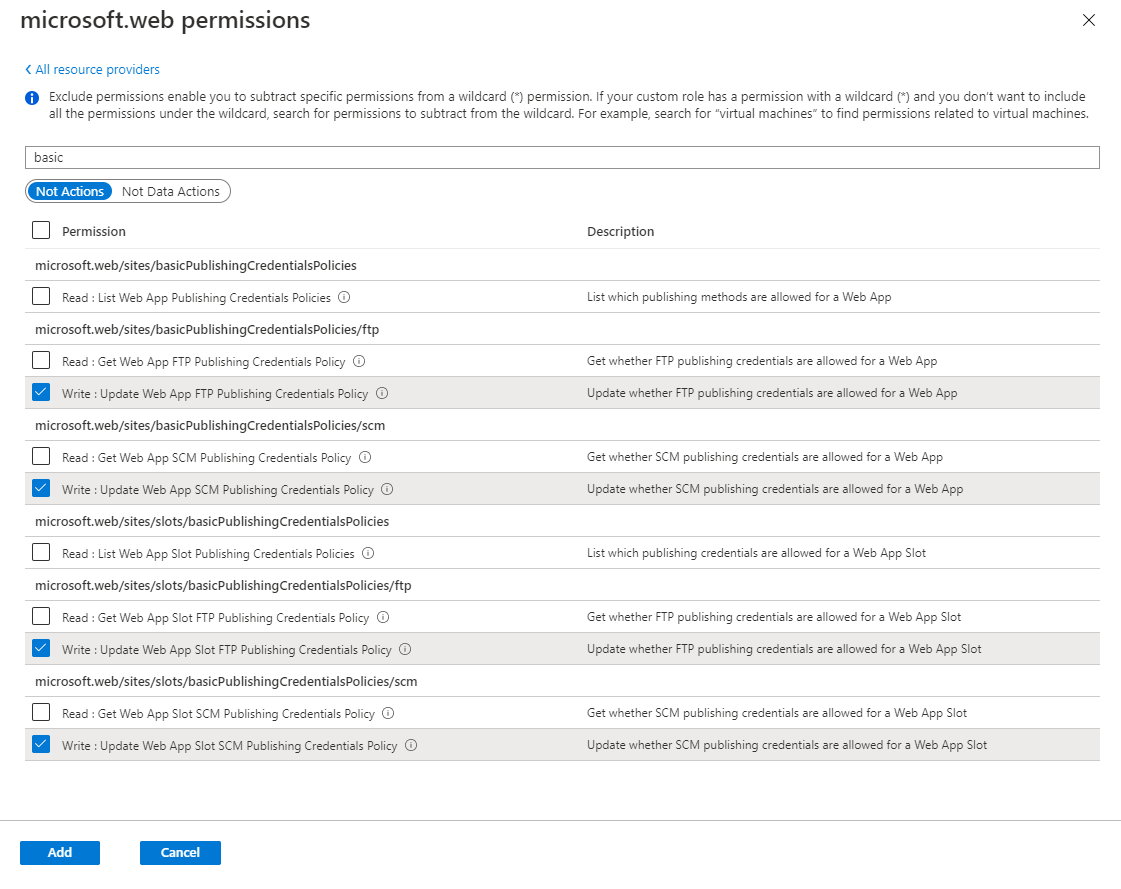
- In the context blade, click the Microsoft Web Apps. This will open a list of all the RBAC actions for App Service
-
Search for the
microsoft.web/sites/basicPublishingCredentialsPolicies/ftpandmicrosoft.web/sites/basicPublishingCredentialsPolicies/scmoperations. Under these, check the box for Write. This will add the actions as NotActions for the role.You can disable this for slots as well. See the
microsoft.web/sites/slots/basicPublishingCredentialsPolicies/ftpandmicrosoft.web/sites/slots/basicPublishingCredentialsPolicies/scmactions
-
Click Review + create at the bottom. Under Permissions, you will see the
basicPublishingCredentialsPoliciesAPIs listed as NotActions.
- Finally, click Create. You can now assign this role to your organization’s users.
More information on setting up custom RBAC roles.
Audit with Azure Monitor
All successful and attempted logins are logged to the Azure Monitor AppServiceAuditLogs log type. This means you can use all of Azure Monitor’s features to store, query, and alert based on the log contents.
Pricing information for Azure Monitor features and services.
To audit the attempted and successful logins on FTP and WebDeploy, click the Diagnostic Settings tab on your web app. This will open a blade to select your desired log types, and the destination for the logs. The logs can be sent to Log Analytics, a Storage Account, or an Event Hub.
- Provide a name for the Diagnostic Setting
- Select the log types you want to capture
- Select the services you want to send the logs to. (The service(s) must already be created, you can’t create them from this blade.)
- Click Save.
To confirm that the logs are sent to your selected service(s), try logging in via FTP or WebDeploy. An example Storage Account log is shown below.
{
  "time": "2020-07-16T17:42:32.9322528Z",
  "ResourceId": "/SUBSCRIPTIONS/EF90E930-9D7F-4A60-8A99-748E0EEA69DE/RESOURCEGROUPS/FREEBERGDEMO/PROVIDERS/MICROSOFT.WEB/SITES/FREEBERG-WINDOWS",
  "Category": "AppServiceAuditLogs",
  "OperationName": "Authorization",
  "Properties": {
    "User": "$freeberg-windows",
    "UserDisplayName": "$freeberg-windows",
    "UserAddress": "24.19.191.170",
    "Protocol": "FTP"
  }
}
Enforce compliance with Azure Policy
Azure Policy can help you enforce organizational standards and to assess compliance at-scale. Using Azure Policy, you can define JSON-formatted policies to alter or deny the creation of Azure services. In this scenario, you can use Azure Policy to audit for any sites which have basic authentication disabled, and remediate any non-compliant resources. Azure has built-in policies for auditing and remediating basic authentication on App Service:
There are corresponding policies for slots as well:
Summary
In this article you learned how to disable basic authentication to the FTP and WebDeploy ports for your sites. Additionally, you can audit any attempted logins with Azure Monitor and use an Azure Policy to esnure any new sites are compliant with your enterprise’s security requirements.
