A/B Testing with App Service, Part 1: Client-side configuration
In software development, A/B testing is the process of comparing two versions of a webpage or application to determine which version improves a metric or KPI. Depending on your role, there a few reasons why you should start A/B testing your applications.
- A frontend developer can test if a refactor improves page load time under real-world conditions
- A backend developer can deploy two versions of an API to determine any performance gains of a new implementation
- A designer can check if a new UI layout improves usability metrics
- A product manager can test different product landing pages to see how different value propositions affect click-through and average time-on-page
A/B testing is a powerful technique for software professionals of all types, but it is not without its complexities. For example, how does one deploy two versions of the application? How is user traffic split between the versions? And most importantly… how is the data tracked, tagged, and analyzed? This blog series will show how to accomplish all these tasks. This first article explains how to instrument your client-side code with a monitoring agent and tag the metrics with the version. The following articles will show how to instrument your backend services and how to analyze the results.
Have any thoughts about this guide? Let us know in the comments below!
Overview
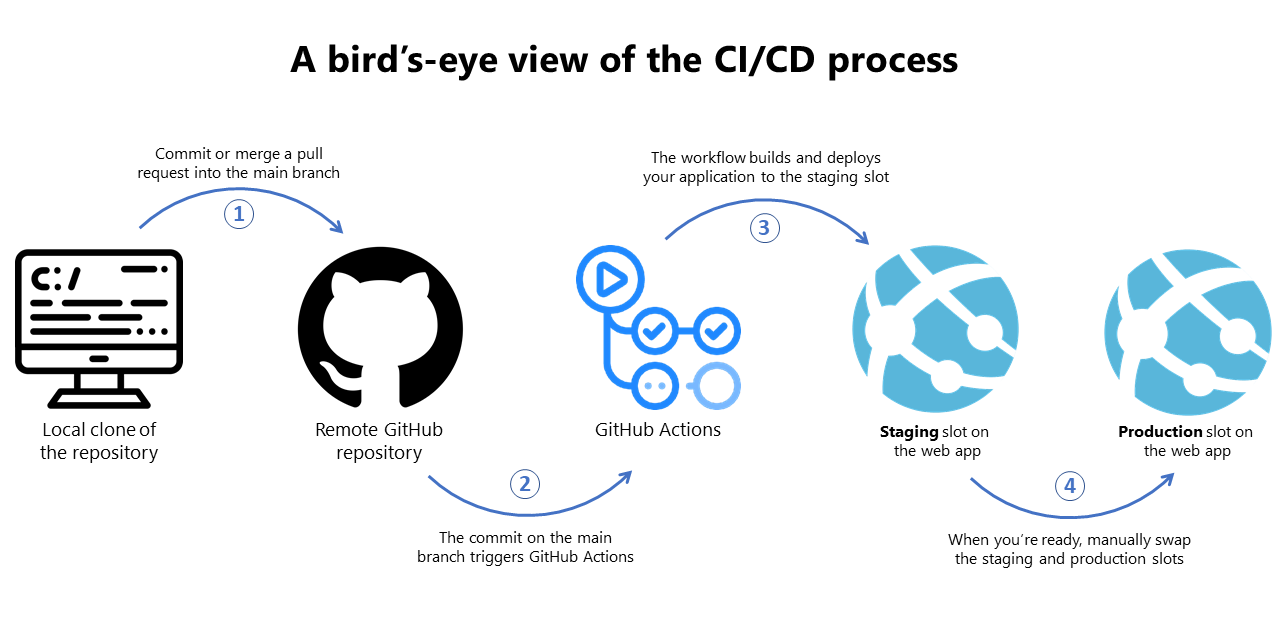
To do A/B testing with App Service, we will use App Service’s deployment slots and Application Insights. Deployment slots allow developers to deploy their new application builds to independent staging environments. Once a new build is deployed to a slot, you can route a percentage of your production traffic to the slot. Once the traffic is split, Application Insights will capture usage and performance metrics tagged with the slot name. The Application Insights blade in the Portal allows you to filter, visualize, and compare data from the different versions.
Prerequisites
You will need to have an Azure Subscription and an App Service before starting this guide. You should also have CI/CD (Continuous Integration and Delivery) set up for the App Service. All these steps are covered in parts one, two, and three of our Zero to Hero with App Service series. Please refer to those articles to create an App Service and set up CI/CD. Once you have that set up, continue to the next section to create an App Insights resource.
Create an Application Insights Resource
Application Insights is a Application Performance Management (APM) service for client-side and backend apps. App Insights (AI) has SDKs for JavaScript, .NET, Java, Python, Node, and more. You will use AI to capture metrics, tag the data, and analyze the results.
Create an App Insights resource in the Portal by following these instructions. If you prefer using the Azure CLI, you can run the following command instead. Replace <name> and <group> with your desired name for the AI resource, and name for the resource group.
az extension add -n application-insights
az monitor app-insights component create --app <name> -resource-group <group> --location westus2
Once the AI resource is created, copy the instrumentation key from the Portal or CLI output. You will need this key in the next section.
You may need to update your Azure CLI to install the
application-insightsmodule.
Install Application Insights
You will now add App Insights to your client-side code. Jump to the section for your app’s frontend framework.
React
App Insights has purpose-built plugins for React and React Native. Follow the linked instructions to add the plugins to your React project.
Vue.js
The Vue.js community has created a wrapper for App Insights to register it as a Vue plugin, vue-app-insights. You can install the package with npm install vue-application-insights --save. Once the package is installed, register it as a plugin on the root Vue instance (this is usually in your main.js file). An example is shown below.
import Vue from 'vue'
import router from './router';
import VueAppInsights from 'vue-application-insights';

Vue.use(VueAppInsights, {
  id: 'da2fab5d-c6fb-4688-8823-303dda0c7ad6',
  router
})
Since Vue is a framework for Single Page Applications (SPA’s), the snippet above also passes the Vue router to App Insights so that it can record view changes as proper page views.
Other JS Frameworks
If you are using a different JavaScript framework, you can install the Application Insights SDK using NPM, as shown below.
npm i --save @microsoft/applicationinsights-web
Once the package is installed, declare the App Insights object and provide your instrumentation key from the previous section.
import { ApplicationInsights } from '@microsoft/applicationinsights-web'

const appInsights = new ApplicationInsights({ config: {
  instrumentationKey: 'YOUR_INSTRUMENTATION_KEY_GOES_HERE';
  /* ...Other Configuration Options... */
} });
appInsights.loadAppInsights();
appInsights.trackPageView(); // Manually call trackPageView to establish the current user/session/pageview
Next, you will need to register this object with your chosen framework. Most client-side frameworks provide an initialization hook where you can register objects with the root object or module. For Angular apps, follow this blog guide. For Ember.js, you can register the appInsights object in the Application Instance Initializer. Configurations for all other frameworks are left as an exercise to the reader.
HTML Templates
If you are using an HTML template engine (like Django, Thymeleaf, or Jekyll) add the following <script> snippet to the <head> of your base template. This will add AI to each of your app’s web pages.
<script type="text/javascript">
!function(T,l,y){var S=T.location,u="script",k="instrumentationKey",D="ingestionendpoint",C="disableExceptionTracking",E="ai.device.",I="toLowerCase",b="crossOrigin",w="POST",e="appInsightsSDK",t=y.name||"appInsights";(y.name||T[e])&&(T[e]=t);var n=T[t]||function(d){var g=!1,f=!1,m={initialize:!0,queue:[],sv:"4",version:2,config:d};function v(e,t){var n={},a="Browser";return n[E+"id"]=a[I](),n[E+"type"]=a,n["ai.operation.name"]=S&&S.pathname||"_unknown_",n["ai.internal.sdkVersion"]="javascript:snippet_"+(m.sv||m.version),{time:function(){var e=new Date;function t(e){var t=""+e;return 1===t.length&&(t="0"+t),t}return e.getUTCFullYear()+"-"+t(1+e.getUTCMonth())+"-"+t(e.getUTCDate())+"T"+t(e.getUTCHours())+":"+t(e.getUTCMinutes())+":"+t(e.getUTCSeconds())+"."+((e.getUTCMilliseconds()/1e3).toFixed(3)+"").slice(2,5)+"Z"}(),iKey:e,name:"Microsoft.ApplicationInsights."+e.replace(/-/g,"")+"."+t,sampleRate:100,tags:n,data:{baseData:{ver:2}}}}var h=d.url||y.src;if(h){function a(e){var t,n,a,i,r,o,s,c,p,l,u;g=!0,m.queue=[],f||(f=!0,t=h,s=function(){var e={},t=d.connectionString;if(t)for(var n=t.split(";"),a=0;a<n.length;a++){var i=n[a].split("=");2===i.length&&(e[i[0][I]()]=i[1])}if(!e[D]){var r=e.endpointsuffix,o=r?e.location:null;e[D]="https://"+(o?o+".":"")+"dc."+(r||"services.visualstudio.com")}return e}(),c=s[k]||d[k]||"",p=s[D],l=p?p+"/v2/track":config.endpointUrl,(u=[]).push((n="SDK LOAD Failure: Failed to load Application Insights SDK script (See stack for details)",a=t,i=l,(o=(r=v(c,"Exception")).data).baseType="ExceptionData",o.baseData.exceptions=[{typeName:"SDKLoadFailed",message:n.replace(/\./g,"-"),hasFullStack:!1,stack:n+"\nSnippet failed to load ["+a+"] -- Telemetry is disabled\nHelp Link: https://go.microsoft.com/fwlink/?linkid=2128109\nHost: "+(S&&S.pathname||"_unknown_")+"\nEndpoint: "+i,parsedStack:[]}],r)),u.push(function(e,t,n,a){var i=v(c,"Message"),r=i.data;r.baseType="MessageData";var o=r.baseData;return o.message='AI (Internal): 99 message:"'+("SDK LOAD Failure: Failed to load Application Insights SDK script (See stack for details) ("+n+")").replace(/\"/g,"")+'"',o.properties={endpoint:a},i}(0,0,t,l)),function(e,t){if(JSON){var n=T.fetch;if(n&&!y.useXhr)n(t,{method:w,body:JSON.stringify(e),mode:"cors"});else if(XMLHttpRequest){var a=new XMLHttpRequest;a.open(w,t),a.setRequestHeader("Content-type","application/json"),a.send(JSON.stringify(e))}}}(u,l))}function i(e,t){f||setTimeout(function(){!t&&m.core||a()},500)}var e=function(){var n=l.createElement(u);n.src=h;var e=y[b];return!e&&""!==e||"undefined"==n[b]||(n[b]=e),n.onload=i,n.onerror=a,n.onreadystatechange=function(e,t){"loaded"!==n.readyState&&"complete"!==n.readyState||i(0,t)},n}();y.ld<0?l.getElementsByTagName("head")[0].appendChild(e):setTimeout(function(){l.getElementsByTagName(u)[0].parentNode.appendChild(e)},y.ld||0)}try{m.cookie=l.cookie}catch(p){}function t(e){for(;e.length;)!function(t){m[t]=function(){var e=arguments;g||m.queue.push(function(){m[t].apply(m,e)})}}(e.pop())}var n="track",r="TrackPage",o="TrackEvent";t([n+"Event",n+"PageView",n+"Exception",n+"Trace",n+"DependencyData",n+"Metric",n+"PageViewPerformance","start"+r,"stop"+r,"start"+o,"stop"+o,"addTelemetryInitializer","setAuthenticatedUserContext","clearAuthenticatedUserContext","flush"]),m.SeverityLevel={Verbose:0,Information:1,Warning:2,Error:3,Critical:4};var s=(d.extensionConfig||{}).ApplicationInsightsAnalytics||{};if(!0!==d[C]&&!0!==s[C]){method="onerror",t(["_"+method]);var c=T[method];T[method]=function(e,t,n,a,i){var r=c&&c(e,t,n,a,i);return!0!==r&&m["_"+method]({message:e,url:t,lineNumber:n,columnNumber:a,error:i}),r},d.autoExceptionInstrumented=!0}return m}(y.cfg);(T[t]=n).queue&&0===n.queue.length&&n.trackPageView({})}(window,document,{
src: "https://az416426.vo.msecnd.net/scripts/b/ai.2.min.js", // The SDK URL Source
//name: "appInsights", // Global SDK Instance name defaults to "appInsights" when not supplied
//ld: 0, // Defines the load delay (in ms) before attempting to load the sdk. -1 = block page load and add to head. (default) = 0ms load after timeout,
//useXhr: 1, // Use XHR instead of fetch to report failures (if available),
//crossOrigin: "anonymous", // When supplied this will add the provided value as the cross origin attribute on the script tag
cfg: { // Application Insights Configuration
    instrumentationKey: "YOUR_INSTRUMENTATION_KEY_GOES_HERE"
    /* ...Other Configuration Options... */
}});
</script>
More information on the snippet-based setup can be found here.
Tag the telemetry
You now have AppInsights installed. However, the outgoing data needs to be tagged with the slot name so you can correctly filter and analyze the data in the Portal. To do this, add a TelemetryInitializer to your project and register it with the AI object. The telemetry intializer below will get the name of the slot from the x-ms-routing-name cookie and add it as a property on the outgoing data object.
NPM-based applications
If you are using React, Angular, Vue, or another NPM-based framework, copy and paste the following method definitions into your project.
/**
 * Tags the outgoing telemetry with the slot name taken from the cookie.
 * @param {object} envelope The outgoing AI telemetry object
 */
var telemetryInitializer = (envelope) => {
  const environment = getCookieValue('x-ms-routing-name') || 'production';
  envelope.data['slot'] = environment;
}
/**
 * Returns the value of the specified cookie. If the cookie cannot be found, returns null;
 * @param {string} key The key of the cookie
 */
export function getCookieValue(key) {
  const cookie = document.cookie
    .split('; ')
    .find(cookie => cookie.startsWith(key));

  return cookie ? cookie.split('=')[1] : null;
}
Finally, register the telemetryInitializer method with the AppInsights instance.
appInsights.addTelemetryInitializer(telemetryInitializer);
Snippet-based applications
If you installed App Insights using the HTML snippet from the previous section, you will need to add the following <script> to your root HTML template. This script will add the TelemetryInitializer and register it with App Insights. This script should be pasted after the script that installs App Insights.
<script>
function getCookieValue(key) {
  const cookie = document.cookie
    .split('; ')
    .find(cookie => cookie.startsWith(key));

  return cookie ? cookie.split('=')[1] : null;
}

var telemetryInitializer = (envelope) => {
  const environment = getCookieValue('x-ms-routing-name') || 'production';
  envelope.data['slot'] = environment;
}

appInsights.addTelemetryInitializer(telemetryInitializer);
</script>
Deploy and split traffic
Your client-side code is now instrumented with App Insights and will tag any outgoing telemetry with the slot’s name. Now all that is left to do is deploy the application. If you followed parts two and three of Zero to Hero with App Service, then you can simply commit your changes to the master branch and let the CI/CD pipeline deploy the new build to your staging slot.
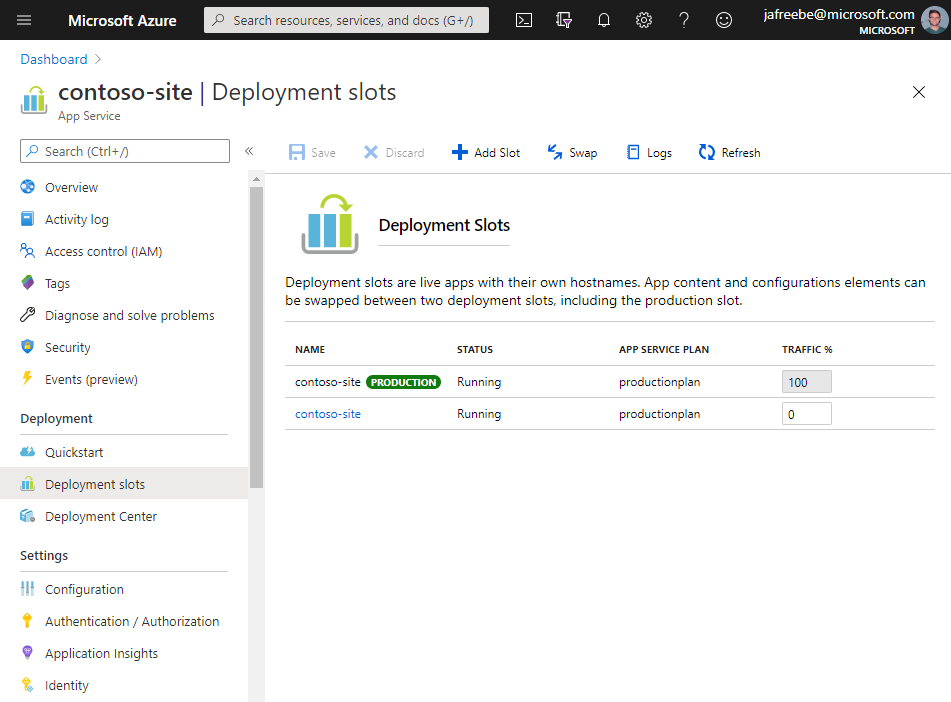
Once your instrumented code is deployed to the staging slot, it is time to start routing some production traffic to the staging slot. In the Azure Portal, go to the Deployment Slots menu. In the table of your slots, you will see a column for Traffic %. By default, all your traffic is routed to the production slot. Try setting the traffic percentage to 10% on the staging slot. Then click Save. With that simple change, a tenth of your production traffic will now go to the new build!
(Optional) Deploy PR’s to staging slots
To do A/B testing with App Service, you need at least two slots: production and staging (which map to the A and B versions). However, you can also spin up a staging slot for Pull Requests to your main tracking branch. This allows your teammates to see the requested changes deployed to a staging server and makes it easy to try the changes live. Even more powerful, you can route a percentage of your traffic to these deployed PR’s as well.
You can set up the automation for this process using GitHub Actions. It requires two workflow files: one to create the slot and deploy the Pull Request contents, and another to delete the slot once the PR has been closed. We put together example workflows for this, check them out in this repository.
Summary
In this article, you instrumented your client-side code or HTML templates. In the next article you will instrument your backend code. We are considering building this functionality into the default behavior of the App Insights SDK (so you don’t have to create your own TelemetryInitializer). If you have thoughts on this guide, please comment below and share! Your input will help us improve this whole story.
Leave a comment