Deploying Linux custom container from private Azure Container Registry
Securing access to your site is important, but securing access to the source of your site is often equally important.
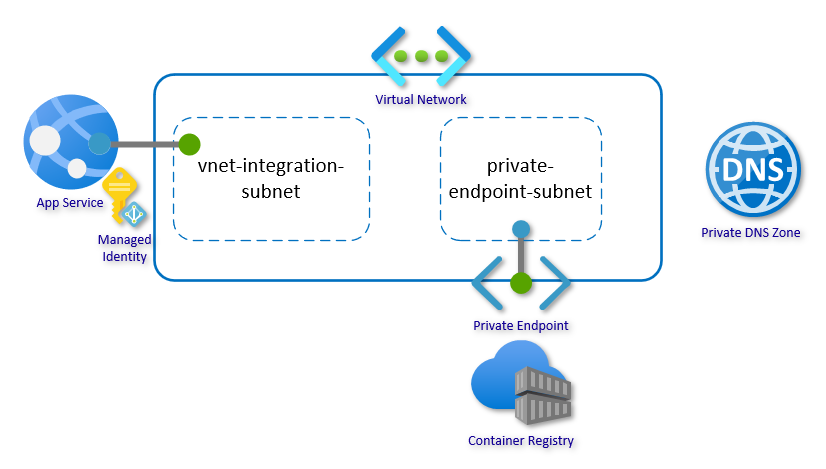
In this article, I will walk you through setting up a Linux web app with secure, network-isolated access to a container registry. The scenario is intentionally kept simple to focus on the architecture and configuration.
This guide is organized into four steps:
- Create network infrastructure
- Set up Azure Container Registry
- Create network integrated web app
- Pull from private registry
In closing, there are sections on advanced scenarios and FAQ.
The default scenario for the article is using system-assigned managed identity. An “Alternative scenarios” section with step for using credentials, user-assigned managed identity, and custom registries has been added. Notes:
- App Service Environment v2 (Isolated SKU) do not support pulling images from a registry url that needs to be resolved using custom DNS servers
Getting started
This is the third article in a series focusing on network security. If you missed the first two, you can find them here:
- Deploying a secure, resilient site with a custom domain
- Deploying a site with secure backend communication
This article will also use the Azure CLI executed in bash shell on WSL to set up the environment. It could be done using the Azure portal, Resource Manager templates, or Azure PowerShell. CLI was chosen as I find it easier to follow and explain the individual steps and configurations needed.
Remember in the scripts to replace all the resource names that need to be unique. This would be the name of the web app and Azure Container Registry. You may also change location if you want something closer to home. All other changes are optional.
Tip: You can search/replace the word “secureacr” with something unique to make all the scripts unique.
1. Create network infrastructure
First, set up a Resource Group with a Virtual Network. The virtual network should have at least two subnets: one for the regional virtual network integration and one for the private endpoints. The address-prefix size must be at least /28 for both subnets; small subnets can affect scaling limits and the number of private endpoints. Go with /24 for both subnets if you are not under constraints.
az group create --name secureacrsetup --location westcentralus
az network vnet create --resource-group secureacrsetup --location westcentralus --name secureacr-vnet --address-prefixes 10.0.0.0/16
For the subnets, there are two settings that we need to pay attention to. This is often set by the portal or scripts, but here it is called out directly. Delegation “Microsoft.Web/serverfarms” informs the subnet that it is reserved for virtual network integration:
az network vnet subnet create --resource-group secureacrsetup --vnet-name secureacr-vnet --name vnet-integration-subnet --address-prefixes 10.0.0.0/24 --delegations Microsoft.Web/serverfarms
az network vnet subnet create --resource-group secureacrsetup --vnet-name secureacr-vnet --name private-endpoint-subnet --address-prefixes 10.0.1.0/24
The last part of the network infrastructure is the Private DNS Zone. The zone is used to host the DNS records for private endpoint allowing the web app to find the container registry by name. Go here for a primer on Azure Private Endpoints and go here for how DNS Zones fits into private endpoints.
Create the Private DNS Zone:
az network private-dns zone create --resource-group secureacrsetup --name privatelink.azurecr.io
Link the zone to the virtual network:
az network private-dns link vnet create --resource-group secureacrsetup --name acr-zonelink --zone-name privatelink.azurecr.io --virtual-network secureacr-vnet --registration-enabled false
… and now the core network setup is done.
2. Set up Azure Container Registry
In this section, we will set up the Azure Container Registry account. We will also create the private endpoint and configure the service to block public traffic. First create the service. We need Premium SKU to enable private endpoint:
az acr create --resource-group secureacrsetup --name secureacr2021 --location westcentralus --sku Premium
Before we lock the registry down, let’s push a few images to it for testing. After you lock it down, you might get a conflict with the ACR firewall. If you are using docker locally, you will need to allow your local IP. If you are running the build from somewhere else, this location will also need access to the registry.
I will create a simple static html site, add it to an nginx container, and use ACR Tasks to build the container. You can of course also use native docker commands on your local machine:
mkdir source
cd source
echo -e 'FROM nginx\nCOPY index.html /usr/share/nginx/html' > Dockerfile

echo '<html><head><title>Private ACR v1</title><link rel="shortcut icon" href="https://appservice.azureedge.net/images/app-service/v4/favicon.ico" type="image/x-icon"/></head><body bgcolor=lightblue><h1>Hello Linux v1 from private Azure Container Registry</h1></body></html>' > index.html
az acr build --registry secureacr2021 --platform Linux --image privatewebsite:lnx-v1 .

echo '<html><head><title>Private ACR v2</title><link rel="shortcut icon" href="https://appservice.azureedge.net/images/app-service/v4/favicon.ico" type="image/x-icon"/></head><body bgcolor=lightgreen><h1>Hello Linux v2 from private Azure Container Registry</h1></body></html>' > index.html
az acr build --registry secureacr2021 --platform Linux --image privatewebsite:lnx-v2 .
Next, let’s create the private endpoints to connect the backend services to the virtual network. Get the Resource ID of the registry and store it in a variable:
acr_resource_id=$(az acr show --name secureacr2021 --query id --output tsv)
Create the private endpoint:
az network private-endpoint create --resource-group secureacrsetup --name secureacr-pe --location westcentralus --connection-name secureacr-pc --private-connection-resource-id $acr_resource_id --group-id registry --vnet-name secureacr-vnet --subnet private-endpoint-subnet
… and create a DNS Zone Group. This will create the DNS record for the private endpoint in the DNS Zone (and remove it if the private endpoint is deleted):
az network private-endpoint dns-zone-group create --resource-group secureacrsetup --endpoint-name secureacr-pe --name secureacr-zg --private-dns-zone privatelink.azurecr.io --zone-name privatelink.azurecr.io
az acr update --resource-group secureacrsetup --name secureacr2021 --public-network-enabled false
Everything is locked down now and you cannot even get to the ACR repositories through the Azure portal. In the ACR Networking section in Azure portal, you can add the public IP of your client if you need to view the registries (images) and other IPs needed to to push an image from remote clients. This will allow your local machine to access the registry:
my_ip=$(curl https://ifconfig.me)
az acr update --resource-group secureacrsetup --name secureacr2021 --public-network-enabled --default-action Deny
az acr network-rule add --resource-group secureacrsetup --name secureacr2021 --ip-address $my_ip
3. Create the network integrated web app
Now we get to creating the actual web app. To use virtual network integration, we need at least the Basic SKU, and then there are a few commands to secure the app and add the integration:
az appservice plan create --resource-group secureacrsetup --name secureacrplan --sku P1V3 --is-linux
az webapp create --resource-group secureacrsetup --plan secureacrplan --name secureacrweb2021 --https-only --deployment-container-image-name 'mcr.microsoft.com/appsvc/staticsite:latest'
az webapp vnet-integration add --resource-group secureacrsetup --name secureacrweb2021 --vnet secureacr-vnet --subnet vnet-integration-subnet
As the last configuration step, we will assign a managed identity to the web app and grant the app access to pull images from the registry.
az webapp identity assign --resource-group secureacrsetup --name secureacrweb2021 --scope $acr_resource_id --role AcrPull
You can now browse to the web app and outbound traffic from the web app will be routed through the virtual network.
4. Pull from private registry
All the infrastructure is now in place and we just need to glue it all together. The web app needs some configuration values from the registry.
Images will by default be pulled over public route, but by setting vnetImagePullEnabled site property to true, you tell the platform to use the virtual network integration for pulling the image:
az resource update --resource-group secureacrsetup --name secureacrweb2021 --set properties.vnetImagePullEnabled=true --resource-type 'Microsoft.Web/sites'
Configure the container image and set image pull to use managed identity:
az webapp config set --resource-group secureacrsetup --name secureacrweb2021 --linux-fx-version 'DOCKER|secureacr2021.azurecr.io/privatewebsite:lnx-v1'
az resource update --resource-group secureacrsetup --name secureacrweb2021/config/web --set properties.acrUseManagedIdentityCreds=true --resource-type 'Microsoft.Web/sites/config'
Note: The app might attempt to pull the image before the configuration is complete which will show up as failed attempts in the logs. Give it a minute or two and the pull will retry with the correct configuration.
Advanced scenarios
Using user-assigned managed identity
System-assigned managed identity is convenient as you do not have any additional resources to manage and it is uniquely associated with your web app. However, there are scenarios where user-assigned managed identity is preferred. It can be configured ahead of the web app and assigning permissions can be delegated. You can also reuse the same managed identity across multiple web apps.
Create a user-assigned managed identity and assign permissions to pull from ACR:
az identity create --resource-group secureacrsetup --name secureacr-identity
identity_principal_id=$(az identity show --resource-group secureacrsetup --name secureacr-identity --query principalId --output tsv)
az role assignment create --role "AcrPull" --assignee-object-id $identity_principal_id --scope $acr_resource_id --assignee-principal-type ServicePrincipal
Assign the identity to the web app:
identity_resource_id=$(az identity show --resource-group secureacrsetup --name secureacr-identity --query id --output tsv)
az webapp identity assign --resource-group secureacrsetup --name secureacrweb2021 --identities $identity_resource_id
Configure the web app to pull the image using the user-assigned managed identity:
identity_client_id=$(az identity show --resource-group secureacrsetup --name secureacr-identity --query clientId --output tsv)
az resource update --resource-group secureacrsetup --name secureacrweb2021/config/web --set properties.acrUserManagedIdentityID=$identity_client_id --resource-type 'Microsoft.Web/sites/config'
az resource update --resource-group secureacrsetup --name secureacrweb2021/config/web --set properties.acrUseManagedIdentityCreds=true --resource-type 'Microsoft.Web/sites/config'
az webapp config set --resource-group secureacrsetup --name secureacrweb2021 --linux-fx-version 'DOCKER|secureacr2021.azurecr.io/privatewebsite:lnx-v2'
Using credentials to pull images
Instead of using managed identity, you can use admin credentials or an Azure AD Service Principal. These values can optionally be stored in Key Vault and configured as Key Vault referenced app settings.
Configure ACR to enable admin credentials:
az acr update --resource-group secureacrsetup --name secureacr2021 --admin-enabled
Set the registry credentials and disable using managed identity (remember to ensure the vnetImagePullEnabled is configured if you want to pull the image over the virtual network integration).
acr_server_url="https://$(az acr show --name secureacr2021 --query loginServer --output tsv)"
acr_username=$(az acr credential show --name secureacr2021 --query username --output tsv)
acr_password=$(az acr credential show --name secureacr2021 --query passwords[0].value --output tsv)
az webapp config appsettings set --resource-group secureacrsetup --name secureacrweb2021 --settings DOCKER_REGISTRY_SERVER_URL=$acr_server_url DOCKER_REGISTRY_SERVER_USERNAME=$acr_username DOCKER_REGISTRY_SERVER_PASSWORD=$acr_password
az resource update --resource-group secureacrsetup --name secureacrweb2021/config/web --set properties.acrUseManagedIdentityCreds=false --resource-type 'Microsoft.Web/sites/config'
az webapp config set --resource-group secureacrsetup --name secureacrweb2021 --linux-fx-version 'DOCKER|secureacr2021.azurecr.io/privatewebsite:lnx-v1'
Using a custom private registry
App Service also support pulling from a custom private registry using the v2 API. If you are using a custom private registry such as Docker Registry, there are no specific changes you need to make except ensure that the registry is reachable and DNS resolvable from the integration virtual network. Setting up a custom private registry depends on the chosen product and platform. A simple test configuration can be setup using App Service to actually host the registry and protect it with a private endpoint. Other apps can then pull from this registry.
To set up a custom private registry in the existing setup:
az webapp create --resource-group secureacrsetup --plan secureacrplan --name secureacrwebregistry2021 --https-only --deployment-container-image-name 'registry:2'
Push a few images to the registry using the docker client:
echo -e 'FROM nginx\nCOPY index.html /usr/share/nginx/html' > Dockerfile

echo '<html><head><title>Custom registry v1</title><link rel="shortcut icon" href="https://appservice.azureedge.net/images/app-service/v4/favicon.ico" type="image/x-icon"/></head><body bgcolor=lightblue><h1>Hello Linux v1 from custom registry</h1></body></html>' > index.html

docker build -t customwebsite:lnx-v1 .
docker tag customwebsite:lnx-v1 secureacrwebregistry2021.azurewebsites.net/customwebsite:lnx-v1
docker push secureacrwebregistry2021.azurewebsites.net/customwebsite:lnx-v1

echo '<html><head><title>Custom registry v2</title><link rel="shortcut icon" href="https://appservice.azureedge.net/images/app-service/v4/favicon.ico" type="image/x-icon"/></head><body bgcolor=lightblue><h1>Hello Linux v2 from custom registry</h1></body></html>' > index.html

docker build -t customwebsite:lnx-v2 .
docker tag customwebsite:lnx-v2 secureacrwebregistry2021.azurewebsites.net/customwebsite:lnx-v2
docker push secureacrwebregistry2021.azurewebsites.net/customwebsite:lnx-v2
Secure the registry with a private endpoint and add a private DNS zone to ensure DNS resolution is working:
az network private-dns zone create --resource-group secureacrsetup --name privatelink.azurewebsites.net
az network private-dns link vnet create --resource-group secureacrsetup --name websites-zonelink --zone-name privatelink.azurewebsites.net --virtual-network secureacr-vnet --registration-enabled false
webregistry_resource_id=$(az webapp show --resource-group secureacrsetup --name secureacrwebregistry2021 --query id --output tsv)
az network private-endpoint create --resource-group secureacrsetup --name securewebregistry-pe --location westcentralus --connection-name securewebregistry-pc --private-connection-resource-id $webregistry_resource_id --group-id sites --vnet-name secureacr-vnet --subnet private-endpoint-subnet
az network private-endpoint dns-zone-group create --resource-group secureacrsetup --endpoint-name securewebregistry-pe --name securewebregistry-zg --private-dns-zone privatelink.azurewebsites.net --zone-name privatelink.azurewebsites.net
Finally, disable using managed identity and update the image the app is using:
az resource update --resource-group secureacrsetup --name secureacrweb2021/config/web --set properties.acrUseManagedIdentityCreds=false --resource-type 'Microsoft.Web/sites/config'
az webapp config set --resource-group secureacrsetup --name secureacrweb2021 --linux-fx-version 'DOCKER|secureacrwebregistry2021.azurewebsites.net/customwebsite:lnx-v1'
After about a minute, you should see the new image served from the web app.
Deploy from secure registry with ARM template using credentials
In this scenario, you will deploy an app with an ARM template from a registry that uses credentials (username/password) for authentication. If you are using ACR, you can use either Admin credentials or a Service Principal. Pulling over virtual network is optional, but if you are using Azure Container Registry with private endpoint, you will have to pull over virtual network.
The template also assumes the App Service plan and the virtual network exist. If not, you can add this to the template as well.
{
  "$schema": "https://schema.management.azure.com/schemas/2019-04-01/deploymentTemplate.json#",
  "contentVersion": "1.0.0.0",
  "parameters": {
    "webAppName": {
      "defaultValue": "secureacrweb2021",
      "type": "string"
    }
  },
  "variables": {
    "appServicePlanName": "secureacrplan",
    "virtualNetworkName": "secureacr-vnet",
    "subnetName": "vnet-integration-subnet",
    "location": "westcentralus",
    "webAppName": "[parameters('webAppName')]"
  },
  "resources": [
    {
      "name": "[variables('webAppName')]",
      "type": "Microsoft.Web/sites",
      "apiVersion": "2021-02-01",
      "location": "[variables('location')]",
      "properties": {
        "serverFarmId": "[resourceId('Microsoft.Web/serverfarms', variables('appServicePlanName'))]",
        "virtualNetworkSubnetId": "[resourceId('Microsoft.Network/virtualNetworks/subnets', variables('virtualNetworkName'), variables('subnetName'))]",
        "vnetImagePullEnabled": true,
        "siteConfig": {
          "linuxFxVersion": "DOCKER|secureacr2021.azurecr.io/privatewebsite:lnx-v1",
          "appSettings": [
            {
              "name":"DOCKER_REGISTRY_SERVER_USERNAME",
              "value": "secureacr2021"
            },
            {
              "name":"DOCKER_REGISTRY_SERVER_PASSWORD",
              "value": "[INSERT_REGISTRY_PASSWORD]"
            }
          ]
        },
        "httpsOnly": true
      }
    }
  ]
}
Deploy from secure registry with ARM template using managed identity
As an alternative to using credentials, you can use Managed Identity when pulling images from Azure Container Registry. Pulling over virtual network is again optional and is configured using the vnetImagePullEnabled site config, but is of course required if your registry is only visible from the virtual network.
Since we need to grant the permissions ahead of creating the app, only User-Assigned Managed Identity will work, and you have to grant the identity AcrPull permissions on the registry. See the section on using user-managed identity.
Even though the managed identity exists when deploying the template, the resource must be in the template to use the reference method to fetch the clientId. You can work around this by inserting the clientId manually.
{
  "$schema": "https://schema.management.azure.com/schemas/2019-04-01/deploymentTemplate.json#",
  "contentVersion": "1.0.0.0",
  "parameters": {
    "webAppName": {
      "defaultValue": "secureacrweb2021",
      "type": "string"
    }
  },
  "variables": {
    "appServicePlanName": "secureacrplan",
    "virtualNetworkName": "secureacr-vnet",
    "subnetName": "vnet-integration-subnet",
    "userAssignedIdentityName": "secureacr-identity",
    "location": "westcentralus",
    "webAppName": "[parameters('webAppName')]"
  },
  "resources": [
    {
      "type": "Microsoft.ManagedIdentity/userAssignedIdentities",
      "name": "[variables('userAssignedIdentityName')]",
      "apiVersion": "2018-11-30",
      "location": "[variables('location')]"
    },
    {
      "name": "[variables('webAppName')]",
      "type": "Microsoft.Web/sites",
      "apiVersion": "2021-02-01",
      "location": "[variables('location')]",
      "dependsOn": [
        "[resourceId('Microsoft.ManagedIdentity/userAssignedIdentities', variables('userAssignedIdentityName'))]"
      ],
      "properties": {
        "serverFarmId": "[resourceId('Microsoft.Web/serverfarms', variables('appServicePlanName'))]",
        "virtualNetworkSubnetId": "[resourceId('Microsoft.Network/virtualNetworks/subnets', variables('virtualNetworkName'), variables('subnetName'))]",
        "siteConfig": {
          "acrUseManagedIdentityCreds": true,
          "acrUserManagedIdentityID": "[reference(resourceId('Microsoft.ManagedIdentity/userAssignedIdentities', variables('userAssignedIdentityName'))).clientId]",
          "linuxFxVersion": "DOCKER|secureacr2021.azurecr.io/privatewebsite:lnx-v2"
        },
        "vnetImagePullEnabled": true,
        "httpsOnly": true
      },
      "identity": {
        "type": "UserAssigned",
        "userAssignedIdentities": {
          "[resourceId('Microsoft.ManagedIdentity/userAssignedIdentities', variables('userAssignedIdentityName'))]": {}
        }
      }
    }
  ]
}
FAQ
Q: Can I apply the same steps to a Function app?
Yes, but you will need a Premium Elastic plan or an App Service plan to use virtual network integration with Function apps.
Q: Can I apply the same steps to a Windows container app?
Windows container apps do not yet support pulling containers over virtual network, but you can use managed identity to pull from Azure Container Registry and you can pull from custom registries that are accessible from the internet.