Migrating your .NET 3.1 Applications to .NET 5
.NET 5 is the first major release in the .NET unification journey bringing together the best of Core, Framework, Xamarin, and Mono to provide an improved developer experience. Although .NET 6 (Preview) is currently available, it is recommended that you migrate your .NET 3.1 applications to .NET 5 prior to migrating to .NET 6 (LTS).
This article outlines what needs to be addressed in an existing .NET 3.1 application when migrating to .NET 5 before publishing it to App Service. For information on hosting .NET 5 applications on App Service please visit our blog.
Update your application
The first step to updating your application to .NET 5 is to go to the project file and update the Target Framework Moniker. Setting the Target Framework tells your application which version you’d like to target by specifying the set of APIs that you want to be made available to your application or library.
In your .csproj file, replace netcoreapp3.1 with net5.0 to update the targeted version
<TargetFramework>netcoreapp3.1</TargetFramework>
<TargetFramework>net5.0</TargetFramework>
After you’ve updated the Target Framework and saved the application. You will notice that your bin is populated with .NET 5 Debug and Release folders, these will include necessary .json, .exe and .dll files that are needed when publishing to App Service.
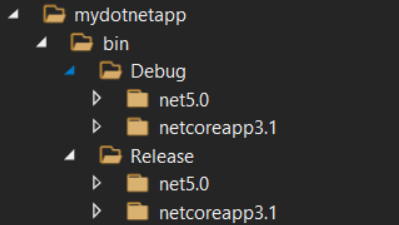
These folders will remain empty until you Build your solution locally. Go to Build in the top menu bar in Visual Studio and select Build Solution to populate the net5.0 folder. Your Release folder will populate when you Publish your application.
Package References
Depending on your application, you may have a number of package references that you rely on. You will need to update each package references Version to match the new version.
In your .csproj file, update the Version from “3.x.x” to “5.0.0”
<ItemGroup>
<PackageReference Include="Microsoft.EntityFrameworkCore.Tools" Version="3.1.6">
<PackageReference Include="System.Net.Http.Json" Version="3.2.1" />
</ItemGroup>
<ItemGroup>
<PackageReference Include="Microsoft.EntityFrameworkCore.Tools" Version="5.0.0">
<PackageReference Include="System.Net.Http.Json" Version="5.0.0" />
</ItemGroup>
global.json
If you are using the global.json file to specify which SDK version you want to use in your application, then you will need to update this as well. If you are not using a global.json file then you can skip this step.
Replace the SDK version from 3.1.200 to 5.0.100
{
    "sdk": {
    "version": "3.1.200"
    }
}
{
    "sdk": {
    "version": "5.0.100"
    }
}
Docker
If you are using Docker to containerize your .NET applications you will need to update your Dockerfile FROM statements for your base image and SDK version. See below for examples for both Windows and Linux.
Before
# .NET 3.1
FROM mcr.microsoft.com/dotnet/aspnet:3.1 AS base        # Windows
# FROM mcr.microsoft.com/dotnet/aspnet:3.1-buster-slim  # Linux

WORKDIR /app
EXPOSE 80

FROM mcr.microsoft.com/dotnet/sdk:3.1 AS build                # Windows
# FROM mcr.microsoft.com/dotnet/sdk:3.1-buster-slim AS build  # Linux
WORKDIR /src
COPY ["mydotnetapp/mydotnetapp.csproj", "mydotnetapp/"]
RUN dotnet restore "mydotnetapp/mydotnetapp.csproj"
COPY . .
WORKDIR "/src/mydotnetapp"

RUN dotnet build "mydotnetapp.csproj" -c Release -o /app/build
FROM build AS publish
RUN dotnet publish "mydotnetapp.csproj" -c Release -o /app/publish
FROM base AS final

WORKDIR /app
COPY --from=publish /app/publish .
ENTRYPOINT ["dotnet", "mydotnetapp.dll"]
After
# .NET 5.0
FROM mcr.microsoft.com/dotnet/aspnet:5.0 AS base                # Windows
# FROM mcr.microsoft.com/dotnet/aspnet:5.0-buster-slim AS base  # Linux

WORKDIR /app
EXPOSE 80
EXPOSE 443

FROM mcr.microsoft.com/dotnet/sdk:5.0 AS build                  # Windows
# FROM mcr.microsoft.com/dotnet/sdk:5.0-buster-slim AS build    # Linux

WORKDIR /src
COPY ["mydotnetapp/mydotnetapp.csproj", "mydotnetapp/"]
RUN dotnet restore "mydotnetapp/mydotnetapp.csproj"
COPY . .
WORKDIR "/src/mydotnetapp"

RUN dotnet build "mydotnetapp.csproj" -c Release -o /app/build
FROM build AS publish
RUN dotnet publish "mydotnetapp.csproj" -c Release -o /app/publish
FROM base AS final
WORKDIR /app

COPY --from=publish /app/publish .
ENTRYPOINT ["dotnet", "mydotnetapp.dll"]
After you’ve completed the updates in your application to .NET 5 you are now ready to publish to App Service as you normally would. While the publish is ongoing it will populate the Release files mentioned above in the net5.0 reference folder equipping your application with the necessary files to run on App Service.
Update Stack Settings
After you’ve published your application to App Service you may choose to update your Stack settings (this sets the language and SDK version used to run the app) in your applications Configuration to match the newer version. While this step is not required to successfully run your updated application on Windows App Service, it is recommended to prevent confusion in the future when looking at the Configuration settings.
Go to Configuration under Settings, click the General settings tab and update the Stack settings .NET Version to .NET 5. Then click the Save icon above.
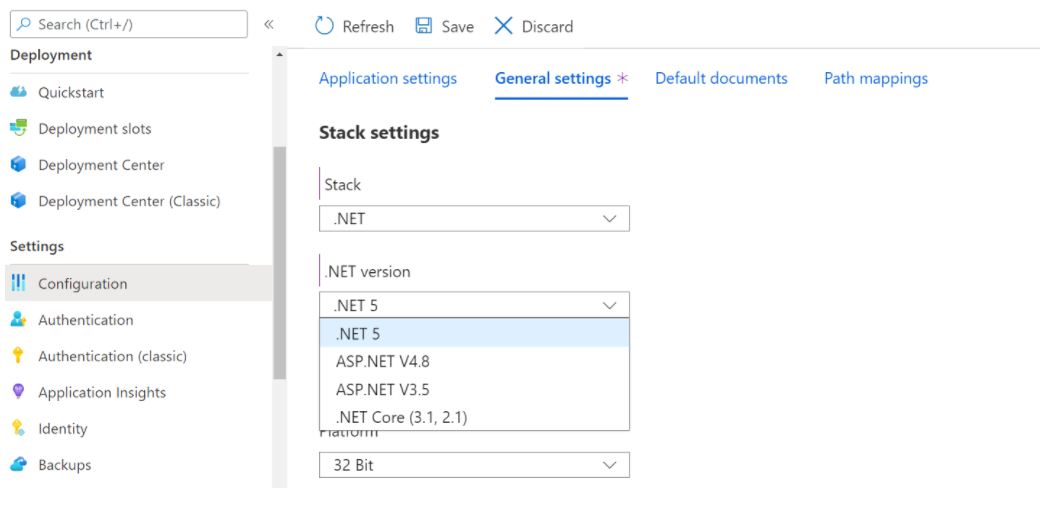
Once it is saved, your application will restart. If you are using Linux, your Major and Minor version will auto-populate to .NET 5 upon publishing.
From here your application is now updated and configured to use .NET 5. For more information on migrating your .NET 3.1 apps to .NET 5, please visit the documentation.