Migrate to Azure Spring Apps
If you want to use microservices and Java in Azure, consider Azure Spring Apps. It allows you to easily migrate Sprint Boot microservices to Azure without needing to change your code. It also supports scaling microservices, both vertically and horizontally, which makes it a smart choice for a Spring Boot native application host.
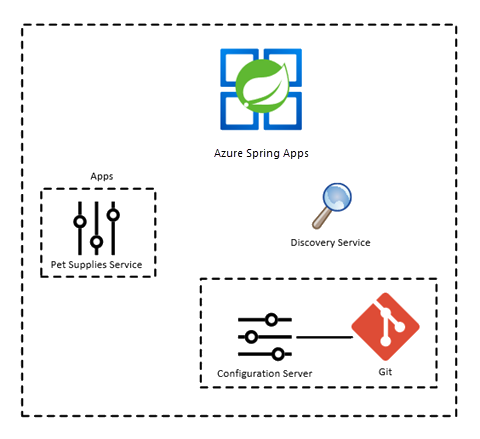
The components of Azure Spring Apps include:
-
Spring Boot microservices
-
Service Registry for discovering microservices
When you deploy your sample application to Azure Spring Apps, you can divide it into the following parts:
-
Pet supplies services
-
Discovery service
-
Config Server linked to a Git repository
Create an Azure Spring Apps instance
Create an Azure Spring Apps instance to hold your resources:
-
To use Azure Spring Apps with Azure CLI, you might be prompted to install the spring extension. You can also install the extension manually with the following command:
az extension add --name spring -
As you name your Azure Spring Apps instance, keep the following points in mind:
- The name can contain only lowercase letters, numbers and hyphens as follows:
- The first character must be a letter.
- The last character must be a letter or number.
- The name must be between 4 and 32 characters long.
- The name of an Azure Spring Apps instance must be unique across all of Azure. To achieve this uniqueness, you might need to use identifying prefixes or suffixes.
- The name can contain only lowercase letters, numbers and hyphens as follows:
-
Set these environment variables as follows:
AZURE_RESOURCE_GROUP=ms-cosmos-db-java-guideAZURE_SPRING_CLOUD_NAME=ms-cosmos-db-java-guide-spring-SUFFIX
-
For this example app, run the following command. Because this application isn’t a production application, use the Basic SKU:
az spring create -n $AZURE_SPRING_CLOUD_NAME -g $AZURE_RESOURCE_GROUP --sku BasicAfter you run this command, it creates an Application Insights component for gathering analytics and telemetry.
-
Set the session defaults for the resource group and Azure Spring Apps instance names so that you don’t need to enter them for every command:
az configure --defaults group=$AZURE_RESOURCE_GROUP
az configure --defaults spring-cloud=$AZURE_SPRING_CLOUD_NAME
Config Server
The Config Server needs a Git repository to store the Spring Boot configuration files. Using a Git repository has the following advantages:
-
Your configuration is stored in a central location, making it easier to maintain.
-
You can secure your Git repository to limit access to specific applications and users.
-
With the configuration stored in a Git server, it’s easy to push changes or roll them back as needed.
-
Your secrets don’t need to be stored with the application itself.
The Git repository can be public, secured by SSH, or secured using HTTP basic authentication.
You can store the configuration files in YAML in application.yml or in name-value pairs in application.properties.
To run a Config Server:
-
Create a Git repository with an application.yml or application.properties file to store the configuration needed for the services.
The following sample shows the application.properties file for the Config Server:
# azure.cosmos properties are needed for the CosmosConfiguration bean # azure.cosmosdb values are from Service bindings on Azure Spring Apps application azure.cosmos.uri=${azure.cosmosdb.uri} azure.cosmos.key=${azure.cosmosdb.key} azure.cosmos.database=${azure.cosmosdb.database} azure.cosmos.populateQueryMetrics=false # Disabling web security for the spring project spring.autoconfigure.exclude=org.springframework.boot.autoconfigure.security.servlet.SecurityAutoConfiguration -
Create a Git personal access token (PAT) with repo access for the Config Server to use.
-
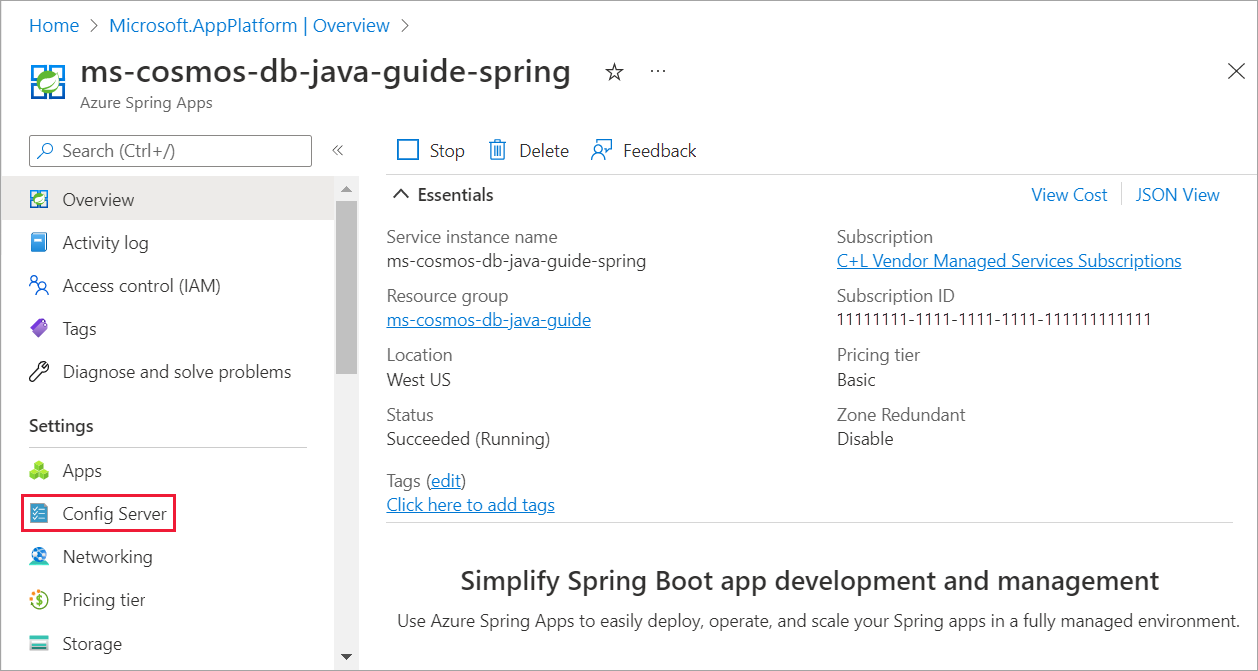
In the Azure portal, navigate to the Azure Spring Apps instance.
-
On the left menu, select Config Server.
-
On the Config Server page, add a default repository with the following details:
-
URI: Git repository URI, including the .git extension.
-
Label: The branch or tag to use, which defaults to main.
-
Search Path: <blank>
-
Authentication: Select Public to display the Edit Authentication popup and configure the following settings:
-
Authentication Type: Select HTTP Basic, which displays the Username and Password fields.
-
Username: Enter your Git username.
-
Password/Personal access token: Enter your password or personal access token.
-

-
-
From the top menu, select Validate. After the settings are validated, select Apply.
Your service settings are now stored in the application.properties or application.yml file in the Config Server repository.
Deploy a Maven application to Azure Spring Apps
Deploy your service, complete with CRUD, to Azure Spring Apps.
Create the Azure Spring Apps application
After you create the Azure Spring Apps instance, you need to create an app for it. Each service has its own app.
To create a new app:
-
Gather the following information:
-
Name of the Azure resource group to use
-
Name for the Azure Spring Apps instance
-
Name for the app
-
Runtime version
You can also specify whether to assign an endpoint and assign a managed identity. You’ll assign an endpoint for it, because this app should be public. Because you’re not explicitly granting access between Azure resources, you won’t create a managed identity on this sample app.
-
-
Enter the following command to create the Azure Spring Apps pet-supplies-app application:
az spring app create -n pet-supplies-app --runtime-version Java_11 --assign-endpoint true
Link the Azure Spring Apps application to Azure Cosmos DB
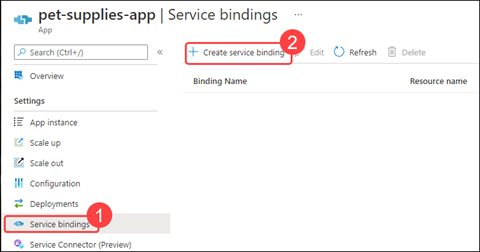
After you create the app, add a service binding for the app to talk directly with Azure Cosmos DB:
-
In the Azure portal, navigate to the Azure Spring Apps resource.
-
Select the pet-supplies-app app.
-
From the left menu, select Service bindings. Then, select Create service binding.
-
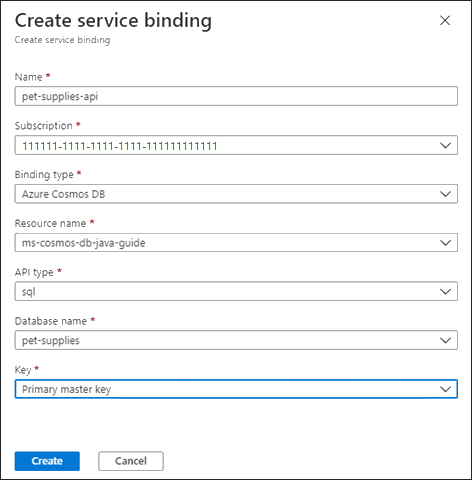
In the Create service binding dialog, configure the following settings:
-
Name: Enter the name for the service binding, pet-supplies-api.
-
Subscription: Choose your subscription.
-
Binding type: Select Azure Cosmos DB.
-
Resource name: Select your Azure Cosmos DB instance.
-
API type: Select sql.
-
Database name: Select pet-supplies.
-
Key: Select Primary master key.
-
-
After you’ve finished configuring the settings, select Create.
-
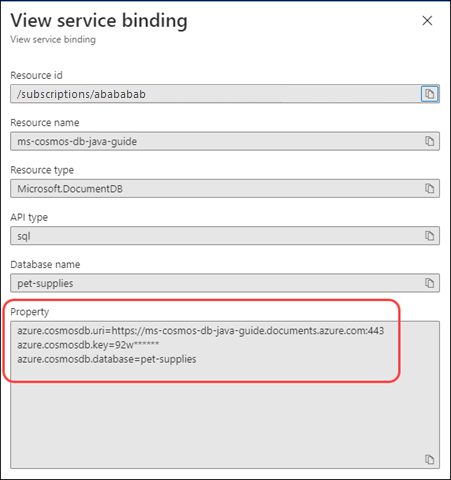
After the service binding is created, select pet-supplies-api from the Binding Name column.
The View service binding dialog appears. Notice that the Property section has the settings needed for connecting to Azure Cosmos DB. Use these settings rather than storing the connection information in Azure Key Vault.
Set up diagnostic logging (optional)
Setting up diagnostic logging makes it easier to debug issues when you deploy an Azure Spring Apps solution, because you can then query the logs for information.
To set up diagnostic logging, follow these steps:
-
Create a Log Analytics workspace with the following Azure CLI command:
az monitor log-analytics workspace create --workspace-name ms-cosmos-db-java-guide-logsAfter the Log Analytics workspace is created, you’re ready to continue setting up diagnostic logging.
-
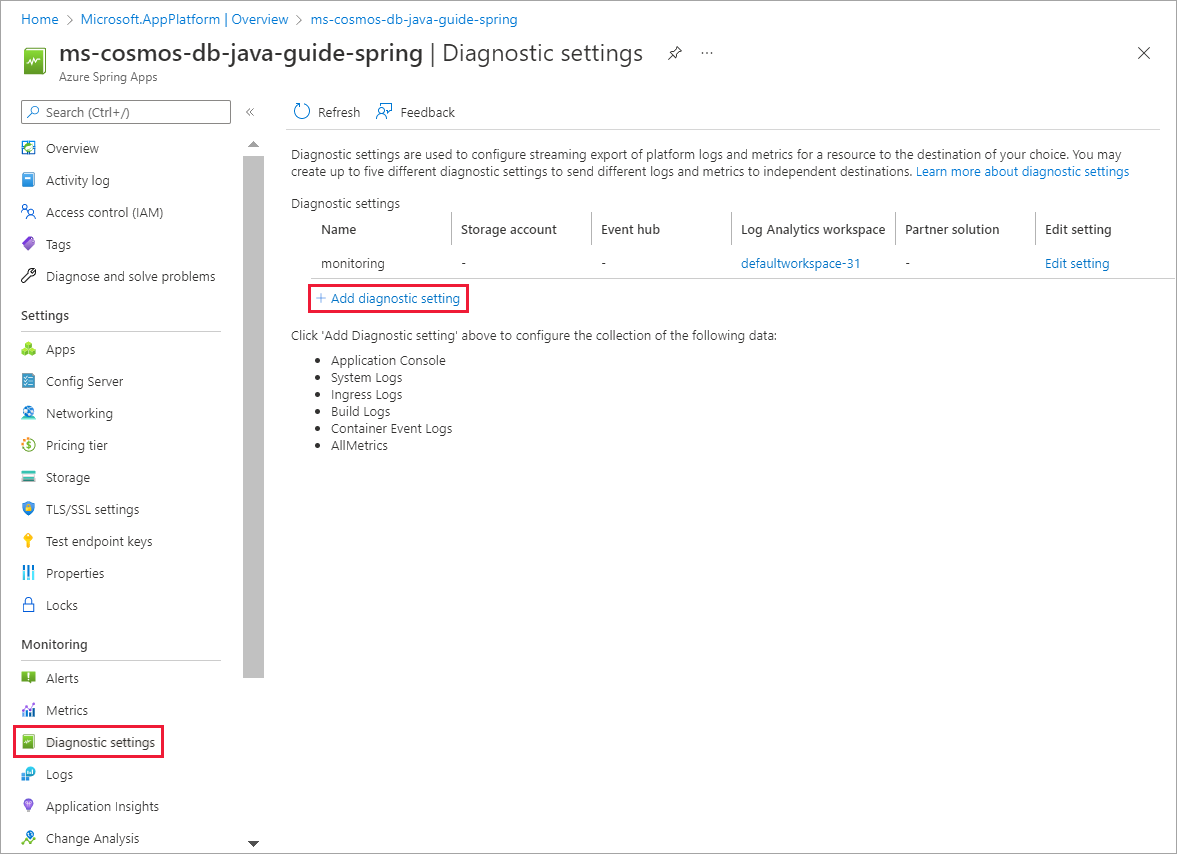
In the Azure portal, navigate to the Azure Spring Apps instance.
-
From the left menu, select Diagnostic settings. Then, select Add diagnostic setting.
-
Configure the following settings:
-
Set the Diagnostic setting name to write-all-logs.
-
Under Logs, select every category.
-
Under Metrics, select AllMetrics.
-
Under Destination details, select Send to Log Analytics workspace, and then select the Log Analytics workspace you created in step 1.
-
-
From the top menu, select Save.
Deploy the code to Azure Spring Apps application
After you create the Azure Spring Apps instance and app, you can deploy the code to the Azure Spring Apps application:
-
Gather the following information:
- App name
- Azure Spring Apps instance name (service)
- Azure resource group name
- Artifact path
-
Enter the following command:
az spring app deploy -n pet-supplies-app --artifact-path target/demo-0.0.1-SNAPSHOT.jarAfter this command is complete, you’ll see a JSON response object in the output, which indicates that the deployment was successful.
-
You can now use the URL of the app to test access. To do so, use the following curl command:
curl $(az spring app list --query "[?name=='pet-supplies-app'].[properties.url]" -o tsv)
Clean up resources
To avoid unnecessary expenses, remove the Basic SKU you created after you’re finished and delete the resource group, which also deletes its contents.
Learn more
To learn more about Azure Spring Apps, see the following resources: