Get started with Java and Azure Key Vault
When you work with Azure resources from within Azure, you can use managed identities to give resources correct access. System-assigned managed identities are preferable because they live with their associated resources and are deleted when the resource is deleted. In the following example, you create a Spring Boot application that can read a value from Azure Key Vault.
In this example, suffixes are used on many resource names for clarity on what they represent.
Prerequisites
-
An Azure account
-
Azure CLI
-
Java 11 or higher
-
Maven
Create a resource group
Create a resource group to store all of the resources in this example. Throughout this example, use the name java-keyvault-demo-rg.
-
Sign in to Azure via the CLI with the following command:
az login -
Create a resource group with the following command:
az group create --location eastus --resource-group java-keyvault-demo-rg
Create a key vault
Throughout this guide, you store connection strings and other application secrets in Azure Key Vault. The upcoming code examples show you how to work with Azure Key Vault in Java. You use the name java-keyvault-demo-kv.
-
To create a key vault, you need your resource name and resource group name. Create your key vault with the following command:
az keyvault create --name java-keyvault-demo-kv -g java-keyvault-demo-rg -
Add a secret to your vault so that you can retrieve it by using Java. To create a value in a key vault, you need the vault name, key name, and value. Create a secret with a generic key named keyName and a secret value of secretValue:
az keyvault secret set --vault-name java-keyvault-demo-kv --name "keyName" --value "secretValue"
You now have a key vault with a key available to be fetched.
Azure key vault names are globally unique. If you input a name that’s already in use, you get a VaultAlreadyExists error.
Confirm the vault setup in the Azure portal
You can view the Azure Key Vault resource and its stored values from the Azure portal.
-
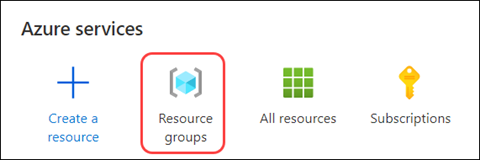
Navigate to the Azure portal.
-
Select Resource groups.
-
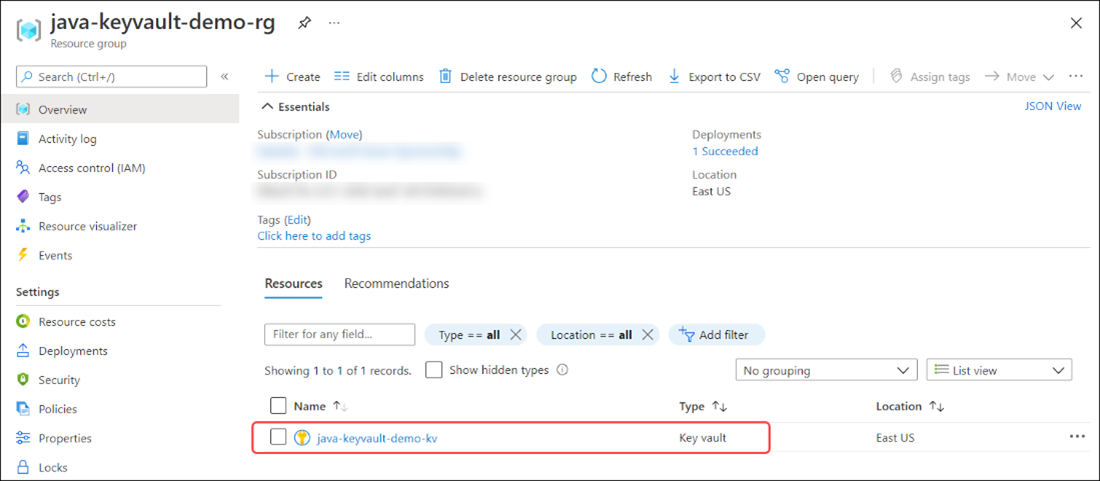
Select the name of your resource group.
-
Select the name of the key vault.
-
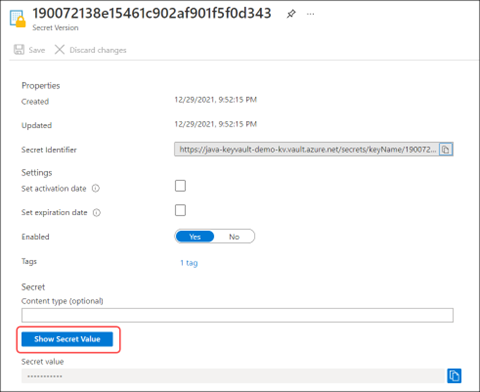
From the menu on the Key vault page, select Secrets to load your stored secrets. Then, select the key named keyName.
Different versions of the stored value load.
-
Select the current version to view the stored value.

-
Select Show Secret Value to see the stored secret value.
-
Notice that the secret value can now be revealed.

Create a Java Spring Boot application with Azure Key Vault and run it locally
Now that you have a value to retrieve, create a Java Spring Boot application to get that value. Keep in mind that you use this pattern to store connection strings and other secrets throughout this guide. For this section, you can use the IDE of your choice plus the Spring Boot Initializr. This example uses Visual Studio Code with the Spring Initializr Java Support extension installed.
Create the Java Spring Boot example
Visual Studio Code has tools that work with Java. The Spring Initializr Java Support extension creates Spring Boot starters like https://start.spring.io without having to leave the editor and without needing to extract an archive file. You create a Spring Web application with a plan to eventually migrate it to an Azure web hosting resource.
-
Open the command palette in Visual Studio Code. Search for Spring Initializr. Select Spring Initializr: Create a Maven Project.
-
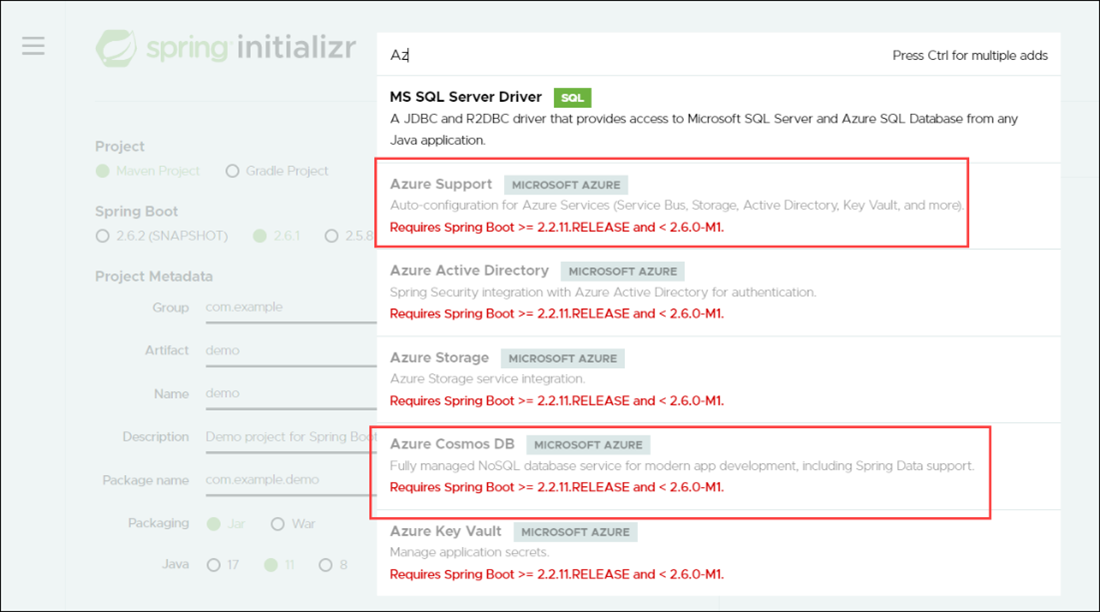
For the Spring Boot version, select 2.5.8, which is the most recent stable version below 2.6. This guide uses this version for its examples because many Azure dependencies require versions greater than or equal to 2.2.11.RELEASE, and less than 2.6.0-ML.
-
On the Spring Initializr page, make the following selections:
-
For Project language, select Java.
-
For Group ID, enter com.example.
-
For Artifact ID, enter demo.
-
For Packaging type, select Jar.
-
For Java version, select 11.
-
-
Choose the dependencies for this example by selecting Spring Web and Azure Key Vault. Then, select Enter.
-
Select a folder to generate your project. Then select Generate into this folder to generate the boilerplate.
After the sample is created, Visual Studio Code notifies you that the code is successfully generated.
Add to the Java Spring Boot-generated app
After you’ve generated the Java Spring Boot app, you can tailor it to your needs.
-
Add a file to src\main\java\com\example\demo named KeyvaultDemoController.java.
-
Add the following source code to the file:
package com.example.demo; import org.springframework.web.bind.annotation.RequestMapping; import org.springframework.web.bind.annotation.RestController; import com.azure.identity.DefaultAzureCredentialBuilder; import com.azure.security.keyvault.secrets.SecretClient; import com.azure.security.keyvault.secrets.SecretClientBuilder; import com.azure.security.keyvault.secrets.models.KeyVaultSecret; @RestController public class KeyvaultDemoController { @RequestMapping("/") public String getKeyvaultValue() { return getStoredValue("keyName"); } private String getStoredValue(String keyName){ String keyVaultName = System.getenv("KEY_VAULT_NAME"); String keyVaultUri = "https://" + keyVaultName + ".vault.azure.net"; SecretClient secretClient = new SecretClientBuilder() .vaultUrl(keyVaultUri) .credential(new DefaultAzureCredentialBuilder().build()) .buildClient(); KeyVaultSecret storedSecret = secretClient.getSecret("keyName"); return storedSecret.getValue(); } } -
Use
DefaultAzureCredentialBuilderto manage your credentials for your key vault. When you run the code locally,DefaultAzureCredentialBuilderlooks for three environment variables:AZURE_CLIENT_ID,AZURE_CLIENT_SECRET, andAZURE_TENANT_ID. -
You created a service principal to use in our development environment. When the application is deployed to Azure,
DefaultAzureCredentialBuilderlooks for the managed identities and service principals of Azure resources that attempt to access Key Vault. To useDefaultAzureCredentialBuilder, you need to addazure-identityas a dependency to the pom.xml file. Add the following code in the <dependencies> section of pom.xml:<dependency> <groupId>com.azure</groupId> artifactId>azure-identity</artifactId> </dependency>
Generate the service principal
Set up environment variables for DefaultAzureCredentialBuilder. These variables hold values from our service principal.
Contact your Azure administrator to create a service principal if you don’t have the rights to do so in your tenant.
To create a service principal, you first need to choose a name. Use the name java-keyvault-demo-sp. Create your service principal using the following command:
az ad sp create-for-rbac -n java-keyvault-demo-sp --role=Contributor
This command produces output values similar to the following sample:
{
   "appId": "ac69d748-d878-4019-81c5-063c511d7857",
   "displayName": "java-keyvault-demo-sp",
   "name": "ac69d748-d878-4019-81c5-063c511d7857",
   "password": "nqaZaiJZMPZixptdoLT10Wz9xJSM~DYzzw",
   "tenant": "a98511b4-fa78-4893-bf7b-0eba7bf495f4"
}
Set your environment variables
There are four environment variables to set up locally for this example:
-
KEY_VAULT_NAME: For this demo, use java-keyvault-demo-kv. -
AZURE_CLIENT_ID: Set to the appId value. -
AZURE_CLIENT_SECRET: Set to the password value. -
AZURE_TENANT_ID: Set to the tenant value.
Package and run locally
-
After you’ve set your environment variables, run the following command to package the demo:
mvn clean package -DskipTests` -
Run the Spring Boot web application in Tomcat:
mvn spring-boot:runThis command outputs a URL for the web application. Save this URL for later.
-
To confirm the output, use the URL generated by the previous command to open your web application in a web browser.
You should see secretValue displayed in the browser.
Create a Java Spring Boot application to use Azure Key Vault and run it on Azure
You can communicate with Azure Key Vault locally by using DefaultAzureCredentialBuilder and your environment variables. To host your code, move it to Azure as shown in the following sections.
Deploy a Maven application to Azure App Services
One of the ways to host your application in Azure is through Azure App Services. Azure App Service has some terminology that you need to be aware of:
-
Azure App Service plan
Apps run on an Azure App Service plan. It determines the operating system, region, number of virtual machines, size of virtual machines, and the pricing tier. Pricing tiers are built around CPU and compute setups.
-
App types
Three types of apps run on Azure App Service plans: Azure Web Apps, Azure API Apps, and Azure Mobile Apps.
Set up the Maven plugin and configure it for Azure Web Apps
Use the Maven Plugin for Azure Web Apps to help deploy your application to an Azure App Service.
-
To install the Maven Plugin for Azure Web Apps, run the following command:
mvn com.microsoft.azure:azure-webapp-maven-plugin:2.3.0:config`.This command creates the initial settings for your Azure App Service. Your application is deployed to a Linux Azure App Service plan with a Java 11 runtime.
-
After you’ve complete the configurator, view pom.xml and make note of the <build> section. This section should appear as follows:
<build>
   <plugins>
      <plugin>
         <groupId>org.springframework.boot</groupId>
         <artifactId>spring-boot-maven-plugin</artifactId>
      </plugin>
      <plugin>
         <groupId>com.microsoft.azure</groupId>
         <artifactId>azure-webapp-maven-plugin</artifactId>
         <version>2.3.0</version>
         <configuration>
            <schemaVersion>v2</schemaVersion>
            <resourceGroup>java-keyvault-demo-rg</resourceGroup>
            <appServicePlanName>java-keyvault-demo-asp</appServicePlanName>
            <appName>java-keyvault-app</appName>
            <region>eastus</region>
            <runtime>
               <os>Linux</os>
               <javaVersion>Java 11</javaVersion>
               <webContainer>Java SE</webContainer>
            </runtime>
            <deployment>
               <resources>
                  <resource>
                     <directory>${project.basedir}/target</directory>
                     <includes>
                        <include>*.jar</include>
                     </includes>
                  </resource>
               </resources>
            </deployment>
         </configuration>
      </plugin>
   </plugins>
</build>
If you see your <SubscriptionId> in the POM file, remove it; it isn’t necessary to store it in this file. Pay attention to the following settings:
-
<appServicePlanName>: Specifies the associated App Service plan.
-
<appName>: Identifies the app in the Azure App Service plan. The Maven Plugin for Azure Web Apps creates the app during deployment.
-
<resourceGroup>: Set to the resource group you created for this example. The configurator doesn’t prompt you for the resource group name.
-
<region>: Set to the region of your resource group.
-
<runtime>: Contains the operating system, Java version, and container.
Create the Azure App Service plan and Web application
Now that you’ve prepared to move your application to an Azure App Service plan, you can create the Azure resource and configure Azure. Before you do so, you need to create the Azure App Service plan.
When you create an Azure App Service plan, you need a name, resource group, and SKU. Use the name java-keyvault-demo-asp, the resource group java-keyvault-demo-rg, and the Free SKU. Learn more about Azure App Service pricing tiers.
To create the Azure App Service plan, run:
az appservice plan create -n java-keyvault-demo-asp -g
java-keyvault-demo-rg --sku FREE --is-linux
Deploy to Azure App Service
When you deploy the app to Azure App Service, it creates the Azure App, if it doesn’t already exist. To deploy the application, run:
mvn package azure-webapp:deploy
The Maven Plugin for Azure Web Apps uses your Azure CLI access token for authentication and publishes the app to Azure.
Although the code is now deployed, it needs to be configured to work successfully.
Create a system-assigned managed identity for the App Service
Because our application runs within Azure, you can use managed identities to securely access resources. Create a system-assigned managed identity for your Azure Web App, which you can then use with role-based access control and Azure Key Vault vault policies.
To create a managed identity for the web app, run:
az webapp identity assign --name java-keyvault-app --resource-group java-keyvault-demo-rg
Make note of the principalId in the output.
Grant your Azure Web App access to Azure Key Vault
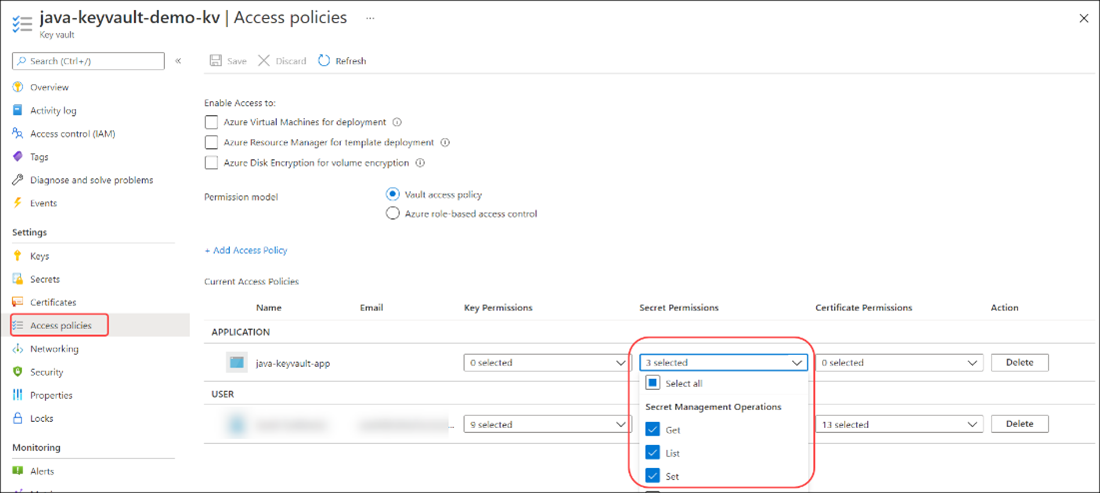
For your Azure Web App to access Azure Key Vault, you need to create a vault policy or Azure role assignment for your managed identity. Your key vault is set for vault policies, so you create a vault policy for your managed identity.
The Azure Web App needs to retrieve secrets from Azure Key Vault. It doesn’t rotate or change the data.
- To grant access to the new managed identity, replace <YOUR_PRINCIPAL_ID> with the principalId value of the system-assigned managed identity.
az keyvault set-policy --name java-keyvault-demo-kv --object-id <YOUR_PRINCIPAL_ID> --secret-permissions set get list
-
To verify that access was granted correctly, select Access policies and confirm that the managed identity appears under the Application section.
Set the KEY_VAULT_NAME environment variable
You don’t explicitly store the key vault name in our application. Instead, you can use application settings with Azure App Service applications. To configure application settings, you need to know your Azure App name, resource group name, and the key-value pair for the application setting.
-
To set the
KEY_VAULT_NAMEvariable, run:az webapp config appsettings set --name java-keyvault-app --resource-group java-keyvault-demo-rg --settings KEY_VAULT_NAME=java-keyvault-demo-kv
To confirm that the key vault name was set successfully:
-
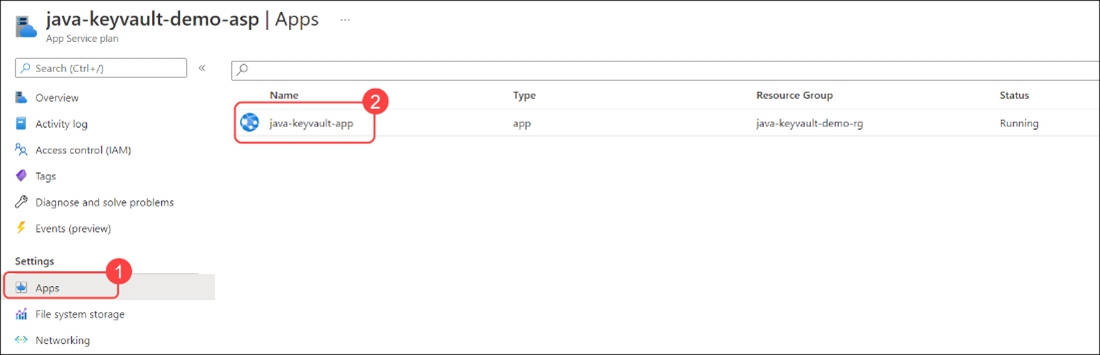
Navigate to the App Service plan resource in the Azure portal.
-
From the navigation in the App Service plan screen, select Apps. Then, select java-keyvault-app.
-
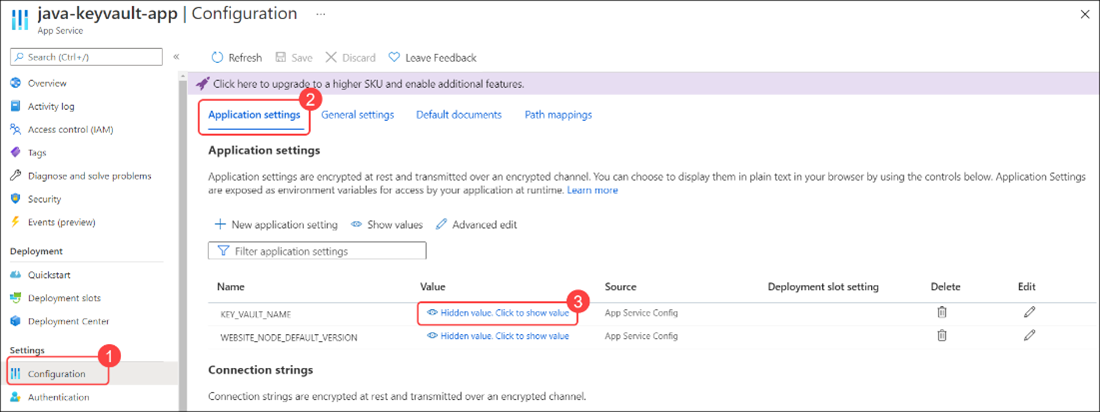
From the navigation in the App Service screen, select Configuration. Then, select Application settings.
-
To see the value of
KEY_VAULT_NAME, select the Hidden value, and then select it to show the value link.You should see the name of the key vault resource.
Confirm that the Azure App Service works successfully
After the managed identity is granted access to the key vault and the key vault name environment variable is set, you can confirm that your app works successfully.
-
In the Azure portal, navigate to your Azure App.
-
On the Overview pane, find the URL. Select the url to go to the deployed app.
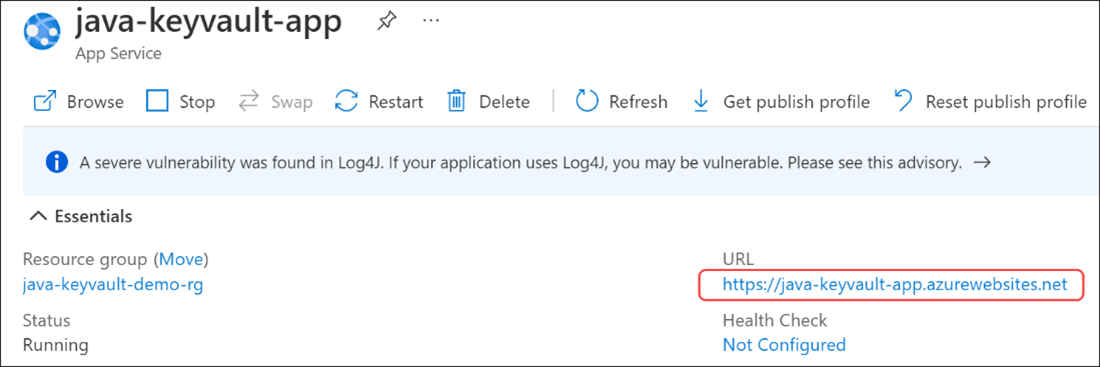
The secret value of secretValue appears.
Clean up resources
You can use this app as a guide for working with Java and Spring Boot. It also demonstrates how to use Azure Key Vault to store application secrets and host your Java app on an Azure App Service.
If you don’t intend to use this app, you should remove its resources to avoid unnecessary charges Deleting a resource group also deletes its contents.
To delete the resource group, run:
az group delete --name java-keyvault-demo-rg
To delete the service principal, which isn’t tied to a resource, run:
az ad sp delete --id AZURE_CLIENT_ID