Announcing GitHub Actions for App Service
Last week GitHub announced the preview of GitHub Actions with built-in CI/CD; watch the announcement here. These actions, defined in YAML files, allow you to trigger an automated workflow process on any GitHub event. Today the App Service team is happy to share our own action, allowing you to deploy to App Service following a push or pull request.
With the App Service Action, you can deploy your code to any of our managed language stacks. Simply specify your source code folder, zip file, JAR or WAR. If you prefer to deploy a Docker container instead, there’s an action for that!
Getting Started
GitHub Actions are currently in Beta. Request access here.
Configure the repository
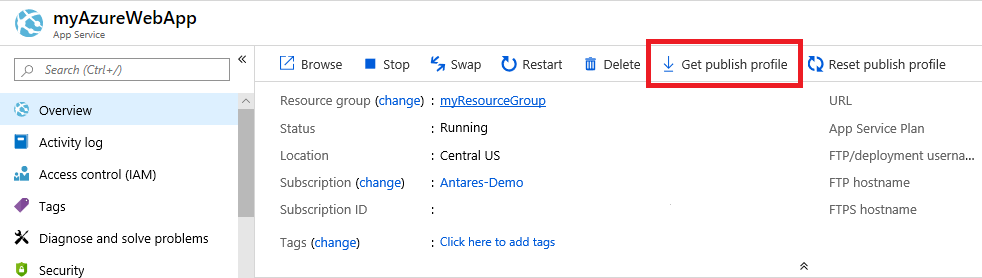
- Open the Azure Portal and navigate to your web app.
- In the toolbar, select Get publish profile. This will trigger a download.
- Open the downloaded file and copy the contents
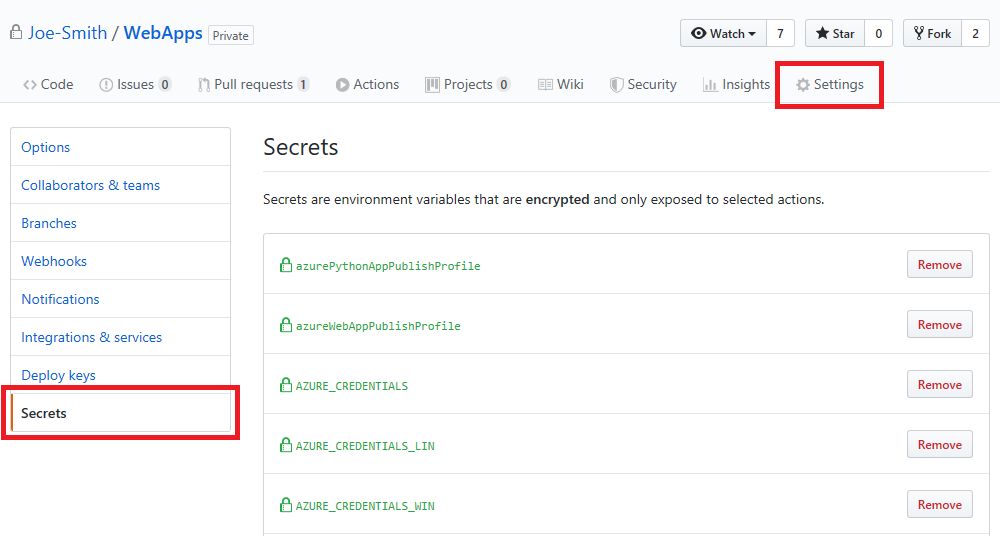
- Open GitHub and navigate to your repository
- Select Settings > Secrets. On the Secrets page, select Add a new secret and paste your publish profile XML.
Now you’re ready to create the workflow file.
Create the action
If you do not have any workflows defined, select the Actions tab and follow the prompts to create a new workflow. This will create a new directory an file in the root of your repository, /.github/workflows/workflow.yml.
In the editor for workflow.yml, define the build steps for your application. For example, a Node application is typically built using npm install followed by npm run build. Below is an example workflow file that installs the dependencies, builds the project, and runs tests on the latest Ubuntu version.
on: push

jobs:
  build:
    runs-on: ubuntu-latest
    steps:
    # This checks out the repository so your workflow operates from root of repository
    - uses: actions/checkout@master

    # Install dependencies, build, and test
    - name: npm install, build, and test # Name is optional
      run: |
        npm install
        npm run build --if-present
        npm run test --if-present
See the examples at the end of this article for specific language examples.
Add the App Service Action
After your build action, add the App Service action with uses: azure/appservice-actions/webapp@master. This action has the following required arguments. These should be listed under a with: key:
app-name:Your application namepackage:The path to the deployment file or folder (relative from the root)publish-profile:The publish profile that you pasted into the GitHub Secrets earlier
# Deploy to App Service
- name: 'Run Azure webapp deploy action using publish profile credentials'
    uses: azure/webapps-deploy@v1
    with:
      app-name: node-rn # Replace with your app name
      publish-profile: ${{ secrets.azureWebAppPublishProfile }} # Replace with the name of your publish profile
      package: <path to artifact>  # Specify the folder or file to deploy
Deploy to a slot
The App Service Action deploys to the production slot by default. To deploy to a staging slot, redo the publish profile steps with the publish profile from your desired staging slot.
Other Azure Actions
In addition to this action, there are actions for other common Azure scenarios such as deploying to Azure Kubernetes Service, logging into Azure with a service principal, or signing into Docker. See the links below.
Examples
Containers
To deploy a container, you will need to create an Azure Service Principal via the Azure CLI, then paste the details of the principal as a GitHub Secret.
- Install the Azure CLI
-
Run the following command, replacing
{subscription}and{resource-group}with the subscription and resource group of your applicationaz ad sp create-for-rbac --name "myServicePrincipal" --role contributor \ --scopes /subscriptions/{subscription}/resourceGroups/{resource-group} \ --sdk-auth - Open GitHub and navigate to your repository
- Select Settings > Secrets. On the Secrets page, select Add a new secret and paste the JSON output from the earlier
az ad spcommand. - Finally, add your Docker username and password as GitHub Secrets
Here is a full example:
on: push

jobs:
  deploy-container:
    runs-on: ubuntu-latest
    steps:
    - uses: actions/checkout@master

    # Unlike code deployment, you will authenticate using a Service Principal
    - uses: azure/actions/login@master
      with:
        creds: ${{ secrets.AZURE_SP }}

    # These creds are used to push your new image
    - uses: azure/container-actions/docker-login@master
      with:
        username: ${{ secrets.DOCKER_USERNAME }}
        password: ${{ secrets.DOCKER_PASSWORD }}
        #loginServer: '<login server>' # default: index.docker.io

    # Tag the image with the git commit hash
    - run: |
        docker build . -t contoso/demo:${{ github.sha }}
        docker push contoso/demo:${{ github.sha }}

    - uses: azure/appservice-actions/webapp-container@master
      with:
        app-name: '<your app name>'
        images: 'contoso/demo:${{ github.sha }}'
        #configuration-file: 'Optional path to a docker compose file'
        #container-command: 'Optional startup command for the app (dotnet run, java -jar app.jar)'
Java
When deploying Java apps, make sure you specify the package name relative from the root directory. Most likely, your deployment artifact will be in the target/ directory.
on: push

jobs:
  java-build-and-deploy:
    runs-on: ubuntu-latest
    steps:

    - uses: actions/checkout@master

    - name: Set up JDK 1.8
      uses: actions/setup-java@v1
      with:
        java-version: 1.8

    # install dependencies, build, and test
    - name: Maven build phase
      run: |
        mvn clean package

    - uses: azure/webapps-deploy@v1
      with:
        app-name: <your-app-name>
        publish-profile: ${{ secrets.<publish-profile> }}
        package: target/app.war  # Can also be a jar
Node
on: push

jobs:
  build-and-deploy:
    runs-on: ubuntu-latest
    steps:
    - uses: actions/checkout@master

    - name: Set Node.js version
      uses: actions/setup-node@v1
      with:
        node-version: '10.x'

    # install dependencies, build, and test
    - name: npm install, build, and test
      run: |
        npm install
        npm run build --if-present
        npm run test --if-present

   - uses: azure/webapps-deploy@v1
     with:
       app-name: <your-app-name>
       publish-profile: ${{ secrets.<publish-profile> }}
       package: '.'
Python
on: push

jobs:
  build-and-deploy:
    runs-on: ubuntu-latest
    steps:
    - uses: actions/checkout@master

    - uses: actions/setup-python@v1
      with:
        python-version: '3.7.4'

    - name: install dependencies, and zip the app to use ZipDeploy
      run: |
        pip install -r requirements.txt

    - uses: azure/appservice-actions/webapp@master
      with:
        app-name: <your-app-name>
        publish-profile: ${{ secrets.<publish-profile> }}
DotNet
on: push

jobs:
  build-and-deploy:
    runs-on: ubuntu-latest
    steps:
    - uses: actions/checkout@master

    - name: Setup .NET Core
      uses: actions/setup-dotnet@v1
      with:
        dotnet-version: 2.2.108

    - name: Build with dotnet
      run: dotnet build --configuration Release
    - name: dotnet publish
      run: |
        dotnet publish -c Release -o myapp

    - uses: azure/webapps-deploy@v1
      with:
        app-name: <your-app-name>
        publish-profile: ${{ secrets.<publish-profile> }}
        package: './myapp'