Removing Easy Tables and Easy APIs from Azure App Service
Integrating mobile services in your application? Sign up with App Center
Visual Studio App Center is the next generation solution for mobile application developers. It offers integrated end-to-end services central to mobile development. If you are integrating Microsoft cloud services in your mobile application, sign up with App Center today.
Removing Easy Tables and Easy APIs from Azure App Service
Azure App Service provides specific features for Node developers to easily get started with mobile backend services by leveraging Easy Tables and Easy APIs in the Azure portal. Easy Tables provides a portal experience for Node developers to create and manage their tables, their schema, and appropriate permissions. Easy APIs lets developers build and consume custom APIs in the backend.
Easy Tables and Easy APIs, along with the Mobile menu in the Azure portal will be removed on November 11, 2019 as these features have a limited audience and the existing functionality can be leveraged in alternate ways.
Developers that have mobile apps with a Node.js backend can leverage the existing functionality from Easy API and Easy Tables by following the guidance below.
Easy API
Existing API
Your existing APIs will continue to work as the backend is already deployed on App Services.
Create a new API or make changes to existing API
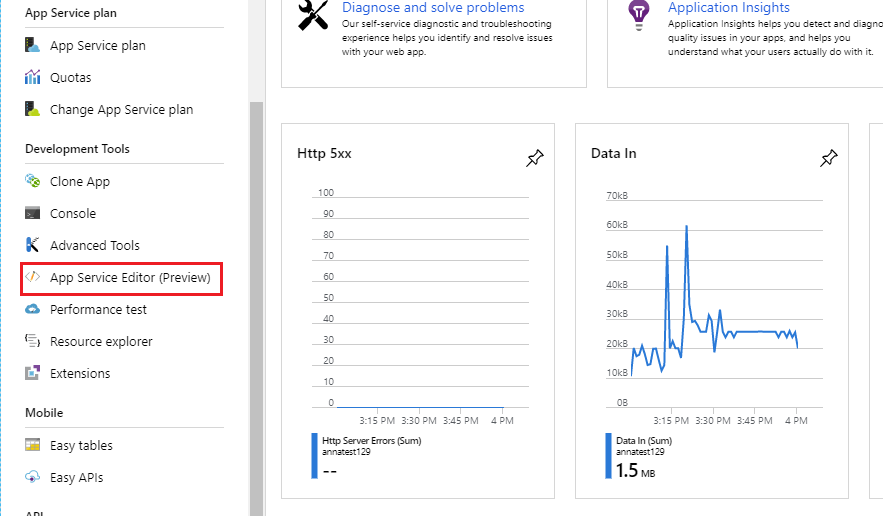
You can either make changes right in the Azure portal or modify the code locally in your development environment and then publish to Azure. Click on the App Service Editor (Preview) under Development Tools menu which provides an in-browser editing experience for your app code.

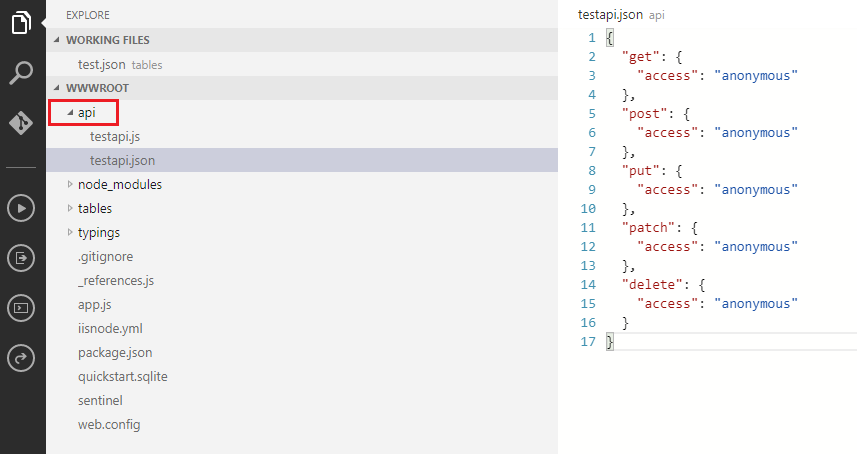
Click on Go and once the App Service Editor opens, you have full control over the source code. Assuming you have already installed express and azure-mobile-apps package with npm install command, click on the api folder under WWWROOT to create or edit custom API. Make your changes to the code file and the changes are saved automatically.

Easy Tables
You have full control on the Azure SQL Database used to store the application data. Your existing tables will continue to work without any required changes. For the existing portal features, below are the alternatives:
Add from CSV
Follow the documentation link in order to load data from CSV into Azure SQL Database.
Add Table
The “+ Add” button lets you add tables to the database. There are four options for creating new tables in the database.
-
Use SQL Server. This tutorial explains how to create tables in your database.
-
From the SQL database in Azure portal, you can run the following query to add a table named
TodoItemsfrom Query editor (preview)CREATE TABLE TodoItems ( id NVARCHAR(36) PRIMARY KEY, createdAt DATETIMEOFFSET NOT NULL, updatedAt DATETIMEOFFSET, version TIMESTAMP NOT NULL, deleted BIT NOT NULL, complete BIT NOT NULL, text NVARCHAR(256) ); -
In App Service Editor or locally, click on
wwwroot/tablesdirectly to create new files, {tablename}.js and {tablename}.json where {tablename} refers to the name of the table you created in Step 1. Sample code can be found at todoitem.js and todoitem.json. -
Edit the files locally and deploy the changes to Azure App Service.
Change permission
In order to change access permissions on tables, you can either use the portal to change the code or modify it locally in your development environment. Click on the App Service Editor (Preview) under Development Tools menu which provides an in-browser editing experience for your app code.
Assuming you have already installed express and azure-mobile-apps package with npm install command, click on “Go” to open the App Service Editor. Once open, click on the tables folder under WWWROOT and open the json file for the table that you want the permissions to change. This will let you modify the access permissions for insert, update, delete, read and undelete operations for that table. You can also do this locally in the app code and deploy back to App Services.
Edit script
You can edit your table script by either using the App Service Editor or modifying the code locally and deploying it back to App Services.
Delete table
Since you own your SQL database, you can delete the table by executing a SQL query against the database.
Clear table
Since you own your SQL database, you can clear contents of the table by executing a SQL query against the database.
Streaming logs
You can use Log stream under the Monitoring menu to stream your application and Web Server logs.
