Installing a vFXT series edge filer in Amazon EC2
To create the vFXT cluster, follow these basic steps:
- Create and configure network infrastructure (itemized below in Network infrastructure checklist and described in more detail in the Product requirements section)
- Create the IAM role for the cluster controller (details in Creating the IAM role)
- Create the cluster controller instance and configure it with the required software (described in Creating a cluster controller)
- From the cluster controller instance, run the vfxt.py script and create the cluster (details in Creating a vFXT cluster)
The vfxt.py script
Avere Systems has created a script that automates vFXT cluster creation. The vfxt.py script can be run from a machine within the cloud (recommended) or from a local machine. Complete details for using the script can be found in the vfxt.py Usage Guide.
Network infrastructure checklist
As the first step in creating a vFXT cluster, create and configure the following network infrastructure in your AWS project.
- VPC - read AWS virtual private cloud (VPC)
- Public and private subnets - read Subnet
- Public and private route tables associated with the corresponding subnets - read Routing
- Security group that allows access to the VPC’s IP address range and ports 22, 80, and 443 - read Security groups
- Internet access through an internet gateway (IGW), NAT, or VPN - read Internet access
Creating the IAM role
A cluster controller instance is used to perform several types of operations within the AWS cloud in order to create the cluster. The cluster controller requires permission to create and modify AWS entities. To assign it these permissions, you must create a role that includes the needed permissions, and then use a profile to attach the role to the instance.
Avere Systems recommends creating an IAM role specifically for the cluster controller instance.
There are two parts to creating the IAM role. First, define the policy with the permissions for cluster creation. Second, add the policy to a role so that it can be connected to the cluster controller instance.
Take these steps in the AWS Identity & Access Management console.
Creating the policy
Follow these steps to create the permissions policy for the cluster controller role.
- Navigate to the Identity & Access Management service within AWS.
- Click Policies on the left.
- Click the blue Create Policy button.
- Choose Select next to Create Your Own Policy.
- Provide a policy name - for example,
vfxt-policy - Copy and paste the following policy:
(A downloadable text file appears in the appendix.)
{
    "Statement": [
    {
        "Resource": "*",
        "Action": [
            "ec2:Describe*",
            "ec2:RunInstances",
            "ec2:TerminateInstances",
            "ec2:RebootInstances",
            "ec2:StartInstances",
            "ec2:StopInstances",
            "ec2:CreateTags",
            "ec2:DeleteTags",
            "ec2:ModifyInstanceAttribute",
            "ec2:CreateVolume",
            "ec2:DeleteVolume",
            "ec2:AttachVolume",
            "ec2:DetachVolume",
            "ec2:CreateSnapshot",
            "ec2:DeleteSnapshot",
            "ec2:RegisterImage",
            "ec2:DeregisterImage",
            "ec2:CreateImage",
            "ec2:DeleteRoute",
            "s3:CreateBucket",
            "s3:DeleteBucket",
            "s3:SetTag",
            "s3:ListBucket",
            "iam:AddRoleToInstanceProfile",
            "iam:CreateInstanceProfile",
            "iam:CreateRole",
            "iam:DeleteInstanceProfile",
            "iam:DeleteRole",
            "iam:DeleteRolePolicy",
            "iam:GetRolePolicy",
            "iam:ListRolePolicies",
            "iam:GetInstanceProfile",
            "iam:PutRolePolicy",
            "iam:RemoveRoleFromInstanceProfile",
            "iam:GetRole",
            "iam:PassRole"
        ],
        "Effect": "Allow"
    }
    ],
    "Version": "2012-04-18"
}
- Click the Validate Policy button.
- Click the blue Create Policy button.
Creating the cluster controller role
After the cluster creation policy has been created, you must create a new role that uses the policy.
- Navigate to the Identity & Access Management service within AWS.
- Click Roles on the left.
- Click Create New Role.
- Enter a name for the role - for example,
vfxt-role - Click Next Step.
- Choose Select next to Amazon EC2.
- Click the checkbox next to the cluster controller policy.
- Click Next Step.
- Click Create role.
When you create the cluster controller instance, you will assign it the role that you created in this step.
Creating a cluster controller
Avere Systems recommends installing and running the vfxt.py script on a Linux-based instance in the cloud. This instance, called a cluster controller instance, can be a pre-existing instance, or you can create a new one. In either case, you must assign it the cluster controller role that you defined in the previous step.
After you create the cluster controller instance, you will download the required software for creating the vFXT cluster.
To create a new cluster controller instance:
- Navigate to the EC2 service within AWS.
- Click Instances on the left.
- Click Launch Instance.
- Click Community AMIs on the left.
- You must find and install a current, stable Debian release.
At the time this document was prepared, the stable distribution was Debian 9 and nicknamed “Stretch”.
In the search field, type
stretch 2018and press Enter. Click Select next to an appropriate image. (Usually, the first search result is appropriate.)
- Leave the instance type at
t2.micro. - Click Next: Configure Instance Details.
- Choose the network and private subnet for the cluster controller instance.
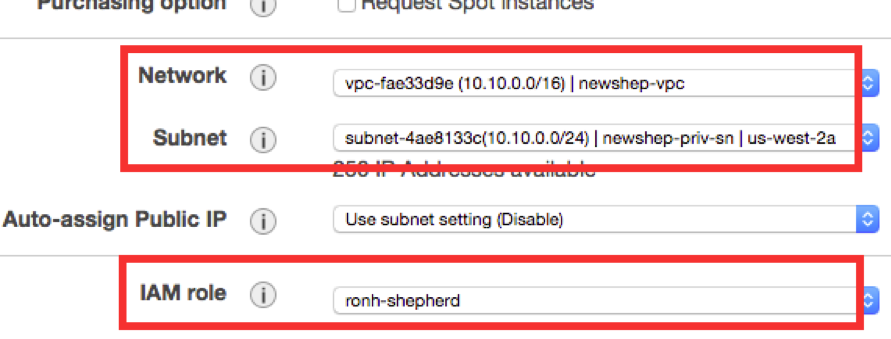
- Choose a public IP address (Enable).
- Choose the IAM role that was created for the cluster controller (for example,
vfxt-role). - Click Next: Add Storage.
- Click Next: Tag Instance.
- Enter Name for a tag and provide a name for the cluster controller instance.
- Click Next: Configure Security Group.
- Choose Select an existing security group.
- Click the box next to the security group that you customized for the cluster (see Security groups).
- Click Review and Launch.
- Review the information on the page and click Launch.
- Choose an existing key pair or create a new key pair.
- Click Launch Instances.
Accessing the cluster controller instance
Use SSH to connect to the cluster controller.
You will need the cluster controller’s IP address and key file in order to access it with SSH. Click on the instance in EC2 and make note of its IP address (at the bottom). Download its key file to a convenient location.
SSH example:
ssh -i ~/Downloads/key.pem admin@54.186.72.16
Configuring the cluster controller
After logging in, download the necessary files needed to run the vfxt.py script. Refer to the vfxt.py Usage Guide for details.
For example:
sudo apt-get update
sudo apt-get install python-pip
sudo easy_install pip
sudo pip install --upgrade boto requests google-api-python-client awscli vFXT
Creating a vFXT cluster
After creating and configuring the cluster controller instance, use it to run the vfxt.py script to create the vFXT cluster. Complete instructions are included in the vfxt.py Usage Guide.
You will need to supply the following information for the command:
- AWS region - for example,
us-west-2a - private subnet ID - for example,
subnet-6e82b427 - security group ID - for example,
sg-3d75aa47
Note
If using AWS S3 as a core filer (your cluster’s backend storage), you will want to enable S3 endpoints, which optimize throughput and availability for S3 traffic into and out of the VPC. See Creating AWS S3 endpoints in the appendix of this document.
Refer to the vfxt.py Usage Guide for additional information on how to use the cluster controller to create a vFXT cluster.
(The sample vfxt.py command below includes line breaks for readability; enter the command on one line or with escape characters before line breaks in actual usage.)
Sample vfxt.py command:
vfxt.py --create --cloud-type aws --on-instance --region us-west-2a
        --subnet subnet-6e82b427 --instance-type r3.2xlarge
        --cluster-name vfxt-demo-cluster --admin-password P@$$w0rd
        --node-cache-size 1000 --nodes 3 --debug
        --security-group sg-3d75aa47
Make note of the management IP address printed at the end of the script. You will use this IP address and the administrative password you set in admin-password to access the cluster.
This sample message shows how the management IP address is reported from a newly created vFXT cluster:
2017-07-12T15:46:49+0000 - vfxt:INFO - vfxt-cluster management address: 10.10.1.4
Post-creation configuration
The vfxt.py script creates and configures the vFXT cluster. To administer the finished cluster, use the Avere Control Panel. Although many settings are set appropriately for your cloud service by the creation script, there are others that you might want to customize.
The FXT Cluster Creation Guide is designed for clusters of physical hardware nodes, but some information in the document is relevant for vFXT clusters as well. In particular, these sections can be useful for vFXT cluster administrators:
Logging In to the Avere Control Panel explains how to connect to the Avere Control Panel and log in. However, note that you must use a VPN or SSH tunnel to access the cluster nodes inside the AWS VPC. Read Accessing vFXT nodes (HTTPS and SSH) for details.
Configuring VServers and Global Namespace has information about creating a client-facing namespace.
Adding Backend Storage documents how to add storage.
(Note: You might need to update the cluster IAM policy to add a second cloud core filer to your AWS cluster - read the cloud core filers tip in the AWS Cluster Settings section of the vfxt.py Usage Guide.)
Customizing Support and Monitoring Settings for the Avere Cluster explains how to customize support settings and remote monitoring.
These additional documents also might be helpful:
- The Cluster Configuration Guide is a complete reference of settings and options for an Avere cluster. A vFXT cluster uses a subset of these options, but many of the same configuration pages apply.
- The Dashboard Guide explains how to use the cluster monitoring features of the Avere Control Panel.
Current documents can always be found on the documentation website at http://azure.github.io/Avere/.