Implementing Local RAG using Phi-3 ONNX Runtime and Sidecar Pattern on Linux App Service
In our previous post, “Phi-3 ONNX: Leveraging the Power of ONNX Runtime to Run SLM on CPU”, we explored how to deploy and run the Phi-3 ONNX Runtime model on Linux App Service, enabling sophisticated language model capabilities without the need for a GPU. Building on that foundation, this blog post will take you through the implementation of Retrieval-Augmented Generation (RAG) using local resources.
To recap, Retrieval-Augmented Generation (RAG) is a hybrid approach that enhances the capabilities of a language model by incorporating external knowledge. This technique combines the strengths of traditional retrieval systems and generative models to provide more accurate and contextually relevant responses. In our case, we’re applying this concept to build an intelligent Assistant for our Fashion Store.
The Assistant we’re creating utilizes external knowledge stored in several markdown (.md) files. These files contain essential information about our store’s products, as well as shipping, payment, and exchange policies. The Assistant will leverage this knowledge to answer customer queries with relevance.
Our sample application is composed of two main components:
-
Frontend Chat Application: Built using Python Flask, this serves as the user interface where customers can interact with the Assistant.
-
Backend Application: Developed in .NET, this application loads the markdown files into an in-memory vector database. Upon receiving a query, the backend performs a search within the vector database and passes the search results as context to the Phi-3 model. The generated response is then streamed back to the chat client.
For the in-memory vector database, we’re using Build5Nines.SharpVector, an excellent open-source project by Chris Pietschmann. SharpVector makes it easy to store and retrieve vectorized data, making it an ideal choice for our sample RAG implementation.
It’s important to note that this setup is designed for demo purposes. For building enterprise-scale applications, you may need to consider using distributed solutions like Cosmos DB or other scalable data storage and retrieval systems to handle larger datasets and more complex operations.
Prerequisites
To build and run this demo, ensure you have the following:
- .NET 8 SDK: Required for the backend application. Download .NET 8.
- Visual Studio Code (VS Code): For editing and developing project files. Get VS Code.
- Docker Desktop: Necessary for containerizing the applications. Install Docker.
- Python 3.9 or higher: Used for the Python Flask frontend. Download Python.
- Git: To clone the sample repository. Get Git.
Clone the sidecar samples repository to get started:
git clone https://github.com/Azure-Samples/sidecar-samples
Setting Up the .NET Backend
Once you have cloned the application, you’ll find the code for the backend in the phi3-vector-api directory. This backend is responsible for loading and processing the markdown files into an in-memory vector database and then generating responses using the Phi-3 ONNX model. Most of the key logic is contained within the PhiController.cs file, which you can view here.
Key Dependencies
We’ve added three important packages to the project:
using Build5Nines.SharpVector;
using Build5Nines.SharpVector.Data;
using Microsoft.ML.OnnxRuntimeGenAI;
These packages enable us to work with vector databases and integrate the ONNX runtime for AI-based generation.
Loading the Model and Creating the Tokenizer
The model is loaded from the filesystem, and a tokenizer is created to handle text processing:
_model = new Model("/app/cpu_and_mobile/cpu-int4-rtn-block-32-acc-level-4");
_tokenizer = new Tokenizer(_model);
Loading Documents into the Vector Database
Next, we load all the .md files from the local filesystem into the in-memory vector database. In this demo, we’re using paragraph chunking, which breaks the text into paragraphs. However, you could opt for other chunking methods, such as line-based or character limit chunking:
private async Task LoadAdditionalDocuments(string directoryPath)
{
    var files = Directory.GetFiles(directoryPath, "*.*", SearchOption.AllDirectories)
                         .Where(f => f.EndsWith(".txt", StringComparison.OrdinalIgnoreCase) ||
                                     f.EndsWith(".md", StringComparison.OrdinalIgnoreCase) ||
                                     f.EndsWith(".mdx", StringComparison.OrdinalIgnoreCase)).ToArray();

    var vectorDataLoader = new TextDataLoader<int, string>(_vectorDatabase);
    var tasks = files.Select(async file =>
    {
        Console.WriteLine($"Loading {file}");
        if (System.IO.File.Exists(file))
        {
            var fileContents = await System.IO.File.ReadAllTextAsync(file);
            await vectorDataLoader.AddDocumentAsync(fileContents, new TextChunkingOptions<string>
            {
                Method = TextChunkingMethod.Paragraph,
                RetrieveMetadata = (chunk) => file
            });
        }
    });

    await Task.WhenAll(tasks);
}
Generating Responses
When a user sends a query, we search the vector database for relevant information and use that as context for generating a response with the Phi-3 model. The response is then streamed back to the client as it’s generated:
[HttpPost("generate-response")]
public async Task GenerateResponse([FromBody] string userPrompt)
{
    Console.WriteLine("Generate method called with : " + userPrompt);
    string resultText = await SearchVectorDatabase(_vectorDatabase, userPrompt);
    Console.WriteLine("Vector search returned : " + resultText);
    var fullPrompt = $"{_systemPrompt}\n\n{resultText}\n\n{userPrompt}";

    Response.ContentType = "text/plain";
    await foreach (var token in GenerateAiResponse(fullPrompt))
    {
        if(token == null || token == "") {
            break;
        }
        await Response.WriteAsync(token);
        await Response.Body.FlushAsync(); // Flush the response stream to send the token immediately
    }
}
AI Response Generation
Finally, in the GenerateAiResponse method, we call the generator and continuously produce the next token in the sequence:
private async IAsyncEnumerable<string> GenerateAiResponse(string fullPrompt)
{
    var tokens = _tokenizer.Encode(fullPrompt);
    var generatorParams = new GeneratorParams(_model);
    generatorParams.SetSearchOption("max_length", 4096);
    generatorParams.SetInputSequences(tokens);
    var generator = new Generator(_model, generatorParams);
    Console.WriteLine("Generator created.");

    while (!generator.IsDone())
    {
        generator.ComputeLogits();
        generator.GenerateNextToken();
        var output = GetOutputTokens(generator, _tokenizer);
        Console.WriteLine("Generating next token..."+output);
        if (output == null || output=="")
        {
            break;
        }
        yield return output; // Yield each token as it's generated
    }
}
Note: This demo focuses on the basic setup and functionality. We haven’t applied any optimizations to the response generation process. As a result, sometimes the output might be incorrect. For more advanced scenarios, consider tuning ONNX runtime parameters like top_k, top_p, temperature, and others to refine the model’s output. Refer to the documentation here
Creating the container image for the backend
Once the backend code is ready, the final step is to containerize the application for deployment. We’ve included a Dockerfile in the repository, which you can find here. This Dockerfile is set up to build and run the .NET backend in a container.
To containerize the backend, navigate to the phi3-vector-api directory and build the Docker image:
docker build -t your-dockerhub-username/phi3-vector-api:latest .
Replace your-registry-url with the name of your container registry, such as Azure Container Registry, Docker Hub, or a private registry.
After building the image, push it to your container registry:
docker push your-registry-url/phi3-vector-api:latest
Creating the Frontend Chat Application
To enable interaction with the backend API, we’ll set up a simple Python Flask app as the chat interface. One of the advantages of the Sidecar pattern is that it allows you to run multiple containers using different languages and frameworks side by side, seamlessly integrating them into a single application.
Flask Chat Application
Navigate to the flask-chat-app folder where the code resides in app.py. This method sends user input to the backend API and streams the response in real-time:
def generate():
    start_time = time.time()
    response = requests.post(API_URL, json=input_text, stream=True)
    print(f"Time taken: {time.time() - start_time:.2f} seconds")

    if response.status_code == 200:
        for chunk in response.iter_content(chunk_size=1):
            if chunk:
                yield chunk.decode('utf-8')
    else:
        yield 'Error: ' + response.text

    return Response(generate(), content_type='text/plain')
Containerizing the Flask Application
To containerize the app, use the provided Dockerfile in the flask-chat-app directory. Build and push the image with:
docker build -t your-registry-url/flask-chat-app:latest .
docker push your-registry-url/flask-chat-app:latest
Note: The Sidecar feature is currently enabled for custom-container scenarios on Linux App Service, with plans to support code-based scenarios soon.
Deploying the Application to Linux App Service
-
Create a New Linux Web App in Azure
Create a new Linux Web App from the portal and choose the options for Container and Linux.
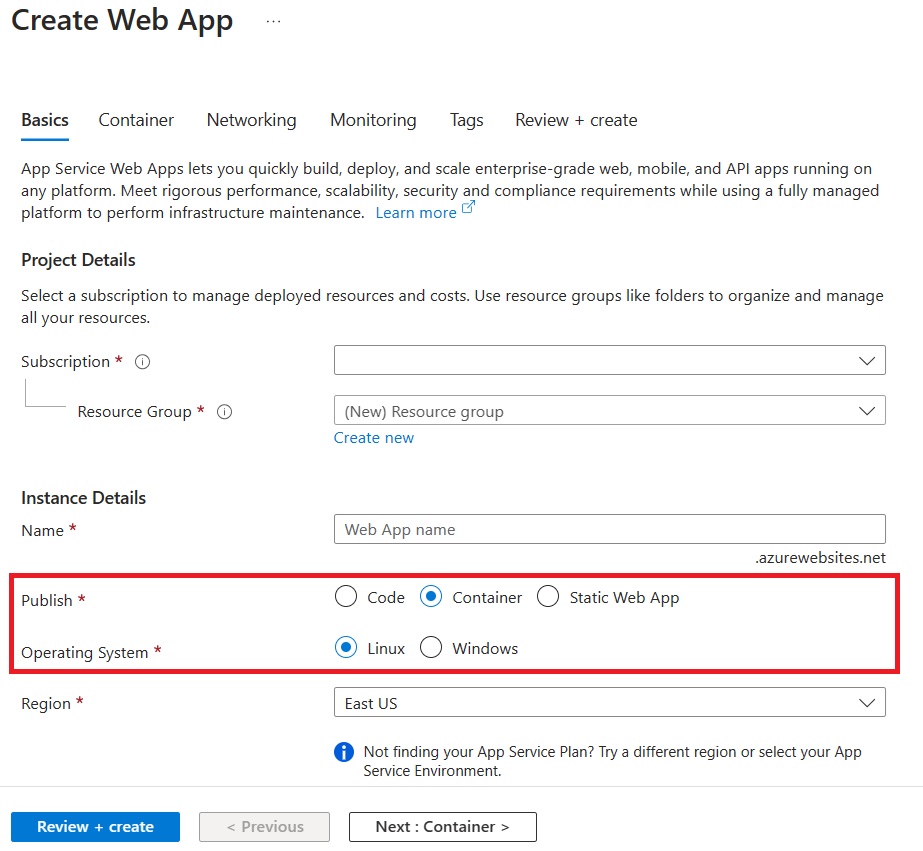
On the Container tab, make sure that Sidecar support is Enabled.
Specify the details of your application image (Flask app).
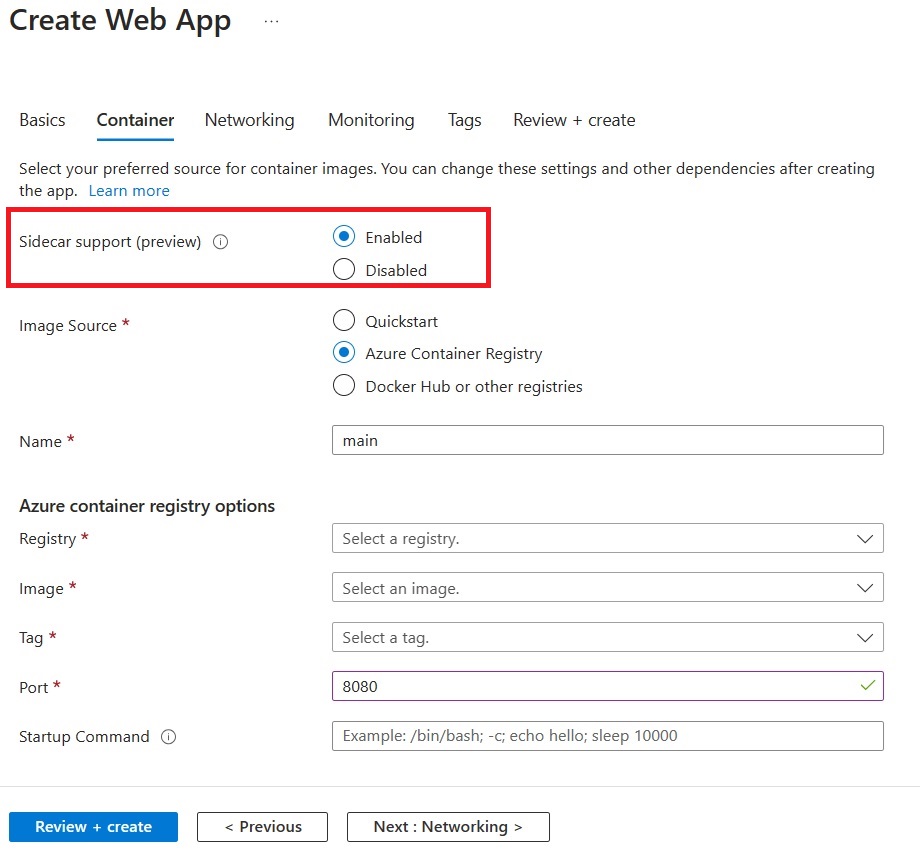
Make sure to set the port to 5000
Note: We strongly recommend enabling Managed Identity for your Azure resources.
-
Add Phi-3 Vector API Sidecar
Go to the Deployment Center for your application and add a sidecar container.
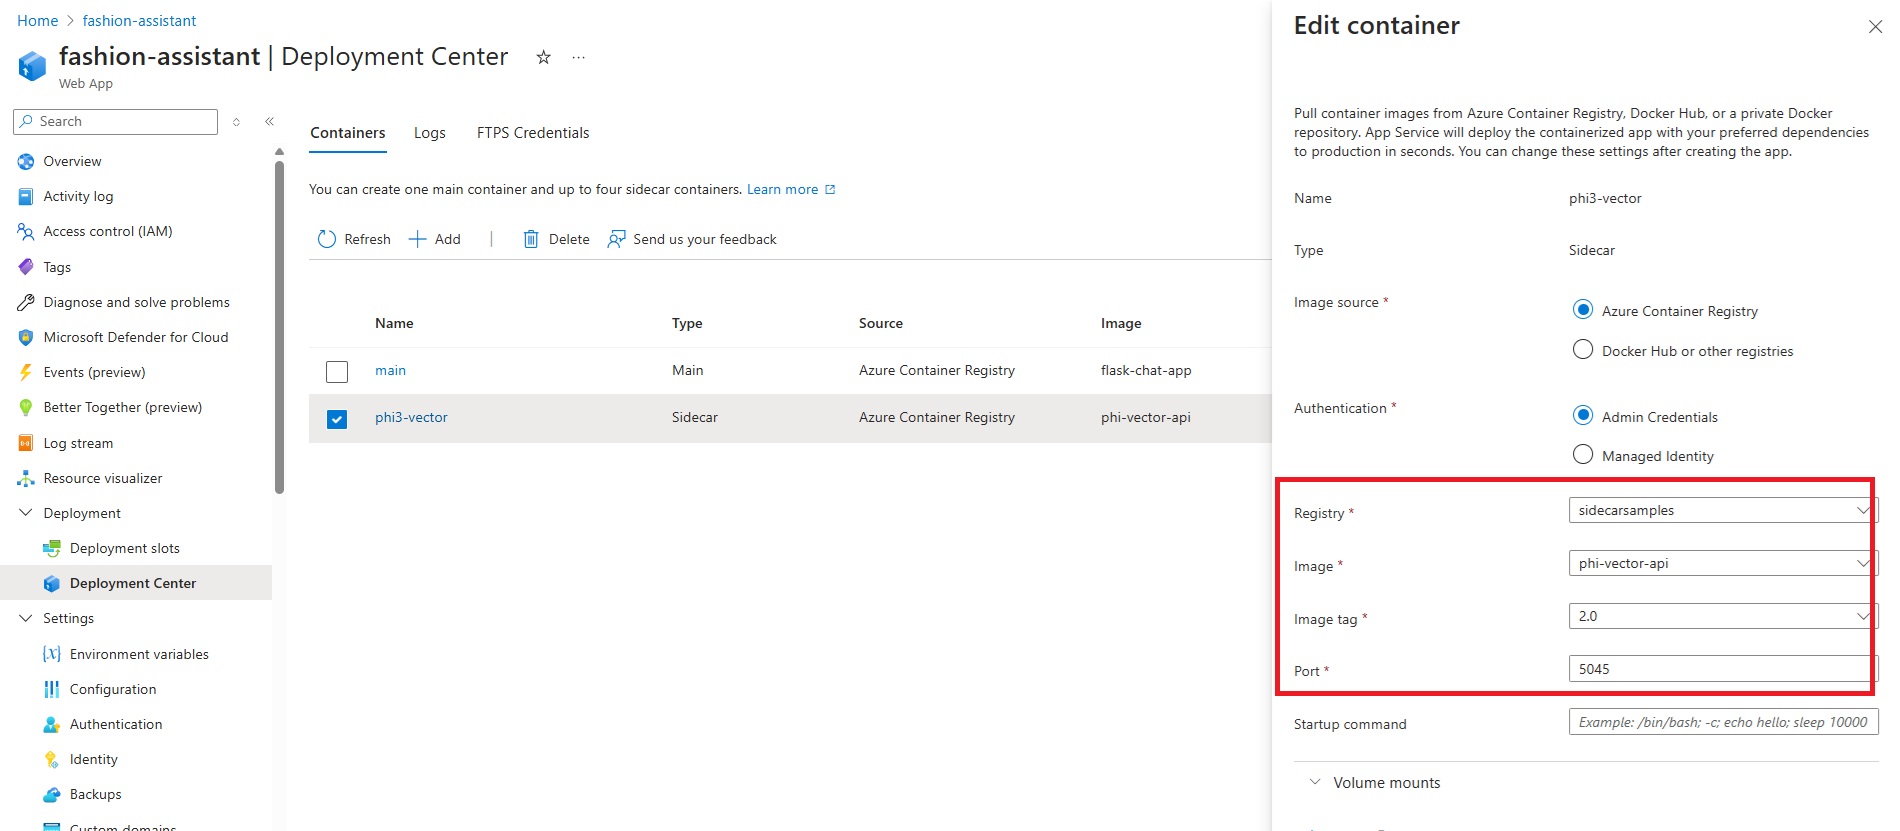
Make sure to set the port to 5045
This document tells you how to add sidecars, step-by-step.
-
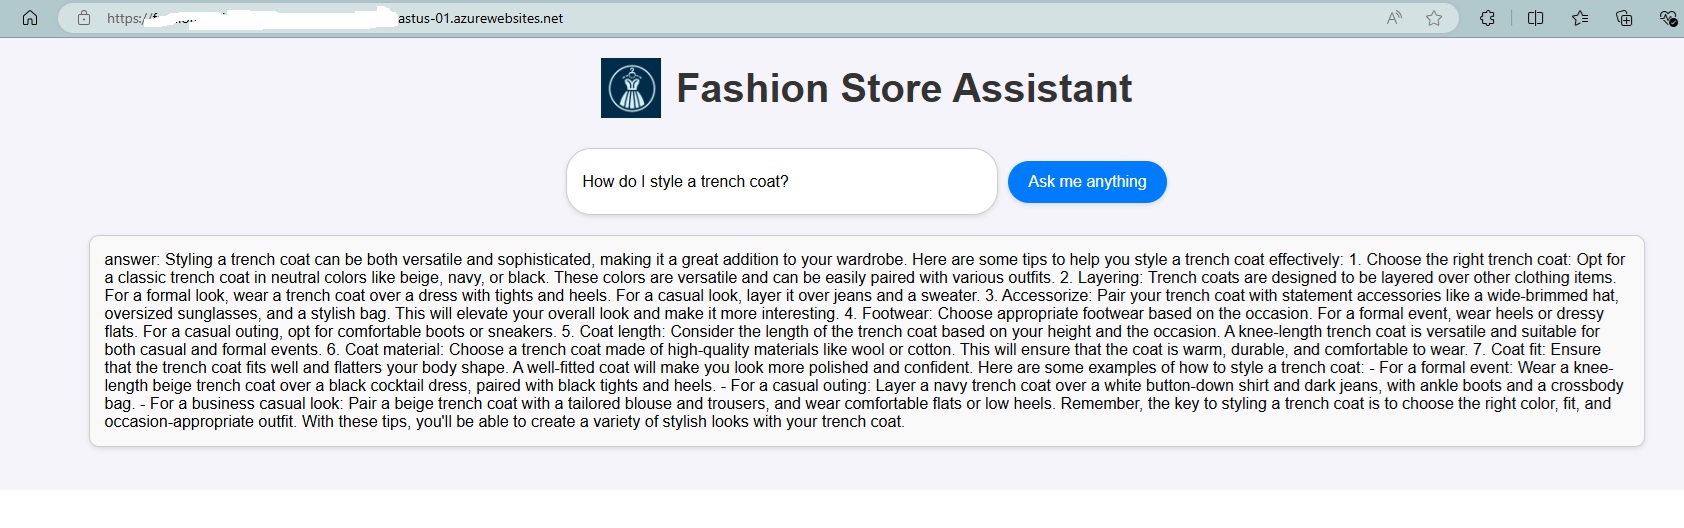
Verify the deployment
Once your deployment is complete, you can browse to your application URL and see the chat frontend.
Note: Since we are deploying a language model, please be aware that the application might take a little longer to start up the first time. This delay is due to the initial setup and loading of the Phi-3 model, which ensures that it is ready to handle requests efficiently. Subsequent startups should be faster once the model is properly initialized.
In Summary
In this blog, we demonstrated how to implement a Retrieval-Augmented Generation (RAG) system using the Phi-3 ONNX Runtime on Linux App Service with the Sidecar pattern. We walked through setting up the .NET backend to load markdown files into an in-memory vector database, generating responses using the Phi-3 model. We then built a Python Flask frontend to interact with the backend, showcasing how different languages and frameworks can seamlessly work together using Sidecars. Finally, we containerized both the backend and frontend for deployment.
We’d love to hear about your experiences and what you’re building with the Sidecar feature. Your feedback is crucial as we continue to expand its capabilities and add more scenarios.