Optimizing SLM with ONNX Runtime: Phi-3 on CPU with Sidecars for App Service
In my previous blog post, Using SLM with Sidecar, we explored the integration of Small Language Models (SLM), specifically Phi-3, with the Sidecar pattern on Linux App Service. This approach offered a flexible and scalable solution to enhance application functionality, particularly in scenarios requiring lightweight language models.
Building on that foundation, this post delves into the next step: leveraging the power of the ONNX Runtime to run Phi-3 on CPU. ONNX Runtime is a high-performance inference engine for deploying machine learning models in production. It offers several advantages, such as cross-platform support, optimized performance for a variety of hardware, and the ability to run models efficiently on CPUs without the need for specialized GPUs.
By using Phi-3 with ONNX Runtime on CPU, you can achieve a more accessible and cost-effective deployment, making it an excellent choice for applications where GPU resources are limited or unnecessary. In this post, we’ll walk through the process of setting up Phi-3 with ONNX Runtime and demonstrate how it can be integrated with the Sidecar pattern on Linux App Service.
Prerequisites
- Docker Desktop
- Visual Studio Code
- Python 3.9 or higher
- The code for this project is available here
Creating the Container Image for Phi-3 ONNX Runtime
In this section, we’ll walk through the process of creating a container image for the Phi-3 model using ONNX Runtime on CPU. This image will be ready to serve the model via an API and can be deployed as a sidecar on Linux App Service.
-
Set Up the Project Directory First, create a directory to hold all the files related to this project. You can name it something like phi-3-sidecar:
mkdir phi-3-sidecar cd phi-3-sidecar -
Download the Hugging Face CLI To download the Phi-3 model, you’ll need the Hugging Face CLI. If you don’t have it installed yet, you can do so using pip:
pip install huggingface-hub -
Download the CPU Model Use the Hugging Face CLI to download the specific version of the Phi-3 model optimized for CPU:
huggingface-cli download microsoft/Phi-3-mini-4k-instruct-onnx --include cpu_and_mobile/cpu-int4-rtn-block-32-acc-level-4/* --local-dir .This command downloads the necessary model files into your project directory.
-
Create the model_api.py File Next, create a Python script named model_api.py to serve the model via an API. This script will handle incoming requests and use the ONNX Runtime to generate output. This is a sample model_api.py that you can use.
These are the key parts of the code
-
Load the model and the tokenizer
model_path = "/app/cpu_and_mobile/cpu-int4-rtn-block-32-acc-level-4" model = og.Model(model_path) # Load the tokenizer from onnxruntime_genai tokenizer = og.Tokenizer(model) tokenizer_stream = tokenizer.create_stream() -
Preprocess the input text and pass it to the model
input_text = data.input_text chat_template = '<|user|>\n{input} <|end|>\n<|assistant|>' prompt = f'{chat_template.format(input=input_text)}' print("Prompt", prompt) input_tokens = tokenizer.encode(prompt) params = og.GeneratorParams(model) params.set_search_options(max_length=2048) params.set_search_options(do_sample=False) params.input_ids = input_tokens print("Input tokens", input_tokens) generator = og.Generator(model, params) -
Generate the output tokens and return it as a streaming response
  def token_generator():
      generated_text = ""
      print("Starting generator", generator.is_done())
      while not generator.is_done():
          generator.compute_logits()
          generator.generate_next_token()

          new_token = generator.get_next_tokens()[0]
          generated_text += tokenizer_stream.decode(new_token)
          yield tokenizer_stream.decode(new_token)

  return StreamingResponse(token_generator(), media_type="text/plain")
-
-
Create a Dockerfile To containerize the application, you’ll need a Dockerfile. This file will define the environment, dependencies, and steps required to run the model_api.py script inside a container. A sample Dockerfile can be found here.
The Dockerfile typically includes:
- Base Image: A lightweight Python image is used as the base.
- Dependencies: Instructions to install necessary Python libraries and ONNX Runtime.
- Copying Files: The model files and the model_api.py script are copied into the container.
- Run command: The container exposes a port and runs the model_api.py script when started.
-
Build and Push the Image Finally, build the Docker image and push it to your preferred container registry. Here’s how you can do it:
 # Build the Docker image
 docker build -t phi-3-sidecar:latest .

 # Tag the image for your container registry
 docker tag phi-3-sidecar:latest <registry-name>/phi-3-sidecar:latest

 # Push the image to your registry
 docker push <registry-name>/phi-3-sidecar:latest
Replace
registry-namewith the name of your container registry, such as Azure Container Registry, Docker Hub, or a private registry.
Setting Up the Chat Application
Now that we’ve created the container image for our Phi-3 ONNX Runtime model, the next step is to set up a chat application that leverages this model to generate responses. This application will serve as the main app, calling the SLM image running as a sidecar to handle user inputs.
-
Implementing the Chat Application The core of our chat application is a Python script,
app.py, which handles the communication between the user and the SLM. Here’s how we set it up:-
Calling the Sidecar: The application communicates with the SLM sidecar using the localhost URL. The API endpoint /predict is called to process the input text and generate responses.
API_URL = "http://localhost:8000/predict" -
Streaming the Response: The response from the SLM is streamed back to the user. This approach ensures that the user receives a continuous stream of text, enhancing the interaction experience.
  Copy code
  def generate():
      start_time = time.time()  # Start the timer
      response = requests.post(API_URL, json={"input_text": input_text}, stream=True)
      end_time = time.time()  # End the timer

      time_taken = end_time - start_time  # Calculate the time taken
      print(f"Time taken for API response: {time_taken:.2f} seconds")  # Print the time taken

      if response.status_code == 200:
          for chunk in response.iter_content(chunk_size=1):
              if chunk:
                  yield chunk.decode('utf-8')
      else:
          yield 'Error: ' + response.text

  return Response(generate(), content_type='text/plain')
This code starts a timer when the request is made, logs the time taken for the API to respond, and then streams the response to the client. If the API call is successful, the chunks of the response are decoded and sent to the user. If there’s an error, it returns the error message.
The full implementation of this script can be found here.
-
-
Containerizing Your Python Application We’ll containerize our chat application by creating a Dockerfile in the root directory of the project. This Dockerfile will set up the environment, install dependencies, and define how the application is run inside a container.
Note: The Sidecar feature is currently enabled for custom-container scenarios for Linux App Service. We are working on enabling it for code scenarios as well. We will update the blog soon for the code-based web applications
The Dockerfile for this project is available here.
-
Build and Push the Docker Image Once the Dockerfile is ready, you can build the Docker image and push it to your preferred container registry. Here are the commands:
 # Build the Docker image
 docker build -t <your-registry>/<your-image-name>:<tag> .

 # Push the image to your registry
 docker push <your-registry>/<your-image-name>:<tag>
Replace
<your-registry>,<your-image-name>, and<tag>with the appropriate values for your container registry, image name, and version tag.
Deploying the Application to Linux App Service
-
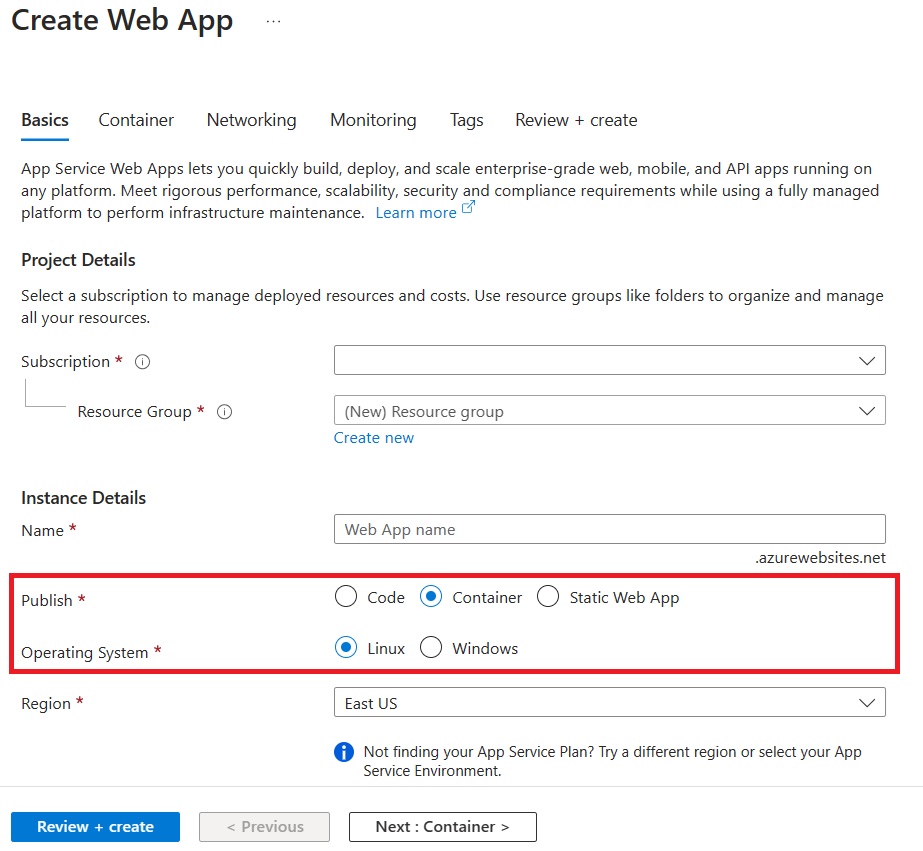
Create a New Linux Web App in Azure
Create a new Linux Web App from the portal and choose the options for Container and Linux.
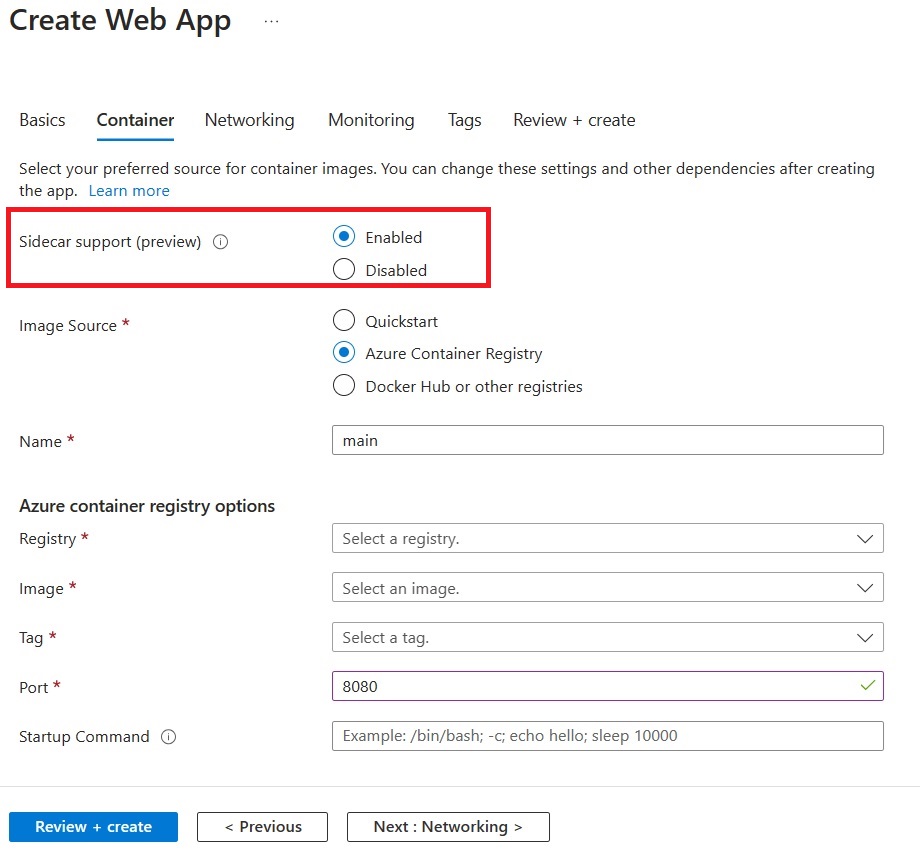
On the Container tab, make sure that Sidecar support is Enabled.
Specify the details of your application image.
Note: We strongly recommend enabling Managed Identity for your Azure resources.
-
Add Phi-3 ONNX Sidecar
Go to the Deployment Center for your application and add a sidecar container.
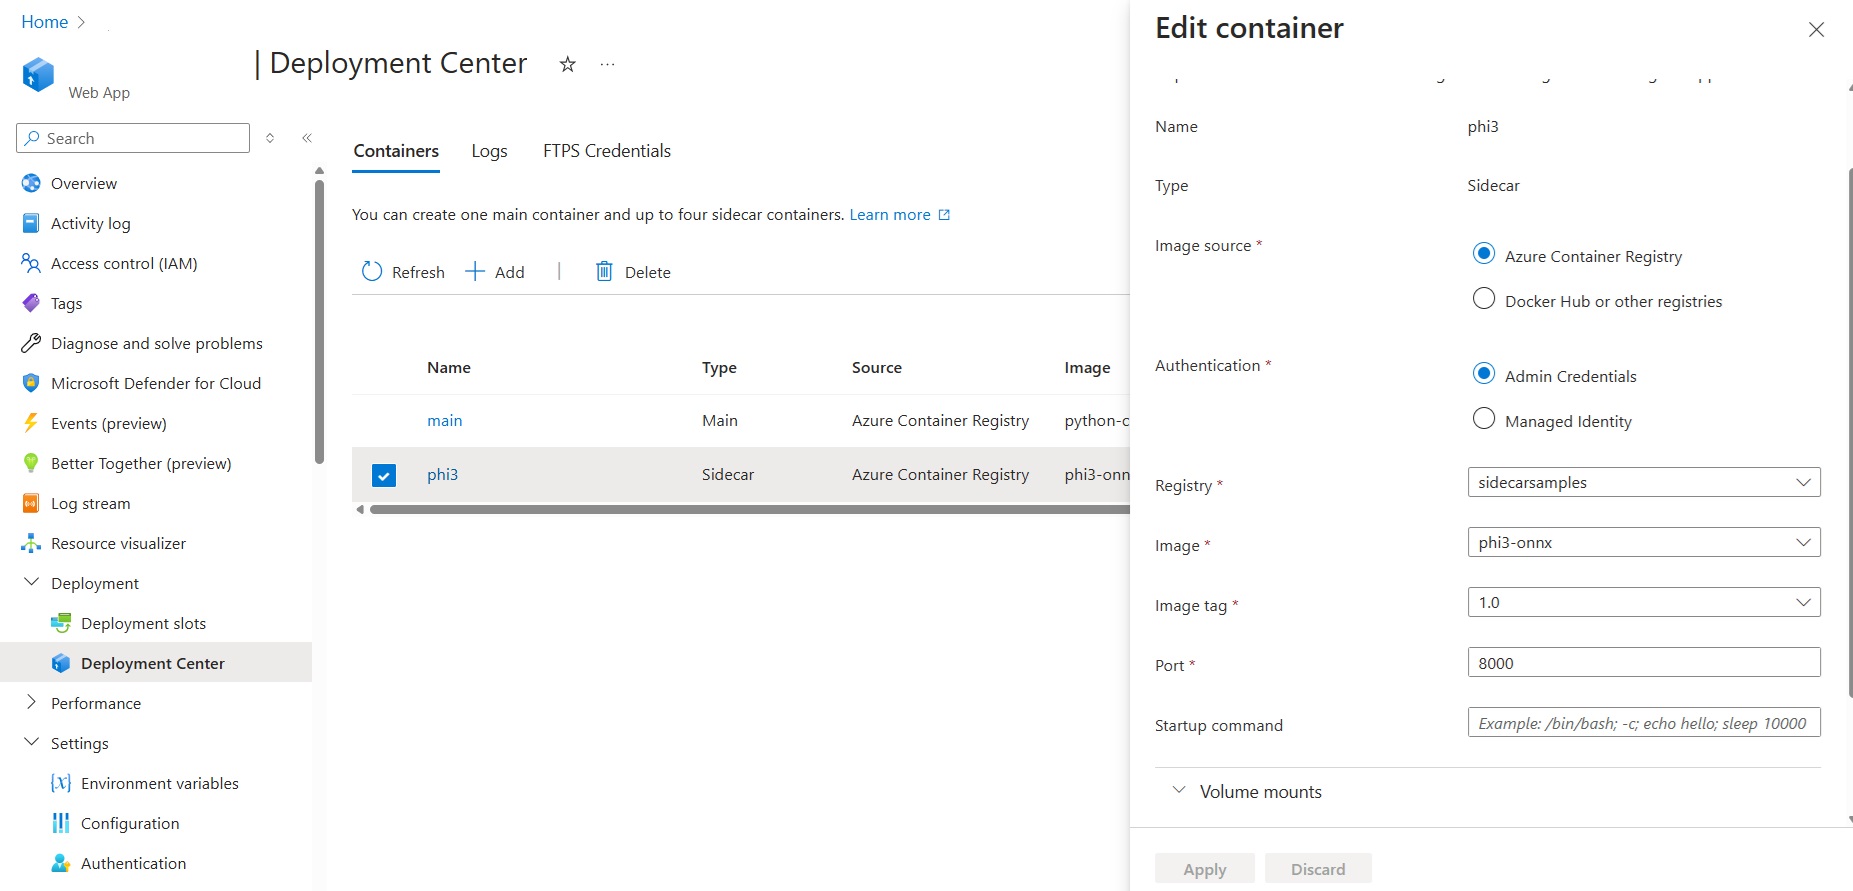
This document tells you how to add sidecars, step-by-step.
-
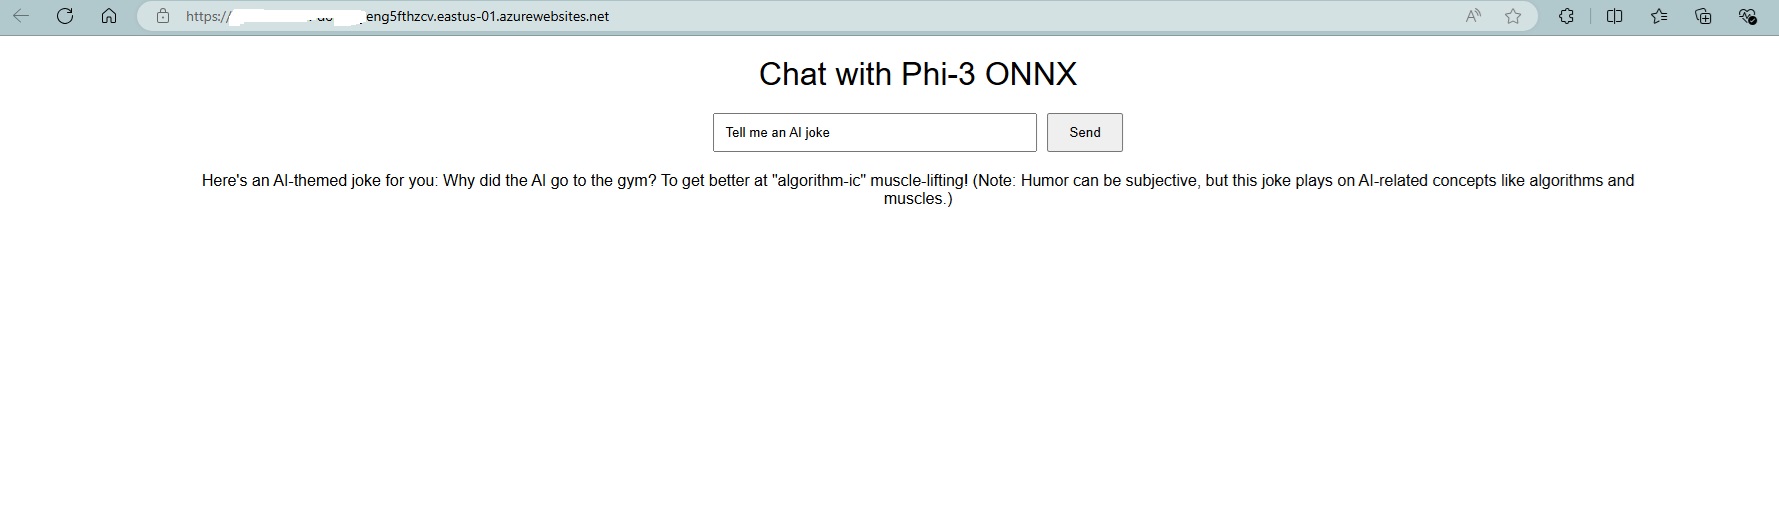
Verify the deployment
Once your deployment is complete, you can browse to your application URL and see the chat frontend.
Note: Since we are deploying a language model, please be aware that the application might take a little longer to start up the first time. This delay is due to the initial setup and loading of the Phi-3 model, which ensures that it is ready to handle requests efficiently. Subsequent startups should be faster once the model is properly initialized.
Summary
In this blog post, we extended our exploration of Small Language Models (SLMs) by focusing on the integration of Phi-3 ONNX Runtime for CPU with the Sidecar pattern on Linux App Service. This powerful combination offers a robust scenario for building intelligent applications that can efficiently run on CPU, making advanced AI capabilities more accessible and cost-effective.
We are actively working on more AI scenarios for Azure App Service and would love to hear what you are building. Your feedback and ideas are invaluable as we continue to explore the possibilities of AI and cloud-based deployments.