Leveraging Redis as a Sidecar for Linux App Service
At Microsoft Build 2024, we had announced the Public Preview for the Sidecar pattern for Linux App Service. This feature allows developers to enhance their web applications with additional services running alongside the main application container. See Sidecars in action in this Build session.
In this blog, we will demonstrate how you can leverage the Sidecar pattern to seamlessly integrate a Redis cache into your Linux App Service, boosting your application’s performance and reliability.
Setting Up your local environment
Before you deploy your application to Azure App Service, you can set it up locally by following these steps
- Prerequisites: Ensure you have Docker Desktop and Visual Studio 2019 or above installed on your machine.
-
Pulling the Redis Container Image: Open your terminal or command prompt and pull the latest Redis container image by running the following command:
docker pull redis -
Starting the Redis Container: Start the Redis container with the following command, replacing
instance-namewith your preferred instance name:docker run --name <instance-name> -p 6379:6379 -d redis -
Verifying the Redis Container: To ensure the container is up and running, execute:
docker ps -a - Creating the .NET Core Application: Now, create a .NET Core application that connects to Redis on port 6379. For our sample, we will use the ASP.NET Core Web API template, which creates a weather forecasting application.
-
Installing the Required NuGet Package: In your project, install the NuGet package
Microsoft.Extensions.Caching.StackExchangeRedisto enable Redis caching. You can do this via the NuGet Package Manager in Visual Studio or by running the following command in the Package Manager Console:Install-Package Microsoft.Extensions.Caching.StackExchangeRedis
Configuring the Application to Use Redis
You can find the full project code here. In this blog, I will highlight some of the main points for configuring your application to use Redis.
-
Setting Up the Redis Connection String In appsettings.json, set up your Redis connection string:
{ "ConnectionStrings": { "Redis": "localhost:6379" } } -
Configuring Redis in Startup.cs In Startup.cs, configure your web API to connect to the Redis instance:
public void ConfigureServices(IServiceCollection services) { // Other service configurations // Add Redis services.AddStackExchangeRedisCache(options => { options.Configuration = Configuration.GetConnectionString("Redis"); options.InstanceName = "Redis.Core.WebApi_"; }); // Other service configurations } -
Implementing Caching in the API Whenever the API is called, it will first check if the values are in the cache. If not, it will fetch them from the database:
public async Task<IEnumerable<WeatherForecast>> GetWeatherForecasts() { var dataFromCache = await _cache.GetRecordAsync<IEnumerable<WeatherForecast>>(WeatherData_Key); if (dataFromCache != null) { _logger.LogInformation("Data loaded from cache @" + DateTime.Now); return dataFromCache; } else { _logger.LogInformation("Data loaded from db @" + DateTime.Now); var dataFromDb = GetDataFromDB(); await _cache.SetRecordAsync<IEnumerable<WeatherForecast>>(dataFromDb, WeatherData_Key); return dataFromDb; } } -
Adding Values to the Cache We have an extension method that adds values to the cache:
public static async Task SetRecordAsync<T>(this IDistributedCache cache, T value, string key, TimeSpan? absoluteExpiry = null, TimeSpan? slidingExpiry = null) { // Caching option var cachingOption = new DistributedCacheEntryOptions(); // Cache Time to Live, from Current Time to <specified> mins, after that cache will expire cachingOption.AbsoluteExpirationRelativeToNow = absoluteExpiry ?? TimeSpan.FromSeconds(60); // Cache Time to Live, will slide if it is accessed within the sliding window cachingOption.SlidingExpiration = slidingExpiry; // Convert to JSON var dataToStore = JsonSerializer.Serialize(value); // Set Cache await cache.SetStringAsync(key, dataToStore, cachingOption); } -
Running Your Application Now you can run your application. Open your browser and navigate to:
http://localhost:5000/weatherforecast.
The browser will display the weather forecast in JSON format. Since we have implemented logging in the application, you will see logs in the command prompt indicating whether the response is coming from the database or the cache.
Deploying the Application to Linux App Service
To get started, you’ll need to containerize your .NET application. This tutorial walks you through the process step by step. Note: The Sidecar feature is currently enabled for custom-container scenarios for Linux App Service. We are working on enabling it for code scenarios as well. We will update the blog soon for the code-based web applications
- Containerize Your .NET Application Create a Dockerfile in the root directory of your project. The Dockerfile for this project is here.
-
Build and Push the Docker Image Build the image and push it to your preferred container registry, such as Azure Container Registry, Docker Hub, or a private registry.
 docker build -t <your-registry>/<your-image-name>:<tag> .
 docker push <your-registry>/<your-image-name>:<tag>
We would also recommend that you push the local redis image to ACR. This would allow you to take advantage of securing your resources using Managed Identity. Please refer to this documentation.
-
Create a New Linux Web App in Azure Create a new Linux Web App from the portal and choose the options for Container and Linux.
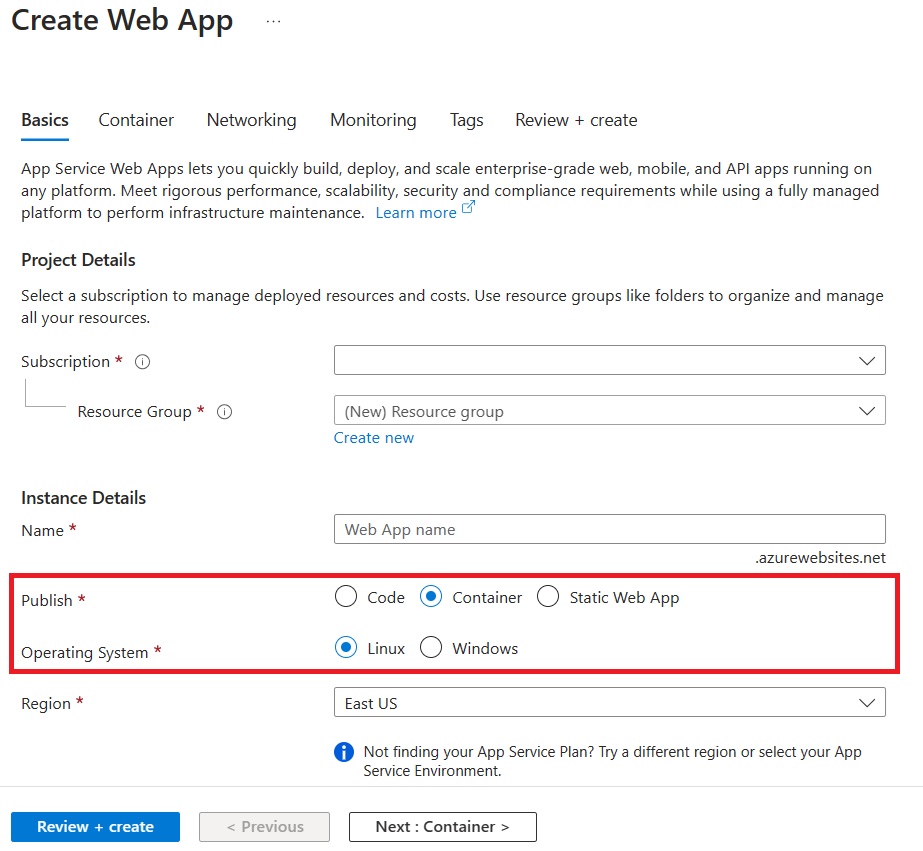
On the Container tab, make sure that Sidecar support is Enabled.
Specify the details of your application image.
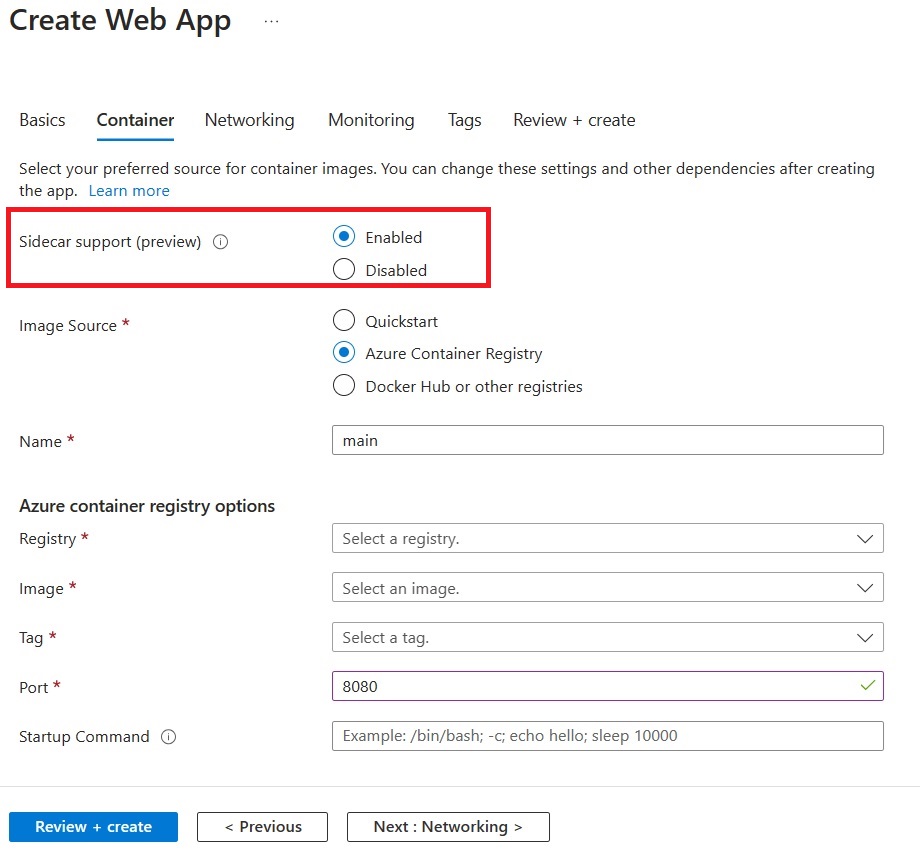
Note: We strongly recommend enabling Managed Identity for your Azure resources.
-
Add Redis Sidecar Go to the Deployment Center for your application and add a sidecar container.
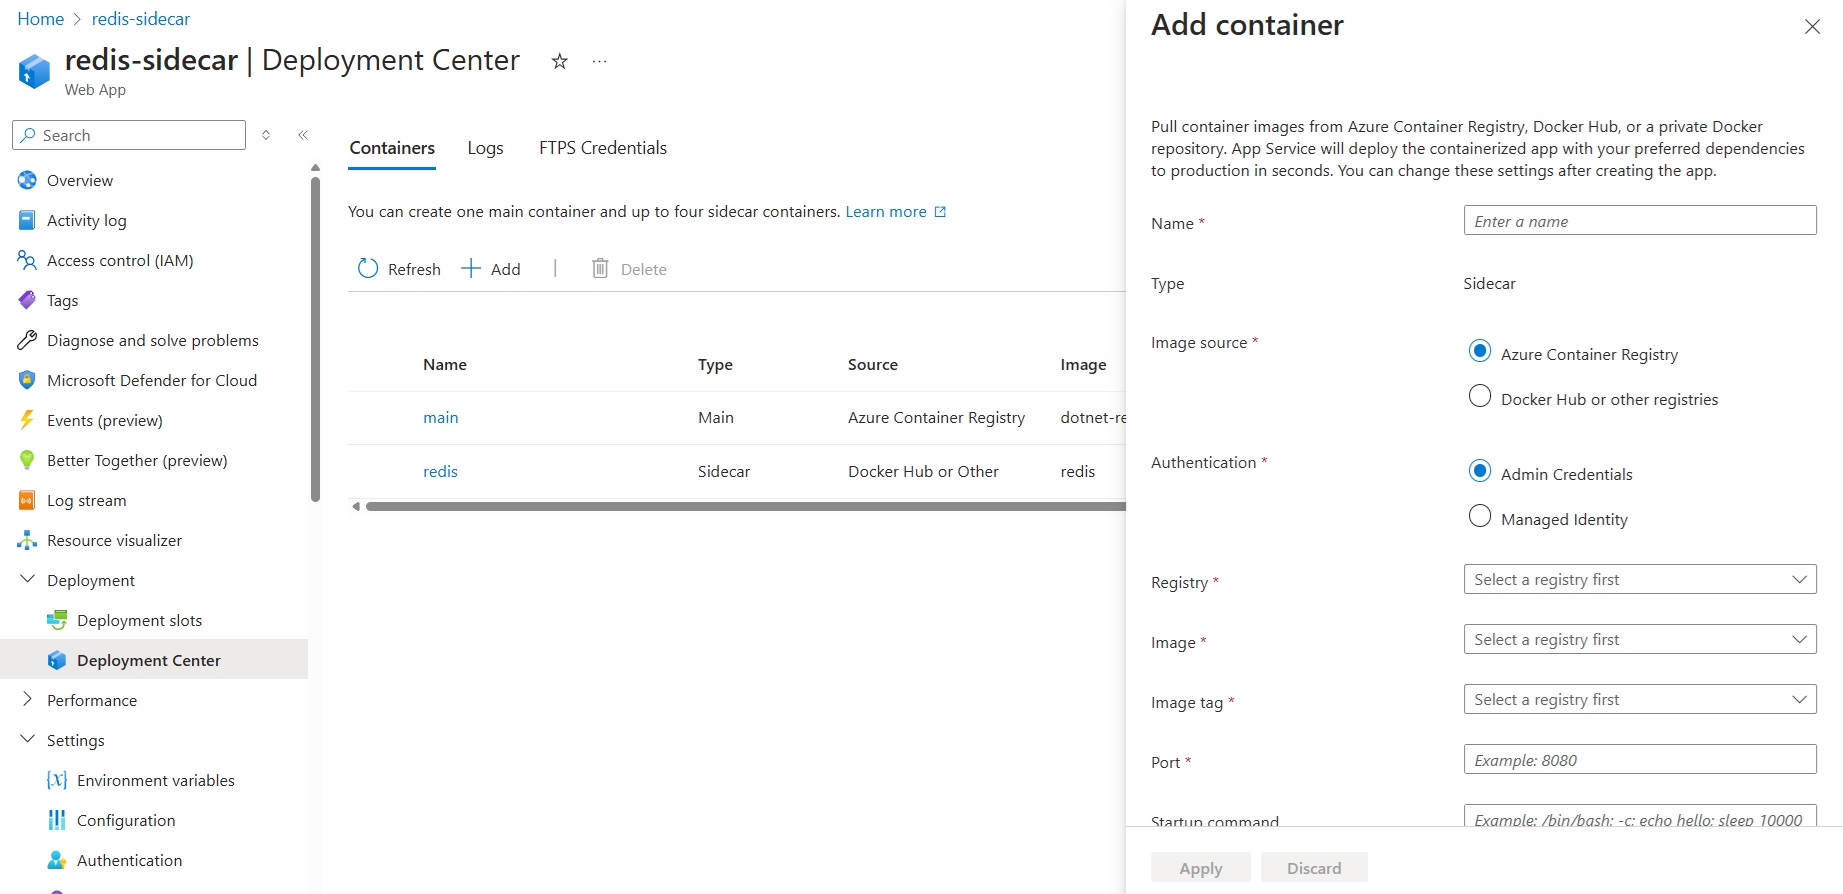
This document tells you how to add sidecars, step-by-step.
-
Verify the deployment Once your deployment is complete, you can browse to
<your application url>/weatherforecastYou should see output like this
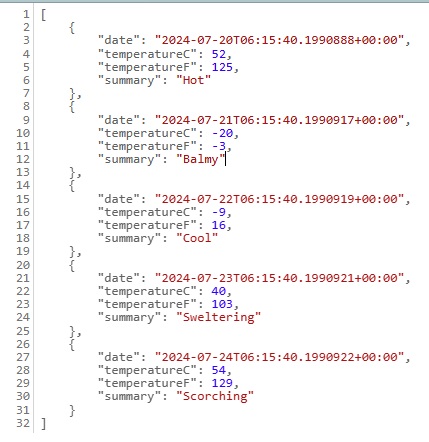
Refresh the page a few times. You can go to the
Log Streamin the Azure Portal to see logs indicating whether the response is coming from the database or the cache.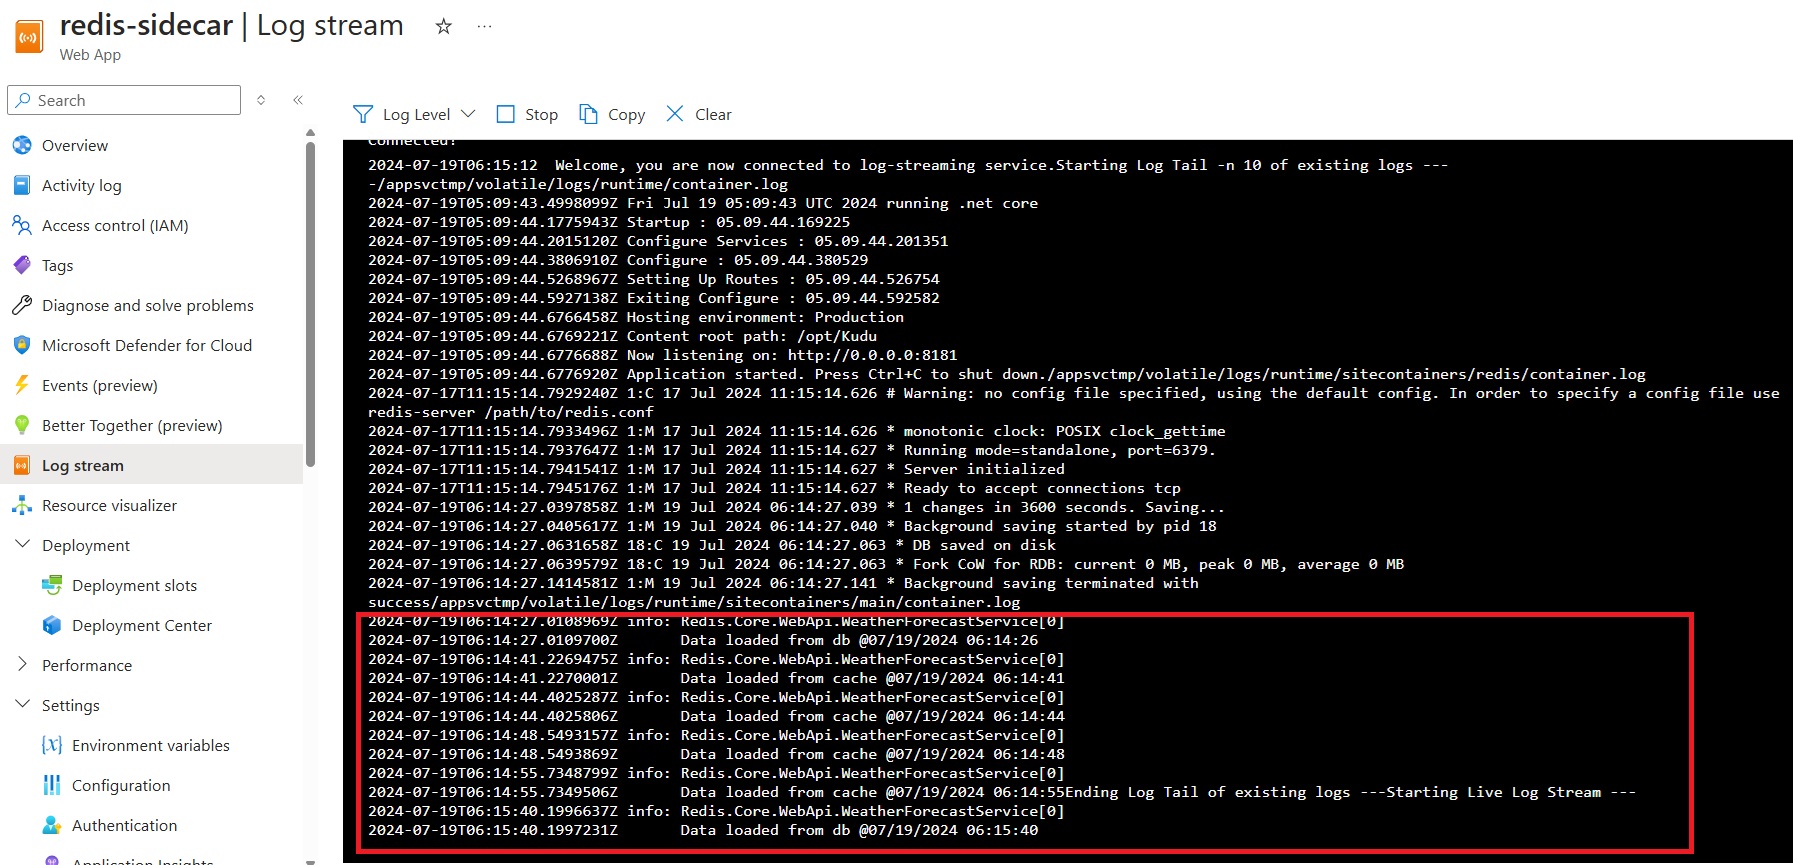
Caveat for Multi-Instance Workloads
There is a caveat for this application. We are using a local instance of Redis. If you scale out your application to multiple instances, you will notice that the response does not always come from the cache, depending on which instance your request is being routed to. For multi-instance workloads, we recommend using Azure Cache for Redis, which provides a distributed, scalable, and high-performance caching solution.
Summary
In this blog, we explored how to enhance your Linux App Service with Redis using the sidecar pattern. We started by setting up the application locally, containerizing it, and then deploying it to Azure App Service. In the coming weeks, we will be publishing more scenarios for leveraging Sidecars with your web applications.
Looking forward to seeing what you are going to build!