Advanced access restriction scenarios in Azure App Service
Introduction
Currently, you can use two options when configuring Azure App Service access restrictions. The preview feature provides some new scenarios that you should know.
This article will walk you through building a demo environment where you will test advanced access restriction scenarios in Azure App Service.
Access restriction advanced scenarios:
- Filter by http header
- Multi-source rules
- Block a single IP address
- Restrict access to the SCM site
For more information about App Service access restrictions, visit this page
Requirements:
Access to an Azure subscription.
Decide where you will execute commands
The best option to walk through this guide and execute commands would be using Azure Cloud Shell with Bash environment. Azure Cloud Shell is an interactive, authenticated, browser-accessible shell for managing Azure resources. It provides the flexibility of choosing the shell experience that best suits the way you work, either Bash or PowerShell. For information on how to use Azure Cloud Shell, visit Azure Cloud Shell. You can also install Azure CLI on your machine. The Azure CLI is available to install in Windows, macOS and Linux environments. It can also be run in a Docker container and Azure Cloud Shell. For information on how to install the Azure CLI, please visit Azure CLI installation.
If you decide to use Azure Cloud Shell, please use Bash environment.
Getting Started
Create folder for your data
You can use the name below for your folder. You just need to replace ardemo with your environment name.
mkdir ardemo
cd ardemo
Choosing the right subscription
If you have many subscriptions, you must select the subscription to which you want to deploy the resources.
Using this command you can find and copy the SubscriptionId on which you want to create resources for this scenario.
az account list -o table
Using this command you can set a subscription to be the current active subscription.
az account set -s YourSubscriptionID
You can find more information about az account command on this site az account.
Prepare parameters
When you construct your naming convention, identify the key pieces of information that you want to reflect in the resource names. Different information is relevant for different resource types. The following sites are useful when you construct resource names - Define your naming convention and Recommended abbreviations for Azure resource types.
You can use the names below. You just need to replace ardemo with your environment name and change LocationRegion parameter.
Please copy and paste your parameters to your shell.
LocationRegion=westeurope
ResourceGroupName=rg-ardemo
WebAppName=app-ardemo-prod-01
AppServicePlanName=asp-ardemo-linux-prod-01
VirtualNetworkName=vnet-ardemo-prod-westeurope-01
SubnetNameVnet=snet-ardemo-prod-westeurope-01
VnetPrefix=192.168.10.0/24
SubnetVnetPrefix=192.168.10.0/25
PrivateEndpointName=pep-ardemo-prod-01
PrivateEndpointConnectionName=con-pep-ardemo-prod-01
FDName=fd-ardemo-01
OriginGroup=origin-group-ardemo
OriginNamePrimary=primary
LogAnalyticsName=log-ardemo-01
ApplicationInsightsName=appi-ardemo-01
ApplicationInsightsWebTestName=WebsiteTest-$WebAppName
Create basic infrastructure
Create Resource Groups
The demo environment will be organized using one resource group.
az group create -l $LocationRegion -n $ResourceGroupName
Create virtual network with subnet for App Service Private Endpoint
A virtual network will be required for Azure App Service Private Endpoint. This command will create a virtual network with a subnet.
az network vnet create -g $ResourceGroupName -n $VirtualNetworkName --address-prefix $VnetPrefix --subnet-name $SubnetNameVnet --subnet-prefix $SubnetVnetPrefix
Create an App Service Plan
An App Service plan defines a set of compute resources for a web app to run.
For more information about Azure App Service plan, visit this page.
az appservice plan create -n $AppServicePlanName -g $ResourceGroupName --location $LocationRegion --sku P1V2 --is-linux --number-of-workers 1
Create a Web App
To create a PHP app in your App Service plan please use this command.
az webapp create -n $WebAppName -g $ResourceGroupName --plan $AppServicePlanName --runtime "PHP:8.0"
Create a variable with the URL of your website. You will use this variable later with curl command to check if your webapp is working correctly.
URLofYourWebsite=$(az webapp show --name $WebAppName --resource-group $ResourceGroupName --query defaultHostName -o tsv)
Create index.php file for your web app
Sample code for your web app:
echo '<?php
 echo "Azure App Service access restrictions demo";
?>' > index.php
Create zip file for your web app code
In the next step you will use ZIP Deploy to deploy the application. You need a ZIP utility for this. If you’re using Azure Cloud Shell, ZIP utility is pre-installed and already available.
zip YourWebSite.zip index.php
Deploy sample app
To deploy a sample application using ZIP Deploy, use this command:
az webapp deployment source config-zip --resource-group $ResourceGroupName --name $WebAppName --src ./YourWebSite.zip
Check if your app is running
Use your browser or use curl command to check if your app is working correctly.
curl https://$URLofYourWebsite
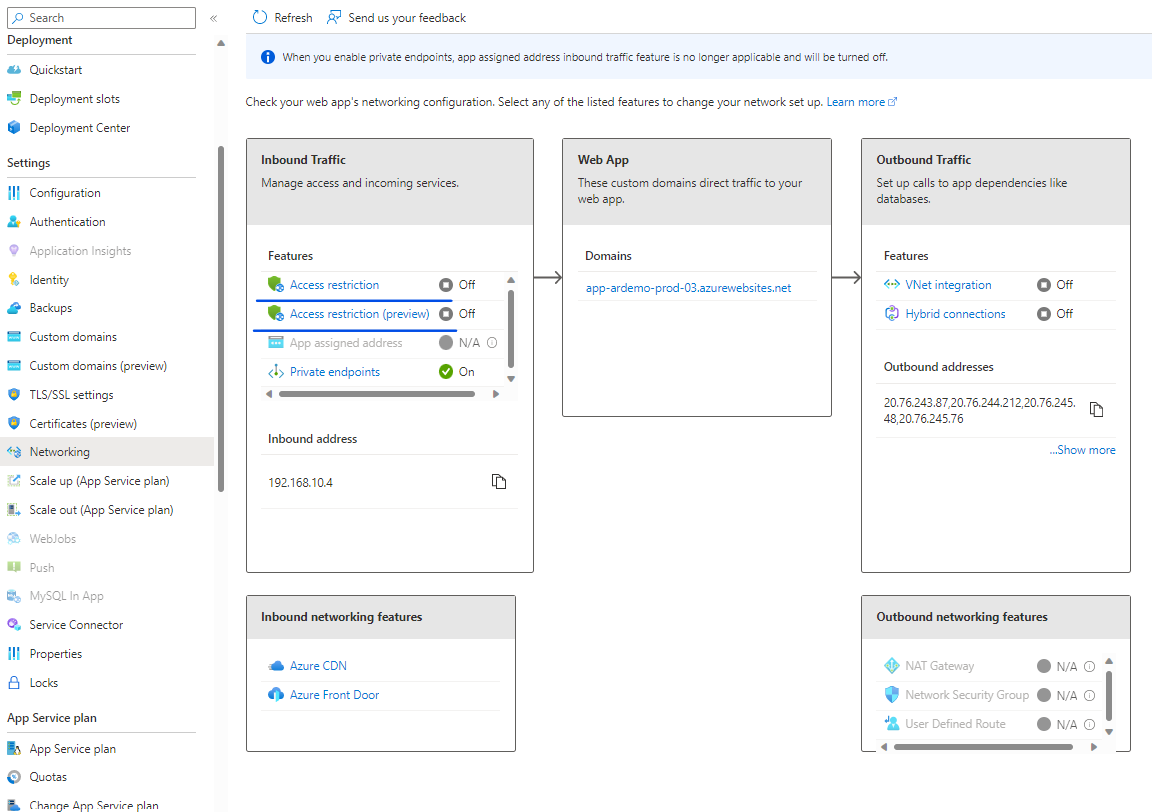
Create the Private Endpoint
A private endpoint is a network interface that uses a private IP address from your virtual network. This network interface connects you privately and securely to a service that’s powered by Azure Private Link. By enabling a private endpoint, you’re bringing the service into your virtual network.
For more information about private endpoint, visit this page.
id=$(az webapp show --name $WebAppName --resource-group $ResourceGroupName --query '[id]' --output tsv)
az network private-endpoint create -n $PrivateEndpointName -g $ResourceGroupName --vnet-name $VirtualNetworkName --subnet $SubnetNameVnet --connection-name $PrivateEndpointConnectionName --private-connection-resource-id $id --group-id sites
Configure the private DNS zone
az network private-dns zone create --name privatelink.azurewebsites.net --resource-group $ResourceGroupName
az network private-dns link vnet create --name myDNSLink --resource-group $ResourceGroupName --registration-enabled false --virtual-network $VirtualNetworkName --zone-name privatelink.azurewebsites.net
az network private-endpoint dns-zone-group create --name myZoneGroup --resource-group $ResourceGroupName --endpoint-name $PrivateEndpointName --private-dns-zone privatelink.azurewebsites.net --zone-name privatelink.azurewebsites.net
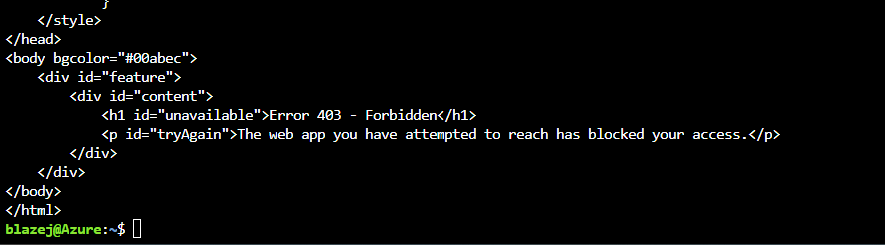
Check if your website is unavailable
After enabling private endpoint, the web app should not be reachable from the Internet.
Use your browser or use curl command to check if your app is not reachable.
curl https://$URLofYourWebsite
The result should look similar to this.
Optional test
You can create a VM in the same virtual network as the private endpoint for Azure App Service and run a network connection test using private IP address. The name of the Azure App Service should resolve to a private IP address. You can check this using the ping or nslookup command. To check if the website is working properly by using the private IP address, use curl command or a browser on a VM that you will deploy.
Remember to use the standard App Service URL. Thanks to the integration with private DNS zone, the name will be translated into a private IP address. For more information about Azure App Service private endpoint DNS, visit this page.
First advanced scenario - Filter by http header
Currently, you can run Azure App Service with a private endpoint as well as allow traffic from the Internet to Azure App Service. Thanks to this, you can use, for example, Azure Front Door Standard SKU to make Azure App Service available from the Internet. Previously, when using a private endpoint for Azure App Service, it was required to use the Azure Front Door Premium SKU.
For more information about Secure Origin with Private Link in Azure Front Door Premium, visit this page.
In this guide you will add a rule that will allow access from Azure Front Door Standard instance to your Azure App Service using X-Azure-FDID.
Tip Access restrictions can use the following headers:
- X-Forwarded-Host - You can specify hostnames of the originating request to limit traffic if a load balancer or HTTP proxy supports hostname forwarding. Enter up to 8 hostnames separated by a comma.
- X-Forwarded-For - You can specify IP addresses of the originating client if a load balancer or HTTP proxy supports IP forwarding when the traffic is passing >through. Enter up to 8 CIDR addresses separated by a comma.
- X-Azure-FDID - You can specify a unique instance id of Azure Front Door or reverse proxies supporting unique header identification. Enter up to 8 ids >separated by a comma.
- X-FD-HealthProbe - You can specify health probe identification to allow probe traffic. Enter up to 8 health probe ids separated by a comma.
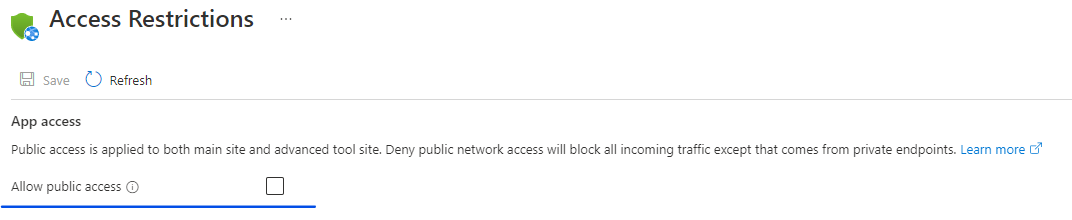
Enable public access
To allow traffic from the Internet, use this command.
az resource update --resource-group $ResourceGroupName --name $WebAppName --resource-type "Microsoft.Web/sites" --set properties.publicNetworkAccess=Enabled
You can also enable Allow public access from the GUI.
Check if your website is available
After enabling public access, the webapp should be available from the Internet and from the private endpoint.
Use your browser or curl command to check if your app is working correctly.
curl https://$URLofYourWebsite
Secure Access using Front Door Standard SKU
Azure Front Door is Microsoft’s modern cloud Content Delivery Network (CDN) that provides fast, reliable, and secure access between your users and your applications’ static and dynamic web content across the globe. Azure Front Door delivers your content using the Microsoft’s global edge network with hundreds of global and local POPs distributed around the world close to both your enterprise and consumer end users.
For more information about Azure Front Door, visit this page.
Create Azure Front Door profile
Run az afd profile create to create an Azure Front Door profile.
az afd profile create \
    --profile-name $FDName \
    --resource-group $ResourceGroupName \
    --sku Standard_AzureFrontDoor
Add an endpoint
Run az afd endpoint create to create an endpoint in your profile.
az afd endpoint create \
    --resource-group $ResourceGroupName \
    --endpoint-name endpoint-$FDName \
    --profile-name $FDName \
    --enabled-state Enabled
Create a variable with the URL of your Azure Front Door endpoint. You will use this variable later with the curl command to check if your Azure Front Door endpoint is working correctly.
URLofYourFrontDoorEndpoint=$(az afd endpoint show \
    --resource-group $ResourceGroupName \
    --profile-name $FDName \
    --endpoint-name endpoint-$FDName \
    --query hostName -o tsv)
You can also write down the URL of your Azure Front Door endpoint.

Create an origin group
Run az afd origin-group create to create an origin group that contains your web apps.
az afd origin-group create \
    --resource-group $ResourceGroupName \
    --origin-group-name $OriginGroup \
    --profile-name $FDName \
    --probe-request-type GET \
    --probe-protocol Https \
    --probe-interval-in-seconds 60 \
    --probe-path / \
    --sample-size 4 \
    --successful-samples-required 3 \
    --additional-latency-in-milliseconds 50
Add an origin to the group - primary website
Run az afd origin create to add an origin to your origin group.
az afd origin create \
    --resource-group $ResourceGroupName \
    --host-name $URLofYourWebsite \
    --profile-name $FDName \
    --origin-group-name $OriginGroup \
    --origin-name $OriginNamePrimary \
    --origin-host-header $URLofYourWebsite \
    --priority 1 \
    --weight 1000 \
    --enabled-state Enabled \
    --http-port 80 \
    --https-port 443
Add a route
Run az afd route create to map your endpoint to the origin group. This route forwards requests from the endpoint to your origin group.
az afd route create \
    --resource-group $ResourceGroupName  \
    --profile-name $FDName \
    --endpoint-name endpoint-$FDName \
    --forwarding-protocol MatchRequest \
    --route-name route \
    --https-redirect Enabled \
    --origin-group $OriginGroup \
    --supported-protocols Http Https \
    --link-to-default-domain Enabled
For more information about Azure CLI for Azure Front Door, visit Front Door CLI.
In a production environment you will probably need to implement a WAF policy for you application. For more information about Azure CLI for Azure Front Door WAF Policy, visit Front Door WAF Policy.
Check if your Azure Front Door Endpoint is running - this process may take a while
Use your browser or curl command to check if your app is working correctly. It may take 10-15 minutes for your app to be accessible using Front Door.
curl https://$URLofYourFrontDoorEndpoint
Add X-Azure-FDID rule
Create a variable with the ID of your Azure Front Door profile.
YourFrontDoorID=$(az afd profile show \
    --resource-group $ResourceGroupName \
    --profile-name $FDName \
    --query frontDoorId -o tsv)
Add a rule that only allows communication from the specific Azure Front Door profile.
az webapp config access-restriction add --resource-group $ResourceGroupName --name $WebAppName --rule-name FrontDoor --action Allow --priority 100 --service-tag AzureFrontDoor.Backend --http-header x-azure-fdid=$YourFrontDoorID
Check if your app allow connections using Azure Front Door URL
Use your browser or curl command to check if your app is working correctly using Azure Front Door URL.
curl https://$URLofYourFrontDoorEndpoint
Check if your app is blocked by network restrictions
Use your browser or curl command to check if your app is not available via direct URL access.
curl https://$URLofYourWebsite
Second advanced scenario - Multi-source rules
Multi-source rules allow you to combine up to eight IP ranges or eight Service Tags in a single rule. You might use this if you have more than 512 IP ranges or you want to create logical rules where multiple IP ranges are combined with a single http header filter.
First example - add multiple ip ranges to rule
In example 1, you will add several ip ranges to one rule.
Prepare to run the first scenario
To remove the policy from the previous scenario, please run the command below.
az webapp config access-restriction remove --resource-group $ResourceGroupName --name $WebAppName --rule-name FrontDoor
To change the default behavior Unmatched rule action to Deny, please run the command below.
az resource update --resource-group $ResourceGroupName --name $WebAppName --resource-type "Microsoft.Web/sites" --set properties.siteConfig.ipSecurityRestrictionsDefaultAction=Deny
Check if your app is blocked by network restrictions
Use your browser or curl command to check if your app is blocked by network restrictions.
curl https://$URLofYourWebsite
Check your public IP addresses and create variable
Remember If you are using Azure Cloud Shell, remember that you will have a different public IP address every time you restart your console.
YourPublicIPaddress=$(curl icanhazip.com)
TIP You can also use a Powershell command to check your public IP address.
(Invoke-WebRequest -uri "http://ifconfig.me/ip").Contentor you can use curl command
(curl icanhazip.com).Content
Add IP addresses to multi-source rule
To add a rule that will block traffic from several IP ranges, run the below command.
az webapp config access-restriction add --resource-group $ResourceGroupName --name $WebAppName --rule-name AllowBranchWarsawIPaddresses --action Allow --priority 200 --ip-address 192.168.1.0/24,192.168.10.0/24,192.168.100.0/24,$YourPublicIPaddress
Check if your app allows connections
Use your browser or curl command to check if your app is working correctly.
curl https://$URLofYourWebsite
Second example - add multiple service tags to a network restriction rule
This example show you how you can add multiple service tags to a network restriction rule. In this example we will allow connections from Logic Apps, Application Insights and API Management from West Europe. In this example you will test this rule using Application Insights availability test.
Prepare to run the second example
The following command will create Application Insights and Log Analytics Workspace for you.
az monitor log-analytics workspace create --resource-group $ResourceGroupName --workspace-name $LogAnalyticsName
LogAnalyticsId=$(az monitor log-analytics workspace show --resource-group $ResourceGroupName --workspace-name $LogAnalyticsName --query id -o tsv)
LogAnalyticsWorkspaceId=$(az monitor log-analytics workspace show --resource-group $ResourceGroupName --workspace-name $LogAnalyticsName --query customerId -o tsv)
az monitor app-insights component create --app $ApplicationInsightsName --location $LocationRegion --kind web -g $ResourceGroupName --application-type web --workspace $LogAnalyticsId
ApplicationInsightId=$(az monitor app-insights component show --app $ApplicationInsightsName -g $ResourceGroupName --query id -o tsv)
az monitor app-insights web-test create --web-test-kind "standard" --enabled true --location $LocationRegion --resource-group $ResourceGroupName --name $ApplicationInsightsWebTestName --defined-web-test-name $ApplicationInsightsWebTestName --tags "hidden-link:$ApplicationInsightId=Resource" --http-verb "GET" --request-url "https://$URLofYourWebsite" --timeout 30 --frequency 300 --retry-enabled true --locations Id="emea-nl-ams-azr" --locations Id="us-fl-mia-edge"
Show Application Insights availability test result
After running the command below, you should get a result from Application Insights that the tests failed.
Tip Please wait 5-10 minutes before you run this command. Availability tests are run every 5 minutes.
az monitor log-analytics query -w $LogAnalyticsWorkspaceId --analytics-query "AppAvailabilityResults | project TimeGenerated, Message, Location | order by TimeGenerated desc" -t P0DT1H -o table
Tip If you have multiple availability tests in one Application Insight, you can use the Name field for filtering.
The result should look similar to this.

Add service tags to multi-source rule
To add a rule that will allow traffic from several service tags, run the following command.
az webapp config access-restriction add --resource-group $ResourceGroupName --name $WebAppName --rule-name AllowMultipleServiceTags --action Allow --priority 300 --service-tag LogicApps,ApiManagement.WestEurope,ApplicationInsightsAvailability
Show Application Insight availability test result
After running the command below, you should get a result from Application Insight that the tests passed.
Tip Please wait 5-10 minutes before you run this command. Availability tests are run every 5 minutes.
az monitor log-analytics query -w $LogAnalyticsWorkspaceId --analytics-query "AppAvailabilityResults | project TimeGenerated, Message, Location | order by TimeGenerated desc" -t P0DT1H -o table
The result should look similar to this.

Third advanced scenario - Block a single IP address
Remove previous rules
To remove the rules from the previous scenario, run the command below.
az webapp config access-restriction remove --resource-group $ResourceGroupName --name $WebAppName --rule-name AllowBranchWarsawIPaddresses
az webapp config access-restriction remove --resource-group $ResourceGroupName --name $WebAppName --rule-name AllowMultipleServiceTags
Change default behavior for Unmatched rule action to Allow
To change the default behavior to Allow, run the command below.
az resource update --resource-group $ResourceGroupName --name $WebAppName --resource-type "Microsoft.Web/sites" --set properties.siteConfig.ipSecurityRestrictionsDefaultAction=Allow
Check if your app allow connections
Use your browser or curl command to check if your app allows connections.
curl https://$URLofYourWebsite
Block your public IP address
To add a rule that will block traffic from your IP address, run the command below.
az webapp config access-restriction add --resource-group $ResourceGroupName --name $WebAppName --rule-name BlockSingleIpAddress --action Deny --priority 200 --ip-address $YourPublicIPaddress
Check if your app is blocked by network restrictions
Use your browser or curl command to check if your app is blocked by network restriction.
curl https://$URLofYourWebsite
Fourth advanced scenario - Restrict access to the SCM site
You can use the same access restriction rules from the Main site or create your own rule for the SCM (Advanced tool) site. The SCM site is responsible for Web Deploy and Kudu console.
For more information about Kudu, visit Kudu service overview.
Verify that you can deploy your sample app
To verify that you can deploy your sample app via Web Deploy, run the command below.
az webapp deployment source config-zip --resource-group $ResourceGroupName --name $WebAppName --src ./YourWebSite.zip
Use the same access restrictions rules from Main site in Advanced tool site
To use the same rules from the Main site in the Advanced tool site, run this command.
az webapp config access-restriction set --resource-group $ResourceGroupName --name $WebAppName --use-same-restrictions-for-scm-site true
Verify that you can’t deploy your sample app
To verify that you can’t deploy your sample app via Web Deploy, please run the command below.
az webapp deployment source config-zip --resource-group $ResourceGroupName --name $WebAppName --src ./YourWebSite.zip
Configure different rules for Advanced tool site
To configure other rules for Advanced tool site, run below command.
az webapp config access-restriction set --resource-group $ResourceGroupName --name $WebAppName --use-same-restrictions-for-scm-site false
To add a rule that will allow traffic from your IP address to the SCM site, run the bellow command.
az webapp config access-restriction add --resource-group $ResourceGroupName --name $WebAppName --rule-name BlockSingleIpAddress --action Allow --scm-site true --priority 200 --ip-address $YourPublicIPaddress
Verify that you can deploy your sample app
To verify that you can deploy your sample app via Web Deploy, please run the command below.
az webapp deployment source config-zip --resource-group $ResourceGroupName --name $WebAppName --src ./YourWebSite.zip
You successfully completed the article.