How-to Host a Python application with Windows containers on App Service
Windows containers on App Service can help you easily modernize your application by making it easier to Lift-and-Shift to App Service and install custom dependencies that would otherwise not be available on App Service. If your application is built with a language other than .NET, you can still create a custom container and take advantage of Windows cotnainers! In this tutorial we will be using a Visual Studio templated Python 3.6 Flask application, containerizing it with Docker and publishing the image to Azure Container Registry so it can be deployed on App Service.
Create and configure your Python app
Open Visual Studio and click on Create a new project. Find the Flask Web Project template, name it and click Create.
Once you have created your application find the runserver.py file and replace the existing code with the following:
from os import environ
from FlaskWebProject1 import app

if __name__ == '__main__':
# Run the app server with default Flask port
app.run(port=5555, host='0.0.0.0')
This code runs the local development server which defines the default Flask port that it will be using along with the host to use IP addresses on the local machine. This will be utilized later for developing in your local browser. In the next step we will be creating a Dockerfile for the application so we can containerize it.
Adding the Dockerfile
To containerize your application you will need to add a Dockerfile, which includes instructions on how to build the container. If you are using Visual Studio you may have to add the Dockerfile manually. To add the Dockerfile manually, Right-Click the project and add a New Item. Then, choose Text file and name it Dockerfile.txt and click Add to add the file. However, Dockerfiles have no extensions so you’ll need to remove the “.txt” from the name and save it to create the Dockerfile.
Once you have your Dockerfile created copy and paste the following:
# first layer is our python base image enabling us to run pip
FROM python:3.7-windowsservercore-1809

# create directory in the container for adding your files
WORKDIR /user/src/app

# copy over the requirements file and run pip install to install the packages into your container at the directory defined above
COPY requirements.txt ./
RUN pip install --no-cache-dir -r requirements.txt --user
COPY . .

# enter entry point parameters executing the container
ENTRYPOINT ["python", "./runserver.py"]

# exposing the port to match the port in the runserver.py file
EXPOSE 5555
This Dockerfile includes instructions that will build your container on a Windows Server base image, add your application files over to the container and build your packages using your requirements.txt file as you normally would with a Python app. The port exposed must match the port that is previously defined in the runserver.py file.
Create the Docker Image
When using Docker, you need to build and create the image first before you can run the container. Open your local Command Prompt, go to the directory where your Dockerfile lives and run this command:
docker build -t mypythonapp .
Running this command will take each step defined in the Dockerfile from above and build your image. Once your image is successfully built and tagged, you can then run it locally to test the application.
Run your application locally
Before you push your image to a registry, you’ll want to make sure your local version runs as expected. Once your Docker image is built run the following command to start your container:
docker run -d --isolation hyperv mypythonapp:latest
Running this command will start your application and give you a Container ID in the form of a long string. Confirm that your container is running by using the docker ps command next. This will output all containers currently running. Locate and copy the string under Container ID to be used later. This is a shorthand version of the long string from before.
After you have confirmed that your container is running locally with docker ps you can use docker inspect to find the IP Address that you will need to use to view your application.
Use the following command to output json that will include your IP Address that you will need:
docker inspect <Container-ID>
Find your IP Address at the bottom of the output and paste it in the browser with your exposed port number after the IP Address. It should look similar to http://172.00.000.000:5555. Hit enter and your application should show up in the browser. If everything looks good and your application is ready to publish, the next step is to push your image to a container registry where it will live prior to being deployed to App Service.
Push your container image to a registry
Now that we’ve tested the application locally in a container we can push it to a container registry where the image will live. This will prepare us and satisfy the requirements for creating and publishing the application to App Service. First you must have a registry created before you can push the image to it. Once that is complete, you can continue with these instructions. For this example, we will be using Azure Container Registry, but you can use Docker Hub as well by swapping out the registry-name.azurecr.io with your-docker-hub-registry-name.
Before you attempt to tag and push the image, make sure you are logged in by using docker login in the command prompt
docker login <registry-name>.azurecr.io
This will prompt you to enter your username and password from your registry. You can find these under Access keys in your Container registry resource in the Azure portal.
After you’ve logged in, run the following commands to tag and push your Docker image:
docker tag mypythonapp:latest <registry-name>.azurecr.io/mypythonapp:latest
docker push <registry-name>.azurecr.io/mypythonapp:latest
Once the image is pushed you can verify that it is in your Azure Container Registry by viewing the Repositories in your Container registry resource. Next, we will use the image from our registry to create our Web App on App Service.
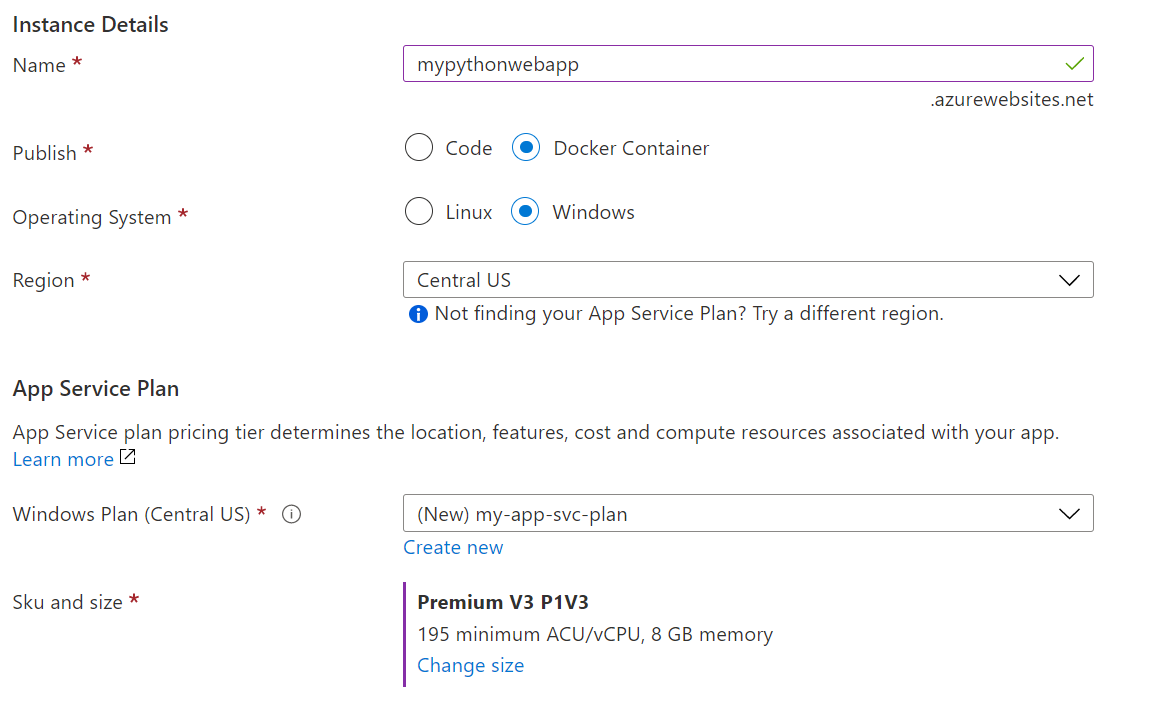
Create the Web App using Premium v3
When you are creating the Web App that you will publish your container to be sure to choose the correct options shown below. Name your site, choose Docker Container under Publishing type and Windows for the Operating System. Choose an available Region and then choose your SKU and size. Premium V3 is the only SKU that supports Windows containers. Learn more about the Premium V3 SKU here.
Next, click the Next:Docker > button to pull your container image from Azure Container Registry.
Choose Azure Container Registry as your Image Source and the registry options will show up for you to select. The registry you selected earlier should show up in the Registry drop-down along with the created Images and Tags.
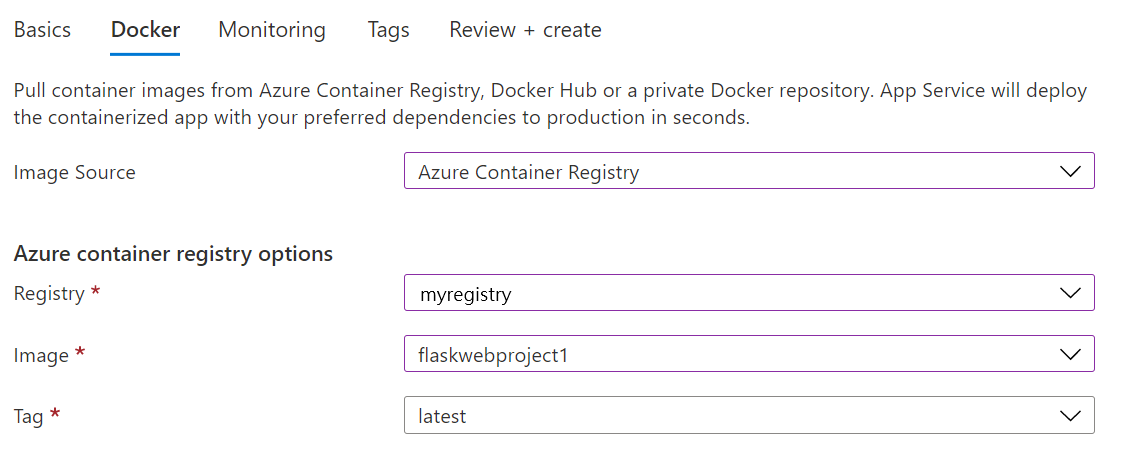
Once you have the correct options selected you can hit Review + create to start your deployment and verify your deployed app on App Service.