Continuous Deployment for Windows Containers with Azure DevOps
Azure DevOps enables you to host, build, plan and test your code with complimentary workflows. Using Azure Pipelines as one of these workflows allows you to deploy your application with CI/CD that works with any platform and cloud. A pipeline is defined as a YAML file in the root directory of your repository.
In this article, we will use Azure Pipelines to deploy a Windows Container application to App Service. The sample application is already configured to be used in a Windows Container, pushed to a registry, and deployed to App Service. Of course, you can use this guide to add the correct deployment tasks to work with your own application.
Sample Application
If you would like to get started with your own application, you can skip to the next section.
The sample application is a simple task-tracking app built with .NET Framework using Azure SQL for storage. The project has a workflow file, azure-pipelines.yaml, that is set up for continuous deployment. You have your choice of using Azure Container Registry (ACR) or Docker Hub for your registry needs (the difference in syntax will be explained below).
Find the full repository samples for .NET Framework and .NET Core at these highlighted links.
Create Resources
Create the following resources. You will need information from each resource that will be used in the pipeline file and stored as a variable. Create your choice of registry (Azure Container Registry or Docker Hub) first since you will need information from there before you can create your App Service.
- Azure Container Registry OR Docker Hub repository
- App Service (Web App for Container)
- .NET Framework application with supporting dockerfile in a GitHub repository
- Azure SQL Database (Optional)
Add a Service Connection
Before you create your pipeline, you should first create your Service Connection since you will be asked to choose and verify your connection when creating your template. A Service Connection will allow you to connect to your registry of choice (ACR or Docker Hub) when using the task templates. When adding a new service connection, choose the Docker Registry option. The following form will ask you to choose Docker Hub or Azure Container Registry along with pertaining information. You can create a new Service Connection following the directions here.
The Dockerfile
The samples below explain the associated Dockerfiles for the .NET Framework and .NET Core sample applications linked above. If creating your own application, use the appropriate Dockerfile below and replace the directory paths to match your application.
.NET Framework
Your .NET Framework application will work best with a multi-stage build. This example copies over the necessary project files and packages before it creates the publish files for deployment to Azure.
# Set the base image
FROM mcr.microsoft.com/dotnet/framework/sdk:4.8 as build
WORKDIR "/src"

# Copy packages to your image and restore them
COPY taskapp/taskapp.sln .
COPY taskapp/taskapp/taskapp.csproj taskapp/taskapp/taskapp.csproj
COPY taskapp/taskapp/packages.config taskapp/taskapp/packages.config
RUN nuget restore taskapp/taskapp/packages.config -PackagesDirectory taskapp/packages

# Add files from source to the current directory and publish the deployment files to the folder profile
COPY . .
WORKDIR /src/taskapp/taskapp
RUN msbuild taskapp.csproj /p:Configuration=Release /m /p:DeployOnBuild=true /p:PublishProfile=FolderProfile

# Layer the production runtime image
FROM mcr.microsoft.com/dotnet/framework/aspnet:4.8-windowsservercore-ltsc2019 as deploy

# Add the publish files into the right directory
WORKDIR /inetpub/wwwroot
COPY --from=build /src/taskapp/taskapp/bin/Release/Publish .
.NET Core
For .NET Core, the nano server base image must be “1809” to be compatible with what Azure currently supports. Keep in mind this may change in the future.
# Set the base image
FROM mcr.microsoft.com/dotnet/core/aspnet:3.1-nanoserver-1809 AS base
WORKDIR /app
EXPOSE 80

# Add the SDK so you can run the dotnet restore and build commands
FROM mcr.microsoft.com/dotnet/core/sdk:3.1-nanoserver-1809 AS build
WORKDIR /src
COPY *.csproj ./
RUN dotnet restore "taskapp.csproj"
COPY . .
WORKDIR "/src/"
RUN dotnet build "taskapp.csproj" -c Release -o /app/build

# Create the publish files
FROM build AS publish
RUN dotnet publish "taskapp.csproj" -c Release -o /app/publish

# Copy the publish files into the container
FROM base AS final
WORKDIR /app
COPY --from=publish /app/publish .
ENTRYPOINT ["dotnet", "taskapp.dll"]
Create the Pipeline
Once you have your repository created in Azure DevOps, or imported from GitHub, you can create your pipeline. On the left menu bar go to Pipelines and click the Create Pipeline button. The next screen will ask you where the code is to create the pipeline from. We already have our code imported, so we can choose Azure Repos Git to select your current repository.
Since we are using Docker containers we can choose the Docker template that allows us to build and push an image to Azure Container Registry or Docker Hub.
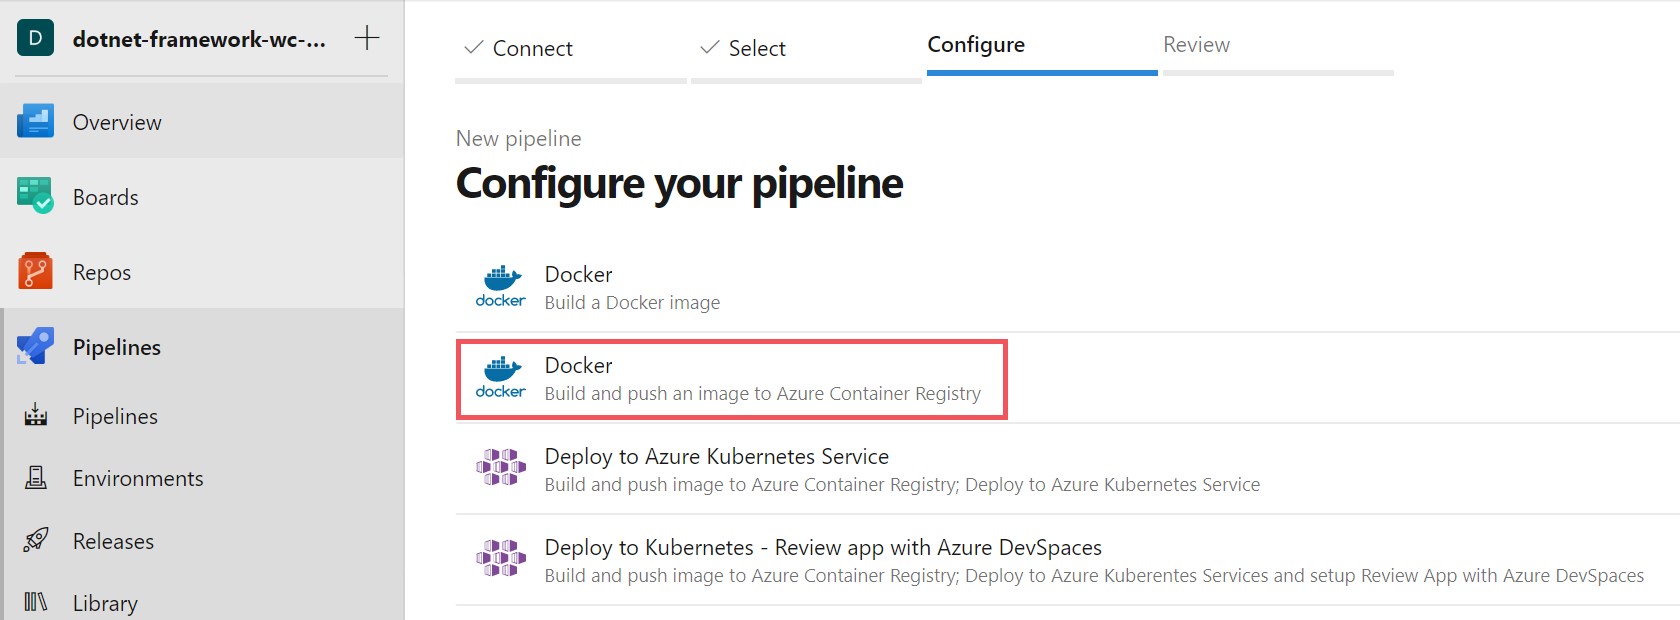
Choose your subscription that you will be pushing your resources to, then pick your Container registry on the following screen. You will notice your Image Name and Dockerfile are pre-populated with a suggested name and path to your Dockerfile. You can leave those as is, and click on the Validate and configure button to generate your azure-pipeline.yaml file.
Secure Secrets with Variables
Variables are only accessible after your create the pipeline.
Since we are using sensitive information that you don’t want others to access, we will use variables to protect our information. Create a variable by following the directions here.
To add a Variable, you click the Variables button next to the Save button in the top-right of the editing view for your pipeline. Select the New Variable button and enter your information. Add the variables below with your own secrets appropriate from each resource.
imageRepository: image-namecontainerRegistry: ‘your-registry-name.azurecr.io’ OR ‘your-docker-hub-registry-name’applicationName: app-nameazureSQLConnectionString: database-connection-string (Optional)
Build the Pipeline
Once you have the necessary variables, you can start to add the tasks you need to complete the pipeline. Below is an explanation of the Docker tasks that were added to your pipeline from the Docker template with the addition of using Docker Hub instead of ACR. The additional tasks to deploy to your App Service and optional Azure SQL follow.
Build and push your image to a registry
After your pipeline is generated from choosing the Docker configured template, you’ll notice a few things in the YAML build. The first is the trigger, which determines what sets off the build. We are using any push or change to master as a trigger here, but you can change it to trigger on another branch as well.
The resource is anything used by the pipeline that lives outside of it like a repository or container registry. You can leave this as self since we are using our own repository. Your image type is included and the build stages & task follow.
# The branch that triggers the pipeline to start building
trigger:
- master

# The source used by the pipeline
resources:
- repo: self

# Variables used in the Azure Container Registry deployment
variables:
  # Container registry service connection established during pipeline creation
  dockerRegistryServiceConnection: '<your-service-connection-number'
  dockerfilePath: '$(Build.SourcesDirectory)/taskapp/taskapp/Dockerfile'
  tag: '$(Build.BuildId)'

  # Agent VM image name
  vmImageName: 'windows-latest'

# Build stage to build your application and push it to a registry
stages:
- stage: Build
  displayName: Build and push stage
  jobs:
  - job: Build
    displayName: Build
    pool:
      vmImage: $(vmImageName)
    steps:
    - task: Docker@2
      displayName: Build and push an image to container registry
      inputs:
        command: buildAndPush
        repository: $(imageRepository)
        dockerfile: $(dockerfilePath)
        containerRegistry: $(dockerRegistryServiceConnection)
        tags: |
          $(tag)
Double check that your vmImageName = ‘windows-latest’ as it might default to ‘ubuntu-latest’.
Next, add the buildContext below to make sure that necessary application files are being copied over to the image file system. If you forget this line, you will run into an error that can’t find the path inside of your Dockerfile build.
Azure Container Registry
    - task: Docker@2
      displayName: Build and push an image to container registry
      inputs:
        command: buildAndPush
        repository: $(imageRepository)
        dockerfile: $(dockerfilePath)
        containerRegistry: $(dockerRegistryServiceConnection)
        buildContext: '.'
        tags: |
          $(tag)
Docker Hub
If you are using Docker Hub, your parameters will already have the buildContext added. However, you may want to add the tags parameter at the end to keep track of which build was sent
      - task: Docker@2
        displayName: Build and Push
        inputs:
          command: 'buildAndPush'
          repository: '$(containerRegistry)/$(imageRepository)'
          dockerfile: '$(Build.SourcesDirectory)/taskapp/taskapp/Dockerfile'
          containerRegistry: '$(dockerRegistryServiceConnection)'
          buildContext: '.'
            tags: |
              $(tag)
You can now hit Save and Run to start the pipeline build. Head over to the Azure portal, where your container registry is, and verify that your image repository name is in the registry repository.
Setup the Deploy Stage
Our first stage was pre-populated by the Docker task assistant as our Build stage. We can split the deployment process in half here by adding our Deploy stage. This is done by using the first part of our yaml file and repurposing it to include our deployment tasks. Add in the following code to define a second stage in your pipeline.
# Deploy stage to your App Service and Azure SQL Database
- stage: Deploy
  displayName: Deploy to App Service and Azure SQL
  jobs:
  - job: Deploy
    displayName: Deploy
    pool:
      vmImage: $(vmImageName)
    steps:
Deploy to Azure App Service
Now that you have your image pushed to your registry and your deploy stage setup. You can push the container to App Service. If you haven’t already created your App Service in the Azure portal, you’ll need to do so now before you can proceed.
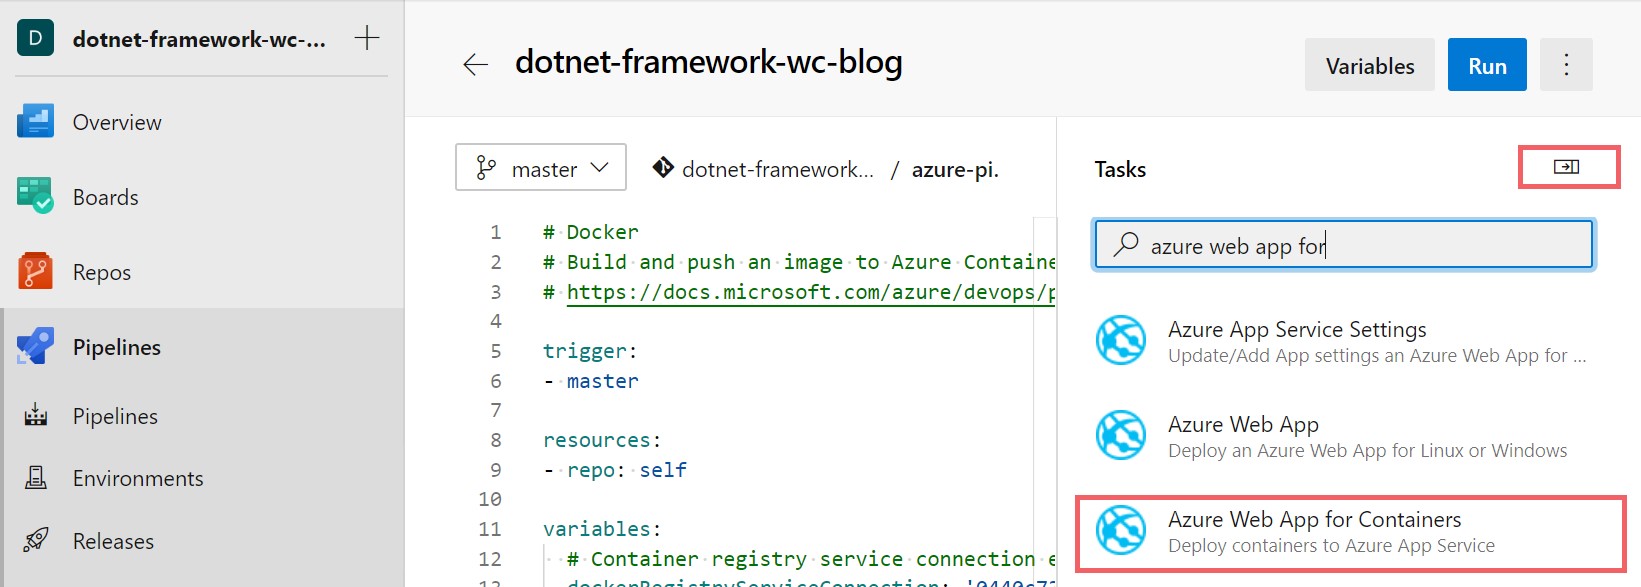
Once you have your App Service created in Azure, you can edit your pipeline to include the deployment to your App Service. Click the assistant in the top right corner of the file and search for Azure Web App for Containers. This task enables you to push a Windows or Linux container to your Azure App Service. You can learn more about how the task works here.
Choose your subscription from the drop down menu and click the authorize button (Note: if authorize returns an error, you may need to add a Service Connection as stated before). Now you can add your App name, which should be populated in the drop down, and Image name, which is in the format of “
| Parameter | Value |
|---|---|
| Azure subscription: | your-subscription-name |
| App name: | your-app-name |
| Image name: | registryname.azurecr.io/imagename:$(tag) |
| Configuration File: | X |
| Startup command: | X |
The registry name information can be found in the Overview tab of you registry resource blade, and the image name can be found in the Repositories tab in the registry resource as well. We are using the DevOps variable $(tag) so it builds with the latest buildId everytime the task is ran.

Now you can save your edited pipeline and get the following output below. You can test that it works by pushing up a change from your code and checking that your App Service will have an updated tag number in the Container Settings tab as well as your application changes in your deployed application.
    - task: AzureWebAppContainer@1
      inputs:
        azureSubscription: '<your-subscription-name>'
        appName: '$(applicationName)'
        containers: '$(containerRegistry)/$(imageRepository):$(tag)'
If you run into the following error during your build: “This pipeline needs permissions to access a resource before this run can continue to Build and push stage”. Click the View button on the error and Permit button on the following screen to allow the build to continue.
Deploy to an Azure SQL Databse (Optional)
Adding Azure SQL to the workflow is optional of course, as you might have other plans for storage. To deploy your SQL database to Azure, you will use a dacpac file or SQL scripts, and a connection string. The connection string can be found in the overview page of your Azure SQL database and you can create your dacpac by extracting the data using something like SQL Server Object Explorer in Visual Studio.
If you need to import a SQL database that you’d like to host on Azure, you have the option to add in the Azure SQL Database deployment task which can be found in the assistant we used earlier. Enter the following values for the parameters.
| Parameter | Value |
|---|---|
| Azure Service Connection Type: | Azure Resource Manager |
| Azure Subscription: | your-subscription-name |
| SQL Database | |
| Authentication Type: | Connection String |
| Connection String: | your-connection-string |
| Deployment Package | |
| Deploy Type: | SQL DACPAC File |
| Action: | Publish |
| DACPAC File: | $(Build.SourcesDirectory)/your-file-name.dacpac |
| Additional SQLPackage.exe Arguments: | X |
Once created with the above parameters, the output should show as below.
    - task: SqlAzureDacpacDeployment@1
      inputs:
        azureSubscription: 'your-subscription-name'
        AuthenticationType: 'connectionString'
        ConnectionString: '$(azureSQLConnectionString)'
        deployType: 'DacpacTask'
        DeploymentAction: 'Publish'
        DacpacFile: '$(Build.SourcesDirectory)/data.dacpac'
        IpDetectionMethod: 'AutoDetect'
Connection String
Our sample app has a dummy connection string in the web.config that will need to be changed for local testing or can be added into your application settings from your App Service as a Connection String setting in the Configuration tab. Make sure the connection string name in the web.config file matches the connection string name in your App Service setting, with the actual connection string added as the value in your settings. For more information on how to do this see this link.
When adding the values for the SQL Database parameters, you’ll want to choose Connection String as your Authentication Type and add in your connection string. We’ll use Variables in DevOps to hide our connection string in safe keeping.
Creating a dacpac file in your project
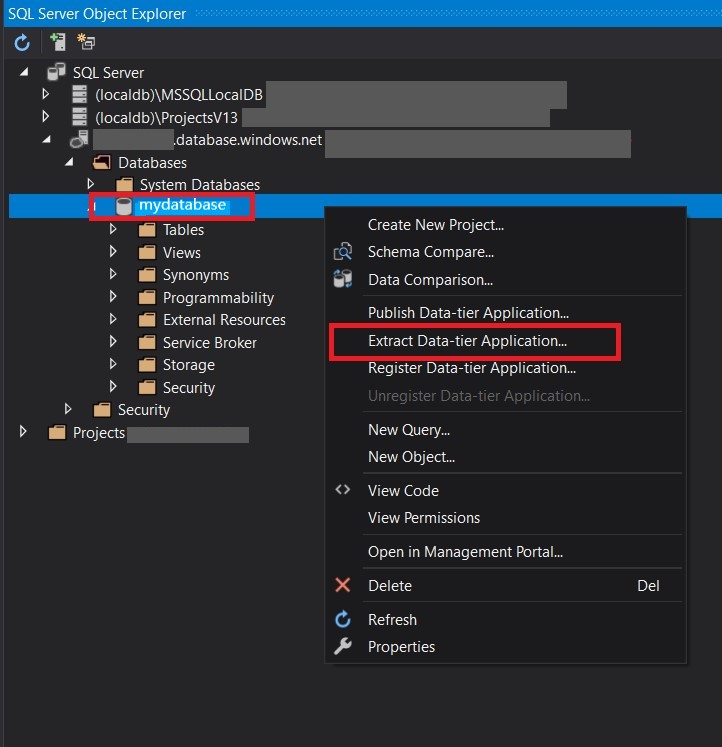
As mentioned before, you’ll need to use either a dacpac file or set of SQL scripts to deploy your database schema. If you are using Visual Studio, it’s easy to create and add the needed dacpac file to run the action.
- Connect your SQL Azure Database to Visual Studio
- Right-click the data base and choose Extract Data-tier application
-
On the following window, choose the location at the same level of your github workflow file and click create.
Your dacpac file should have been created and added to your project. The action finds your file under the dacpac-package parameter seen above.
Summary
From here you are setup to continuously build your Windows Container application through Azure DevOps. Below you’ll see the final result of the workflow yaml file.
Full workflow file
The previous sections showed how to assemble the workflow step-by-step. The full azure-pipelines.yaml is below.
trigger:
- master

resources:
- repo: self

variables:
  # Container registry service connection established during pipeline creation
  dockerRegistryServiceConnection: 'your-auto-populated-service-connection-number'
  azureSubscriptionName: 'your-azure-subscription-name'
  dockerfilePath: '$(Build.SourcesDirectory)/taskapp/taskapp/Dockerfile'
  tag: '$(Build.BuildId)'

  # Agent VM image name
  vmImageName: 'windows-latest'

stages:
- stage: Build
  displayName: Build and push stage
  jobs:
  - job: Build
    displayName: Build
    pool:
      vmImage: $(vmImageName)
    steps:
    - task: Docker@2
      displayName: Build and push an image to container registry
      inputs:
        command: buildAndPush
        repository: '$(imageRepository)'
        dockerfile: $(dockerfilePath)
        containerRegistry: '$(dockerRegistryServiceConnection)'
        buildContext: .
        tags: |
          $(tag)

- stage: Deploy
  displayName: Deploy to App Service and Azure SQL
  jobs:
  - job: Deploy
    displayName: Deploy
    pool:
      vmImage: $(vmImageName)
    steps:

    - task: AzureWebAppContainer@1
      inputs:
        azureSubscription: '$(azureSubscriptionName)'
        appName: '$(applicationName)'
        containers: '$(containerRegistry)/$(imageRepository):$(tag)'

    - task: SqlAzureDacpacDeployment@1
      inputs:
        azureSubscription: '$(azureSubscriptionName)'
        AuthenticationType: 'connectionString'
        ConnectionString: '$(azureSQLConnectionString)'
        deployType: 'DacpacTask'
        DeploymentAction: 'Publish'
        DacpacFile: '$(Build.SourcesDirectory)/data.dacpac'
        IpDetectionMethod: 'AutoDetect'