Creating a local PFX copy of App Service Certificate
Introduction
Last year, we introduced ‘App Service Certificate’, a certificate lifecycle management offering. Azure portal provides a user-friendly experience for creating App Service Certificates and using them with App Service Apps. You can read more about this service here. While the portal provides first class experience for deploying App Service Certificate through Key Vault to App Service Apps, we have been receiving customer requests where they would like to use these certificates outside of App Service platform, say with Azure Virtual Machines. In this blogpost, I am going to describe how to create a local PFX copy of App Service Certificate so that you can use it anywhere you want.Prerequisites
Before making a local copy, make sure that: 1. The App Service Certificate is in ‘Issued’ state 2. It’s assigned to a Key Vault (Step 1 in the link shared above).Creating a local copy of the issued SSL certificate using PowerShell
You can use the following PowerShell script to create a local PFX copy. You need to first install Azure PowerShell and have the required modules installed. Follow this blog to install the Azure PowerShell commandlets. To use the script, open a PowerShell window, copy the entire script below (uncomment Remove-AzKeyVaultAccessPolicy line if you want to remove Access policies after export, check your permissions to see if you want to remove the policy) and paste it on the PowerShell window and hit enter.
    Function Export-AppServiceCertificate
    {
    ###########################################################

    Param(
    [Parameter(Mandatory=$true,Position=1,HelpMessage="ARM Login Url")]
    [string]$loginId,

    [Parameter(Mandatory=$true,HelpMessage="Subscription Id")]
    [string]$subscriptionId,

    [Parameter(Mandatory=$true,HelpMessage="Resource Group Name")]
    [string]$resourceGroupName,

    [Parameter(Mandatory=$true,HelpMessage="Name of the App Service Certificate Resource")]
    [string]$name
    )

    ###########################################################

    Connect-AzAccount
    Set-AzContext -Subscription $subscriptionId

    ## Get the KeyVault Resource Url and KeyVault Secret Name were the certificate is stored
    $ascResource= Get-AzResource -ResourceId "/subscriptions/$subscriptionId/resourceGroups/$resourceGroupName/providers/Microsoft.CertificateRegistration/certificateOrders/$name"
    $certProps = Get-Member -InputObject $ascResource.Properties.certificates[0] -MemberType NoteProperty
    $certificateName = $certProps[0].Name
    $keyVaultId = $ascResource.Properties.certificates[0].$certificateName.KeyVaultId
    $keyVaultSecretName = $ascResource.Properties.certificates[0].$certificateName.KeyVaultSecretName

    ## Split the resource URL of KeyVault and get KeyVaultName and KeyVaultResourceGroupName
    $keyVaultIdParts = $keyVaultId.Split("/")
    $keyVaultName = $keyVaultIdParts[$keyVaultIdParts.Length - 1]
    $keyVaultResourceGroupName = $keyVaultIdParts[$keyVaultIdParts.Length - 5]

    ## --- !! NOTE !! ----
    ## Only users who can set the access policy and has the the right RBAC permissions can set the access policy on KeyVault, if the command fails contact the owner of the KeyVault
    Set-AzKeyVaultAccessPolicy -ResourceGroupName $keyVaultResourceGroupName -VaultName $keyVaultName -UserPrincipalName $loginId -PermissionsToSecrets get
    Write-Host "Get Secret Access to account $loginId has been granted from the KeyVault, please check and remove the policy after exporting the certificate"

    ## Getting the secret from the KeyVault
    $secret = Get-AzKeyVaultSecret -VaultName $keyVaultName -Name $keyVaultSecretName -AsPlainText
    $pfxCertObject= New-Object System.Security.Cryptography.X509Certificates.X509Certificate2 -ArgumentList @([Convert]::FromBase64String($secret),"",[System.Security.Cryptography.X509Certificates.X509KeyStorageFlags]::Exportable)
    $pfxPassword = -join ((65..90) + (97..122) + (48..57) | Get-Random -Count 50 | % {[char]$_})
    $currentDirectory = (Get-Location -PSProvider FileSystem).ProviderPath
    [Environment]::CurrentDirectory = (Get-Location -PSProvider FileSystem).ProviderPath
    [io.file]::WriteAllBytes(".\appservicecertificate.pfx",$pfxCertObject.Export([System.Security.Cryptography.X509Certificates.X509ContentType]::Pkcs12,$pfxPassword))

    ## --- !! NOTE !! ----
    ## Remove the Access Policy required for exporting the certificate once you have exported the certificate to prevent giving the account prolonged access to the KeyVault
    ## The account will be completely removed from KeyVault access policy and will prevent to account from accessing any keys/secrets/certificates on the KeyVault,
    ## Run the following command if you are sure that the account is not used for any other access on the KeyVault or login to the portal and change the access policy accordingly.
    # Remove-AzKeyVaultAccessPolicy -ResourceGroupName $keyVaultResourceGroupName -VaultName $keyVaultName -UserPrincipalName $loginId
    # Write-Host "Access to account $loginId has been removed from the KeyVault"

    # Print the password for the exported certificate
    Write-Host "Created an App Service Certificate copy at: $currentDirectory\appservicecertificate.pfx"
    Write-Warning "For security reasons, do not store the PFX password. Use it directly from the console as required."
    Write-Host "PFX password: $pfxPassword"

    }
Now you will have a new command called Export-AppServiceCertificate, use the command as follows
Export-AppServiceCertificate -loginId yourarmemail@domain.com -subscriptionId yoursubid -resourceGroupName resourceGroupNameOfYourAppServiceCertificate -name appServiceCertificateNameOnce the command is executed, you would see a new file in the current directory called ‘appservicecertificate.pfx’. This is a password protected PFX, the PowerShell console would display the corresponding password. For security reasons, do not store this password in a text file. You can use the password directly from the console as required. Also, don’t forget to delete the local PFX file once you no longer need it.
Exporting the certificate with the chain included for App Service Web App consumption.
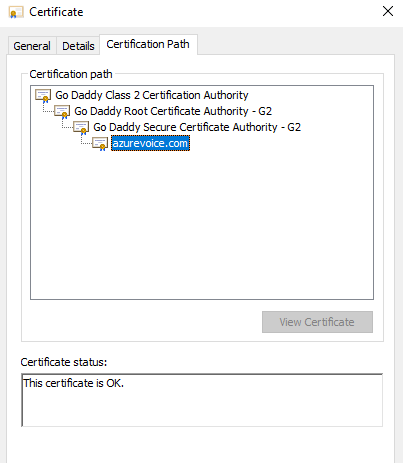
The pfx created by the above commands will not include certificates from the chain. Services like Azure App Services expect the certificates that are being uploaded to have all the certificates in the chain included as part of the pfx file. To get the certificates of the chain to be part of the pfx, you will need to install the exported certificate on your machine first using the password that is provided by the script, make sure you mark the certificate as exportable.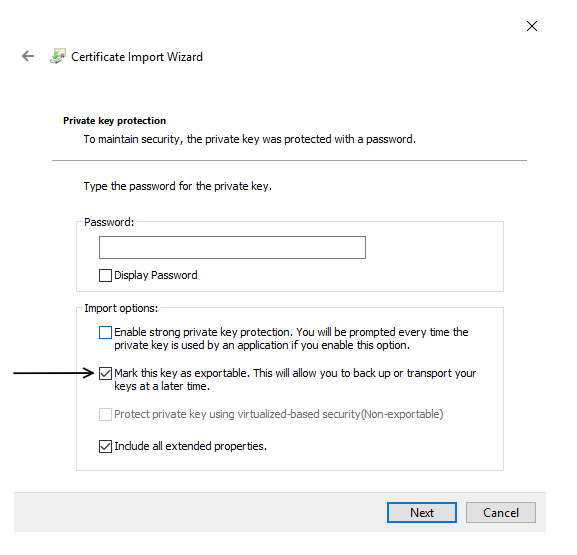 Once you have installed the exported certificate open the certificate from your certificate store and navigate to the Certification Path tab, it would look something like below,
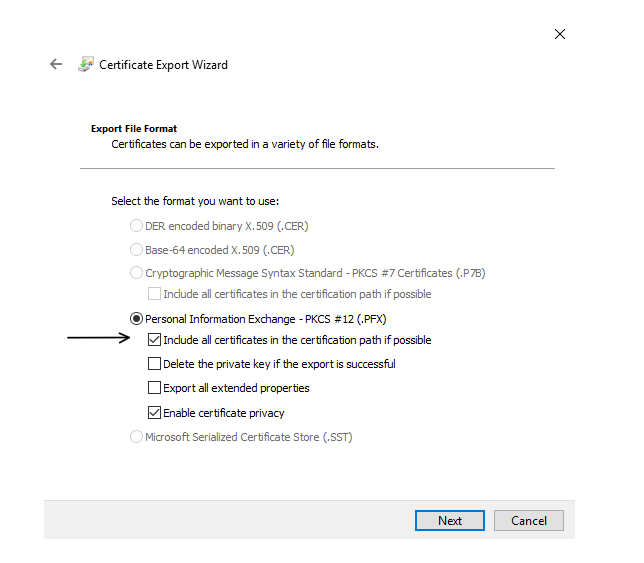
 Now go to https://certs.godaddy.com/repository and download the intermediate certificates and the root certificate. Install all of the certificates downloaded to the same store as your certificate. Once you confirmed that all the certificates in the chain have been installed we can export the certificate with the chain by going to the certificate store, right clicking on the SSL certificate we exported and installed and clicking of All Tasks -> Export ...
In the wizard, make sure you select the option, "Yes, export the private key"
And then under the Personal Information Exchange property, make sure the option "Include all certificates in the certification path if possible" is checked.
Now go to https://certs.godaddy.com/repository and download the intermediate certificates and the root certificate. Install all of the certificates downloaded to the same store as your certificate. Once you confirmed that all the certificates in the chain have been installed we can export the certificate with the chain by going to the certificate store, right clicking on the SSL certificate we exported and installed and clicking of All Tasks -> Export ...
In the wizard, make sure you select the option, "Yes, export the private key"
And then under the Personal Information Exchange property, make sure the option "Include all certificates in the certification path if possible" is checked.
 Once exported into a new pfx file we can check if the new pfx has the certificate chain included in it by running the command,
certutil -dump <path of the certificate file>You will see the list of the certificates that are part of the pfx from the root to your certificate. A pfx file created with the above steps with all the certificates of the chain contained is well formed and can be uploaded to App Service Web Apps with confidence. Note the CA part of the uploaded pfx file will be discarded when we process the uploaded certificate, we store all the intermediate certificates associated with the certificate to enable the chain to be remade properly in the runtime. Once all the export operation is complete and you have successfully uploaded your certificate clean your machine of any trace of the SSL certificate by deleting the certificate from the store to secure your certificate.
Things to note
If you create a copy of App Service Certificate this way, it won’t have any impact on existing App Service SSL bindings that were created using the portal experience. It also won’t affect any such SSL bindings you may create in the future. You can still Rekey and Renew an App Service Certificate with one click even after making a copy but you would be responsible for creating a new local copy with the new certificate and updating all services that are using the old certificate.Tips
This section compares this method of certificate deployment with the built-in Azure portal experience for Web Apps. It also contains recommendations you should follow when you use the PFX copy elsewhere.|
Title |
Azure portal Deployment |
Deploying local PFX copy |
Recommendations |
|
Auto/Manual Renew |
When an App Service Certificate is renewed, all the corresponding App Service SSL bindings are updated automatically |
When a certificate is renewed, you would need to manually update all the services that are using a local copy. |
Turn off Auto renew as you won’t know when exactly an App Service Certificate gets renewed with Auto renew and this would end up breaking your SSL endpoints. Manually renew such App Service Certificates before they expire |
|
Rekey |
Just like renewal, the corresponding SSL bindings are updated automatically |
Just like renewal, you would need to manually update all such services. |
|
|
Deployment |
When deploying certificate this way, you don’t need any file locally and there won’t be any secrets to clean up |
When deploying certificate this way, you would have the PFX certificate on local disk. |
Always delete the local copy once you no longer need it as you can create a PFX copy as many times as you want. Also, never store the password shown in PowerShell console locally. This way, even if somehow an adversary gets hold of your local disk, he still won’t be able to use the PFX certificate as it’s protected by a strong password |