Cross-Post Creating a Corporate Wiki in Azure
Chris Gillum (MSFT)
Using Azure App Service and Azure Active Directory (AAD), it's possible to create a MediaWiki-based web app for use within your organization with minimal setup and for little or no cost. If you're not familiar with MediaWiki, it's the same open source platform which powers Wikipedia. A few folks within Microsoft surprised me when they created internal wikis using my Easy Auth feature (Authentication / Authorization) so I thought I'd try it out for myself and do a quick write-up on it.
Note that I'm assuming you're already familiar with Azure Active Directory and that you have an Azure Subscription that is associated with your organization. If not, you can find more information here: https://azure.microsoft.com/en-us/documentation/articles/sign-up-organization/.
 At this point, your new web app is now protected using Azure Active Directory authentication and only users in your organization will be able to access the site.
 There are many ways to configure this so consider the below just one of many examples.
 This is a big improvement from before!
 With this setting in place, when users click on your links which contain URL fragments, the login process will ensure that the URL fragment part of your URL does not get lost in the login redirect process. Let us know in the comments if you found this feature helpful for you, we'd love to know about it. If it helps out enough folks, we'll likely turn on this capability by default.
Note: This post was cross-posted from CGillum Dev Blog.
Creating a Web App
The first step is to create a new web app. If you already know how to do this, you can skip this section. The easiest way is to simply navigate to https://portal.azure.com, log in with your Azure Subscription (the one for your organization), and go to New --> Web and Mobile --> Web App. This can also be done using the Azure PowerShell or Cross-Platform CLI Tools, though I won't cover those details here. In this example, let's suppose you named the web app easyauth-wiki (all my examples and screenshots will use this name, but you can replace it with your own app name). IMPORTANT: If you want to create custom hostnames for your web app, you should set that up now.Enabling AAD Authentication
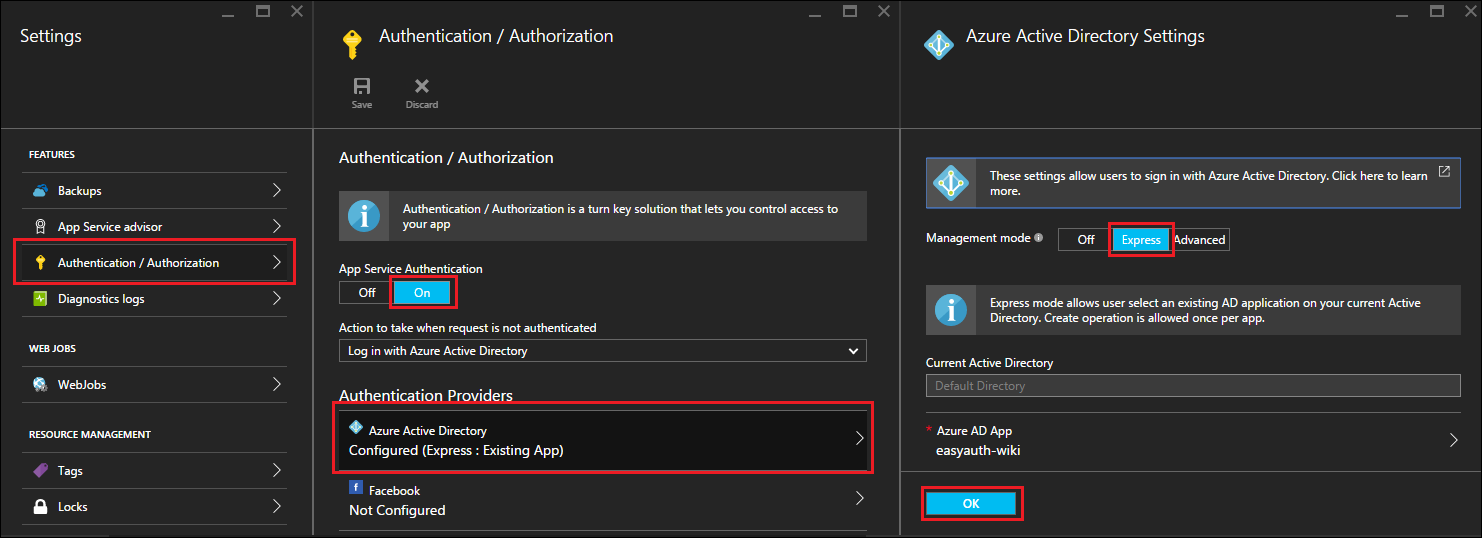
As I hinted to before, this can be done in the portal via Easy Auth, Azure App Service's integrated authentication feature. For simplicity, we'll use the Express configuration, which automatically creates an AAD application and configures it for your site.- In https://portal.azure.com, select the web app you previously created.
- Select Settings and navigate down to Authentication / Authorization.
- Set App Service Authentication to On.
- Under Authentication Providers, select Azure Active Directory
- For Management mode, select Express and then click OK.
- Back in the Authentication / Authorization blade, click Save.
At this point, your new web app is now protected using Azure Active Directory authentication and only users in your organization will be able to access the site.
Installing MediaWiki
It's possible to create a MediaWiki app using the Marketplace gallery in the Azure management portal, but for this write-up I'm going to configure it from scratch. This also allows me to use a local SQLite database (instead of paying for a ClearDB MySQL database), which is convenient for testing and is free. If you're expecting your wiki to be used by a large number of users, then you should definitely consider using MySQL instead of SQLite, though I won't cover the MySQL setup here.Download MediaWiki
There are multiple ways to get MediaWiki installed on your web app. I'm going to show you the quick-and-dirty way which doesn't involve any 3rd party tools or source control. Start by navigating to the debug console on the SCM endpoint for the site you just created: https://{appname}.scm.azurewebsites.net/DebugConsole. You can log in using your Azure Subscription credentials if you're not already logged in. Then do the following:- cd D:\home\site\wwwroot
- del hostingstart.html
- curl https://releases.wikimedia.org/mediawiki/1.26/mediawiki-1.26.3.tar.gz > mediawiki.tar.gz
- tar -xzvf mediawiki.tar.gz
Configure MediaWiki
Now that MediaWiki is installed, let's configure it with a simple SQLite database backend.- Navigate to https://{appname}.azurewebsites.net/mediawiki-1.26.3/mw-config/index.php
- Click through the first two pages.
- In the Connect to database page, select Database type: SQLite and click Continue.
- Configure your wiki with a name and an administrator account and click Continue.
- For User rights profile, select Private wiki.
- Feel free to mess with additional settings on this page as necessary. Under Advanced configuration, you may want to enable PHP object caching for improved performance (internally we use WinCache). When all done, click Continue and then Continue two more times to complete the installation.
Configuring Integrated Authentication
The final required step is to connect the user accounts in your Azure Active Directory to the user accounts in your wiki. This can be done using the Auth_remoteuser extension, as I'll describe here. The great thing about this extension is that it can also be used for on-premises Active Directory, making it very easy to do on-premises to Azure migrations. Once again, let's take the simple route of installing it directly onto the web app using the Kudu Debug console (otherwise you can follow the instructions on the extension page).- Use cURL to download the extension, e.g. curl https://extdist.wmflabs.org/dist/extensions/Auth_remoteuser-REL1_26-6103d19.tar.gz > Auth_remoteuser-REL1_26-6103d19.tar.gz (the actual URL will be different for you depending on which version is the latest by the time you read this).
- Extract the downloaded extension into the MediaWiki extensions directory - e.g. tar -xzvf Auth_remoteuser-REL1_26-6103d19.tar.gz -C D:\home\site\wwwroot\mediawiki-1.26.3\extensions (again, your exact path may differ).
- Open your LocalSettings.php for editing (e.g. D:\home\site\wwwroot\mediawiki-1.26.3\LocalSettings.php) and make the following changes:
Configuring URL Rewrite Rules (Optional)
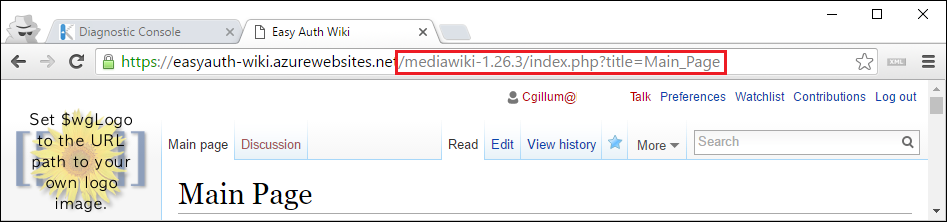
The final step involves configuring IIS rewrite rules on your app to remove the installation directory as well as to "prettify" your URLs. Without doing this, your URLs are quite ugly and hard to discover.
There are many ways to configure this so consider the below just one of many examples.
- In the Kudu console, navigate to D:\home\site\wwwroot.
- Create a web.config file by entering the following command: touch web.config
- Open the file for editing and add the following content (replacing the MediaWiki version numbers as necessary):
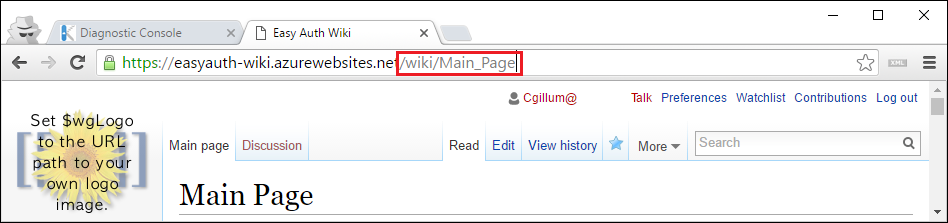
- Open the LocalSettings.php file and ensure the following variables are set as shown here (again, you may need to fix up the MediaWiki version number):
This is a big improvement from before!
Linking to Anchors (Optional)
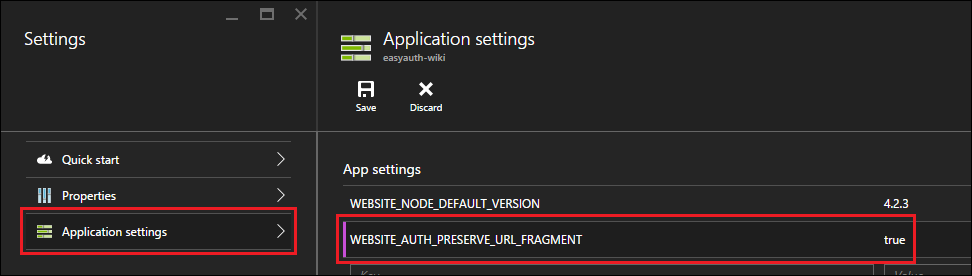
It's common for people to create links to certain sections of their wiki pages which contain URL fragments. For example, you might have a URL which looks like /wiki/Main_Page#SectionZ. This ensures that when you share the link with someone and they click it, the browser will automatically scroll to wherever "SectionZ" is located on the page. More information on anchors in MediaWiki can be found here. There is one problem that occurs when you introduce login to your web app, however. If you're familiar with URL fragments (the #SectionZ part of the URL) then you'll know that they are never sent to the server. By default, the Easy Auth module handles the login entirely on the server, so if one of your colleagues clicks on a link to the wiki with a URL fragment in it and they are not yet logged in, the URL fragment will be lost by the time they finish logging in and get redirected back to the page they tried to visit. This is a pain because then they have to manually scroll to find the location that they were supposed to be directly linked to. Note that this problem is not unique to MediaWiki or Easy Auth. There are many other server-side authentication solutions which suffer from the same issue. One potential workaround is to have people complete the login and then click the link again in order to be navigated to the correct location in the target page. Obviously, this is not a very good solution. Several teams internally at Microsoft have run into this problem and reported it to me, so I thought it would be a good idea to find a way to solve it in a way that didn't require users to know about the problem. To that end, we recently added a new feature in Easy Auth which solves this by using some JavaScript to ensure URL fragments are correctly preserved. Currently it's an opt-in feature which you can enable by setting the WEBSITE_AUTH_PRESERVE_URL_FRAGMENT app setting to true in the Azure management portal.
With this setting in place, when users click on your links which contain URL fragments, the login process will ensure that the URL fragment part of your URL does not get lost in the login redirect process. Let us know in the comments if you found this feature helpful for you, we'd love to know about it. If it helps out enough folks, we'll likely turn on this capability by default.