Module 1 - Workload Identity
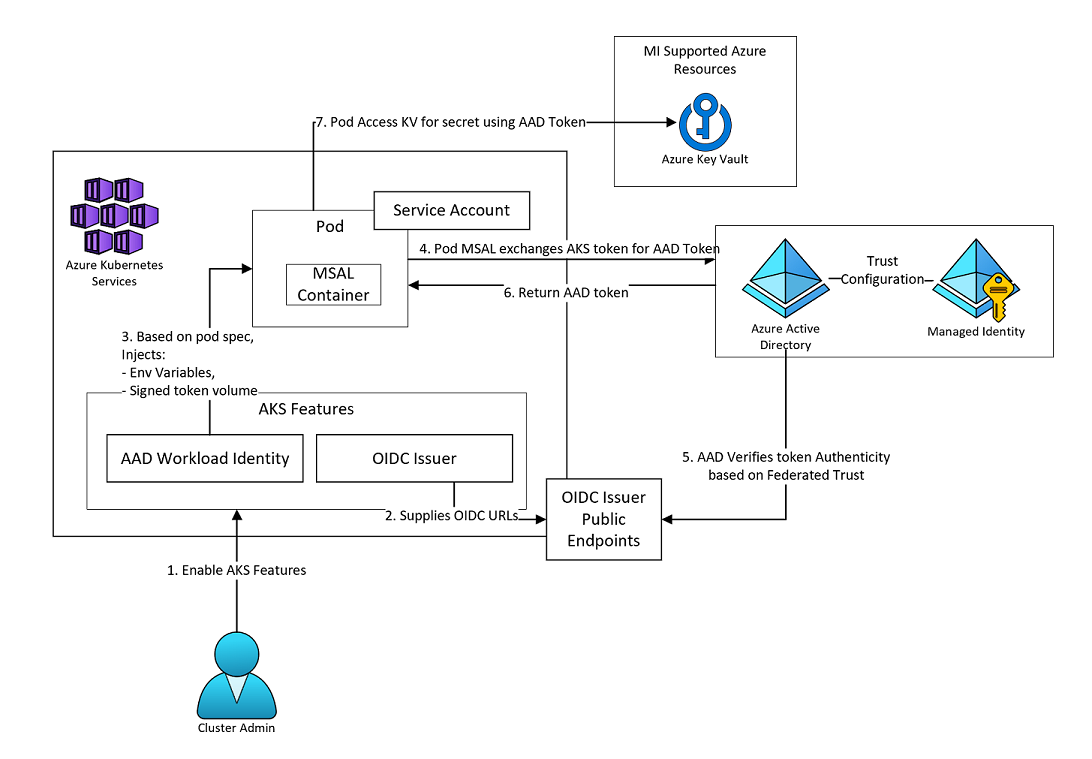
Workload Identity allows pods to access Azure resources using Azure managed identities and removes the need to store any credential secrets. For example, given a workload that may store files in Azure Storage, when it needs to access those files, the pod authenticates itself against the resource as an Azure managed identity.
AAD Workload Identity for AKS integrates with the Kubernetes native capabilities to federate with any external identity providers. The feature sunsets the existing AAD Pod-Managed Identity offering and makes it easier to use and deploy, and overcome several limitations in AAD Pod-Managed Identity.
This lab will perform the following work:
- Enable OIDC Issuer and Workload Identity features on the AKS cluster
- Create a Managed Identity in Azure
- Create a Service Account in Kubernetes
- Create a Keyvault secret and grant the Managed Identity access to read secrets
- Establish a Federated Trust between Kubernetes and AAD
- Deploy a sample application and validate it can access the Keyvault secret using the Managed Identity
The following is a diagram for this lab module:
Enabling Workload Identity
Note As of Feb. 2023, this feature is in public preview, with expectations that GA is soon, so the following ‘Register preview providers’ section will not be required once the feature is GA.
Set the following environment variables in your bash session by updating the values and executing in your terminal.
RG_NAME=rg-aks-gha
LOCATION=eastus
CLUSTER_NAME=devsecops-aks
KEYVAULT_SECRET_NAME=mysecret
SUBSCRIPTION_ID=$(az account show --query id -o tsv)
KEYVAULT_NAME=$(az keyvault list -g ${RG_NAME} --query "[0].name" -o tsv)
Enable ODIC and Workload Identity on the AKS Cluster
- Execute the following CLI command to enable oidc-issuer and to enable workload identity on your AKS cluster. This operation will take several minutes.
az aks update --resource-group $RG_NAME --name $CLUSTER_NAME --enable-oidc-issuer --enable-workload-identity- The OIDC Issuer feature allows Azure Active Directory (Azure AD) or other cloud provider identity and access management platforms, to discover the API server’s public signing keys.
- The Azure AD Workload Identity feature for Kubernetes integrates with the capabilities native to Kubernetes to federate with external identity providers. It allows for workloads in your AKS cluster to make use of AAD Managed Identities.
- Set the ODIC Issuer URL to a variable for usage later.
export AKS_OIDC_ISSUER="$(az aks show -n $CLUSTER_NAME -g $RG_NAME --query "oidcIssuerProfile.issuerUrl" -otsv)" echo $AKS_OIDC_ISSUER echo "$AKS_OIDC_ISSUER/.well-known/openid-configuration" - Verify that you now see a mutating webhook pod on your cluster. The mutating admission webhook is used to project a signed service account token to a workload’s volume and inject environment variables to pods.
az aks get-credentials --resource-group $RG_NAME  --name $CLUSTER_NAME --admin --overwrite
kubectl get pods -n kube-system | grep webhook
Create a managed identity and grant permission to Azure Keyvault
- Create Managed Identity in your resource group
export USER_ASSIGNED_IDENTITY_NAME="workshop-Identity" az identity create --name "${USER_ASSIGNED_IDENTITY_NAME}" --resource-group "${RG_NAME}" --location "${LOCATION}" --subscription "${SUBSCRIPTION_ID}" - Create Access Policy against Keyvault, allowing the identity to get secrets.
export USER_ASSIGNED_CLIENT_ID="$(az identity show --resource-group "${RG_NAME}" --name "${USER_ASSIGNED_IDENTITY_NAME}" --query 'clientId' -o tsv)" az keyvault set-policy --name "${KEYVAULT_NAME}" --secret-permissions get --spn "${USER_ASSIGNED_CLIENT_ID}" --resource-group "${RG_NAME}" - Create a Secret in Keyvault
export USERID=$(az ad signed-in-user show --query id -o tsv)
az keyvault set-policy --name "${KEYVAULT_NAME}" --secret-permissions list set get --object-id $USERID --resource-group "${RG_NAME}"
az keyvault secret set --vault-name "${KEYVAULT_NAME}" \
    --name "${KEYVAULT_SECRET_NAME}" \
    --value "LevelUp Lab Secret\!"
Create a Service Account and Establish Federated Identity
- Create/Deploy Service Account K8S YAML. Note the annotations and labels required for this service account to leverage Workload Identity.
export SERVICE_ACCOUNT_NAME="workload-identity-sa"
export SERVICE_ACCOUNT_NAMESPACE="default"

cat <<EOF | kubectl apply -f -
apiVersion: v1
kind: ServiceAccount
metadata:
  annotations:
    azure.workload.identity/client-id: "${USER_ASSIGNED_CLIENT_ID}"
  labels:
    azure.workload.identity/use: "true"
  name: "${SERVICE_ACCOUNT_NAME}"
  namespace: "${SERVICE_ACCOUNT_NAMESPACE}"
EOF
- Establish Federated Identity. The namespace and service account name are used to create the subject identifier in the federation. Once this is setup, this Managed Identity will now trust tokens coming from our Kubernetes cluster. The subject claim identifies the principal that will be the subject of the token.
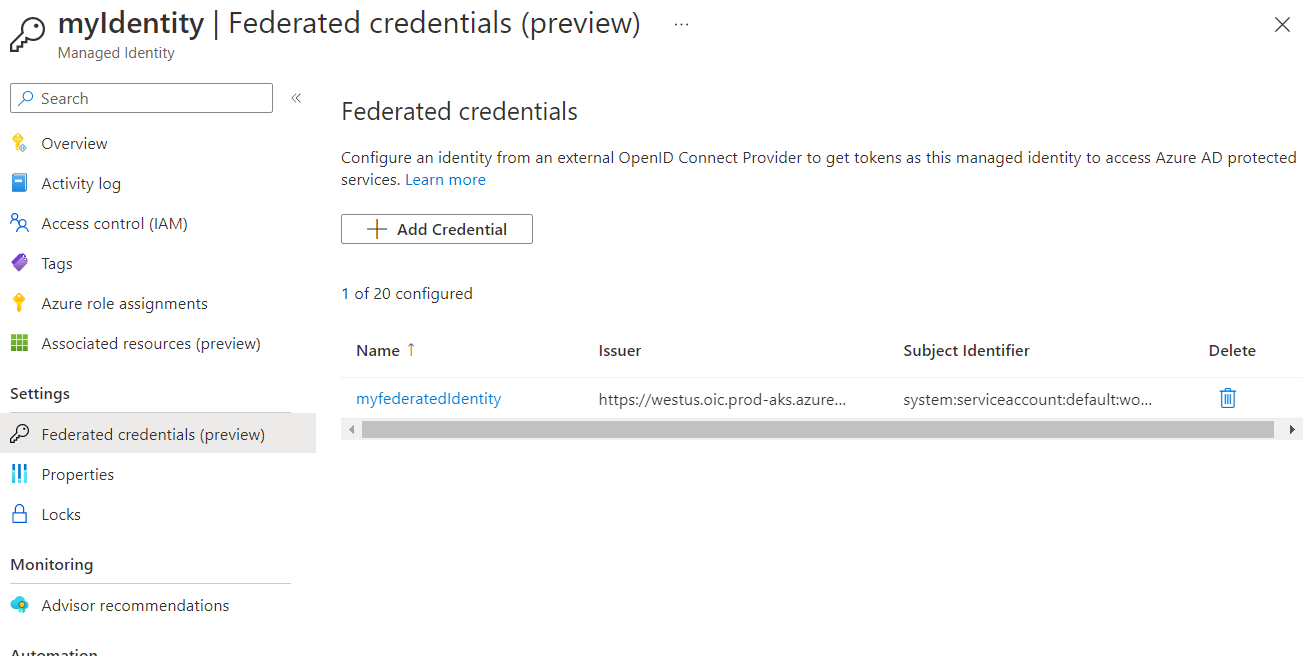
az identity federated-credential create --name myfederatedIdentity --identity-name "${USER_ASSIGNED_IDENTITY_NAME}" --resource-group "${RG_NAME}" --issuer "${AKS_OIDC_ISSUER}" --subject system:serviceaccount:"${SERVICE_ACCOUNT_NAMESPACE}":"${SERVICE_ACCOUNT_NAME}"
After the federation is setup, navigate to your cluster resource group, and you will now see an identity. Click the Identity resource and select the “Federated credentials” blade under Settings.
Deploy Sample workload & Test
The following YAML deploys a sample .net application that writes to the log the content of the secret inside keyvault. The .NET application expects two environment variables for the Kevault URL and the Keyvault secret name references. You can find source code for different programming languages that implement MSAL and KeyVault integration here.
Note the following required annotations on the K8S YAML configuration:
- azure.workload.identity/use: “true”
- serviceAccountName: ${SERVICE_ACCOUNT_NAME}
- Execute:
export KEYVAULT_URL="$(az keyvault show -g ${RG_NAME} -n ${KEYVAULT_NAME} --query properties.vaultUri -o tsv)"

cat <<EOF | kubectl apply -f -
apiVersion: v1
kind: Pod
metadata:
  name: quick-start
  namespace: ${SERVICE_ACCOUNT_NAMESPACE}
  labels:
    azure.workload.identity/use: "true"
spec:
  serviceAccountName: ${SERVICE_ACCOUNT_NAME}
  containers:
    - image: ghcr.io/azure/azure-workload-identity/msal-net
      name: oidc
      env:
      - name: KEYVAULT_URL
        value: ${KEYVAULT_URL}
      - name: SECRET_NAME
        value: ${KEYVAULT_SECRET_NAME}
EOF
- Once the pod is running, ensure the pod is showing the KeyVault secret:
kubectl logs quick-startIf the pod communication to the KeyVault was successful, you will see the following message:

- Inspect the additional environment variables and volumeMounts created:
kubectl describe pod quick-startYou should notice the new environment variables and volume mount, as shown in this screenshot.

- Additionally, you can inspect the token mounted to the pod by executing into the quick-start container. The path here is found in the volumeMount. You can further copy this token and paste it into jwt.io to inspect the content of the token.
kubectl exec quick-start -- cat /var/run/secrets/azure/tokens/azure-identity-token
This completes the hands-on lab.
Troubleshooting
In the case you do not see the above logs, validate the environment variables and delete/re-deploy the application.
For troubleshooting the azure-workload-identity components, you can view and isolate errors from logs with the following command:
kubectl logs -n kube-system -l azure-workload-identity.io/system=true --since=1h | grep ^E