Visual Studio Code AKS Tools
Introduction
Azure Kubernetes Service (AKS) Extension for Visual Studio Code helps enable AKS developers with one-click quick to deploy features with in vscode eco-system.
Features
- Add AKS clusters to kubeconfig
- Perform AKS Diagnostics checks on your AKS cluster
- Install Azure Service Operator on your AKS cluster
- Create GitHub Workflow from your AKS cluster (deprecated)
- Show AKS cluster overview in Azure Portal
- Show AKS cluster properties
- Create AKS cluster from Azure Portal
- Stop and Start the AKS cluster
- Run Kubectl Commands from your AKS cluster
- Run Managed Cluster Operations from your AKS cluster
- Run Kubernetes API Health Endpoints
- Run Inspektor Gadget Commands
- Collect TCP Dumps
- Compare AKS Cluster
- Run Image Cleaner Eraser Tool
- Run Retina Capture
- Run Deployment Tools Commands
- Use Container Assist Integration (Preview)
- Install and Deploy KAITO Models
- Manage and Test KAITO Deployments
- Use Simplified AKS Menu Structure (Feature Flag)
- Use Argo CD GitOps Integration (Feature Flag)
- Create AKS Fleet Manager from VS Code
- AKS MCP Server
Development and Release
Installation
-
Download and install the Azure Kubernetes Service extension for Visual Studio Code.
-
Wait for the extension to finish installing then reload Visual Studio Code when prompted.
-
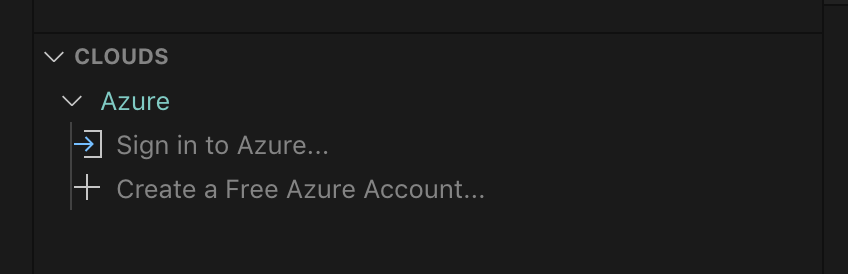
Once the installation is complete, you’ll see a section named Azure under Clouds.
-
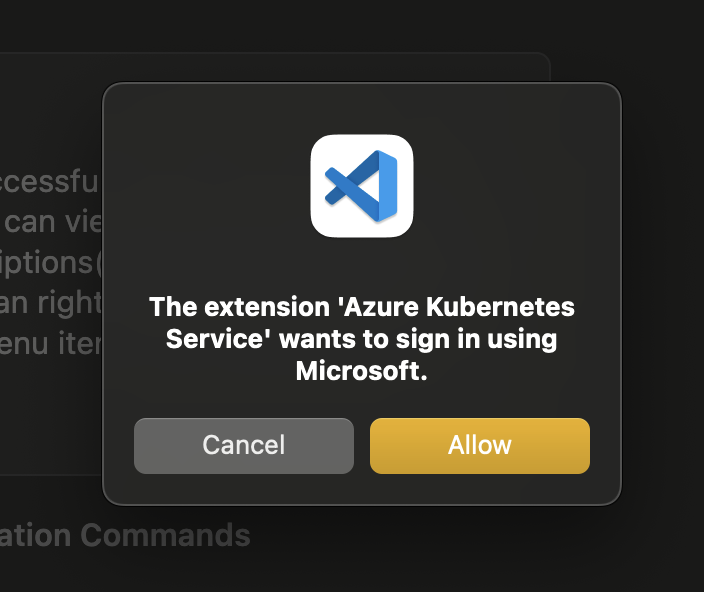
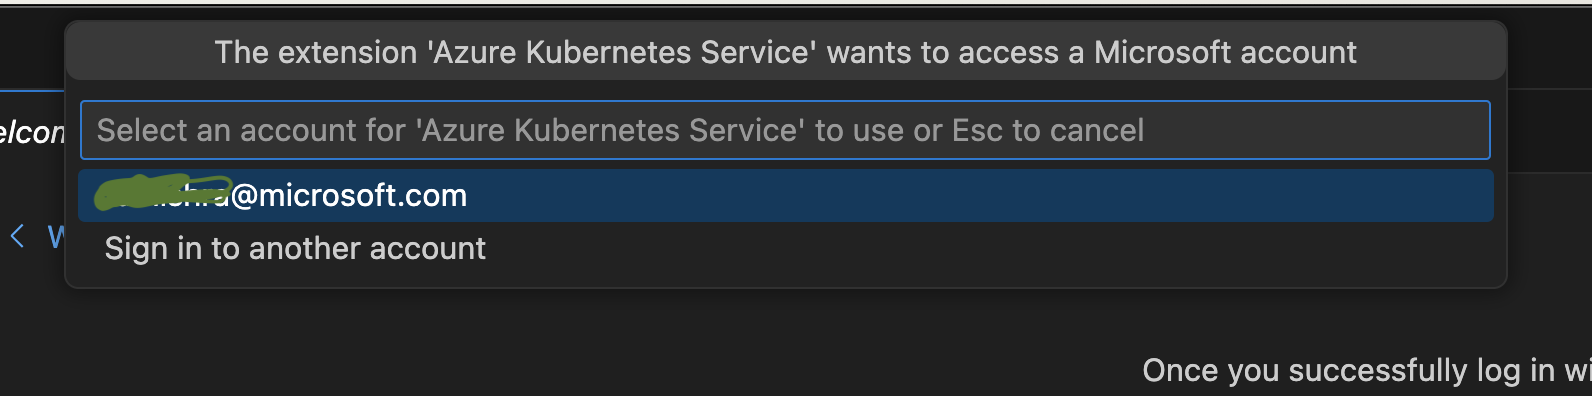
Sign in to your Azure Account by clicking Sign in to Azure…, (Afternatively, user can use
ctrl + shift + porcmd + shift + pand chooseAKS: Sign in to Azure) screenshot below could guide the switch for account as well. If your account has access to more than one Azure tenant, you will be prompted to pick one. To change the selected tenant later, you can runAKS: Select tenant...from the command palettectrl + shift + porcmd + shift + p.

Development
Package Scripts
This gives an overview of the npm scripts available for development and release of the extension. See the scripts block in package.json.
These can all be run from the command line in the root of the repository (with npm installed), using npm run {script-name}.
Environment Initialization
install:all: Installsnpmdependencies for both the main extension project and thewebview-uisub-project. It’s recommended to use this instead ofnpm install, which will only install dependencies for the main project.
Development and Testing
dev-webview: for concurrent development/debugging of webview UX.build-webview: bundles and minifies the webview UX for consumption by the extension.webpack: builds and packages the extension.test: runs automated tests.
Not for Running Directly
Some scripts are invoked by other scripts or tools, so need not be run directly, or are otherwise not required for general development tasks:
vscode:prepublish: used by thevscecommand for packaging the extension into avsixfile for distribution.webpack-dev: builds thewebview-uiproject and then bundles the extension code in development mode (--watch). This is thepreLaunchTaskfor theExtensiondebug profile (F5).test-compile: compiles the extension typescript (after building thewebview-uiproject) without webpacking it. This is a prerequisite to running automated tests. It could be moved intotest, but keeping it separate would allow it to be used in the future as a prelaunch task for debugging the extension without webpacking it.watch: not currently used as part of any workflow I’m aware of, but could potentially be useful for editing while debugging.
Local VSIX Sharing and How to Share via a GitHub Comment
Follow these steps to modify the package.json version, generate a VSIX file, and prepare it for sharing as a renamed file in a GitHub comment:
Step 1: Update the package.json Version
- Open the
package.jsonfile in your project directory. - Find the
"version"field. - Update it to a unique test version (e.g.,
1.0.0-test.1or include a timestamp for uniqueness).
Example:{ "name": "my-extension", "version": "1.0.0-test.1", "main": "extension.js" } - Save your changes.
Step 2: Generate the VSIX File
- Open a terminal in your project directory.
- Run the following command to package the extension: (How to install
vsce)vsce package - A file like
my-extension-1.0.0-test.1.vsixwill be created in your project directory.
Step 3: Rename the File for Sharing
-
Rename the VSIX File: GitHub does not allow direct upload of files with the
.vsixextension. To work around this:- Rename the file by appending
.zipto the original name.
Example:
Renamefilename.vsixtofilename.vsix.zip.
- Rename the file by appending
-
Upload to GitHub:
- Drag and drop the renamed file (
filename.vsix.zip) into your GitHub comment or PR description.
- Drag and drop the renamed file (
Final Notes
- This renaming approach avoids additional steps like zipping or compressing the file.
- The development team is typically familiar with this process, making it a quick and effective way to share test versions.
Happy coding! 🚀
Webview Development
For commands that require a webview (see guidance on where this is appropriate), the webview-ui project provides the necessary tooling to develop the front end.
Initial Setup
Run npm run install:all to install package dependencies for both the extension and webview project.
Development/Debugging
File structure
- Webview source files are under
/webview-ui/src. - When built, bundled/minified webview assets are output to
/webview-ui/dist.
When the extension is run (both in development and production), the webview assets are read from /webview-ui/dist.
Developing the UI
If you like to use your browser development tools for debugging, or you wish to open the web application in an existing browser window:
- Run
npm run dev:webviewto start the development server. - Navigate to
http://localhost:3000in your browser.
Alternatively, if you are developing in VS Code and wish to use the inbuilt debugging functionality:
- Hit
F5to launch theWebview UIdebug profile in a new browser window. This will automatically run the development server and attach a debugger.
Developing the VS Code commands that launch the UI
Prerequisite: Run
npm run install:allat least once before debugging (see Initial Setup). A plainnpm installdoes not install thewebview-uidependencies, so the webview build produces no assets and panels render blank.
To debug the extension itself, hit F5 to launch the Extension debug profile in a new VS Code Window. This will automatically build the webview-ui project (via npm run build:webview) and bundle the extension, so the assets in /webview-ui/dist are always present.
The extension will not automatically update itself in response to code changes as you are debugging, so the best workflow here is to stop debugging, make changes, and launch the debugger again.
Custom UI Elements
Most input components have been intentionally designed to be theme-aware by default, inheriting VS Code’s global design tokens to stay in sync with the user’s selected theme. This includes buttons (which can be styled using our secondary-button and icon-button classes), anchor tags, <option> elements, and common input types like radio, checkbox, and text.
To keep things consistent while avoiding unnecessary dependencies, we also include a small set of custom components:
<CustomDropdown>and<CustomDropdownOption>provide a theme-integrated dropdown experience.<ProgressRing>is a simple, consistent loading indicator that fits right in with VS Code’s UI.
These components help us maintain a clean, unified look without relying on external UI libraries — and give us more control over the details when we need it.
Building for release
The process for this is unaffected by the webview setup. The npm run webpack and vsce package commands will ensure the webpack-ui project is built and bundled.
Features
Once you successfully log in with your Azure Account, you can view all AKS clusters in your Azure subscriptions(s) under the section named Azure. You can right click on your AKS cluster and click a menu item to perform following actions.
Release spotlight
This release adds two configurable experiences:
These can be enabled independently:
{
	"aks.containerAssistEnabledPreview": true,
	"aks.simplifiedMenuStructure": true
}
From 2.1.0, aks.containerAssistEnabledPreview is enabled by default.
Container Assist release screenshots:
Menu simplification release screenshots:


Merge and Save Into Kubeconfig
Merge into Kubeconfig
Right click on your AKS cluster and click on Merge into Kubeconfig to add the selected AKS cluster to the kubeconfig file.
Save Kubeconfig
Right click on your AKS cluster and click on Save Kubeconfig to save the kubeconfig of the selected AKS cluster.
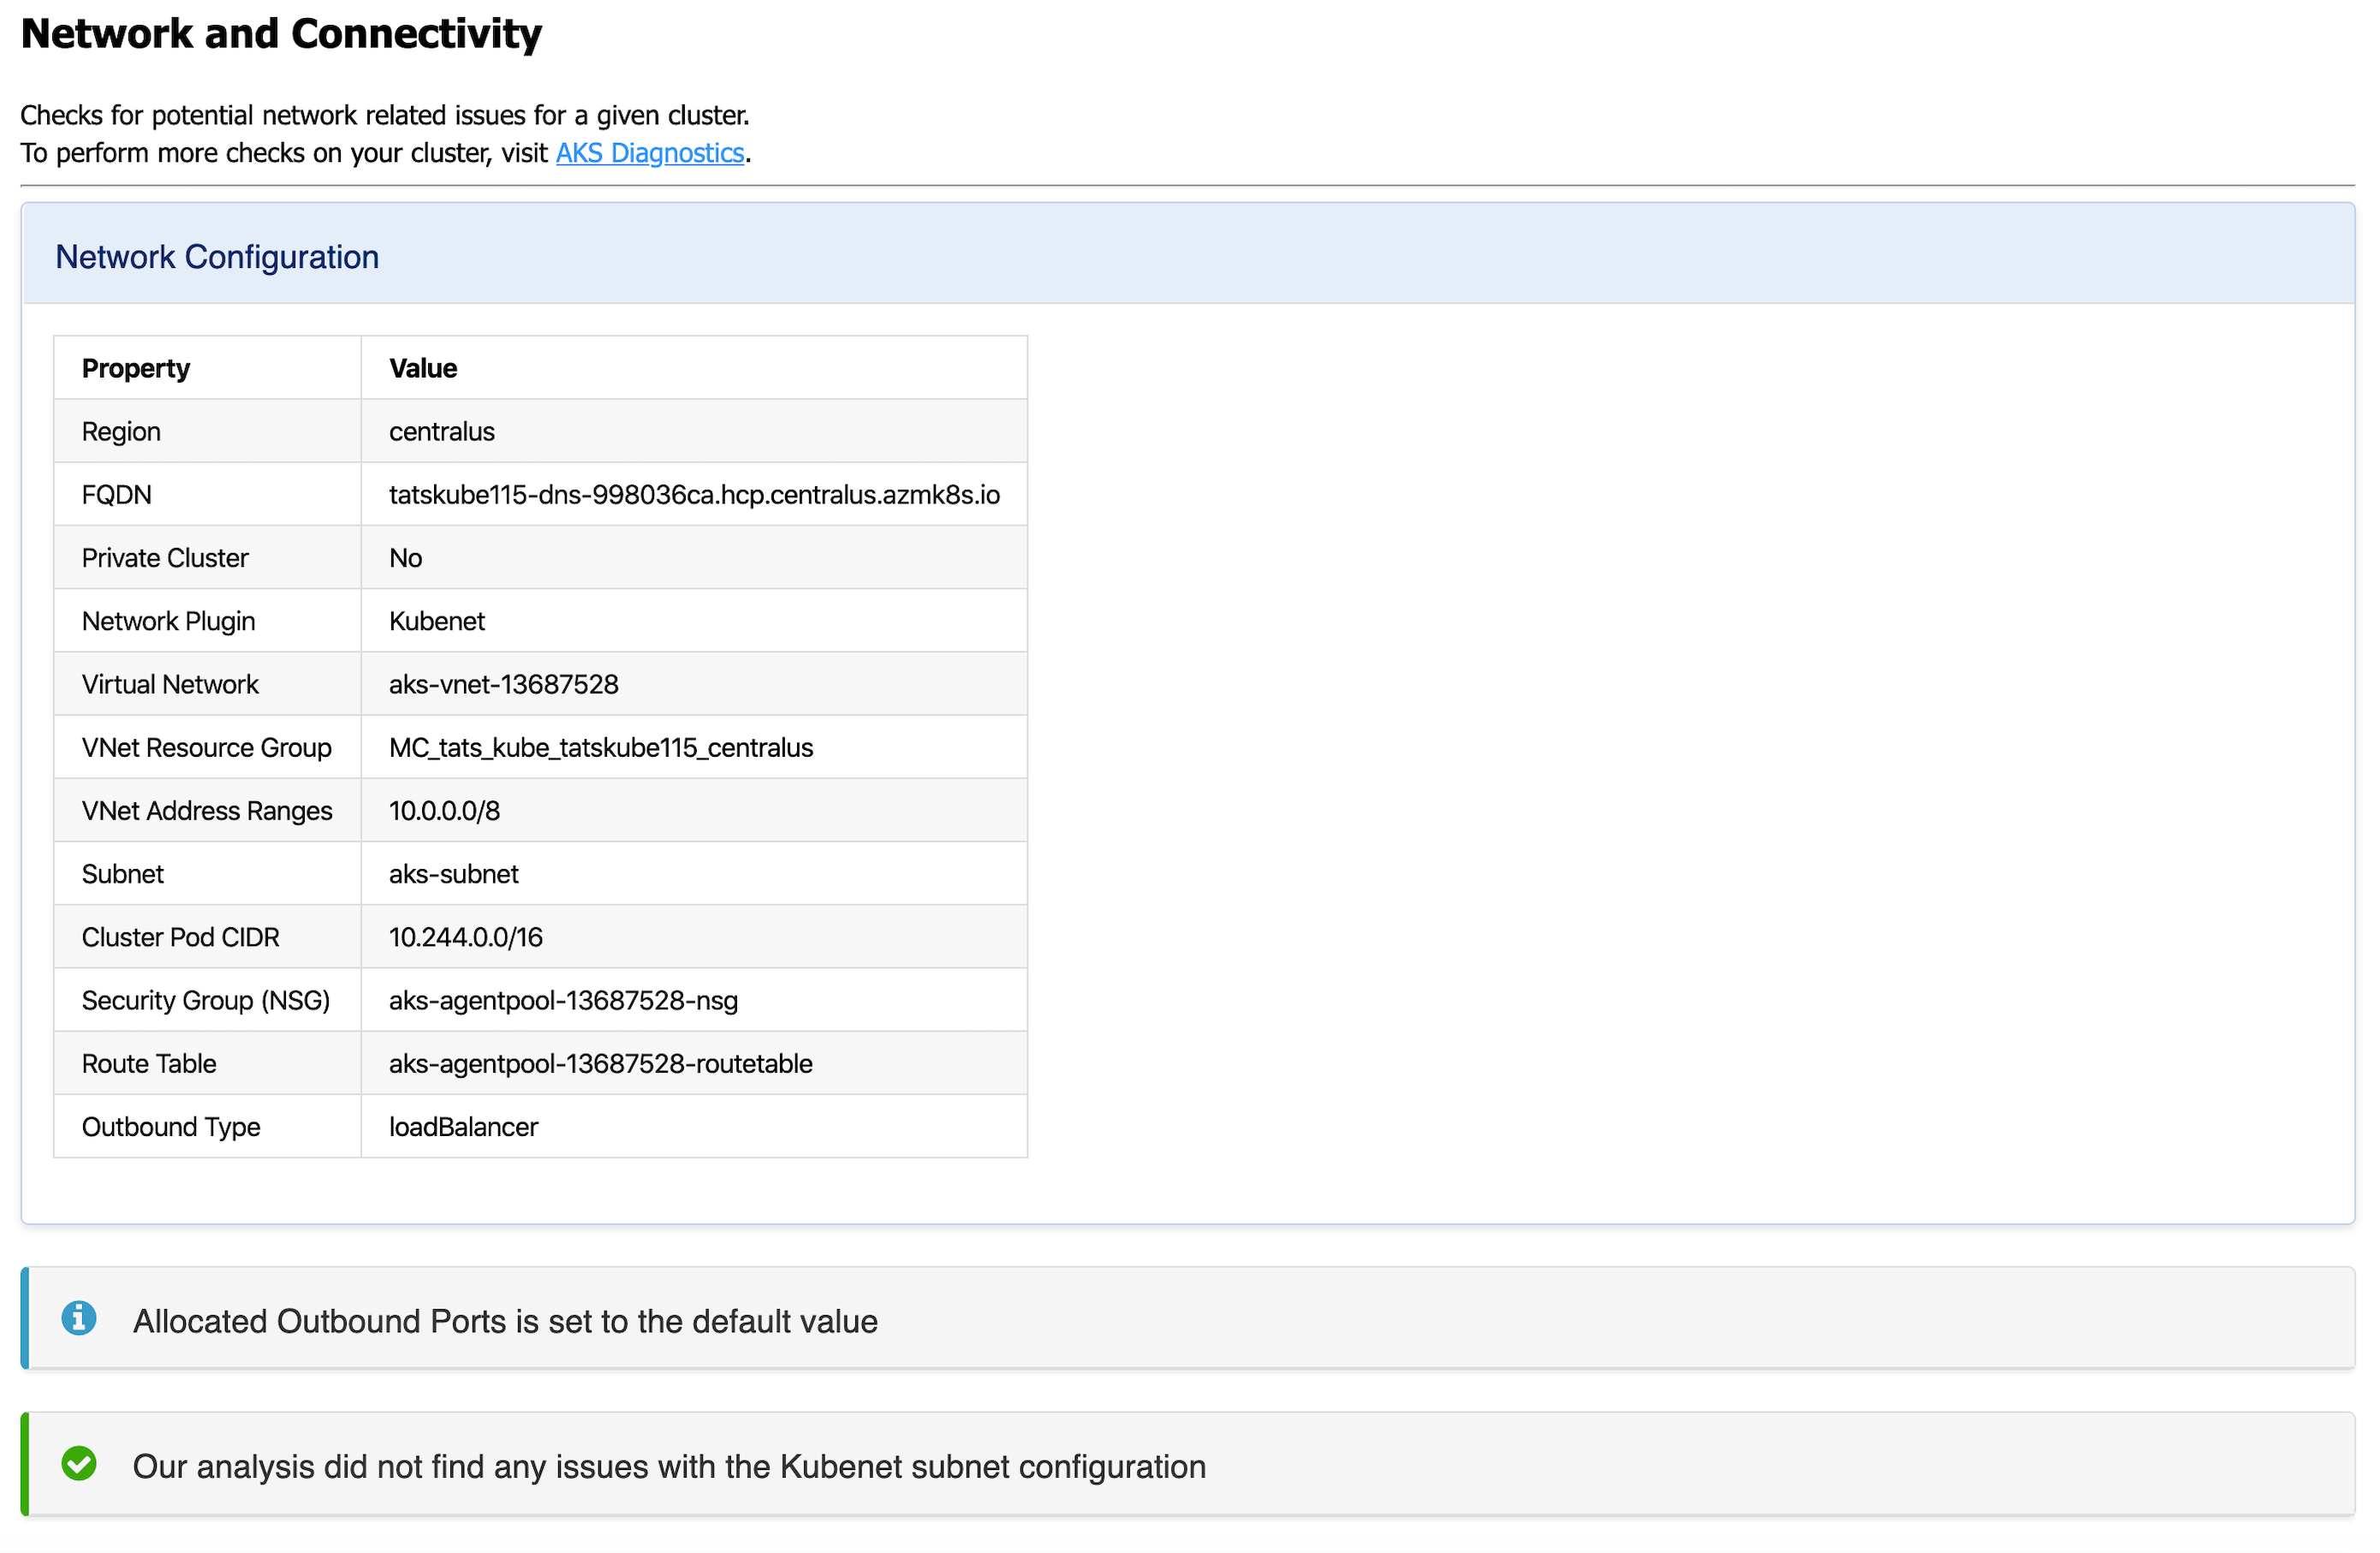
AKS Diagnostics
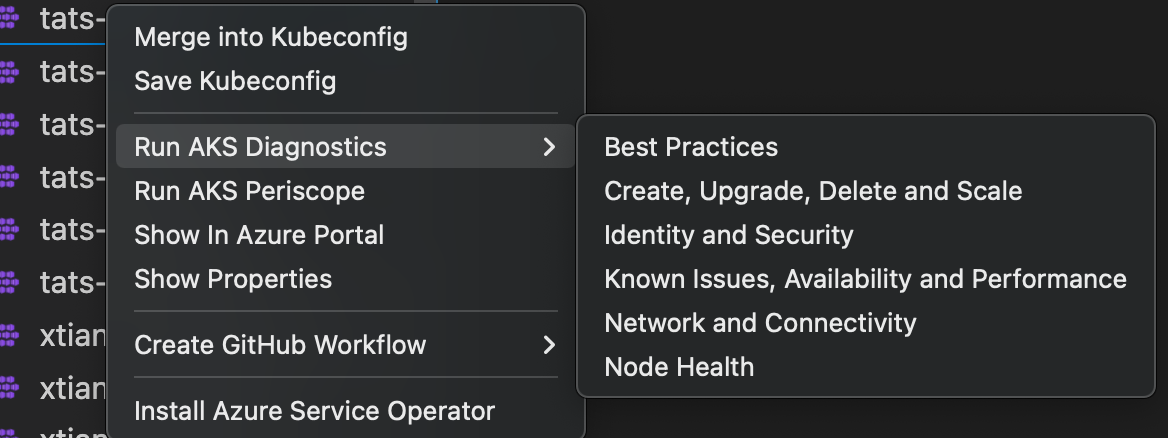
AKS Diagnostics
Right click on your AKS cluster and click on Run AKS Diagnostics to display diagnostics information based on your AKS cluster’s backend telemetry for:
- Best Practices
- Create, Upgrade, Delete and Scale issues
- Identity and Security
- Known Issues, Availability and Performance
- Network and Connectivity issues
- Node Health
To perform further checks on your AKS cluster to troubleshoot and get recommended solutions, click on the AKS Diagnostics link at the top of the page to open it for the selected cluster. For more information on AKS Diagnostics, visit AKS Diagnostics Overview.
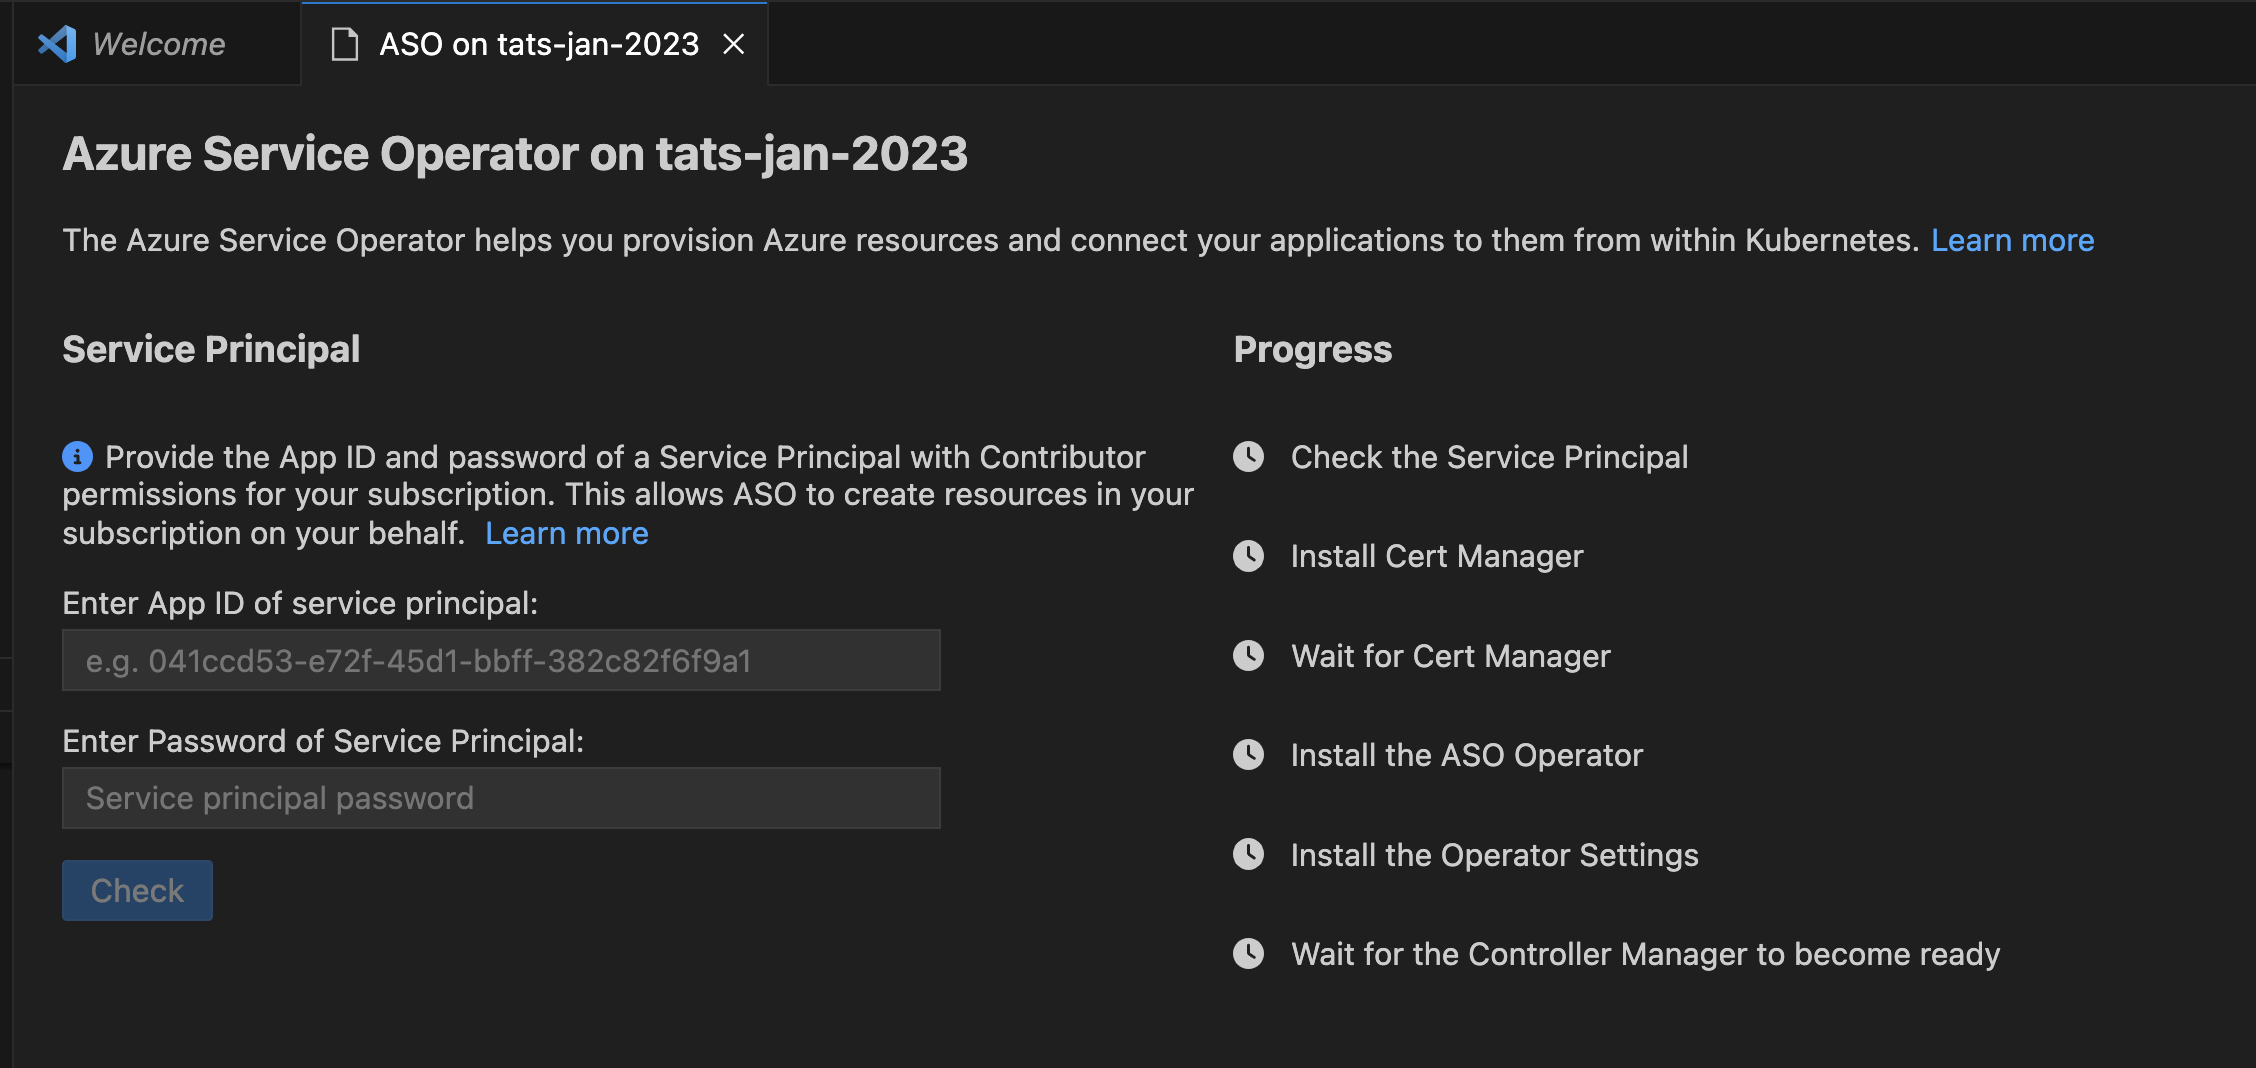
Install Azure Service Operator
Install Azure Service Operator
Right click on your AKS cluster and click on Install Azure Service Operator to easily deploy the latest version of Azure Service Operator (ASO) on your AKS cluster and provision and connect applications to Azure resources within Kubernetes. When you select this option, you’ll be prompted for a service principal for ASO to use when performing Azure resource operations. This service principal must have appropriate permissions (typically Contributor at suitable scope). Fill out the service principal details and click Submit to kick off the installation of Azure Service Operator.
Install Azure Service Operator can only be performed on an AKS cluster that has never had ASO installed before. If you have already initiated the installation manually, follow the instructions on Azure Service Operator to complete.
For more information on Azure Service Operator, visit Azure Service Operator (for Kubernetes). If you are experiencing issues with Azure Service Operator, visit Azure Service Operator (ASO) troubleshooting.
Create GitHub Workflow
Deprecation note
This command has been superseded by the Draft Workflow command.
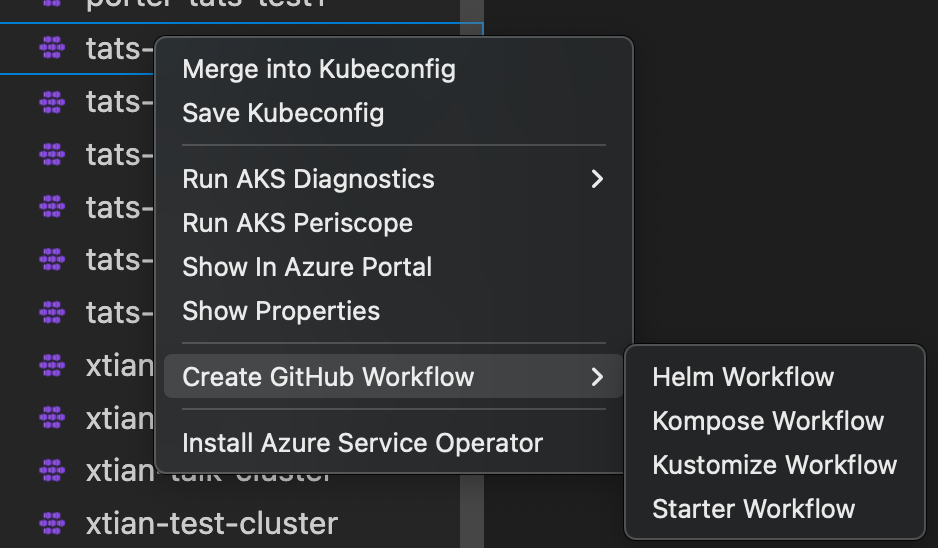
Create GitHub Workflow
Right click on your AKS cluster and click on Create GitHub Workflow to easily open and create a workflow starter template. This helps in quick generation of the workflow templates with pre populates resource and clustername for:
Show Properties, Show in Azure Portal
Show in Azure Portal
Right click on your AKS cluster and click on Show in Azure Portal to easily navigate to AKS cluster overview page in Azure Portal.
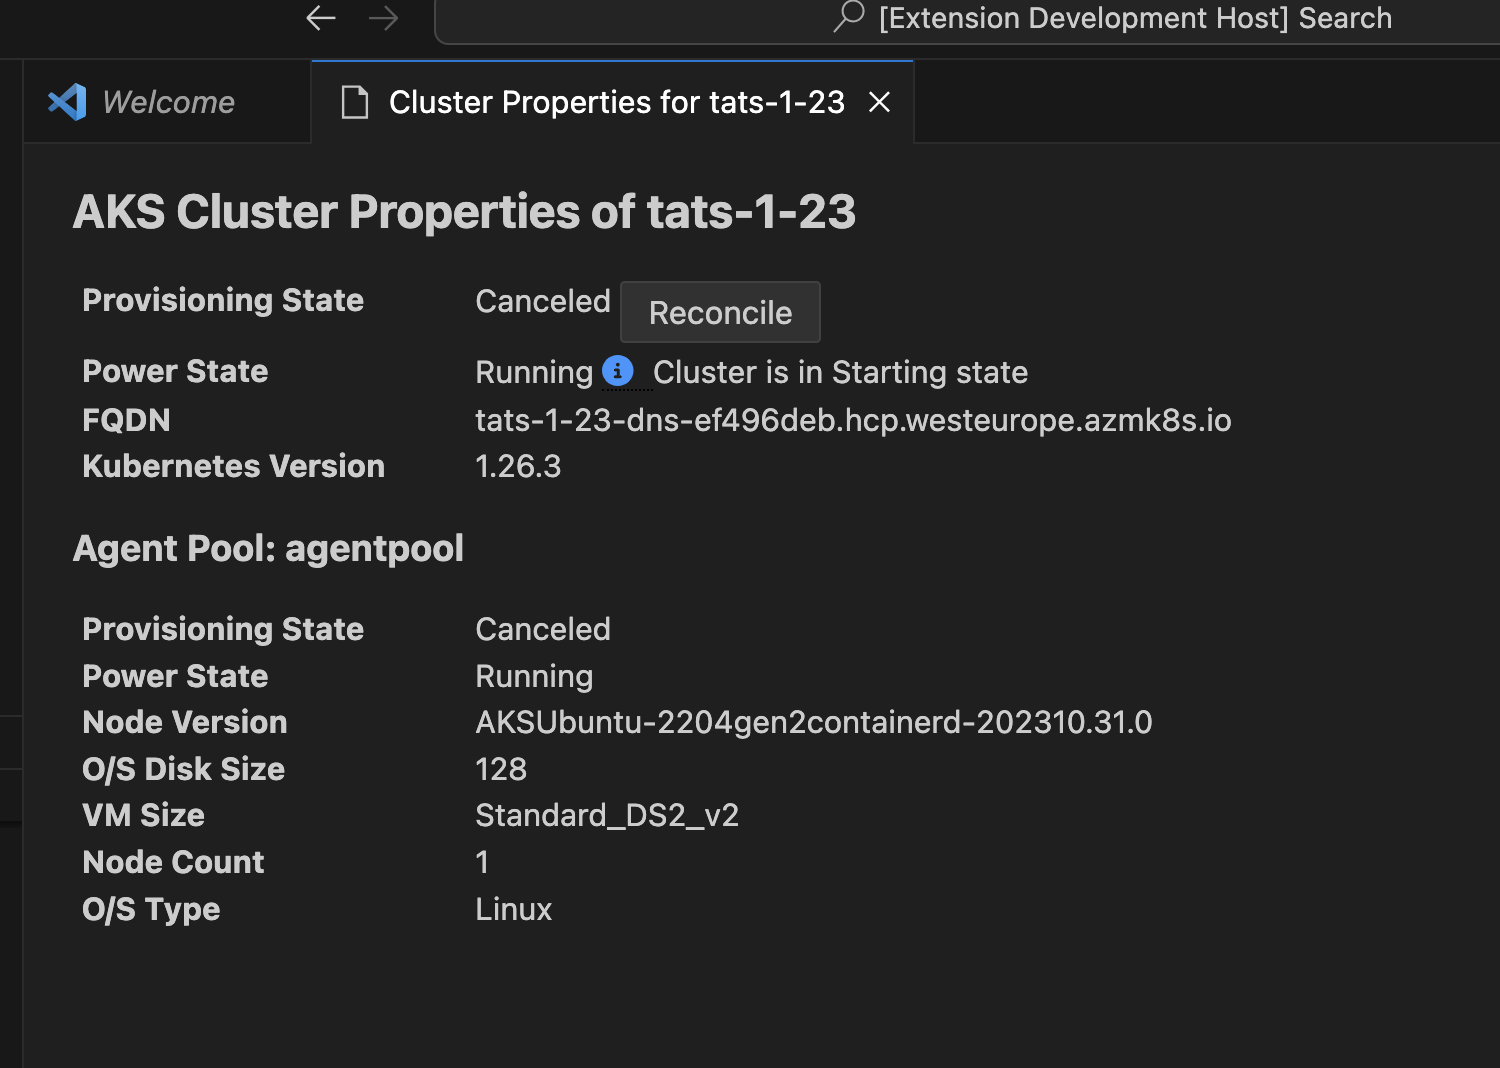
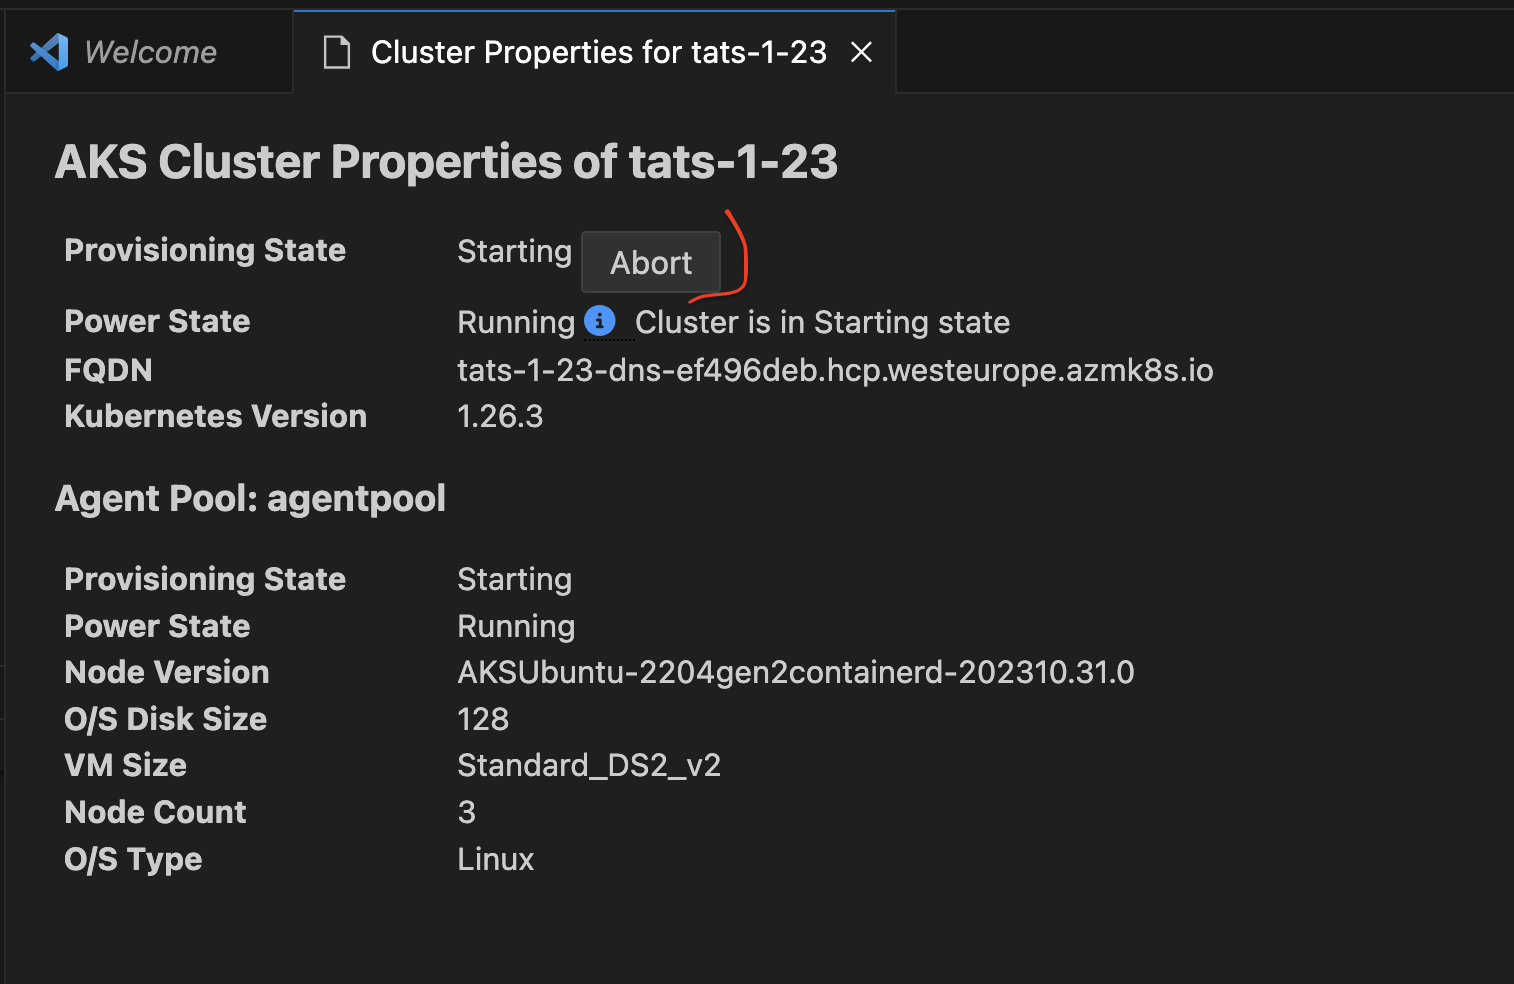
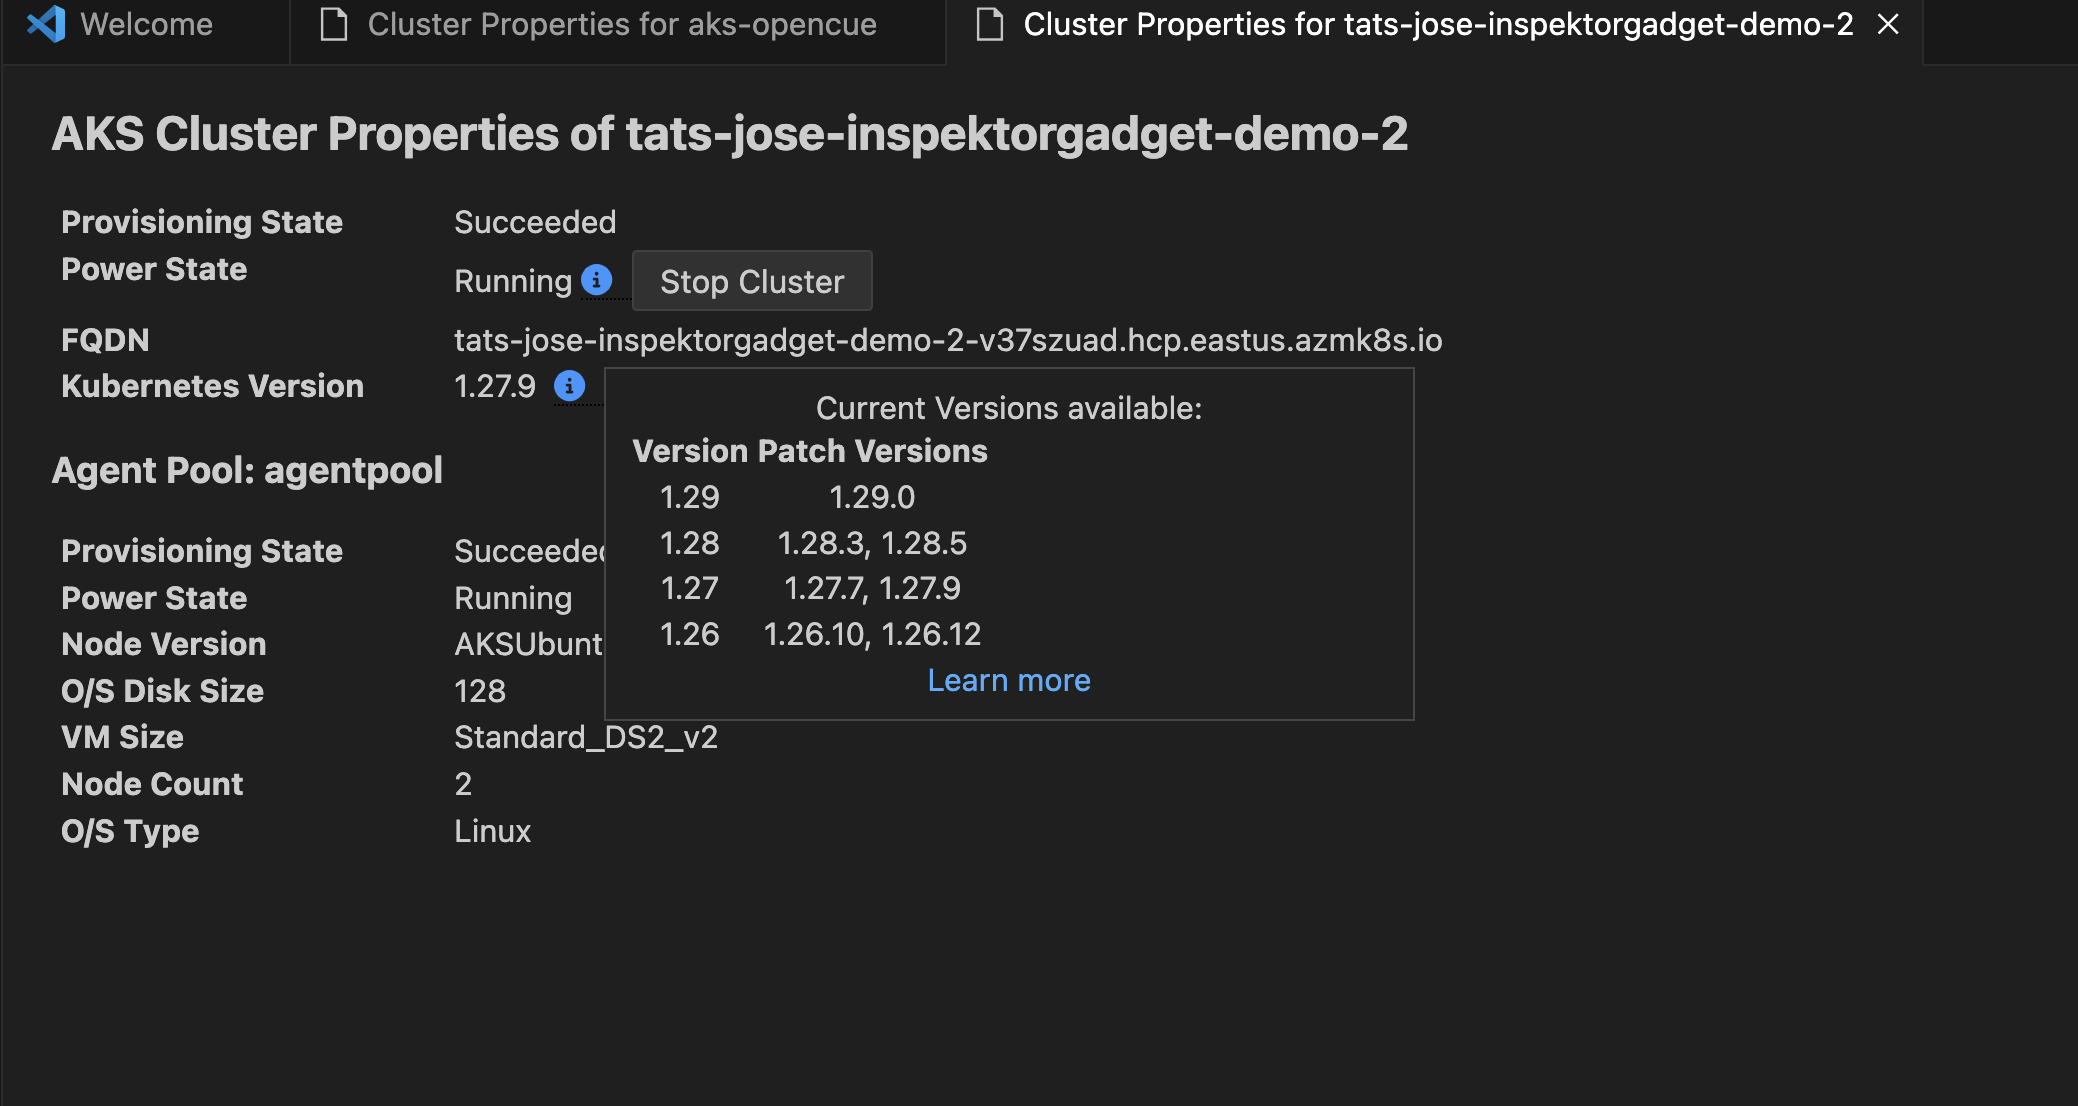
Show Properties
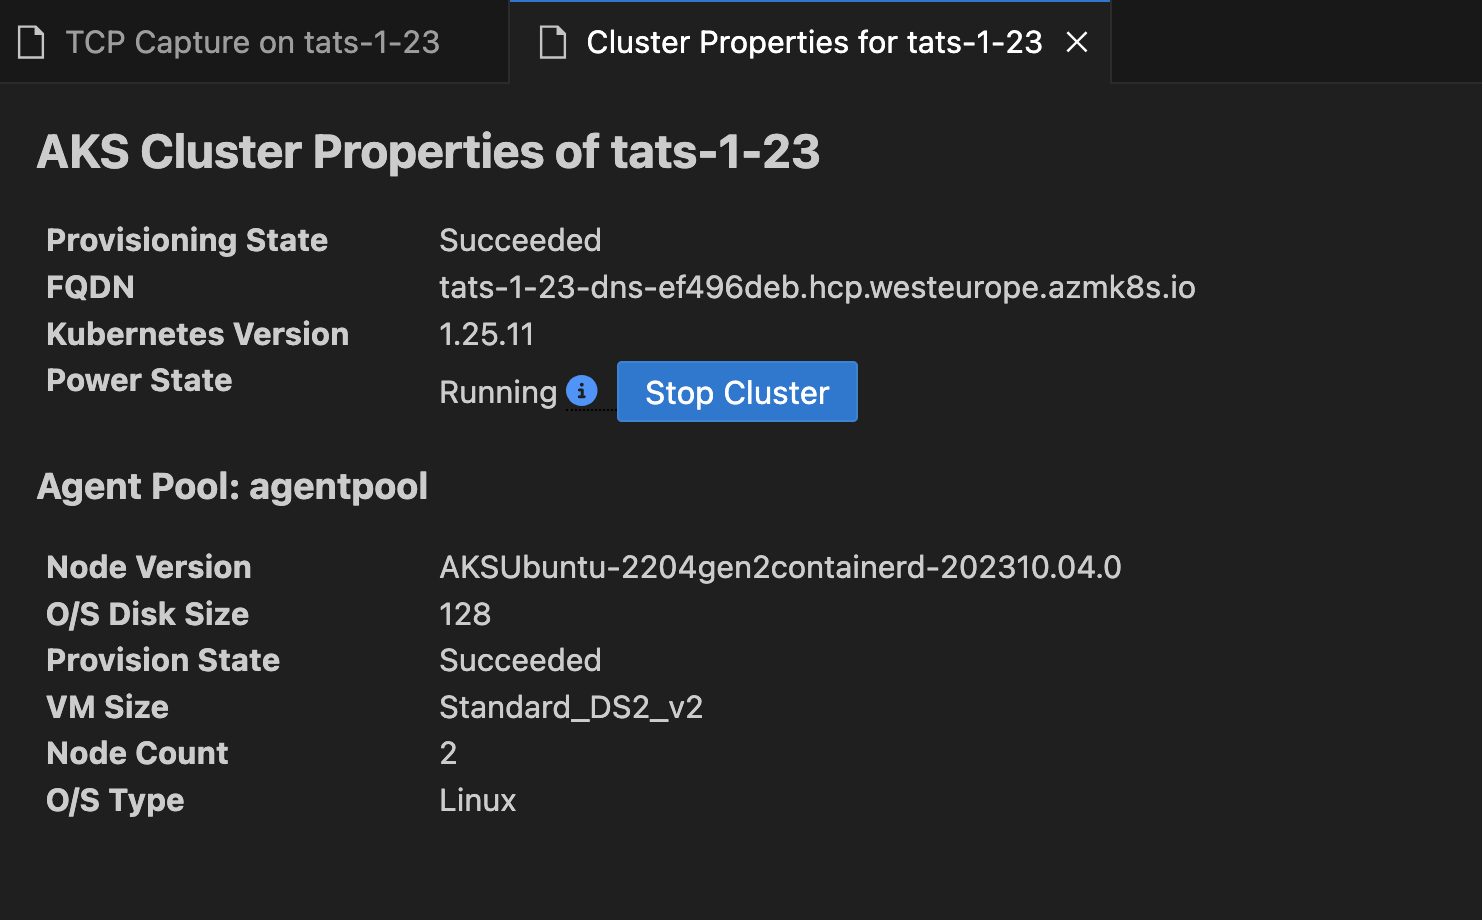
Right click on your AKS cluster and click on Show Properties to display the AKS cluster and agent pool properties like provisioning state, fqdn, k8s version, along with node properties like node version, vm type, vm size, o/s type, o/s disk size and nodes provisioning state.
This page also enables some useful cluster and node pool level operations like Abort Last Operation (at cluster and agent pool level) and Reconcile.
This page now also enable information box for the users to quickly see available kuberentes versions available for the cluster to upgrade and if the current version is out of support or not.
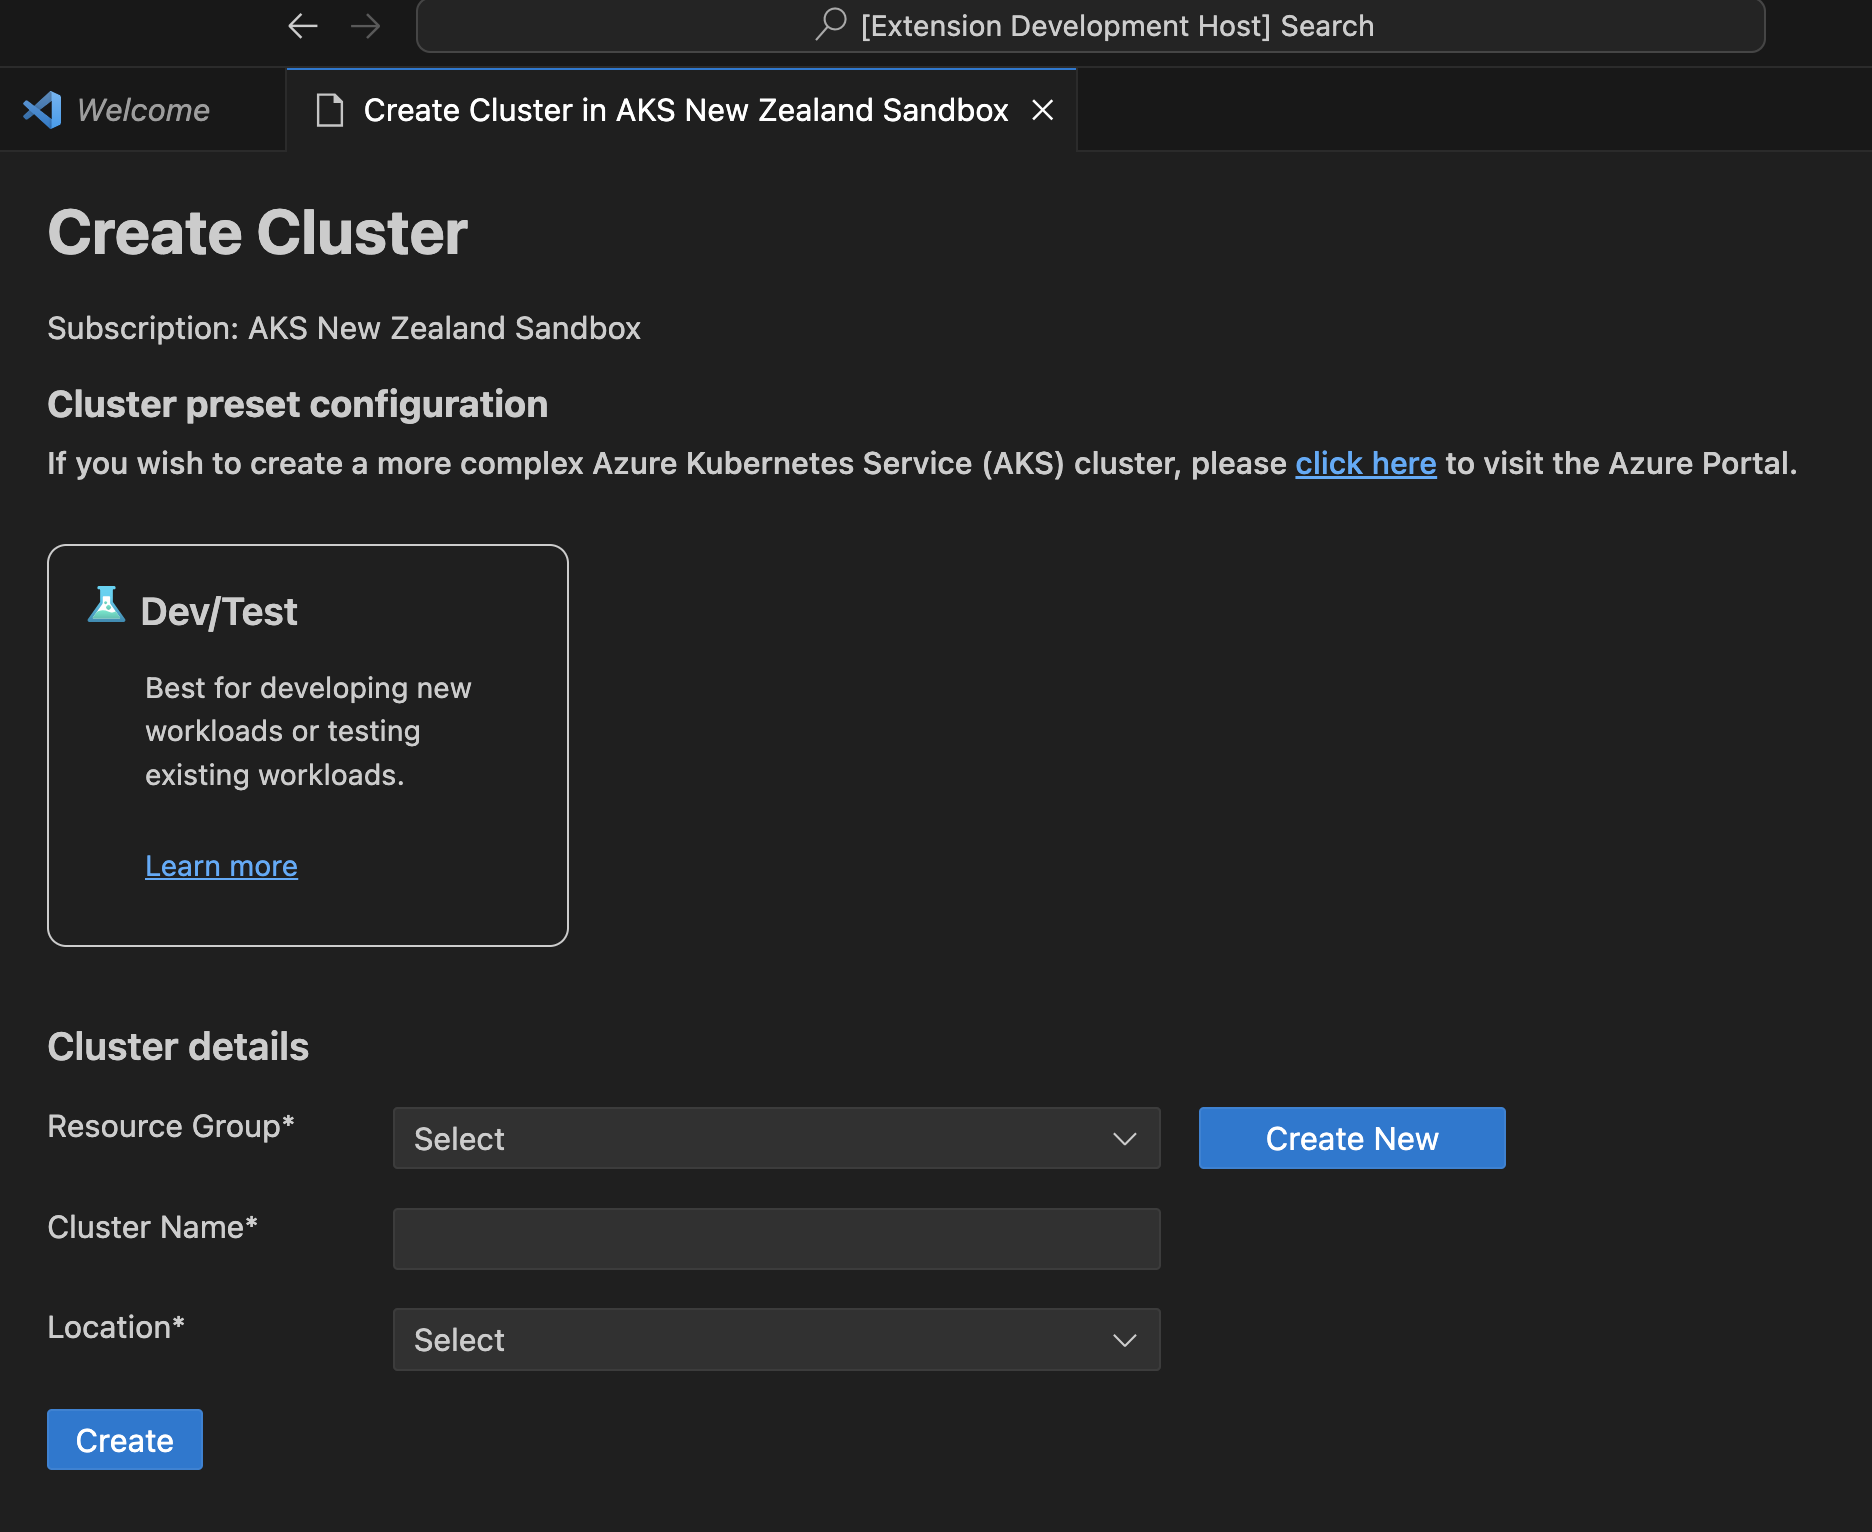
Create cluster from Azure Portal
Right click on your AKS sunscription and click on Create cluster from Azure Portal to easily navigate to AKS create cluster page in Azure Portal.
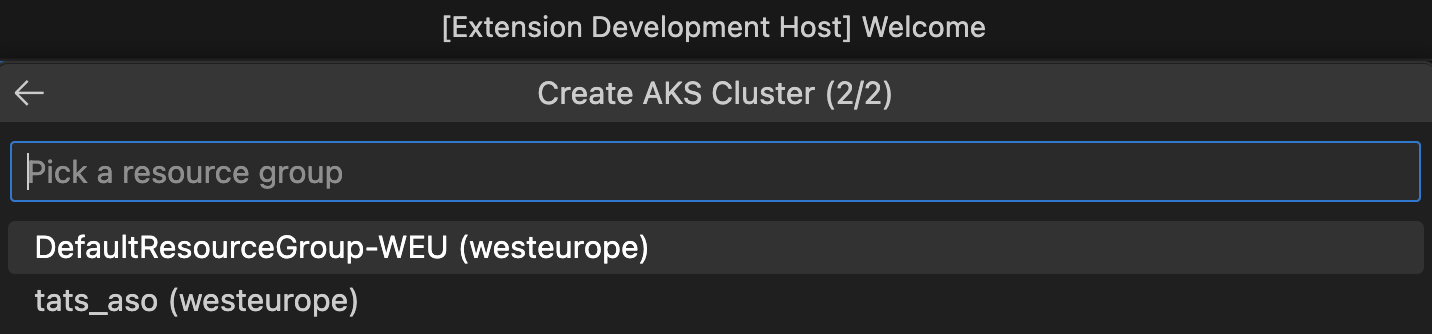
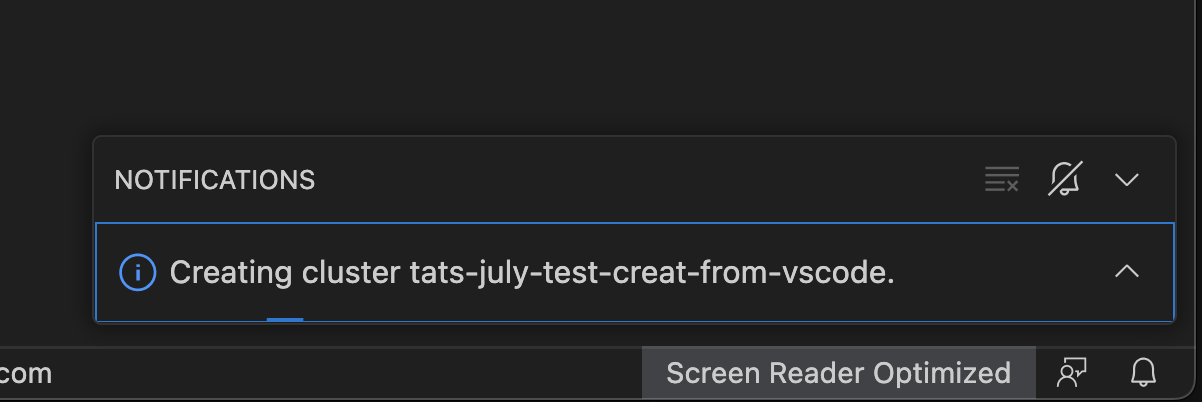
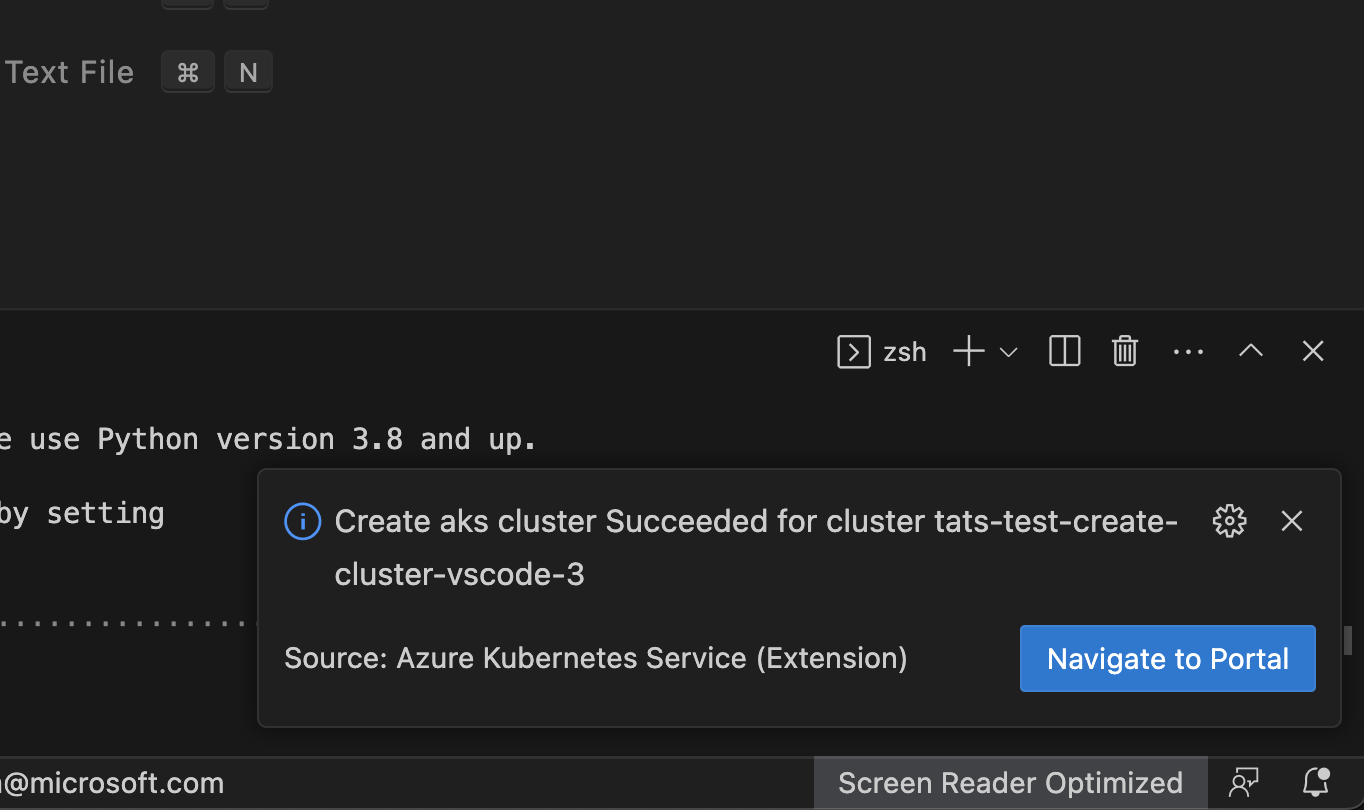
Create cluster
Right click on your AKS subscription and click on Create Cluster and select Create Standard Cluster which will start a 2-step wizard for you to enter a valid cluster name and select an existing resource group. The VS Code experience will then notify user with the deployment progress and present you with the Navigate to Portal link when it completes successfully.

Start or Stop AKS cluster
Right click on your AKS cluster and click on Show Properties to display the AKS cluster properties, within the page there will be Stop/Start Cluster button to perform the start or stop the cluster operation.
Show Properties, Show in Azure Portal
Show in Azure Portal
Right click on your AKS cluster and click on Show in Azure Portal to easily navigate to AKS cluster overview page in Azure Portal.
Show Properties
Right click on your AKS cluster and click on Show Properties to display the AKS cluster and agent pool properties like provisioning state, fqdn, k8s version, along with node properties like node version, vm type, vm size, o/s type, o/s disk size and nodes provisioning state.
This page also enables some useful cluster and node pool level operations like Abort Last Operation (at cluster and agent pool level) and Reconcile.
This page now also enable information box for the users to quickly see available kuberentes versions available for the cluster to upgrade and if the current version is out of support or not.
Create cluster from Azure Portal
Right click on your AKS sunscription and click on Create cluster from Azure Portal to easily navigate to AKS create cluster page in Azure Portal.
Create cluster
Right click on your AKS subscription and click on Create Cluster and select Create Standard Cluster which will start a 2-step wizard for you to enter a valid cluster name and select an existing resource group. The VS Code experience will then notify user with the deployment progress and present you with the Navigate to Portal link when it completes successfully.
Start or Stop AKS cluster
Right click on your AKS cluster and click on Show Properties to display the AKS cluster properties, within the page there will be Stop/Start Cluster button to perform the start or stop the cluster operation.
Run Kubectl Commands
Run Kubectl Commands from your AKS cluster
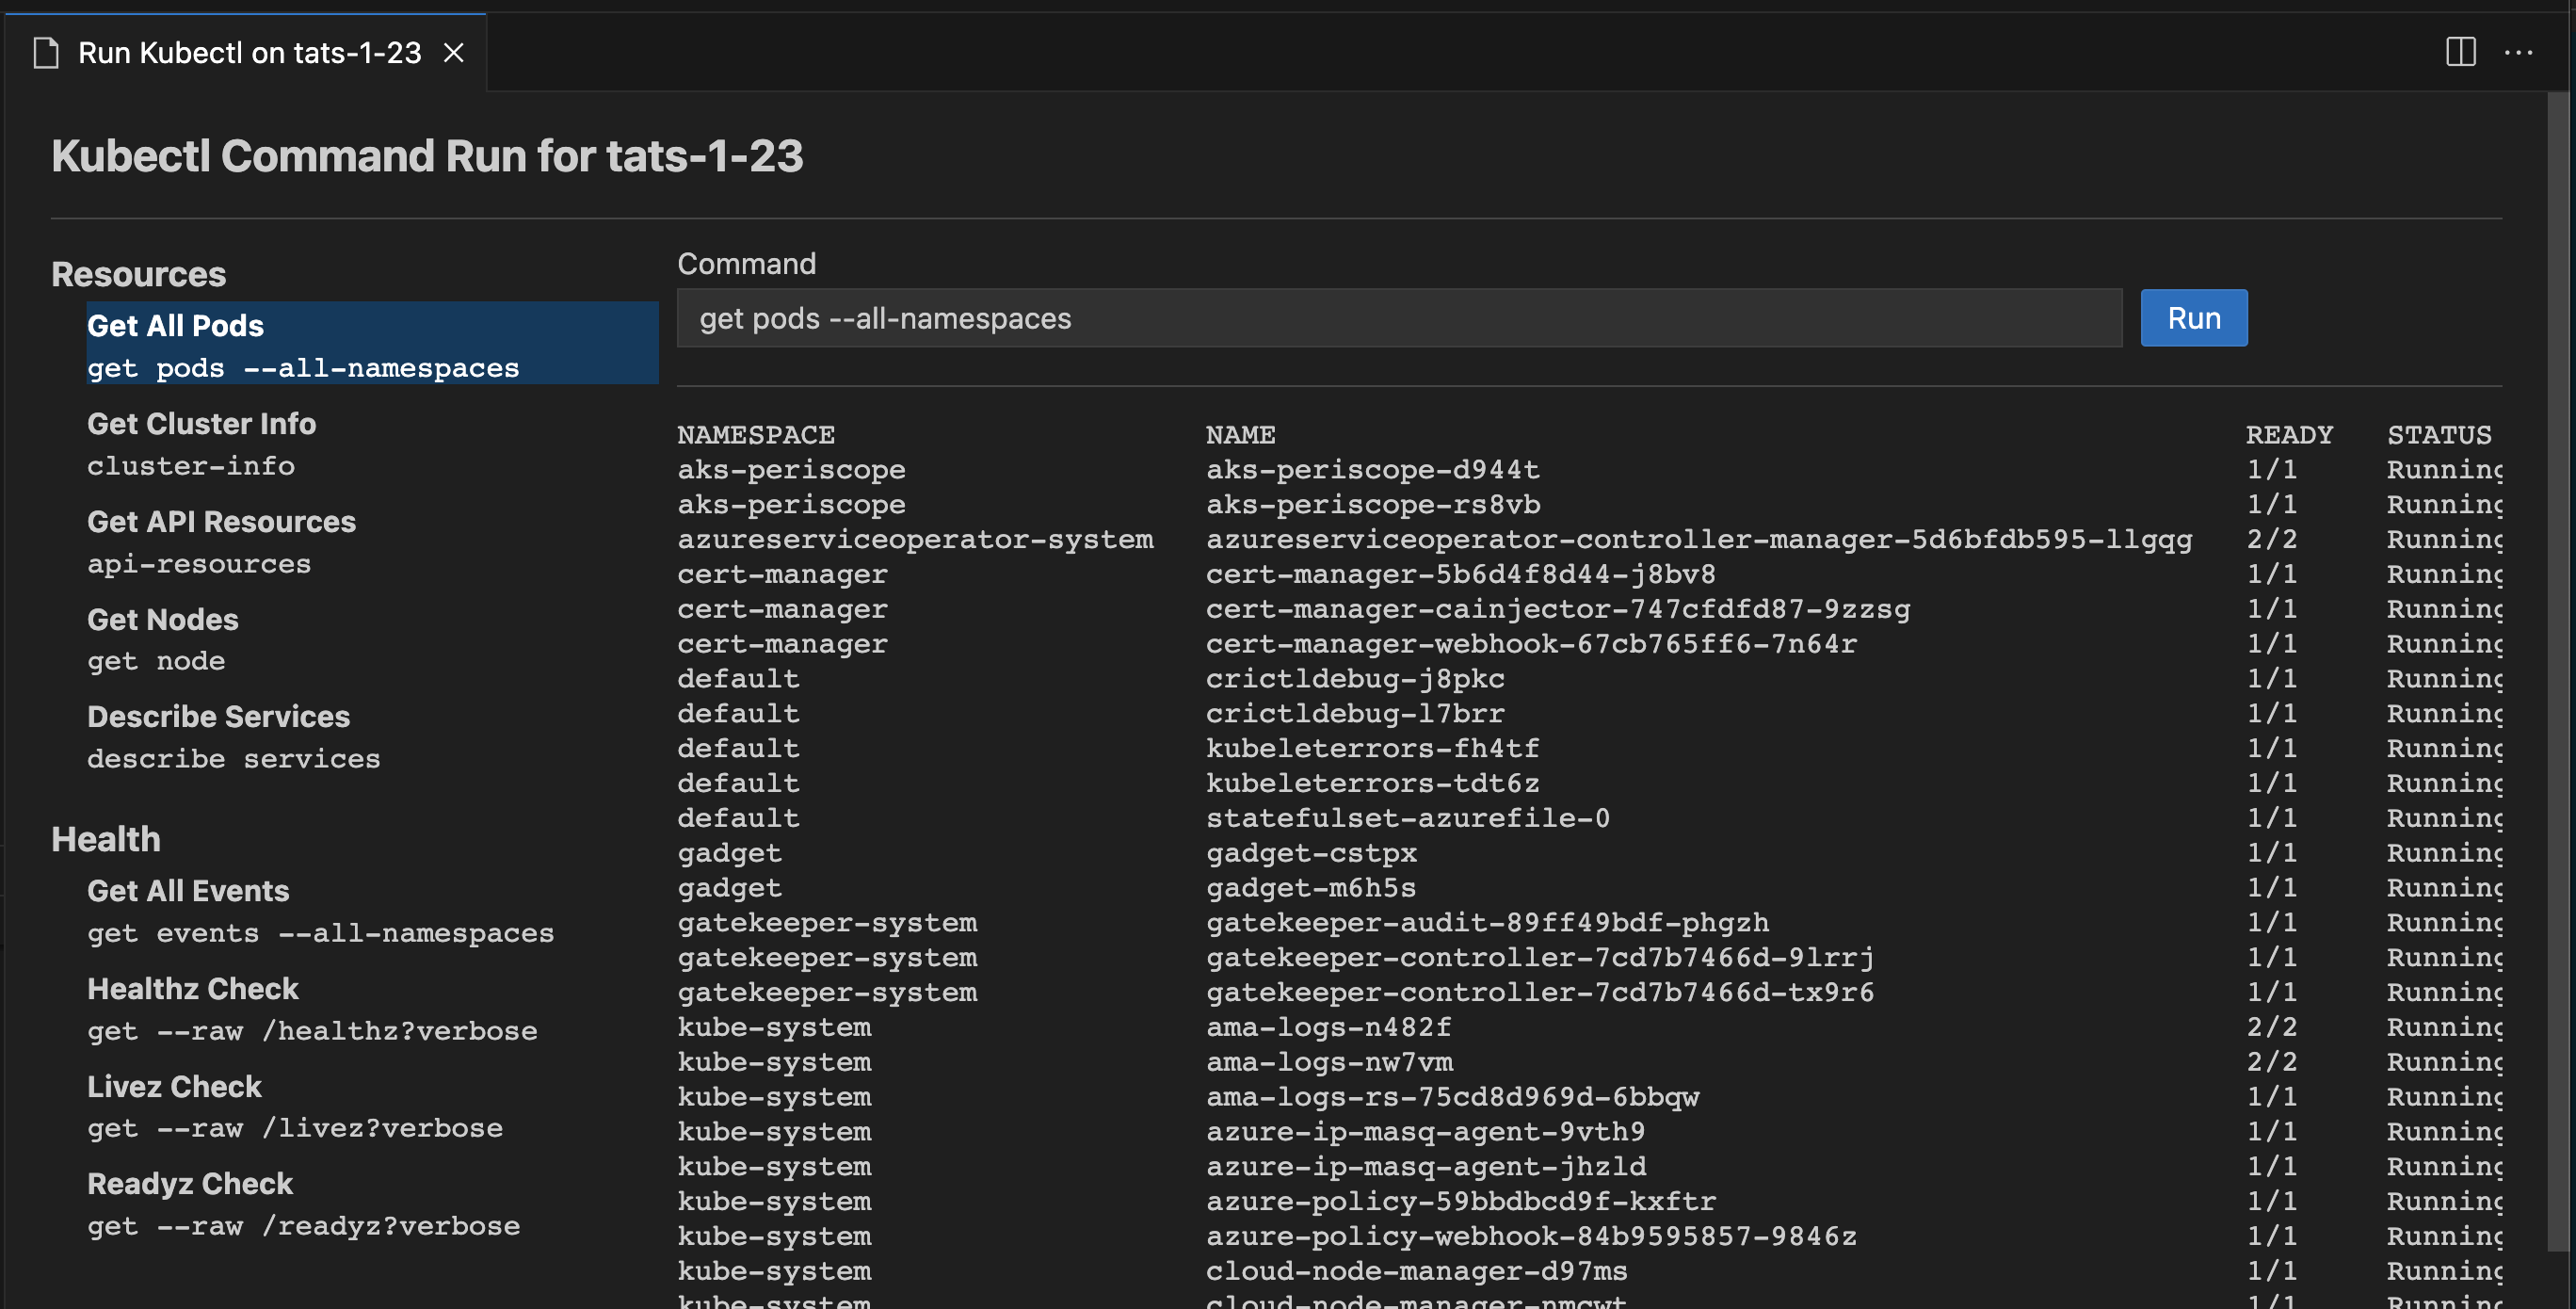
Right click on your AKS cluster and click on Run Kubectl Commands to easily run few known kubectl commands on your cluster. Currently we have enable following kubectl commands for the AKS cluster:
- Describe Services
- Get All Pods
- API Resources
- Get Cluster Info
- Get Node
- Get All Events
User can also run custom commands by typing or editing kubectl command parameters in the text field. Custom commands can optionally be saved for future use..
Run Managed Cluster Operations
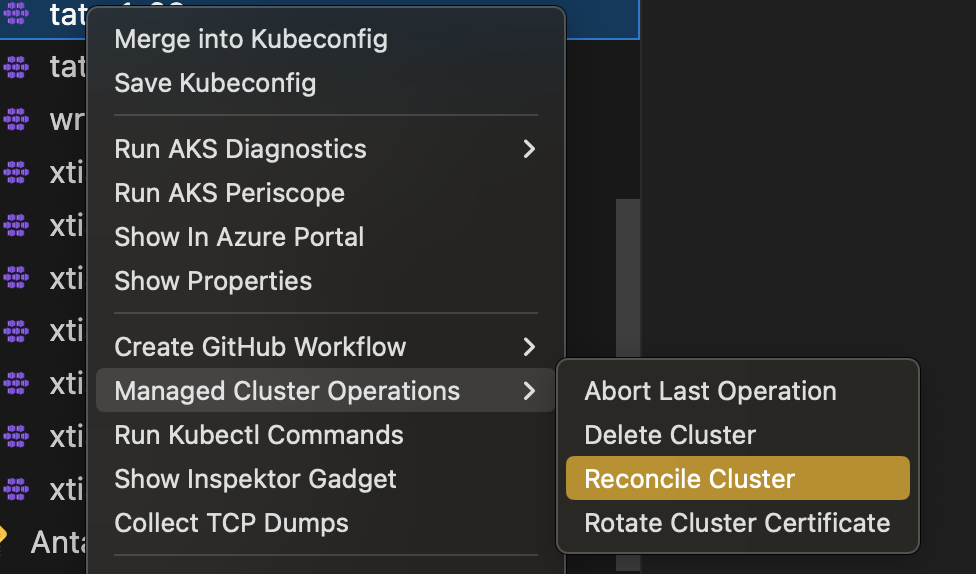
Run Managed Cluster Operations from your AKS cluster
Right click on your AKS cluster and click on Managed Cluster Operations to easily run few managed cluster operations on your cluster. Currently we have enable following operations:
- Abort Last Operation
- Delete Cluster
- Reconcile Cluster
- Rotate Cluster Certificate
Kubernetes API Health Endpoints
Run Kubernetes API Health Endpoints
Right click on your AKS cluster and click on Run Kubectl Commands. Select and run health check commands from the Health section as shown in the image below. Currently we provide:
- Healthz
- Livez
- Readyz
Inspektor Gadget
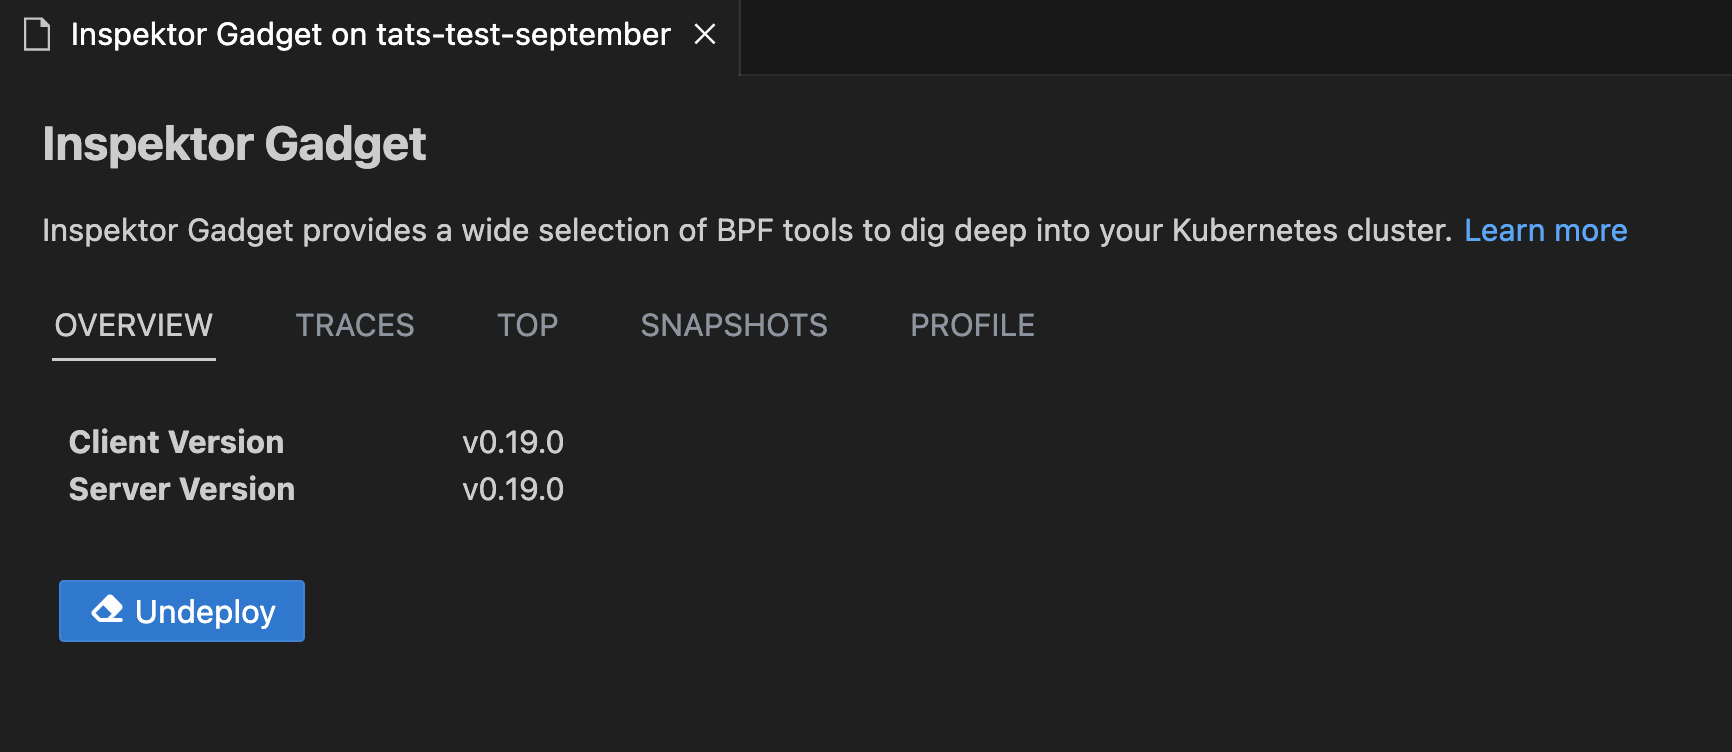
Deploy and Undeploy InspektorGadget
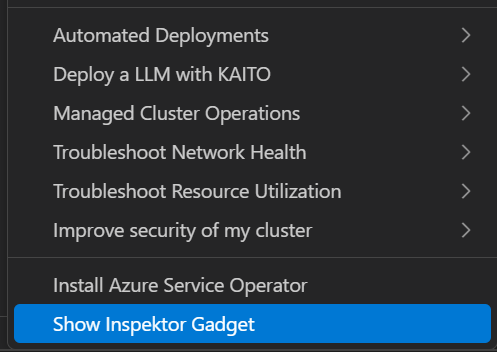
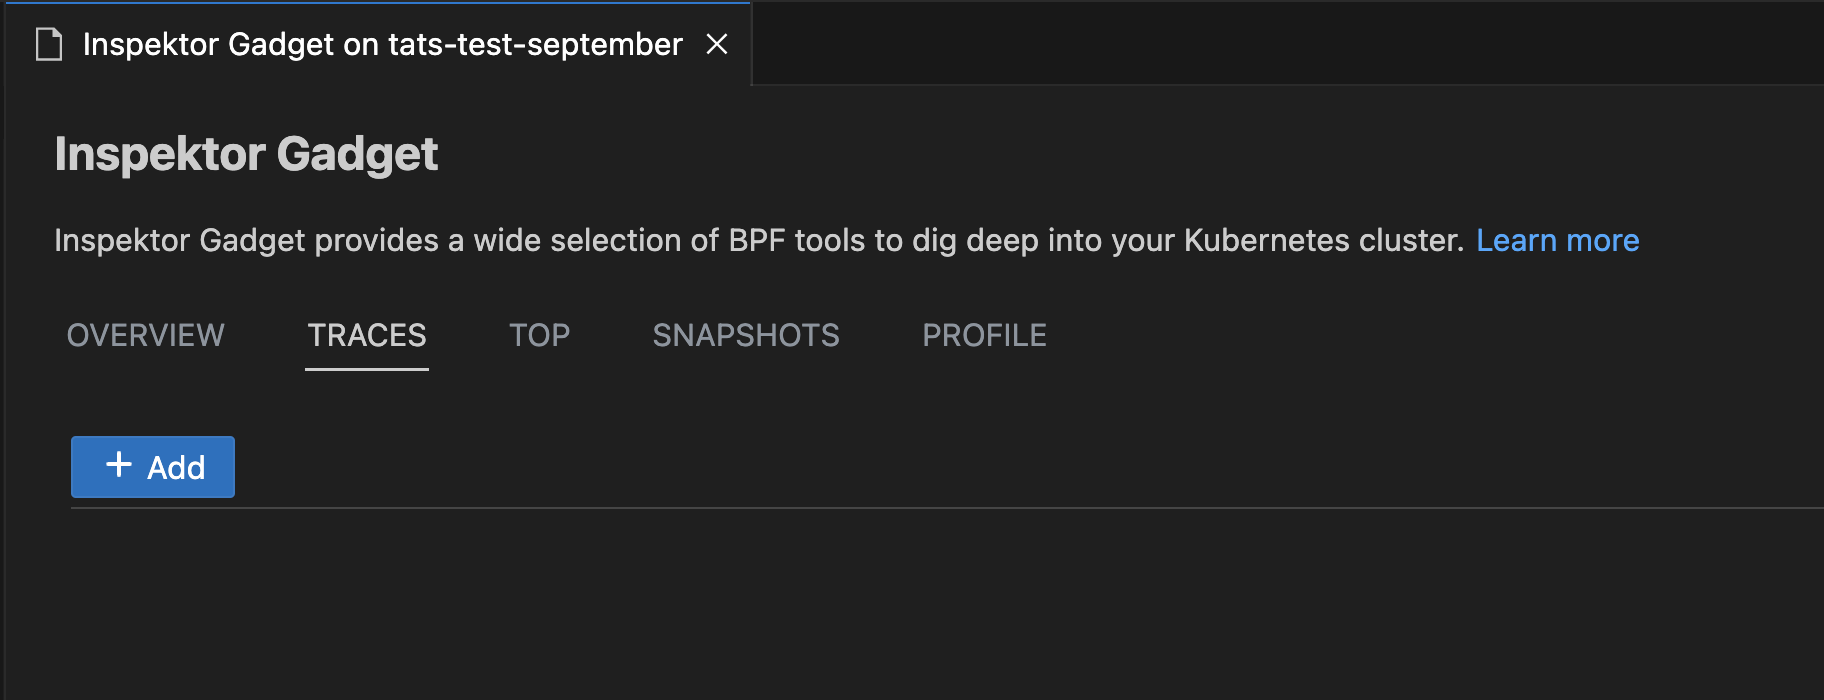
Right click on your AKS cluster and select Show Inspektor Gadget to easily deploy gadget into your cluster. The Show Inspektor Gadget command has been moved to the main context menu for easier access. Users can easily one-click deploy and undeploy gadget from this feature.
Profile, Top, Trace and Snapshot Inspektor Gadget Commands
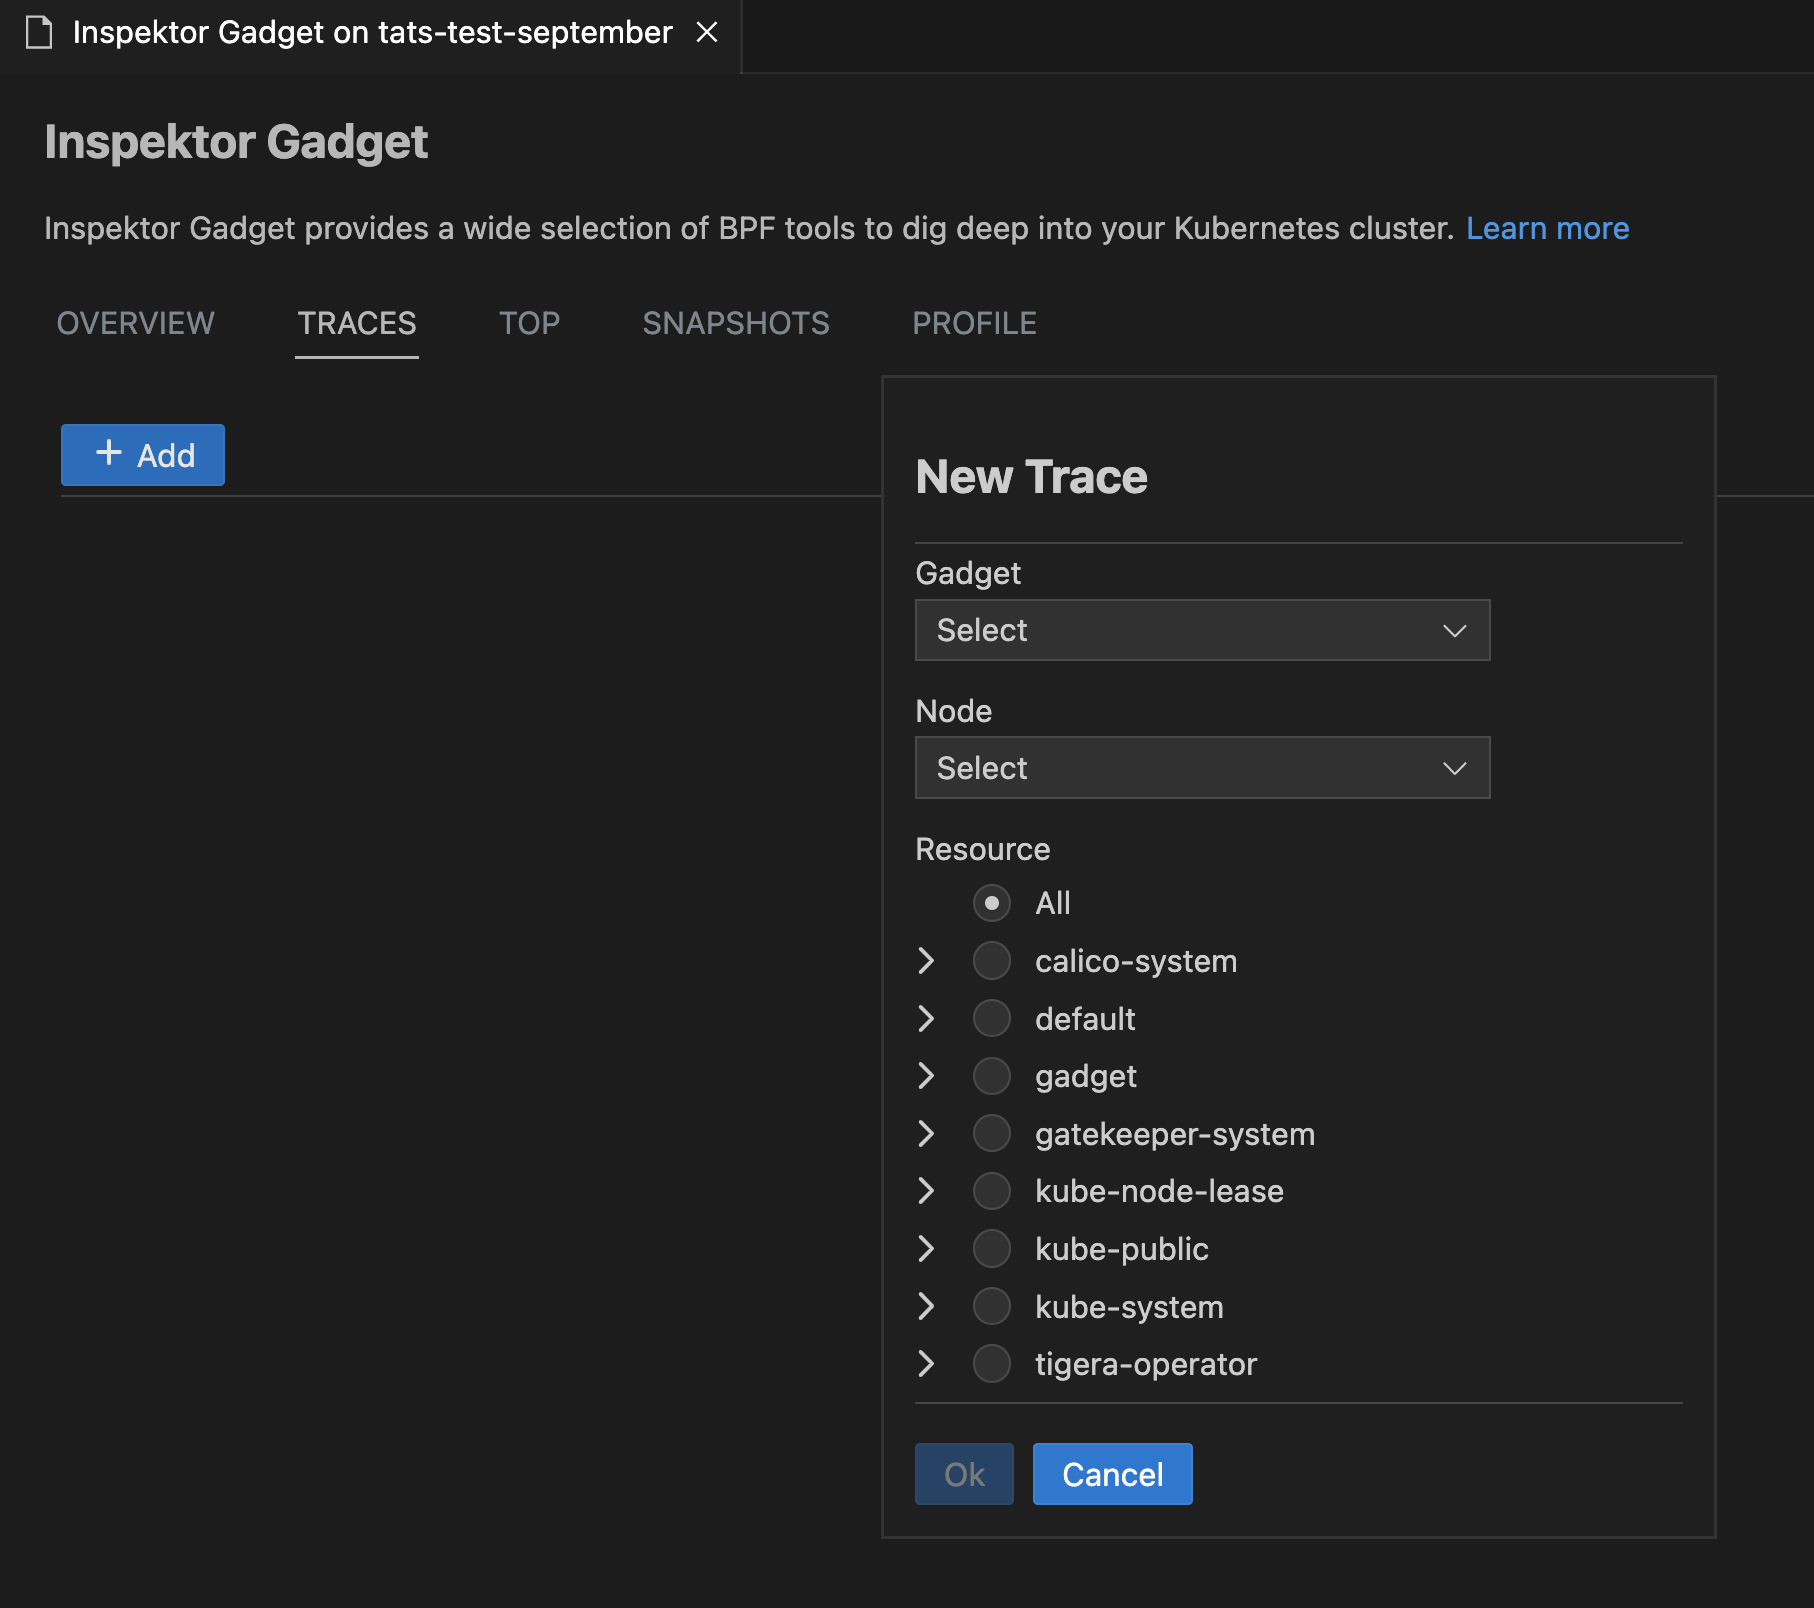
Right-click on your AKS cluster and select Show Inspektor Gadget and choose Gadget Commands to easily use non-interactive Top, Trace, Profile or Snapshot commands for your cluster.
New Troubleshooting Menu Items
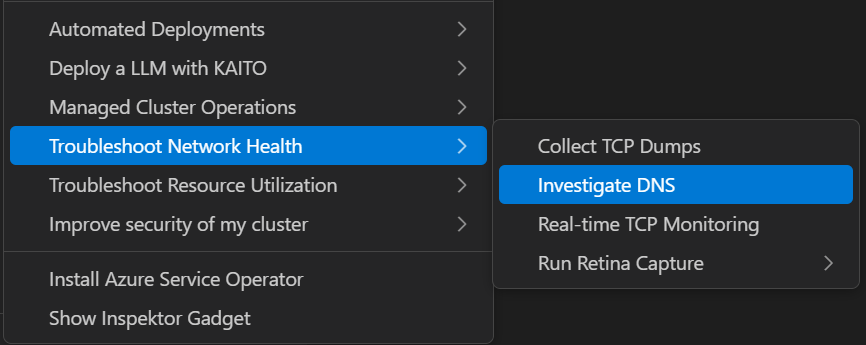
The Inspektor Gadget integration now includes specialized menu items for common troubleshooting scenarios. If Inspektor Gadget is not deployed, the extension will prompt you to deploy it as below.

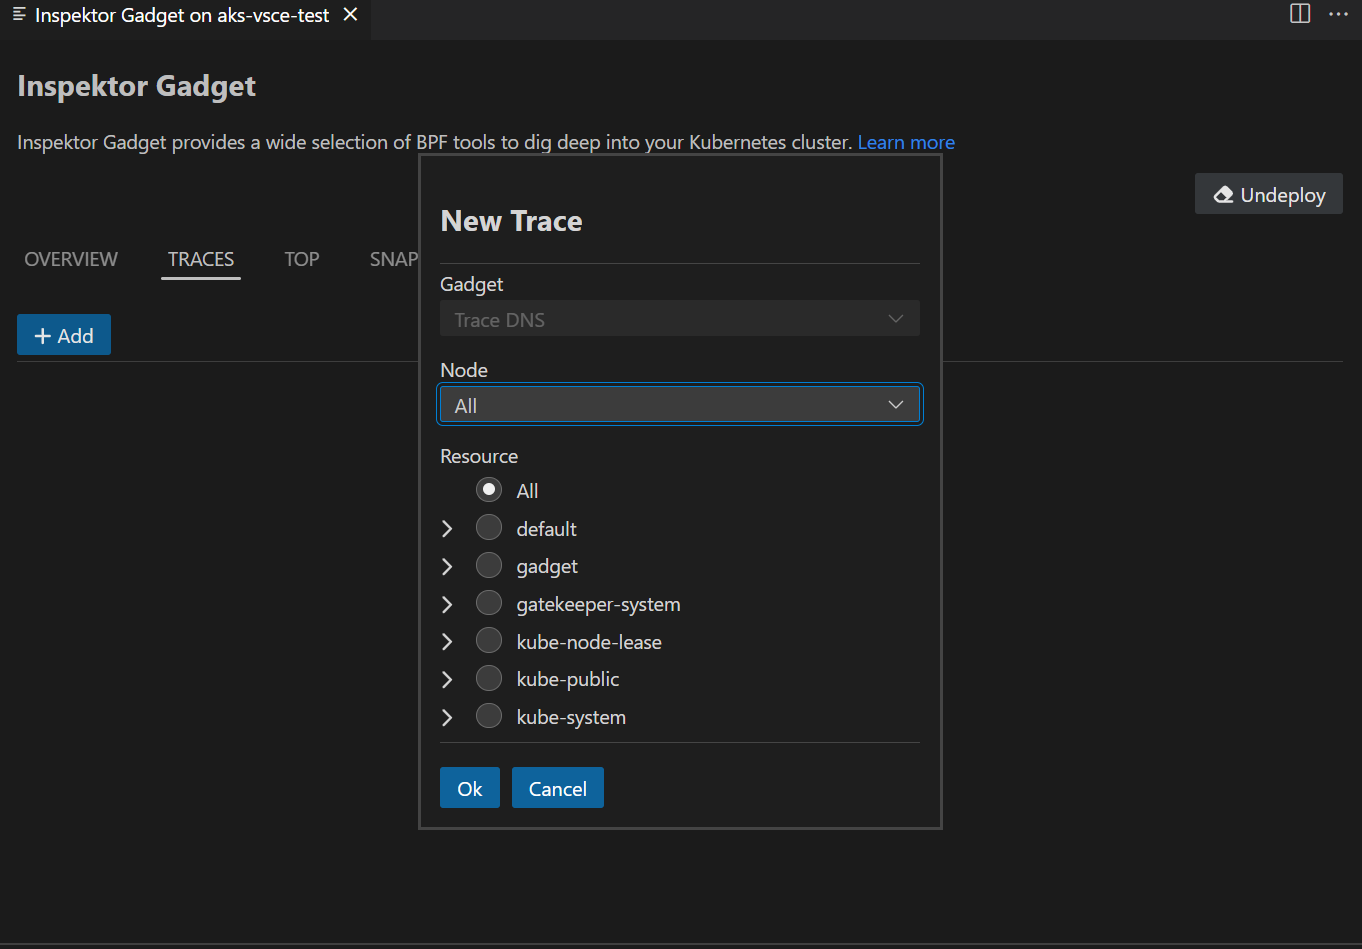
Depending on the context, the appropriate gadget will be selected automatically and the gadget dialog will open with the relevant options.
Investigate DNS
Right-click on your AKS cluster and select Investigate DNS to troubleshoot DNS-related issues in your cluster. This provides specialized tools for monitoring DNS queries and identifying connectivity problems.
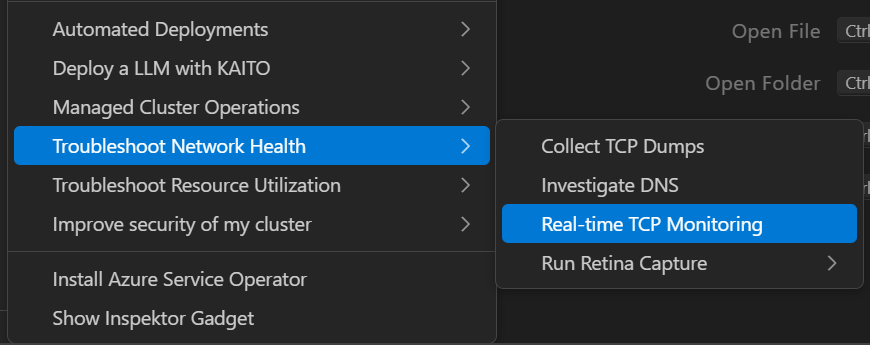
Real-time TCP Monitoring
Select Real-time TCP Monitoring to monitor TCP connections and network traffic in real-time. This helps identify network bottlenecks and connection issues.
Troubleshoot Resource Utilization
Use Troubleshoot Resource Utilization to analyze CPU, memory, and other resource usage patterns across your cluster. This helps identify resource constraints and optimization opportunities.
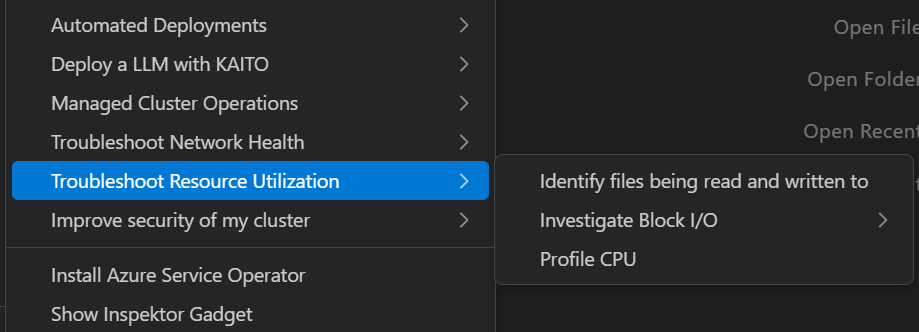
The Troubleshoot Resource Utilization menu includes the following sub-options:
- Identify files being read and written to: Monitor file system operations to understand which processes are accessing specific files.
- Investigate Block I/O intensive processes: Detect processes with high disk usage to identify potential performance bottlenecks.
- Profile CPU: Take samples of stack traces to analyze performance issues and identify resource-intensive processes.
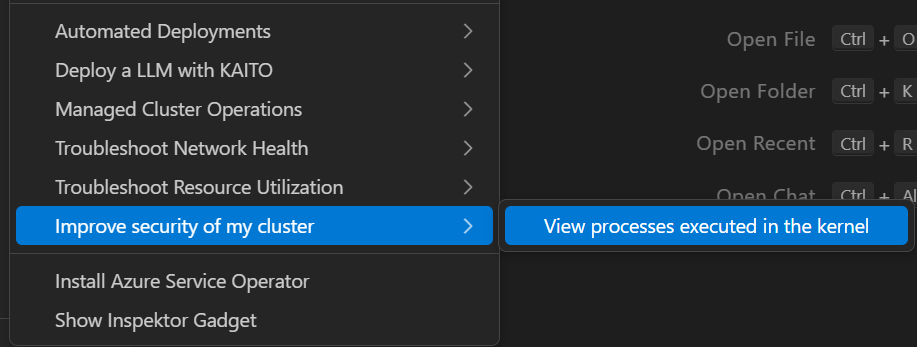
Improve Security of My Cluster
Select Improve Security of My Cluster to access the trace_exec gadget under the hood to monitor when new processes are executed.
Inspektor Gadget
Deploy and Undeploy InspektorGadget
Right click on your AKS cluster and select Show Inspektor Gadget to easily deploy gadget into your cluster. The Show Inspektor Gadget command has been moved to the main context menu for easier access. Users can easily one-click deploy and undeploy gadget from this feature.
Profile, Top, Trace and Snapshot Inspektor Gadget Commands
Right-click on your AKS cluster and select Show Inspektor Gadget and choose Gadget Commands to easily use non-interactive Top, Trace, Profile or Snapshot commands for your cluster.
New Troubleshooting Menu Items
The Inspektor Gadget integration now includes specialized menu items for common troubleshooting scenarios. If Inspektor Gadget is not deployed, the extension will prompt you to deploy it as below.
Depending on the context, the appropriate gadget will be selected automatically and the gadget dialog will open with the relevant options.
Investigate DNS
Right-click on your AKS cluster and select Investigate DNS to troubleshoot DNS-related issues in your cluster. This provides specialized tools for monitoring DNS queries and identifying connectivity problems.
Real-time TCP Monitoring
Select Real-time TCP Monitoring to monitor TCP connections and network traffic in real-time. This helps identify network bottlenecks and connection issues.
Troubleshoot Resource Utilization
Use Troubleshoot Resource Utilization to analyze CPU, memory, and other resource usage patterns across your cluster. This helps identify resource constraints and optimization opportunities.
The Troubleshoot Resource Utilization menu includes the following sub-options:
- Identify files being read and written to: Monitor file system operations to understand which processes are accessing specific files.
- Investigate Block I/O intensive processes: Detect processes with high disk usage to identify potential performance bottlenecks.
- Profile CPU: Take samples of stack traces to analyze performance issues and identify resource-intensive processes.
Improve Security of My Cluster
Select Improve Security of My Cluster to access the trace_exec gadget under the hood to monitor when new processes are executed.
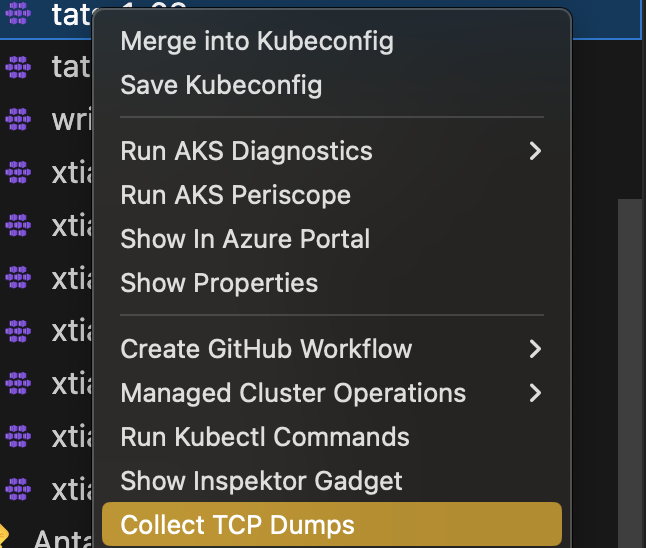
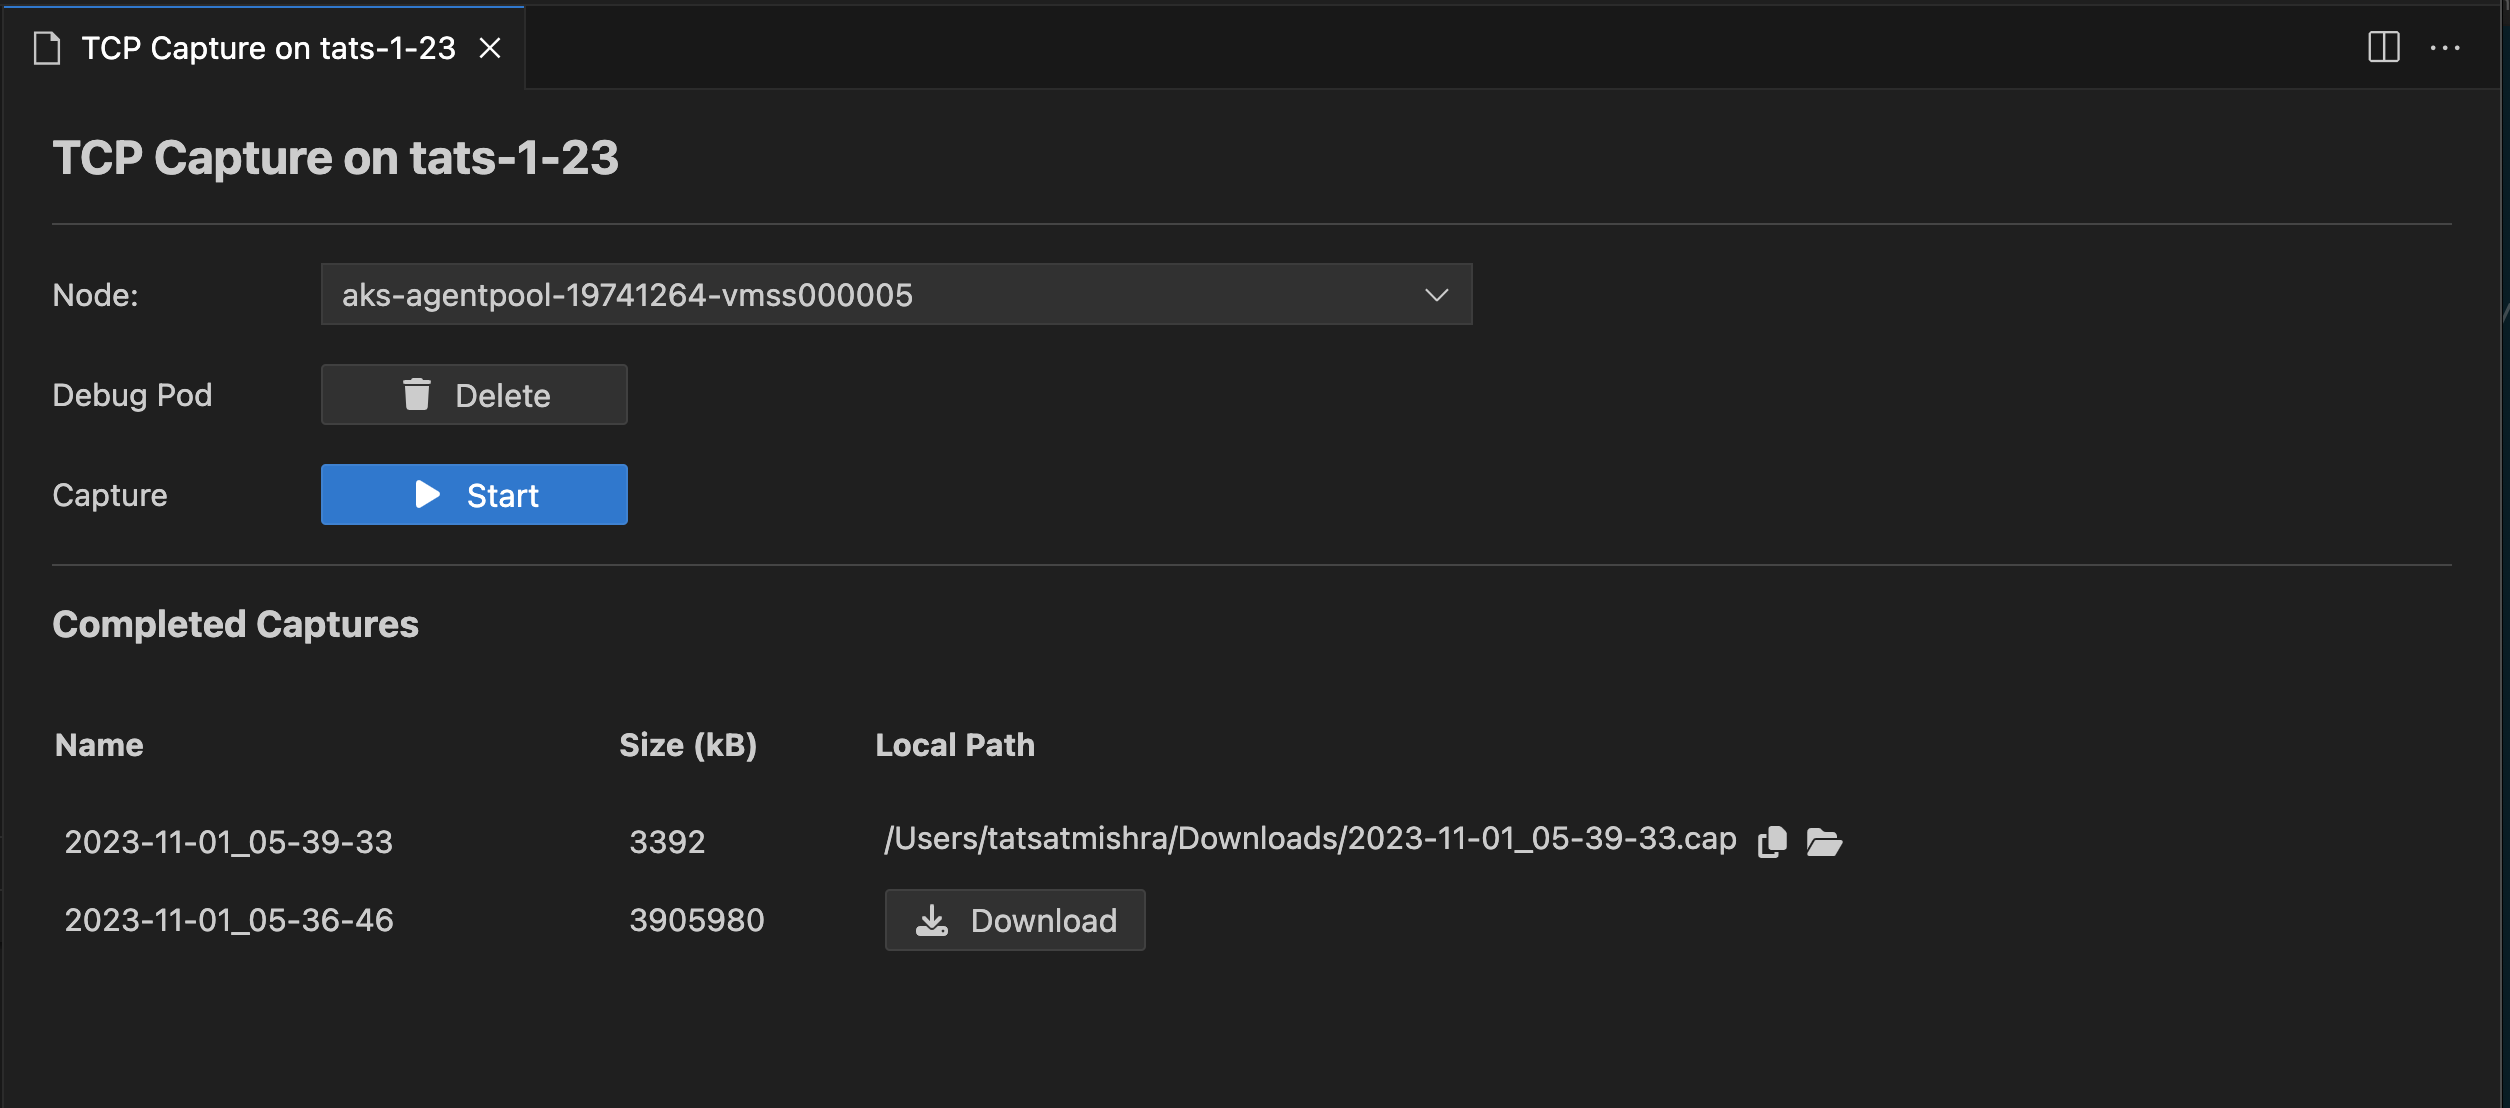
Collect TCP Dumps from AKS Cluster Linux Nodes
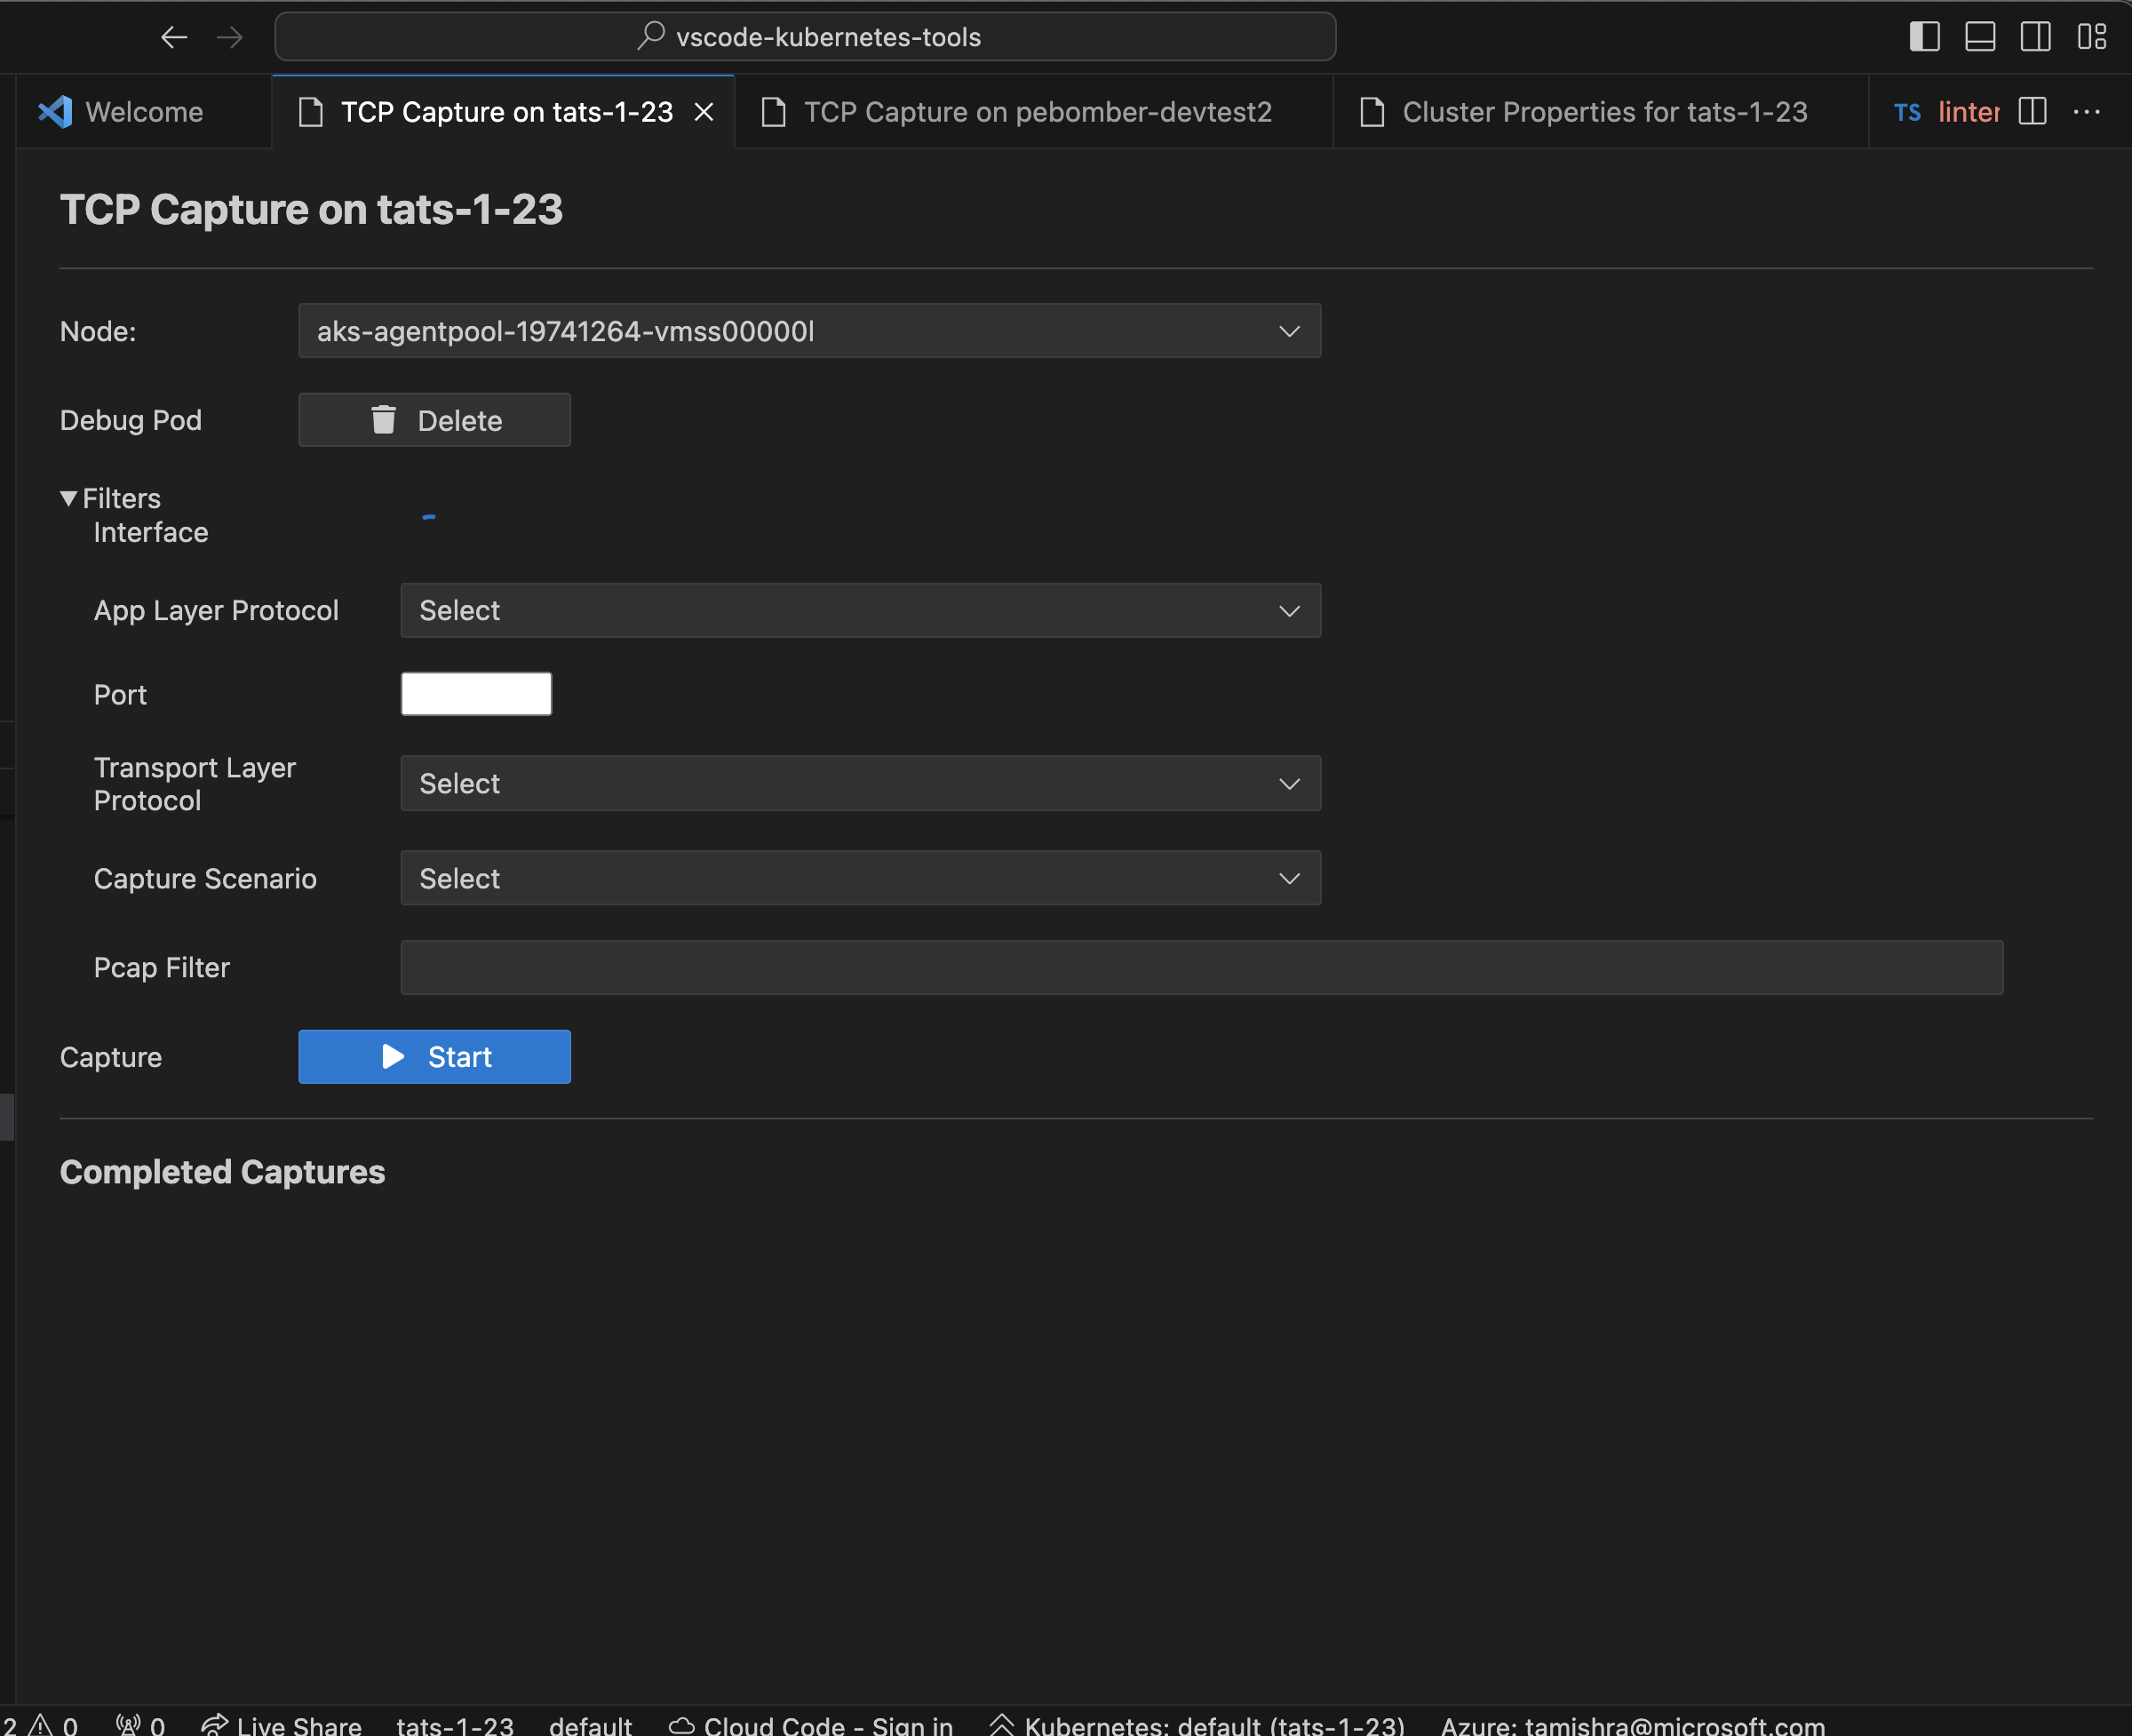
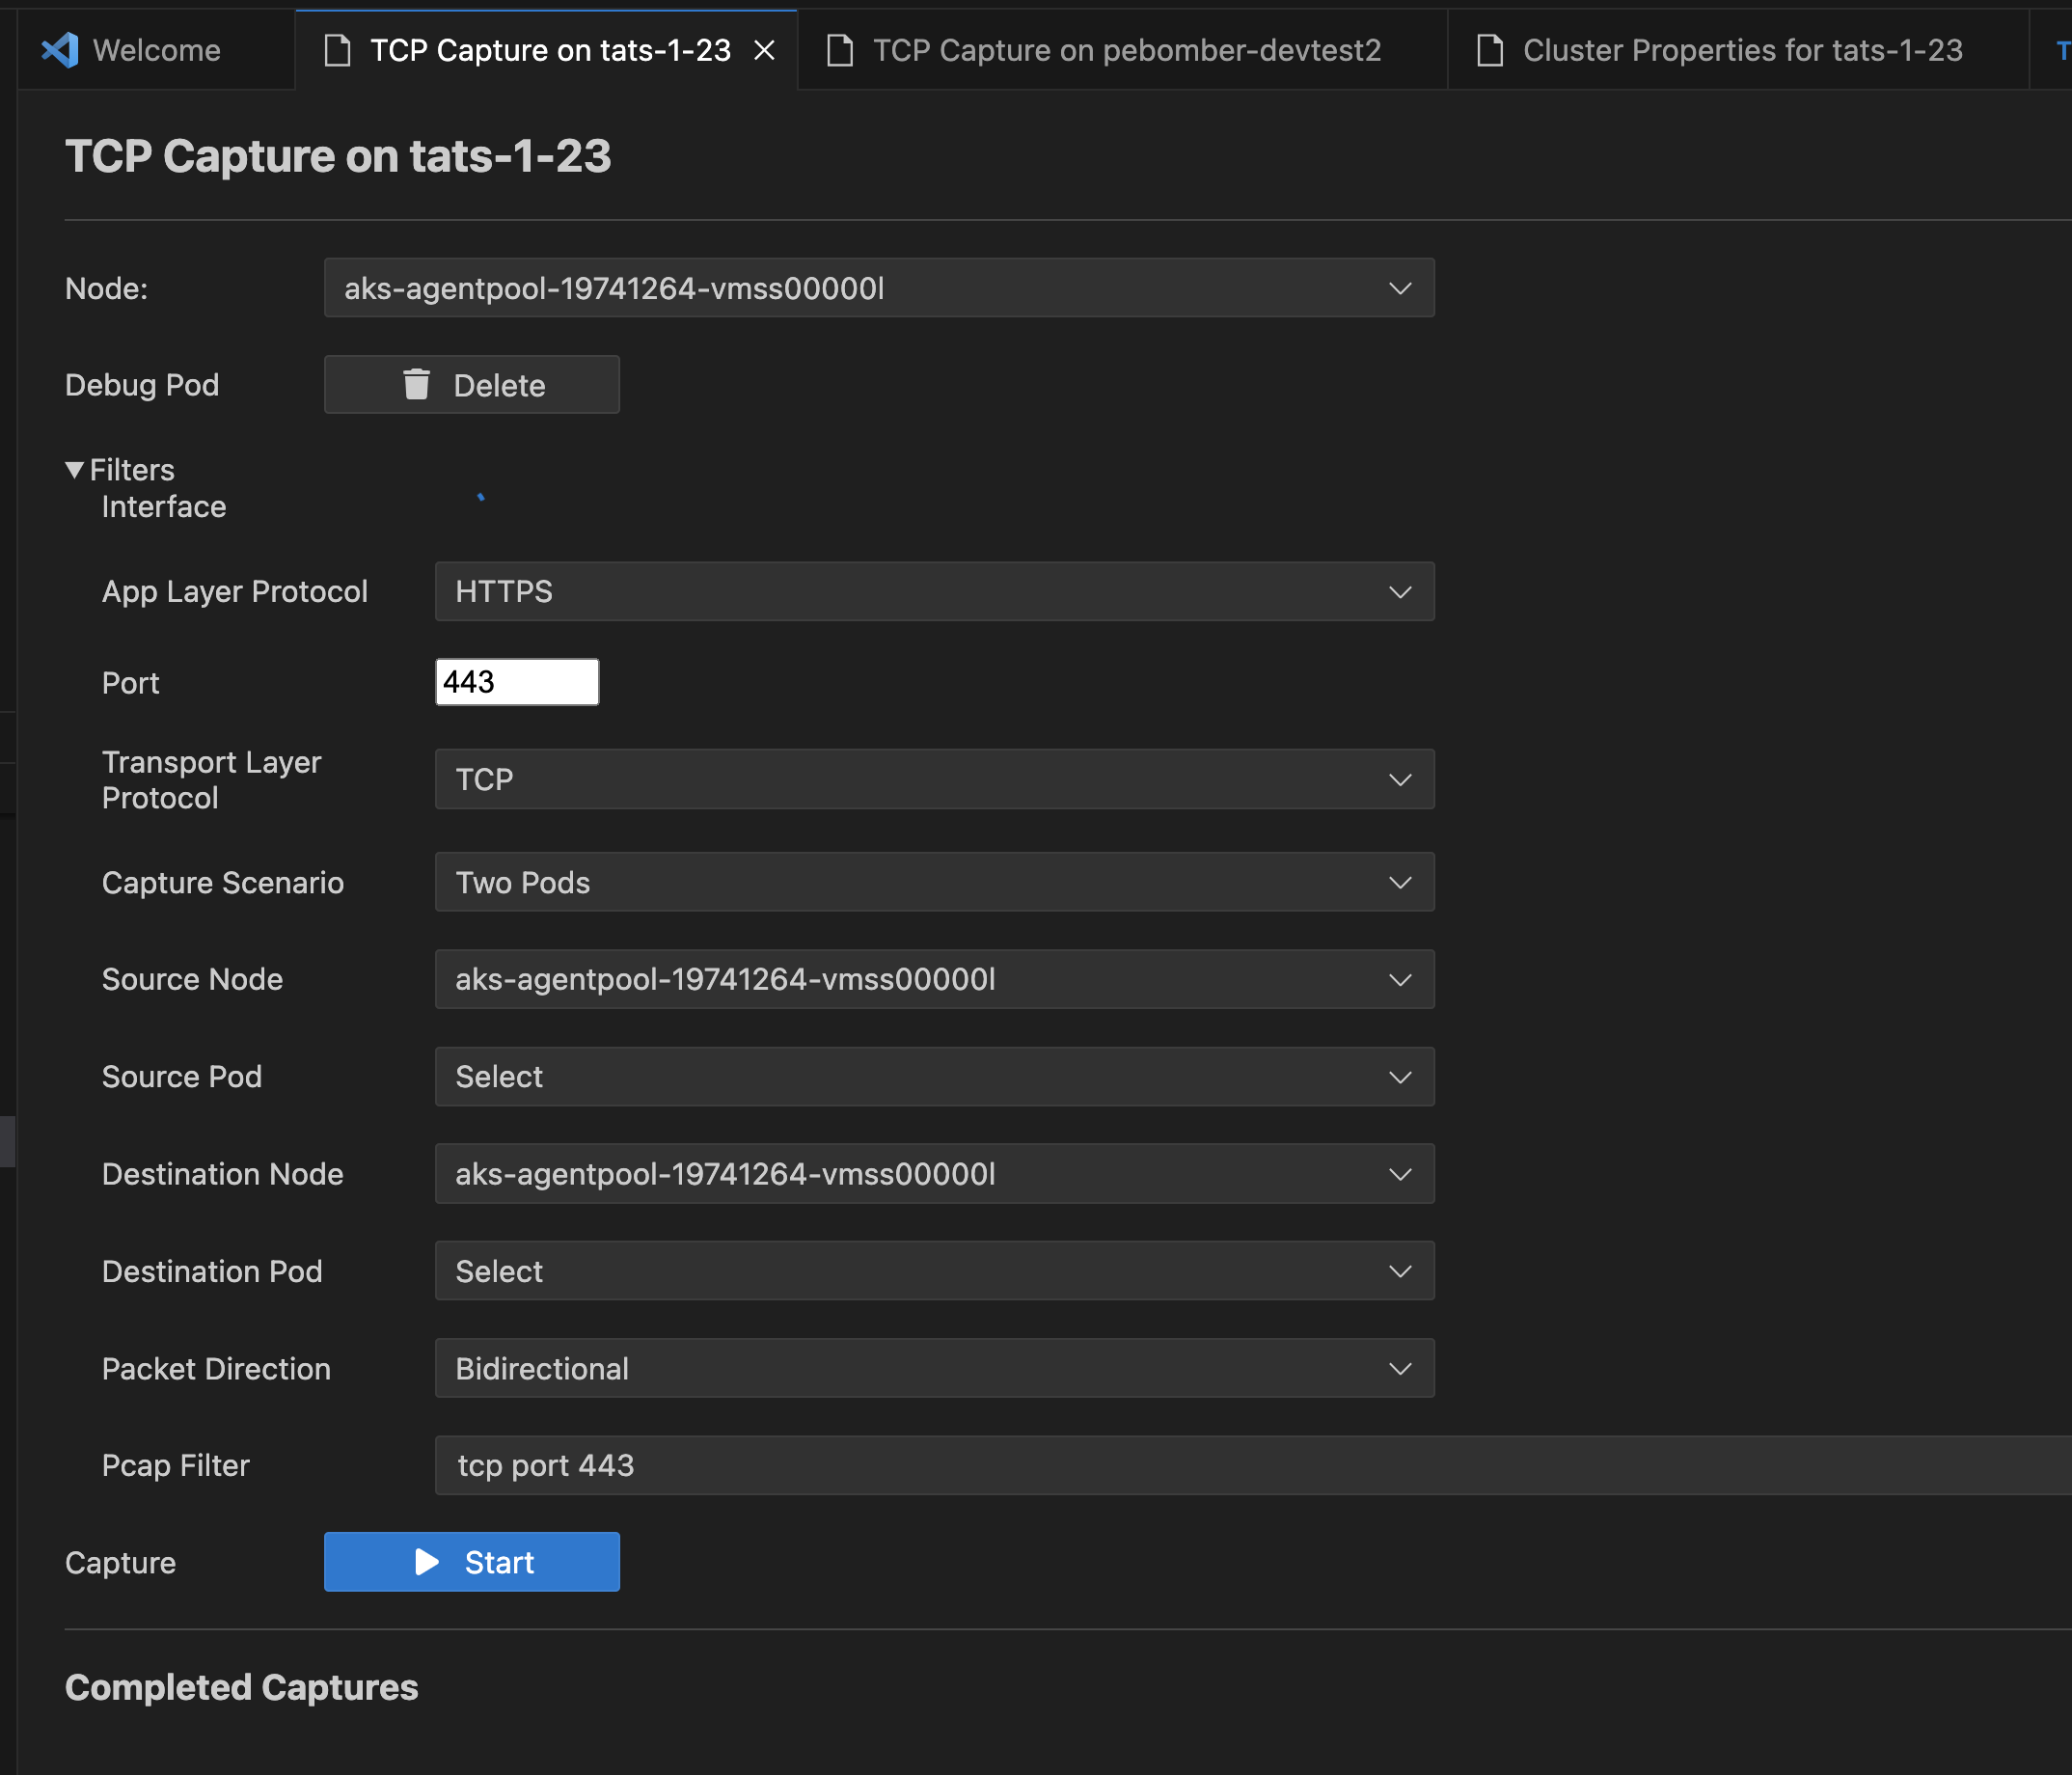
Collect TCP Dumps
Right click on your AKS cluster and select Troubleshoot Network Health and then select Collect TCP Dumps to capture TCP dumps for any Linux node and download them to your local machine with ease.
Added filters to the TCP Dump functionality, so that you can target traffic capture to specific network interfaces, ports or protocols, to or from specific pods, or craft custom pcap filter strings.
Compare 2 AKS Cluster within Same Subscription
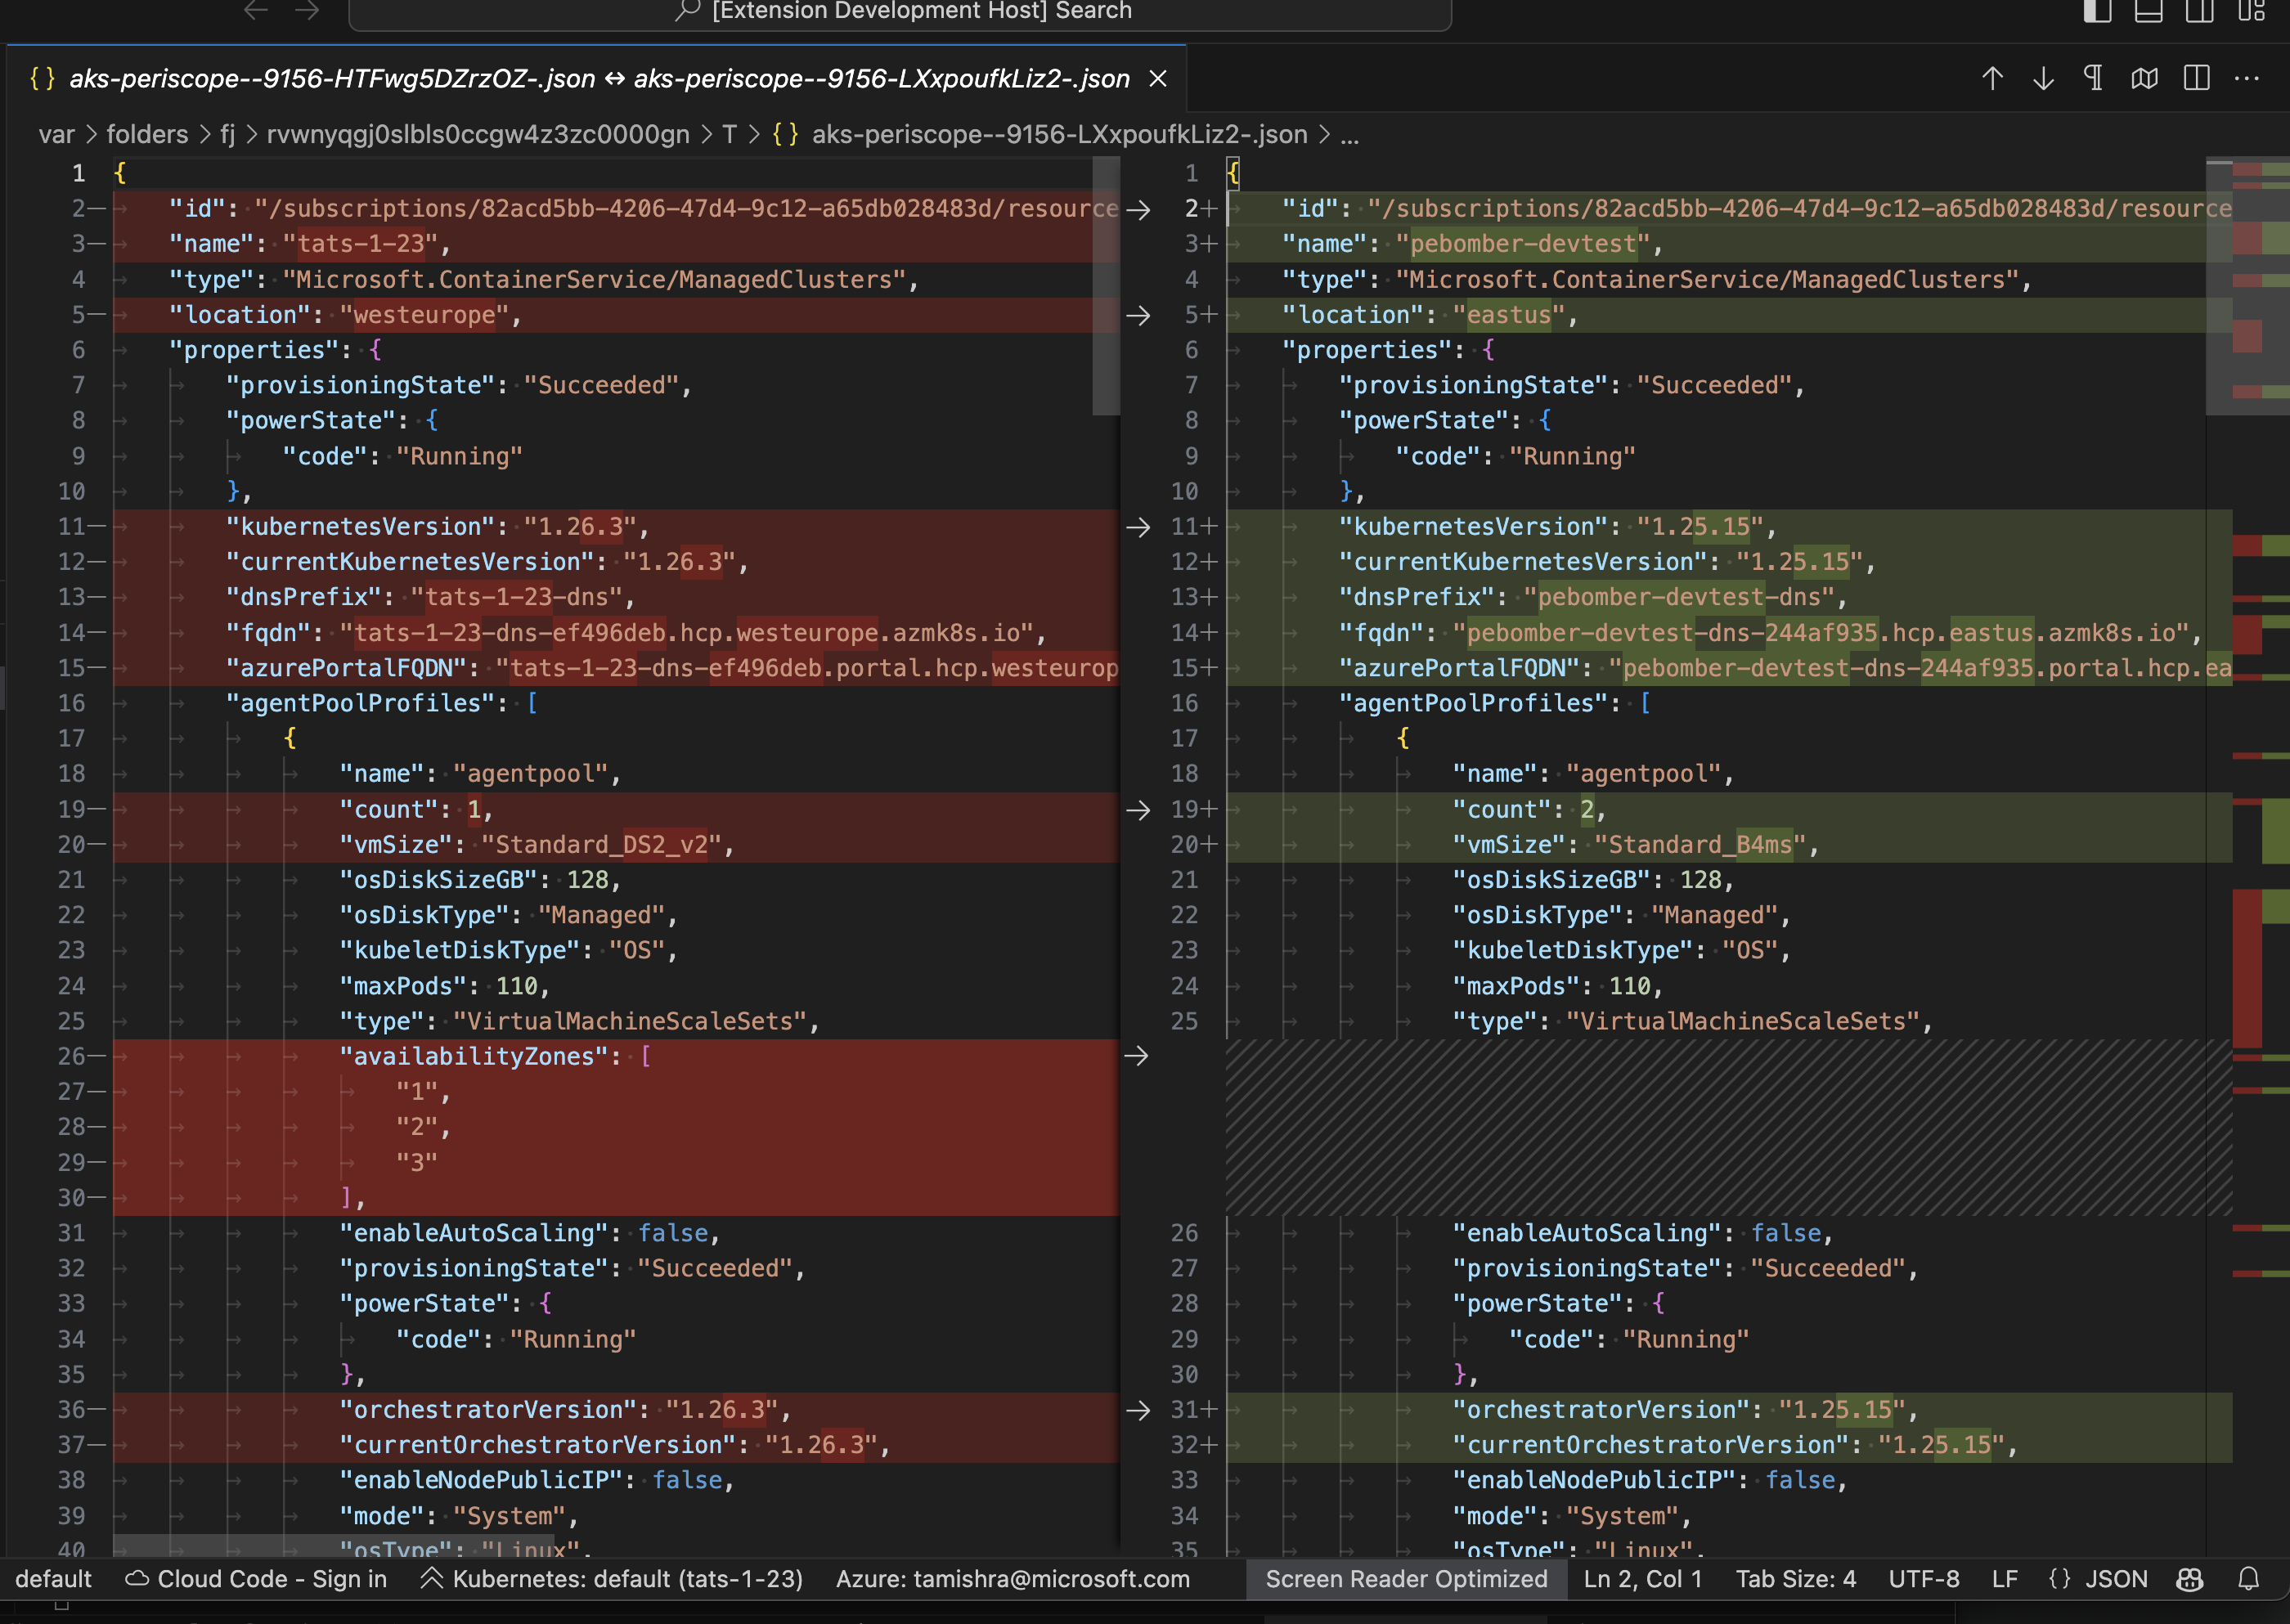
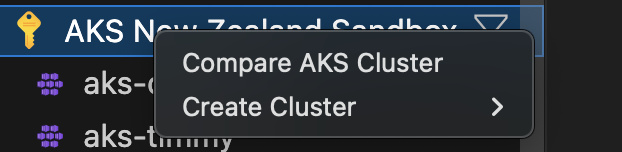
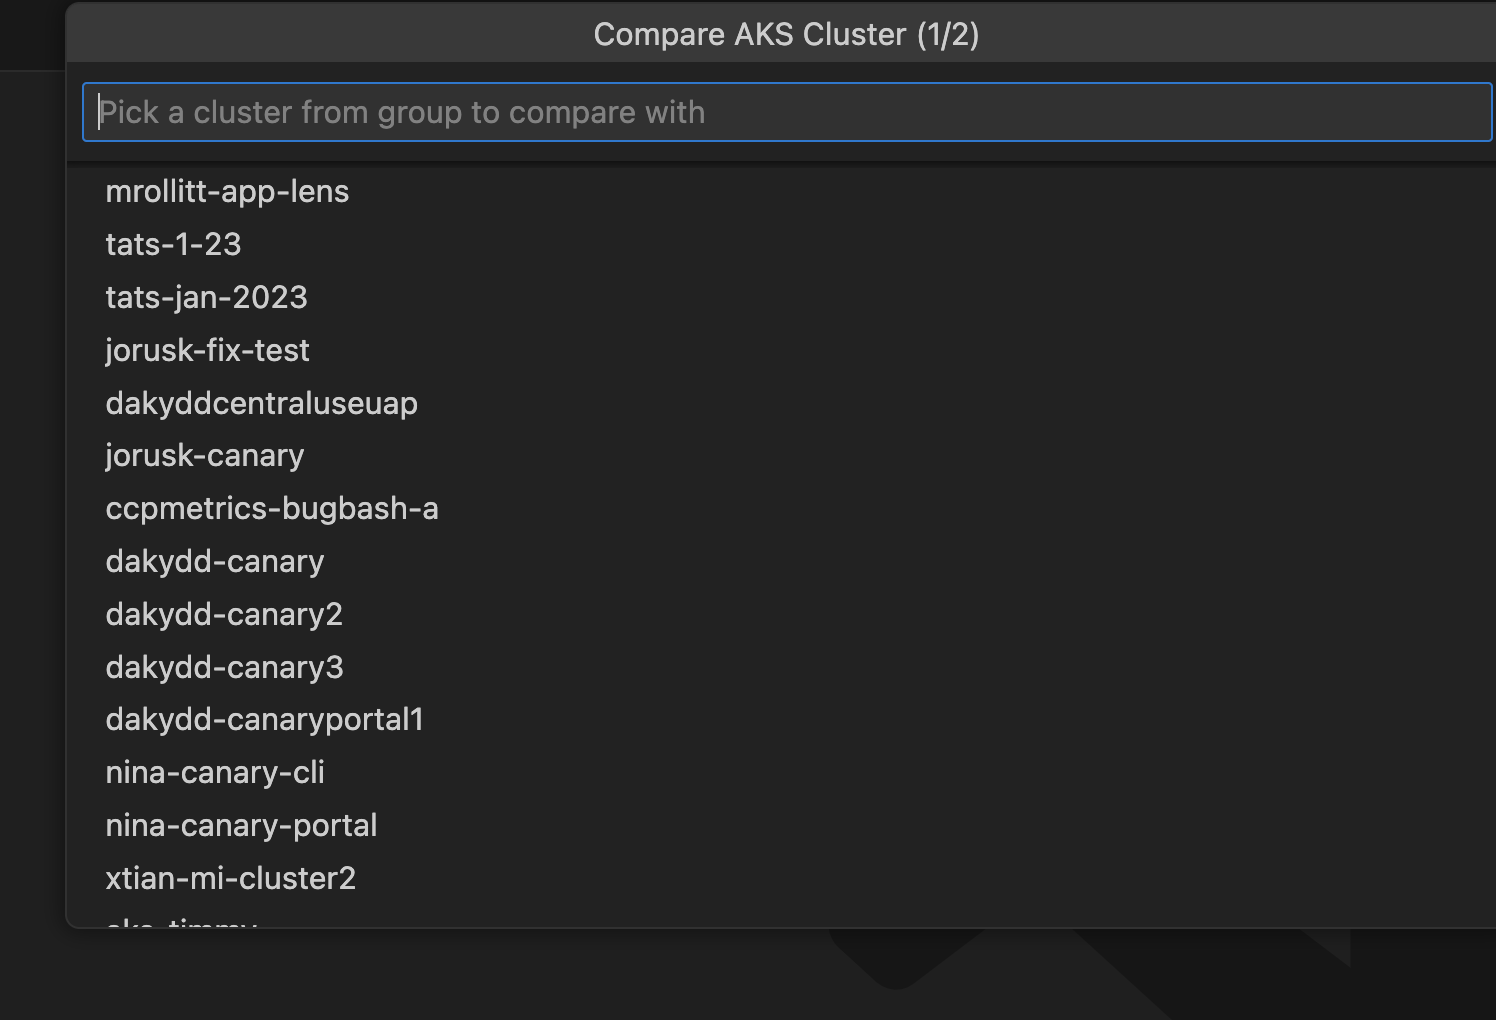
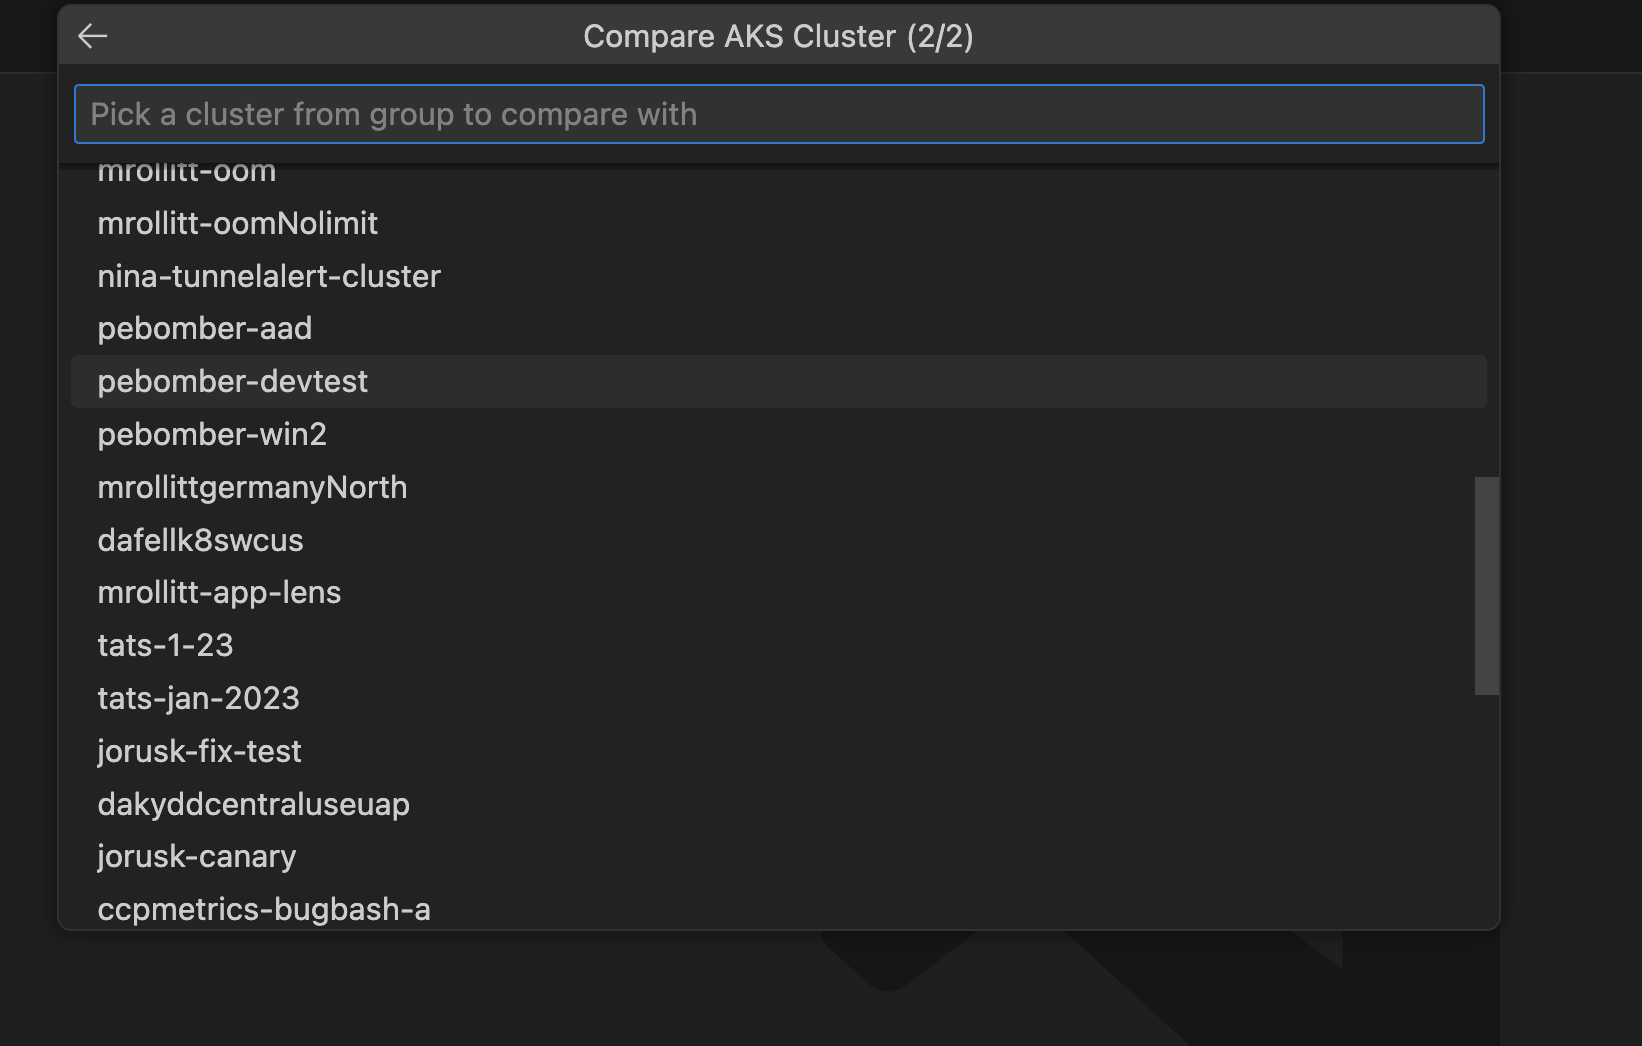
Compare AKS Clusters
Right click on your AKS cluster and select Compare AKS Cluster to use vscode diff to compare json object of 2 AKS clusters.
Garbage collection Using Eraser Image Cleanup Tool
Run Eraser Image Cleanup
Right click on your AKS cluster and select Run Eraser Image Cleanup to deploy the Eraser Tool to auomatically clean images in a regular interval for the selected AKS Cluster.


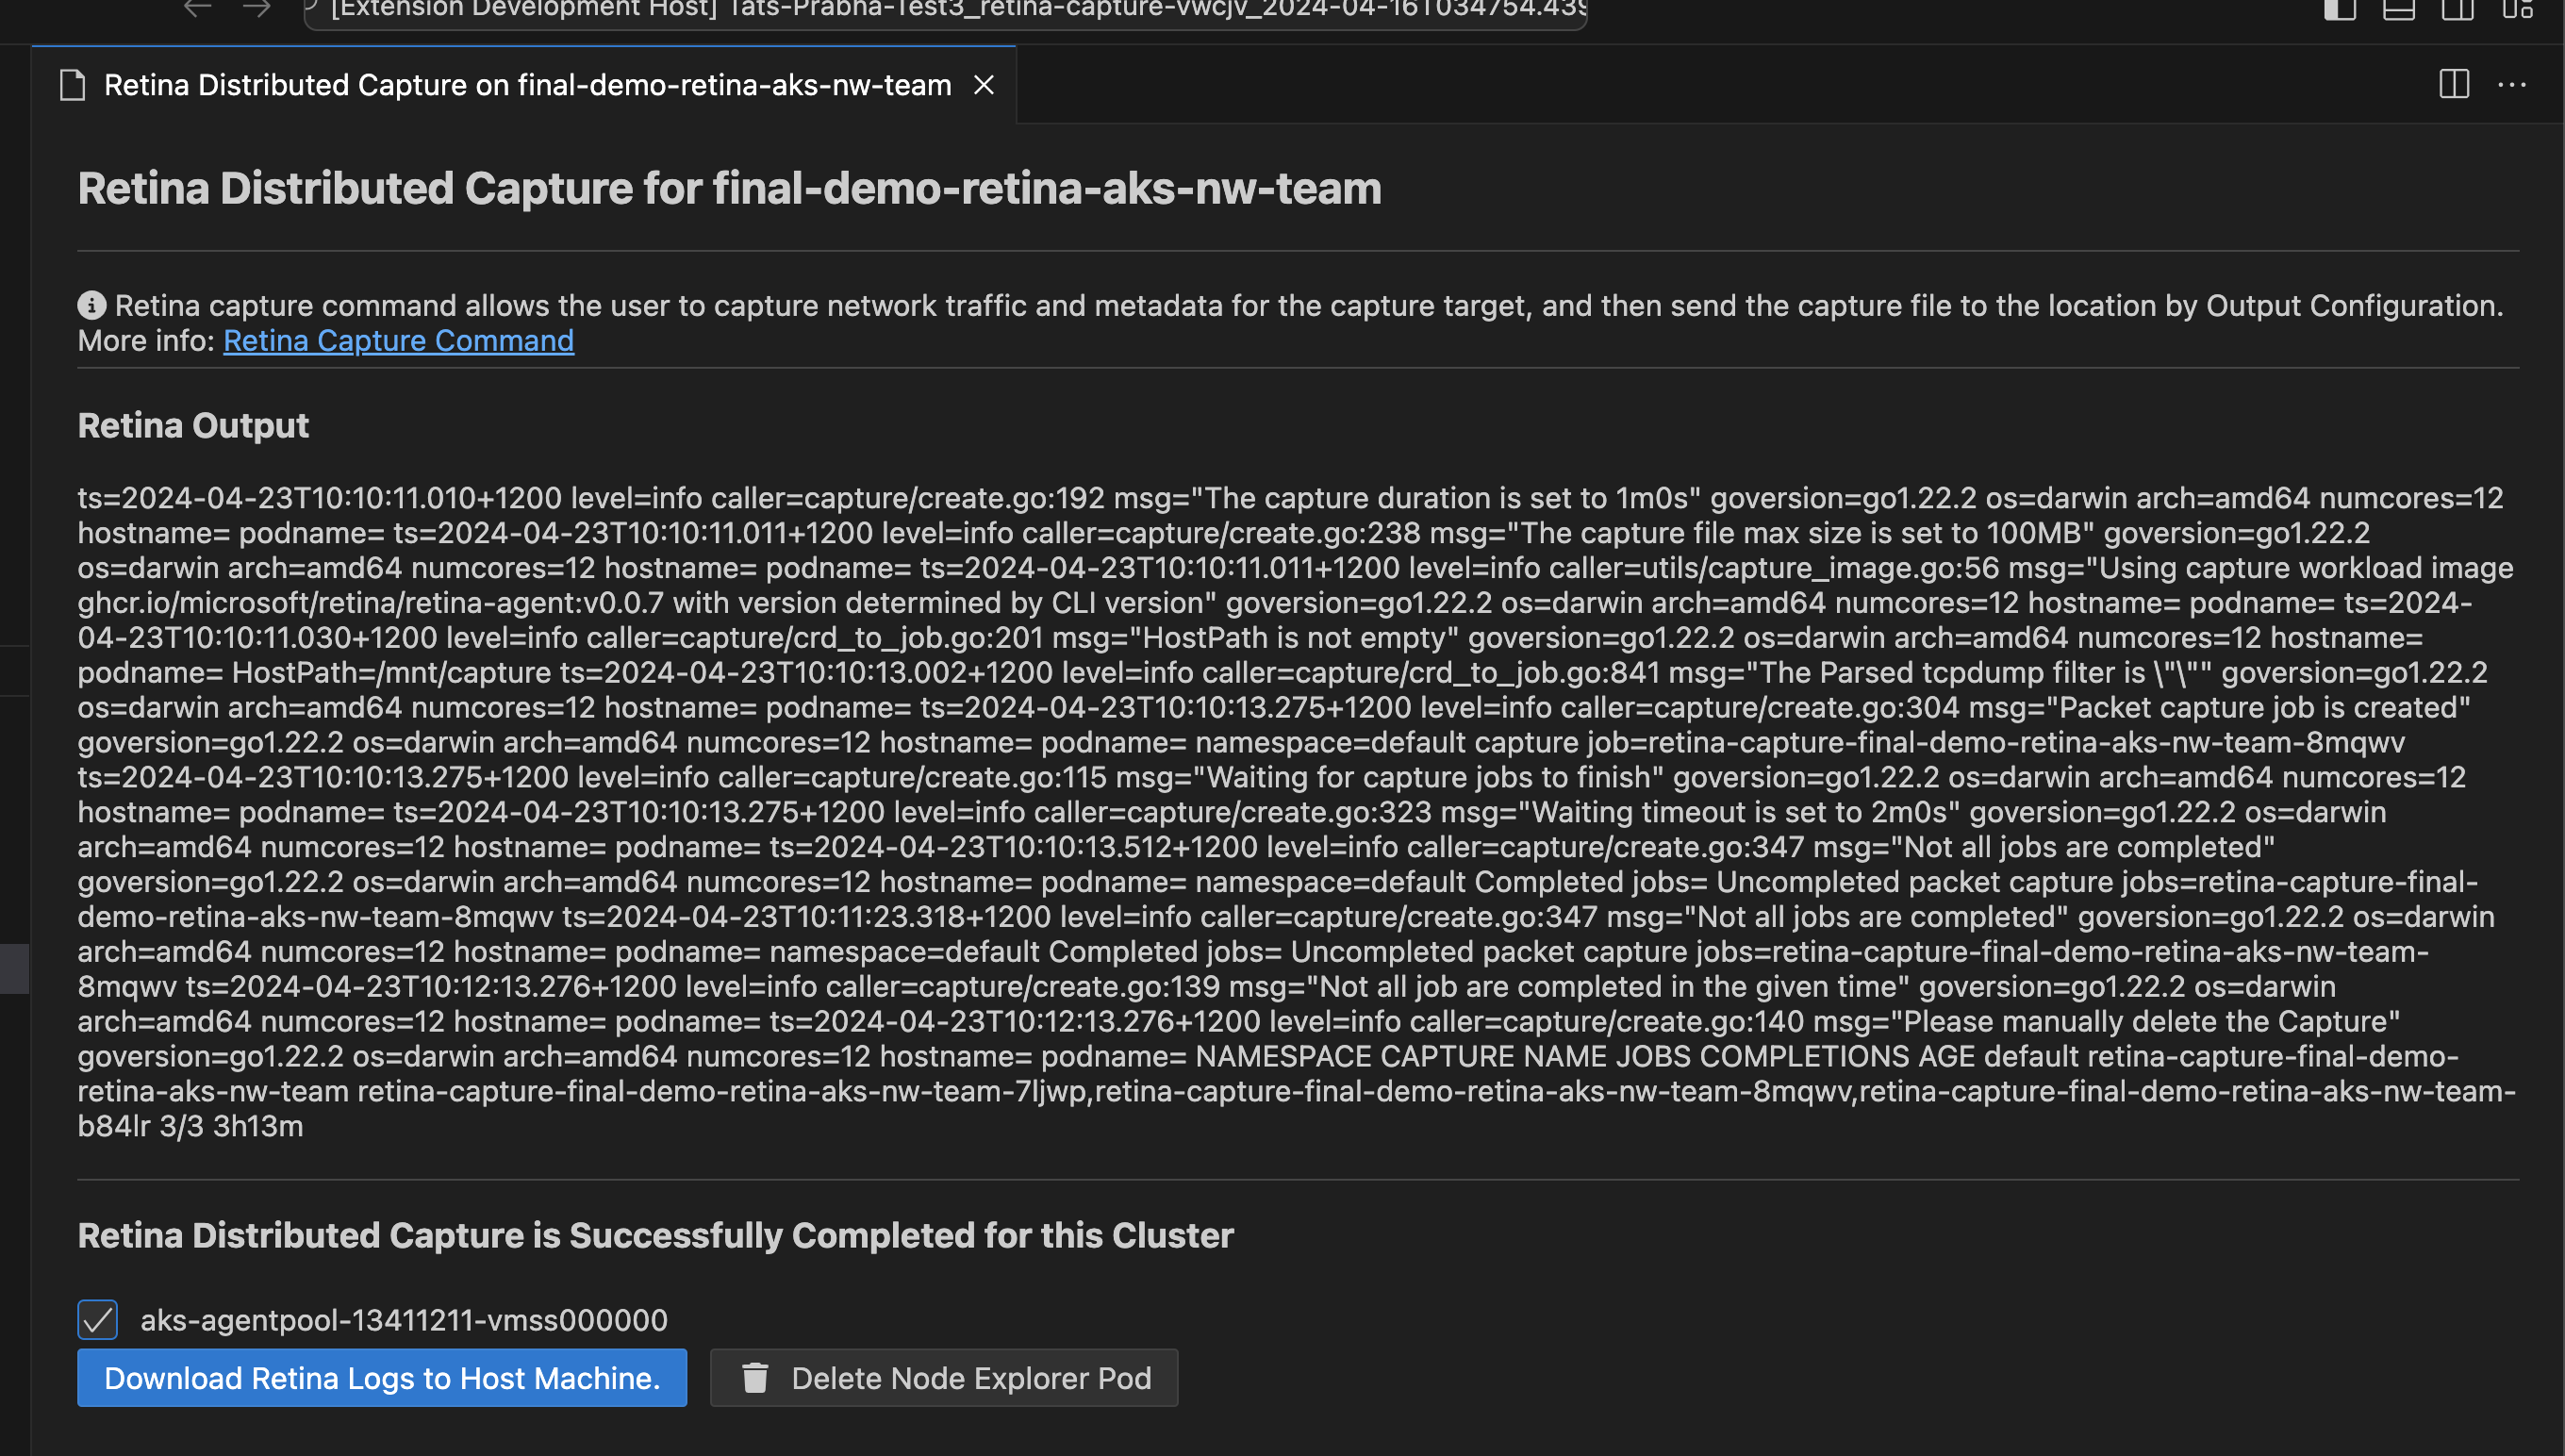
Run Retina Distributed Capture from AKS Cluster Linux Nodes
Run Retina Capture
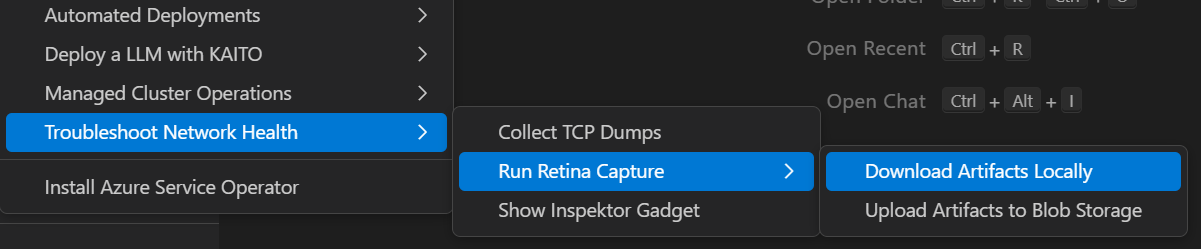
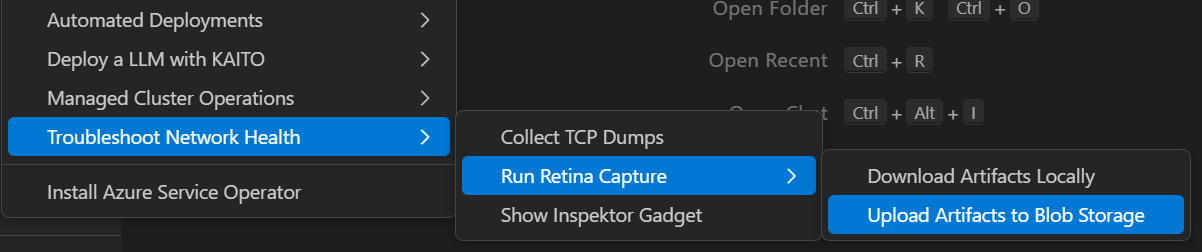
Right click on your AKS cluster and select Troubleshoot Network Health and then click on Run Retina Capture to capture logs like iptables-rules, ip-resrouces.txt and other key distributed captures form this azure networking tool for any Linux nodes in yout AKS cluster.
There are two options to run the capture:
Download the capture locally
Step 1: Right-click on your AKS cluster and select Troubleshoot Network Health > Run Retina Capture > Download Artifacts Locally
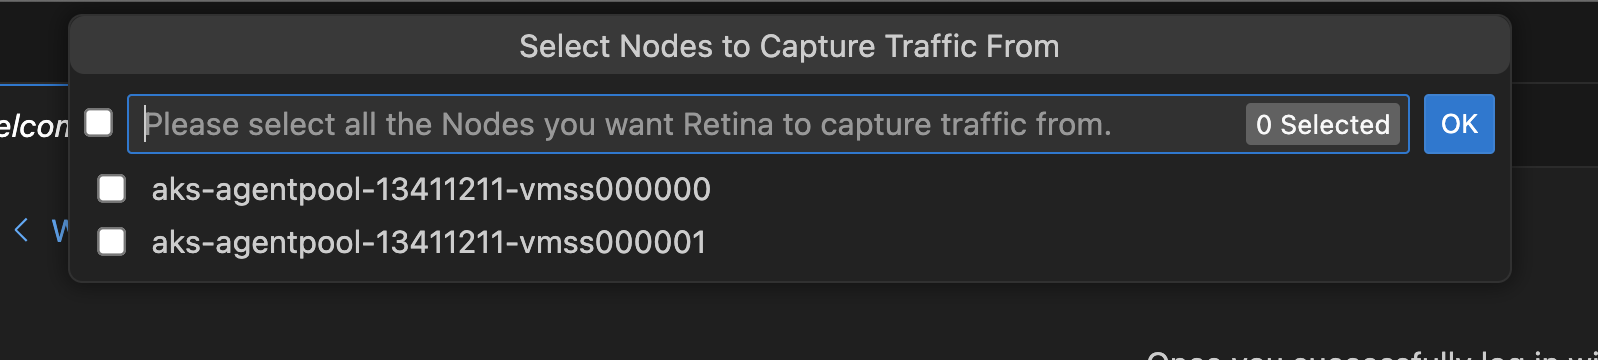
Step 2: Select the nodes on which you want to run the capture
Step 3: Download the capture locally after the capture is completed
Upload the capture to Azure Storage
Before uploading the capture to Azure Storage, ensure the following prerequisites are met:
-
A storage account exists in the same region as your AKS cluster.
-
The storage account is configured in the Diagnostic settings of your AKS cluster.
-
A container is created within the storage account to store the capture.
Step 1: Right-click on your AKS cluster and select Troubleshoot Network Health > Run Retina Capture > Upload Artifacts to Blob Storage
Step 2: Select the storage account where you want to upload the capture

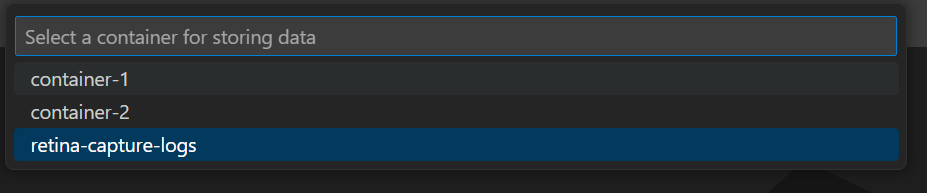
Step 3: Select the container within the storage account where you want to upload the capture
Step 4: Select the nodes on which you want to run the capture
Step 5: Success message will be displayed once the capture is completed and uploaded to the selected storage account
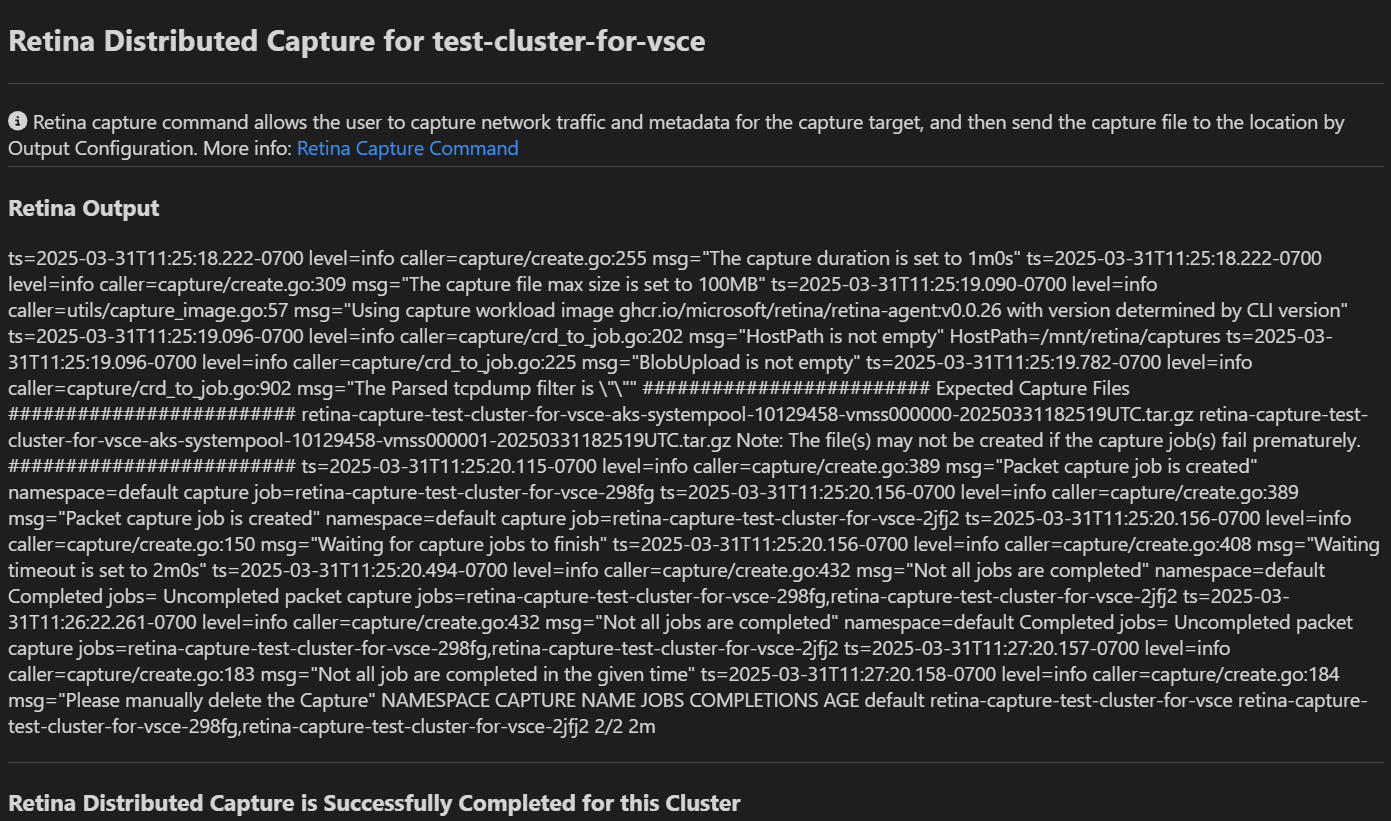
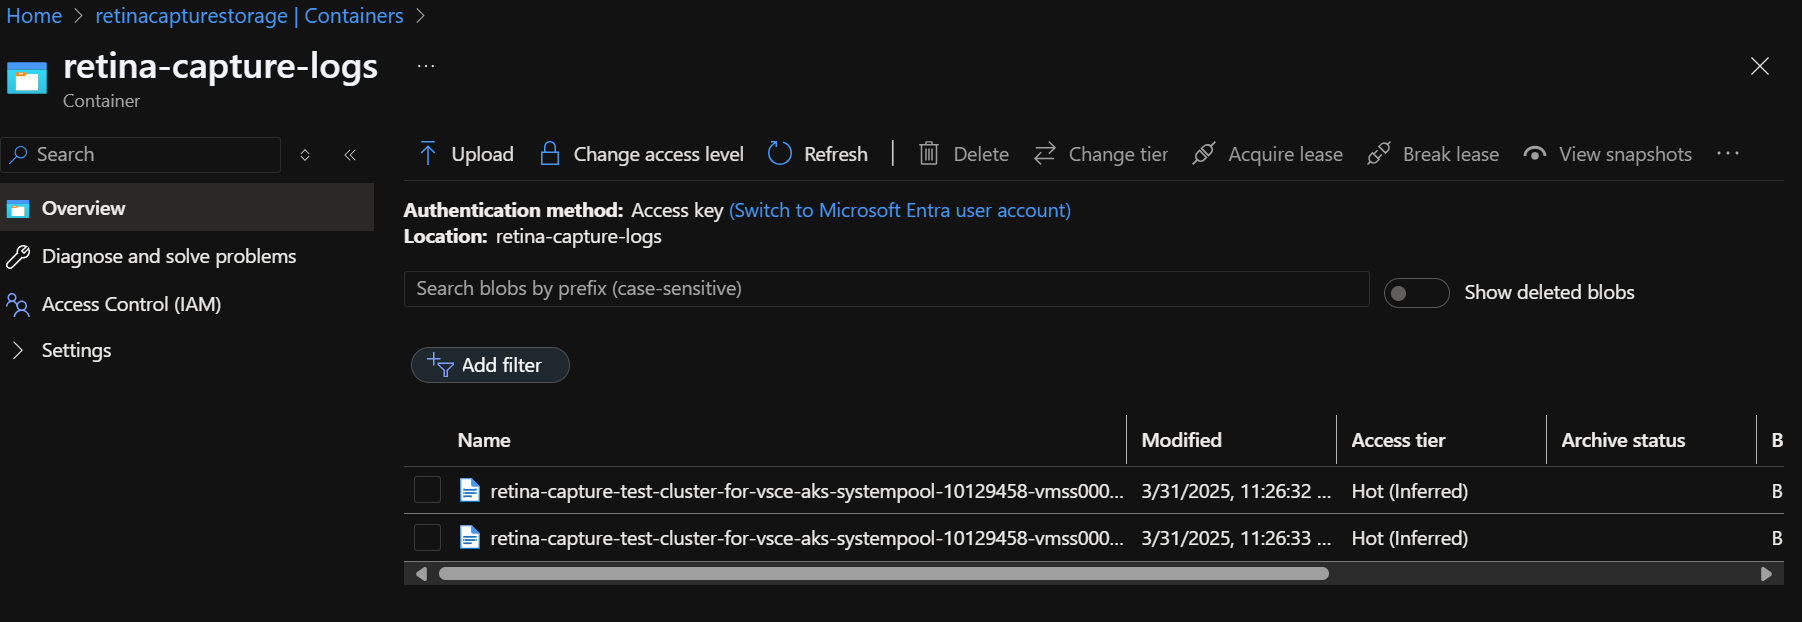
Step 6: Check the storage account to access the uploaded capture files. The files will be stored in the selected container with a timestamp
Deployment Tools: Draft Tool Integration
The Deployment Tools commands integrate the Draft tool to provide:
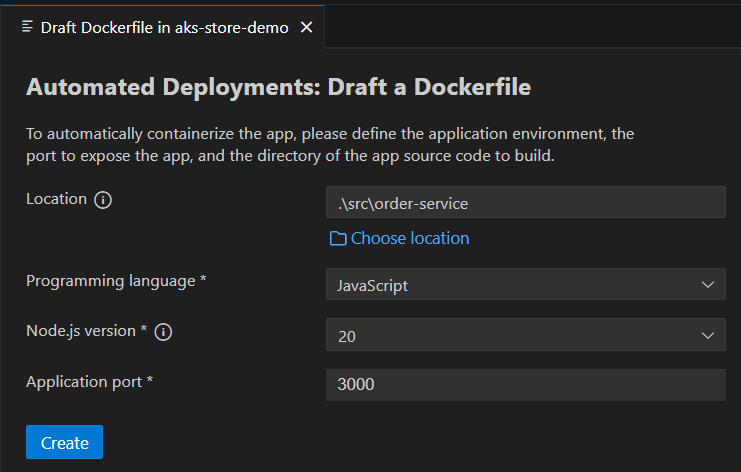
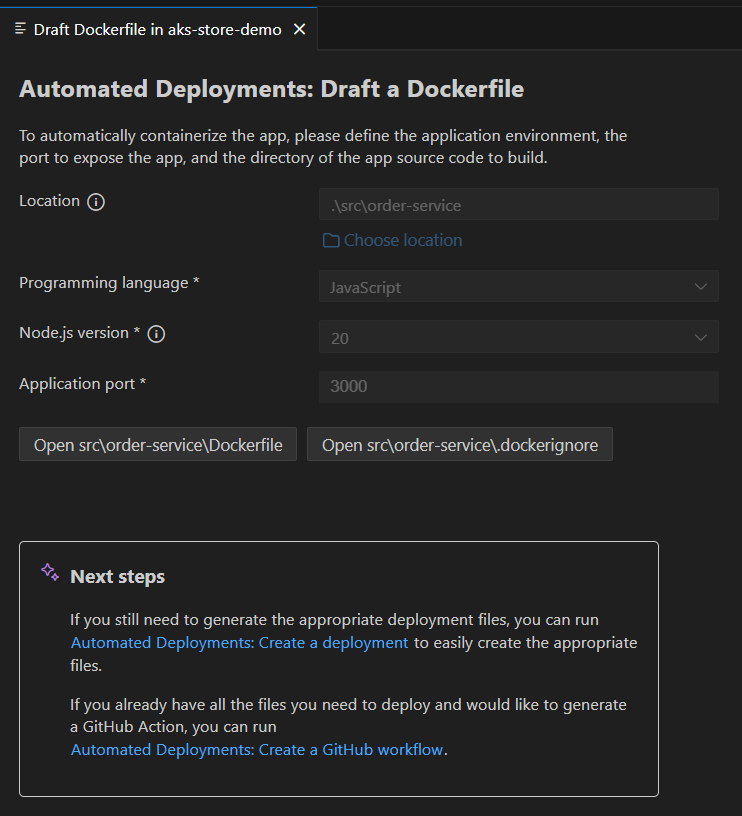
- Draft Dockerfile
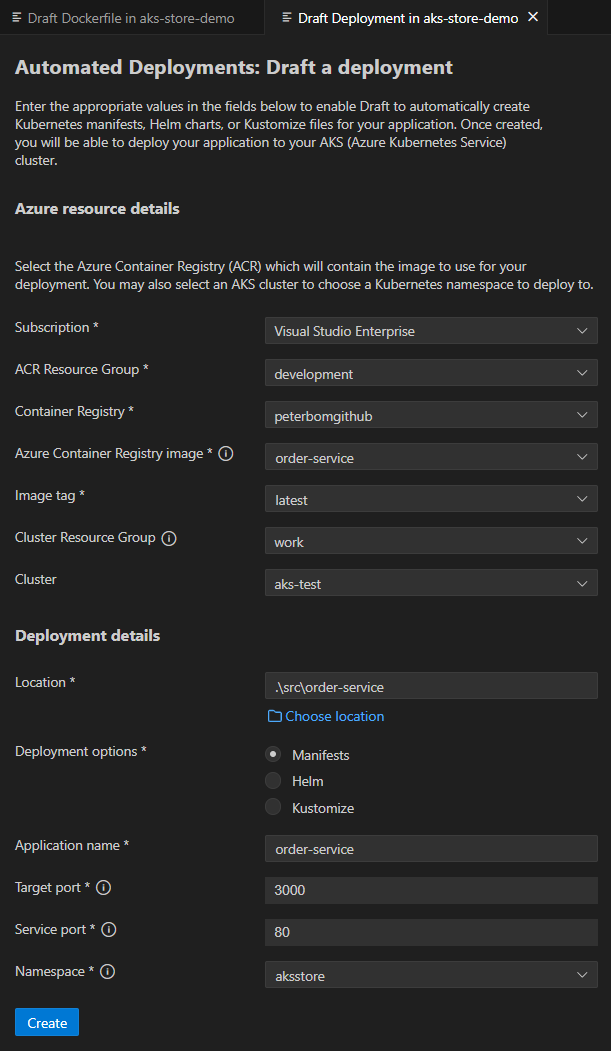
- Draft Deployment
- Draft Workflow
These can be launched from either:
- The command palette. (To open: Hold
Ctrl(⌘ Cmdon macOS) +shift+p)
This will allow user to have access to a complete power of Draft tool and allow users to take advantage for scaffolding geenration for their projects.


Deploying Apps to AKS with GitHub Actions and Container Assist (Alpha Preview)
Please Note This is an Alpha Preview feature. Behavior, prompts, and generated output may change between releases.
AI Notice Container Assist uses AI models to analyze project context and generate deployment files. Always review generated files before use, and do not include secrets or sensitive data in source files used for generation. See AI Data Flow and Privacy for details on what data is sent to AI models.
Technology Note This experience is built on Azure/containerization-assist, which combines AI generation with a specialized containerization toolchain and knowledge/policy guidance for Docker and Kubernetes workflows.
Container Assist is a preview workflow in the AKS VS Code extension that helps generate deployment assets for AKS directly from your project.
Detailed documentation
For in-depth coverage of specific topics, see:
- Azure Resources and Permissions – Azure resources created, role assignments, and prerequisite permissions
- AI Data Flow and Privacy – What data is sent to AI models, blocked files, and security protections
- GitHub Workflow and OIDC Setup – Workflow template details, OIDC configuration, GitHub secrets, and post-generation flow
Problem this feature solves
Deploying an application to AKS with a GitHub Actions pipeline usually requires multiple manual steps:
- Creating and tuning a Dockerfile
- Authoring Kubernetes manifests for deployment and service resources
- Creating a CI/CD workflow for build, push, and deploy
- Wiring Azure authentication and repository workflow setup
This process is flexible, but often time-consuming and error-prone, especially when teams are setting up deployment automation for a new or existing project.
How this feature helps
Container Assist reduces setup friction by guiding you through:
- Repository analysis
- Dockerfile generation
- Kubernetes manifest generation
- Optional GitHub workflow generation
- Optional PR-ready Git staging flow
This gives teams a review-first starting point so they can iterate quickly while keeping full control over the final deployment configuration.
Why this is different from generic AI code generation
Container Assist is not a single free-form prompt that guesses deployment files from source code alone.
It uses a structured, workflow-driven approach based on containerization-assist capabilities:
- Repository-aware analysis first (
analyze-repo) to detect language, framework, and module shape - Knowledge-enhanced planning for Dockerfile and Kubernetes outputs
- Security and quality guidance in the tool flow (for example vulnerability and best-practice checks)
- Policy-driven extensibility so organization standards can shape recommendations
- Clear next-step/tool-chain guidance for staged execution from analysis to deployment verification
For AKS migration and onboarding scenarios, this helps teams move from app code to deployable AKS artifacts with better consistency and less manual trial-and-error.
Prerequisites
Before using Container Assist, make sure the following are in place.
Required software
| Requirement | Details |
|---|---|
| VS Code | Version 1.110.0 or later. |
| GitHub Copilot | The GitHub Copilot extension must be installed and you must be signed in. Container Assist uses the VS Code Language Model API, which is provided by GitHub Copilot. If no language model is available, the extension shows: “No Language Model available. Please ensure GitHub Copilot is installed and signed in.” |
| Kubernetes Tools | The Kubernetes Tools extension is a declared dependency and is installed automatically. It provides kubectl integration used by the AKS cluster tree. |
Required accounts
| Account | Why |
|---|---|
| Azure | You must be signed in to Azure in VS Code. Container Assist creates and manages Azure resources (managed identities, role assignments, federated credentials) on your behalf. The Contributor role alone is not sufficient – you also need role assignment permissions. See Azure Account Permissions for details on which roles work. |
| GitHub | You must be signed in to GitHub because GitHub Copilot (which provides the language models) requires it. Additionally, if you want to use OIDC setup (which sets GitHub repository secrets) or the pull request creation flow, you need at least write access to the target repository. If the repository belongs to a GitHub organization using SAML SSO, you must authorize your token for that organization before setting secrets. |
Azure resources that must already exist
Container Assist does not create these for you – they must be provisioned before you start:
| Resource | Why |
|---|---|
| Azure subscription | All Azure operations require an active subscription. |
| AKS cluster | The target Kubernetes cluster where your application will be deployed. |
| Azure Container Registry (ACR) | Where container images are built and stored. You select an ACR during the wizard. |
Workspace requirements
| Requirement | Details |
|---|---|
| Open workspace folder | You must have at least one folder open in VS Code. Container Assist analyzes files in the workspace root. |
| Recognized project type | Your project must contain at least one indicator file for a supported language (see Supported languages and project types below). |
| Git repository (optional) | Required for the post-generation Git staging and PR creation flow. The workspace folder should be a Git repository with a GitHub remote if you want to use OIDC setup. |
Optional extensions
| Extension | Purpose |
|---|---|
| GitHub Pull Requests | If installed, Container Assist can create a pull request directly from VS Code after staging generated files. Without this extension, you can still commit and push manually. |
Supported languages and project types
Container Assist uses the containerization-assist SDK to detect your project’s language and framework by scanning for specific files in your workspace. The following project types are supported:
| Language / Platform | Indicator file(s) |
|---|---|
| JavaScript / TypeScript (Node.js) | package.json |
| Java (Maven) | pom.xml |
| Java (Gradle) | build.gradle, build.gradle.kts |
| Python | requirements.txt, pyproject.toml |
| Go | go.mod |
| Rust | Cargo.toml |
| .NET (C#) | *.csproj |
The SDK also reads additional files for context when present (such as Dockerfile, docker-compose.yml, application.properties, application.yml), but these are not required for language detection.
If your project type is not in the list above, the SDK classifies it as other and generation results may be less accurate.
Feature flag
From 2.1.0, this preview feature is enabled by default.
You can still explicitly control it in VS Code settings:
{
  "aks.containerAssistEnabledPreview": true
}
Default value: true
This can also be enabled from the VS Code Settings UI.

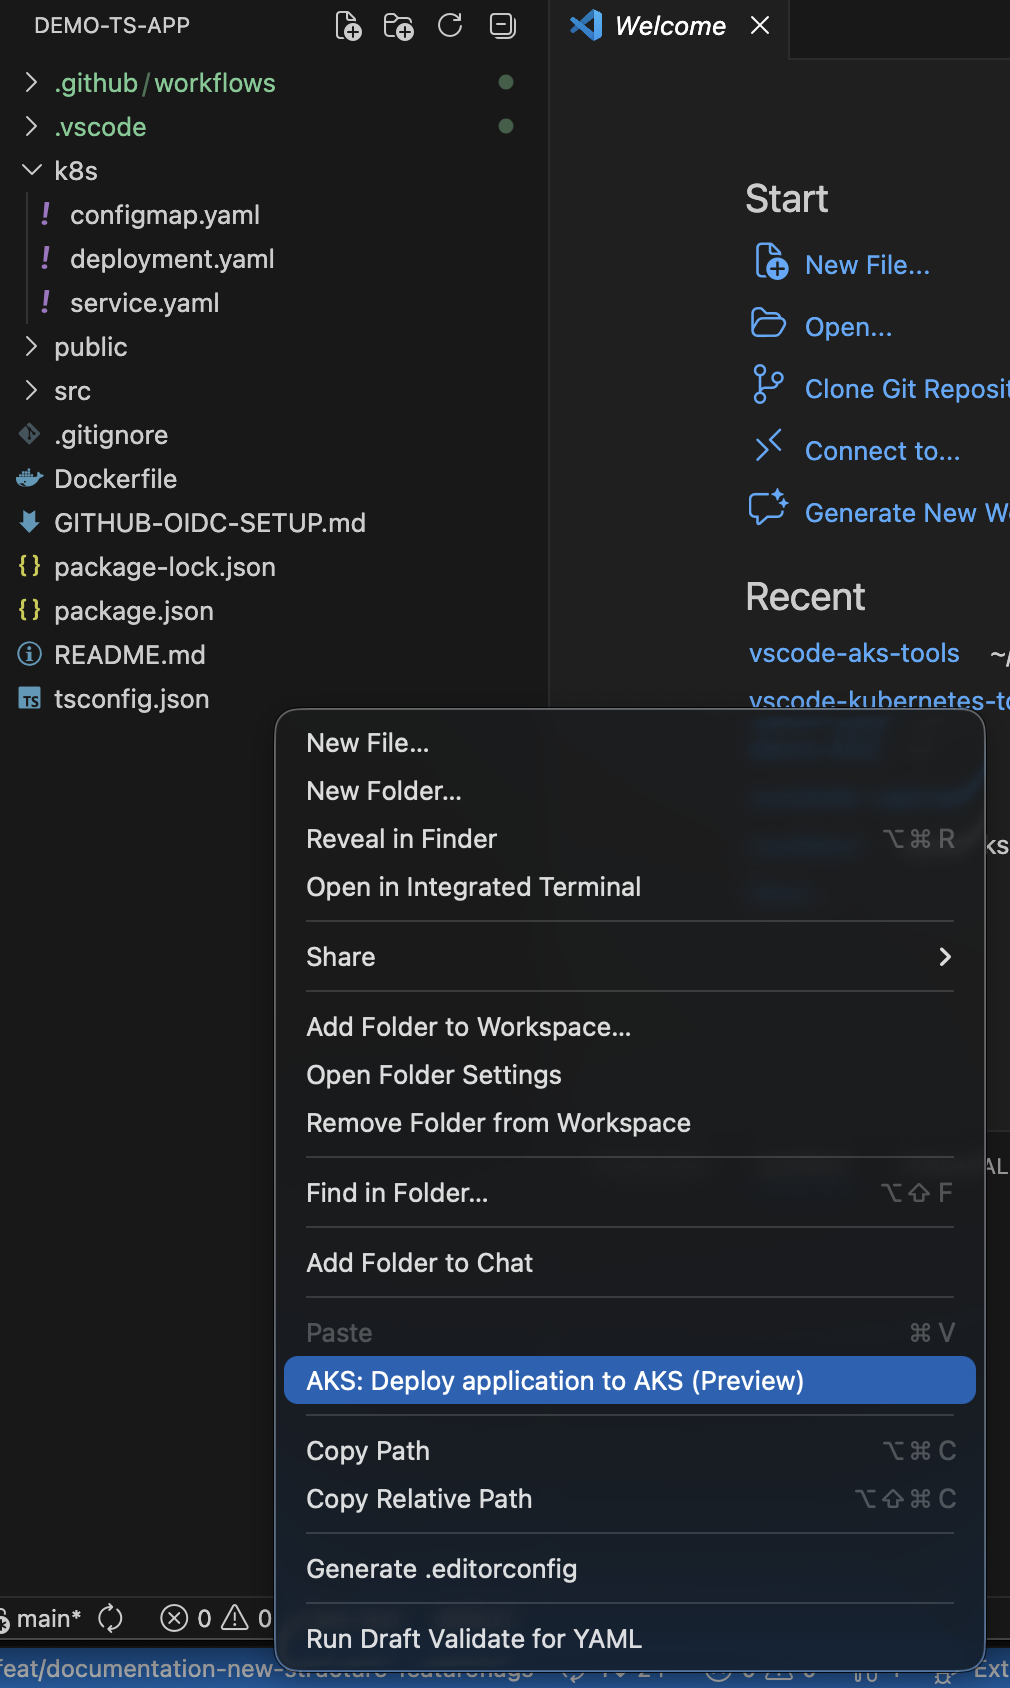
Where you can launch it
Container Assist can be launched from:
- Explorer folder context menu:
AKS: Deploy application to AKS (Preview) - AKS cluster context menu:
AKS: Run Container Assist (Preview)
The AKS cluster context menu entry is shown when:
aks.containerAssistEnabledPreviewistrue(default in2.1.0)- At least one workspace folder is open
User flow and options
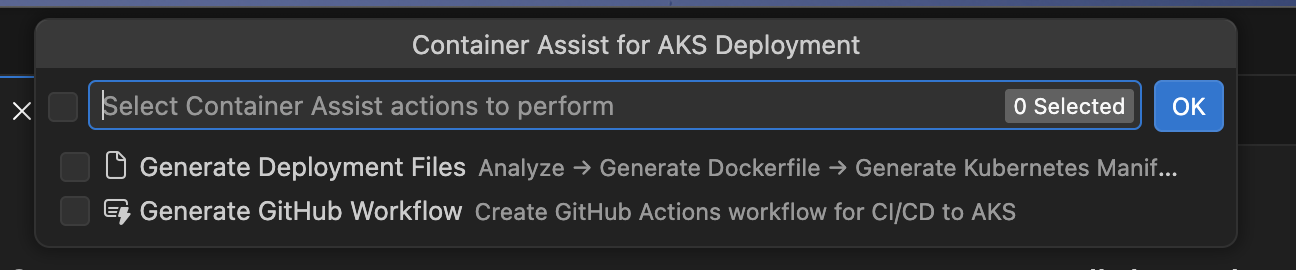
After launch, you can select one or both actions:
Generate Deployment FilesGenerate GitHub Workflow
Azure context selection
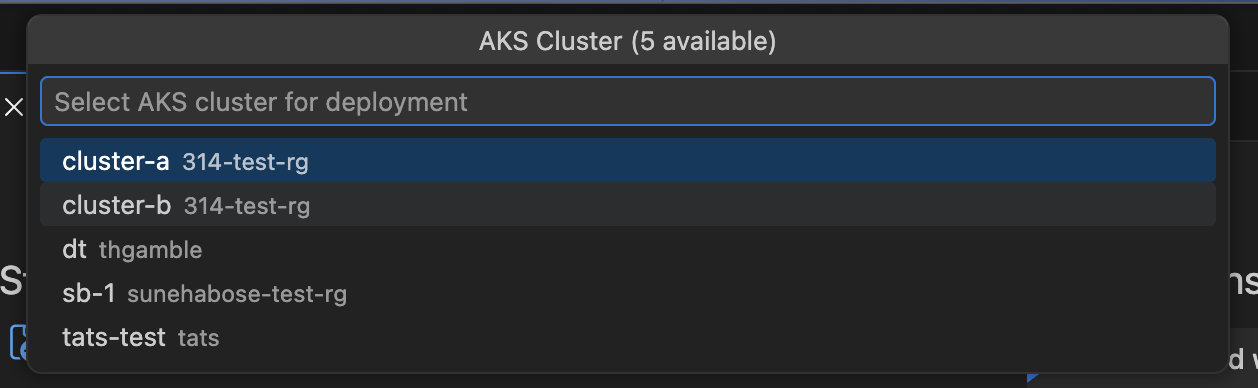
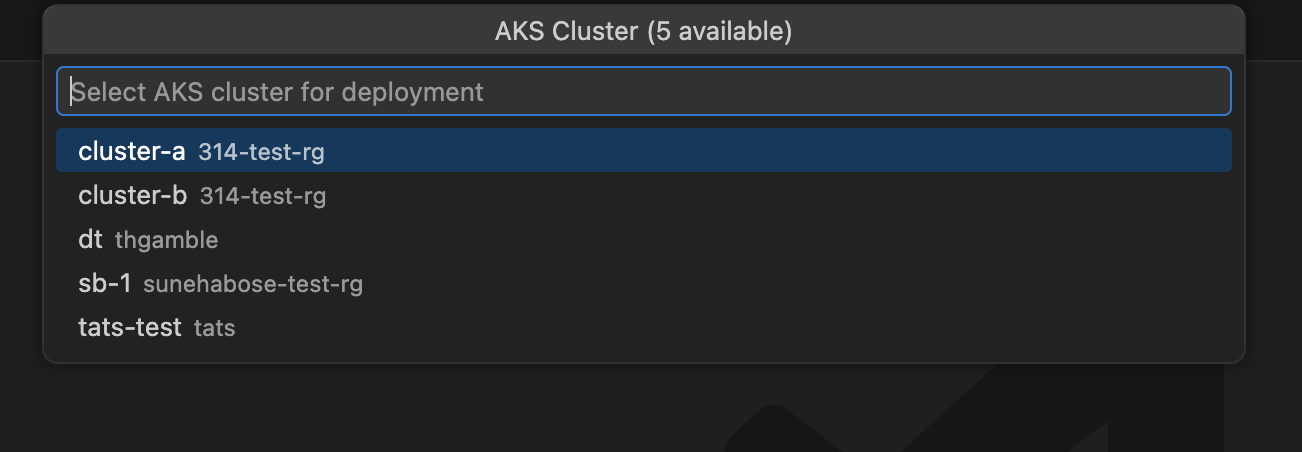
Before generation begins, you are guided through Azure resource selection:
- Subscription – select your Azure subscription (skipped if launched from AKS cluster tree)
- AKS cluster – select the target cluster (skipped if launched from AKS cluster tree)
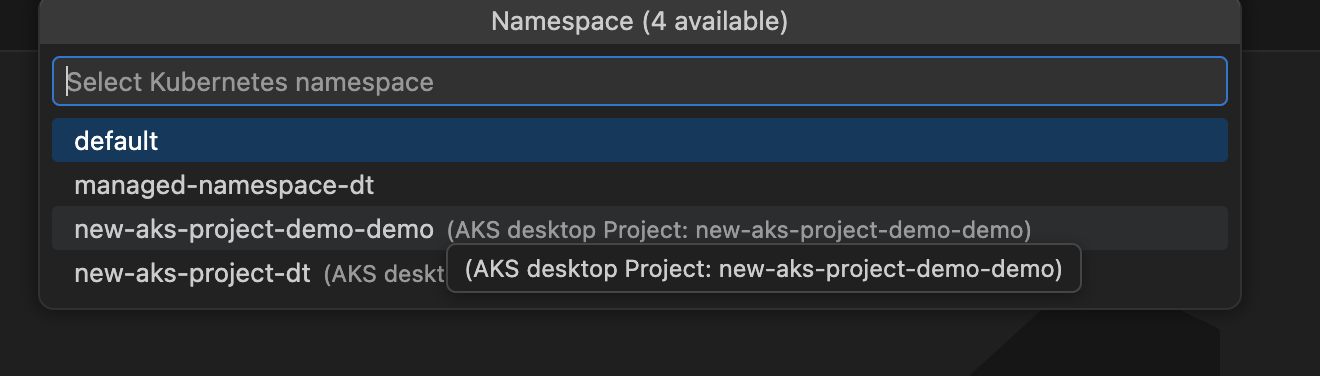
- Namespace – select or enter a Kubernetes namespace on the cluster
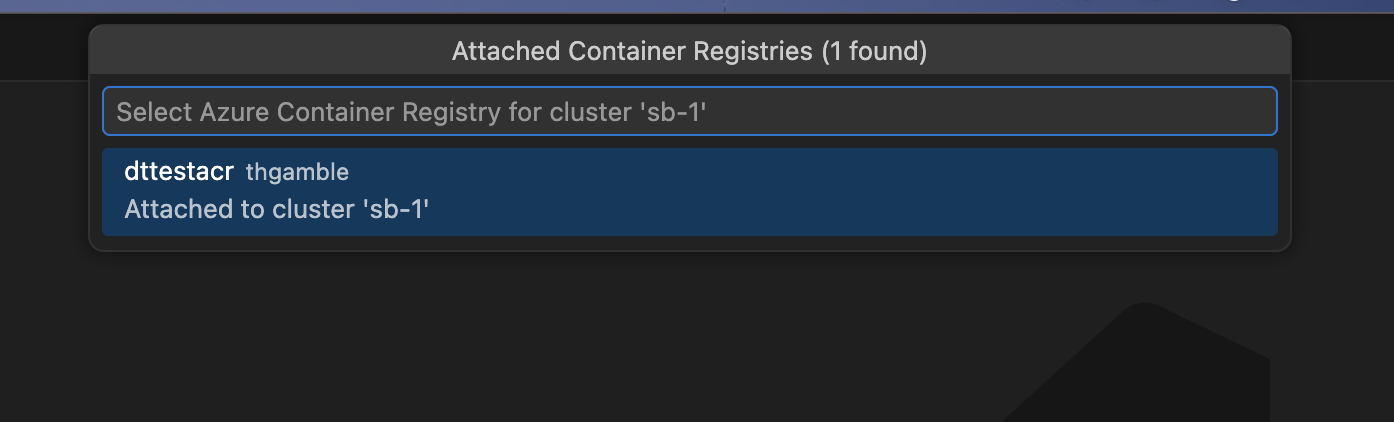
- Azure Container Registry – select an ACR from your subscription. If the ACR is not already attached to the cluster, you are prompted to assign the AcrPull role. See Azure Resources and Permissions for details.
Deployment file generation
If Generate Deployment Files is selected, the flow analyzes your project and generates:
Dockerfileat project root (or selected module path)- Kubernetes manifests under your configured manifests folder (default:
k8s)
The analysis detects your project’s language, framework, ports, dependencies, and entry points. If existing Dockerfiles or manifests are found, the extension detects them and can enhance rather than overwrite. See AI Data Flow and Privacy for how AI models are used during generation.
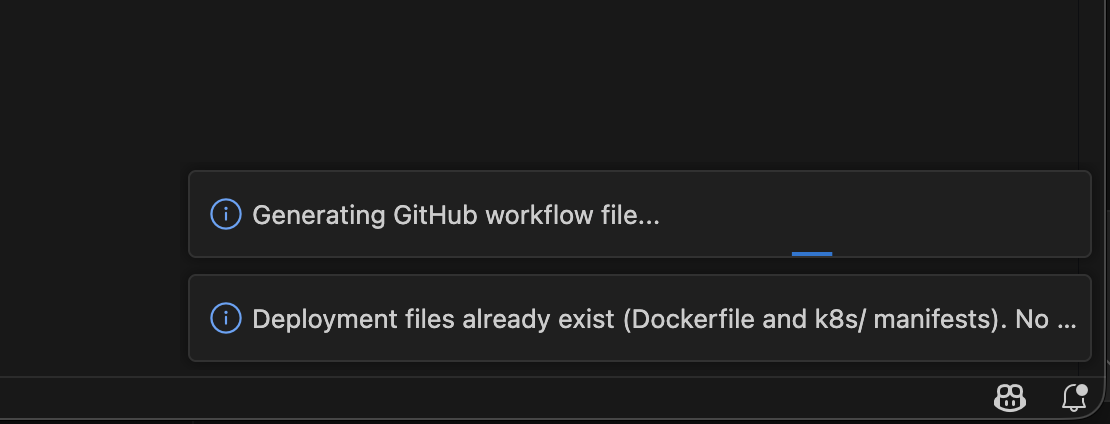
Workflow generation
If Generate GitHub Workflow is selected, a GitHub Actions CI/CD workflow is configured for the selected AKS/Azure context. See GitHub Workflow and OIDC Setup for details on the generated workflow.
If both actions are selected, deployment file generation runs first, then workflow generation.
GitHub integration story
When generated files are ready, the post-generation flow is designed for PR-friendly collaboration:
- OIDC setup prompt (when workflow is generated):
Configure Pipeline with Managed Identity– creates Azure managed identity, federated credentials, role assignments, and sets GitHub secrets. See GitHub Workflow and OIDC Setup for the full process and Azure Resources and Permissions for what is created.Skip
- Review prompt:
Stage & ReviewOpen Files
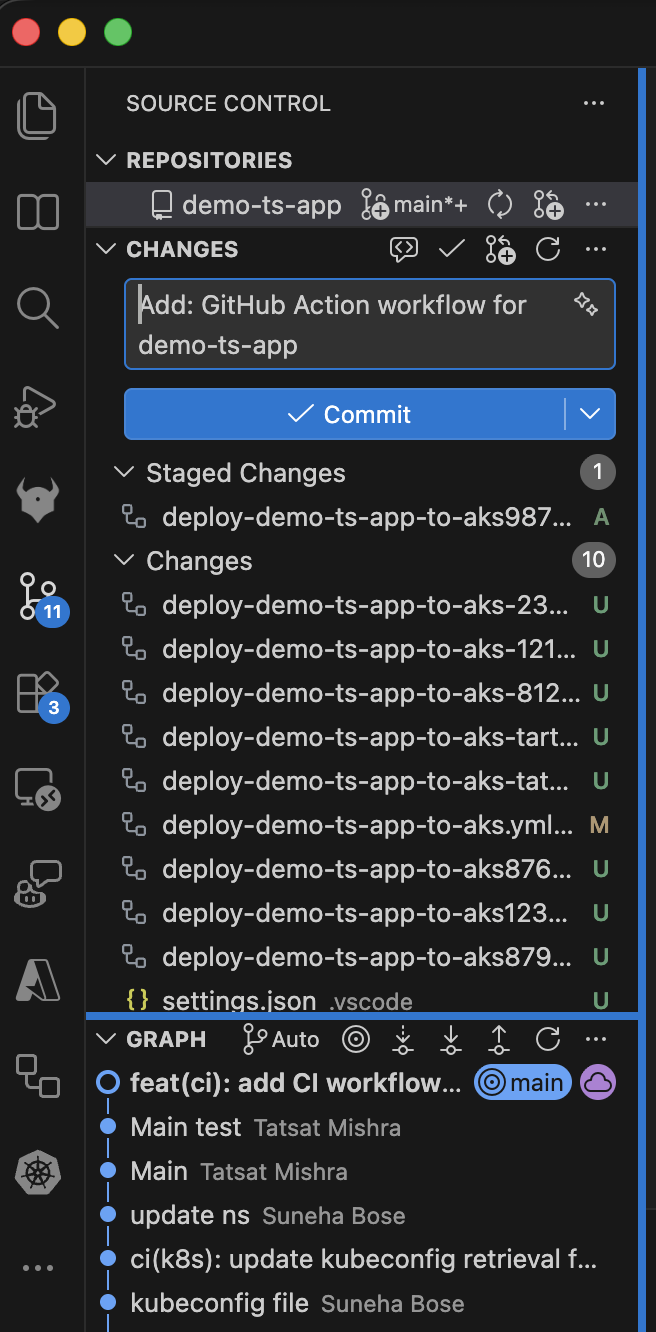
- If you choose staging, files are staged and Source Control is focused with a suggested commit message.
- After commit, you are prompted to create a pull request.
- PR creation can run through the GitHub Pull Requests extension, with default branch and draft behavior from settings.
This supports a full path from local generation to reviewable GitHub PR with minimal manual glue steps.
Configuration reference
aks.containerAssistEnabledPreview
: Enable/disable the Container Assist preview entry points. Default: true.
aks.containerAssist.k8sManifestFolder
: Folder name for generated Kubernetes manifests. Default: k8s.
aks.containerAssist.enableGitHubIntegration
: Enables Git/GitHub integration in the post-generation flow.
aks.containerAssist.promptForPullRequest
: Reserved setting for PR prompting behavior.
aks.containerAssist.prDefaultBranch
: Default base branch for PRs. Default: main.
aks.containerAssist.prCreateAsDraft
: Create PRs as draft by default. Default: true.
aks.containerAssist.modelFamily
: Default model family used by Container Assist. Default: gpt-5.2-codex.
aks.containerAssist.modelVendor
: Default model vendor used by Container Assist. Default: copilot.
Deployment annotations
The generated workflow annotates resources in your cluster after each deployment. These annotations use the aks-project/ prefix, which is a shared schema read by both this extension and aks-desktop.
Namespace annotations
Applied once per deployment run to the target namespace via kubectl annotate namespace:
| Annotation | Value | Description |
|---|---|---|
aks-project/workload-identity-id | ${{ secrets.AZURE_CLIENT_ID }} | Client ID of the managed identity used for workload identity federation. Stored on the namespace because identity config is per-namespace, not per-deployment. |
aks-project/workload-identity-tenant | ${{ secrets.AZURE_TENANT_ID }} | Azure AD tenant ID associated with the managed identity. |
Deployment annotations
Applied to all deployments in the namespace via kubectl annotate deployment --all:
| Annotation | Value | Description |
|---|---|---|
aks-project/pipeline-repo | ${{ github.repository }} | The owner/repo of the GitHub repository that triggered the deployment. |
aks-project/pipeline-workflow | ${{ github.workflow }} | Name of the GitHub Actions workflow. |
aks-project/deployed-by | vscode | Identifies the tool that generated and deployed this workflow. Recognized by aks-desktop for provenance display. |
aks-project/pipeline-run-url | ${{ github.server_url }}/${{ github.repository }}/actions/runs/${{ github.run_id }} | Direct link to the Actions run that produced this deployment. |
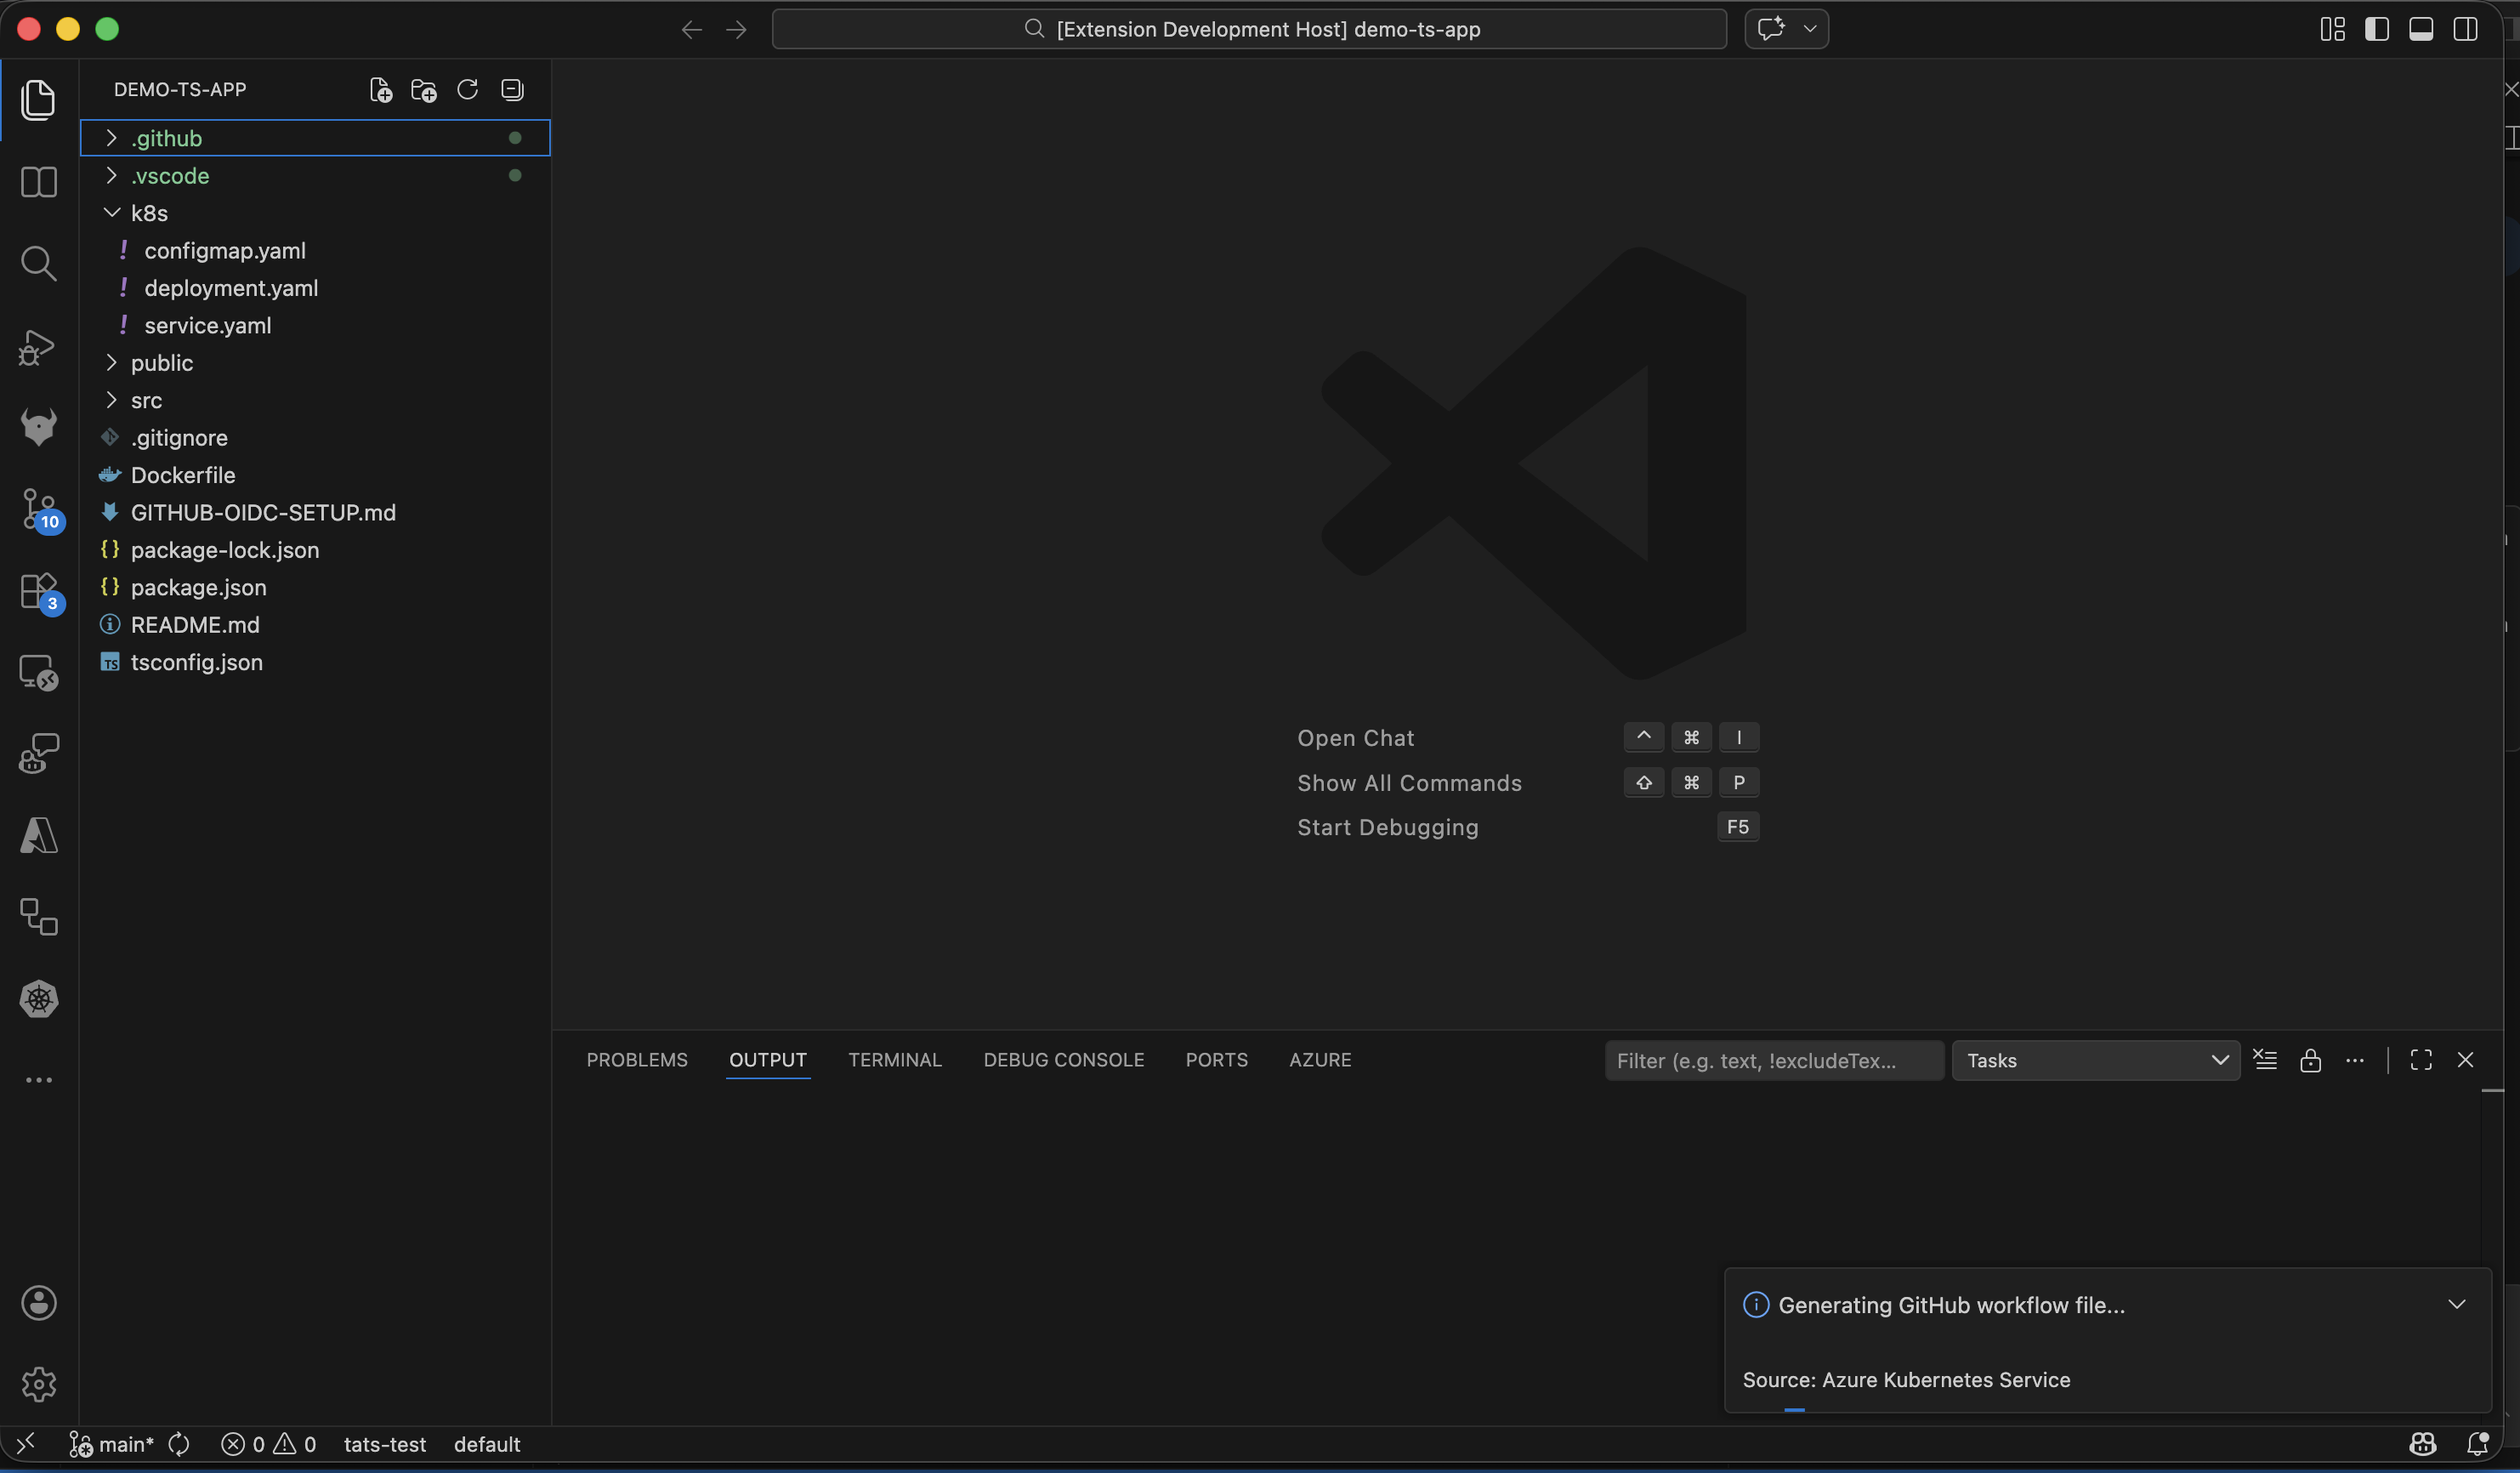
Screenshots
Menu entry points
Container Assist and GitHub integration flow


Troubleshooting
“No Language Model available”
Container Assist requires a language model provided by GitHub Copilot. If you see this error:
- Install the GitHub Copilot extension.
- Sign in with a GitHub account that has an active Copilot subscription.
- Try launching Container Assist again.
If models are available but the preferred model (gpt-5.2-codex / copilot by default) is not found, the extension falls back to the first available model with a warning. You can change the preferred model via the aks.containerAssist.modelFamily and aks.containerAssist.modelVendor settings.
OIDC setup fails with “SAML SSO required”
If your GitHub repository belongs to an organization that enforces SAML single sign-on, you must authorize your GitHub token for that organization before the extension can set repository secrets. When this happens, the extension shows an Authorize Token button that opens the SSO authorization page in your browser. Complete the authorization and retry.
Some role assignments failed
During OIDC setup, role assignments are attempted individually. If some succeed and others fail, you see a warning listing the roles that could not be assigned. This can happen if:
- Your Azure account lacks sufficient permissions (you need
Microsoft.Authorization/roleAssignments/writeon the target scope). - The target resource is locked or has a deny assignment.
The warning tells you which roles to assign manually. See Azure Resources and Permissions for the full list of roles and their scopes.
Azure RBAC is not enabled on the cluster
When Azure RBAC is disabled on the AKS cluster, the extension skips the AKS RBAC Writer role assignment for standard (user) namespaces. This is expected behavior – the role only applies to clusters with Azure RBAC enabled. ACR-related roles (AcrPush, Container Registry Tasks Contributor) are still assigned regardless.
For managed namespaces, AKS RBAC Writer is always assigned at namespace scope, regardless of the cluster-level Azure RBAC setting.
Project type not detected
If Container Assist does not detect your project’s language, ensure your workspace root contains one of the supported indicator files (see Supported languages and project types). Projects classified as other may produce less accurate Dockerfile and manifest output.
“GitHub authentication failed”
This error appears when the extension cannot obtain a GitHub token. Make sure:
- You have a GitHub account with access to the target repository.
- VS Code can authenticate with GitHub (the built-in GitHub Authentication provider should be available).
- You grant the requested
reposcope when prompted.
Repository is archived or read-only
OIDC setup cannot set secrets on archived GitHub repositories. If you see a message about the repository being archived, you need to unarchive it first in GitHub settings, or set the required secrets manually.
Partial secrets set
If some GitHub secrets were set but others failed, the extension reports which secrets could not be written. You can set the missing secrets manually in your repository’s Settings > Secrets and variables > Actions page. The required secrets are:
AZURE_CLIENT_ID– client ID of the managed identityAZURE_TENANT_ID– Azure AD tenant IDAZURE_SUBSCRIPTION_ID– Azure subscription ID
See GitHub Workflow and OIDC Setup for details on how these secrets are used in the workflow.
No Azure subscriptions found
If the extension shows a warning about no subscriptions, verify that:
- You are signed in to Azure in VS Code.
- Your Azure account has at least one active subscription.
- The subscription filter in the Azure extension is not hiding your subscriptions.
Azure Resources and Permissions
This page documents every Azure resource that Container Assist creates on your behalf, every role assignment it makes, and the Azure permissions you need to use the feature.
Prerequisites: Azure Account Permissions
Container Assist operates across multiple resource groups and requires both resource management and role assignment permissions. This section explains which built-in roles work, which don’t, and why.
Which built-in roles work?
| Role | Scope | Sufficient? | Why |
|---|---|---|---|
| Owner | Subscription | Yes | Has full resource management and role assignment permissions. |
| Contributor + User Access Administrator | Subscription | Yes | Contributor handles resource creation; User Access Administrator handles role assignments. |
| Contributor (alone) | Subscription | No | Can create resource groups, managed identities, and federated credentials, but cannot assign RBAC roles. All 9 role assignments will fail. |
| Contributor (alone) | Resource group | No | Cannot list clusters/ACRs across the subscription, cannot create the OIDC resource group, and cannot assign roles. |
Why Contributor alone is not enough: The Contributor role explicitly excludes
Microsoft.Authorization/roleAssignments/write. Container Assist assigns up to 9 RBAC roles across multiple resources (see Role Assignments below). Without role assignment permissions, the OIDC setup completes partially – the managed identity and federated credential are created, but the pipeline will fail at runtime because the identity lacks access to the cluster and ACR. The extension warns you which roles could not be assigned so you can request them from an admin.
Why subscription-level access is needed
Container Assist touches up to 4 separate resource groups during a single run:
| Resource group | What happens there |
|---|---|
OIDC identity RG (e.g. rg-myapp-oidc) | Created if it doesn’t exist. Managed identity and federated credential are created here. |
| AKS cluster RG | AKS Cluster User Role and AKS RBAC Writer are assigned here. Cluster properties are read. |
| ACR RG | AcrPull, AcrPush, and ACR Tasks Contributor are assigned here. May be a different RG than the cluster. |
| Node RG (MC_*) | Kubelet identity is read from the cluster object (no direct operations). |
The extension also lists all AKS clusters and ACRs across the subscription during the selection wizard, which requires subscription-level read access (Microsoft.Resources/subscriptions/resources/read).
If your account is scoped to a single resource group, the cluster/ACR listing fails before you can even start.
Detailed permission breakdown
For least-privilege or custom role setups, here are the specific permissions required:
| Permission | Why | When |
|---|---|---|
Microsoft.Authorization/roleAssignments/write | Assign RBAC roles to managed identities and AKS kubelet identity | ACR attachment and OIDC setup |
Microsoft.ManagedIdentity/userAssignedIdentities/write | Create managed identities | OIDC setup (if creating new identity) |
Microsoft.ManagedIdentity/userAssignedIdentities/read | List/read existing managed identities | OIDC setup (if reusing identity) |
Microsoft.ManagedIdentity/userAssignedIdentities/federatedIdentityCredentials/write | Create OIDC federated credentials | OIDC setup |
Microsoft.Resources/subscriptions/resourceGroups/write | Create resource groups | OIDC setup (if resource group does not exist) |
Microsoft.Resources/subscriptions/resources/read | List resources across the subscription | Cluster and ACR selection wizard |
Microsoft.ContainerService/managedClusters/read | Read AKS cluster properties | Cluster selection, Azure RBAC check |
Microsoft.ContainerRegistry/registries/read | List and read ACR registries | ACR selection |
Microsoft.ContainerService/managedClusters/listClusterUserCredential/action | List namespaces | Namespace selection |
These permissions must be granted at subscription scope (or across all relevant resource groups) for the full workflow to succeed.
Azure Resources Created
Container Assist may create the following Azure resources during the OIDC setup flow. These resources appear in your Azure subscription and may incur governance or cost implications.
Resource Group
| Attribute | Value |
|---|---|
| Resource type | Microsoft.Resources/resourceGroups |
| When created | During OIDC setup, if the specified resource group does not already exist |
| Default name | rg-<appName>-oidc (user-editable) |
| User consent | Implicit – you enter the resource group name, but are not separately prompted to confirm creation |
User-Assigned Managed Identity
| Attribute | Value |
|---|---|
| Resource type | Microsoft.ManagedIdentity/userAssignedIdentities |
| When created | During OIDC setup, if you choose “Create new managed identity” |
| Default name | id-<appName>-github (user-editable) |
| Tags | purpose: "GitHub Actions OIDC", createdBy: "AKS VS Code Extension" |
| User consent | You explicitly choose “Create new” vs. “Use existing” before creation |
Note: If you select “Use existing managed identity”, no new identity is created. The selected identity is reused.
Federated Identity Credential
| Attribute | Value |
|---|---|
| Resource type | Federated Identity Credential on the managed identity |
| When created | During OIDC setup, automatically after identity is created or selected |
| Credential name | GitHubActions (fixed) |
| Issuer | https://token.actions.githubusercontent.com |
| Subject | repo:<owner>/<repo>:ref:refs/heads/<branch> |
| Audiences | api://AzureADTokenExchange |
| User consent | Automatic – created as part of the OIDC setup progress after you initiate it |
The subject uses your repository’s owner/repo from the git remote and the detected default branch (usually main).
Role Assignments
Container Assist assigns Azure RBAC roles at two distinct stages: ACR selection (during the main wizard) and OIDC setup (when configuring the GitHub workflow pipeline). The principals and scopes differ between these stages.
Stage 1: ACR Selection (Main Wizard)
When you select an Azure Container Registry that is not already attached to your AKS cluster, the extension offers to assign the AcrPull role:
| Role | Role Definition ID | Scope | Principal | Consent |
|---|---|---|---|---|
| AcrPull | 7f951dda-4ed3-4680-a7ca-43fe172d538d | ACR resource | AKS kubelet (agentpool) identity | Prompted – you see a dialog with “Assign AcrPull Now” / “Dismiss” |
Why: This allows your AKS cluster to pull container images from the selected ACR at runtime. Without this, pod image pulls will fail with authentication errors.
Principal: The AKS cluster’s kubelet identity (from identityProfile.kubeletidentity). For service-principal-based clusters, the service principal is used instead.
Stage 2: OIDC Setup (GitHub Workflow Pipeline)
When you run the OIDC setup to configure GitHub Actions authentication, role assignments are created for the OIDC managed identity (the identity that your GitHub Actions workflow uses to authenticate with Azure). The roles assigned depend on whether you are deploying to a user namespace or a managed namespace.
User Namespace Path
For standard (non-managed) Kubernetes namespaces:
| # | Role | Role Definition ID | Scope | Purpose |
|---|---|---|---|---|
| 1 | Azure Kubernetes Service Cluster User Role | 4abbcc35-e782-43d8-92c5-2d3f1bd2253f | Resource group containing the AKS cluster | Allows the workflow to get cluster credentials (kubeconfig) |
| 2 | AcrPush | 8311e382-0749-4cb8-b61a-304f252e45ec | ACR resource | Allows the workflow to push built container images to ACR |
| 3 | Container Registry Tasks Contributor | fb382eab-e894-4461-af04-94435c366c3f | ACR resource | Allows the workflow to run az acr build (cloud-based image builds) |
| 4 | Azure Kubernetes Service RBAC Writer | a7ffa36f-339b-4b5c-8bdf-e2c188b2c0eb | AKS cluster resource | Allows the workflow to deploy workloads to the cluster. Only assigned if Azure RBAC is enabled on the cluster. |
Note on role #4: The AKS RBAC Writer role is only assigned when the cluster has Azure RBAC enabled (
aadProfile.enableAzureRBAC). If the cluster uses Kubernetes-native RBAC instead, this role is skipped and you will need to create a KubernetesClusterRoleBindingorRoleBindingmanually.
Managed Namespace Path
For AKS managed namespaces, roles are scoped to the specific namespace rather than the entire cluster:
| # | Role | Role Definition ID | Scope | Purpose |
|---|---|---|---|---|
| 1 | Azure Kubernetes Service RBAC Writer | a7ffa36f-339b-4b5c-8bdf-e2c188b2c0eb | Managed namespace | Kubernetes data-plane access (create/update deployments, services, configmaps, etc.) |
| 2 | Azure Kubernetes Service Namespace Contributor | 289d8817-ee69-43f1-a0af-43a45505b488 | Managed namespace | ARM-level access to fetch namespace-scoped kubeconfig |
| 3 | AcrPush | 8311e382-0749-4cb8-b61a-304f252e45ec | ACR resource | Push container images to ACR |
| 4 | Container Registry Tasks Contributor | fb382eab-e894-4461-af04-94435c366c3f | ACR resource | Run az acr build for cloud-based image builds |
AI Data Flow and Privacy
This page documents how Container Assist uses AI models, what data from your project is sent to cloud AI services, what data stays local, and the security protections in place.
Architecture: Local Analysis + Cloud AI Generation
Container Assist uses a two-phase architecture:
-
Phase 1 – Local analysis (no network calls): The
containerization-assist-mcp/sdkruns entirely on your machine. It scans your project filesystem to detect languages, frameworks, dependencies, ports, and entry points. No data leaves your machine during this phase. -
Phase 2 – Cloud AI generation: The SDK’s analysis results are formatted into prompts and sent to a VS Code Language Model (via the
vscode.lmAPI) to generate Dockerfiles and Kubernetes manifests. This phase involves cloud AI calls.
What AI Models Are Used
| Setting | Default | Description |
|---|---|---|
aks.containerAssist.modelFamily | gpt-5.2-codex | The model family to use |
aks.containerAssist.modelVendor | copilot | The model vendor (provider) |
- Container Assist uses the VS Code Language Model API (
vscode.lm), which routes requests through GitHub Copilot’s infrastructure. - On launch, you can choose “Use Default Model” or “Select Model…” to pick from any available VS Code language model.
- If the configured default model is not found, the first available model is used as a fallback.
What Data Is Sent to the AI Model
Per-Interaction Overview
Container Assist makes two AI calls per module in your project:
- Dockerfile generation – one AI call
- Kubernetes manifest generation – one AI call
Each call includes a system prompt, a user prompt, and tool definitions. The AI may then invoke tools to read additional files from your project (up to 20 rounds of tool calls per interaction).
System Prompts (Static, Hardcoded)
The system prompts are fixed strings that describe the AI’s role and workflow. They do not contain any of your project data. They instruct the AI to:
- Act as an expert at creating Dockerfiles or Kubernetes manifests
- Use tools (
readProjectFile,listDirectory) to verify project details before generating - Output content in a specific
<content>marker format
User Prompts (Contain Project Data)
The user prompt is built from the local SDK analysis and includes:
For Dockerfile generation:
- Detected programming language (e.g., “typescript”, “python”, “java”)
- Framework names and versions (e.g., “Express v4.18.0”)
- Entry point path (e.g., “src/index.ts”)
- Detected ports (e.g., “3000, 8080”)
- First 15 dependency names (e.g., “express, pg, redis, …”)
- SDK recommendations: build strategy, base image suggestions, security considerations, optimizations
- Existing Dockerfile content (if present), including analysis and enhancement guidance
- Language-specific verification hints (what config files to check)
For Kubernetes manifest generation:
- All of the above, plus:
- Application name (e.g., “my-app”)
- Target Kubernetes namespace
- Full image repository URL (e.g.,
myacr.azurecr.io/my-app)
Tool Calls (AI Reads Your Files)
During generation, the AI can invoke two tools to inspect your project:
readProjectFile
Reads a file from your project. The AI decides which files to read based on the analysis.
- Input: Relative file path, optional line limit
- Output: File content (up to 200 lines)
- Typical files read:
package.json,tsconfig.json,pom.xml,Dockerfile,go.mod, source entry points, configuration files
listDirectory
Lists files and subdirectories in your project.
- Input: Relative directory path, optional max depth
- Output: Tree listing of files and directories (up to 200 entries, max 3 levels deep)
- Excluded from listings:
node_modules,.git,dist,build,target,bin,obj,__pycache__,venv,.next,.nuxt
The AI can make up to 20 rounds of tool calls per interaction. In each round, it may call multiple tools concurrently. After 20 rounds, a final request is sent without tools to force the AI to produce its output.
What Data Is NOT Sent
Blocked Sensitive Files
The following files are blocked from being read by the AI, even if it requests them:
| Pattern | Examples |
|---|---|
.env, .env.local, .env.production, .env.staging | Environment variable files |
*.pem, *.key, *.pfx, *.p12 | TLS/SSL certificates and private keys |
credentials* | Credential files (any extension) |
secret.*, secrets.*, .secrets | Secret configuration files |
id_rsa, id_ed25519 | SSH private keys |
*.secret | Any file with .secret extension |
If the AI requests a blocked file, the tool returns an error and the AI must proceed without that file’s content.
Path Traversal Protection
All file access tools enforce strict path boundaries:
..path segments are rejected (no escaping the project root)- Absolute paths are rejected
- Windows drive paths and UNC paths are rejected
- The resolved path is verified to remain within the workspace root
What Stays Entirely Local
The following data is processed locally and never sent to any AI model:
- Your Azure subscription, cluster, ACR, and namespace selections
- Managed identity details, role assignments, federated credentials
- GitHub repository secrets
- Git history and commit data
- The workflow YAML template (generated from a local template, not AI)
- File write operations (Dockerfile, manifests, workflow files)
Summary: Data Flow by Destination
| Destination | Data |
|---|---|
| Local only (no network) | Full project filesystem scan, Azure resource operations, role assignments, GitHub secrets, workflow template rendering, file writes |
| VS Code Language Model API (cloud) | SDK analysis summaries (language, framework, ports, dependencies, entry point), project file contents requested by AI tools, system prompts |
| Not sent (blocked) | .env files, private keys, certificates, credential files, SSH keys, secret files |
GitHub Workflow and OIDC Setup
This page documents the GitHub Actions workflow that Container Assist generates, the OIDC setup process for Azure authentication, and the GitHub secrets that are configured.
Generated Workflow Overview
Container Assist generates a GitHub Actions workflow file at .github/workflows/<name>.yml in your project. The workflow has two jobs:
buildImage– Builds the container image and pushes it to Azure Container Registrydeploy– Deploys the application to AKS using the generated Kubernetes manifests
The workflow uses OIDC (OpenID Connect) for passwordless authentication with Azure – no long-lived secrets like client secrets or certificates are stored in GitHub.
Workflow Template Variants
Two workflow templates exist, selected automatically based on your namespace type:
| Namespace Type | Template | Difference |
|---|---|---|
| User namespace (standard) | aks-deploy.template.yaml | Uses azure/aks-set-context@v4 to get kubeconfig |
| Managed namespace | aks-deploy-managed-ns.template.yaml | Uses az aks namespace get-credentials + kubelogin convert-kubeconfig (managed namespaces are not yet supported by aks-set-context) |
Workflow Configuration Values
The following values are injected into the workflow template. All deployment-specific values are inlined as workflow-level env: variables, not secrets:
| Value | Source |
|---|---|
| Workflow name | User-prompted during generation |
| Branch name | Hardcoded to main |
| Container name | Derived from primary module name or project folder name |
| Dockerfile path | Relative path from workspace root to the Dockerfile |
| Build context path | Relative path from workspace root to the build context directory |
| ACR name | Selected Azure Container Registry (short name) |
| ACR resource group | Resource group of the ACR |
| AKS cluster name | Selected AKS cluster |
| AKS cluster resource group | Resource group of the AKS cluster |
| K8s manifest paths | One or more manifest file paths |
| Namespace | Target Kubernetes namespace |
Workflow Jobs and Steps
Job: buildImage
| Step | Action / Command | Purpose |
|---|---|---|
| 1. Checkout | actions/checkout@v4 | Clone the repository |
| 2. Azure login | azure/login@v2 | OIDC login using AZURE_CLIENT_ID, AZURE_TENANT_ID, AZURE_SUBSCRIPTION_ID from GitHub secrets |
| 3. Log into ACR | az acr login -n <ACR> | Authenticate Docker to the Azure Container Registry |
| 4. Build and push image | az acr build --image <ACR>.azurecr.io/<container>:<sha> --registry <ACR> -g <RG> -f <Dockerfile> <context> | Cloud-build the image using ACR Tasks and push to ACR |
Note: Images are built in the cloud using ACR Tasks (
az acr build), not with a local Docker daemon. This is why the OIDC managed identity needs the Container Registry Tasks Contributor role in addition to AcrPush. See Azure Resources and Permissions for the full role assignment details.
Job: deploy (depends on buildImage)
| Step | Action / Command | Purpose |
|---|---|---|
| 1. Checkout | actions/checkout@v4 | Clone the repository |
| 2. Azure login | azure/login@v2 | OIDC login (same as build job) |
| 3. Set up kubelogin | azure/use-kubelogin@v1 | Install kubelogin for non-interactive Azure AD authentication |
| 4. Get K8s context | azure/aks-set-context@v4 (user namespace) or az aks namespace get-credentials (managed namespace) | Fetch kubeconfig for the target cluster/namespace |
| 5. Deploy application | Azure/k8s-deploy@v5 | Apply Kubernetes manifests with the built image |
| 6. Annotate namespace | kubectl annotate namespace | Set aks-project/workload-identity-id and aks-project/workload-identity-tenant |
| 7. Annotate deployment | kubectl annotate deployment --all | Set traceability annotations (see Deployment Annotations) |
GitHub Actions Permissions
Both jobs request these permissions:
| Permission | Value | Purpose |
|---|---|---|
contents | read | Read repository contents |
id-token | write | Required for OIDC – allows the workflow to request an Azure AD token via federated identity |
actions | read | Read workflow run metadata (deploy job only) |
GitHub Secrets
The workflow references three GitHub repository secrets for OIDC authentication:
| Secret Name | Value | Set By |
|---|---|---|
AZURE_CLIENT_ID | Client ID of the OIDC managed identity | OIDC setup or manual |
AZURE_TENANT_ID | Azure AD tenant ID | OIDC setup or manual |
AZURE_SUBSCRIPTION_ID | Azure subscription ID | OIDC setup or manual |
These are not long-lived credentials. They are identifiers used together with the OIDC federated credential to obtain short-lived Azure AD tokens at workflow runtime.
OIDC Setup Process
When a GitHub workflow is generated, Container Assist prompts you to configure OIDC authentication. This is the process that creates the Azure managed identity, federated credential, and sets the GitHub secrets.
Step-by-Step Flow
Phase 1: Gather Information
-
Detect GitHub repository – reads
git remote originURL and parsesowner/repo. Detects the default branch fromrefs/remotes/origin/HEAD, falling back to checking fororigin/mainororigin/master. -
Prompt for Azure configuration:
- Subscription – uses the subscription from the main wizard if available, otherwise prompts
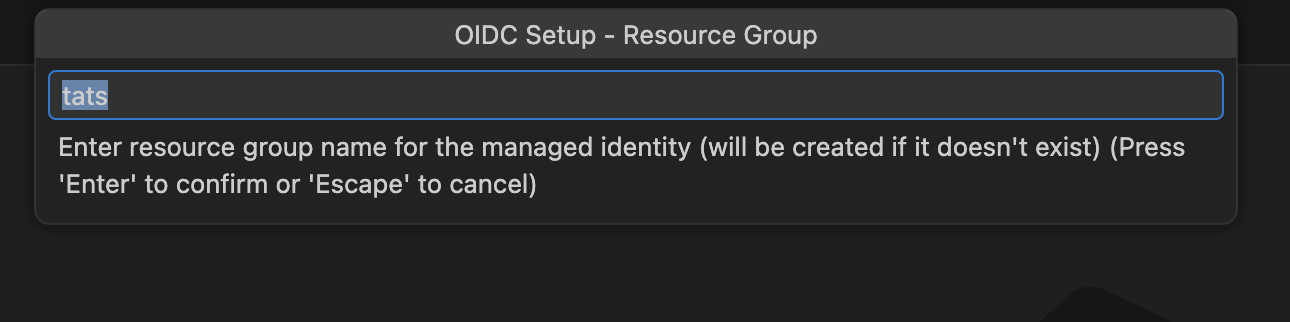
- Resource group – input box, default:
rg-<appName>-oidc - Managed identity – choose “Create new” or “Use existing” (lists identities in the resource group)
- If new: enter name (default:
id-<appName>-github) and Azure region (default:eastus)
- If new: enter name (default:
Phase 2: Azure Resource Creation
-
Create or retrieve managed identity:
- If new: creates resource group (if needed), then creates managed identity with tags
- If existing: retrieves the selected identity
-
Assign role permissions:
- Roles differ by namespace type – see Azure Resources and Permissions for the complete list
- Role assignments are idempotent (re-running OIDC setup will not create duplicate assignments)
-
Create federated identity credential:
- Name:
GitHubActions - Issuer:
https://token.actions.githubusercontent.com - Subject:
repo:<owner>/<repo>:ref:refs/heads/<branch> - Audiences:
api://AzureADTokenExchange
- Name:
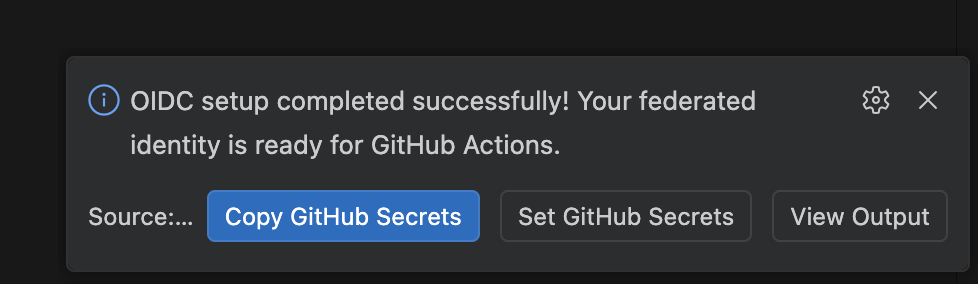
Phase 3: Set GitHub Secrets
- Display results with three options:
- “Set secrets” – authenticates with GitHub (requires
reposcope), encrypts secrets using the repository’s NaCl public key, and sets them via the GitHub API - “Copy secrets and set manually” – copies all three secret key-value pairs to your clipboard
- “View Output” – logs the detailed summary to the VS Code output channel
- “Set secrets” – authenticates with GitHub (requires
GitHub Authentication for Setting Secrets
When you choose “Set secrets”, the extension:
- Requests a GitHub session via
vscode.authentication.getSession("github", ["repo"])– you may see a GitHub OAuth consent prompt - Verifies repository access (checks you have push or admin permissions, and the repo is not archived)
- Fetches the repository’s public encryption key
- Encrypts each secret value using NaCl sealed-box encryption (
libsodium-wrappers) - Sets each secret via the GitHub Actions API (
createOrUpdateRepoSecret)
GitHub SSO Note: If your repository is in a GitHub organization that requires SAML SSO, the extension detects the
X-GitHub-SSOresponse header and provides an authorization URL to complete SSO before retrying.
Managed vs. User Namespace Differences
The namespace type affects multiple aspects of the generated workflow and OIDC configuration:
| Aspect | User Namespace | Managed Namespace |
|---|---|---|
| Workflow template | aks-deploy.template.yaml | aks-deploy-managed-ns.template.yaml |
| Kubeconfig method | azure/aks-set-context@v4 action | az aks namespace get-credentials CLI command + kubelogin convert-kubeconfig |
| Role scope for K8s access | Cluster-level (conditional on Azure RBAC) | Namespace-level (always) |
| AKS Namespace Contributor | Not assigned | Assigned (needed for namespace-scoped kubeconfig) |
| AKS Cluster User Role | Assigned at resource group level | Not assigned |
See Azure Resources and Permissions for the complete role assignment matrix.
Post-Generation Flow
After files are generated, the post-generation flow guides you through:
1. OIDC Setup Prompt
Shown only when a workflow was generated:
“Your pipeline needs an Azure Managed Identity to connect to AKS…”
Options: “Configure Pipeline with Managed Identity” or “Skip”
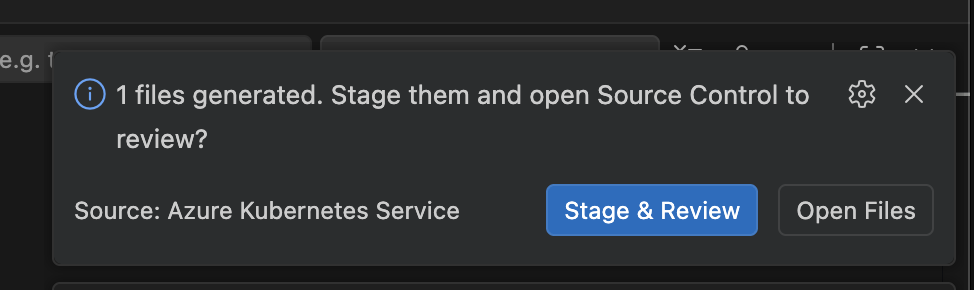
2. Stage and Review
“{N} files generated. Stage them and open Source Control to review?”
Options: “Stage & Review” or “Open Files”
- Stage & Review: Stages all generated files via the Git extension API, pre-fills a commit message (e.g.,
"Add: Dockerfile, k8s manifests and GitHub Action workflow for myapp"), and focuses the Source Control panel. - Open Files: Opens all generated files in editor tabs, then offers staging.
3. Pull Request Creation
After you commit (from the SCM view, terminal, or any method), a one-time event listener detects the commit and offers:
“Changes committed. Would you like to create a pull request?”
Options: “Create Pull Request” or “Dismiss”
PR creation requires the GitHub Pull Requests extension (github.vscode-pull-request-github). If not installed, the extension offers to install it.
The PR is created with:
- Title:
"feat: Add container and K8s deployment files for <appName>" - Base branch: configured via
aks.containerAssist.prDefaultBranch(default:main) - Draft: configured via
aks.containerAssist.prCreateAsDraft(default:true) - Body: Markdown template listing generated files with a description and next-steps checklist
AKS Plugins for GitHub Copilot for Azure
Overview
The AKS plugins (or skills) for GitHub Copilot for Azure (@azure) extension enable users to perform various tasks related to Azure Kubernetes Service (AKS) directly from the GitHub Copilot Chat view. These skills include creating an AKS cluster, deploying a manifest to an AKS cluster, and generating Kubectl commands.
Features
💡 Important Note: To disable the GitHub Copilot AKS hook in VS Code, add the following line to your user
settings.jsonfile:"aks.copilotEnabledPreview": falseYou can open this file by pressing
Ctrl+Shift+P(orCmd+Shift+Pon macOS), selecting Preferences: Open Settings (JSON), and adding the setting within the top-level JSON object.
Create an AKS Cluster
Users can quickly set up an AKS cluster using simple, natural language prompts. This reduces the complexity and time required to manually configure and deploy a Kubernetes cluster.
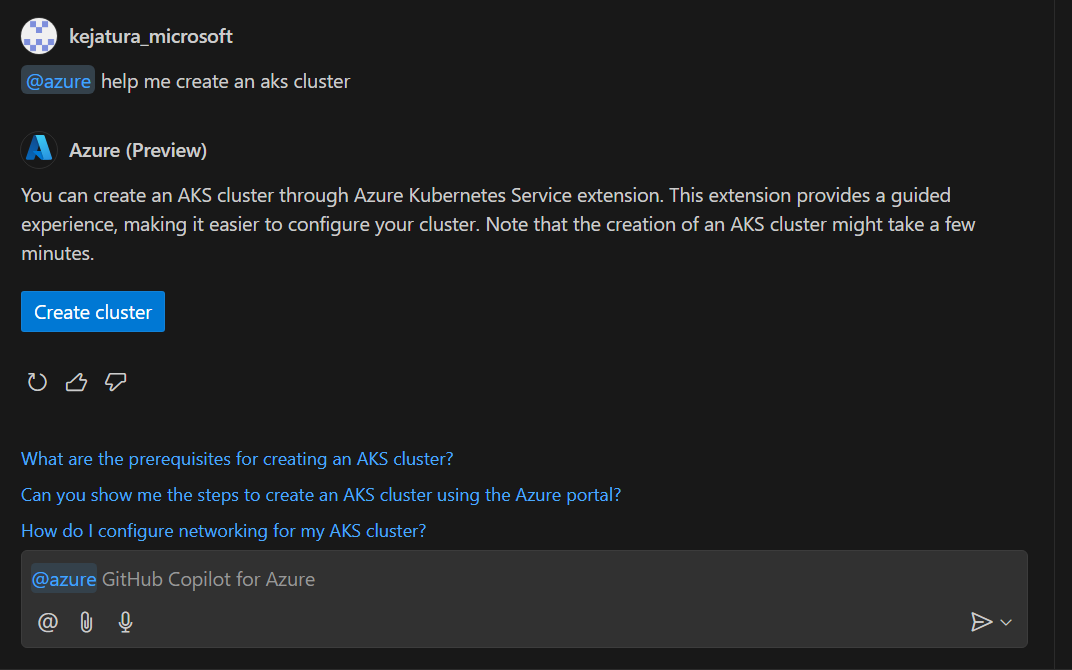
You can create an AKS cluster using the following prompts:
- [@azure] can you help me create a Kubernetes cluster
- [@azure] can you set up an AKS cluster for me?
- [@azure] I have a containerized application, can you help me create an AKS cluster to host it?
- [@azure] create AKS cluster
- [@azure] Help me create a Kubernetes cluster to host my application
Deploy a Manifest to an AKS Cluster
Users can deploy their application manifests to an AKS cluster directly from the GitHub Copilot Chat view. This simplifies the deployment process and ensures consistency. By using predefined prompts, the risk of errors during deployment is minimized, leading to more reliable and stable deployments.
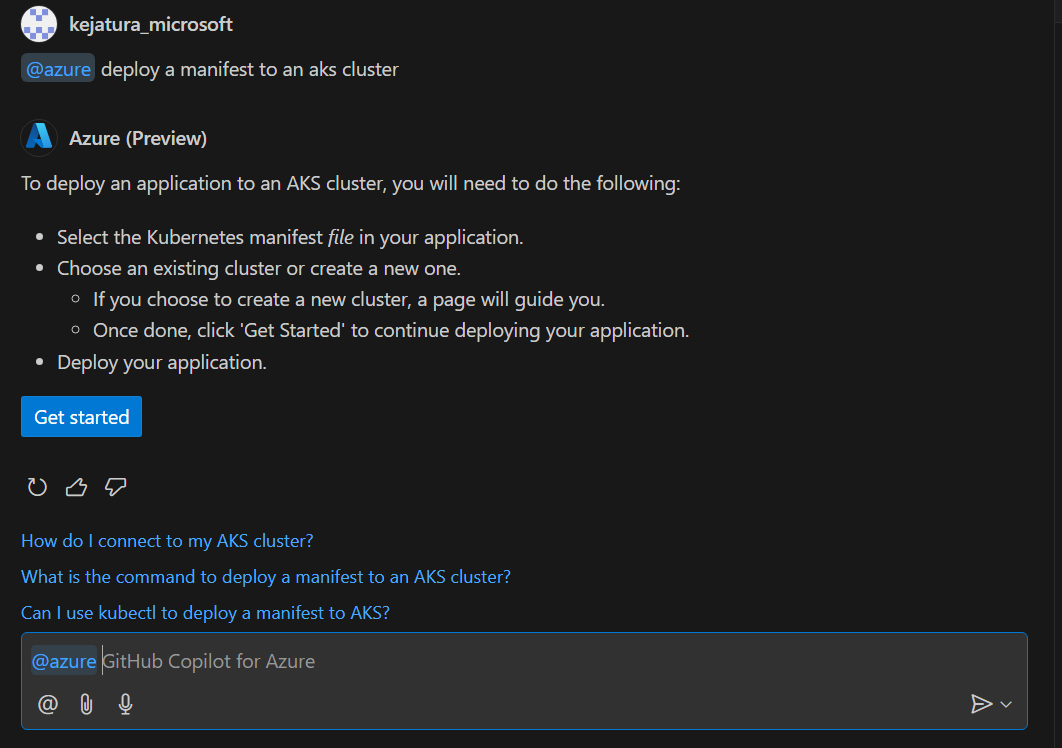
To deploy a manifest file to an AKS cluster you can use these prompts:
- [@azure] help me deploy my manifest file
- [@azure] can you deploy my manifest to my AKS cluster?
- [@azure] can you deploy my manifest to my Kubernetes cluster?
- [@azure] deploy my application manifest to an AKS cluster
- [@azure] deploy manifest for AKS cluster
Generate Kubectl Command
Users can generate various Kubectl commands to manage their AKS clusters without needing to remember complex command syntax. This makes cluster management more accessible, especially for those who may not be Kubernetes experts. Quickly generating the necessary commands helps users perform cluster operations more efficiently, saving time and effort.
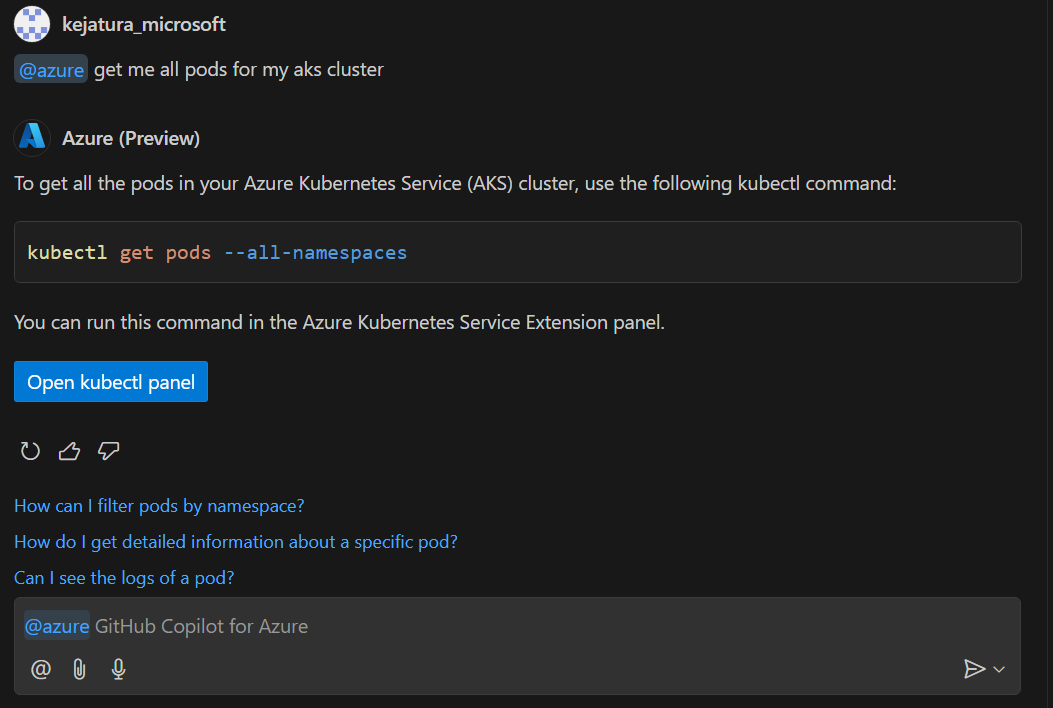
You can generate various Kubectl commands for your AKS cluster using these prompts:
- [@azure] list all services for my AKS cluster
- [@azure] kubectl command to get deployments with at least 2 replicas in AKS cluster
- [@azure] get me all services in my AKS cluster with external IPs
- [@azure] what is the kubectl command to get pod info for my AKS cluster?
- [@azure] Can you get kubectl command for getting all API resources
Overall, these features enhance the user experience by making it easier to manage AKS clusters, deploy applications, and execute commands, all from within the GitHub Copilot Chat view. This integration promotes a more seamless and productive workflow for DevOps engineers and developers
Simplified AKS Menu Structure
The AKS extension uses a role-based cluster context menu organization as the default experience.
Setting
{
  "aks.simplifiedMenuStructure": true
}
Default value: true
After changing this setting, reload the VS Code window. You can also switch modes via the commands AKS: Switch to Classic Menu and AKS: Switch to Grouped Menu without editing settings directly.
What changes when enabled
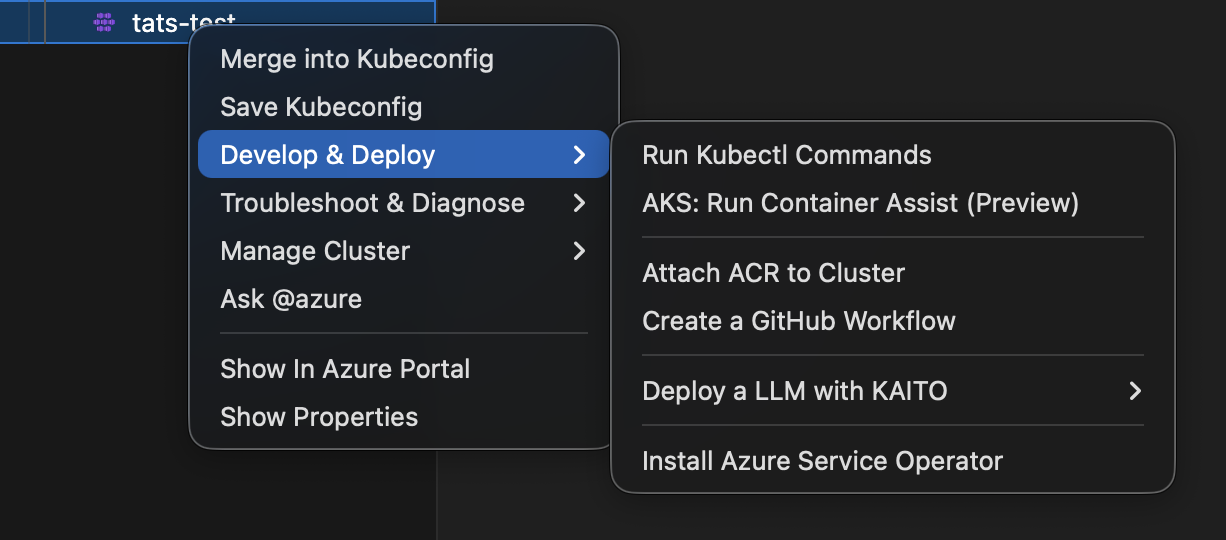
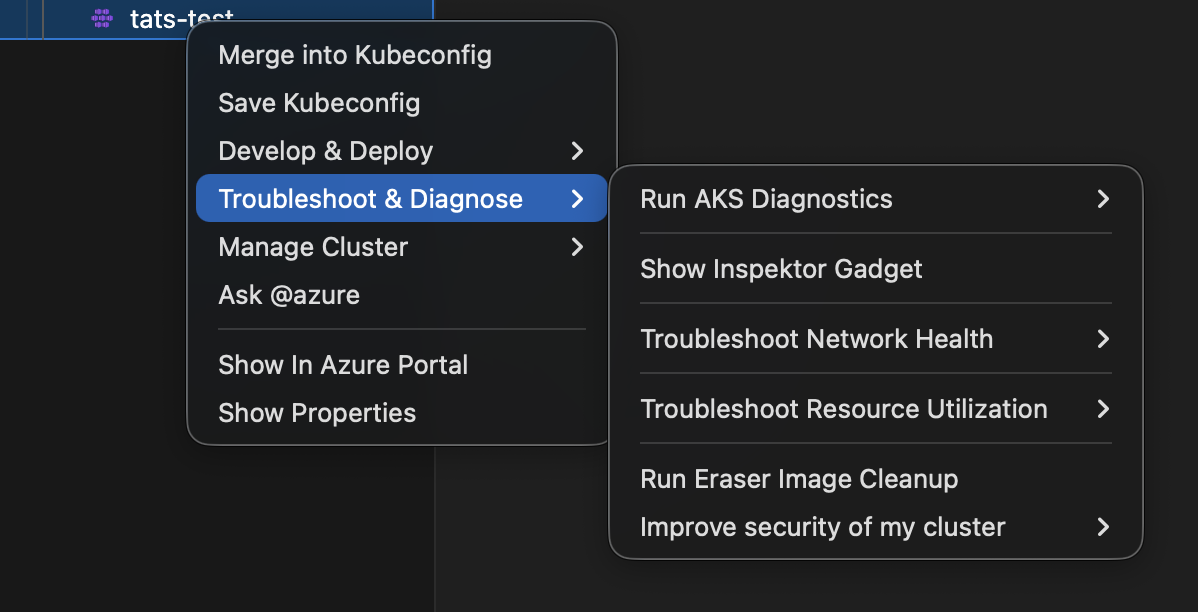
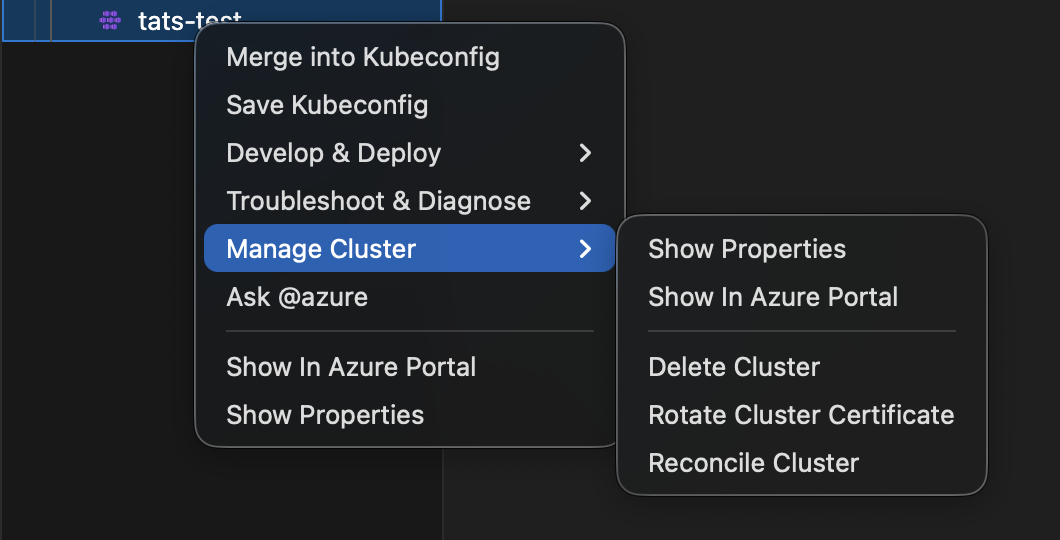
Instead of many top-level commands, cluster actions are grouped into three submenus:
Develop & DeployTroubleshoot & DiagnoseManage Cluster
Direct commands Show In Azure Portal and Show Properties remain available.
Menu grouping overview
Develop & Deploy
: Run Kubectl commands, Container Assist (preview), Attach ACR, Create GitHub Workflow, KAITO submenu, Install Azure Service Operator.
Troubleshoot & Diagnose
: AKS Diagnostics submenu, Inspektor Gadget, network troubleshooting submenu, resource utilization submenu, Eraser Tool, security submenu.
Manage Cluster
: Show properties, show in portal, delete cluster, rotate certificate, reconcile cluster.
Container Assist in the new menu
When both feature flags are enabled:
aks.simplifiedMenuStructure = trueaks.containerAssistEnabledPreview = true(default in2.1.0)
and a workspace folder is open, AKS: Run Container Assist (Preview) appears under Develop & Deploy.
Switching between Classic and Grouped menus
Two commands let you switch menu modes without opening Settings:
| Command | Effect |
|---|---|
| AKS: Switch to Classic Menu | Sets aks.simplifiedMenuStructure to false and prompts to reload. |
| AKS: Switch to Grouped Menu | Sets aks.simplifiedMenuStructure to true and prompts to reload. |
Both commands are available in:
- The Command Palette (
Cmd+Shift+P/Ctrl+Shift+P). - The AKS cluster context menu (right-click on a cluster in the Azure/Kubernetes Cloud Explorer).
Only the applicable command is shown — if the grouped menu is active you see “Switch to Classic Menu”, and vice versa.
After running either command, VS Code prompts you to reload the window. The new menu layout takes effect after the reload.
Backward compatibility
When aks.simplifiedMenuStructure is false, the previous menu organization stays active.
This allows gradual rollout, internal validation, and user feedback collection without breaking existing workflows.
Suggested rollout plan
- Keep default
falsefor broad compatibility. - Enable in dogfood or preview cohorts.
- Collect feedback on discoverability and click depth.
- Promote to default once validated.
Screenshots

Install and Deploy KAITO models
The KAITO integration enables seamless installation of KAITO onto your clusters, empowering you to deploy AI models, manage workflows, and test deployments with ease and precision.
Install KAITO
Right click on your desired AKS cluster and select Deploy an LLM with KAITO and then click on Install KAITO to open up the KAITO installation page.

Once on the page, click Install KAITO and the KAITO installation process will begin. Once KAITO has been successfully installed, you will be prompted with a “Generate Workspace” button that will redirect you to the model deployment page.

Deploy a model
Right click on an AKS cluster that has KAITO successfully installed and select Deploy an LLM with KAITO and then click on Create KAITO Workspace to open the KAITO model deployment page.

Once on this page, you can click any of the models to open up the side panel, which will present you with the option to either Deploy Default workspace CRD or Customize Workspace CRD.
Click Deploy Default workspace CRD to deploy the model. It will track the progress of the model and notify you once the model has been successfully deployed. It will also notify you if the model was already previously unsucessfully onto your cluster. Upon successful deployment, you will be prompted with a “View Deployed Models” button that will redirect you to the deployment management page.


Click Customize Workspace CRD to open up a CRD file pre-populated with the infromation necessary to deploy the model. You can alter this file to your desires and save it locally.
Manage and Test KAITO Deployments
Actively monitor the the status of all KAITO deployments on the cluster, retrieve logs, test the inference servers, and delete/redeploy models.
Manage KAITO Deployments
Right click on your desired AKS cluster and select Deploy an LLM with KAITO and then click on Manage KAITO Models.
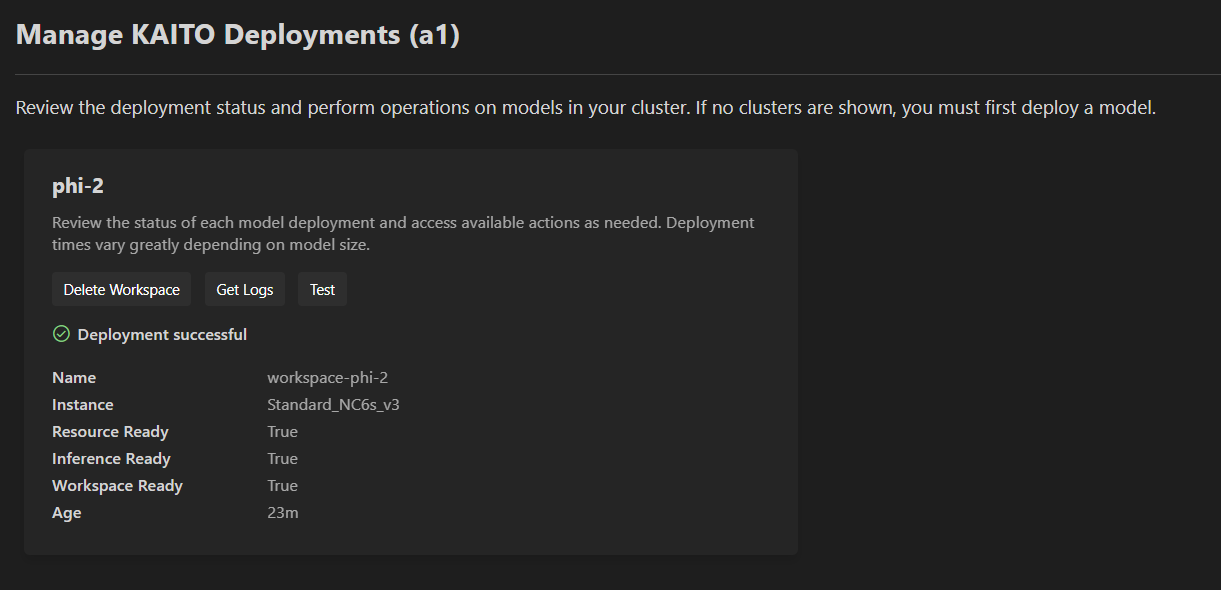
Once on this page, you will see all existing KAITO deployments on the cluster, alongside their status (ongoing, successful, or failed).
For your selected deployment, click Get Logs to access the latest logs from the KAITO workspace pods. This action will generate a new text file containing the most recent 500 lines of logs.
To delete a model, select Delete Workspace (or Cancel for ongoing deployments). For failed deployments, choose Re-deploy Default CRD to remove the current deployment and restart the model deployment process from scratch.
Test a Model
On your desired model, select Test to access the model testing page.
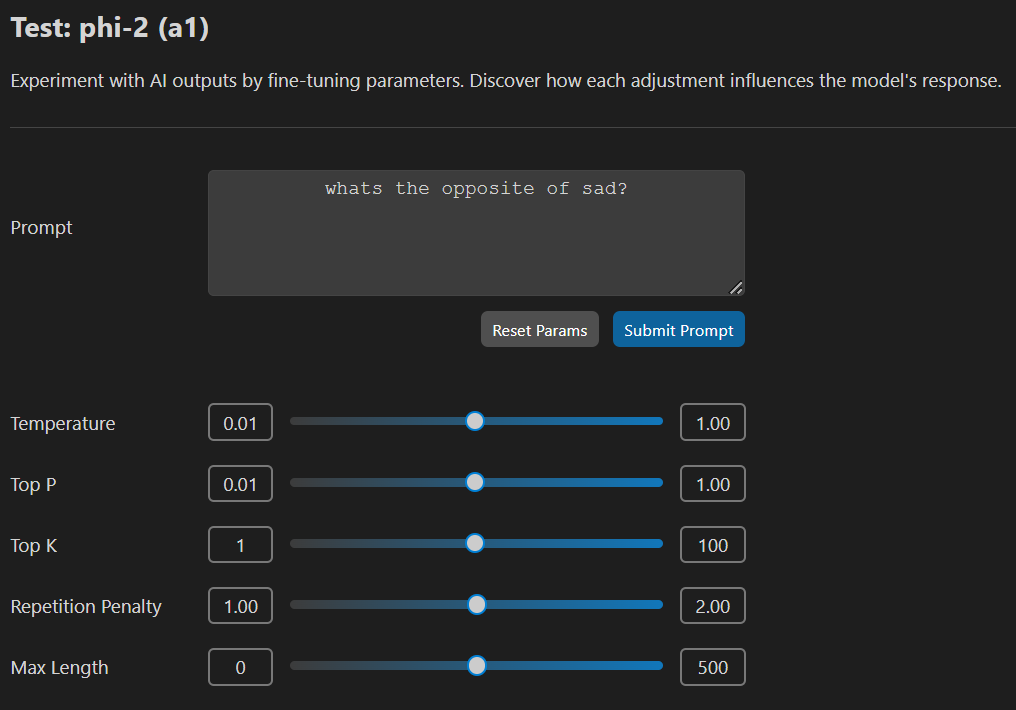
Once on the testing page, you can modify the parameters and enter a prompt for submsission. Click Reset Params to reset all configurable parameters to their default values. Click Submit Prompt to submit your query.

AKS Fleet Manager
The extension allows you to create AKS Fleet Manager resources and visualize them in the tree view.
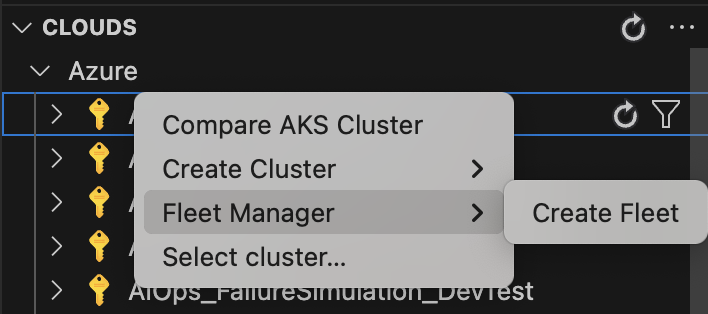
Create an AKS Fleet Manager
- Right-click on the subscription where you want to create a Fleet.
- Choose Fleet Manager, then select Create Fleet.
A loading screen will appear while resource groups and locations are being retrieved. Once loaded, an input form will be displayed.
Complete all required fields marked with an asterisk (*). If any input is invalid, an error message will indicate the issue and guide you on how to fix it.
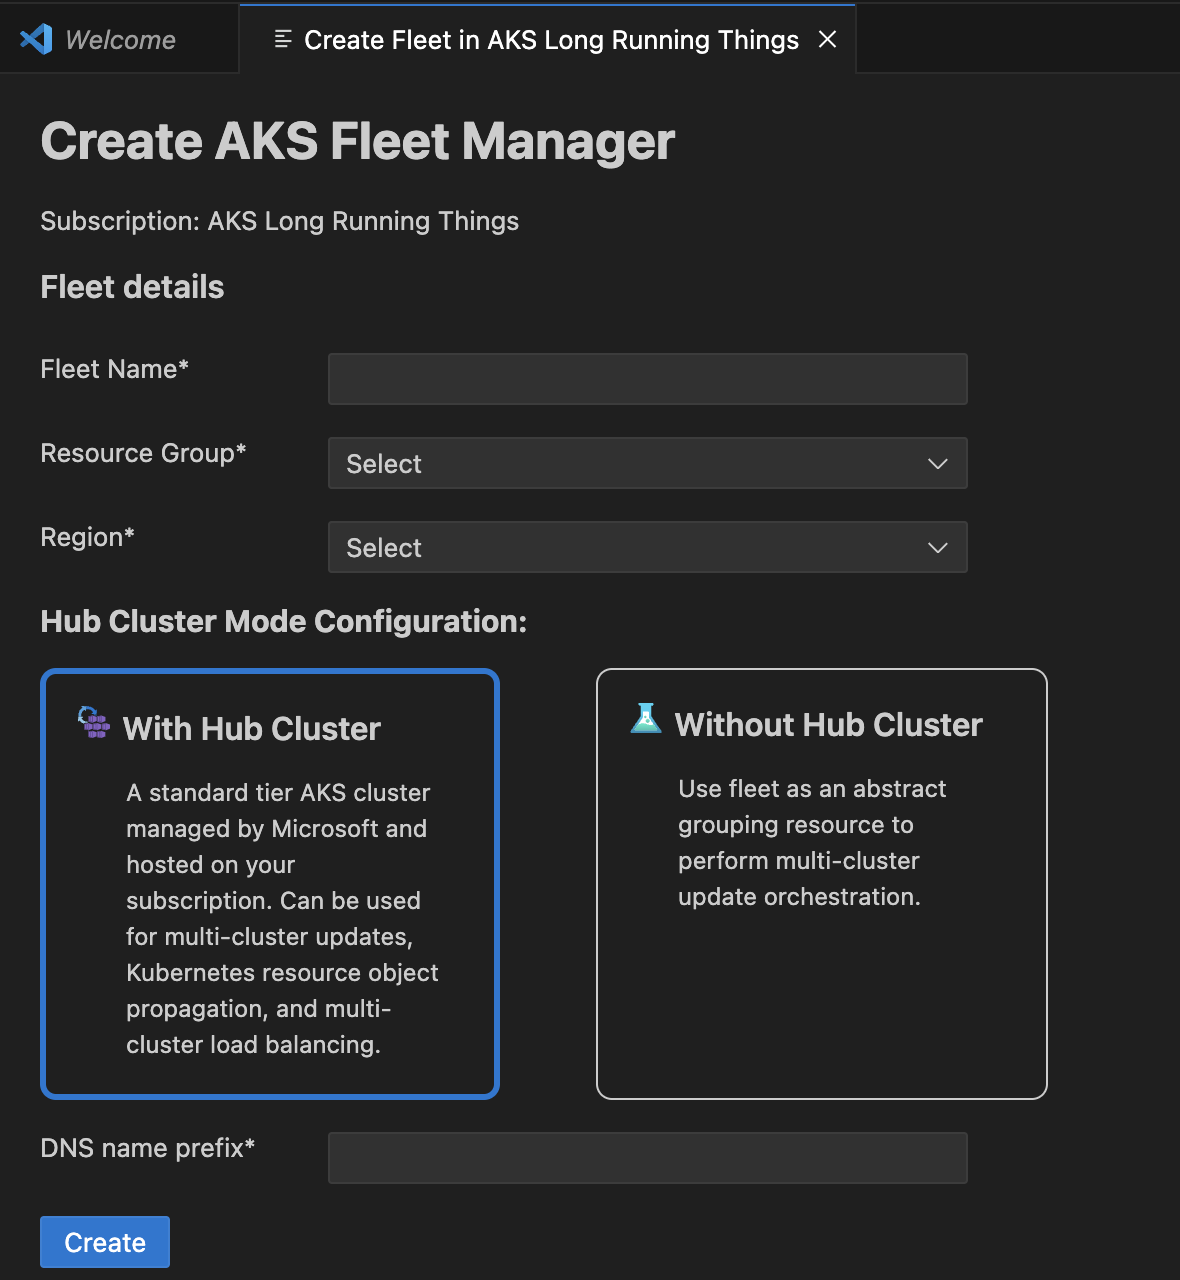
Once all required fields are filled with valid inputs, submit the form to create the Fleet resource. A loading screen will appear while the API processes the request.
Upon successful creation, a confirmation page will be shown, including a link to view the newly created Fleet in the Azure portal.
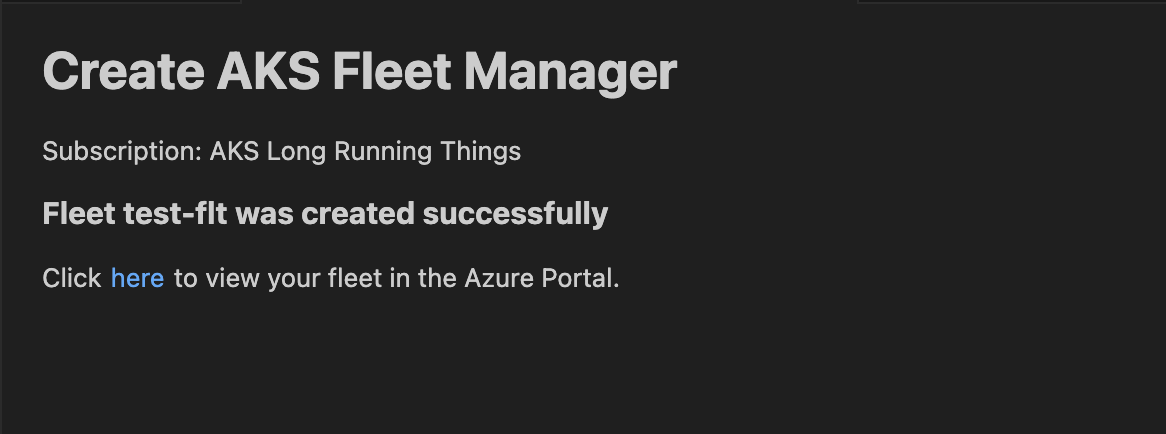
If there is an error during creation, a failure page will be displayed with the error message from the API.
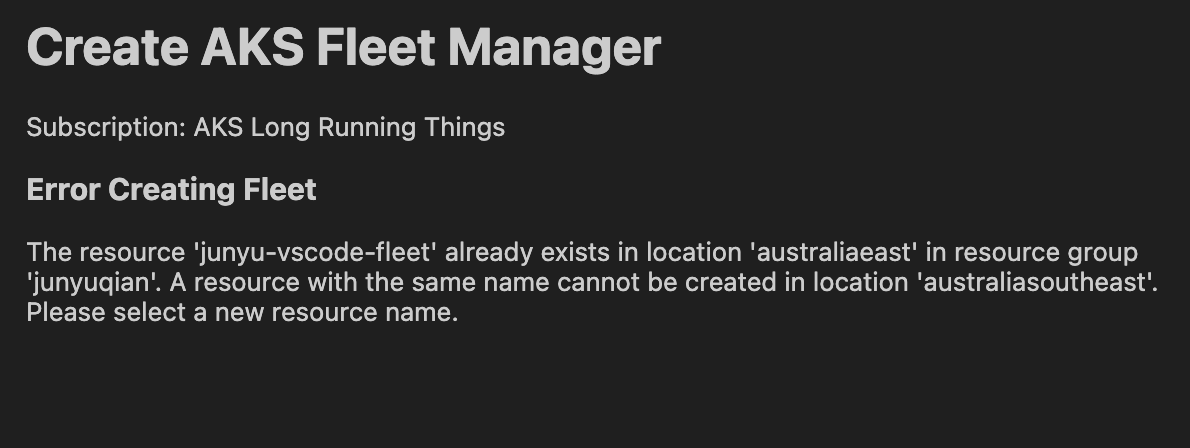
AKS MCP Server
The AKS extension registers a Model Context Protocol (MCP) server that gives Copilot Chat contextual access to your AKS clusters. The server is registered automatically — there is no setup command to run.
How to Use
- Open the Command Palette (
Cmd+Shift+Pon macOS /Ctrl+Shift+Pon Windows/Linux) and runMCP: List Servers. - Find AKS MCP in the list and start it. The first start downloads the server binary, and subsequent starts will use the stored copy.

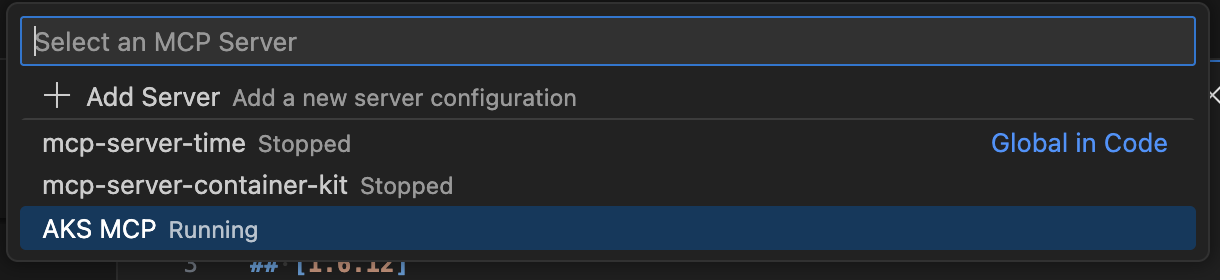
Once started, the AKS MCP server appears in the Copilot Chat: Configure Tools dropdown.

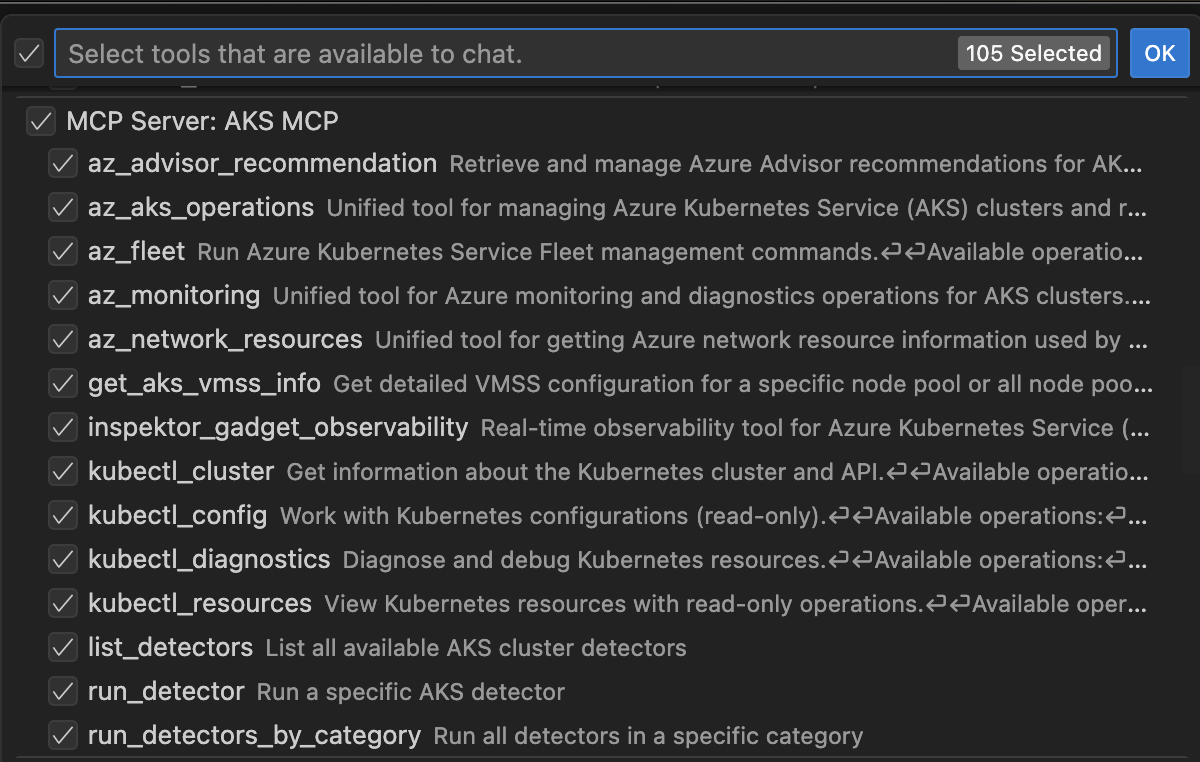
Remote development (WSL, Remote-SSH, Dev Containers)
The server registers itself in whichever extension host you’re connected to, and the binary downloads to that same machine on first usage. No additional setup is required.
Limiting Enabled Components
Some components require local CLI tools (e.g. helm, cilium, hubble). The default configuration enables az_cli, monitor, fleet, network, compute, detectors, advisor, inspektorgadget, and kubectl to ensure a comprehensive setup out of the box. You can change this by setting aks.aksmcpserver.enabledComponents in your VS Code user settings.
"aks.aksmcpserver.enabledComponents": "az_cli,kubectl,monitor,network"
Available components: az_cli, monitor, fleet, network, compute, detectors, advisor, inspektorgadget, kubectl, helm, cilium, hubble. Set to an empty string to enable all components.
Pinning the Server Version
The extension pins a specific aks-mcp release via the aks.aksmcpserver.releaseTag setting. Override it to test a different release. Binaries are cached at ~/.vs-kubernetes/tools/aks-mcp/<version>/; you can delete old versions manually if needed.
Troubleshooting
- If the server doesn’t appear in
MCP: List Servers, restart VS Code so the extension can re-register the provider. - If the server fails to start, open
MCP: List Servers, select AKS MCP, and choose Show Output to view the server log.
Argo CD GitOps Integration
The Argo CD integration brings a complete GitOps workflow to AKS clusters directly inside VS Code. Argo CD must be pre-installed on your cluster — the extension checks for its presence and directs you to the official docs if it is missing.
GitOps “Hollywood Principle” — Don’t call us, we’ll call you. Your cluster never pushes. Argo CD continuously pulls desired state from a dedicated Git config repository and reconciles it automatically.
Feature Flag
All Argo CD commands are gated behind a feature flag and enabled by default.
If you want to hide Argo CD commands, set:
{
   "aks.argoCDEnabled": false
}
Default value: true
After changing this setting, reload the VS Code window (Developer: Reload Window).
Installation options
The VS Code commands below work with either install path. Pick whichever fits your environment.
| Option | Best for | How to install |
|---|---|---|
| Azure-managed Argo CD extension (recommended for production) | AKS or Azure Arc-enabled clusters that need Entra ID SSO, Workload Identity Federation to ACR / Azure DevOps, Azure Linux–hardened images, and opt-in automatic patch releases | az k8s-extension create --extension-type Microsoft.ArgoCD … — see the Microsoft Learn tutorial |
| Upstream Argo CD (manifests / Helm) | Dev clusters, custom builds, strict OSS parity, or non-Azure clusters | Argo CD getting started |
The extension uses two independent runtime probes:
- Install-method detection — the
app.kubernetes.io/managed-by=Microsoft.ArgoCDpod label in theargocdnamespace. Resolves tomanaged,upstream, orunknown(e.g. RBAC forbidden, transient kubectl failure). The post-apply menu only surfaces the Azure Workload Identity hint when this resolves tomanaged(or when SSO is independently detected, see below). - Auth-mode detection — the
argocd-cmConfigMap’soidc.configentry. When it referenceslogin.microsoftonline.com, the UI sign-in is treated as Entra ID SSO and the OSS admin-password flow is skipped.
These signals are orthogonal: a managed install can be configured without SSO, and — in principle — an upstream install can be wired to Entra ID by hand. The extension treats them as separate hints rather than collapsing them into one flag.
Public preview, Mar 2026. The Azure-managed extension is in public preview on AKS and Azure Arc-enabled Kubernetes — see the announcement blog.
Prerequisites
- A Kubernetes cluster with Argo CD installed via either of the Installation options above.
kubectlavailable on your PATH (the extension uses the active kubectl context).- A separate GitOps config repository — Argo CD manifests should live apart from your application source code.
Commands
The integration provides four commands, all prefixed with AKS:
| Command | Where it appears | Description |
|---|---|---|
| AKS: Create Argo CD GitOps Pipeline | Command Palette, Explorer folder context menu | Scaffold an annotated Argo CD Application manifest in a config repo |
| AKS: Apply Argo CD Application to Cluster | Explorer YAML file context menu, Editor context menu | Apply an Application YAML to the active cluster |
| AKS: Check Argo CD Status | AKS cluster tree right-click menu | Show Argo CD pod and service health in an output channel |
| AKS: Argo CD Post-Deploy Actions | Shown after a successful apply, or from the Command Palette | Open UI (SSO-aware), configure Azure Workload Identity (when source is ACR / Azure DevOps), connect a private GitHub repo, or open the Argo CD sync guide |
Scaffold a GitOps Config Repository
- Open the Command Palette (
Cmd+Shift+Pon macOS /Ctrl+Shift+Pon Windows/Linux). - Run AKS: Create Argo CD GitOps Pipeline.
- If you are inside an application source repository (detected by the presence of
Dockerfile,package.json,go.mod, etc.), the extension warns you and offers to open a separate config repo folder instead. - Fill in the prompted parameters:
- App name — validated as
[a-z0-9][a-z0-9-]*. - GitOps config repo URL — enter manually, browse a local folder (reads
.git/configorigin automatically), or browse your GitHub repos (authenticates via VS Code’s built-in GitHub provider). - Source repo URL (optional) — same picker options.
- Target cluster API server URL.
- Target namespace — where your workloads will be deployed.
- Container image and port.
- App name — validated as
- The extension scaffolds an
apps/<name>/directory containing:application.yaml— the Argo CD Application CR with all placeholders substituted.README.md— step-by-step setup guide covering install, UI access, repo registration, day-2 workflow, and monitoring commands.
- A notification offers quick-open buttons for the generated files.
Apply an Application YAML to a Cluster
- Open or right-click an Argo CD Application YAML file (
.yaml/.yml). - Select AKS: Apply Argo CD Application to Cluster.
- Alternatively, when you open an Application YAML, the extension detects it and shows an “Apply to Cluster” notification.
- The extension:
- Validates the file is an
argoproj.io/v1alpha1 Application. - Resolves the active kubectl context (no subscription or cluster picker needed).
- Checks that Argo CD is installed (looks for the
argocdnamespace). - Confirms the apply action.
- Runs
kubectl apply -n argocd -f <file>.
- Validates the file is an
- After a successful apply, a notification offers four actions:
Open Argo CD UI
- If Argo CD is installed via the Azure-managed extension with Entra ID OIDC configured, the dialog prompts you to sign in with your Microsoft account — no admin password is fetched.
- If the
argocd-serverService has a LoadBalancer with an external IP, the extension openshttps://<address>directly. - If the Service is ClusterIP (common for local setups), the extension starts a
kubectl port-forwardin an integrated terminal and shows an Open Browser button once the tunnel is ready.
Configure Workload Identity for Azure (recommended)
Shown only when both conditions hold:
spec.source.repoURLof the applied Application points at an Azure source:- ACR hosts:
*.azurecr.io(OCI Helm chart / manifest sources). - Azure DevOps hosts:
dev.azure.com/*, legacy*.visualstudio.com, and the SSH variantsssh.dev.azure.com/vs-ssh.visualstudio.com.
- ACR hosts:
- The cluster is running the Azure-managed Argo CD extension (managed-by label detected) or Entra ID SSO is already configured on the
argocd-cmConfigMap.
The action behaves differently depending on which install path was detected:
- Managed extension detected — runs a guided WIF bootstrap helper directly inside VS Code:
- Auto-detects the Argo CD
ServiceAccount(argocd-repo-serverby default) and the cluster’s OIDC issuer URL, and prints the federated-credential subject claim (system:serviceaccount:argocd:<sa>) and audience (api://AzureADTokenExchange) to the Argo CD output channel — with one-click clipboard copy. - Opens the Azure Portal directly on Managed Identities (or App registrations) so you can paste those values into a new federated credential.
- Prints the final wiring steps: the
AcrPull/Readerrole assignment and theazure.workload.identity/client-idServiceAccount annotation, plus thekubectl rollout restartcommand. The Microsoft Learn tutorial remains available as a fallback link.
- Auto-detects the Argo CD
- SSO-only (no managed-by label) — opens the Microsoft Learn tutorial directly, since the in-cluster annotations the bootstrap helper relies on may not match an upstream install.
Workload Identity Federation is the recommended credential path when running the Azure-managed Argo CD extension — no long-lived PATs or SSH keys are stored as Kubernetes Secrets.
Connect Private Repository (GitHub)
Shown only when the applied Application’s spec.source.repoURL is a private GitHub repository:
- Pre-populates owner/repo from the YAML and (when a silent VS Code GitHub session exists) resolves the numeric repo ID.
- Opens the GitHub fine-grained PAT creation page with the token name and repository pre-filled.
- Prompts for the PAT in a masked input (never logged, never written to disk).
- Creates a labelled Kubernetes Secret (
argocd.argoproj.io/secret-type: repository) viakubectl create secret --from-literalso Argo CD auto-discovers it without a restart.
For Azure DevOps or ACR sources, prefer the Configure Workload Identity action above instead of creating a PAT secret.
Sync Guide
- Opens the Argo CD documentation for syncing applications.
Check Argo CD Status
- In the AKS cluster tree, right-click a cluster node.
- Select AKS: Check Argo CD Status.
- The Argo CD output channel shows:
- Whether the
argocdnamespace exists. - Whether the Azure-managed
Microsoft.ArgoCDextension is detected (via theapp.kubernetes.io/managed-bypod label). Reported asmanaged,upstream, orcould not determinewhen the label query fails (for example, due to RBAC). - Pod status (
kubectl get pods -n argocd -o wide). - Service status (
kubectl get svc -n argocd). - Tips for port-forwarding and authentication (SSO vs. initial admin password).
- Whether the
Copilot Chat Integration
A GitHub Copilot chat skill is registered so you can ask questions like:
- “How do I set up Argo CD on my AKS cluster?”
- “Create an Argo CD deployment for my cluster”
The skill explains the GitOps principle and offers a button to launch the scaffold command directly from chat.
Production topologies
The scaffolded Application manifests work unchanged with the upstream-parity features of the Azure-managed extension:
- High availability (HA) — chosen at install time via the managed extension or upstream Helm chart; no change required to the generated YAML.
- Hub-and-spoke / multi-cluster — the Create Argo CD GitOps Pipeline command prompts for a target cluster API server URL, which becomes
spec.destination.serverand can point at a remote spoke cluster from a central hub. ApplicationSet— the scaffolder currently emits a singleApplication. For generator-driven, multi-cluster rollouts (cluster generator, Git generator, etc.), hand-author anApplicationSetalongside the generatedapplication.yaml; the Apply Argo CD Application to Cluster command accepts anyargoproj.io/v1alpha1resource.
Security Notes
- PATs and passwords are never written to disk or logged to output channels. Repo credential Secrets are created via
kubectl create secret --from-literal(in-memory only). - Workload Identity Federation is preferred over PATs for ACR and Azure DevOps sources when running the Azure-managed extension — no long-lived credentials are stored on the cluster.
- Entra ID SSO replaces the OSS
argocd-initial-admin-secretflow when the managed extension is configured with OIDC; the extension auto-detects this and skips the password prompt.
Troubleshooting
| Problem | Solution |
|---|---|
| “Argo CD is not installed on cluster” | Install Argo CD first — see Installation options |
az k8s-extension create fails with Microsoft.ArgoCD not found | Register the Microsoft.KubernetesConfiguration resource provider and confirm region availability per the Microsoft Learn tutorial |
kubectl not found | Ensure kubectl is on your PATH and the correct context is active |
| Port-forward fails | Check that no other process is using port 8080, or that the argocd-server Service exists |
| Admin-password Secret missing | Expected when the managed extension is configured with Entra ID SSO — sign in through the browser instead of entering a password |
| Want to avoid PATs for ACR or Azure DevOps | Configure Workload Identity Federation via the managed extension instead of using Connect Private Repository |
| Repo not syncing after credential registration | Verify the repo URL matches spec.source.repoURL exactly (including .git suffix if used) |
| Application CR not visible in Argo CD UI | Ensure the YAML has namespace: argocd in metadata — the Application CR must be in the Argo CD namespace |
Further reading
- Announcing public preview of the Argo CD extension on AKS and Azure Arc-enabled Kubernetes clusters — Azure Arc Blog, Mar 2026.
- Microsoft Learn: Use GitOps with Argo CD on Azure Arc-enabled Kubernetes.
- Argo CD upstream documentation.
Release
Use this section to track reader-facing changes by version and maintain release process guidance.
What’s New in 2.1.0
Version 2.1.0 updates Container Assist preview behavior to be enabled by default.
Highlights
aks.containerAssistEnabledPreviewnow defaults totrue.- Container Assist entry points are available out of the box when a workspace folder is open.
- Users can still disable Container Assist via settings when needed.
Feature flag behavior
{
  "aks.containerAssistEnabledPreview": true
}
Default in 2.1.0: true
To disable:
{
  "aks.containerAssistEnabledPreview": false
}
Related docs
How to Release
To make a new release and publish it to the marketplace you have to follow the following steps.
- Create a branch
publish-x.y.z - Update
package.jsonwith the new version - Add a section to
CHANGELOG.mdwith the header## [x.y.z](N.B: make sure to write the new version in square brackets as thechangelog-readeraction only works if theCHANGELOG.mdfile follows the Keep a Changelog standard) - Create a new PR, get approval and merge
- Run the
Build & Publishworkflow manually from the GH Actions tab
Build & Publish
The Build & Publish workflow allows to create a new release, package it in a VSIX file and publish to the VSCode marketplace with a single click.
The only requirement needed to run the workflow is to have a secret named VS_MARKETPLACE_TOKEN containing the Personal Access Token of the publisher. You can find more infos about how to create a publisher/token in the official documentation
Once everything is set up and you followed all first 4 steps in the previous section, you are ready to trigger the Build & Publish workflow.
This is what it actually does:
- Install all dependencies and build the project
- Check if the
CHANGELOG.mdcontains a section related to the new version - Create a new release
- Create the VSIX file and publish it to the marketplace
- Attach the VSIX file to the new release
Contributing
Contributing
This project welcomes contributions and suggestions. Most contributions require you to agree to a Contributor License Agreement (CLA) declaring that you have the right to, and actually do, grant us the rights to use your contribution. For details, visit https://cla.microsoft.com.
When you submit a pull request, a CLA-bot will automatically determine whether you need to provide a CLA and decorate the PR appropriately (e.g., label, comment). Simply follow the instructions provided by the bot. You will only need to do this once across all repos using our CLA.
This project has adopted the Microsoft Open Source Code of Conduct. For more information see the Code of Conduct FAQ or contact opencode@microsoft.com with any additional questions or comments.
Telemetry
Telemetry
This extension collects telemetry data to help us build a better experience for building applications with Azure Kubernetes Service and VS Code. We only collect the following data:
- Which commands are executed.
- Events pertaining to GitHub Copilot for Azure (@azure) handlers
- Which VS Code command ID was used to enable handler
- Whether or not if a subscription was selected
- Whether or not a manifest file was selected
- Whether or not a cluster was selected
- Which cluster option was selected (see
SelectClusterOptionstype) - Whether or not a manifest deployment was cancelled
- Whether or not a manifest deployment was successful
- Whether or not the success manifest deployment link was clicked
- Whether or not a cluster was successfully created
We do not collect any information about image names, paths, etc. Read our privacy statement to learn more. If you don’t wish to send usage data to Microsoft, you can set the telemetry.enableTelemetry setting to false. Learn more in our FAQ.