Forking the GitHub Repo - an Alternate Installation Method
Instead of installing EnterprisePolicyAsCode from the PowerShell Gallery, you can clone the GitHub repository and use the scripts described below to install the script source code. This is useful, if your organization has overly restrictive policies on installing PowerShell modules from the PowerShell Gallery. It can also be useful if you want to contribute EPAC source code to the project.
Changes to the Forking Process
With the ability to provide prerelease versions via release and PowerShell - if you are working in a forked repo you should also clone the tags from the original source to allow your forked repo to pin to specific releases.
- Add an upstream remote containing the original release
git remote add upstream https://github.com/Azure/enterprise-azure-policy-as-code.git - Fetch the tags from the upstream -
git fetch --tags upstream - Push tags to the fork -
git push --tags
Tags are not automatically synced to a forked repo so you must perform this task each time you sync your fork with the main project.
Setting up your Repo
- Initial setup
- Create
MyForkRepoas a fork of GitHub repo. - Create
MyWorkingRepo. 1. Clone your forked repo. 1. Create a new repo from the clone (do not forkMyForkRepo)
- Create
- Work in
MyWorkingRepo- While the root folder is not modified as part of the Sync-Repo process, it is recommended that this part of the file structure not be used for storage of any custom material other than new folders.
- You may add additional folders, such as a folder for your own operational scripts.
- Use only folders
DefinitionsandPipeline, except when working on fixes to be contributed back to GitHub.- Review the
Sync-Repodocumentation for additional information on the folders which are destroyed and recreated as part of the version upgrade process for additional insight on this topic.
- Review the
- While the root folder is not modified as part of the Sync-Repo process, it is recommended that this part of the file structure not be used for storage of any custom material other than new folders.
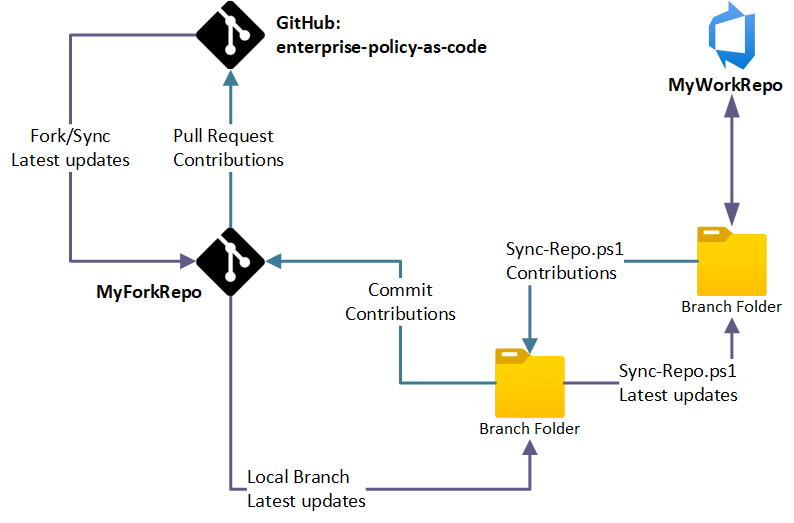
Syncing latest Version from GitHub repo
- Fetch changes from GitHub to
MyForkRepo. - Execute
Sync-Repoto copy files fromMyForkRepotoMyWorkingRepofeature branch. - PR
MyWorkingRepofeature branch.
Contribute to GitHub
- Execute
Sync-Repoto copy files fromMyWorkingRepotoMyForkRepofeature branch.- Be sure not to copy internal references within your files during your sync to MyForkRepo.
- PR
MyForkRepofeature branch. - PR changes in your fork (
MyForkRepo) to GitHub. - GitHub maintainers will review the PR.
Sync-Repo.ps1
The repo contains script to synchronize directories in both directions: Sync-Repo.ps1. It only works if you do not modify:
Docs,Scripts,ModuleandStarterKitdirectories*.md,*.ps1,*.yml, andLICENSEfiles in repo root directory
| Parameter | Required | Explanation |
|---|---|---|
SourceDirectory |
Required | Directory with the source (forked repo) |
DestinationDirectory |
Required | Directory with the destination (your private repo) |
SuppressDeleteFiles |
Optional | Switch parameter to suppress deleting files in $destinationDirectory tree |