Create and manage IoT Edge devices
Table of contents
Once you finally have decided to introduce Azure IoT Edge for your IoT solution, the following question is how you should create, manage, and maintain the IoT devices in production. This section covers considerations and provides pointers to further documentation to allow you to ask important questions so you can make correct choices.
There are three aspects you need to consider when creating IoT Edge devices: what is your target platform, how you are going to manage your edge fleet hardware, how you will be provisioning your edge devices within IoT Hub, and finally, what authentication method you will be using.
Choose your target platform
As commented in previous sections, IoT Edge can run in multiple operating systems, and you need support to run containers within the host operating system. There are three platform options you can choose from:
-
Linux containers on Linux hosts.
-
Linux containers on Windows hosts (also known as Linux on Windows, IoT Edge for Linux on Windows, or EFLOW).
-
Windows containers on Windows hosts, only supported for IoT Edge version 1.1 LTS (ending official support by December 13, 2022).
In general, choose the platform that best fits you and your organization’s needs, for example in-house expertise. From an official support point of view, be aware of the different support tiers for the host OS, and use our container engine distribution, so we can provide best class support for any issue. You can also use other Moby open-source project based or compatible container engines, but Microsoft will provide best-effort support in this case.
Hardware Requirements
Despite there are no explicit or concrete hardware requirements to execute IoT Edge runtime in the chosen platform, be mindful of having enough computing resources (CPU, memory, hard disk & network bandwidth) for your workload. IoT Edge runtime can be installed in a wide range of devices, just ensure it performs as expected for your requirements.
You can review this is interesting blog post on Stretching the IoT Edge performance limits to get good insights and considerations regarding performance, scalability, latency and the relationship with hardware capabilities.
Device setup and provisioning
Device provisioning is an important stage within the device’s lifecycle. There’s a set of general device management stages that are common to all enterprise IoT projects. For Azure IoT, there are five stages within the device lifecycle: Plan, Provision, Configure, Monitor, Retire. Each stage includes goals and activities related to:
-
Plan: Define a metadata scheme to enable query your repository for bulk management operations. You can use the device twin to store this device metadata in the form of tags and properties.
-
Provision: Securely provision new devices to IoT Hub and enable operators to immediately discover device capabilities. Use the IoT Hub identity registry to create flexible device identities and credentials and perform this operation in bulk by using the IoT Hub Device Provisioning Service or an IoT Hub job. Build devices to report their capabilities and conditions through device properties in the device twin. This is the target of this section.
-
Configure: Consider facilitating bulk configuration changes and firmware updates to devices while maintaining both health and security. Perform these device management operations in bulk by using desired properties or with direct methods and broadcast jobs.
-
Monitor: Monitor overall device collection health, the status of ongoing operations, and alert operators to issues that might require their attention. Apply the device twin to allow devices to report real-time operating conditions and status of update operations.
-
Retire: Replace or decommission devices after a failure, upgrade cycle, or at the end of the service lifetime. Use the device twin to maintain device info if the physical device is being replaced or archived if being retired. Use the IoT Hub identity registry for securely revoking device identities and credentials.
Regarding the provision stage, to set up an IoT edge device, you need to complete the following tasks:
-
Provision your IoT Edge device in IoT Hub.
-
Install and configure the runtime.
-
Define the modules that will be part of the edge device.
The implementation of the above tasks would vary in complexity depending on the number of devices you need to manage. It is not the same managing few edge devices as managing a fleet with a large number of devices. In the first case, manual provisioning and runtime setup would fit, but handling hundreds, thousands or even millions of devices would require provision devices at scale and manage the runtime setup (as well as manage runtime updates) by using automated approaches.
Single device provisioning
Single device provisioning (registering the IoT Edge device in IoT Hub), also known as manual provisioning, is when you’ll need to manually enter provisioning information, like a connection string, on your devices. Manual provisioning is quick and easy to set up only a few devices, but your workload will increase with the number of devices. You can choose between symmetric key and X.509 self-signed authentication methods when using manual provision.
Runtime
For the runtime installation, if you manage a low number of devices, you can manually distribute and install the runtime packages to each of the edge devices, but as with provisioning, your workload will increase with the number of devices. Also, consider the need to apply different updates and fixes to your host OS as well as the possible updates required by the IoT Edge runtime itself over the time.
Devices provisioning at scale
When managing devices at scale, you should consider auto-provisioning the devices using Device Provisioning Service (DPS) to save the effort of manually entering information into the configuration of each device. This automated model can be scaled to millions of IoT Edge devices. When using DPS you can choose among different authentication methods: symmetric key, X.509 certificates and trusted platform module (TPM) attestation.
For further information regarding Device Provisioning Service, see the Features Section of the overview page.
To see more details regarding authentication methods, have a look at Choose an authentication method documentation.
Deployment Manifest
When managing devices at scale, you also need to consider the deployment manifest management at scale. It will not be effective or even possible to manually manage modules’ definition and configuration for each of your edge devices. To help in this requirement, IoT Hub platform provides the ability to define Automatic IoT Edge deployments so you can manage your device deployment manifest at scale.
Runtime
Regarding the runtime installation, you will need to consider an automated approach to provide the IoT Edge runtime to your devices. If you are using physical machines or VMs as part of your network, you can use any deployment automation tooling, package distribution or automated CI/CD pipeline which you are familiar with. If you are a device manufacturer, you will need to introduce the pre-installation of the IoT Edge runtime within your manufacturing process (i.e., by using golden images).
Another important aspect to keep in consideration is the managing of device updates, including OS updates, package updates, and IoT edge runtime updates. IoT Edge runtime follows a Long-Term Servicing (LTS) approach for their releases, where an LTS release will last around two years. Device Update of IoT Hub is a service that enables you to deploy over-the-air updates to your IoT devices.
Authentication methods
As mentioned above, there are three different ways for an IoT Edge device to authenticate to an IoT Hub: X.509 certificates, Trusted platform module (TPM) and symmetric keys. TMP authentication is only suitable for deployments at scale assisted with Device Provisioning Service, and symmetric keys are the least secure in comparison to the other two.
-
X.509 certificates: this is the recommended way to scale production and simplify the device provisioning. It relies on a certificate chain of trust, which can start with a self-signed or trusted root certificate. The device will store two identity “leaf” certificates and when you create the new identity in IoT Hub you provide thumbprint for both certificates. Having two certificates will ease the certificate rotation when needed (something you need to plan for). This method supports DPS group enrollments.
-
Trusted platform module (TPM): When available in your device a TPM chip can be used for device attestation and authentication. Each TPM chip has a unique endorsement key to verify its authenticity. TPM attestation is only available for provisioning at-scale with DPS, and only supports DPS individual enrollments, not group enrollments. Group enrollments aren’t available because of the device-specific nature of TPM.
-
Symmetric key: this is the simplest authentication approach, suitable for testing purposes or when you don’t have strict security requirements. In this case, when you create a new device identity in IoT Hub, the service creates two keys. You use one of the keys from the device when authenticating to the IoT Hub. This method can be used with DPS group enrollments and is faster to get started but is not as secure as the previous ones.
Limits and restrictions
One thing you need to keep in mind while designing your IoT Edge device as part of your IoT solution is the inherent limitations and restrictions of the platform you are using. In this case, you need to be aware of both IoT Edge and IoT Hub limits and restrictions as there are limits that apply to the interactions of both, for example limits that apply to message size, telemetry frequency, twin updates, direct methods, etc.; or limitations that might impact your design.
Consider this limits are designed to enable solution designers to create efficient cost-effective solutions, leaning your architecture and design towards optimized models to ensure an efficient usage of available resources.
For IoT Hub, it is also interesting to be aware of the limits, as those vary depending on the selected SKU and the number of instances you have in place, so optimizations in efficiency or strategies to reduce the telemetry volumes will directly impact the cost effectiveness of your IoT solution.
For detailed information on limits and restrictions, check:
Custom Modules
Azure IoT Edge custom modules extend your global data pipeline processing capabilities at the edge, but also allow you to provide specific capabilities to your IoT edge devices under the cloud native architecture paradigm. IoT edge unfolds the possibility to accommodate the requirements of your edge devices depending on your scenario. For example, you can create custom modules that apply rules and specific transformations to your telemetry, but you can also create a custom module to provide a web interface to enable interactive interaction with your devices. The possibilities are endless.
In general, any program can be packaged as an IoT Edge module. To take full advantage of IoT Edge communication and management functionalities, a program running in a module can use the Azure IoT Device SDK to connect to the local IoT Edge hub. To be able to deploy your program to an IoT Edge device, it must first be containerized and run with a Docker-compatible engine. The same parameters that you’re used to with Docker can be passed to IoT Edge Modules.
Module Client
To connect to the IoT Edge hub from a module requires the same connections steps as for any client. You can use the ModuleClient from the Azure IoT SDK to connect and use the IoT Edge routing and communication methods. A module instance is analogous to a device in the sense that:
-
It can send device-to-cloud messages,
-
It can receive direct methods targeted specifically to its identity.
-
Has a module twin that is distinct and isolated from the device twin and other modules of that device.
IoT Edge supports multiple operating systems, device architectures and development languages: C, C#, Java, Node.js and Python are currently supported on AMD64 and ARM32 Linux containers.
To learn more about custom modules and its development see Develop modules for Azure IoT Edge and Develop and debug modules for Azure IoT Edge.
Offline Capabilities
Azure IoT Edge supports extended offline operations on your IoT Edge devices and enables offline operations on child devices too. To take advantage of the offline capabilities your IoT Edge device needs to connect to the IoT Hub at least one time. From that moment, the IoT Edge device can continue to operate in offline mode until is reconnected to the IoT Hub again. The following sample shows how an IoT Edge device operates in offline mode:
- Configure devices: IoT Edge devices have offline capabilities enabled by default, but you will need to tune these up to adjust to your concrete scenario. For example, depending on how long you need your devices to operate completely disconnected, you will need to make considerations like message time to leave (TTL), persistent storage capacity, logging retention, etc.
If you want to extend these capabilities to downstream devices, you need to register the parent-child relations and route the device-to-cloud communications from the downstream devices thru the parent as a gateway
-
Sync with IoT Hub: After the IoT Edge runtime installation, the IoT Edge device needs to be online to sync with the IoT Hub at least once. During this sync, the edge device retrieves the child devices information and settings to enable the offline operation.
-
Go offline: while disconnected, the edge device, its deployed modules, and any child devices can operate indefinitely by authenticating to the edge hub module when needed and locally storing the upstream telemetry.
-
Reconnect and resync with IoT Hub: once the connection is available, IoT Edge syncs again. Local stored messages are delivered to the IoT Hub in the same order in which they were stored, the desired and reported properties are reconciled, and the parent-child relationships are updated.
To ensure a smooth and reliable offline operation of your edge devices you need to ensure that your devices can operate properly during the maximum planned offline duration. Consider the following:
- Edge device storage limit: IoT Edge devices and their assigned child devices can function indefinitely offline after the initial, one-time sync. However, storage of messages depends on the time to live (TTL) setting and the available disk space for storing the messages.
By default, messages and module state information are stored in the IoT Edge hub’s local container filesystem. For improved reliability, especially operating offline, it is recommended to use dedicated storage on the host.
-
Time to Live (TTL): is the amount of time (in seconds) that a message can wait to be delivered before it expires (7200 seconds, two hours, by default). The maximum value is limited by the maximum value of an integer variable (around 2 billion, >68 years!). You will need to adjust the messages TTL to cover your scenario requirements and to ensure you have enough storage capacity for the volume of messages you will be generating during the maximum offline period.
-
Redundant Storage: also aligned to your scenario, for example if it considers longs periods of offline operations. Imagine your device is running on a vessel overseas. You can consider having an external redundant storage mounted to your device to provide more reliability and avoid important data loss. To continue with the sample, imagine the IoT Edge device is running on a VM and acting as a gateway for other devices distributed in the vessel machine room. In case of VM corruption, you can restore the VM, and your messages will continue to be in the external redundant storage.
-
Container engine logging: by default, the Moby container engine does not set container log size limits. Over time, this can lead to the device filling up with logs and running out of disk space. Configure your container engine to use the local logging driver as your logging mechanism
-
Parent-child relationship: if your IoT Edge scenario involves downstream devices with parent-child relationship, consider that, by default, a parent device can have up to 100 children. You can change this limit by setting the MaxConnectedClients environment variable in the edgeHub module. A child device only has one parent.
-
Specify DNS Servers: To improve robustness, it is highly recommended you specify the DNS server addresses used in your environment by configuring it through the container engine settings or through the “createOptions” in the IoT Edge deployment. See details here.
Production deployment checklist
There is a comprehensive article that guides you through multiple aspects you should verify before you roll out your IoT Edge in production. The article presents the topics that apply to the following categories: device configuration, deployment, container management, networking, solution management and security considerations.
The following table contains a summary of the recommendations:
| Category | Recommendation | Priority |
|---|---|---|
| Device Configuration | Install production certificates | Important |
| Have a device management plan | Important | |
| Use Moby as the container engine | Important | |
| Choose upstream protocol | Helpful | |
| Deployment | Be consistent with the upstream protocol | Helpful |
| Set up host storage for system modules | Helpful | |
| Reduce memory space used by the IoT Edge hub | Helpful | |
| Use correct module images in deployment manifests | Helpful | |
| Be mindful of twin size limits when using custom modules | Helpful | |
| Configure how updates to modules are applied | Helpful | |
| Container Management | Use tags to manage versions | Important |
| Manage Volumes | Important | |
| Store runtime containers in your private registry | Helpful | |
| Configure image garbage collection | Helpful | |
| Networking | Review outbound/inbound configuration | Helpful |
| Allow connections from IoT Edge devices | Helpful | |
| Configure communication through a proxy | Helpful | |
| Solution Management | Set up logs and diagnostics | Helpful |
| Set up default logging driver | Helpful | |
| Consider teste and CI/CD pipelines | Helpful | |
| Security Considerations | Manage access to your container registry | Important |
| Limit container access to host resources | Important |
For details, see Prepare to deploy your solution in production - Azure IoT Edge | Microsoft Learn
Sample: Check your IoT Edge device production readiness
In this section we will be showing how you can verify your IoT Edge device by running the ‘check’ command on your device. This command allows you to troubleshoot, diagnose and verify the state of your IoT Edge Device, providing detailed information about:
-
Configuration checks: by verifying the config file and the container engine.
-
Connection checks: by verifying the IoT Edge runtime can access the ports on the host device and that all IoT Edge components can connect to the IoT Hub.
-
Production readiness checks: by looking for recommended production best practices.
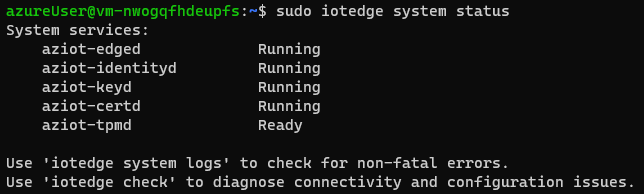
This sample is based on the Quickstart: Deploy your first IoT Edge Module to a virtual Linux device, so before starting, verify IoT Edge is up & running by executing the following commands from shell.
Step by step instructions: | |
|---|---|
| Verify IoT Edge status |
|
| Check deployed modules | $ sudo iotedge list
|
| Check telemetry sent | $ sudo iotedge logs SimulatedTemperatureSensor -f
|
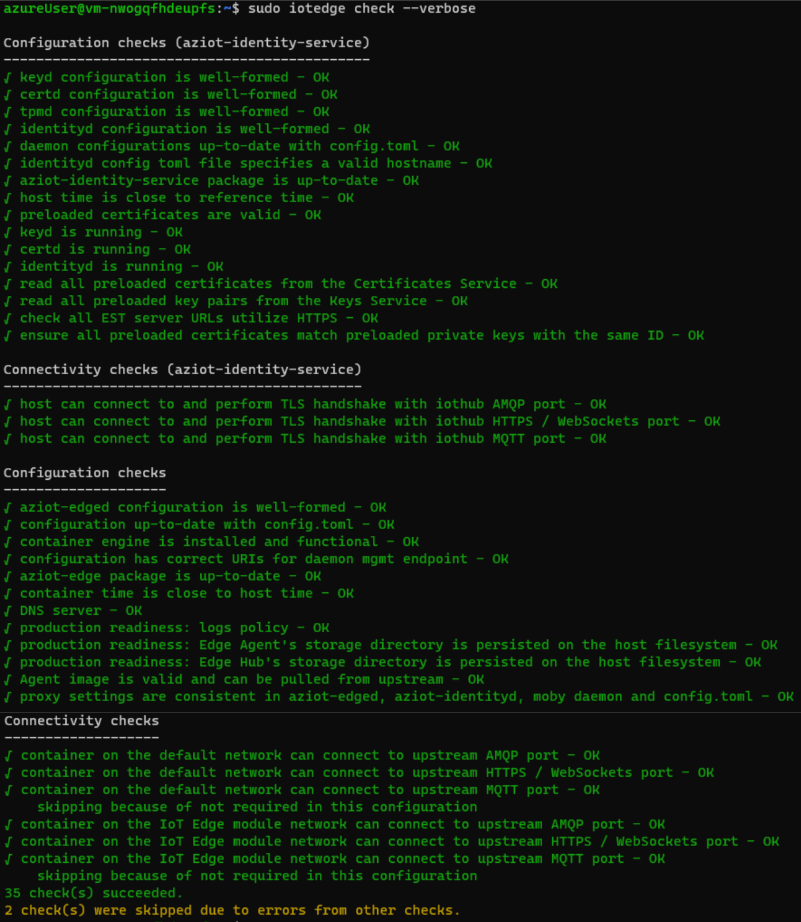
| Now use the ‘iotedge check’ command to verify the connectivity and production readiness of this IoT Edge device: | $ sudo iotedge check
|


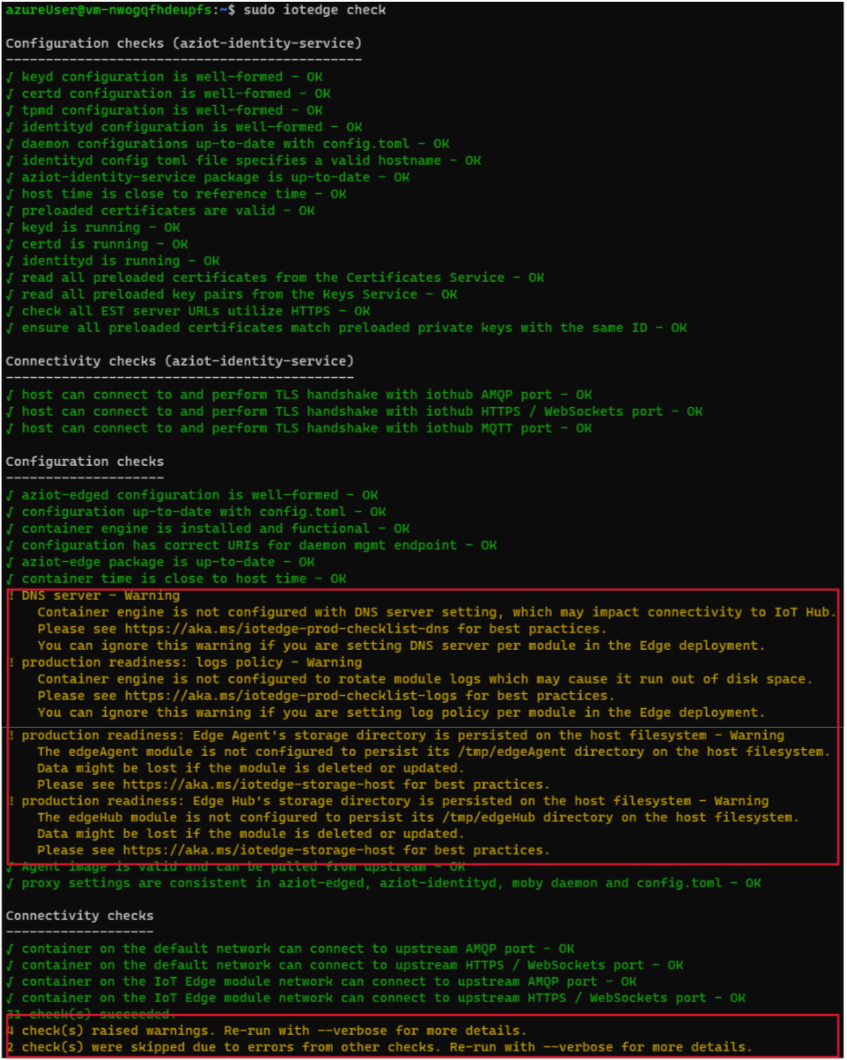
The check command returns the list of verifications executed, and for those that do not pass the checks, it provides detailed guidance pointers. You can identify 4 warnings and its corresponding doc pointers:
-
DSN Server: https://aka.ms/iotedge-prod-checklist-dns
-
Production readiness: logs policy: https://aka.ms/iotedge-prod-checklist-logs
-
Production readiness: Edge Agent’s storage directory is persisted on the host filesystem: https://aka.ms/iotedge-storage-host
-
Production readiness: Edge Hub’s storage directory is persisted on the host filesystem: https://aka.ms/iotedge-storage-host
The first warning points to the lack of configuration of DNS server, which is highly recommended to improve robustness as not having a proper DNS resolution could prevent the edgeAgent from properly downloading the configuration file for the edge device. The resolution is explained in the following reference Troubleshoot Azure IoT Edge common errors | Microsoft Learn.
The second issue spots that your docker container is using the default logging configuration, which would result exhausting your edge device storage. To avoid this situation, you can follow the guidance for Setting up default logging driver.
Finally, the last two are the same issue, related to the fact that the edgeAgent and edgeHub modules is not configured to use the host filesystem, which is the recommendation. Following the doc pointer we end up in the following documentation: Use IoT Edge device local storage from a module - Azure IoT Edge | Microsoft Learn.
Now, following the guidance provided, we are going to fix each of the identified issues.
Step by step instructions: | |
|---|---|
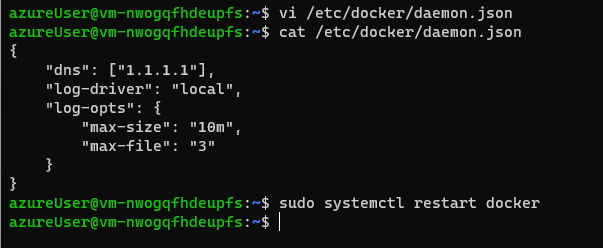
DNS & Logs Policies: These issues can be fixed by adjusting the global configuration for the container engine or by specifying the configuration for each of the modules by using the createOptions (container create options) in the deployment manifest. We are going to use the global approach. | |
| Add or edit a daemon.json file in the /etc/docker directory. | $ sudo vi /etc/docker/daemon.json
|
| Add the following content to define the DNS and local logging driver configuration. | 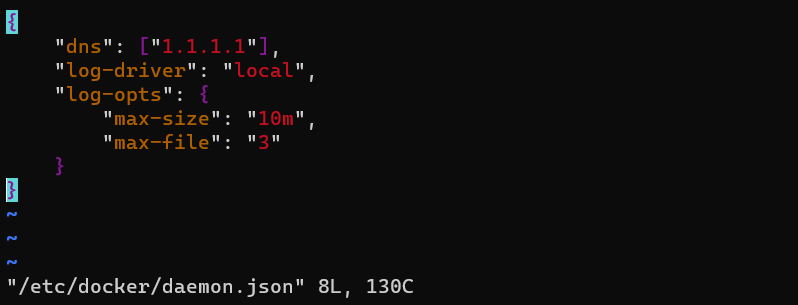 |
| Restart the container engine for the updates to take effect. | $ sudo systemctl restart docker
|
Modules storage configuration: We will be configuring the modules to use the host storage. To do so we need to prepare the host folders we will be using and, then, set up the modules configuration in the deployment manifest. | |
| Create host folders. | $ mkdir /tmp/edgeAgent $ mkdir /tmp/edgeAgent $ mkdir /tmp/tempSensor |
| The system modules do not require permissions handling as per the automatic system permission management, but you need to set the correct permissions for the TemperatureModule folder. | $ sudo chown 1000 /tmp/tempSensor $ sudo chmod 700 /tmp/tempSensor |
| Now, from the Azure Porta, open the edge device configuration and click on “Set Modules”. | 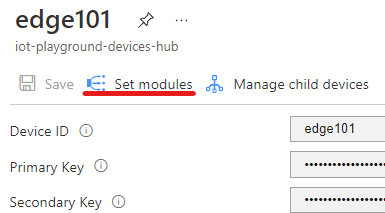 |
| Click on “Runtime Settings” to provide the configuration for the Edge Agent and Edge Hub modules. | 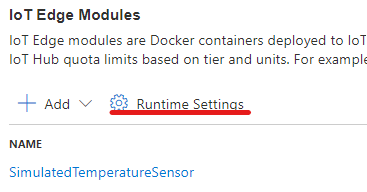 |
| For the Edge Agent, define the storageFolder environment variable pointing to the module storage path /tmp/storage | 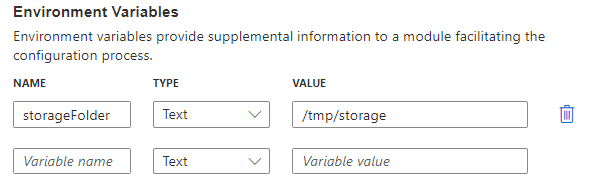 |
| Now define the Container Create Options to bind the module storage path to the host storage folder. | 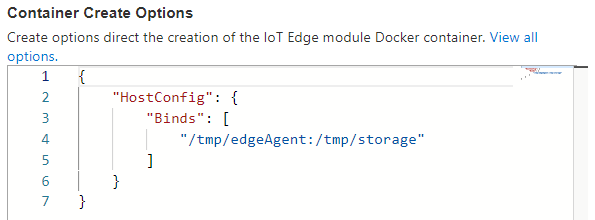 |
| Repeat the steps for the Edge Hub. First, the environment variable pointing to the local storage path. | |
Now the Container Create Options to bind the module and host storage folders. In this case, the edgeHub contains some predefined configuration, be careful to preserve the document correctness. | 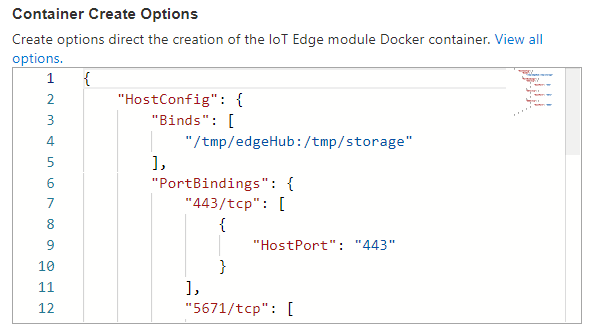 |
| Apply the changes. |  |
| Now, we will configure the TemperatureSensor module. | 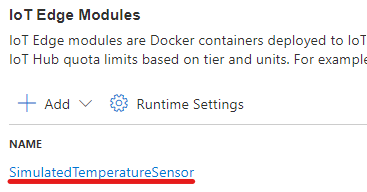 |
| Define the environment variable. | 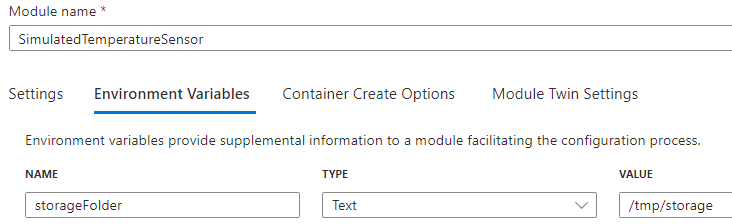 |
| And the Container Create Options. | 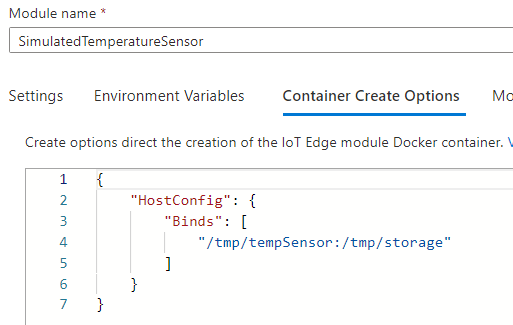 |
| Apply the changes again. | |
| We are not going to change any route, so you can go directly to “Review + create” step | 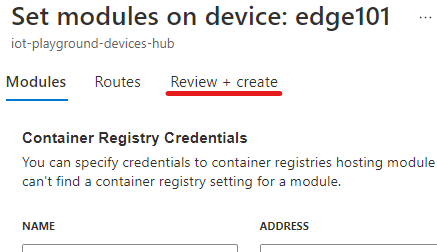 |
| We can review the deployment manifest. And then create the deployment. | 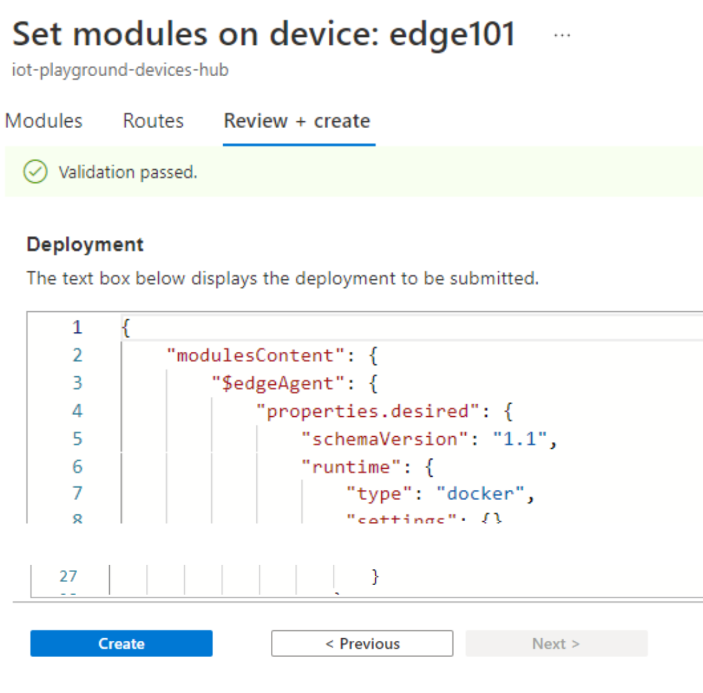 |
| After few moments, the configurations will be applied in the device, so we can execute again the ‘iotedge check’ command. | $ sudo iotedge check
|
| In the output of the command, we see the warnings removed. The only warning left is related to verification of the MQTT protocol connectivity which is not currently in use. | |

Appendix: Helpful tooling
Here are some tools that would help you design, test, and troubleshoot IoT Solutions in general and IoT Edge devices.
Azure IoT Explorer The Azure IoT explorer is a graphical tool for interacting with devices connected to your IoT hub. [Linux / Windows] | Install and use Azure IoT explorer | Microsoft Learn |
|---|---|
Service Bus Explorer The Service Bus Explorer allows users to connect to a Service Bus namespace. The tool provides advanced features like import/export functionality or the ability to test topic, queues, subscriptions, relay services, notification hubs and events hubs. [Windows] | Service Bus Explorer OSS tool |
Azure IoT Tools for Visual Studio Code Microsoft Azure IoT support for Visual Studio Code is provided through a rich set of extensions that make it easy to discover and interact with Azure IoT Hub that power your IoT Edge and device applications. | Azure IoT Tools - Visual Studio Marketplace |
Mostquitto pub/sub MQTT testing cli tools to publish and subscribe messaging based on MQTT protocol. Part of the Eclipse Mosquito MQTT broker. [Linux/Windows] | Download | Eclipse Mosquitto |
MQTT TUI Terminal User Interface to subscribe and publish MQTT messages over terminal. [Linux] | MQTT TUI: Subscribe to a MQTT Topic or publish something quickly from the terminal |
Azure IoT Device Telemetry Simulator The IoT Telemetry Simulator allows you to test Azure IoT Hub, Event Hub or Kafka ingestion at scale. The implementation is communicating with Azure IoT Hub using multiplexed AMQP connections. An automation library allows you to run it as load test as part of a CI/CD pipeline. [Linux/Windows] | Azure IoT Device Telemetry Simulator - Code Samples | Microsoft Learn |