Personalizing Education with Generative AI and Retrieval Augmented Generation Part 3: Deploying a Web Interface
Welcome to the final installment of our three-part tutorial series on building a personalized Python tutor with Generative AI and Retrieval Augmented Generation (RAG)! If you’re new to this series, be sure to check out Part 1, which shows you how to set up the essential Azure resources, and Part 2, which explains how to build out the chatbot’s core functionality.
In this final tutorial, you’ll take your chatbot from the development environment to a live web application where anyone can interact with it.
Prerequisites
To follow this tutorial, ensure you have the following:
- The Azure services set up in Part 1
- The Python web app built in Part 2
- An active Azure subscription
- The Azure command-line interface (CLI) installed
- Docker installed
To preview the final application, take a look at the complete project code.
Register for Episode 4 of the new hands-on live learning series with an SME on Intelligent Apps with Serverless on Azure.
Deploy the Web Interface for the Educational Chatbot
With the chatbot’s intelligence and functionality in place, it’s time to make it accessible to the world. You’ll use Azure Container Apps for a smooth and scalable deployment.
Azure Container Apps is a serverless platform designed to streamline the deployment and management of containerized applications. It handles infrastructure complexities for you, letting you focus on your application’s code.
Containerization packages your chatbot’s code, dependencies, and runtime into a self-contained image. This means it will run consistently across different environments. Since it’s lightweight, you can scale up or down based on demand.
Creating an Azure Container Registry
Azure Container Registry (ACR) is your private storage space for container images. To get started with ACR, use the Azure CLI to log in to your Azure account by running:
az login
After authenticating, run the following, ensuring you replace personaltutor with your chosen registry name:
az acr login --name personaltutor
Building the Container Image
Next, create a file named Dockerfile in your project’s root directory. This file provides Docker with instructions for building your image:
FROM python:3.11-slim-bullseye

WORKDIR /app

# Install Streamlit and other dependencies
COPY requirements.txt ./
RUN pip install -r requirements.txt

# Copy your application files
COPY . ./

# Expose the port used by Streamlit
EXPOSE 8501

# Command to start your app
CMD streamlit run main.py
Execute the following command to build the image, making sure to use your registry name:
az acr build --registry personaltutor --image python-tutor:latest --file Dockerfile .
This command instructs Azure to build a container image named python-tutor:latest, using your Dockerfile and the code in the current directory (indicated by the period). The image is then stored in your ACR.
Once you push your image to ACR, open the Azure portal and navigate to your container registry. Enable admin access by selecting Access keys under Settings, and then clicking Enable under Admin user.
Alternatively, run the following command from the terminal to enable admin access (again, updating personaltutor to reflect your selected registry name):
az acr update -n personaltutor --admin-enabled true
Creating an Environment
An Azure Container Apps environment acts as a logical boundary for your apps. Think of it as the neighborhood where your chatbot will live.
To create a container app environment, run:
az containerapp env create \
   --name python-tutor-app-env \
   --resource-group personal-tutor \
   --location eastus
This command creates an environment named python-tutor-app-env within your existing resource group, located in the eastus region.
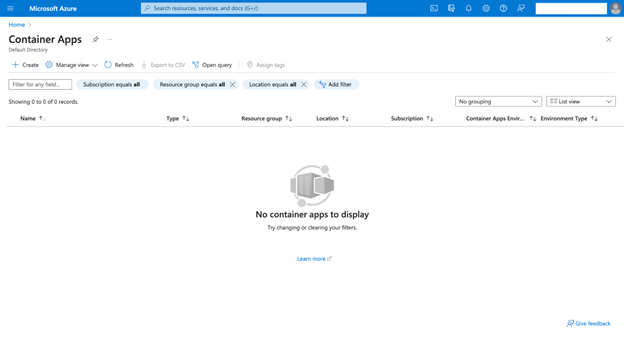
Creating the Container App
Now, you can deploy your application using Azure Container Apps!
Sign in to the Azure portal and search for “Azure Container Apps” in the search bar at the top. Select the service. Then, click + Create to start a new container app.
On the Basics tab, configure the settings as follows:
- Subscription and Resource group — For consistency, ensure these match the resources you set in the first two parts of this series.
- Container app name — Choose a unique name, such as “personaltutor.”
- Region — Select the same region where you created your environment.
- Container Apps Environment — Select the environment you created earlier.
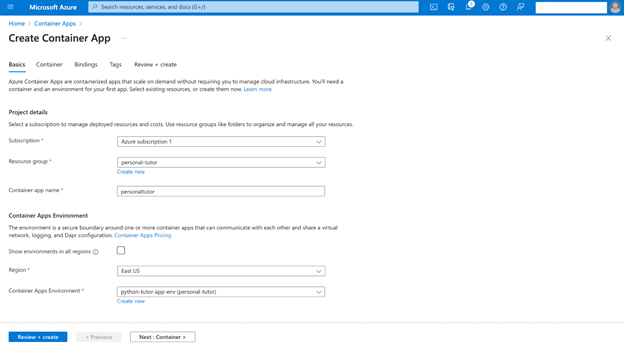
Click Next: Container > to proceed.
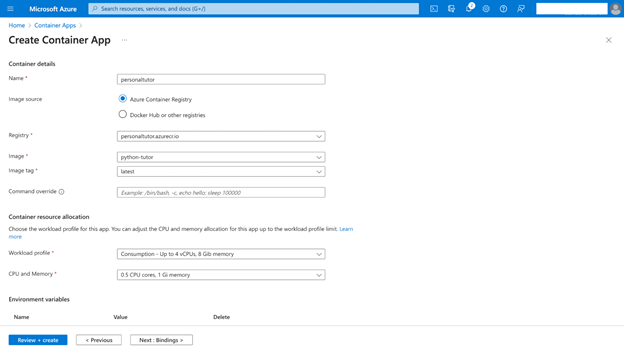
On the Container tab, configure the settings as follows:
- Uncheck Use quickstart image, as you’ll use your custom image.
- Image Source — Select Azure Container Registry.
- Registry — Choose the ACR you created previously.
- Image — Select the python-tutor:latest image you built.
- Tag — Keep the default latest.
Then, click Environment Variables and add the following, ensuring you replace the placeholders with your actual values:
- AOAIEndpoint
- AOAIKey
- AOAIDeploymentId
- SearchEndpoint
- SearchKey
- SearchIndex
Your chatbot needs these variables to connect to and interact with your Azure OpenAI and AI Search services. Review the section “Retrieving Environment Variables” in Part 2 of this series if you need a refresher on how to retrieve these.
Click Next: Bindings >. Leave the Bindings section with the default settings and click Next: Ingress >.
Configure as follows:
- Ingress — Select Enabled to make your app publicly accessible.
- Ingress traffic — Choose Accepting traffic from anywhere.
- Ingress type — Keep HTTP.
- Target port — Enter “8501” (assuming your Dockerfile specifies this).
- Session affinity — Select Enabled. This helps maintain user sessions.
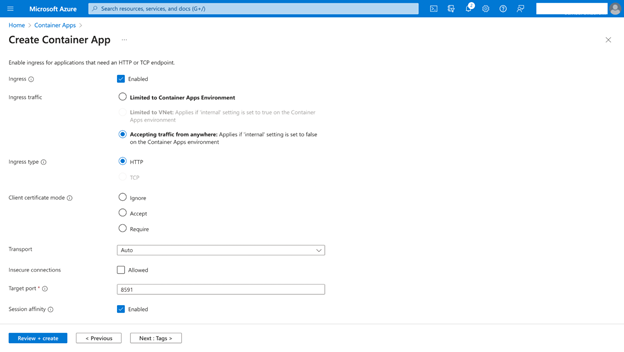
Click Review + create.
Double-check your settings. If everything is correct, click Create.
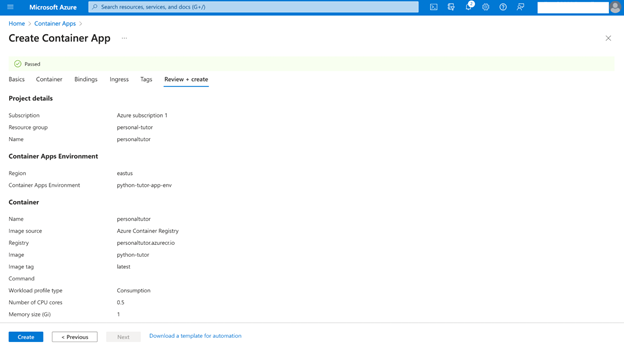
Azure will now deploy your application as a container app. Once finished, you’ll see a URL in the Overview section (Application Url) where your app is live!

Next Steps
Congratulations! Over this three-part series, you built an incredible AI-powered educational chatbot using Azure OpenAI, Azure AI Search, and Azure Container Apps for scalable deployment. You’ve seen how simple it is to build a dynamic, scalable, and high-impact Intelligent App with the help of Azure services.
Now that you have some boots-on-the-ground experience building an Intelligent App, test your knowledge by joining our Cloud Skills Challenge. And to keep the learning going, register for an upcoming demo bytes for Intelligent Apps with Azure Container Apps where the product engineering team gives a walkthrough on using open source vector databases and building a multi-LLM chat application.