In this article, continue to explore the power of multi-model databases for Intelligent Apps and their integration with Azure Cosmos DB and Azure Kubernetes Service (AKS).
What We'll Cover:
- Loading OCR Data into the Multi-Model Database
- Configuring the Intelligent App to Use Cosmos DB
- Testing the app locally and deploying to AKS

Powering Intelligent Apps with a Multi-Model Database Using Cosmos DB and Azure Kubernetes Service (2)
In the first article of this week, we created an Intelligent App that helped us analyze images and extract valuable data. We constructed a Python web API to execute optical character recognition (OCR) on images uploaded to the application using Azure AI Vision and Azure Kubernetes Service (AKS) for hosting the application.
In continuation of the previous article, we’ll continue to explore how Azure Cosmos DB’s support for multi-model databases provides flexibility in data modeling, scalability, and performance optimization—crucial for storing, indexing, and querying data in multiple formats.
Loading OCR Data into the Multi-Model Database
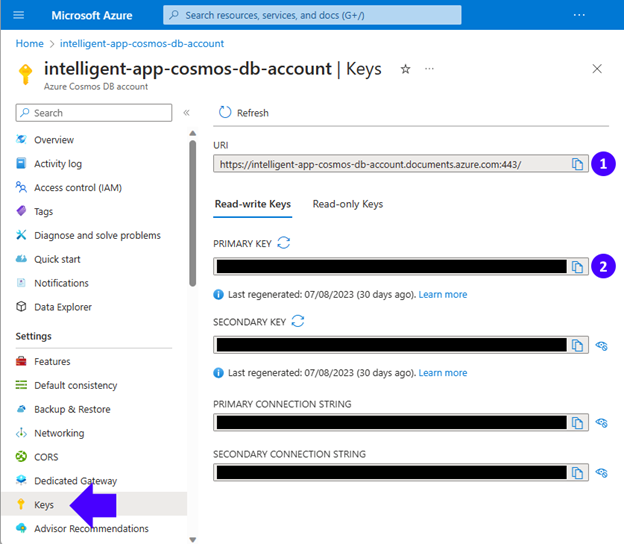
Once we’ve created our Cosmos DB account and configured our containers, we can access them using the Azure Cosmos DB API with the appropriate host URI and key. You can find these credentials by selecting Keys on the sidebar, like in the image below:
Configuring the Intelligent App to Use Cosmos DB
Now, we must provide the app with our Cosmos DB database credentials. We’ll do this using the environment variables in the deployment configuration file created in the first part of this series.
Open the deployment.yml file (in the Deployment folder) and add the following environment variables matching your Cosmos DB account information:
- name: COSMOS_ACCOUNT_CONNECTION_STRING
  value: <YOUR-COSMOS-ACCOUNT-PRIMARY-CONNECTION-STRING>
- name: COSMOS_ACCOUNT_HOST
  value: <YOUR-COSMOS-ACCOUNT-URI>
- name: COSMOS_ACCOUNT_KEY
  value: <YOUR-COSMOS-ACCOUNT-PRIMARY-KEY>
- name: COSMOS_DATABASE_ID
  value: IntelligentAppDB
- name: COSMOS_IMAGE_ANALYSIS_CONTAINER_ID
  value: ImageAnalysisContainer
- name: COSMOS_AGGREGATE_RESULTS_CONTAINER_ID
  value: AggregateResultsContainer
Then, open the docker-compose.yml file and add the following environment variables, copying the same values you defined above:
      - COSMOS_ACCOUNT_CONNECTION_STRING=<YOUR-COSMOS-ACCOUNT-PRIMARY-CONNECTION-STRING>
      - COSMOS_ACCOUNT_HOST=<YOUR-COSMOS-ACCOUNT-URI>
      - COSMOS_ACCOUNT_KEY=<YOUR-COSMOS-ACCOUNT-PRIMARY-KEY>
      - COSMOS_DATABASE_ID=IntelligentAppDB
      - COSMOS_IMAGE_ANALYSIS_CONTAINER_ID=ImageAnalysisContainer
      - COSMOS_AGGREGATE_RESULTS_CONTAINER_ID=AggregateResultsContainer
Diverse Data and Cosmos DB: A Perfect Match
The diverse and often unstructured nature of OCR data finds an ideal match in the flexible structure of a multi-model database like Azure Cosmos DB for NoSQL. OCR data frequently encompasses many document types, varying layouts, languages, and formatting styles, making it inherently challenging to impose a rigid schema.
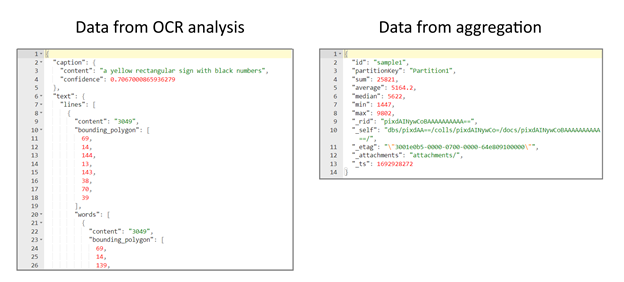
The picture below represents the varying data layouts we’ll encounter in this article. The left-hand picture shows Data from OCR analysis, which contains AI-generated descriptions of the image, plus the characters read and their positions within it. The right-hand picture shows Data from aggregation—the numeric operations performed on the numbers read.
Implementing the CosmosDBHelper Class
We need a Python class to provide a convenient way to interact with our Azure Cosmos DB service. It will encapsulate the necessary operations for creating and managing documents within the ImageAnalysisContainer and the AggregateResultsContainer.
Let’s create a file named CosmosDBHelper.py in the project root folder with the following contents:
import os
import azure.cosmos.cosmos_client as cosmos_client

class CosmosDBHelper:

  def __init__(self):
    self.cosmos_database_id = os.environ["COSMOS_DATABASE_ID"]
    self.cosmos_image_analysis_container_id = os.environ["COSMOS_IMAGE_ANALYSIS_CONTAINER_ID"]
    self.cosmos_aggregate_results_container_id = os.environ["COSMOS_AGGREGATE_RESULTS_CONTAINER_ID"]
    cosmos_account_host = os.environ["COSMOS_ACCOUNT_HOST"]
    cosmos_account_key = os.environ["COSMOS_ACCOUNT_KEY"]
    self.client = cosmos_client.CosmosClient(cosmos_account_host, {'masterKey': cosmos_account_key})

  def create_analysis(self, document):
    db = self.client.get_database_client(self.cosmos_database_id)
    container = db.get_container_client(self.cosmos_image_analysis_container_id)
    return container.upsert_item(document)

  def create_aggregate_result(self, inserted_id, aggregate_result):
    db = self.client.get_database_client(self.cosmos_database_id)
    container = db.get_container_client(self.cosmos_aggregate_results_container_id)
    entity = {
      "id": inserted_id,
      "sum": float(aggregate_result["sum"]),
      "average": float(aggregate_result["average"]),
      "median": float(aggregate_result["median"]),
      "min": float(aggregate_result["min"]),
      "max": float(aggregate_result["max"])
    }
    return container.upsert_item(entity)
Let's break down the code step by step, detailing the process of transferring the OCR-extracted data into the Cosmos DB database.
The azure.cosmos.cosmos_client module imported at the beginning of the file represents the Azure Cosmos DB for NoSQL client library for Python. We use it to interact with the Azure Cosmos DB service.
The CosmosDBHelper class constructor initializes the class instance and retrieves configuration values from the environment variables we configured in the previous section:
COSMOS_DATABASE_ID—The ID of the Cosmos DB databaseCOSMOS_IMAGE_ANALYSIS_CONTAINER_ID—The ID of the container for storing image analysis documentsCOSMOS_AGGREGATE_RESULTS_CONTAINER_ID—The ID of the container for storing aggregate result documentsCOSMOS_ACCOUNT_HOST—The host URL for the Cosmos DB accountCOSMOS_ACCOUNT_KEY—The authentication key for the Cosmos DB account
The class constructor also creates a CosmosClient instance using the provided account host and key, which we’ll use in the methods below:
-
The
create_analysismethod inserts or updates an image analysis document into theImageAnalysisContainercontainer. It takes the document parameter, which represents the structured analysis data, to be inserted or updated. This method first fetches the database client using the provided database ID and the previously created Cosmos Client instance. Then, it fetches the container client for image analysis using the provided container ID. Finally, thecreate_analysismethod calls theupsert_itemmethod on the container client to insert or update the supplied document. -
The
create_aggregate_resultmethod inserts or updates an aggregate result document into the specified container. It takes two arguments:inserted_id(the document’s ID) andaggregate_result(a dictionary containing aggregated data like sum, average, median, min, and max). Similarly to the previous method, it fetches the database and container clients. Finally, thecreate_aggregate_resultconstructs an entity dictionary with the provided data and uses theupsert_itemmethod to insert or update the entity in theAggregateResultsContainercontainer.
Introducing New OCR Helper Functions
We need some additional Python functions to process and insert image analysis results into a Cosmos DB using the CosmosDBHelper class from the previous explanation. First, open the ocr_helper.py file from the first part of this series and add these import statements at the top of the file:
import json
from CosmosDBHelper import CosmosDBHelper
Next, locate these lines in the ocr_helper.py file:
  ocr_result = get_ocr_result(result)
  return ocr_result
Replace these lines with:
  ocr_result = get_ocr_result(result)
  analysis_result = get_image_analysis_result(result, source_image)
  ocr_result["analysis_result"] = analysis_result
  inserted_id = insert_analysis(ocr_result["analysis_result"])
  insert_aggregate_result(inserted_id, ocr_result["aggregate_result"])
  return ocr_result
Last, add the get_image_analysis_result, insert_aggregate_result, and insert_analysis functions:
def get_image_analysis_result(result, source_image):

  analysis_result = { }
  string_list = []

  if result.reason != sdk.ImageAnalysisResultReason.ANALYZED:
    return sdk.ImageAnalysisErrorDetails.from_result(result)
  else:

    if result.caption is not None:
        analysis_result["caption"] = {
                                      "content": result.caption.content,
                                      "confidence": result.caption.confidence
                                      }
        analysis_result["text"] = {
                                      "lines": []
                                  }
    if result.text is not None:
      for line in result.text.lines:
        line_result = {
                        "content": line.content,
                        "bounding_polygon": line.bounding_polygon,
                        "words": [],
                      }

        for word in line.words:
          word_result = {
                          "content": word.content,
                          "bounding_polygon": word.bounding_polygon,
                          "confidence": word.confidence
                        }
          string_list.append(word.content)
          line_result["words"].append(word_result)

        document_id = os.path.basename(source_image).rsplit('.', 1)[0]

        analysis_result["file_name"] = source_image
        analysis_result["text"]["lines"].append(line_result)
        analysis_result["id"] = document_id
        analysis_result["partitionKey"] = "Partition1"

      return analysis_result

def insert_aggregate_result(inserted_id, aggregate_result):
    db_helper = CosmosDBHelper()
    db_helper.create_aggregate_result(inserted_id, aggregate_result)

def insert_analysis(analysis_result):
    db_helper = CosmosDBHelper()
    doc = db_helper.create_analysis(analysis_result)
    return str(doc["id"])
Let's examine each function step by step.
-
The
get_image_analysis_resultfunction takes two parameters:result, an image analysis result object, andsource_image, the path to the source image. This function is responsible for the format transformation and data loading process: It creates an empty dictionary,analysis_result, and an empty list,string_list, to store words extracted from the text analysis. It checks if thereasonattribute of the result indicates that the image has been successfully analyzed (not an error). The function iterates through each line inresult.text.linesand processes the line’s content, bounding polygon, and words. In the end, the function returns the populated analysis_result dictionary. -
The
insert_aggregate_resultfunction takes two parameters:inserted_id, the ID of the inserted document, and aggregate_result, a dictionary containing aggregated analysis results (sum, average, median, min, max). It initializes an instance of theCosmosDBHelperclass calleddb_helper. It calls thecreate_aggregate_resultmethod ofdb_helperto insert the providedaggregate_resultinto theAggregateResultsContainercontainer. -
The
insert_analysisfunction takes one parameter:analysis_result, a dictionary containing the image analysis results. It initializes an instance of theCosmosDBHelperclass calleddb_helper. It then calls thecreate_analysismethod of db_helper to insert the providedanalysis_resultinto the Analysis Results container. The ID of the inserted document is retrieved from the returned document and converted to a string before being returned from the function.
The steps above highlight how the diverse and unstructured nature of OCR data, which we obtained from the Azure AI for Vision configured in the first article of this series, fits well with the flexible structure of a multi-model database.
Now, open your terminal and run the command below to reinstall all the packages added in the first part of this series:
pip install -r requirements.txt
Then, run the following commands to install the packages related to Azure Cosmos DB:
pip install azure-cosmos
pip install azure-data-tables
Finally, update the requirements.txt file with the current package list:
pip freeze > requirements.txt
Testing the Intelligent App Locally
As in Part 1 of this series, run the following command in the terminal to build the image and start a container for the Intelligent App services defined in docker-compose.yml:
docker-compose up --build --force-recreate
To test the API, open Postman and provide the fields as follows:
- URL: http://localhost:5000/
- Method: POST
- Body:
- Form-data
- Key: file—Click the right end of the Key field and select “File” from the dropdown list.
- Value: Click Select Files, then select the sample1.png file provided in the sample code.
- Form-data

Now click the Send button and review the result in Body:
"{\"aggregate_result\": {\"sum\": \"25821\", \"average\": \"5164.2\", \"median\": \"5622\", \"min\": \"1447\", \"max\": \"9802\"}, \"numbers_read\": [\"3049\", \"5901\", \"5622\", \"1447\", \"9802\"], \"analysis_result\": {\"caption\": {\"content\": \"a yellow rectangular sign with black numbers\", \"confidence\": 0.7065904140472412}, \"text\": {\"lines\": [{\"content\": \"3049\", \"bounding_polygon\": [69.0, 14.0, 144.0, 13.0, 143.0, 38.0, 70.0, 39.0], \"words\": [{\"content\": \"3049\", \"bounding_polygon\": [69.0, 14.0, 139.0, 13.0, 140.0, 38.0, 69.0, 39.0], \"confidence\": 0.991}]}, {\"content\": \"5901\", \"bounding_polygon\": [70.0, 54.0, 142.0, 54.0, 141.0, 78.0, 70.0, 79.0], \"words\": [{\"content\": \"5901\", \"bounding_polygon\": [70.0, 54.0, 139.0, 54.0, 139.0, 79.0, 70.0, 79.0], \"confidence\": 0.995}]}, {\"content\": \"5622\", \"bounding_polygon\": [70.0, 94.0, 143.0, 94.0, 142.0, 119.0, 69.0, 119.0], \"words\": [{\"content\": \"5622\", \"bounding_polygon\": [69.0, 94.0, 140.0, 94.0, 140.0, 119.0, 69.0, 119.0], \"confidence\": 0.998}]}, {\"content\": \"1447\", \"bounding_polygon\": [69.0, 136.0, 144.0, 136.0, 144.0, 161.0, 69.0, 161.0], \"words\": [{\"content\": \"1447\", \"bounding_polygon\": [70.0, 137.0, 140.0, 137.0, 139.0, 161.0, 70.0, 161.0], \"confidence\": 0.998}]}, {\"content\": \"9802\", \"bounding_polygon\": [69.0, 176.0, 142.0, 176.0, 143.0, 202.0, 69.0, 202.0], \"words\": [{\"content\": \"9802\", \"bounding_polygon\": [69.0, 176.0, 141.0, 176.0, 141.0, 202.0, 69.0, 202.0], \"confidence\": 0.998}]}]}, \"file_name\": \"static/files/sample1.png\", \"id\": \"sample1\", \"partitionKey\": \"Partition1\"}}"
As we can see, the app running on a local container returned the correct JSON containing the analysis results and aggregate results based on the sample image.
Updating the Version of the Intelligent App on AKS
Now that we’ve learned how to implement and test the new Cosmos DB-powered app version locally, let’s explore how to update and deploy this new version of our Intelligent App in AKS using Docker and Kubernetes command-line tools. This process ensures that the latest version of the application is deployed and running in the Kubernetes cluster.
Checking the Results in Azure Cosmos DB
Now, it’s time to see how the results were stored in the Azure Cosmos DB for NoSQL multi-model database.
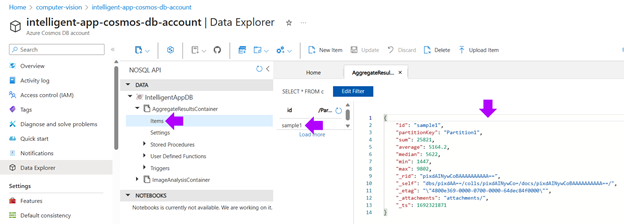
In the Azure Portal, open your Cosmos DB account resource, click the Data Explorer tab, expand the IntelligentAppDB database tree, and click the Items node within the AggregateResultsContainer. Then click the sample1 item to see the results on the right-side panel:
Now, click the Items node within the ImageAnalysisContainer and click the sample1 item to see the results on the right-side panel:
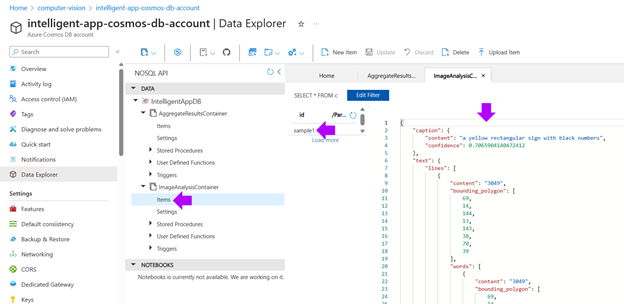
As we can see, our Intelligent App performs OCR operations that produce results in varied structures. However, through Azure Cosmos DB, we can store these structures effortlessly by separating items into containers without creating complex schemas for each data type.
Before creating version 2 of the app, ensure your Docker container is running. Then, run the following commands to stop and remove the local intelligent-app container:
docker container stop intelligent-app
docker container rm intelligent-app
Then, to recreate the Intelligent App’s image, use the docker-compose app command below with the --build argument:
docker-compose up --build --force-recreate
Now, use the docker tag command to tag the image. Replace <name-of-azure-container-registry> below with your ACR login server name or public registry hostname. Be sure to update the image version to :v2 as follows:
docker tag intelligent-app <name-of-azure-container-registry>.azurecr.io/intelligent-app:v2
Now, run the following command to show your container image with the new tags:
docker images
You’ll get a result similar to the one below:
| REPOSITORY | TAG | IMAGE ID | CREATED | SIZE |
|---|---|---|---|---|
| intelligent-app | latest | 1ca9eb914279 | 40 minutes ago | 258MB |
| <name-of-azure-container-registry>.azurecr.io/intelligent-app | v2 | 1ca9eb914279 | 40 minutes ago | 258MB |
| <name-of-azure-container-registry>.azurecr.io/intelligent-app | v1 | 676ede4aa18c | About an hour ago | 197MB |
Now, use docker push to upload the image to your registry. Replace <name-of-azure-container-registry> with your ACR login server name.
docker push <name-of-azure-container-registry>.azurecr.io/intelligent-app:v2
To update the application, use the kubectl set command. Update <name-of-azure-container-registry> with the login server or hostname of your container registry, and specify the v2 application version:
kubectl set image deployment intelligent-app intelligent-app=<name-of-azure-container-registry>.azurecr.io/intelligent-app:v2
Now, we’ll deploy version 2 of our application using the kubectl command. First, change the terminal to the Deployment folder:
cd Deployment
Open the deployment.yml file in an editor and update the container image version tag to v2:
image: intelligentapp.azurecr.io/intelligent-app:v2
Then, run the following command to create or update Kubernetes resources defined in the deployment.yml file:
kubectl apply -f deployment.yml
Exploring Real-World Use Cases for Multi-Model Databases
Numerous industries can benefit from leveraging multi-model databases when building Intelligent Apps. Below are just a few real-world examples:
- E-commerce personalization—Multi-model databases allow e-commerce platforms to store and manage various data types, such as customer profiles, product details, purchase history, and user-generated content like reviews and images.
- Healthcare patient records—Multi-model databases can help manage diverse patient data in the healthcare sector, like diagnoses and medications, semi-structured data like doctors' notes, and unstructured data like medical images and test results.
- Social media analytics—Multi-model databases find applications in social media platforms for handling the vast and varied data users generate, such as user profiles, connections, posts, images, videos, and textual content. The databases enable social platforms to execute quick and complex queries for real-time analytics.
- Cosmos DB’s schema-agnostic approach helps it seamlessly adapt to this diversity, enabling our Intelligent App to store OCR analysis and aggregation data as JSON documents without predefined structures.
Unlike traditional relational databases, the flexibility of a multi-model database like Cosmos DB for NoSQL ensures that the database can accommodate the ever-evolving OCR data without frequent schema modifications. This quality makes it a robust choice for our Intelligent App, which processes diverse documents and requires rapid adaptability.
Exercise
- Complete this hands-on sample project code to build your intelligent app with multi-modal databases and AKS.
- Complete the Apps Cloud Skills Challenge to build on your app dev and AI skills.
- Register for Ask the Expert: Azure Kubernetes Service session for live Q&A with the Product Engineering team on building intelligent serverless apps.
Next Steps
Multi-model databases are invaluable for Intelligent Apps, offering intelligent indexing, caching, and query optimization for swift data access. They accommodate various data structures like documents, graphs, and key-value pairs, enabling cohesive data management, streamlined development, and insightful analysis—promoting limitless scalability and letting us adapt data to numerous formats without compromising efficiency.
Discover Azure’s Cosmos DB and other services to unlock even more potential in your Intelligent Apps—and carry on to the third and final topic of this week to learn how to take your Intelligent Apps to the next level with Azure Kubernetes Service in the next article.