In the last article, we created an Intelligent App that leverages Azure AI Vision to analyze images and extract data. Develop an API to perform optical character recognition (OCR) on uploaded images and testing this API locally.
In this article, we will deploy the web API to the cloud platform using Azure Kubernetes Service.
What We'll Cover:
- Understanding Azure AI Vision and Azure Kubernetes Service
- Build a Python Web API to perform OCR
- Test the API locally
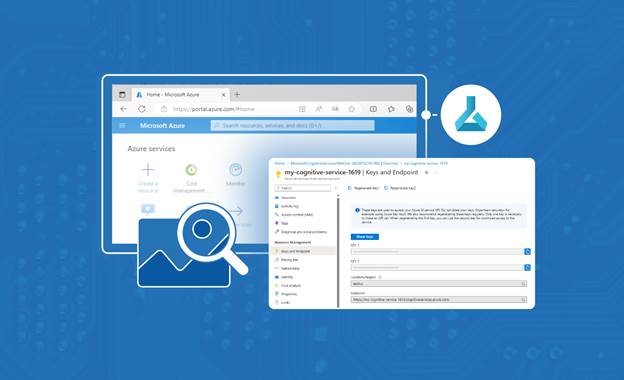
Jumpstart Your AI Journey: Building Your First Intelligent App with Azure AI and AKS (2)
In the previous article we explored the creation of an Intelligent App that leverages Azure AI Vision to analyze images and extract data. We learned how to build a Python Web API to perform OCR on uploaded images and subsequently test this API locally.
In this article we will use Azure Kubernetes Service (AKS) to develop, publish, and maintain our app in the cloud on Azure.
Let’s get started!
Prerequisites
To follow this tutorial, ensure you have completed Jumpstart Your AI Journey: Building Your First Intelligent App with Azure AI and AKS (1).
Pushing a Container Image to Azure Container Registry (ACR)
To start, open your CLI or terminal and type the following command:
az login
Follow the instructions displayed on your browser to enter your Azure credentials.
Once authenticated, you’ll initiate a secure connection between your local environment and Azure. This process grants you access to cloud services and resources.
Next, type the command below in your terminal to set up a new Azure Container Registry (ACR) to store your container images:
az acr create --resource-group computer-vision --name <name-of-azure-container-registry> --sku Basic
Remember to replace <name-of-azure-container-registry> with your container registry name. The name must be unique within Azure and comply with these rules.
The command above creates an Azure Container Registry (ACR) in the computer-vision resource group under the Basic SKU. This ACR is your secure and private repository for storing container images within Azure.
Next, log in to the registry with the following command:
az acr login -n <name-of-azure-container-registry>
The az acr login command above lets you securely authenticate and access the specified ACR without providing their Azure credentials each time.
Now, run the following command in your terminal. It will display the endpoint URL to log in to and interact with the ACR for pushing and pulling container images.
az acr show --name <name-of-azure-container-registry> --query loginServer --output table
This returns an endpoint URL as follows:
Result
<name-of-azure-container-registry>.azurecr.io
Now, run the following command to show all container images, their repository, tags, and size:
docker images
| REPOSITORY | TAG | IMAGE ID | CREATED | SIZE |
|---|---|---|---|---|
| intelligent-app | latest | a7bf9f753617 | 16 hours ago | 197MB |
Tags are necessary to push Docker images to a remote registry like Azure Container Registry. They also let you differentiate between different versions of the same image and upload or download the one you want.
Run the following command to tag your Docker image:
docker tag intelligent-app <name-of-azure-container-registry>.azurecr.io/intelligent-app:v1
Then, run the docker images command again to check your tagged image:
docker images
| REPOSITORY | TAG | IMAGE ID | CREATED | SIZE |
|---|---|---|---|---|
| intelligent-app | latest | c52168039265 | About a minute ago | 197MB |
| <name-of-azure-container-registry>.azurecr.io/intelligent-app | v1 | c52168039265 | About a minute ago | 197MB |
Now run the following command so Docker can securely upload the image to your Azure Container Registry:
docker push <name-of-azure-container-registry>.azurecr.io/intelligent-app:v1
Once we've deployed the image to the container registry, AKS can access it during deployment.
Watch Episode 03 for the Learn Live session to experience a guided session on how to build, test and deploy an end-to-end intelligent app solution.
Deploying the Intelligent App on Azure Kubernetes Service (AKS)
Before we deploy our Intelligent App to AKS, we need to provision an AKS cluster and define Kubernetes manifests.
To provision an AKS cluster to host our application, we specify the desired configurations for the cluster, such as the number of nodes, node size, and networking options. But first, download and install the Kubernetes command-line tools (kubectl), a client credential plugin implementing Azure authentication:
az aks install-cli
If you’re using Linux, review this tutorial. Then run the following:
sudo az aks install-cli
Next, run the following command in your terminal to enable access to the networking-related resources and services provided by the `Microsoft.Network`` namespace in Azure:
az provider register --namespace Microsoft.Network
Now, we must create an AKS cluster. Run the following command to create an AKS cluster named aks-intelligent-app in the computer-vision resource group.
az aks create --resource-group computer-vision --name aks-intelligent-app --node-count 1 --generate-ssh-keys
The command above specifies the target resource group: computer-vision. The node pool is configured with one virtual machine (VM), and the secure shell (SSH) keys for secure node access are generated automatically.
Next, run the following command to update the AKS cluster you created by attaching it to your ACR. Doing so allows the AKS cluster to pull container images from the specified ACR when deploying workloads to the cluster.
az aks update -n aks-intelligent-app -g computer-vision --attach-acr <name-of-azure-container-registry>
Then, run the command below to configure kubectl to work with our AKS cluster in the computer-vision resource group.
az aks get-credentials --resource-group computer-vision --name aks-intelligent-app
The command above retrieves the necessary credentials and context information required for kubectl to communicate with the AKS cluster.
We still have to define the Kubernetes manifests written in YAML, describing the desired state of our application deployment, including containers, networking, and scaling rules. We’ll prepare these manifests, including Deployment and Service configurations, to define how our application should be deployed and exposed.
Create a folder named Deployment in the project root directory. Next, create two files in the deployment folder: deployment.yml and service.yml.
Add the following configuration to the deployment.yml file, replacing the <name-of-azure-container-registry> placeholder with your registry’s name:
apiVersion: apps/v1
kind: Deployment
metadata:
  name: intelligent-app
spec:
  replicas: 1
  selector:
    matchLabels:
      app: intelligent-app
  template:
    metadata:
      labels:
        app: intelligent-app
    spec:
      nodeSelector:
        kubernetes.io/os: linux
      containers:
        - name: intelligent-app
          image: <name-of-azure-container-registry>.azurecr.io/intelligent-app:v1
          resources:
            limits:
              memory: 512Mi
              cpu: "1"
            requests:
              memory: 256Mi
              cpu: "0.2"
          ports:
            - containerPort: 5000
          env:
            - name: FLASK_DEBUG
              value: "1"
            - name: VISION_KEY
              value: <THE-KEY-1-VALUE-FROM-YOUR-AZURE-AI-SERVICE>
            - name: VISION_ENDPOINT
              value: <THE-ENDPOINT-VALUE-FROM-YOUR-AZURE-AI>
Additionally, edit the VISION_KEY and VISION_ENDPOINT environment variables above according to the API key and endpoint of your Azure AI Services instance.
Then, add the following configuration to the service.yml file:
apiVersion: v1
kind: Service
metadata:
  name: intelligent-app-service
spec:
  type: LoadBalancer
  ports:
    - protocol: TCP
      port: 80
      targetPort: 5000
      name: port5000
  selector:
    app: intelligent-app
Now, we’ll deploy our application using kubectl. Applying the Kubernetes manifests creates the necessary resources and deploys our containerized application to the AKS cluster.
First, change the terminal to the deployment folder:
cd Deployment
Then, run the following command to create or update Kubernetes resources defined in the deployment.yml file:
kubectl apply -f deployment.yml
Create a Kubernetes Service resource in a Kubernetes cluster based on the configuration defined in the service.yml file using the code below:
kubectl apply -f service.yml
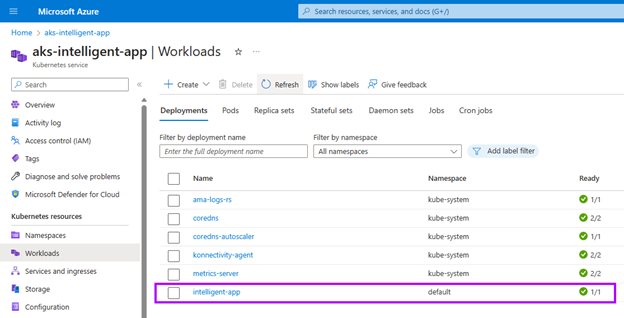
Once you’ve applied the resource definition and the service configuration contained in the deployment.yml and the service.yml files, open the aks-intelligent-app Kubernetes Service in the Azure Portal, select Workloads under Kubernetes resources on the sidebar, and find the deployment named intelligent-app. It must have the status “Ready 1/1”. If you encounter an issue with this status, check out these troubleshooting resources.
Testing the Intelligent App on AKS
To test the app on AKS, first, run the command below:
kubectl get services
This command lists the Services and their corresponding details, including the Service name, cluster IP address, external IP, and ports.
| NAME | TYPE | CLUSTER-IP | EXTERNAL-IP | PORT(S) | AGE |
|---|---|---|---|---|---|
| intelligent-app-service | LoadBalancer | 10.0.77.60 | 20.121.76.153 | 80:30936/TCP | 47s |
| kubernetes | ClusterIP | 10.0.0.1 | <none> | 443/TCP | 14m |
The output above shows a Kubernetes Service named intelligent-app-service with a type set to LoadBalancer. It’s reachable from within the cluster using the cluster IP 10.0.77.60 and accessible externally via the external IP 20.121.76.153 on port 80 (mapped to port 30936).
Note: Your set of IP addresses will differ. Remember to use your unique external IP address when testing with Postman.
To test the deployed app, go to Postman, replace the URL with the external IP of the Kubernetes Service you just deployed, and click Send:
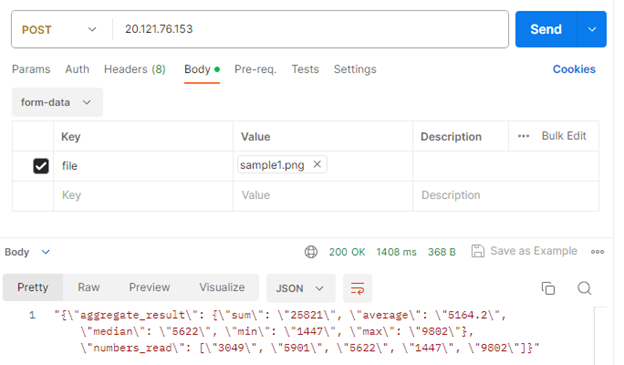
As we can see, our Intelligent App has successfully deployed to AKS and is functioning on the cloud as expected.
Exercise
- Complete this hands-on sample project code to build your first intelligent app.
- Complete the Apps Cloud Skills Challenge to build on your app dev and AI skills.
- Register for Ask the Expert: Azure Kubernetes Service session for live Q&A with the Product Engineering team on building intelligent apps.
Next Steps
In this two-part article, we explored the creation of an Intelligent App that leverages Azure AI Vision to analyze images and extract data. We learned how to build a Python Web API to perform OCR on uploaded images and subsequently deploy this API via Azure Kubernetes Service.
Besides OCR and Image Analysis, you can continue exploring Azure’s vast array of services and experiment further with Azure AI and AKS by applying various practical uses to your Intelligent Apps, including natural language processing, speech recognition and synthesis, sentiment analysis for customer feedback, and automated content moderation.