07 - Add security filters for agentic workflow knowledge trimming
This module explains how to implement security filters to control knowledge access in your Azure Logic Apps agents, ensuring users only receive information they are authorized to view.
When finished with this module, you'll have gained the following knowledge:
- Security Filter Pattern: How to implement document-level authorization using user id filters in RAG-enabled Logic Apps
The Importance of Security in Enterprise AI Applications
In enterprise AI applications, ensuring that users can only access information they are authorized to view is crucial for maintaining data privacy, regulatory compliance, and organizational security. Security trimming prevents unauthorized access to sensitive documents and ensures that AI responses are contextually appropriate based on user permissions.
Security-Enhanced RAG Implementation
Implementing security filters in Azure Logic Apps RAG patterns requires a multi-layered approach that combines data indexing with security metadata and dynamic filtering during retrieval:
Phase 1: Secure Data Ingestion and Indexing
In this phase, Azure AI Search will index and vectorize your data:
- Parse and extract text content
- Generate embeddings for content
- Index documents with security fields in Azure AI Search, enabling efficient knowledge trimming during retrieval
Phase 2: Filtered Retrieval and Response Generation
When users interact with your agent, Logic Apps applies security filters before generating responses:
- Apply security filters to ensure only authorized content is retrieved
- Generate responses based only on content that the user is authorized to access
Phase 1 - Secure Data Ingestion and Indexing
notePrerequisites for this phase are the following:
- You have access to an Azure Storage Account resource. For steps on setting this resource up, follow the guide here Create an Azure storage account.
- You have created a new container in your Azure Storage Account resource. For steps on creating a container, follow the guide here Manage blob containers using the Azure portal
- You have uploaded interns and employees folder to the container in your Azure Storage Account resource. The folders used in this module can be downloaded here: employees folder in zip format and interns folder in the container in your Azure Storage Account resource.
- You have access to an Azure OpenAI Service with a deployed text embeddings model. For more on creating this service, visit Explore Azure OpenAI in Azure AI Foundry.
- You have access to an Azure AI Search service. For more on creating this resource visit here Create an Azure AI Search service.
- You have configured an Azure AI Search service connection to the Azure Storage account using a managed identity : Connect to Azure Storage using a managed identity (Azure AI Search)
Step 1 - Index and Vectorize Data
- In the Azure portal, open your Azure AI Search instance and click on Import Data (New).

- Choose your data source and then select
RAG.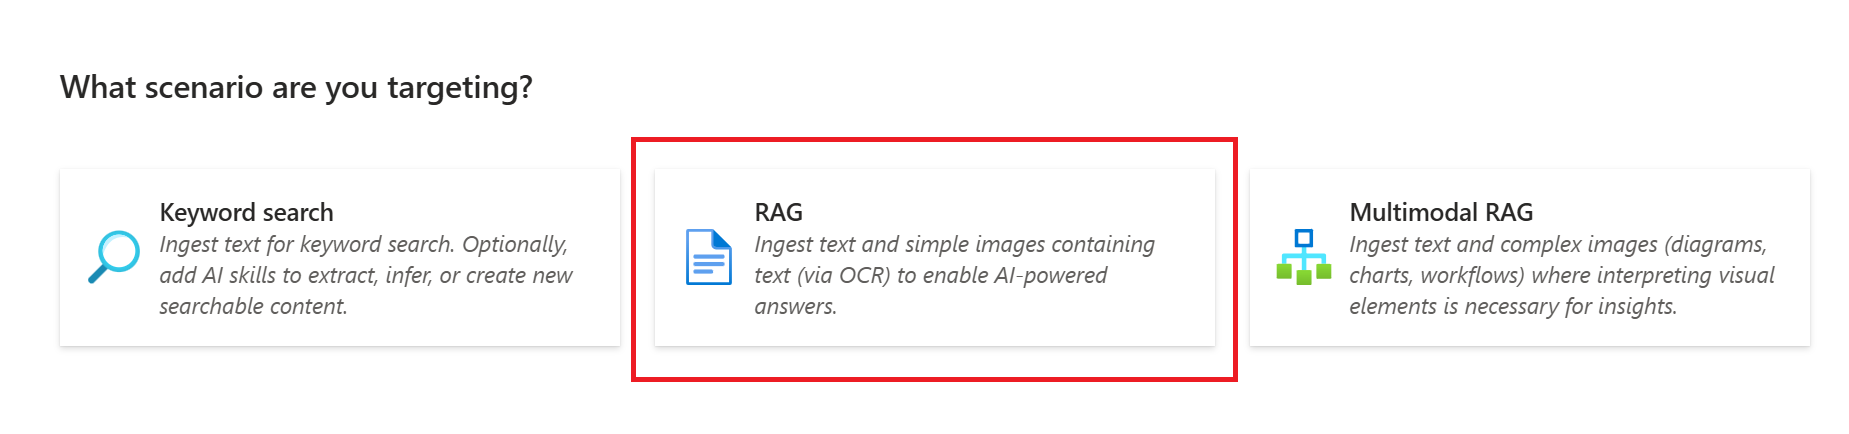
- On this page,
- Fill out the appropriate
Subscription,Storage accountandBlob container - Leave
Blob folderblank Parsing modeshould be set toText- Check
Authenticate using Managed Identity - Select
System-assignedorUser-assignedbased on how you configured the Azure AI Search service connection to the Azure Storage account - Then click on
Next
- Fill out the appropriate
- On the next page,
- Select
AI Foundry Hub catalog models (Preview)forKind - Select the appropriate
SubscriptionandAzure AI Foundry/Hub Project - Select your embedding model under
Model deployment - Set
API keyas the Authentication type - Check the acknowledgement
- Then click on
Next
- Select
- On the next page, keep all the default values and click on
Next. - On the last page, rename your
Objects name prefixtohr-index. Then pressCreate.
Step 2 - Add empty UserIds Field
- On the left navigation bar of your Azure AI Search instance, click on
Search managementand then click onIndexes.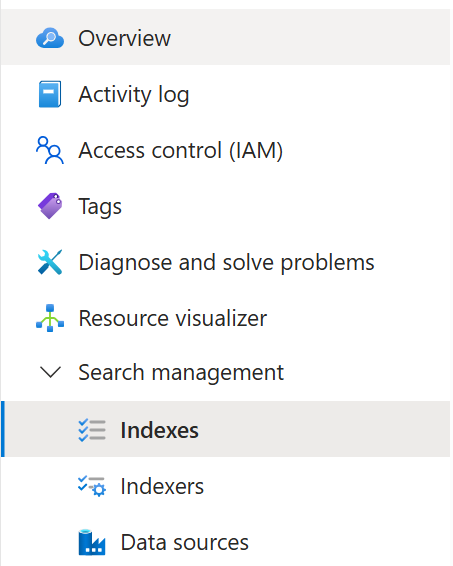
- Click on
hr-index. - Click on
Fieldsand then click+ Add field.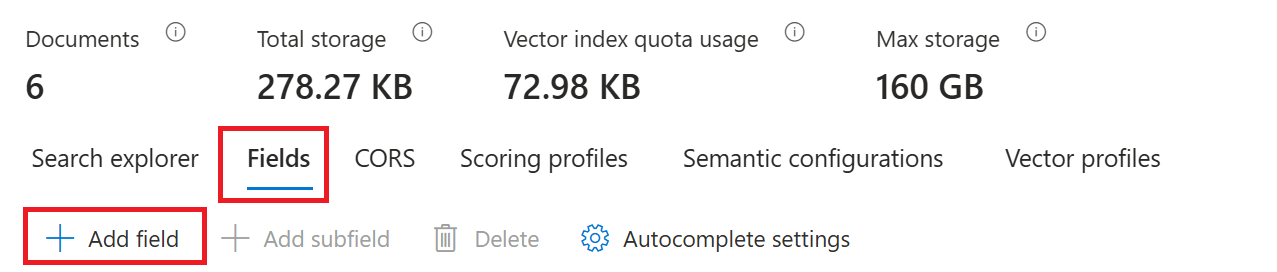
- On the pop-up on the right-hand, fill in the following information:
- Field Name:
UserIds - Type:
Collection(Edm.String) - Check
Filterable - Press
Save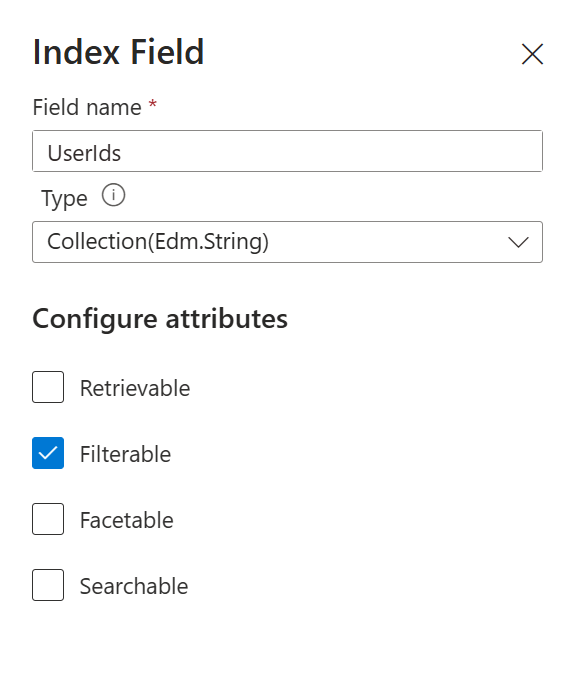
- Field Name:
Step 3 - Obtain document chunk ids
- Start Visual Studio Code and select the
Extensionstile.
- Search for the Rest Client and Select
Install.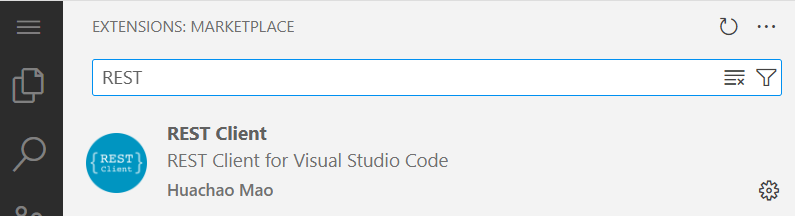
- Create a new file named
get-documents.rest. - Paste in the following code in your file.
@endpoint = PUT-YOUR-SEARCH-SERVICE-ENDPOINT-HERE
@index = hr-index
@queryApiKey = PUT-YOUR-SEARCH-SERVICE-QUERY-API-KEY-HERE

POST https://{{endpoint}}/indexes/{{index}}/docs/search?api-version=2025-09-01
api-key: {{queryApiKey}}
Content-Type: application/json

{
   "search": "*",
   "select": "chunk_id,title",
   "top": 6,
   "skip": 0
}
You will need to replace the endpoint with your own. To do this,
- On Azure Portal, open your Azure AI Search instance. Copy the link next to
Urland paste it inget-documents.rest. TheUrlwill look something like this:https://name-of-azure-search-service.search.windows.net.
You will need to replace the queryApiKey with your own. To do this,
- On Azure Portal, open your Azure AI Search instance. On the left navigation bar, click on
Settingsand then click onKeys. - Under
Manage query keys, copy the key and paste it inget-documents.rest.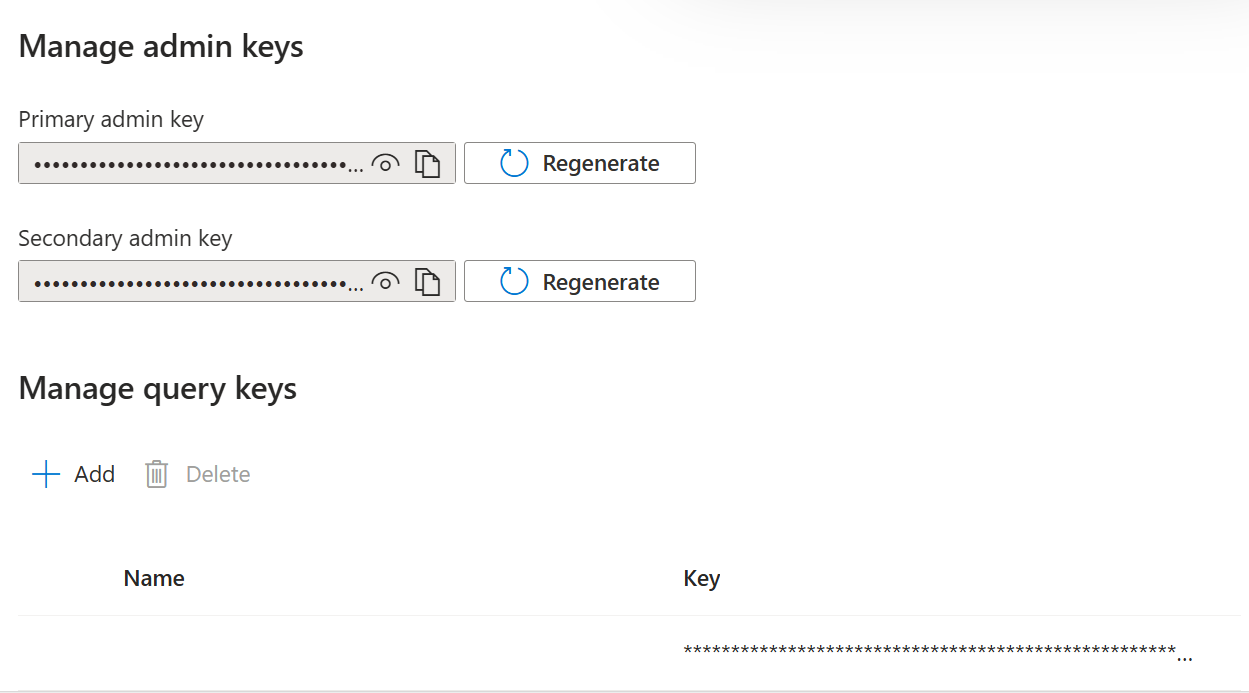
Now press Send Request. You should have gotten a value array with the @search.score, chunk_id and title.
Step 4 - Populate User Ids for each document
noteThis step demonstrates how to manually update documents with security metadata for testing purposes. In a production environment, you would typically incorporate this security metadata assignment into your automated data ingestion pipeline to ensure all documents are properly tagged with appropriate user access permissions during the indexing process.
- Create a new file in Visual Studio Code named
update-documents.rest - Paste in the following code in your file.
@endpoint = PUT-YOUR-SEARCH-SERVICE-ENDPOINT-HERE
@index = hr-index
@adminApiKey = PUT-YOUR-SEARCH-SERVICE-ADMIN-API-KEY-HERE

POST https://{{endpoint}}/indexes/{{index}}/docs/index?api-version=2025-09-01
api-key: {{adminApiKey}}
Content-Type: application/json

{
    "value": [
        {
            "@search.action": "mergeOrUpload",
            "chunk_id": "f9f29713558d_aHR0cHM6Ly93YXdzZHN0ZXN0c2E1MS5ibG9iLmNvcmUud2luZG93cy5uZXQvcmFnLXRlbXAtdGVzdC9pbnRlcm5zL2ludGVybl9qb2JfcmVzcG9uc2liaWxpdGllcy50eHQ1_pages_0",
            "title": "intern_job_responsibilities.txt",
            "UserIds": ["249f5761-6f30-4e27-a1db-df2399e13b3d"]
        },
        {
            "@search.action": "mergeOrUpload",
            "chunk_id": "f9f29713558d_aHR0cHM6Ly93YXdzZHN0ZXN0c2E1MS5ibG9iLmNvcmUud2luZG93cy5uZXQvcmFnLXRlbXAtdGVzdC9pbnRlcm5zL2ludGVybl9wZXJrcy50eHQ1_pages_0",
            "title": "intern_perks.txt",
            "UserIds": ["249f5761-6f30-4e27-a1db-df2399e13b3d"]
        },
        {
            "@search.action": "mergeOrUpload",
            "chunk_id": "f9f29713558d_aHR0cHM6Ly93YXdzZHN0ZXN0c2E1MS5ibG9iLmNvcmUud2luZG93cy5uZXQvcmFnLXRlbXAtdGVzdC9pbnRlcm5zL2ludGVybl9jb21wZW5zYXRpb24udHh00_pages_0",
            "title": "intern_compensation.txt",
            "UserIds": ["249f5761-6f30-4e27-a1db-df2399e13b3d"]
        },
        {
            "@search.action": "mergeOrUpload",
            "chunk_id": "f9f29713558d_aHR0cHM6Ly93YXdzZHN0ZXN0c2E1MS5ibG9iLmNvcmUud2luZG93cy5uZXQvcmFnLXRlbXAtdGVzdC9lbXBsb3llZXMvZW1wbG95ZWVfcGVya3MudHh00_pages_0",
            "title": "employee_perks.txt",
            "UserIds": ["cfb80024-5aab-49cb-af64-cc1df63aff24"]
        },
        {
            "@search.action": "mergeOrUpload",
            "chunk_id": "f9f29713558d_aHR0cHM6Ly93YXdzZHN0ZXN0c2E1MS5ibG9iLmNvcmUud2luZG93cy5uZXQvcmFnLXRlbXAtdGVzdC9lbXBsb3llZXMvZW1wbG95ZWVfam9iX3Jlc3BvbnNpYmlsaXRpZXMudHh00_pages_0",
            "title": "employee_job_responsibilities.txt",
            "UserIds": ["cfb80024-5aab-49cb-af64-cc1df63aff24"]
        },
        {
            "@search.action": "mergeOrUpload",
            "chunk_id": "f9f29713558d_aHR0cHM6Ly93YXdzZHN0ZXN0c2E1MS5ibG9iLmNvcmUud2luZG93cy5uZXQvcmFnLXRlbXAtdGVzdC9lbXBsb3llZXMvZW1wbG95ZWVfY29tcGVuc2F0aW9uLnR4dA2_pages_0",
            "title": "employee_compensation.txt",
            "UserIds": ["cfb80024-5aab-49cb-af64-cc1df63aff24"]
        }
    ]
}
Make sure to replace the endpoint with your own.
Update each chunk_id value in the value array with the actual chunk_id you obtained in Step 3. Make sure each chunk_id is being mapped to the correct document title.
Next, UserIds values must be updated with the actual Microsoft Entra object identifiers (GUIDs) of the users who should have access to view these documents. In this example:
- The first three documents (intern-related) use
249f5761-6f30-4e27-a1db-df2399e13b3d, which could represent the user id of a particular intern. - The last three documents (employee-related) use
cfb80024-5aab-49cb-af64-cc1df63aff24, which could represent the user id of a particular full-time employee.
You can assign multiple User Ids to each document by adding more GUIDs to the array if you want to grant access to multiple interns or full-time employees.
For testing purposes: You can use your own user Object ID for the employee documents (so you can access them) and use another user's Object ID for the intern documents (to test access restrictions).
To find your Object ID:
- In the Azure Portal search box, search for your name
- Your profile will appear under "Microsoft Entra ID"
- Click on your profile and copy the "Object ID" value from the details page
Finally, you will need to replace the @adminApiKey with your own. To do this:
-
On Azure Portal, open your Azure AI Search instance. On the left navigation bar, click on
Settingsand then click onKeys. -
Under
Manage admin keys, copy thePrimary admin keyand paste it inupdate-documents.rest. -
Now press
Send Request.
Phase 2: Filtered Retrieval and Response Generation
notePrerequisites for this module are the following:
- You have Easy Auth configured. For steps on setting up EasyAuth, follow the guide here Setting up Easy Auth.
Step 1 - Create the Logic Apps Workflow
- In the Azure portal, open your Standard logic app resource. Add a new conversational agent workflow in the designer and name it
Secure-Document-Retrieval.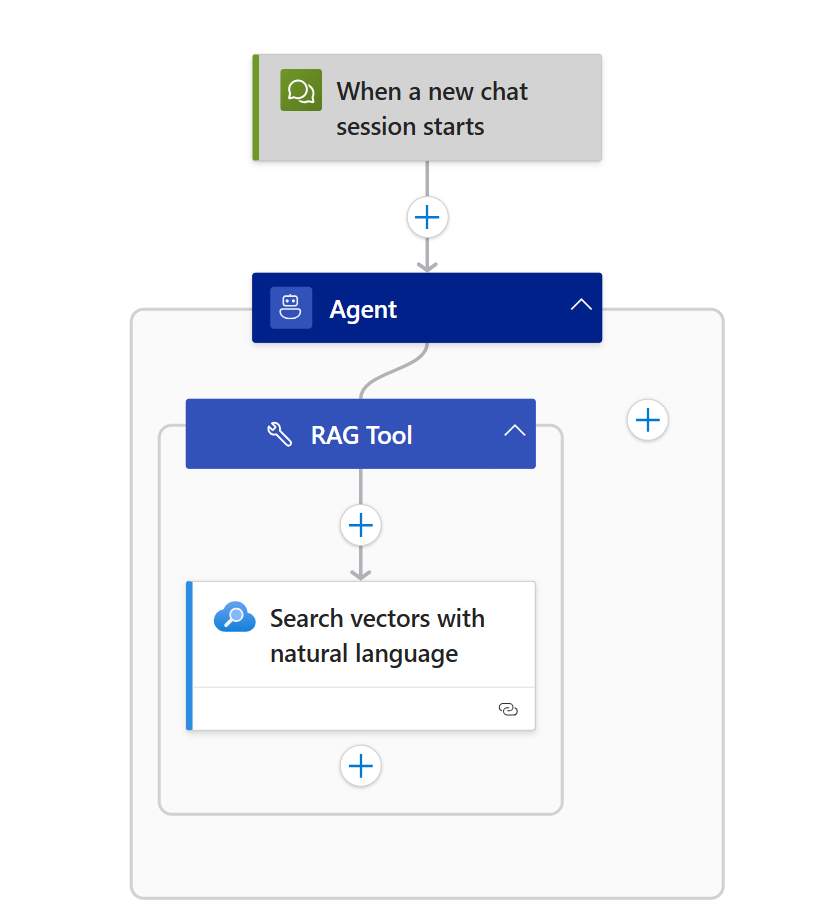
- Configure the agent with the following settings:
- Name: HR Agent
- System Instructions:
You are an HR assistant that answers questions about job responsibilities, compensation and perks. Use the Document Search Tool to do a vector search of the user's question. Use only information outputted from this tool to answer the user's question. No other data or information should be used to answer the question.- Click “Add an action” inside the agent loop.
- Select the Azure AI Search > Search vectors with natural language.
- Rename the tool:
Document Search Tool - Tool description:
Query the knowledge base. - Create an agent parameter:
- Name:
query - Type: String
- Name:
- Add a new connection for the
Search vectors with natural languageaction by setting the Azure AI Search Endpoint and Admin Key. - Set the following:
- Index Name:
hr-index - Search Text: Insert the agent parameter
query - Number of nearest neighbors to return:
2
- Index Name:
- Press
Show AllunderAdvanced Parametersand set the following:- Filter Condition:
UserIds/any(u: u eq '@{currentRequest()['headers']['X-MS-CLIENT-PRINCIPAL-ID']}') - The Vector Fields To Search:
"text_vector" - Fields To Select:
"chunk"
- Filter Condition:
Step 2 - Test the Workflow
On the designer toolbar, select Chat to open the chat client in the Azure portal. Select the chat client URL, which opens the chat client integrated with your logic app.
In the chat client interface, ask the following question: What are the perks?

Since you only have access to employee documents, the response is based on the employee documents.
In a new chat session, ask the following question: What is the intern compensation?

Since you only have access to employee documents, the agent is unable to provide a response.
Security Best Practices for RAG-Enabled Logic Apps
- Principle of Least Privilege: Grant users access only to the minimum information required for their role
- Document-Level Access Control: Use the
UserIdsfield to specify exactly which users can access each document - Role-Based Filtering: Implement different UserIds arrays for different organizational roles