Introduction
Workloads deployed in Kubernetes clusters require Azure AD application credentials or managed identities to access Azure AD protected resources, such as Azure Key Vault and Microsoft Graph. The Azure AD Pod Identity open-source project provided a way to avoid needing these secrets, by using Azure managed identities.
Azure AD Workload Identity for Kubernetes integrates with the capabilities native to Kubernetes to federate with external identity providers. This approach is simpler to use and deploy, and overcomes several limitations in Azure AD Pod Identity:
- Removes the scale and performance issues that existed for identity assignment
- Supports Kubernetes clusters hosted in any cloud or on-premises
- Supports both Linux and Windows workloads
- Removes the need for Custom Resource Definitions and pods that intercept Instance Metadata Service (IMDS) traffic
- Avoids the complication and error-prone installation steps such as cluster role assignment from the previous iteration.
Getting started
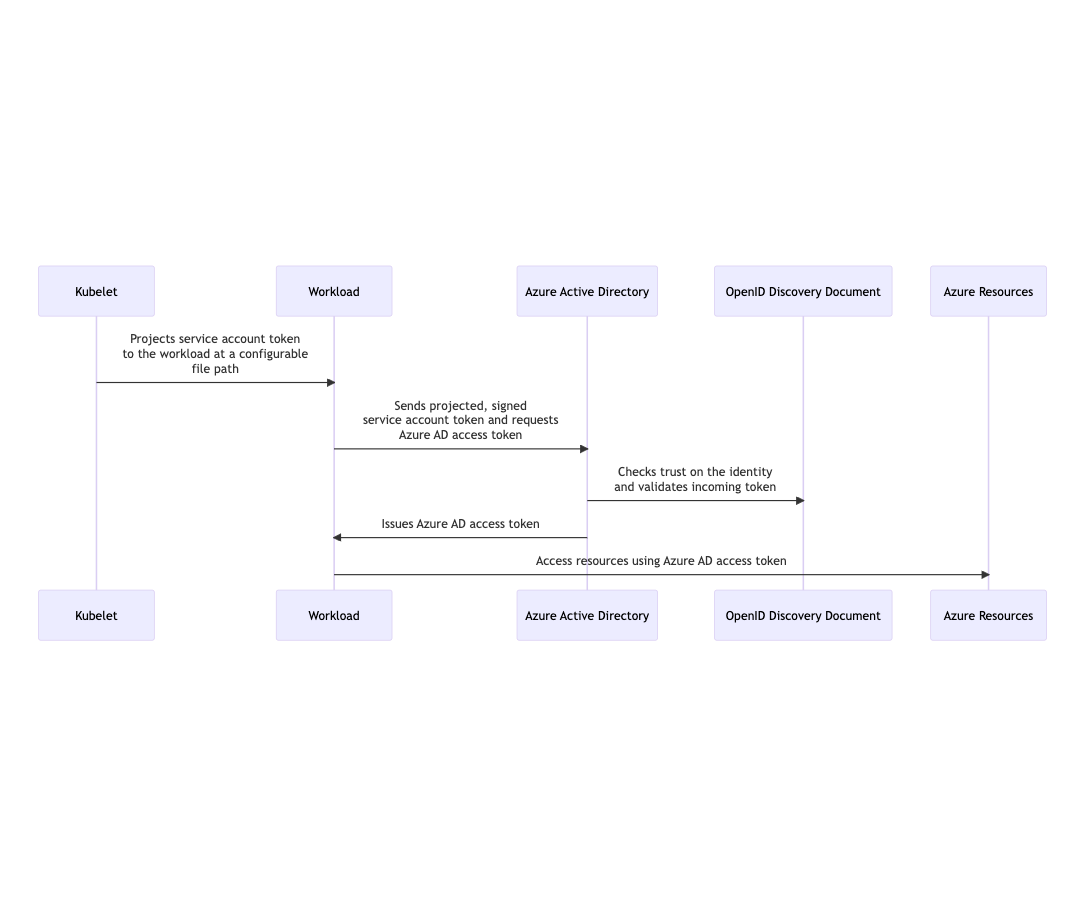
How it works
In this model, the Kubernetes cluster becomes a token issuer, issuing tokens to Kubernetes Service Accounts. These service account tokens can be configured to be trusted on Azure AD applications or user-assigned managed identities. Workload can exchange a service account token projected to its volume for an Azure AD access token using the Azure Identity SDKs or the Microsoft Authentication Library (MSAL).
Installation
Prerequisites
- Azure CLI (≥2.32.0)
- with aks-preview CLI extension installed (≥0.5.50)
- Helm 3
- A Kubernetes cluster with version ≥ v1.20
- Follow the cluster-specific setup guide below before deploying Azure AD Workload Identity:
| Cluster type | Steps | Guide |
|---|---|---|
| Managed cluster | 1. Enable any OIDC-specific feature flags 2. Extract the OIDC issuer URL | Link |
| Self-managed cluster | 1. Generate service account key pair or bring your own keys 2. Setup the public OIDC issuer URL 3. Generate OIDC discovery and JWKS documents 4. Configure kube-apiserver and kube-controller-manager flags | Link |
Azure AD Workload Identity Components
| Component | Description | Guide |
|---|---|---|
| Mutating Admission Webhook | Projects a signed service account token to a well-known path (/var/run/secrets/azure/tokens/azure-identity-token) and inject authentication-related environment variables to your pods based on annotated service account. | Link |
Azure AD Workload Identity CLI (azwi) | A utility CLI that helps manage Azure AD Workload Identity and automate error-prone operations. | Link |
Managed Clusters
- Azure Kubernetes Service (AKS)
- Amazon Elastic Kubernetes Service (EKS)
- Google Kubernetes Engine (GKE)
- Steps to get the OIDC issuer URL from a generic managed cluster
For managed clusters, the service account signing keys will be set up and managed by the cloud provider.
Before deploying Azure AD Workload Identity, you will need to enable any OIDC-specific feature flags and obtain the OIDC issuer URL when setting up the federated identity credentials.
Azure Kubernetes Service (AKS)
To create a new AKS cluster with OIDC Issuer URL enabled or update an existing cluster, follow the instructions in the Azure Kubernetes Service (AKS) documentation.
To get your cluster’s OIDC issuer URL run:
# Output the OIDC issuer URL
az aks show --resource-group <resource_group> --name <cluster_name> --query "oidcIssuerProfile.issuerUrl" -otsv
Amazon Elastic Kubernetes Service (EKS)
EKS cluster has an OIDC issuer URL associated with it by default. To get your cluster’s OIDC issuer URL run:
# Output the OIDC issuer URL
aws eks describe-cluster --name <cluster_name> --query "cluster.identity.oidc.issuer" --output text
Refer to the Amazon EKS documentation for more information on the OIDC issuer URL for the EKS cluster.
Google Kubernetes Engine (GKE)
GKE cluster has an OIDC issuer URL associated with it by default. Follow the steps to get the OIDC issuer URL.
Steps to get the OIDC issuer URL from a generic managed cluster
In this section, we will cover how to get the OIDC issuer URL from a generic managed cluster using a jump pod.
1. Create a service account for the jump pod
Run the following commands to set up a service account for the jump pod:
export NAMESPACE="default"
export SERVICE_ACCOUNT_NAME="jump-pod-sa"

kubectl create serviceaccount ${SERVICE_ACCOUNT_NAME} -n ${NAMESPACE}
Output
serviceaccount/jump-pod-sa created
2. Deploy a jump pod referencing the service account
Deploy a jump pod with projected service account token to your cluster. The jump pod uses the step-cli docker image that is used for inspecting the service account token to retrieve the OIDC issuer URL.
cat <<EOF | kubectl apply -f -
apiVersion: v1
kind: Pod
metadata:
  name: jump
  namespace: ${NAMESPACE}
spec:
  containers:
  - image: smallstep/step-cli
    name: step-cli
    command:
    - /bin/sh
    - -c
    - cat /var/run/secrets/tokens/test-token | step crypto jwt inspect --insecure
    volumeMounts:
    - mountPath: /var/run/secrets/tokens
      name: test-token
  serviceAccountName: ${SERVICE_ACCOUNT_NAME}
  volumes:
  - name: test-token
    projected:
      sources:
      - serviceAccountToken:
          path: test-token
          expirationSeconds: 3600
          audience: test
EOF
Output
pod/jump created
3. Get the OIDC issuer URL from the jump pod
The jump pod logs will contain the decoded JWT. Run the following command to get the logs and extract the OIDC issuer URL:
kubectl logs jump -n ${NAMESPACE}
Output
{
  "header": {
    "alg": "RS256",
    "kid": "[REDACTED]"
  },
  "payload": {
    "aud": [
      "test"
    ],
    "exp": 1634671190,
    "iat": 1634667590,
    "iss": "https://container.googleapis.com/v1/projects/[REDACTED]/locations/us-central1-c/clusters/[REDACTED]",
    "kubernetes.io": {
      "namespace": "default",
      "pod": {
        "name": "jump",
        "uid": "c4e09c90-3007-4255-ab74-f5f97d944db2"
      },
      "serviceaccount": {
        "name": "jump-pod-sa",
        "uid": "6af8dfb1-8a28-48f8-a7fe-e2abd99cd35e"
      }
    },
    "nbf": 1634667590,
    "sub": "system:serviceaccount:default:jump-pod-sa"
  },
  "signature": "[REDACTED]"
}
The OIDC issuer URL is the value of the iss claim in the JWT.
To just get the issuer from the JWT, run the following command:
kubectl logs jump -n ${NAMESPACE} | jq -r '.payload.iss'
Output
https://container.googleapis.com/v1/projects/[REDACTED]/locations/us-central1-c/clusters/[REDACTED]
4. Cleanup
kubectl delete pod jump -n ${NAMESPACE}
kubectl delete serviceaccount ${SERVICE_ACCOUNT_NAME} -n ${NAMESPACE}
Self-Managed Clusters
When compared to using managed Kubernetes services like AKS, managing your own Kubernetes cluster provides the most freedom in customizing Kubernetes and your workload. However, there are additional setup required before deploying Azure AD Workload Identity to a self-managed cluster. If you are a cluster administrator, make sure you can perform the following actions:
- Generate your own service account signing key pair and rotate it regularly (at least quarterly)
- Manually set up your OIDC issuer URL, and upload your discovery document and JWKS to a public endpoint
- Ability to configure flags for system-critical pods such as
kube-apiserverandkube-controller-manager
Service Account Key Generation
There are two keys in an RSA key pair: a private key and a public key. The RSA private key is used to generate the digital signature and the RSA public key is used to verify them. In the case of service account tokens, they are signed by your private key/signing key before being projected to your workload’s volume. Azure Active Directory will then use your public key to verify the signature and ensure that the service account tokens are not malicious.
This section will show you how to generate an RSA key pair using openssl.
Feel free to skip this section if you are planning to bring your own keys.
Walkthrough
1. Generate an RSA private key using openssl
openssl genrsa -out sa.key 2048
Output
Generating RSA private key, 2048 bit long modulus
.............................................+++
.......+++
e is 65537 (0x10001)
2. Generate an RSA public key from a private key using openssl
openssl rsa -in sa.key -pubout -out sa.pub
OpenID Connect Issuer
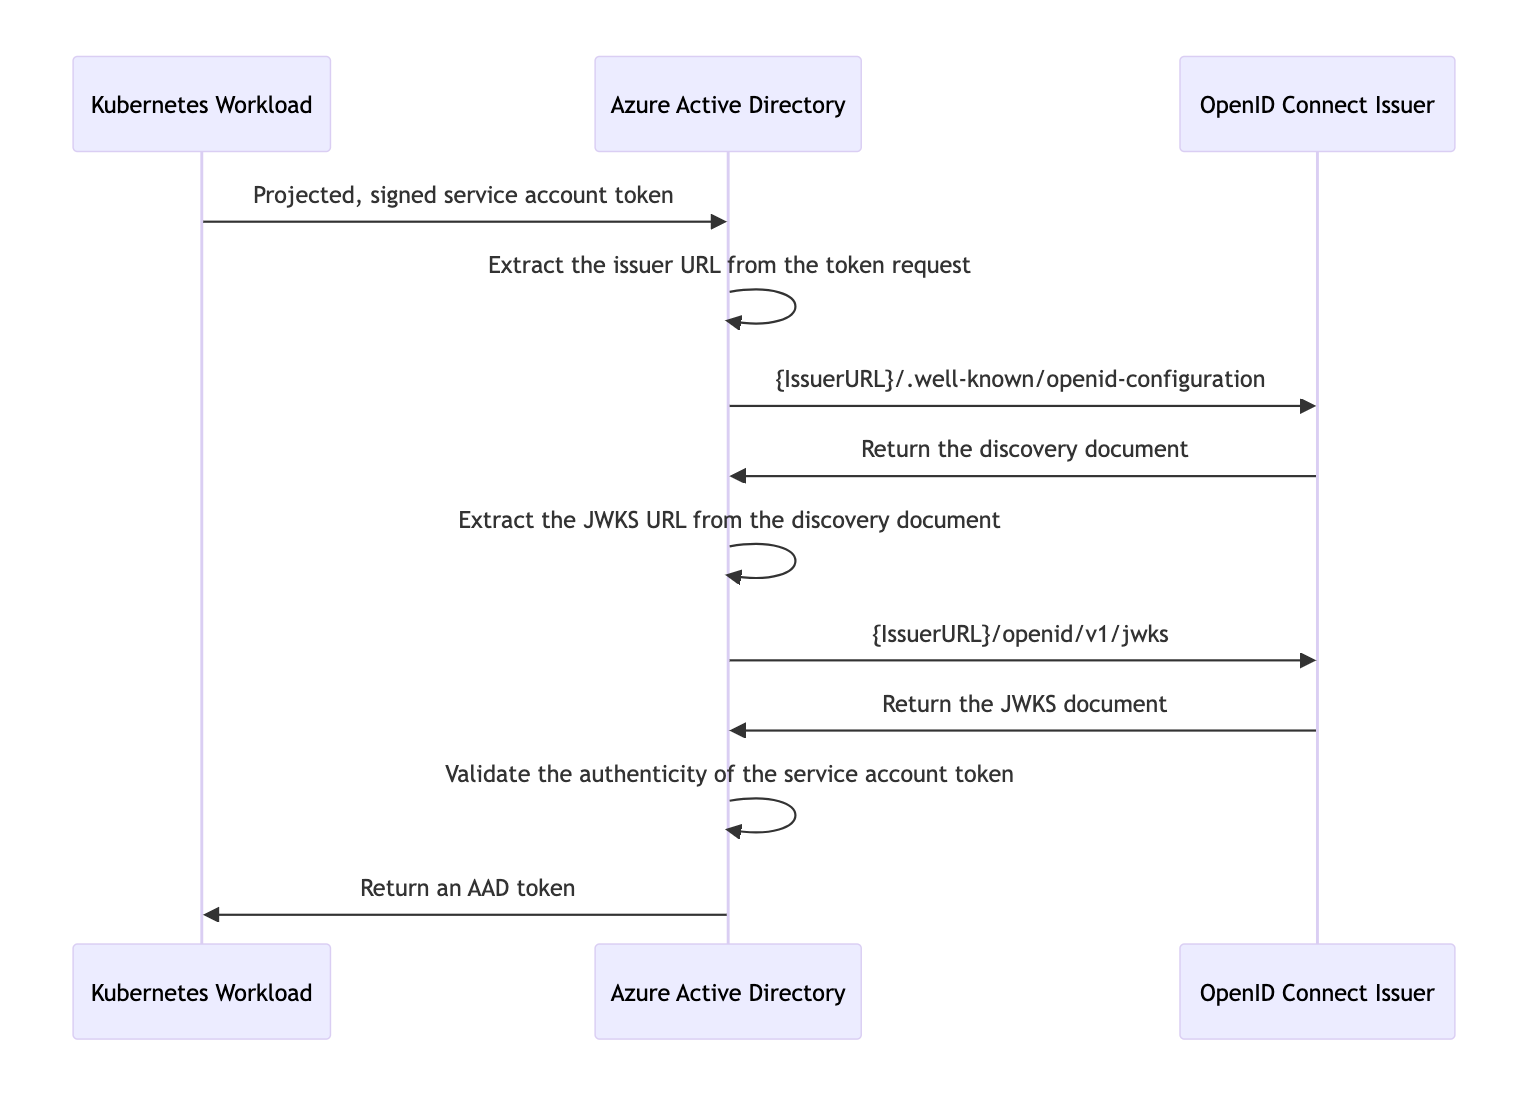
With the Kubernetes cluster acting as a token issuer, Azure Active Directory (AAD) leverages OpenID Connect (OIDC) to discover public signing keys and verify the authenticity of the service account token before exchanging it for an AAD token. Your workload can then consume the AAD token to access Azure cloud resources via the Azure Identity SDKs or the Microsoft Authentication Library (MSAL).
In the case of self-managed clusters, administrator will have to manually publish the cluster’s service account issuer URL, which should comply with the OpenID specification. The following table describes the required OIDC issuer endpoints for Azure AD Workload Identity:
| Endpoint | Description |
|---|---|
{IssuerURL}/.well-known/openid-configuration | Also known as the OIDC discovery document. This contains the metadata about the issuer’s configurations. |
{IssuerURL}/openid/v1/jwks | This contains the public signing key(s) that AAD uses to verify the authenticity of the service account token. |
Sequence Diagram
Discovery Document
OpenID Connect describes a metadata document that contains the metadata of the issuer. This includes information such as the URLs to use and the location of the service’s public signing keys. The following section will walk you through how to set up a secured, public OIDC issuer URL using Azure blob storage and upload a minimal discovery document to the storage account.
Walkthrough
1. Create an Azure Blob storage account
export RESOURCE_GROUP="oidc-issuer"
export LOCATION="westus2"
az group create --name "${RESOURCE_GROUP}" --location "${LOCATION}"

export AZURE_STORAGE_ACCOUNT="oidcissuer$(openssl rand -hex 4)"
# This $web container is a special container that serves static web content without requiring public access enablement.
# See https://learn.microsoft.com/en-us/azure/storage/blobs/storage-blob-static-website
AZURE_STORAGE_CONTAINER="\$web"
az storage account create --resource-group "${RESOURCE_GROUP}" --name "${AZURE_STORAGE_ACCOUNT}"
az storage container create --name "${AZURE_STORAGE_CONTAINER}"
2. Generate the discovery document
cat <<EOF > openid-configuration.json
{
  "issuer": "https://${AZURE_STORAGE_ACCOUNT}.blob.core.windows.net/${AZURE_STORAGE_CONTAINER}/",
  "jwks_uri": "https://${AZURE_STORAGE_ACCOUNT}.blob.core.windows.net/${AZURE_STORAGE_CONTAINER}/openid/v1/jwks",
  "response_types_supported": [
    "id_token"
  ],
  "subject_types_supported": [
    "public"
  ],
  "id_token_signing_alg_values_supported": [
    "RS256"
  ]
}
EOF
3. Upload the discovery document
az storage blob upload \
  --container-name "${AZURE_STORAGE_CONTAINER}" \
  --file openid-configuration.json \
  --name .well-known/openid-configuration
4. Verify that the discovery document is publicly accessible
curl -s "https://${AZURE_STORAGE_ACCOUNT}.blob.core.windows.net/${AZURE_STORAGE_CONTAINER}/.well-known/openid-configuration"
Output
{
  "issuer": "https://<REDACTED>.blob.core.windows.net/oidc-test/",
  "jwks_uri": "https://<REDACTED>.blob.core.windows.net/oidc-test/openid/v1/jwks",
  "response_types_supported": [
    "id_token"
  ],
  "subject_types_supported": [
    "public"
  ],
  "id_token_signing_alg_values_supported": [
    "RS256"
  ]
}
JSON Web Key Sets (JWKS)
The JSON Web Key Sets (JWKS) document contains the public signing key(s) that allows AAD to verify the authenticity of the service account token.
Walkthrough
Assuming you have access to your service account signing key pair and followed the guide on how to create and upload the discovery document to an Azure blob storage account. See this section on how to generate a minimal signing key pair.
1. Install azwi
2. Generate the JWKS document
azwi jwks --public-keys <PublicKeyPath> --output-file jwks.json
If you have multiple public signing keys, you can append additional
--public-keysflag to the command.
3. Upload the JWKS document
az storage blob upload \
  --container-name "${AZURE_STORAGE_CONTAINER}" \
  --file jwks.json \
  --name openid/v1/jwks
4. Verify that the JWKS document is publicly accessible
curl -s "https://${AZURE_STORAGE_ACCOUNT}.blob.core.windows.net/${AZURE_STORAGE_CONTAINER}/openid/v1/jwks"
Output
{
  "keys": [
    {
      "use": "sig",
      "kty": "RSA",
      "kid": "Me5VC6i4_4mymFj7T5rcUftFjYX70YoCfSnZB6-nBY4",
      "alg": "RS256",
      "n": "ywg7HeKIFX3vleVKZHeYoNpuLHIDisnczYXrUdIGCNilCJFA1ymjG2UAADnt_FpYUsCVyKYJTqcxNbK4boNg_P3uK39OAqXabwYrilEZvsVJQKhzn8dXLeqAnM98L8eBpySU208KTsfMkS3Q6lqwurUP7c_a3g_1XRJukz_EmQxg9jLD_fQd5VwPTEo8HJQIFqIxFWzjTkkK5hbcL9Cclkf6RpeRyjh7Vem57Fu-jAlxDUiYiqyieM4OBNm4CQjiqDE8_xOC8viNpHNw542MYVDKSRnYui31lCOj32wBDphczR8BbnrZgbqN3K_zzB3gIjcGbWbbGA5xKJYqSu5uRwN89_CWrT3vGw5RN3XQPSbhGC4smgZkOCw3N9i1b-x-rrd-mRse6F95ONaoslCJUbJvxvDdb5X0P4_CVZRwJvUyP3OJ44ZvwzshA-zilG-QC9E1j2R9DTSMqOJzUuOxS0JIvoboteI1FAByV9KyU948zQRM7r7MMZYBKWIsu6h7",
      "e": "AQAB"
    }
  ]
}
Configurations
The following configurations are required to be enabled/set in the cluster configuration for Azure AD Workload Identity to function properly.
kube-apiserver flags
This a list of required flags that need to be configured in the kube-apiserver. Refer to kube-apiserver for more available flags.
--service-account-issuer
Identifier of the service account token issuer. The issuer will assert this identifier in “iss” claim of issued tokens. This value is a string or URI. If this option is not a valid URI per the OpenID Discovery 1.0 spec, the ServiceAccountIssuerDiscovery feature will remain disabled, even if the feature gate is set to true. It is highly recommended that this value comply with the OpenID spec: https://openid.net/specs/openid-connect-discovery-1_0.html. In practice, this means that service-account-issuer must be an https URL. It is also highly recommended that this URL be capable of serving OpenID discovery documents at {service-account-issuer}/.well-known/openid-configuration. When this flag is specified multiple times, the first is used to generate tokens and all are used to determine which issuers are accepted.
--service-account-signing-key-file
Path to the file that contains the current private key of the service account token issuer. The issuer will sign issued ID tokens with this private key.
--service-account-key-file
File containing PEM-encoded x509 RSA or ECDSA private or public keys, used to verify ServiceAccount tokens. The specified file can contain multiple keys, and the flag can be specified multiple times with different files. If unspecified, --tls-private-key-file is used. Must be specified when --service-account-signing-key is provided
kube-controller-manager flags
This is a list of required flags that need to be configured in the kube-controller-manager. Refer to kube-controller-manager for more available flags.
--service-account-private-key-file
Filename containing a PEM-encoded private RSA or ECDSA key used to sign service account tokens.
Feature Flags
Service Account Token Volume Projection
This feature is stable in Kubernetes v1.20 and is enabled by default. Refer to Service Account Token Volume Projection for more information.
Mutating Admission Webhook
Azure AD Workload Identity uses a mutating admission webhook to project a signed service account token to your workload’s volume and inject the following properties to pods with a service account that is configured to use the webhook:
Properties
| Environment variable | Description |
|---|---|
AZURE_AUTHORITY_HOST | The Azure Active Directory (AAD) endpoint. |
AZURE_CLIENT_ID | The application/client ID of the Azure AD application or user-assigned managed identity. |
AZURE_TENANT_ID | The tenant ID of the Azure subscription. |
AZURE_FEDERATED_TOKEN_FILE | The path of the projected service account token file. |
| Volume | Description |
|---|---|
azure-identity-token | The projected service account volume. |
| Volume mount | Description |
|---|---|
/var/run/secrets/azure/tokens/azure-identity-token | The path of the projected service account token file. |
The webhook allows pods to use a service account token projected to a well-known volume path to exchange for an Azure AD access token by leveraging the above properties with the Azure Identity SDKs or the Microsoft Authentication Library (MSAL).
Prerequisites
Obtain your Azure tenant ID by running the following command:
export AZURE_TENANT_ID="$(az account show -s <AzureSubscriptionID> --query tenantId -otsv)"
The tenant ID above will be the default tenant ID that the webhook uses when configuring the AZURE_TENANT_ID environment variable in the pod. In the case of a multi-tenant cluster, you can override the tenant ID by adding the azure.workload.identity/tenant-id annotation to your service account.
You can install the mutating admission webhook with one of the following methods:
Helm 3 (Recommended)
helm repo add azure-workload-identity https://azure.github.io/azure-workload-identity/charts
helm repo update
helm install workload-identity-webhook azure-workload-identity/workload-identity-webhook \
   --namespace azure-workload-identity-system \
   --create-namespace \
   --set azureTenantID="${AZURE_TENANT_ID}"
Output
namespace/azure-workload-identity-system created
NAME: workload-identity-webhook
LAST DEPLOYED: Wed Aug  4 10:49:20 2021
NAMESPACE: azure-workload-identity-system
STATUS: deployed
REVISION: 1
TEST SUITE: None
Deployment YAML
Install envsubst
The deployment YAML contains the environment variables we defined above and we rely on the envsubst binary to substitute them for their respective values before deploying. See the envsubst‘s installation guide on how to install it.
Install the webhook using the deployment YAML via kubectl apply -f and envsubst:
curl -sL https://github.com/Azure/azure-workload-identity/releases/download/v1.6.0/azure-wi-webhook.yaml | envsubst | kubectl apply -f -
Output
namespace/azure-workload-identity-system created
serviceaccount/azure-wi-webhook-admin created
role.rbac.authorization.k8s.io/azure-wi-webhook-manager-role created
clusterrole.rbac.authorization.k8s.io/azure-wi-webhook-manager-role created
rolebinding.rbac.authorization.k8s.io/azure-wi-webhook-manager-rolebinding created
clusterrolebinding.rbac.authorization.k8s.io/azure-wi-webhook-manager-rolebinding created
configmap/azure-wi-webhook-config created
secret/azure-wi-webhook-server-cert created
service/azure-wi-webhook-webhook-service created
deployment.apps/azure-wi-webhook-controller-manager created
mutatingwebhookconfiguration.admissionregistration.k8s.io/azure-wi-webhook-mutating-webhook-configuration created
Azure AD Workload CLI (azwi)
azwi is a utility CLI that helps manage Azure AD Workload Identity and automate error-prone operations:
- Generate the JWKS document from a list of public keys
- Streamline the creation and deletion of the following resources:
- AAD applications
- Kubernetes service accounts
- Federated identities
- Azure role assignments
GitHub Releases
You can download azwi from our latest GitHub releases.
Homebrew (MacOS only)
brew install Azure/azure-workload-identity/azwi
Quick Start
- 1. Complete the installation guide
- 2. Export environment variables
- 3. Create an Azure Key Vault and secret
- 4. Create an AAD application or user-assigned managed identity and grant permissions to access the secret
- 5. Create a Kubernetes service account
- 6. Establish federated identity credential between the identity and the service account issuer & subject
- 7. Deploy workload
- 8. Cleanup
In this tutorial, we will cover the basics of how to use the webhook to acquire an Azure AD token to access a secret in an Azure Key Vault.
While this tutorial shows a 1:1 mapping between a Kubernetes service account and an Azure AD identity, it is possible to map:
Before we get started, ensure the following:
- Azure CLI version 2.40.0 or higher. Run
az --versionto verify. - You are logged in with the Azure CLI as a user.
- If you are logged in with a Service Principal, ensure that it has the correct API permissions enabled.
- Your logged in account must have sufficient permissions to create applications and service principals or user-assigned managed identities in Azure AD.
1. Complete the installation guide
Installation guide. At this point, you should have already:
- installed the mutating admission webhook
- obtained your cluster’s OIDC issuer URL
- [optional] installed the Azure AD Workload Identity CLI
2. Export environment variables
# environment variables for the Azure Key Vault resource
export KEYVAULT_NAME="azwi-kv-$(openssl rand -hex 2)"
export KEYVAULT_SECRET_NAME="my-secret"
export RESOURCE_GROUP="azwi-quickstart-$(openssl rand -hex 2)"
export LOCATION="westus2"

# environment variables for the AAD application
# [OPTIONAL] Only set this if you're using a Azure AD Application as part of this tutorial
export APPLICATION_NAME="<your application name>"

# environment variables for the user-assigned managed identity
# [OPTIONAL] Only set this if you're using a user-assigned managed identity as part of this tutorial
export USER_ASSIGNED_IDENTITY_NAME="<your user-assigned managed identity name>"

# environment variables for the Kubernetes service account & federated identity credential
export SERVICE_ACCOUNT_NAMESPACE="default"
export SERVICE_ACCOUNT_NAME="workload-identity-sa"
export SERVICE_ACCOUNT_ISSUER="<your service account issuer url>" # see section 1.1 on how to get the service account issuer url
3. Create an Azure Key Vault and secret
Create an Azure resource group:
az group create --name "${RESOURCE_GROUP}" --location "${LOCATION}"
Create an Azure Key Vault:
az keyvault create --resource-group "${RESOURCE_GROUP}" \
   --location "${LOCATION}" \
   --name "${KEYVAULT_NAME}"
Create a secret:
az keyvault secret set --vault-name "${KEYVAULT_NAME}" \
   --name "${KEYVAULT_SECRET_NAME}" \
   --value "Hello\!"
4. Create an AAD application or user-assigned managed identity and grant permissions to access the secret
Azure Workload Identity CLI
NOTE:
azwicurrently only supports Azure AD Applications. If you want to use a user-assigned managed identity, skip this section and follow the steps in the Azure CLI section.
azwi serviceaccount create phase app --aad-application-name "${APPLICATION_NAME}"
Output
INFO[0000] No subscription provided, using selected subscription from Azure CLI: REDACTED
INFO[0005] [aad-application] created an AAD application  clientID=REDACTED name=azwi-test objectID=REDACTED
WARN[0005] --service-principal-name not specified, falling back to AAD application name
INFO[0005] [aad-application] created service principal   clientID=REDACTED name=azwi-test objectID=REDACTED
Azure CLI
# create an AAD application if using Azure AD Application for this tutorial
az ad sp create-for-rbac --name "${APPLICATION_NAME}"
# create a user-assigned managed identity if using user-assigned managed identity for this tutorial
az identity create --name "${USER_ASSIGNED_IDENTITY_NAME}" --resource-group "${RESOURCE_GROUP}"
Set access policy for the AAD application or user-assigned managed identity to access the keyvault secret:
If using Azure AD Application:
export APPLICATION_CLIENT_ID="$(az ad sp list --display-name "${APPLICATION_NAME}" --query '[0].appId' -otsv)"
az keyvault set-policy --name "${KEYVAULT_NAME}" \
  --secret-permissions get \
  --spn "${APPLICATION_CLIENT_ID}"
if using user-assigned managed identity:
export USER_ASSIGNED_IDENTITY_CLIENT_ID="$(az identity show --name "${USER_ASSIGNED_IDENTITY_NAME}" --resource-group "${RESOURCE_GROUP}" --query 'clientId' -otsv)"
export USER_ASSIGNED_IDENTITY_OBJECT_ID="$(az identity show --name "${USER_ASSIGNED_IDENTITY_NAME}" --resource-group "${RESOURCE_GROUP}" --query 'principalId' -otsv)"
az keyvault set-policy --name "${KEYVAULT_NAME}" \
  --secret-permissions get \
  --object-id "${USER_ASSIGNED_IDENTITY_OBJECT_ID}"
5. Create a Kubernetes service account
Create a Kubernetes service account and annotate it with the client ID of the AAD application we created in step 4:
Azure Workload Identity CLI
NOTE:
azwicurrently only supports Azure AD Applications. If you want to use a user-assigned managed identity, skip this section and follow the steps in thekubectlsection.
azwi serviceaccount create phase sa \
  --aad-application-name "${APPLICATION_NAME}" \
  --service-account-namespace "${SERVICE_ACCOUNT_NAMESPACE}" \
  --service-account-name "${SERVICE_ACCOUNT_NAME}"
Output
INFO[0000] No subscription provided, using selected subscription from Azure CLI: REDACTED
INFO[0002] [service-account] created Kubernetes service account  name=workload-identity-sa namespace=default
kubectl
cat <<EOF | kubectl apply -f -
apiVersion: v1
kind: ServiceAccount
metadata:
  annotations:
    azure.workload.identity/client-id: ${APPLICATION_CLIENT_ID:-$USER_ASSIGNED_IDENTITY_CLIENT_ID}
  name: ${SERVICE_ACCOUNT_NAME}
  namespace: ${SERVICE_ACCOUNT_NAMESPACE}
EOF
Output
serviceaccount/workload-identity-sa created
If the AAD application or user-assigned managed identity is not in the same tenant as the default tenant defined during installation, then annotate the service account with the application or user-assigned managed identity tenant ID:
kubectl annotate sa ${SERVICE_ACCOUNT_NAME} -n ${SERVICE_ACCOUNT_NAMESPACE} azure.workload.identity/tenant-id="${APPLICATION_OR_USER_ASSIGNED_IDENTITY_TENANT_ID}" --overwrite
6. Establish federated identity credential between the identity and the service account issuer & subject
Azure Workload Identity CLI
NOTE:
azwicurrently only supports Azure AD Applications. If you want to use a user-assigned managed identity, skip this section and follow the steps in theAzure CLIsection.
azwi serviceaccount create phase federated-identity \
  --aad-application-name "${APPLICATION_NAME}" \
  --service-account-namespace "${SERVICE_ACCOUNT_NAMESPACE}" \
  --service-account-name "${SERVICE_ACCOUNT_NAME}" \
  --service-account-issuer-url "${SERVICE_ACCOUNT_ISSUER}"
Output
INFO[0000] No subscription provided, using selected subscription from Azure CLI: REDACTED
INFO[0032] [federated-identity] added federated credential  objectID=REDACTED subject="system:serviceaccount:default:workload-identity-sa"
Azure CLI
If using Azure AD Application:
# Get the object ID of the AAD application
export APPLICATION_OBJECT_ID="$(az ad app show --id ${APPLICATION_CLIENT_ID} --query id -otsv)"
Add the federated identity credential:
cat <<EOF > params.json
{
  "name": "kubernetes-federated-credential",
  "issuer": "${SERVICE_ACCOUNT_ISSUER}",
  "subject": "system:serviceaccount:${SERVICE_ACCOUNT_NAMESPACE}:${SERVICE_ACCOUNT_NAME}",
  "description": "Kubernetes service account federated credential",
  "audiences": [
    "api://AzureADTokenExchange"
  ]
}
EOF

az ad app federated-credential create --id ${APPLICATION_OBJECT_ID} --parameters @params.json
If using user-assigned managed identity:
az identity federated-credential create \
  --name "kubernetes-federated-credential" \
  --identity-name "${USER_ASSIGNED_IDENTITY_NAME}" \
  --resource-group "${RESOURCE_GROUP}" \
  --issuer "${SERVICE_ACCOUNT_ISSUER}" \
  --subject "system:serviceaccount:${SERVICE_ACCOUNT_NAMESPACE}:${SERVICE_ACCOUNT_NAME}"
7. Deploy workload
Deploy a pod that references the service account created in the last step:
export KEYVAULT_URL="$(az keyvault show -g ${RESOURCE_GROUP} -n ${KEYVAULT_NAME} --query properties.vaultUri -o tsv)"
cat <<EOF | kubectl apply -f -
apiVersion: v1
kind: Pod
metadata:
  name: quick-start
  namespace: ${SERVICE_ACCOUNT_NAMESPACE}
  labels:
    azure.workload.identity/use: "true"
spec:
  serviceAccountName: ${SERVICE_ACCOUNT_NAME}
  containers:
    - image: ghcr.io/azure/azure-workload-identity/msal-go
      name: oidc
      env:
      - name: KEYVAULT_URL
        value: ${KEYVAULT_URL}
      - name: SECRET_NAME
        value: ${KEYVAULT_SECRET_NAME}
  nodeSelector:
    kubernetes.io/os: linux
EOF
Note: Newer version of the sample image will only need KEYVAULT_URL variable.
Feel free to swap the msal-go example image above with a list of language-specific examples we provide.
To check whether all properties are injected properly by the webhook:
kubectl describe pod quick-start
Output
You can verify the following injected properties in the output:
| Environment variable | Description |
|---|---|
AZURE_AUTHORITY_HOST | The Azure Active Directory (AAD) endpoint. |
AZURE_CLIENT_ID | The client ID of the AAD application or user-assigned managed identity. |
AZURE_TENANT_ID | The tenant ID of the registered AAD application or user-assigned managed identity. |
AZURE_FEDERATED_TOKEN_FILE | The path of the projected service account token file. |
| Volume mount | Description |
|---|---|
/var/run/secrets/azure/tokens/azure-identity-token | The path of the projected service account token file. |
| Volume | Description |
|---|---|
azure-identity-token | The projected service account volume. |
Name:         quick-start
Namespace:    default
Priority:     0
Node:         k8s-agentpool1-38097163-vmss000002/10.240.0.34
Start Time:   Wed, 13 Oct 2021 15:49:25 -0700
Labels:       azure.workload.identity/use=true
Annotations:  <none>
Status:       Running
IP:           10.240.0.55
IPs:
  IP:  10.240.0.55
Containers:
  oidc:
    Container ID:   containerd://f425e89eef9aa3a62eb51a3daa5af8c06d8a59baa79c4e4dbb1887aea2647048
    Image:          ghcr.io/azure/azure-workload-identity/msal-go:latest
    Image ID:       ghcr.io/azure/azure-workload-identity/msal-go@sha256:84421aeea707ce66ade0891d9fcd3bb3f7bbd5dd3f810caced0acd315dcf8751
    Port:           <none>
    Host Port:      <none>
    State:          Running
      Started:      Wed, 13 Oct 2021 15:49:29 -0700
    Ready:          True
    Restart Count:  0
    Environment:
      KEYVAULT_URL:               ${KEYVAULT_URL}
      SECRET_NAME:                ${KEYVAULT_SECRET_NAME}
      AZURE_AUTHORITY_HOST:       (Injected by the webhook)
      AZURE_CLIENT_ID:            (Injected by the webhook)
      AZURE_TENANT_ID:            (Injected by the webhook)
      AZURE_FEDERATED_TOKEN_FILE: (Injected by the webhook)
    Mounts:
      /var/run/secrets/kubernetes.io/serviceaccount from kube-api-access-844ns (ro)
      /var/run/secrets/azure/tokens from azure-identity-token (ro) (Injected by the webhook)
Conditions:
  Type              Status
  Initialized       True
  Ready             True
  ContainersReady   True
  PodScheduled      True
Volumes:
  kube-api-access-844ns:
    Type:                    Projected (a volume that contains injected data from multiple sources)
    TokenExpirationSeconds:  3607
    ConfigMapName:           kube-root-ca.crt
    ConfigMapOptional:       <nil>
    DownwardAPI:             true
  azure-identity-token: (Injected by the webhook)
    Type:                    Projected (a volume that contains injected data from multiple sources)
    TokenExpirationSeconds:  3600
QoS Class:                   BestEffort
Node-Selectors:              kubernetes.io/os=linux
Tolerations:                 node.kubernetes.io/not-ready:NoExecute op=Exists for 300s
                             node.kubernetes.io/unreachable:NoExecute op=Exists for 300s
Events:
  Type    Reason     Age   From               Message
  ----    ------     ----  ----               -------
  Normal  Scheduled  19s   default-scheduler  Successfully assigned oidc/quick-start to k8s-agentpool1-38097163-vmss000002
  Normal  Pulling    18s   kubelet            Pulling image "ghcr.io/azure/azure-workload-identity/msal-go:latest"
  Normal  Pulled     16s   kubelet            Successfully pulled image "ghcr.io/azure/azure-workload-identity/msal-go:latest" in 1.987165801s
  Normal  Created    15s   kubelet            Created container oidc
  Normal  Started    15s   kubelet            Started container oidc
To verify that pod is able to get a token and access the secret from the Key Vault:
kubectl logs quick-start
Output
If successful, the log output would be similar to the following output:
I1013 22:49:29.872708 1 main.go:30] "successfully got secret" secret="Hello!"
8. Cleanup
kubectl delete pod quick-start
kubectl delete sa "${SERVICE_ACCOUNT_NAME}" --namespace "${SERVICE_ACCOUNT_NAMESPACE}"

az group delete --name "${RESOURCE_GROUP}"
# if you used Azure AD Application for tutorial, delete it by running the following command
az ad sp delete --id "${APPLICATION_CLIENT_ID}"
Concepts
Service Account
“A service account provides an identity for processes that run in a Pod.” - source
Azure AD Workload Identity supports the following mappings:
- one-to-one (a service account referencing an AAD object)
- many-to-one (multiple service accounts referencing the same AAD object).
- one-to-many (a service account referencing multiple AAD objects by changing the client ID annotation).
Note: if the service account annotations are updated, you need to restart the pod for the changes to take effect.
Users who used aad-pod-identity can think of a service account as an AzureIdentity, except service account is part of the core Kubernetes API, rather than a CRD. This doc describes a list of available labels and annotations to configure.
Workload Identity Federation
Using workload identity federation allows you to access Azure Active Directory (Azure AD) protected resources without needing to manage secrets. This doc describes in detail on workload identity federation works and steps to create, delete, get or update federated identity credentials.
Topics
This section contains information about enabling and configuring various features with Azure AD Workload Identity. We strongly recommend users to go through each applicable topic in order, from setting up your Kubernetes clusters, performing various tasks for self-managed clusters, to leveraging the webhook in your application to securely access Azure cloud resources.
Service Account Labels and Annotations
The following is a list of available labels and annotations that can be used to configure the behavior when exchanging the service account token for an AAD access token:
Pod
Labels
| Label | Description | Recommended value | Required? |
|---|---|---|---|
azure.workload.identity/use | This label is required in the pod template spec. Only pods with this label will be mutated by the azure-workload-identity mutating admission webhook to inject the Azure specific environment variables and the projected service account token volume. | true | ✓ |
Annotations
All annotations are optional. If the annotation is not specified, the default value will be used.
| Annotation | Description | Default |
|---|---|---|
azure.workload.identity/service-account-token-expiration | (Takes precedence if the service account is also annotated) Represents the expirationSeconds field for the projected service account token. It is an optional field that the user might want to configure this to prevent any downtime caused by errors during service account token refresh. Kubernetes service account token expiry will not be correlated with AAD tokens. AAD tokens will expire in 24 hours after they are issued. | 3600 (acceptable range: 3600 - 86400) |
azure.workload.identity/skip-containers | Represents a semi-colon-separated list of containers (e.g. container1;container2) to skip adding projected service account token volume. By default, the projected service account token volume will be added to all containers. | |
azure.workload.identity/inject-proxy-sidecar | Injects a proxy init container and proxy sidecar into the pod. The proxy sidecar is used to intercept token requests to IMDS and acquire an AAD token on behalf of the user with federated identity credential. | false |
azure.workload.identity/proxy-sidecar-port | Represents the port of the proxy sidecar. | 8000 |
Service Account
Annotations
All annotations are optional. If the annotation is not specified, the default value will be used.
| Annotation | Description | Default |
|---|---|---|
azure.workload.identity/client-id | Represents the AAD application or user-assigned managed identity client ID to be used with the pod. | |
azure.workload.identity/tenant-id | Represents the Azure tenant ID where the AAD application or user-assigned managed identity is registered. | AZURE_TENANT_ID environment variable extracted from azure-wi-webhook-config ConfigMap |
azure.workload.identity/service-account-token-expiration | Represents the expirationSeconds field for the projected service account token. It is an optional field that the user might want to configure this to prevent any downtime caused by errors during service account token refresh. Kubernetes service account token expiry will not be correlated with AAD tokens. AAD tokens will expire in 24 hours after they are issued. | 3600 (acceptable range: 3600 - 86400) |
Federated Identity Credential
Not all service account tokens can be exchanged for a valid AAD token. A federated identity credential between an existing Kubernetes service account and an AAD application or user-assigned managed identity has to be created in advance. Refer to doc for an overview of federated identity credentials in Azure Active Directory.
NOTE: A maximum of 20 federated identity credentials can be added per AAD application or user-assigned managed identity object. The federated identity credentials API is not available in national cloud deployments - source
Export the following environment variables:
export SERVICE_ACCOUNT_NAMESPACE="..."
export SERVICE_ACCOUNT_NAME="..."
export SERVICE_ACCOUNT_ISSUER="..." # see section 1.1 on how to get the service account issuer url

# if you are using a Azure AD application
export APPLICATION_NAME="<your application name>"

# if you are using a user-assigned managed identity
export USER_ASSIGNED_MANAGED_IDENTITY_NAME="<your user-assigned managed identity name>"
export RESOURCE_GROUP="<your user-assigned managed identity resource group>"
Currently, there are several ways to create and delete a federated identity credential:
Azure Workload Identity CLI
NOTE:
azwicurrently only supports Azure AD Applications. If you want to use a user-assigned managed identity, skip this section and follow the steps in the Azure CLI section.
To create a federated identity credential:
azwi serviceaccount create phase federated-identity \
  --aad-application-name "${APPLICATION_NAME}" \
  --service-account-namespace "${SERVICE_ACCOUNT_NAMESPACE}" \
  --service-account-name "${SERVICE_ACCOUNT_NAME}" \
  --service-account-issuer-url "${SERVICE_ACCOUNT_ISSUER}"
To delete a federated identity credential:
azwi serviceaccount delete phase federated-identity \
  --aad-application-name "${APPLICATION_NAME}" \
  --service-account-namespace "${SERVICE_ACCOUNT_NAMESPACE}" \
  --service-account-name "${SERVICE_ACCOUNT_NAME}" \
  --service-account-issuer-url "${SERVICE_ACCOUNT_ISSUER}"
Azure CLI
A federated identity credential can also be created using the az CLI. This can either be done in a local terminal session, or using Azure Cloud Shell. Use the az CLI to run the following commands:
Federated identity credential for an Azure AD application
# Get the object ID of the AAD application
export APPLICATION_OBJECT_ID="$(az ad app list --display-name "${APPLICATION_NAME}" --query '[0].id' -otsv)"

cat <<EOF > params.json
{
  "name": "kubernetes-federated-identity",
  "issuer": "${SERVICE_ACCOUNT_ISSUER}",
  "subject": "system:serviceaccount:${SERVICE_ACCOUNT_NAMESPACE}:${SERVICE_ACCOUNT_NAME}",
  "description": "Kubernetes service account federated identity",
  "audiences": [
    "api://AzureADTokenExchange"
  ]
}
EOF

az ad app federated-credential create --id $APPLICATION_OBJECT_ID --parameters params.json
To delete a federated identity credential, the federated identity credential ID needs to be obtained with the following command:
az ad app federated-credential list --id "${APPLICATION_OBJECT_ID}"
Select the desired ID of the federated identity credential and run the following command:
az ad app federated-credential delete --federated-credential-id $FIC_ID --id $APPLICATION_OBJECT_ID
Federated identity credential for a user-assigned managed identity
az identity federated-credential create \
  --name "kubernetes-federated-identity" \
  --identity-name "${USER_ASSIGNED_MANAGED_IDENTITY_NAME}" \
  --resource-group "${RESOURCE_GROUP}" \
  --issuer "${SERVICE_ACCOUNT_ISSUER}" \
  --subject "system:serviceaccount:${SERVICE_ACCOUNT_NAMESPACE}:${SERVICE_ACCOUNT_NAME}"
To delete a federated identity credential
az identity federated-credential delete \
  --identity-name "${USER_ASSIGNED_MANAGED_IDENTITY_NAME}" \
  --name "kubernetes-federated-identity" \
  --resource-group "${RESOURCE_GROUP}"
For more information on the az identity federated-credential command, refer to the Azure CLI documentation.
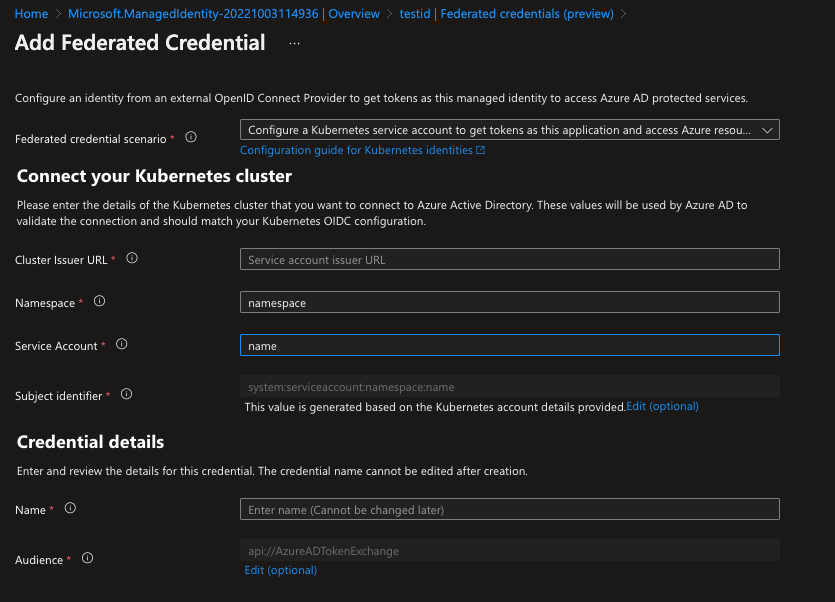
Azure Portal UI
Federated identity credential for an Azure AD application
- Sign in to the Azure portal.
- Go to App registrations and open the app you want to configure.
- Go to Certificates and secrets.
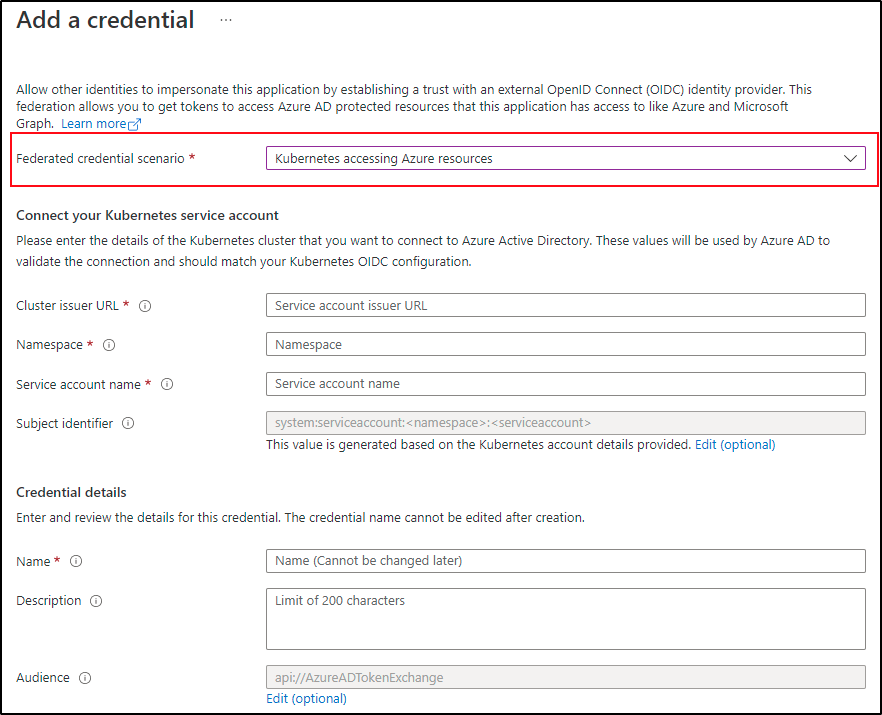
- In the Federated credentials tab, select Add credential. The Add a credential blade opens.
- In the Federated credential scenario drop-down box select Kubernetes accessing Azure resources.
- Specify the Cluster issuer URL.
- Specify the Namespace.
- Specify the Service account name.
- The Subject identifier field auto-populates based on the values you entered.
- Add a Name for the federated credential.
- Click Add to configure the federated credential.
Federated identity credential for a user-assigned managed identity
- Sign in to the Azure portal.
- Go to resource group and open the user-assigned managed identity you want to configure.
- Go to Federated credentials.
- In the Federated credentials tab, select Add credential. The Add a credential blade opens.
- In the Federated credential scenario drop-down box select Kubernetes accessing Azure resources.
- Specify the Cluster issuer URL.
- Specify the Namespace.
- Specify the Service account name.
- The Subject identifier field auto-populates based on the values you entered.
- Add a Name for the federated credential.
- Click Add to configure the federated credential.
Azure Workload Identity CLI (azwi)
The Azure Workload Identity CLI (azwi) is a utility CLI that helps manage Azure AD Workload Identity and automate error-prone operations:
- Generate the JWKS document from a list of public keys
- Streamline the creation and deletion of the following resources:
- AAD applications
- Kubernetes service accounts
- Federated identities
- Azure role assignments
azwi serviceaccount create
Create a workload identity.
Synopsis
The “create” command executes the following phases in order:
aad-application     Create Azure Active Directory (AAD) application and its underlying service principal
service-account     Create Kubernetes service account in the current KUBECONFIG context and add azure-workload-identity labels and annotations to it
federated-identity  Create federated identity credential between the AAD application and the Kubernetes service account
role-assignment     Create role assignment between the AAD application and the Azure cloud resource
azwi serviceaccount create [flags]
Options
      --aad-application-client-id string            Client ID of the AAD application. If not specified, it will be fetched using the AAD application name
      --aad-application-name string                 Name of the AAD application, If not specified, the namespace, the name of the service account and the hash of the issuer URL will be used
      --aad-application-object-id string            Object ID of the AAD application. If not specified, it will be fetched using the AAD application name
      --auth-method string                          auth method to use. Supported values: cli, client_secret, client_certificate (default "cli")
      --azure-env string                            the target Azure cloud (default "AzurePublicCloud")
      --azure-role string                           Role of the AAD application (see all available roles at https://docs.microsoft.com/en-us/azure/role-based-access-control/built-in-roles)
      --azure-scope string                          Scope at which the role assignment or definition applies to
      --certificate-path string                     path to client certificate (used with --auth-method=client_certificate)
      --client-id string                            client id (used with --auth-method=[client_secret|client_certificate])
      --client-secret string                        client secret (used with --auth-method=client_secret)
  -h, --help                                        help for create
      --private-key-path string                     path to private key (used with --auth-method=client_certificate)
      --service-account-issuer-url string           URL of the issuer
      --service-account-name string                 Name of the service account
      --service-account-namespace string            Namespace of the service account (default "default")
      --service-account-token-expiration duration   Expiration time of the service account token. Must be between 1 hour and 24 hours (default 1h0m0s)
      --service-principal-name string               Name of the service principal that backs the AAD application. If this is not specified, the name of the AAD application will be used
      --service-principal-object-id string          Object ID of the service principal that backs the AAD application. If not specified, it will be fetched using the service principal name
      --skip-phases strings                         List of phases to skip
  -s, --subscription-id string                      azure subscription id (required)
Example
az login && az account set -s <SubscriptionID>
azwi serviceaccount create \
  --service-account-name azwi-sa \
  --service-account-issuer-url https://azwi.blob.core.windows.net/oidc-test/ \
  --skip-phases role-assignment
Output
INFO[0000] No subscription provided, using selected subscription from Azure CLI: <SubscriptionID>
INFO[0003] skipping phase                                phase=role-assignment
INFO[0003] [aad-application] created an AAD application  clientID=936ed007-52c2-4785-8c09-04eeca2e5970 name="default-azwi-sa-1g7d7NgSw9Q2EsSeafgx8uQKqR4q6zTrsPjDdrvN79Y=" objectID=19888f97-e0d3-4f61-8eb9-b87bf161e27d
INFO[0003] [aad-application] created service principal   clientID=936ed007-52c2-4785-8c09-04eeca2e5970 name="default-azwi-sa-1g7d7NgSw9Q2EsSeafgx8uQKqR4q6zTrsPjDdrvN79Y=" objectID=4e3c51e5-ec74-40e2-8e28-2606803a048e
INFO[0003] [service-account] created Kubernetes service account  name=azwi-sa namespace=default
INFO[0004] [federated-identity] added federated credential  objectID=19888f97-e0d3-4f61-8eb9-b87bf161e27d subject="system:serviceaccount:default:azwi-sa"
Invoke a single phase of the create workflow
To invoke a single phase of the create workflow:
azwi sa create phase <phase name>
azwi serviceaccount delete
Delete a workload identity.
Synopsis
The “delete” command executes the following phases in order:
role-assignment     Delete the role assignment between the AAD application and the Azure cloud resource
federated-identity  Delete federated identity credential for the AAD application and the Kubernetes service account
service-account     Delete the Kubernetes service account in the current KUBECONFIG context
aad-application     Delete the Azure Active Directory (AAD) application and its underlying service principal
azwi serviceaccount delete [flags]
Options
      --aad-application-name string         Name of the AAD application. If not specified, the namespace, the name of the service account and the hash of the issuer URL will be used
      --aad-application-object-id string    Object ID of the AAD application. If not specified, it will be fetched using the AAD application name
      --auth-method string                  auth method to use. Supported values: cli, client_secret, client_certificate (default "cli")
      --azure-env string                    the target Azure cloud (default "AzurePublicCloud")
      --certificate-path string             path to client certificate (used with --auth-method=client_certificate)
      --client-id string                    client id (used with --auth-method=[client_secret|client_certificate])
      --client-secret string                client secret (used with --auth-method=client_secret)
  -h, --help                                help for delete
      --private-key-path string             path to private key (used with --auth-method=client_certificate)
      --role-assignment-id string           Azure role assignment ID
      --service-account-issuer-url string   URL of the issuer
      --service-account-name string         Name of the service account
      --service-account-namespace string    Namespace of the service account (default "default")
      --skip-phases strings                 List of phases to skip
  -s, --subscription-id string              azure subscription id (required)
Example
az login && az account set -s <SubscriptionID>
azwi sa delete \
  --service-account-name azwi-sa \
  --service-account-issuer-url https://azwi.blob.core.windows.net/oidc-test/ \
  --skip-phases role-assignment
Output
INFO[0000] No subscription provided, using selected subscription from Azure CLI: <SubscriptionID>
INFO[0001] skipping phase                                phase=role-assignment
INFO[0001] [federated-identity] deleted federated identity credential  issuerURL="https://azwi.blob.core.windows.net/oidc-test/" subject="system:serviceaccount:default:azwi-sa"
INFO[0001] [service-account] deleted service account     name=azwi-sa namespace=default
INFO[0001] [aad-application] deleted aad application     objectID=19888f97-e0d3-4f61-8eb9-b87bf161e27d
Invoke a single phase of the delete workflow
To invoke a single phase of the delete workflow:
azwi sa delete phase <phase name>
azwi jwks
Create JSON Web Key Sets for the service account issuer keys.
Synopsis
This command provides the ability to generate the JSON Web Key Sets (JWKS) for the service account issuer keys
azwi jwks [flags]
Options
  -h, --help                  help for jwks
      --output-file string    The name of the file to write the JWKS to. If not provided, the default output is stdout
      --public-keys strings   List of public keys to include in the JWKS
Example
azwi jwks --public-keys sa.pub
Output
{
  "keys": [
    {
      "use": "sig",
      "kty": "RSA",
      "kid": "Me5VC6i4_4mymFj7T5rcUftFjYX70YoCfSnZB6-nBY4",
      "alg": "RS256",
      "n": "ywg7HeKIFX3vleVKZHeYoNpuLHIDisnczYXrUdIGCNilCJFA1ymjG2UAADnt_FpYUsCVyKYJTqcxNbK4boNg_P3uK39OAqXabwYrilEZvsVJQKhzn8dXLeqAnM98L8eBpySU208KTsfMkS3Q6lqwurUP7c_a3g_1XRJukz_EmQxg9jLD_fQd5VwPTEo8HJQIFqIxFWzjTkkK5hbcL9Cclkf6RpeRyjh7Vem57Fu-jAlxDUiYiqyieM4OBNm4CQjiqDE8_xOC8viNpHNw542MYVDKSRnYui31lCOj32wBDphczR8BbnrZgbqN3K_zzB3gIjcGbWbbGA5xKJYqSu5uRwN89_CWrT3vGw5RN3XQPSbhGC4smgZkOCw3N9i1b-x-rrd-mRse6F95ONaoslCJUbJvxvDdb5X0P4_CVZRwJvUyP3OJ44ZvwzshA-zilG-QC9E1j2R9DTSMqOJzUuOxS0JIvoboteI1FAByV9KyU948zQRM7r7MMZYBKWIsu6h7",
      "e": "AQAB"
    }
  ]
}
Self-Managed Clusters
The following sections contain the best practices when using Azure AD Workload Identity on a self-managed clusters.
Service Account Key Rotation
A security best practice is to routinely rotate your key pair used to sign the service account tokens. This page explains the best practices, guidelines, as well as how to generate and rotate it in the case of self-managed Kubernetes clusters where you have access to the control plane.
This technique requires that the Kubernetes control plane is running in a high-availability (HA) setup with multiple API servers. Clusters that use a single API server will become unavailable while the API server is restarted.
Best Practices
Key rotation
Key pair should be rotated on a regular basis. For references, AKS clusters rotate their service account signing key pairs every three months.
Key retirement
Key pair should be retired when they are no longer needed. In most cases, this means permanently removing them to guarantee that it poses no more risk and to minimize the number of active key pairs that are being handled.
Steps to manually generate and rotate keys
1. Generate a new key pair
Skip this step if you are planning to bring your own keys.
openssl genrsa -out sa-new.key 2048
openssl rsa -in sa-new.key -pubout -out sa-new.pub
2. Backup the old key pair and distribute the new key pair
Schedule a jump pod to each control plane node, which mounts the /etc/kubernetes/pki folder:
/etc/kubernetes/pki/sa.puband/etc/kubernetes/pki/sa.keyare the paths of the service account key pair for a kind cluster. The paths can vary depending on your provider.
cat << EOF | kubectl apply -f -
apiVersion: apps/v1
kind: DaemonSet
metadata:
  name: jump
  labels:
    k8s-app: jump
spec:
  selector:
    matchLabels:
      name: jump
  template:
    metadata:
      labels:
        name: jump
    spec:
      tolerations:
      - key: node-role.kubernetes.io/master
        operator: Exists
        effect: NoSchedule
      containers:
        - name: busybox
          image: busybox
          command:
            - sleep
            - "3600"
          volumeMounts:
              - mountPath: /etc/kubernetes/pki
                name: etc-kubernetes-pki
      volumes:
        - name: etc-kubernetes-pki
          hostPath:
            path: /etc/kubernetes/pki
EOF
Backup the old service account key pair to your local machine:
POD_NAME="$(kubectl get po -l name=jump -ojson | jq -r '.items[0].metadata.name')"
kubectl cp default/${POD_NAME}:/etc/kubernetes/pki/sa.pub sa-old.pub
kubectl cp default/${POD_NAME}:/etc/kubernetes/pki/sa.key sa-old.key
Distribute the new key pair to the certificate directory of each control plane node:
for POD_NAME in "$(kubectl get po -l name=jump -ojson | jq -r '.items[].metadata.name')"; do
  kubectl cp sa-new.pub default/${POD_NAME}:/etc/kubernetes/pki/sa-new.pub
  kubectl cp sa-new.key default/${POD_NAME}:/etc/kubernetes/pki/sa-new.key
done
3. Update the JWKS
In the case of service account tokens generated before you initiated the key rotation, you would need a time period where the old and new public keys exist in the JWKS. The relying party can then validate service account tokens signed by both the old and new private key.
Download azwi from our latest GitHub releases, which is a CLI tool that helps generate the JWKS document in JSON.
Generate and upload the JWKS:
Assuming you followed our Quick Start and store your OIDC discovery document and JWKS in an Azure storage account.
azwi jwks --public-keys sa-old.pub --public-keys sa-new.pub --output-file jwks.json
export AZURE_STORAGE_ACCOUNT=<AzureStorageAccount>
az storage blob upload \
  --container-name "${AZURE_STORAGE_CONTAINER}" \
  --file jwks.json \
  --name openid/v1/jwks
4. Key Rotation
With the new key pair distributed, you can utilize kubectl-node-shell to update the following core components arguments by spawning a root shell to each control plane node:
kubectl node-shell <NodeName>

# Run in the root shell
# download yq (jq for yaml)
curl -L https://github.com/mikefarah/yq/releases/download/v4.12.1/yq_linux_amd64 --output /usr/bin/yq
chmod +x /usr/bin/yq

# append the new public key as an kube-apiserver argument
yq eval -i '.spec.containers[0].command |= . + ["--service-account-key-file=/etc/kubernetes/pki/sa-new.pub"]' /etc/kubernetes/manifests/kube-apiserver.yaml

# replace the old private key with the new private key for kube-apiserver and kube-controller-manager
sed -i 's|--service-account-signing-key-file=.*|--service-account-signing-key-file=/etc/kubernetes/pki/sa-new.key|' /etc/kubernetes/manifests/kube-apiserver.yaml
sed -i 's|--service-account-private-key-file=.*|--service-account-private-key-file=/etc/kubernetes/pki/sa-new.key|' /etc/kubernetes/manifests/kube-controller-manager.yaml
The commands above should trigger a restart for kube-apiserver and kube-controller-manager pod.
5. Verification
Create a dummy pod that uses an annotated service account.
cat << EOF | kubectl apply -f -
apiVersion: v1
kind: ServiceAccount
metadata:
  annotations:
    azure.workload.identity/client-id: dummy
  name: workload-identity-sa
---
apiVersion: v1
kind: Pod
metadata:
  name: dummy-pod
  labels:
    azure.workload.identity/use: "true"
spec:
  serviceAccountName: workload-identity-sa
  containers:
    - name: busybox
      image: busybox
      command:
        - sleep
        - "3600"
EOF
Output the projected service account token:
kubectl exec dummy-pod -- cat /var/run/secrets/azure/tokens/azure-identity-token
Decode your token using jwt.ms. The kid field in the token header should be the same as the kid of azwi jwks --public-keys sa-new.pub | jq -r '.keys[0].kid'. This means that the service account token is signed by the new private key.
6. Cleanup
Delete the dangling resources created above:
kubectl delete ds jump
kubectl delete pod dummy-pod
kubectl delete sa workload-identity-sa
7. Remove old JWK after maximum token expiration
After the maximum token expiration (the default expiration is 24 hours) has passed, projected service account tokens signed by the old private key will be rotated by kubelet and signed with the new signing key. The kubelet proactively rotates the token if it is older than 80% of its total TTL, or if the token is older than 24 hours. You should update the JWKS accordingly to only include the new public key:
azwi jwks --public-keys sa-new.pub --output-file jwks.json
az storage blob upload \
  --container-name "${AZURE_STORAGE_CONTAINER}" \
  --file jwks.json \
  --name openid/v1/jwks
Remove the old public key from kube-apiserver’s arguments:
# get the index of the old public key from the kube-apiserver argument array
INDEX="$(yq e '.spec.containers[0].command' /etc/kubernetes/manifests/kube-apiserver.yaml | grep -Fn 'service-account-key-file' | head -n 1 | cut -d':' -f1)"

# convert to zero-index
INDEX="$(expr ${INDEX} - 1)"

# remove the old public key argument using yq
yq eval -i "del(.spec.containers[0].command[${INDEX}])" /etc/kubernetes/manifests/kube-apiserver.yaml

# remove the old key pair from disk
rm sa.*
Examples
This section contains examples about setting up a self-managed cluster with the required configurations.
| Tool | Description | Example |
|---|---|---|
| Kubernetes in Docker (kind) | Run local Kubernetes clusters using Docker container. A fast way to create a conformant Kubernetes cluster. Great for local testing and development. | Link |
Kubernetes in Docker (kind)
This document shows you how to create a kind cluster and customize the required configuration for the kube-apiserver.
1. Complete the self-managed cluster installation guide
2. Create a kind cluster
Export the following environment variables:
export SERVICE_ACCOUNT_ISSUER="https://${AZURE_STORAGE_ACCOUNT}.blob.core.windows.net/${AZURE_STORAGE_CONTAINER}/"
export SERVICE_ACCOUNT_KEY_FILE="$(pwd)/sa.pub"
export SERVICE_ACCOUNT_SIGNING_KEY_FILE="$(pwd)/sa.key"
Create a kind cluster with one control plane node and customize various service account related flags for the kube-apiserver:
The minimum supported Kubernetes version for the webhook is v1.18, however, we recommend using Kubernetes version v1.20+.
cat <<EOF | kind create cluster --name azure-workload-identity --image kindest/node:v1.22.4 --config=-
kind: Cluster
apiVersion: kind.x-k8s.io/v1alpha4
nodes:
- role: control-plane
  extraMounts:
    - hostPath: ${SERVICE_ACCOUNT_KEY_FILE}
      containerPath: /etc/kubernetes/pki/sa.pub
    - hostPath: ${SERVICE_ACCOUNT_SIGNING_KEY_FILE}
      containerPath: /etc/kubernetes/pki/sa.key
  kubeadmConfigPatches:
  - |
    kind: ClusterConfiguration
    apiServer:
      extraArgs:
        service-account-issuer: ${SERVICE_ACCOUNT_ISSUER}
        service-account-key-file: /etc/kubernetes/pki/sa.pub
        service-account-signing-key-file: /etc/kubernetes/pki/sa.key
    controllerManager:
      extraArgs:
        service-account-private-key-file: /etc/kubernetes/pki/sa.key
EOF
Output
Creating cluster "azure-workload-identity" ...
 • Ensuring node image (kindest/node:v1.22.4) 🖼  ...
 ✓ Ensuring node image (kindest/node:v1.22.4) 🖼
 • Preparing nodes 📦   ...
 ✓ Preparing nodes 📦
 • Writing configuration 📜  ...
 ✓ Writing configuration 📜
 • Starting control-plane 🕹️  ...
 ✓ Starting control-plane 🕹️
 • Installing CNI 🔌  ...
 ✓ Installing CNI 🔌
 • Installing StorageClass 💾  ...
 ✓ Installing StorageClass 💾
Set kubectl context to "kind-azure-workload-identity"
You can now use your cluster with:

kubectl cluster-info --context kind-azure-workload-identity

Have a question, bug, or feature request? Let us know! https://kind.sigs.k8s.io/#community 🙂
Run the following command to verify that the kind cluster is online:
kubectl get nodes
Output
NAME                                     STATUS   ROLES                  AGE     VERSION   INTERNAL-IP   EXTERNAL-IP   OS-IMAGE       KERNEL-VERSION     CONTAINER-RUNTIME
azure-workload-identity-control-plane   Ready    control-plane,master   2m28s   v1.22.4   172.18.0.2    <none>        Ubuntu 21.04   5.4.0-1047-azure   containerd://1.5.2
Now that we have confirmed the cluster is up and running with the required configuration, you can follow the tutorial in Quick Start to learn the basics of how to use the Azure AD Workload Identity webhook to acquire a token to access a secret in an Azure Key Vault.
Language-Specific Examples
Azure AD Workload Identity works especially well with the Azure SDK and the Microsoft Authentication Library (MSAL). Your workload can leverage any of these library to seamlessly access Azure cloud resources. This section contains example projects using both libraries in different programming languages.
You can swap the demo image used in the quick start with images built from these example projects.
Azure Identity client libraries
For details on Workload Identity support in the Azure Identity client libraries, see Azure Identity client libraries.
Microsoft Authentication Library (MSAL)
| Language | Library | Image | Example | Has Windows Images |
|---|---|---|---|---|
| C# | microsoft-authentication-library-for-dotnet | ghcr.io/azure/azure-workload-identity/msal-net | Link | ✅ |
| Go | microsoft-authentication-library-for-go | ghcr.io/azure/azure-workload-identity/msal-go | Link | ✅ |
| Java | microsoft-authentication-library-for-java | ghcr.io/azure/azure-workload-identity/msal-java | Link | ❌ |
| JavaScript/TypeScript | microsoft-authentication-library-for-js | ghcr.io/azure/azure-workload-identity/msal-node | Link | ❌ |
| Python | microsoft-authentication-library-for-python | ghcr.io/azure/azure-workload-identity/msal-python | Link | ❌ |
Metrics provided by Azure Workload Identity
The Azure Workload Identity mutating admission webhook uses opentelemetry for reporting metrics.
Prometheus is the only exporter that’s currently supported.
List of metrics provided by Azure Workload Identity
| Metric | Description | Tags |
|---|---|---|
azwi_mutation_request_bucket | Distribution of how long it took for the azure-workload-identity mutation request | namespace |
Metrics are served from port 8095, but this port is not exposed outside the pod by default. Use kubectl port-forward to access the metrics over localhost:
kubectl port-forward deploy/azure-wi-webhook-controller-manager -n azure-workload-identity-system 8095:8095 &
curl localhost:8095/metrics
Sample Metrics output
azwi_mutation_request_bucket{namespace="default",service_name="webhook",telemetry_sdk_language="go",telemetry_sdk_name="opentelemetry",telemetry_sdk_version="0.20.0",le="0.001"} 0
azwi_mutation_request_bucket{namespace="default",service_name="webhook",telemetry_sdk_language="go",telemetry_sdk_name="opentelemetry",telemetry_sdk_version="0.20.0",le="0.002"} 0
azwi_mutation_request_bucket{namespace="default",service_name="webhook",telemetry_sdk_language="go",telemetry_sdk_name="opentelemetry",telemetry_sdk_version="0.20.0",le="0.003"} 0
azwi_mutation_request_bucket{namespace="default",service_name="webhook",telemetry_sdk_language="go",telemetry_sdk_name="opentelemetry",telemetry_sdk_version="0.20.0",le="0.004"} 0
azwi_mutation_request_bucket{namespace="default",service_name="webhook",telemetry_sdk_language="go",telemetry_sdk_name="opentelemetry",telemetry_sdk_version="0.20.0",le="0.005"} 0
azwi_mutation_request_bucket{namespace="default",service_name="webhook",telemetry_sdk_language="go",telemetry_sdk_name="opentelemetry",telemetry_sdk_version="0.20.0",le="0.006"} 0
azwi_mutation_request_bucket{namespace="default",service_name="webhook",telemetry_sdk_language="go",telemetry_sdk_name="opentelemetry",telemetry_sdk_version="0.20.0",le="0.007"} 0
azwi_mutation_request_bucket{namespace="default",service_name="webhook",telemetry_sdk_language="go",telemetry_sdk_name="opentelemetry",telemetry_sdk_version="0.20.0",le="0.008"} 0
azwi_mutation_request_bucket{namespace="default",service_name="webhook",telemetry_sdk_language="go",telemetry_sdk_name="opentelemetry",telemetry_sdk_version="0.20.0",le="0.009"} 0
azwi_mutation_request_bucket{namespace="default",service_name="webhook",telemetry_sdk_language="go",telemetry_sdk_name="opentelemetry",telemetry_sdk_version="0.20.0",le="0.01"} 0
azwi_mutation_request_bucket{namespace="default",service_name="webhook",telemetry_sdk_language="go",telemetry_sdk_name="opentelemetry",telemetry_sdk_version="0.20.0",le="0.02"} 0
azwi_mutation_request_bucket{namespace="default",service_name="webhook",telemetry_sdk_language="go",telemetry_sdk_name="opentelemetry",telemetry_sdk_version="0.20.0",le="0.03"} 0
azwi_mutation_request_bucket{namespace="default",service_name="webhook",telemetry_sdk_language="go",telemetry_sdk_name="opentelemetry",telemetry_sdk_version="0.20.0",le="0.04"} 0
azwi_mutation_request_bucket{namespace="default",service_name="webhook",telemetry_sdk_language="go",telemetry_sdk_name="opentelemetry",telemetry_sdk_version="0.20.0",le="0.05"} 0
azwi_mutation_request_bucket{namespace="default",service_name="webhook",telemetry_sdk_language="go",telemetry_sdk_name="opentelemetry",telemetry_sdk_version="0.20.0",le="0.06"} 0
azwi_mutation_request_bucket{namespace="default",service_name="webhook",telemetry_sdk_language="go",telemetry_sdk_name="opentelemetry",telemetry_sdk_version="0.20.0",le="0.07"} 0
azwi_mutation_request_bucket{namespace="default",service_name="webhook",telemetry_sdk_language="go",telemetry_sdk_name="opentelemetry",telemetry_sdk_version="0.20.0",le="0.08"} 0
azwi_mutation_request_bucket{namespace="default",service_name="webhook",telemetry_sdk_language="go",telemetry_sdk_name="opentelemetry",telemetry_sdk_version="0.20.0",le="0.09"} 0
azwi_mutation_request_bucket{namespace="default",service_name="webhook",telemetry_sdk_language="go",telemetry_sdk_name="opentelemetry",telemetry_sdk_version="0.20.0",le="0.1"} 0
azwi_mutation_request_bucket{namespace="default",service_name="webhook",telemetry_sdk_language="go",telemetry_sdk_name="opentelemetry",telemetry_sdk_version="0.20.0",le="0.2"} 1
azwi_mutation_request_bucket{namespace="default",service_name="webhook",telemetry_sdk_language="go",telemetry_sdk_name="opentelemetry",telemetry_sdk_version="0.20.0",le="0.3"} 1
azwi_mutation_request_bucket{namespace="default",service_name="webhook",telemetry_sdk_language="go",telemetry_sdk_name="opentelemetry",telemetry_sdk_version="0.20.0",le="0.4"} 1
azwi_mutation_request_bucket{namespace="default",service_name="webhook",telemetry_sdk_language="go",telemetry_sdk_name="opentelemetry",telemetry_sdk_version="0.20.0",le="0.5"} 1
azwi_mutation_request_bucket{namespace="default",service_name="webhook",telemetry_sdk_language="go",telemetry_sdk_name="opentelemetry",telemetry_sdk_version="0.20.0",le="0.6"} 1
azwi_mutation_request_bucket{namespace="default",service_name="webhook",telemetry_sdk_language="go",telemetry_sdk_name="opentelemetry",telemetry_sdk_version="0.20.0",le="0.7"} 1
azwi_mutation_request_bucket{namespace="default",service_name="webhook",telemetry_sdk_language="go",telemetry_sdk_name="opentelemetry",telemetry_sdk_version="0.20.0",le="0.8"} 1
azwi_mutation_request_bucket{namespace="default",service_name="webhook",telemetry_sdk_language="go",telemetry_sdk_name="opentelemetry",telemetry_sdk_version="0.20.0",le="0.9"} 1
azwi_mutation_request_bucket{namespace="default",service_name="webhook",telemetry_sdk_language="go",telemetry_sdk_name="opentelemetry",telemetry_sdk_version="0.20.0",le="1"} 1
azwi_mutation_request_bucket{namespace="default",service_name="webhook",telemetry_sdk_language="go",telemetry_sdk_name="opentelemetry",telemetry_sdk_version="0.20.0",le="1.5"} 1
azwi_mutation_request_bucket{namespace="default",service_name="webhook",telemetry_sdk_language="go",telemetry_sdk_name="opentelemetry",telemetry_sdk_version="0.20.0",le="2"} 1
azwi_mutation_request_bucket{namespace="default",service_name="webhook",telemetry_sdk_language="go",telemetry_sdk_name="opentelemetry",telemetry_sdk_version="0.20.0",le="2.5"} 1
azwi_mutation_request_bucket{namespace="default",service_name="webhook",telemetry_sdk_language="go",telemetry_sdk_name="opentelemetry",telemetry_sdk_version="0.20.0",le="3"} 1
azwi_mutation_request_bucket{namespace="default",service_name="webhook",telemetry_sdk_language="go",telemetry_sdk_name="opentelemetry",telemetry_sdk_version="0.20.0",le="+Inf"} 1
azwi_mutation_request_sum{namespace="default",service_name="webhook",telemetry_sdk_language="go",telemetry_sdk_name="opentelemetry",telemetry_sdk_version="0.20.0"} 0.104694953
azwi_mutation_request_count{namespace="default",service_name="webhook",telemetry_sdk_language="go",telemetry_sdk_name="opentelemetry",telemetry_sdk_version="0.20.0"} 1
Please note that there are many webhook specific metrics that may be useful to monitor as well. Here are some webhook controller examples:
controller_runtime_webhook_requests_totalcontroller_runtime_webhook_latency_secondsworkqueue_depthcertwatcher_read_certificate_totalcertwatcher_read_certificate_errors_totalworkqueue_retries_total
To learn more about these metrics, please see Default Exported Metrics References
Frequently Asked Questions
- How does the azwi-cli differ from the azure-cli?
- How is azure-workload-identity different from aad-pod-identity v2?
- How to federate multiple identities with a Kubernetes service account?
- How to federate multiple Kubernetes service accounts with a single identity?
- Is there a propagation delay after creating a federated identity credential?
- What is the Azure Workload Identity release schedule?
- What permissions are required to create a federated identity credential for Azure AD Application?
- What permissions are required to create a federated identity credential for user-assigned managed identity?
- How to migrate from
aad-pod-identity? - Does Workload Identity work in disconnected environments?
How does the azwi-cli differ from the azure-cli?
The azwi-cli tool is specific to the Azure Workload Identity support in Kubernetes to group several manual steps (e.g. the creation of federated identity credential, annotated service accounts, etc) and automate them. Comparing with the azure-cli, it does not have an official command to add/delete federated identity (configuring federated identity credential with az rest is available here)
Azure CLI and AKS are currently working on the above requirements, as well as an Azure CLI extension that natively integrate this project with AKS clusters.
How is azure-workload-identity different from aad-pod-identity v2?
Azure Workload Identity is v2 of the AAD Pod Identity. AAD Pod Identity v2 was a placeholder name and is now rebranded as Azure Workload Identity.
How to federate multiple identities with a Kubernetes service account?
It’s possible to have a many-to-one relationship between multiple identities and a Kubernetes service account. For example, you can create multiple federated identity credentials that reference the same service account in your Kubernetes cluster.
The azure.workload.identity/client-id annotation in your service account represents the default identity’s client ID used by an Azure Identity library during authentication. If you’d like to use a different identity, specify the client ID when creating the Azure Identity library’s credential object.
For example, if you’re using the Azure Identity for Python library’s DefaultAzureCredential to authenticate your application, you can specify which identity to use by adding the workload_identity_client_id parameter to the DefaultAzureCredential constructor.
How to federate multiple Kubernetes service accounts with a single identity?
It is possible to have a many-to-one relationship between a single identity and multiple Kubernetes service accounts, i.e. you can create a federated identity credential for every <service account namespace, service account name, OIDC issuer> tuple that you want to federate with the same identity.
Is there a propagation delay after creating a federated identity credential?
It takes a few seconds for the federated identity credential to be propagated after being initially added. If a token request is made immediately after adding the federated identity credential, it might lead to failure for a couple of minutes as the cache is populated in the directory with old data. To avoid this issue, you can add a slight delay after adding the federated identity credential.
What is the Azure Workload Identity release schedule?
Currently, we release on a monthly basis, targeting the last week of the month.
What permissions are required to create a federated identity credential for Azure AD Application?
One of the following roles is required:
Required permissions to create/update/delete federated identity credential:
What permissions are required to create a federated identity credential for user-assigned managed identity?
One of the following roles is required:
Required permissions to create/update/delete federated identity credential:
Microsoft.ManagedIdentity/userAssignedIdentities/federatedIdentityCredentials/writeMicrosoft.ManagedIdentity/userAssignedIdentities/federatedIdentityCredentials/delete
How to migrate from aad-pod-identity?
You can refer to this link for more information.
tl;dr:
- If you use
DefaultAzureCredentialin your workload, you can update the Azure Identity client library version to the latest that supports Workload Identity (ref: link). - If you still have workloads that get managed identity token from IMDS, you can annotate the pod to get a proxy sidecar injected, that’ll do the token exchange with the new flow.
Does Workload Identity work in disconnected environments?
No, Workload Identity doesn’t work in completely disconnected environments. The AAD token is valid for 24 hours, so the workload needs to be connected to the network at least once every 24 hours to refresh the token.
Troubleshooting
- Logging
- AADSTS70021: No matching federated identity record found for presented assertion.
- AADSTS90061: Request to External OIDC endpoint failed.
- Workload pod doesn’t have the Azure specific environment variables and projected service account token volume after upgrading to v1.0.0
An overview of a list of components to assist in troubleshooting.
Logging
Below is a list of commands you can use to view relevant logs of azure-workload-identity components.
Mutating Admission Webhook
To get the logs of the mutating admission webhook, run the following command:
kubectl logs -n azure-workload-identity-system -l app=workload-identity-webhook
Isolate errors from logs
You can use grep ^E and --since flag from kubectl to isolate any errors occurred after a given duration.
kubectl logs -n azure-workload-identity-system -l app=workload-identity-webhook --since=1h | grep ^E
It is always a good idea to include relevant logs from the webhook when opening a new issue
AADSTS70021: No matching federated identity record found for presented assertion.
token_credential.go:70] "failed to acquire token" err="FromAssertion(): http call(https://login.microsoftonline.com//{tenant-id}//oauth2/v2.0/token)(POST) error: reply status code was 400:\n{\"error\":\"invalid_request\",\"error_description\":\"AADSTS70021: No matching federated identity record found for presented assertion. Assertion Issuer: 'https://oidc.prod-aks.azure.com/XXXXXX/'. Assertion Subject: 'system:serviceaccount:default:workload-identity-sa'. Assertion Audience: 'api://AzureADTokenExchange'.\\r\\nTrace ID: b0f62116-10b6-4a73-bdb2-281524404e00\\r\\nCorrelation ID: 4a42e576-85bc-46ae-b7e3-b52cb8958917\\r\\nTimestamp: 2022-01-20 22:54:42Z\",\"error_codes\":[70021],\"timestamp\":\"2022-01-20 22:54:42Z\",\"trace_id\":\"b0f62116-10b6-4a73-bdb2-281524404e00\",\"correlation_id\":\"4a42e576-85bc-46ae-b7e3-b52cb8958917\",\"error_uri\":\"https://login.microsoftonline.com/error?code=70021\"}"
E0120 22:55:12.472912       1 token_credential.go:70] "failed to acquire token" err="FromAssertion(): http call(https://login.microsoftonline.com/{tenant-id}/oauth2/v2.0/token)(POST) error: reply status code was 400:\n{\"error\":\"invalid_request\",\"error_description\":\"AADSTS70021: No matching federated identity record found for presented assertion. Assertion Issuer: 'https://oidc.prod-aks.azure.com/XXXXXX/'. Assertion Subject: 'system:serviceaccount:default:workload-identity-sa'. Assertion Audience: 'api://AzureADTokenExchange'.\\r\\nTrace ID: 8f29172d-bf0d-4165-9d86-816665612d00\\r\\nCorrelation ID: 472f3de0-666f-411e-8d4c-cd46b6d6db26\\r\\nTimestamp: 2022-01-20 22:55:12Z\",\"error_codes\":[70021],\"timestamp\":\"2022-01-20 22:55:12Z\",\"trace_id\":\"8f29172d-bf0d-4165-9d86-816665612d00\",\"correlation_id\":\"472f3de0-666f-411e-8d4c-cd46b6d6db26\",\"error_uri\":\"https://login.microsoftonline.com/error?code=70021\"}"
If you encounter the error above, it means that the issuer of the service account token does not match the issuer you defined in the federated identity credential. In the case of an AKS cluster with OIDC issuer enabled, the most common cause is when the user is missing the trailing / when creating the federated identity credential (e.g. https://oidc.prod-aks.azure.com/XXXXXX vs https://oidc.prod-aks.azure.com/XXXXXX/).
You can follow this guide on how to get the token issuer of your cluster.
AADSTS90061: Request to External OIDC endpoint failed.
 ---> MSAL.NetCore.4.39.0.0.MsalServiceException:
        ErrorCode: invalid_request
Microsoft.Identity.Client.MsalServiceException: AADSTS90061: Request to External OIDC endpoint failed.
Trace ID: 86c81de3-efbd-4c0f-854d-cb8f329e5b00
Correlation ID: a92568a5-cc37-4136-ad4d-1ba82988abc2
Timestamp: 2022-10-21 04:36:48Z
   at Microsoft.Identity.Client.Internal.Requests.RequestBase.HandleTokenRefreshErrorAsync(MsalServiceException e, MsalAccessTokenCacheItem cachedAccessTokenItem)
   at Microsoft.Identity.Client.Internal.Requests.ClientCredentialRequest.ExecuteAsync(CancellationToken cancellationToken)
   at Microsoft.Identity.Client.Internal.Requests.RequestBase.RunAsync(CancellationToken cancellationToken)
   at Microsoft.Identity.Client.ApiConfig.Executors.ConfidentialClientExecutor.ExecuteAsync(AcquireTokenCommonParameters commonParameters, AcquireTokenForClientParameters clientParameters, CancellationToken cancellationToken)
   at Azure.Identity.AbstractAcquireTokenParameterBuilderExtensions.ExecuteAsync[T](AbstractAcquireTokenParameterBuilder`1 builder, Boolean async, CancellationToken cancellationToken)
   at Azure.Identity.MsalConfidentialClient.AcquireTokenForClientCoreAsync(String[] scopes, String tenantId, Boolean async, CancellationToken cancellationToken)
   at Azure.Identity.MsalConfidentialClient.AcquireTokenForClientAsync(String[] scopes, String tenantId, Boolean async, CancellationToken cancellationToken)
   at Azure.Identity.ClientAssertionCredential.GetTokenAsync(TokenRequestContext requestContext, CancellationToken cancellationToken)
        StatusCode: 400
        ResponseBody: {"error":"invalid_request","error_description":"AADSTS90061: Request to External OIDC endpoint failed.\r\nTrace ID: 86c81de3-efbd-4c0f-854d-cb8f329e5b00\r\nCorrelation ID: a92568a5-cc37-4136-ad4d-1ba82988abc2\r\nTimestamp: 2022-10-21 04:36:48Z","error_codes":[90061],"timestamp":"2022-10-21 04:36:48Z","trace_id":"86c81de3-efbd-4c0f-854d-cb8f329e5b00","correlation_id":"a92568a5-cc37-4136-ad4d-1ba82988abc2"}
...
If you encounter the error above, it means the OIDC issuer endpoint is not exposed to the internet or is inaccessible. You can verify this by running the following commands to check if the endpoints are accessible:
export SERVICE_ACCOUNT_ISSUER="<your service account issuer url>" # see section 1.1 on how to get the service account issuer url

# check if the OIDC issuer endpoint is accessible
curl ${SERVICE_ACCOUNT_ISSUER}/.well-known/openid-configuration
curl ${SERVICE_ACCOUNT_ISSUER}/openid/v1/jwks
If you’re seeing this issue with an AKS cluster, to resolve the issue try to reconcile the cluster by running az aks update. If the issue persists after reconciliation, create an Azure support ticket.
Workload pod doesn’t have the Azure specific environment variables and projected service account token volume after upgrading to v1.0.0
As of v1.0.0 release, the azure-workload-identity mutating admission webhook is defaulting to using failurePolicy: Fail instead of Ignore. With this change, we have added an object selector in the configuration to only intercept and mutate pods that have the azure.workload.identity/use: "true" label. This change reduces the latency impact of the webhook and prevents workload pods that require the injected environment variables and projected service account token volume from starting in an unexpected state. Refer to issue for more details.
If you are upgrading from a previous version of the azure-workload-identity, you will need to add the azure.workload.identity/use: "true" label to your workload pods to ensure that the mutating admission webhook is able to inject the required environment variables and projected service account token volume.
Run the following command to check if the workload pod is labeled:
kubectl get pod quick-start -n oidc -o jsonpath='{.metadata.labels.azure\.workload\.identity/use}'
Output
kubectl get pod quick-start -n oidc -o jsonpath='{.metadata.labels.azure\.workload\.identity/use}'
true
Known Issues
- Permission denied when reading the projected service account token file
- User tried to log in to a device from a platform (Unknown) that’s currently not supported through Conditional Access policy
- Environment variables not injected into pods deployed in the kube-system namespace in an AKS cluster
- Proxy sidecar not injected into pods that have
hostNetwork: true
Permission denied when reading the projected service account token file
In Kubernetes 1.18, the default mode for the projected service account token file is 0600. This causes containers running as non-root to fail while trying to read the token file:
F0826 20:03:20.113998 1 main.go:27] failed to get secret from keyvault, err: autorest/Client#Do: Preparing request failed: StatusCode=0 -- Original Error: failed to read service account token: open /var/run/secrets/azure/tokens/azure-identity-token: permission denied
The default mode was changed to 0644 in Kubernetes v1.19, which allows containers running as non-root to read the projected service account token.
If you ran into this issue, you can either:
-
Upgrade your cluster to v1.20+ or
-
Apply the following
securityContextfield to your pod spec:
spec:
  securityContext:
    fsGroup: 65534
User tried to log in to a device from a platform (Unknown) that’s currently not supported through Conditional Access policy
When creating a federated identity credential, your request might be blocked by Azure Active Directory Conditional Access: Require compliant devices policy:
az rest --method POST --uri "https://graph.microsoft.com/beta/applications/${APPLICATION_OBJECT_ID}/federatedIdentityCredentials" --body @body.json
AADSTS50005: User tried to log in to a device from a platform (Unknown) that's currently not supported through Conditional Access policy. Supported device platforms are: iOS, Android, Mac, and Windows flavors.
...
To re-authenticate, please run:
az login --scope https://graph.microsoft.com//.default
Another quick way to verify if your tenant has a conditional access policy in place:
az account get-access-token --resource-type=ms-graph
To bypass this policy:
az loginwith a user account on a supported system - Windows or MacOS, and make the device compliant.az login --service-principalwith a service principal which does not have the above compliance check.
In the case of service principal, you will have to grant the Application.ReadWrite.All API permission:
# get the app role ID of `Application.ReadWrite.All`
APPLICATION_OBJECT_ID="$(az ad app show --id ${APPLICATION_CLIENT_ID} --query id -otsv)"
GRAPH_RESOURCE_ID="$(az ad sp list --display-name "Microsoft Graph" --query '[0].id' -otsv)"
APPLICATION_READWRITE_ALL_ID="$(az ad sp list --display-name "Microsoft Graph" --query "[0].appRoles[?value=='Application.ReadWrite.All' && contains(allowedMemberTypes, 'Application')].id" --output tsv)"

URI="https://graph.microsoft.com/v1.0/servicePrincipals/${APPLICATION_OBJECT_ID}/appRoleAssignments"
BODY="{'principalId':'${APPLICATION_OBJECT_ID}','resourceId':'${GRAPH_RESOURCE_ID}','appRoleId':'${APPLICATION_READWRITE_ALL_ID}'}"
az rest --method post --uri "${URI}" --body "${BODY}" --headers "Content-Type=application/json"
Environment variables not injected into pods deployed in the kube-system namespace in an AKS cluster
To protect the stability of the system and prevent custom admission controllers from impacting internal services in the kube-system, namespace AKS has an Admissions Enforcer, which automatically excludes kube-system and AKS internal namespaces. Refer to doc for more details.
If you’re deploying a pod in the kube-system namespace of an AKS cluster and need the environment variables, projected service account token volume injected by the Azure Workload Identity Mutating Webhook, add the "admissions.enforcer/disabled": "true" label or annotation in the MutatingWebhookConfiguration.
Proxy sidecar not injected into pods that have hostNetwork: true
The proxy sidecar modifies the iptables rules to redirect traffic to the Azure Instance Metadata Service (IMDS) endpoint to the proxy sidecar. This is not supported when hostNetwork: true is set on the pod as it will modify the host’s iptables rules which will impact other pods running on the same host.
Development
Setting up
Base requirements
- Prerequisites from Installation
- Install go
- Get the latest patch version for go 1.20.
- Install jq
brew install jqon macOS.chocolatey install jqon Windows.sudo apt install jqon Ubuntu Linux.
- Install make.
Clone the repository
git clone https://github.com/Azure/azure-workload-identity.git $(go env GOPATH)/src/github.com/Azure/azure-workload-identity
Create a test cluster
Generate a custom public/private key pair
Skip this step if you are planning to bring your own keys.
openssl genrsa -out sa.key 2048
openssl rsa -in sa.key -pubout -out sa.pub
Output
Generating RSA private key, 2048 bit long modulus
..............+++
......+++
e is 65537 (0x10001)
writing RSA key
Setup the OIDC discovery document and JWKS
Skip this step if you already set up the OIDC discovery document and JWKS.
Azure blob storage will be used to host the OIDC discovery document and JWKS. However, you can host them in anywhere, as long as they are publicly available.
export AZURE_STORAGE_ACCOUNT="azwi$(openssl rand -hex 4)"
# This $web container is a special container that serves static web content without requiring public access enablement.
# See https://learn.microsoft.com/en-us/azure/storage/blobs/storage-blob-static-website
AZURE_STORAGE_CONTAINER="\$web"
az storage account create --resource-group "${RESOURCE_GROUP}" --name "${AZURE_STORAGE_ACCOUNT}"
az storage container create --name "${AZURE_STORAGE_CONTAINER}"
Generate and upload the OIDC discovery document:
cat <<EOF > openid-configuration.json
{
  "issuer": "https://${AZURE_STORAGE_ACCOUNT}.blob.core.windows.net/${AZURE_STORAGE_CONTAINER}/",
  "jwks_uri": "https://${AZURE_STORAGE_ACCOUNT}.blob.core.windows.net/${AZURE_STORAGE_CONTAINER}/openid/v1/jwks",
  "response_types_supported": [
    "id_token"
  ],
  "subject_types_supported": [
    "public"
  ],
  "id_token_signing_alg_values_supported": [
    "RS256"
  ]
}
EOF
az storage blob upload \
  --container-name "${AZURE_STORAGE_CONTAINER}" \
  --file openid-configuration.json \
  --name .well-known/openid-configuration
Download azwi from our latest GitHub releases, which is a CLI tool that helps generate the JWKS document in JSON.
Generate and upload the JWKS:
azwi jwks --public-keys sa.pub --output-file jwks.json
az storage blob upload \
  --container-name "${AZURE_STORAGE_CONTAINER}" \
  --file jwks.json \
  --name openid/v1/jwks
Verify that the OIDC discovery document is publicly accessible:
curl -s "https://${AZURE_STORAGE_ACCOUNT}.blob.core.windows.net/${AZURE_STORAGE_CONTAINER}/.well-known/openid-configuration"
Output
{
  "issuer": "https://<REDACTED>.blob.core.windows.net/oidc-test/",
  "jwks_uri": "https://<REDACTED>.blob.core.windows.net/oidc-test/openid/v1/jwks",
  "response_types_supported": [
    "id_token"
  ],
  "subject_types_supported": [
    "public"
  ],
  "id_token_signing_alg_values_supported": [
    "RS256"
  ]
}
Create a kind cluster
Export the following environment variables:
export SERVICE_ACCOUNT_ISSUER="https://${AZURE_STORAGE_ACCOUNT}.blob.core.windows.net/${AZURE_STORAGE_CONTAINER}/"
export SERVICE_ACCOUNT_KEY_FILE="$(pwd)/sa.pub"
export SERVICE_ACCOUNT_SIGNING_KEY_FILE="$(pwd)/sa.key"
Create a kind cluster with one control plane node and customize various service account-related flags for the API server:
The minimum supported Kubernetes version for the webhook is v1.18.0, however, we recommend using Kubernetes version v1.20.0+.
cat <<EOF | kind create cluster --name azure-workload-identity --image kindest/node:v1.22.4 --config=-
kind: Cluster
apiVersion: kind.x-k8s.io/v1alpha4
nodes:
- role: control-plane
  extraMounts:
    - hostPath: ${SERVICE_ACCOUNT_KEY_FILE}
      containerPath: /etc/kubernetes/pki/sa.pub
    - hostPath: ${SERVICE_ACCOUNT_SIGNING_KEY_FILE}
      containerPath: /etc/kubernetes/pki/sa.key
  kubeadmConfigPatches:
  - |
    kind: ClusterConfiguration
    apiServer:
      extraArgs:
        service-account-issuer: ${SERVICE_ACCOUNT_ISSUER}
        service-account-key-file: /etc/kubernetes/pki/sa.pub
        service-account-signing-key-file: /etc/kubernetes/pki/sa.key
EOF
Output
Creating cluster "azure-workload-identity" ...
 • Ensuring node image (kindest/node:v1.22.4) 🖼  ...
 ✓ Ensuring node image (kindest/node:v1.22.4) 🖼
 • Preparing nodes 📦   ...
 ✓ Preparing nodes 📦
 • Writing configuration 📜  ...
 ✓ Writing configuration 📜
 • Starting control-plane 🕹️  ...
 ✓ Starting control-plane 🕹️
 • Installing CNI 🔌  ...
 ✓ Installing CNI 🔌
 • Installing StorageClass 💾  ...
 ✓ Installing StorageClass 💾
Set kubectl context to "kind-azure-workload-identity"
You can now use your cluster with:

kubectl cluster-info --context kind-azure-workload-identity

Have a question, bug, or feature request? Let us know! https://kind.sigs.k8s.io/#community 🙂
Run the following command to verify that the kind cluster is online:
kubectl get nodes
Output
NAME                                     STATUS   ROLES                  AGE     VERSION   INTERNAL-IP   EXTERNAL-IP   OS-IMAGE       KERNEL-VERSION     CONTAINER-RUNTIME
azure-workload-identity-control-plane   Ready    control-plane,master   2m28s   v1.22.4   172.18.0.2    <none>        Ubuntu 21.04   5.4.0-1047-azure   containerd://1.5.2
Build and deploy the webhook
export REGISTRY=<YourPublicRegistry>
export IMAGE_VERSION="$(git describe --tags --always)"
export AZURE_TENANT_ID="..."
ALL_IMAGES=webhook make clean docker-build docker-push-manifest deploy
Unit Test
make test
E2E Test
make test-e2e-run
Optional settings are:
| Environment variables | Description | Default |
|---|---|---|
GINKGO_FOCUS | Allow you to focus on a subset of specs using regex. | |
GINKGO_SKIP | Allow you to skip a subset of specs using regex. | |
GINKGO_NODES | The number of ginkgo workers to run the specs. | 3 |
GINKGO_NO_COLOR | True if you want colorized output. | false |
GINKGO_TIMEOUT | The test suite timeout duration. | 5m |
KUBECONFIG | The cluster KUBECONFIG you want to run the e2e test against. | ${HOME}/.kube/config |
E2E_EXTRA_ARGS | Allow you to insert extra arguments when executing the test suite. |
Releasing
- 1. Create a release pull request
- 2. Review and approve the release pull request
- 3. Verify that the
create_releaseaction is triggered after the release pull request is merged - 4. Verify that the tag and release is successfully created
Currently, Azure Workload Identity releases on a monthly basis, targeting the last week of the month.
We use GitHub Actions to automate our release process.
1. Create a release pull request
2. Review and approve the release pull request
3. Verify that the create_release action is triggered after the release pull request is merged

4. Verify that the tag and release is successfully created
Contributing
The Azure AD Workload Identity project welcomes contributions and suggestions. Most contributions require you to agree to a Contributor License Agreement (CLA) declaring that you have the right to, and actually do, grant us the rights to use your contribution. For details, visit https://cla.microsoft.com.
When you submit a pull request, a CLA-bot will automatically determine whether you need to provide a CLA and decorate the PR appropriately (e.g., label, comment). Simply follow the instructions provided by the bot. You will only need to do this once across all repos using our CLA.
Code of Conduct
This project has adopted the Microsoft Open Source Code of Conduct. For more information, see the Code of Conduct FAQ or contact opencode@microsoft.com with any additional questions or comments.