Welcome to Day 25 of #30DaysOfServerless!
Azure Container Apps enable application code packaged in containers to run and scale without the overhead of managing cloud infrastructure and container orchestration. In this post I'll show you how to deploy a Java application running on Spring Boot in a container to Azure Container Registry and Azure Container Apps.
What We'll Cover
- Introduction to Deploying Java containers in the cloud
- Step-by-step: Deploying to Azure Container Registry
- Step-by-step: Deploying and running on Azure Container Apps
- Resources: For self-study!

Deploy Java containers to cloud
We'll deploy a Java application running on Spring Boot in a container to Azure Container Registry and Azure Container Apps. Here are the main steps:
- Create Azure Container Registry (ACR) on Azure portal
- Create Azure Container App (ACA) on Azure portal.
- Deploy code to Azure Container Registry from the Azure CLI.
- Deploy container from ACR to ACA using the Azure portal.
- Active Azure subscription with Contributor or Owner permissions. Create an account for free if you don't have one.
- GitHub account. Sign up for free if you don't have one.
- Install Git.
- Install the Azure CLI.
Sign in to Azure from the CLI using the az login command, and follow the prompts in your browser to complete the authentication process. Also, ensure you're running the latest version of the CLI by using the az upgrade command.
1. Get Sample Code
Fork and clone the sample GitHub repo to your local machine. Navigate to the and click Fork in the top-right corner of the page.
The example code that we're using is a very basic containerized Spring Boot example. There are a lot more details to learn about Spring boot apps in docker, for a deep dive check out this Spring Boot Guide
2. Run Sample Locally (Optional)
If you have docker installed locally, you can optionally test the code on your local machine. Navigate to the root directory of the forked repository and run the following commands:
docker build -t spring-boot-docker-aca .
docker run -p 8080:8080 spring-boot-docker-aca
Open a browser and go to https://localhost:8080. You should see this message:
Hello Docker World
That indicates the the Spring Boot app is successfully running locally in a docker container.
Next, let's set up an Azure Container Registry an an Azure Container App and deploy this container to the cloud!
3. Step-by-step: Deploy to ACR
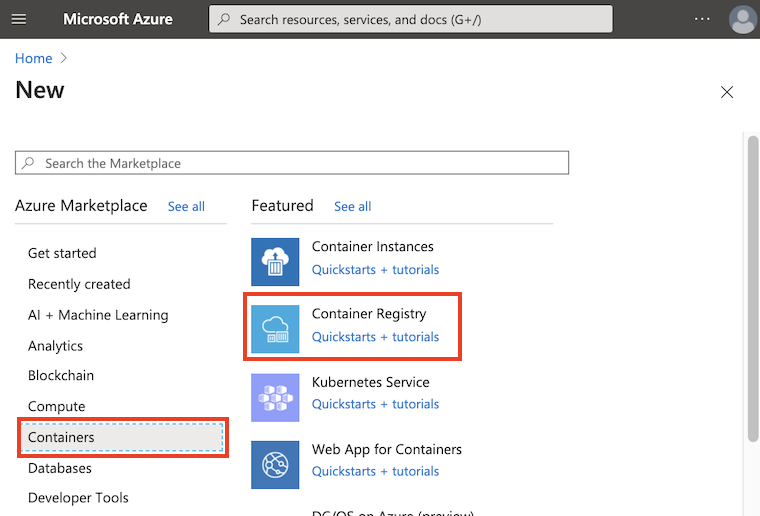
To create a container registry from the portal dashboard, Select Create a resource > Containers > Container Registry.

In the Basics tab, enter values for Resource group and Registry name. The registry name must be unique within Azure, and contain 5-50 alphanumeric characters. Create a new resource group in the West US location named spring-boot-docker-aca. Select the 'Basic' SKU.
Keep the default values for the remaining settings. Then select Review + create, then Create. When the Deployment succeeded message appears, select the container registry in the portal.
Note the registry server name ending with azurecr.io. You will use this in the following steps when you push and pull images with Docker.
3.1 Log into registry using the Azure CLI
Before pushing and pulling container images, you must log in to the registry instance. Sign into the Azure CLI on your local machine, then run the az acr login command. For this step, use the registry name, not the server name ending with azurecr.io.
From the command line, type:
az acr login --name myregistryname
The command returns Login Succeeded once completed.
3.2 Build & deploy with az acr build
Next, we're going to deploy the docker container we created earlier using the AZ ACR Build command. AZ ACR Build creates a docker build from local code and pushes the container to Azure Container Registry if the build is successful.
Go to your local clone of the spring-boot-docker-aca repo in the command line, type:
az acr build --registry myregistryname --image spring-boot-docker-aca:v1 .
3.3 List container images
Once the AZ ACR Build command is complete, you should be able to view the container as a repository in the registry. In the portal, open your registry and select Repositories, then select the spring-boot-docker-aca repository you created with docker push. You should also see the v1 image under Tags.
4. Deploy on ACA
Now that we have an image in the Azure Container Registry, we can deploy it to Azure Container Apps. For the first deployment, we'll pull the container from our ACR as part of the ACA setup.
4.1 Create a container app
We'll create the container app at the same place that we created the container registry in the Azure portal. From the portal, select Create a resource > Containers > Container App. In the Basics tab, set these values:
4.2 Enter project details
| Setting | Action |
|---|---|
| Subscription | Your Azure subscription. |
| Resource group | Use the spring-boot-docker-aca resource group |
| Container app name | Enter spring-boot-docker-aca. |
4.3 Create an environment
-
In the Create Container App environment field, select Create new.
-
In the Create Container App Environment page on the Basics tab, enter the following values:
Setting Value Environment name Enter my-environment. Region Select westus3. -
Select OK.
-
Select the Create button at the bottom of the Create Container App Environment page.
-
Select the Next: App settings button at the bottom of the page.
5. App settings tab
The App settings tab is where you connect to the ACR and pull the repository image:
| Setting | Action |
|---|---|
| Use quickstart image | Uncheck the checkbox. |
| Name | Enter spring-boot-docker-aca. |
| Image source | Select Azure Container Registry |
| Registry | Select your ACR from the list. |
| Image | Select spring-boot-docker-aca from the list. |
| Image Tag | Select v1 from the list. |
5.1 Application ingress settings
| Setting | Action |
|---|---|
| Ingress | Select Enabled. |
| Ingress visibility | Select External to publicly expose your container app. |
| Target port | Enter 8080. |
5.2 Deploy the container app
- Select the Review and create button at the bottom of the page.
- Select Create.
Once the deployment is successfully completed, you'll see the message: Your deployment is complete.
5.3 Verify deployment
In the portal, go to the Overview of your spring-boot-docker-aca Azure Container App, and click on the Application Url. You should see this message in the browser:
Hello Docker World
That indicates the the Spring Boot app is running in a docker container in your spring-boot-docker-aca Azure Container App.
Resources: For self-study!
Once you have an understanding of the basics in ths post, there is so much more to learn!
- Check out the other Serverless September posts.
- For DevOps and Java on Azure, see the tutorials and workshops at https://aka.ms/devopsforjavashops
- Also see https://developer.microsoft.com/java for everything Java on Azure!
Thanks for stopping by!
