
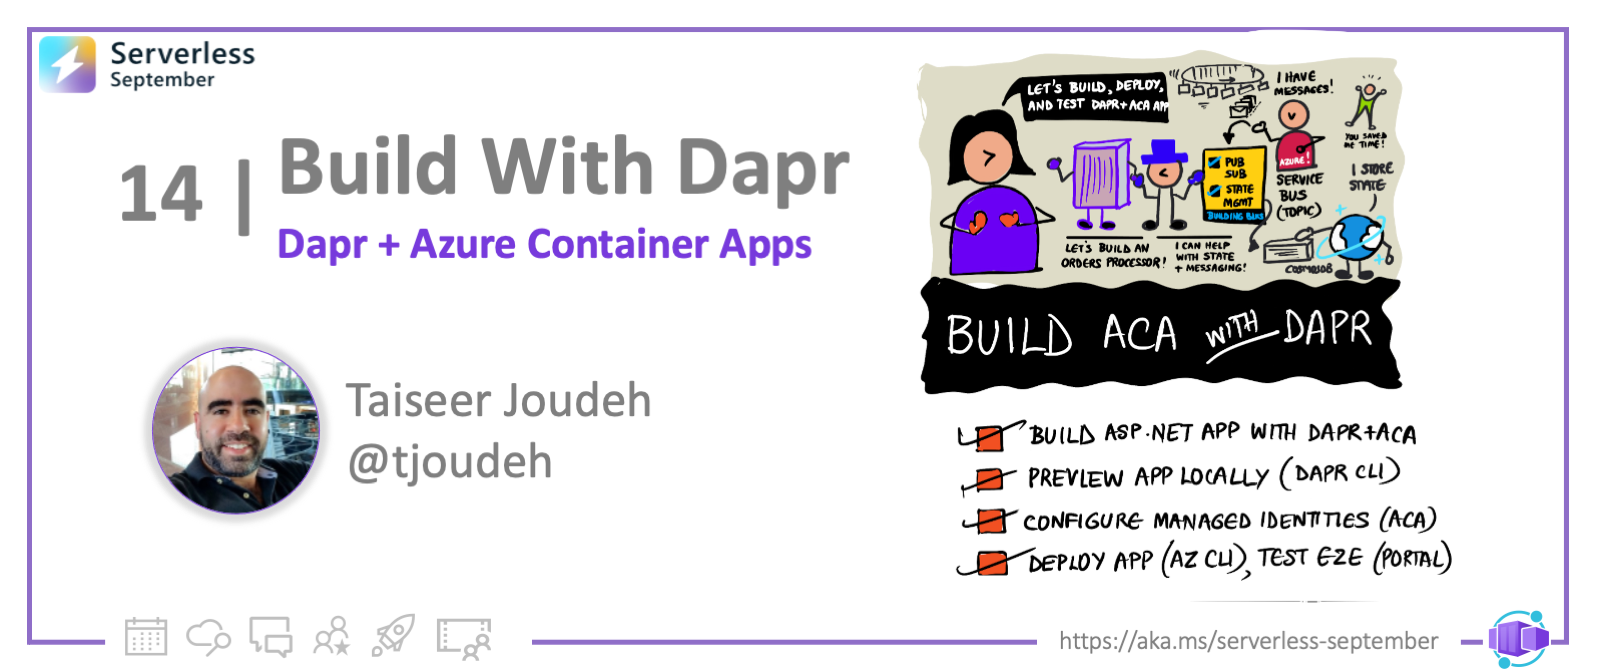
Welcome to Day 14 of #30DaysOfServerless!
In the past few days we focused our attention on Azure Container Apps, building microservices-based solutions and learning related concepts like environments, networking and auto-scaling - before introducing the sidecar capability of Dapr. Today, we look at how Dapr and ACA work seamlessly together to simplify microservices development in the cloud.
What We'll Cover
- Dapr refresher
- Application scenario we are covering today
- Quickstart: Build your first ACA with Dapr
- Exercise: Try this yourself!
- What's Next: Advanced scenario in 12-part series
- Resources: For self-study!
Introduction To Dapr
As developers, we are often tasked with create scalable resilient and distributed microservices, but face challenges such as recovering state after failures, establishing reliable communication between services, integrating with external resources and instrumenting distributed tracing for end-to-end solution observability. Dapr (Distributed Application Runtime) offers an approach for solving these common problems more easily.
Dapr provides its core capabilities as a set of Building Blocks as detailed in the introduction to dapr article released as a part of this series. Building Blocks provide consistent APIs that abstract away the implementation details to keep microservices code simple and portable.
Today's App Scenario
In this blog post we will create an Azure Container App which will act as an internal-only, background processor service. This service will not be accessible from the internet or from other services directly. We will also configure two Dapr building blocks (APIs): Pub/Sub and State Management. Let's take a look at the architecture diagram below to have better understanding of what we are building:
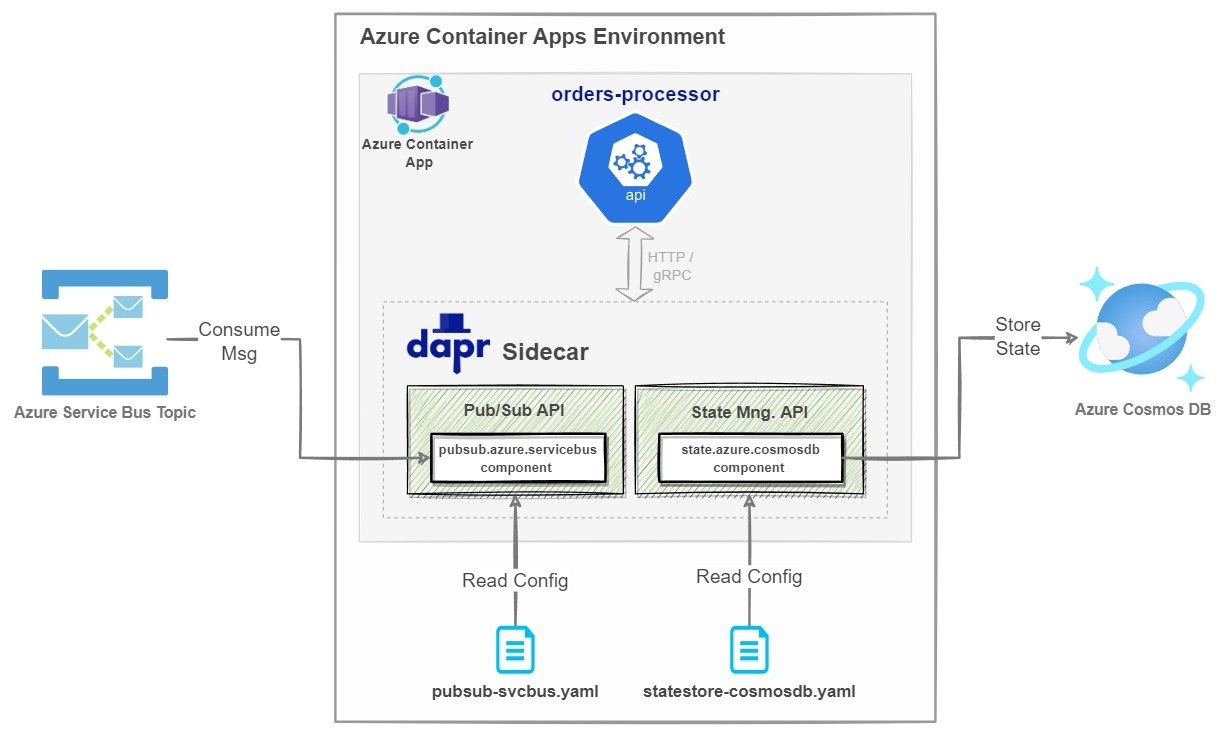
Our service, orders-processor, will be processing messages published to an Azure Service Bus Topic named orderreceivedtopic. The Dapr Pub/Sub building block will be configured by providing a configuration file named pubsub-svcbus.yaml which contains all the needed information to establish the connection between the container app and the service bus topic. Once a message is consumed by the orders-processor service, it will store a copy of it in Azure Cosmos DB. To wire up Cosmos DB, we will use the Dapr State Store building block and a statestore-cosmosdb.yaml component.
Because we are leveraging Dapr, we will not introduce any SDK for Azure Service Bus nor Azure Cosmos DB; everything will be configured using the component files, so let's jump into the code! :)
This scenario is a simplified version of a detailed tutorial which covers more advanced scenarios, if you are interested you can check more Advanced scenarios on my blog.
Build ACA with Dapr
In today's post, we'll be using VS Code to build the app using ASP.NET Core 6.0. In the process, we'll setup our development environment with the relevant command-line tools and VS Code extensions. In addition, we will use the Azure CLI to create the Azure resources which will be used in this solution.
Note: Completing this exercise may incur a a cost of a few USD based on your Azure subscription.
First, make sure you have your development environment setup and configured.
- An Azure account with an active subscription - Create an account for free
- dotnet 6.0 - Install
- Docker Desktop - Install
- Visual Studio Code - Install
- VS Code Docker extension - Install
- Dapr CLI. Details on installation on this post too - Install
- VS Code Dapr extension. Depends on Dapr CLI - Install
- Azure CLI - Install
Create the service project (Web API)
-
Open a command-line terminal and create a folder for your project. Use the
codecommand to launch Visual Studio Code from that directory as shown:mkdir orders-service
cd orders-service
code . -
From VS Code Terminal tab, open developer command prompt or PowerShell terminal in the project folder
orders-serviceand initialize the project by typing:dotnet new webapi -o Orders.Processor --no-httpsThis will create and ASP.NET Web API project scaffolded with 1 single controller. -
We need to containerize this application so we can push it to Azure Container Registry as a docker image and deploy it to Azure Container Apps. To do so, Open the VS Code Command Palette (Ctrl + Shift + p) and select
Docker: Add Docker Files to Workspace...- Use
.NET: ASP.NET Corewhen prompted for application platform. - Choose
Linuxwhen prompted to choose the operating system. - You will be asked if you want to add Docker Compose files. Select
No. - Take a not of the provided application port as we will be using later on.
Dockerfileand.dockerignorefiles are added to the workspace.
- Use
-
Now we will add the DTO which will be used to deserialize the consumed message from Azure Service Bus Topic, so add a new file named
OrderModel.csunder a new folder namedModelsand use the code belowpublic class OrderModel
{
public Guid OrderId { get; set; } = Guid.NewGuid();
public string Reference { get; set; } = string.Empty;
public int Quantity { get; set; }
public DateTime CreatedOn { get; set; }
} -
Install Dapr Client NuGet package, we will use this package to subscribe to the Azure Service Bus Topic in a programmatic way. From the developer command prompt or PowerShell terminal type
dotnet add package Dapr.AspNetCore -
Create an API endpoint for the consumer/service to subscribe to the topic, this endpoint will start receiving the messages published to the topic
orderreceivedtopic. Add a new controller namedExternalOrdersController.csunder theControllersfolder and use the code below:[ApiController]
[Route("api/externalorders")]
public class ExternalOrdersController : ControllerBase
{
private readonly ILogger<ExternalOrdersController> _logger;
private readonly DaprClient _daprClient;
public ExternalOrdersController(ILogger<ExternalOrdersController> logger, DaprClient daprClient)
{
_logger = logger;
_daprClient = daprClient;
}
[Topic("pubsub-servicebus", "orderreceivedtopic")]
[HttpPost("orderreceived")]
public async Task<IActionResult> OrderReceived([FromBody] OrderModel orderModel)
{
_logger.LogInformation("Received new order at: '{0}' Order Id: '{1}' Order reference: '{2}', Order quantity: '{3}'",
DateTime.UtcNow, orderModel.OrderId, orderModel.Reference, orderModel.Quantity);
//Do your business logic with order received
orderModel.CreatedOn = DateTime.UtcNow;
////ToDo: Your exercise :) Save the received message into CosmoDb using the SveStateAsync
//await _daprClient.SaveStateAsync<OrderModel>("statestore-cosmosdb", orderModel.OrderId.ToString(), orderModel);
//Return 200 ok to acknowledge order is processed successfully
return Ok($"Order Processing completed successfully");
//Retunr 400 bad request to retry re-processing based on service broker configuration
//return BadRequest($"Failed to process order due to: failure reason");
}
}
In summary, the above steps result in:
-
An action method called
orderreceivedwhich can be reached on the routeapi/externalorders/orderreceivedand receives anOrderModelobject. -
An attribute
Topicon the action method including the name of the pub/sub component and the topic to subscribe to. -
Business logic for processing the message which will result in an appropriate response which dictates if the message was process successfully, should be retried or should be dead-lettered.
- Register the Dapr client and Subscribe handler at service startup. Open the file
Program.csand replace with the content below::::note Want to know more? Check this blog post which describes in detail how the consumer was able to discover available topic names, Pub/Sub names, and which routes/endpoints to push messages to. :::var builder = WebApplication.CreateBuilder(args);
// Add services to the container.
builder.Services.AddControllers().AddDapr();
// Learn more about configuring Swagger/OpenAPI at https://aka.ms/aspnetcore/swashbuckle
builder.Services.AddEndpointsApiExplorer();
builder.Services.AddSwaggerGen();
var app = builder.Build();
// Configure the HTTP request pipeline.
if (app.Environment.IsDevelopment())
{
app.UseSwagger();
app.UseSwaggerUI();
}
app.UseAuthorization();
app.UseCloudEvents();
app.MapControllers();
app.MapSubscribeHandler();
app.Run();
Provision Azure Service Bus, Topic and Subscription
We need to create the Azure Service Bus so we can configure the Dapr Pub/Sub component and test locally
-
Open your Powershell console and login to Azure by using the command
az login. If you have multiple subscriptions, set the subscription you want to use in this tutorial before proceeding, you can do this by usingaz account set --subscription <name or id>. Callingaz upgradeis a good practice to ensure you are running the latest Aure CLI version. -
Create an Azure Resource Group by using the code below, feel free to change the name and location of the resource group
$RESOURCE_GROUP="orders-services-rg"
$LOCATION="eastus"
az group create `
  --name $RESOURCE_GROUP `
--location "$LOCATION" -
Create the necessary Azure Service Bus resource and retrieve the primary connection string (for local dev testing).
$NamespaceName="ordersservices"
$TopicName="orderreceivedtopic"
$TopicSubscription="orders-processor-subscription"

##Create servicebus namespace
az servicebus namespace create --resource-group $RESOURCE_GROUP --name $NamespaceName --location $LOCATION

##Create a topic under namespace
az servicebus topic create --resource-group $RESOURCE_GROUP --namespace-name $NamespaceName --name $TopicName

##Create a topic subscription
az servicebus topic subscription create `
  --resource-group $RESOURCE_GROUP `
  --namespace-name $NamespaceName `
  --topic-name $TopicName `
  --name $TopicSubscription

##List connection string
az servicebus namespace authorization-rule keys list --resource-group $RESOURCE_GROUP --namespace-name $NamespaceName --name RootManageSharedAccessKey --query primaryConnectionString --output tsv
You can navigate to the Azure Portal and check that the resource group is created and the service bus namespace is created too.
Setup Dapr for local dev
In order to run Dapr locally on our development machine, we need to install Dapr CLI, you can follow the official documentation or use the steps below.
-
Install the Dapr CLI, run PowerShell console as an administrator and run the below command:
powershell -Command "iwr -useb https://raw.githubusercontent.com/dapr/cli/master/install/install.ps1 | iex"Note: You might need to execute the following PowerShell command
Set-ExecutionPolicy RemoteSigned -scope CurrentUserbefore installing the Dapr CLI, this command is to allow local PowerShell scripts to run regardless of signature, and requires trusted digital signatures only for remote scripts. -
Initialize Dapr in your local development environment. By initializing Dapr, we will fetch and install the Dapr sidecar binaries locally, and we will create a development environment that streamlines application development with Dapr. To do so open the PowerShell console as an administrator and run the below command:
dapr initTo verify the deployment; check Dapr version by running the following command:
dapr --version:::note Want to know more? Check this blog post which describes in detail what components added to your machine when we called
dapr init:::
Create a local Dapr Component file for Pub/Sub
Dapr uses a modular design where functionality is delivered as a component. Each component has an interface definition. All of the components are pluggable so that you can swap out one component with the same interface for another.
Components are configured at design-time with a YAML file which is stored in either a components/local folder within your solution, or globally in the .dapr folder created when invoking dapr init (read here for more details). These YAML files adhere to the generic Dapr component schema, but each is specific to the component specification.
-
Create 2 new folders under the project root directory
orders-service, one calleddapr-componentand the second onecomponent(will be used in next steps). Add a new yaml file calledpubsub-svcbus.yamlunder folderdapr-componentusing the content below:apiVersion: dapr.io/v1alpha1
kind: Component
metadata:
name: pubsub-servicebus
spec:
type: pubsub.azure.servicebus
version: v1
metadata:
- name: connectionString # Used for local dev testing.
value: "<connection string from step 2.3>"
- name: consumerID
value: "orders-processor-subscription"
scopes:
- orders-processorNote that we used the name
pubsub-servicebuswhich should match the name of Pub/Sub component we've used earlier in theExternalOrdersController.cscontroller on the action method with the attributeTopic. As well we have set the metadata (key/value) to allow us to connect to Azure Service Bus topic. The metdataconsumerIDvalue should match the topic subscription nameorders-processor-subscription. We have set the scopes section to include theorders-processorapp id, as this will be the specific application that needs access to Azure Service Bus.You need to replace the
connectionStringvalue with your Service Bus connection string. This is only needed for your local testing on your development machine, we'll be using a different approach (Managed Identities) when deploying Dapr component to Azure Container Apps Environment. For full metadata specs, you can check this page.warningThe above sample uses secrets as plain strings for local dev testing. It is recommended to use Managed Identities approach when we deploy the app to Azure Container Apps. Your Dapr components directory should be added to your .gitignore to avoid checking in secrets.
Preview Dapr app locally for e2e testing
-
Within VS Code, open PowerShell terminal, change the directory in the terminal to folder
orders-serviceand run the below command in PS terminal:dapr run --app-id orders-processor --app-port 5039 --dapr-http-port 3500 --components-path "../dapr-components" dotnet runWhen using the
dapr runcommand we are running a dapr process as a sidecar next to the Web API application. The following properties were configured:- app-id: The unique identifier of the application. Used for service discovery, state encapsulation, and the pub/sub consumer identifier.
- app-port: This parameter tells Dapr which port your application is listening on, you can get the app port from
dockerfilein the Web API Project. - dapr-http-port: the HTTP port for Dapr to listen on.
- components-path: path to the Dapr component(s) folder.
If all is working as expected, you can open the VS Code Dapr extension to see the application
orders-processorup and running as shown below: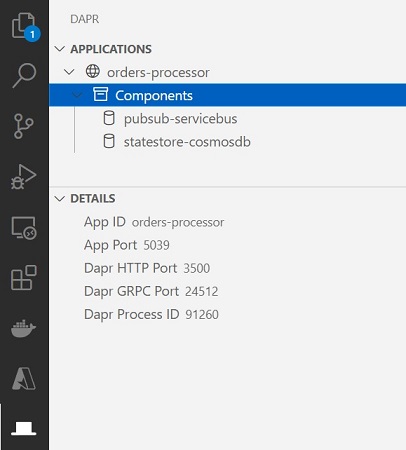
-
To publish a message to the topic
orderreceivedtopicwe can use Dapr extension:- Right click on the Dapr application
orders-processorand selectPublish Message to Application. - Wizard will ask what is the Pub/sub component name you want to publish to, provide
pubsub-servicebusand hit enter. - Wizard will ask what topic name to publish to, provide
orderreceivedtopicand hit enter. - Wizard will ask to provide a JSON payload for the method, provide the JSON below and hit enter.
{
    "reference": "Order 1",
    "quantity": 5,
    "createdOn": "2022-08-19T12:45:22.0983978Z"
}
- Right click on the Dapr application
To check the results, go to the VS Code terminal and check the logs. In the action method, we are logging information when a message is consumed. You should see something similar to the below

:::info Want to debug Dapr application locally? If you want to set breakpoints and debug your daper application locally, you can do this in VS code by following simple steps. This is very important when you are running multiple services together and want to test your microservice where multi-services are invoking each other. To learn more, you can continue reading on my blog. :::
Deploy the app to Azure Container Apps
We will follow few steps in order to deploy the service Orders.Processor to Azure Container Apps, but we need to do one addition before deploying, we have to create a component file for Azure Service Bus which meets the specs defined by Azure Container Apps.
- Create a new yaml file named
pubsub-svcbus.yamland add it under foldercomponents(folder created earlier), use the file content below:# pubsub.yaml for Azure Service Bus component
componentType: pubsub.azure.servicebus
version: v1
metadata:
- name: namespaceName
value: "ordersservices.servicebus.windows.net"
- name: consumerID
value: "orders-processor-subscription"
# Application scopes
scopes:
- orders-processor
Things to notice here:
- We didn't specify the component name
pubsub-servicebuswhen we created this component file, we are going to specify it once we add this dapr component to Azure Container Apps Environment via CLI. - We are not referencing any service bus connection strings as the authentication between Dapr and Azure Service Bus will be configured using Managed Identities.
- The metadata
namespaceNamevalue is set to the address of the Service Bus namespace as a fully qualified domain name. The key is mandatory when using Managed Identities for authentication. - We are setting the metadata
consumerIDvalue to match the topic subscription nameorders-processor-subscription. If you didn't set this metadata, dapr runtime will try to create a subscription using the dapr application ID.
-
Createan Azure Container Registry (ACR) instance in the resource group to build/push and store docker images of our service. Feel free to change the name of the ACR, to do so run the following command:
  ## Create Azure Container Registry
  $ACR_NAME="ordersservicesacr"
  az acr create `
    --resource-group $RESOURCE_GROUP `
    --name $ACR_NAME `
    --sku Basic `
--admin-enabled true -
Build the Web API project on ACR and push the docker image to ACR. Use the below command to initiate the image build and push process using ACR:
## Build and push image to ACR
$BACKEND_SVC_NAME="orders-processor"
cd {YourLocalPath}\orders-service
az acr build --registry $ACR_NAME --image $BACKEND_SVC_NAME --file 'Orders.Processor/Dockerfile' . -
Provision an Azure Container Apps Env and Container App: the Azure Container Apps Environment acts as a secure boundary around a group of all container apps:
  ## Upgrade az container app cli or install it
  az extension add --name containerapp --upgrade

  ## Create ACA Env
  $ENVIRONMENT="orders-services-aca-env"

  az containerapp env create `
    --name $ENVIRONMENT `
    --resource-group $RESOURCE_GROUP `
--location $LOCATION -
Deploy the Dapr Pub/Sub Component to the Azure Container Apps Environment using the following command:
    az containerapp env dapr-component set `
    --name $ENVIRONMENT --resource-group $RESOURCE_GROUP `
    --dapr-component-name pubsub-servicebus `
--yaml '.\components\pubsub-svcbus.yaml' -
Create a new Azure Container App with the below capabilities:
- Ingress should be disabled
- Dapr needs to be enabled
To achieve the above run the below PowerShell script:
## Create Azure COntain App
$BACKEND_SVC_NAME="orders-processor"

az containerapp create `
  --name $BACKEND_SVC_NAME  `
  --resource-group $RESOURCE_GROUP `
  --environment $ENVIRONMENT `
  --registry-server "$ACR_NAME.azurecr.io" `
  --image "$ACR_NAME.azurecr.io/$BACKEND_SVC_NAME" `
  --min-replicas 1 `
  --max-replicas 1 `
  --cpu 0.50 --memory 1.0Gi `
  --enable-dapr `
  --dapr-app-id  $BACKEND_SVC_NAME `
  --dapr-app-port 5039
Configure Managed Identities in Azure Container App
As you noticed so far, we are not using any connection strings to establish the relation between our Container App and Azure Service Bus, we will rely on Managed Identities to allow our container app to access Azure Service Bus.
We will be using a system-assigned identity with a role assignments to grant our container app the Azure Service Bus Data Receiver role which will allow it to receive messages from Service Bus queues and subscriptions.
-
Run the command below to create
system-assignedidentity for our container app:##assigning the system assigned identity
az containerapp identity assign `
--resource-group $RESOURCE_GROUP `
--name $BACKEND_SVC_NAME `
--system-assignedThis command will create an Enterprise Application (so a Service Principal) within Azure AD, which is linked to our container app, the output of this command will be as the below, keep a note of the property
principalIdas we are going to use it in the next step.{
"principalId": "456782b0-d5be-4dbd-afa0-5e2cff05d04d",
"tenantId": "0a02a8b1-XXXX-XXXX-XXXX-67ceb9132d81",
"type": "SystemAssigned"
}Note: This can be done from Azure Portal as described here.
-
Next, we need to associate the container app system-identity with the target Azure Service Bus resouce. You can read more about Azure built-in roles for Azure Service Bus.. Run the command below to associate the
system-assignedwith access-control roleAzure Service Bus Data Receiver$subscription_id = "<Your Azure Subscription ID>" ## Your Azure Subscription
$principalId = "456782b0-d5be-4dbd-afa0-5e2cff05d04d" ## Principal Id after creating system identity for container app
$roleNameOrId = "Azure Service Bus Data Receiver" ## Built in role name
$resourceName = "ordersservices" ##Name of your Service Bus Namespace
az role assignment create `
--assignee $principalId `
--role $roleNameOrId `
--scope /subscriptions/$subscription_id/resourcegroups/$RESOURCE_GROUP/providers/Microsoft.ServiceBus/namespaces/$resourceNameYou can verify from Azure Portal that the association relation is created by going to your container app, select
identitytab, then click onAzure role assignmentsbutton, you should see the role assignment below: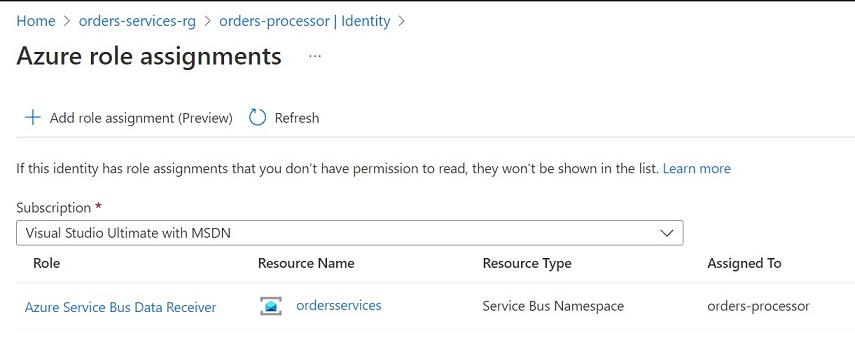
-
Lastly, we need to restart the container app revision, to do so run the command below:
 ##Get revision name and assign it to a variable
 $REVISION_NAME = (az containerapp revision list `
         --name $BACKEND_SVC_NAME  `
         --resource-group $RESOURCE_GROUP `
         --query [0].name)

 ##Restart revision by name
 az containerapp revision restart `
   --resource-group $RESOURCE_GROUP `
   --name $BACKEND_SVC_NAME  `
   --revision $REVISION_NAME
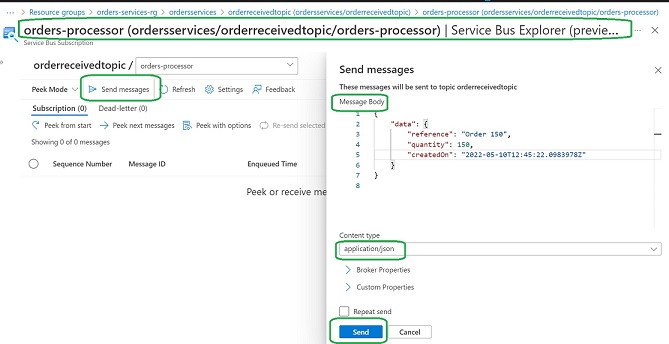
Run end-to-end Test on Azure
From the Azure Portal, select the Azure Container App orders-processor and navigate to Log stream under Monitoring tab, leave the stream connected and opened. From the Azure Portal, select the Azure Service Bus Namespace ordersservices, select the topic orderreceivedtopic, select the subscription named orders-processor-subscription, then click on Service Bus Explorer (preview). From there we need to publish/send a message. Use the JSON payload below
  {
    "data": {
        "reference": "Order 150",
        "quantity": 150,
        "createdOn": "2022-05-10T12:45:22.0983978Z"
      }
  }
If all is configured correctly, you should start seeing the information logs in Container Apps Log stream, similar to the images below
Information logs on the Log stream of the deployed Azure Container App
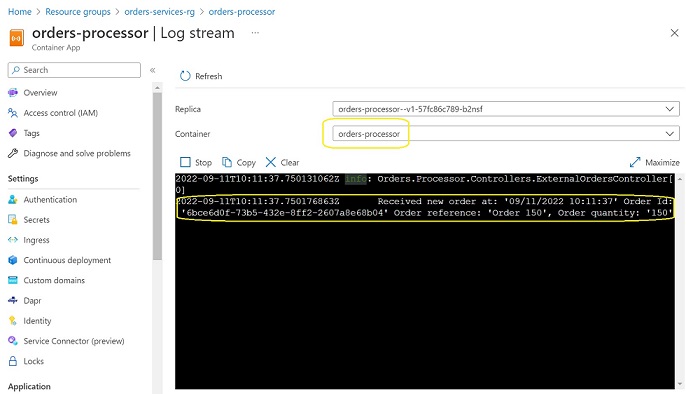
You have successfully deployed to the cloud an Azure Container App and configured Dapr Pub/Sub API with Azure Service Bus.
9. Clean up
If you are done with the tutorial, use the following command to delete the resource group and all its contained resources to avoid incurring further costs.
az group delete --name $RESOURCE_GROUP
Exercise
I left for you the configuration of the Dapr State Store API with Azure Cosmos DB :)
When you look at the action method OrderReceived in controller ExternalOrdersController, you will see that I left a line with ToDo: note, this line is responsible to save the received message (OrderModel) into Azure Cosmos DB.
There is no need to change anything on the code base (other than removing this commented line), that's the beauty of Dapr Building Blocks and how easy it allows us to plug components to our microservice application without any plumping and brining external SDKs.
For sure you need to work on the configuration part of Dapr State Store by creating a new component file like what we have done with the Pub/Sub API, things that you need to work on are:
- Provision Azure Cosmos DB Account and obtain its masterKey.
- Create a Dapr Component file adhering to Dapr Specs.
- Create an Azure Container Apps component file adhering to ACA component specs.
- Test locally on your dev machine using Dapr Component file.
- Register the new Dapr State Store component with Azure Container Apps Environment and set the Cosmos Db masterKey from the Azure Portal. If you want to challenge yourself more, use the Managed Identity approach as done in this post! The right way to protect your keys and you will not worry about managing CosmosDb keys anymore!
- Build a new image of the application and push it to Azure Container Registry.
- Update Azure Container Apps and create a new revision which contains the updated code.
- Verify the results by checking Azure Cosmos DB, you should see the Order Model stored in Cosmos DB.
If you need help, you can always refer to my blog post Azure Container Apps State Store With Dapr State Management API which contains exactly what you need to implement here, so I'm very confident you will be able to complete this exercise with no issues, happy coding :)
What's Next?
If you enjoyed working with Dapr and Azure Container Apps, and you want to have a deep dive with more complex scenarios (Dapr bindings, service discovery, auto scaling with KEDA, sync services communication, distributed tracing, health probes, etc...) where multiple services deployed to a single Container App Environment; I have created a detailed tutorial which should walk you through step by step with through details to build the application.
So far, the published posts below, and I'm publishing more posts on weekly basis, so stay tuned :)
- Tutorial for building Microservice Applications with Azure Container Apps and Dapr – Part 1
- Deploy backend API Microservice to Azure Container Apps – Part 2
- Communication between Microservices in Azure Container Apps – Part 3
- Dapr Integration with Azure Container Apps – Part 4
- Azure Container Apps State Store With Dapr State Management API – Part 5
- Azure Container Apps Async Communication with Dapr Pub/Sub API – Part 6
- Azure Container Apps with Dapr Bindings Building Block – Part 7
- Azure Container Apps Monitoring and Observability with Application Insights – Part 8
- Continuous Deployment for Azure Container Apps using GitHub Actions – Part 9
- Use Bicep to Deploy Dapr Microservices Apps to Azure Container Apps – Part 10
- Azure Container Apps Auto Scaling with KEDA – Part 11
- Integrate Health probes in Azure Container Apps – Part 12