Solution Authoring
Solution authoring
- Manifest metadata
- Provisioning steps
Manifest metadata
Owner(s)
<Owners/> tag specifies a list of <Owner/> of the solution. As a solution owner, you will be able to:
- Publish/Modify/Update the solution in CIQS curated gallery;
- Change/Transfer ownership of the solution;
To use this feature, please specify <Owners/> within <Template/> in your solution Manifest.xml.
Here is an example of how it is used:
<Template>
  <Owners>
    <Owner displayname="Don John" email="donjohn@microsoft.com" />
    <Owner displayname="Boken Henry" email="bokeh@microsoft.com" />
  </Owners>
</Template>
Disabled
<Disabled/> tag allows template owner(s) to temporarily disable a solution for maintenance, with customized message and estimated time of solution readiness (ETA).
Attributes
| Name | Description |
|---|---|
Message (optional): string |
The custom message to be shown to solution users. If not present, a default message will be added by CIQS. |
ETA (optional): string |
The estimated time (UTC) of solution readiness in the format of ‘MM/dd/yyyy’. It must not be a date earlier than DateTime.UtcNow. If not set, the day will be set to the date a week after DateTime.UtcNow. For example, if today is ‘07/18/2018’(UTC), by default the ETA will be ‘07/25/2018’ (a week after). |
Attributes
| Name | Description |
|---|---|
message (optional): string |
The custom message to be shown to solution users. If not present, a default message will be added by CIQS. |
ETA (optional): string |
The estimated time (UTC) of solution readiness in the format of ‘MM/dd/yyyy’. It must not be a date earlier than DateTime.UtcNow. If not set, the day will be set to the date a week after DateTime.UtcNow. For example, if today is ‘07/18/2018’(UTC), by default the ETA will be ‘07/25/2018’ (a week after). |
Examples
<Disabled />
With the above configuration, a default message will be returned to users:
{This solution is disabled for maintenance}. Please come check back after {07/25/2018}. For more information, please contact cisolutions@microsoft.com.
  <Disabled>
    <Message>Vehicle Telemetry solution is temporarily disabled for maintenance. We are ugrading underlying services for this solution. Sorry about the inconvenience.</Message>
	<ETA>01/01/2019</ETA>
  </Disabled>
With the above configuration, a custom message will be returned to users:
{Vehicle Telemetry solution is temporarily disabled for maintenance. We are ugrading underlying services for this solution. Sorry about the inconvenience.}. Please come check back after {01/01/2019}. For more information, please contact cisolutions@microsoft.com.
LocationsToExclude
<LocationsToExclude/> tag allows pattern authors to hide locations from CIQS location dropdown. This is very useful especially when some region(s) is known to cause deployment failures.
To use this feature, please specify <LocationsToExclude/> within <Template/> in your solution Manifest.xml.
Here is an example of how it is used:
<Template>
  <LocationsToExclude>
    <Location>Japan East</Location>
  </LocationsToExclude>
</Template>
Parameters
Parameters is a property of ProvisioningStep. There are two types of parameters in CIQS: Parameter and Credential.
Parameter provides an easy interface for CIQS solutions to define, collect and resolve parameter values, either defined in the solution template by the authors or entered by the end users through CIQS deployment UX. This section will also cover the parameter resolving capability in solution authors, enabling flexible variant consumption of parameters.
Credential is a special type of parameter, which internally will be interpreted as the same as other parameters. It offers a ready-to-use interface for solutions to easily collect user credential inputs, such as usernames and passwords for underlying Azure resources.
Parameter
Attributes
| Name | Description |
|---|---|
name: string |
The name of the parameter. This field is essentially important because Parameter Resolver uses the name to automatically resolve corresponding parameter. |
type: string |
The type of the parameter |
description: string |
Descriptions which will be displayed on the deployment UX |
defaultValue: string |
Default value of the parameter |
allowedValues: string |
Dynamic allowed values which will be resolved by CIQS; This attribute supports CIQS parameter resolving syntax |
regex: string |
A single regular expression for parameter input validation |
hidden: bool |
“true” if the parameter is correctly resolved or assigned, therefore user input is not needed; “false” if the parameter should be a user input value. |
Note: Currently, only
stringtyped parameters are recognized; integer and boolean type are specificied as string format.
Properties
| Name | Description |
|---|---|
DefaultValue: string |
Default value of the parameter |
ExtraDescription: string |
Extra Description which will be displayed on the deployment UX |
Example
A sample parameter with defaultValue and and hidden properties set in a Function step:
<Function name="hatch" title="Hatching the eggs" retriable="true">
  <Parameters>
    <Parameter hidden="true" name="experimentCount" defaultValue="{Inputs.experimentCount}" />
  </Parameters>
</Function>
A sample parameter with description and ExtraDescription properties set in a Manual step.
<Manual title="Count your eggs">
  <Parameters>
    <Parameter name="experimentCount" defaultValue="10000" description="How long have you been running this business?">
      <ExtraDescription>
         (in days)
      </ExtraDescription>
    </Parameter>
  </Parameters>
</Manual>
Parameter Resolver
Parameter resolver in CIQS allows solution authors to specify parameters as variable in solution source files (e.g. Manifest.xml, markdown files, etc.), of which values can be resolved as input, output or constant strings.
In CIQS solution source files, text enclosed with { and } will be interpreted as parameter variables, and will be resolved as the corresponding values if available. Table below shows all parameter variables available in CIQS.
| Variable Name | Description |
|---|---|
| {PatternAssetBaseUrl} | Base URL for asset files |
| {ResourceGroup.Name} | Resource group name |
| {ProjectName} | Project name |
| {UserId} | User ID, e.g. johnjames@contoso.com |
| {UserDisplayName} | User displayed name, e.g. John James |
| {SubscriptionId} | Subscription ID |
| {TenantId} | Tenant ID |
| {Authorization} | The user’s authorization token which can be used for calling Azure services |
| {GraphAuthorization} | The user’s authorization token which can be used for calling Microsoft’s graph APIs |
| {PowerBIAuthorization} | The user’s authorization token that can be used for calling Power BI APIs |
| {Location} | Location as string, e.g. West US |
{Inputs.ParameterName} |
Resolved as the value of the input parameter named ParameterName from previous provisioning steps |
{Outputs.ParameterName} |
Resolved as the value of the output parameter named ParameterName from previous provisioning steps |
| {Constants.LinuxMachineNameRegex} | Linux machine host name regex |
| {Constants.LinuxMachineNameRegexDescription} | Linux machine host name regex description |
| {Constants.WindowsMachineNameRegex} | Windows machine name regex |
| {Constants.WindowsMachineNameRegexDescription} | Windows machine name regex description |
Authors are highly recommended to use
{Constants.LinuxMachineNameRegex}or{Constants.WindowsMachineNameRegex}to enforce validation on the VM name input. For example:
<Parameter name="vmName" regex="{Constants.LinuxMachineNameRegex}">
  <ExtraDescription>{Constants.LinuxMachineNameRegexDescription}</ExtraDescription>
</Parameter>
Note: It is NOT recommended to relay an input parameter as an output without any change in ARM templates; {Inputs.
ParameterName} variable offers you the flexibility to use any input value in subsequent steps within the solution.
Auto-generated Allowed Values
There is a special type of parameter variables in CIQS, which will be resolved as an available set of allowed values for the designated parameter. Currently we only support one dynamic variable: {VirtualMachineSkus}.
| Dynamic Variable Name | Description |
|---|---|
| {VirtualMachineSkus} | The available set of virtual machine SKUs based on the user’s selection of subscription and location |
Here is a sample use case of {VirtualMachineSkus} in <Parameter/>.
<Parameter name="clusterNodeSize" allowedValues="{VirtualMachineSkus}" defaultValue="Standard_D3_v2" description="Size of both the HeadNode and the WorkerNode in the HDInsight Cluster" />
The rendered UX looks like:

Credential
Credential is a special type of Parameter in CIQS. It wires up different set of rules so that corresponding credential rules are applied to corresponding provisioned Azure resources, such as SQL Server/Datawarehouse, Virtual Machine, HDInsight clusters, etc. You can also specify default username value, to reduce user inputs during deployment provisioning.
Solutions that ask for user name and password inputs are highly recommended to use
Credentialto wrap the credential inputs.
To use this feature, please specify <Credential/> within <Parameters/> in your pattern Manifest.xml.
Attributes
| Name | Description |
|---|---|
type: string |
The credential type. The current supported types are: sql, sqlwithoutodbc, linuxvm, windowsvm, hdi, AND any combination of them seperated by “,” |
username: string |
The name of the username parameter defined in the provision step |
password: string |
The name of the password parameter defined in the provision step |
defaultUsername: string |
The default value to be assigned to the username |
According to ODBC 3.0 spec,
[ ] { } ( ) , ; ? * ! @ \ | ' " = :and space character are not permitted in SqlClient, OLE DB or ODBC connection strings; By default, ODBC rules are enforced withsqltype, because ODBC connections are widely used in CIQS solutions. To ignore ODBC restriction insqlinputs, please usesqlwithoutodbcinstead.
Note: Depending on the osType of underlying clusters,
hdiMUST come with eitherwindowsvmorlinuxvm. Otherwise, some invalid usernames/passwords will be overlooked.
Examples
A simple use case would be specifying the credential with a single type, with default username value specified:
<Parameters>
  <Credential type="sql" username="sqlServerUserName" defaultUsername="adminuser" password="sqlServerPassword" />
</Parameters>
A more complex use case is to combine multiple type of credentials together; It is used when the credential is applied to more than one Azure resources:
<Parameters>
  <Credential type="sql,linuxvm,hdi" username="userName" password="password" />
</Parameters>
VmSku
VmSku is a special type of Parameter in CIQS. It provides a way to let the user select a SKU for use within their deployment.
Solutions that use virtual machines or an HDI cluster are suggested to use this.
To use this feature, please specify <VmSku/> within <Parameters/> in your pattern Manifest.xml.
Attributes
| Name | Description |
|---|---|
minCores: integer |
The minimum number of CPU cores that the VM should support |
minMemoryInMB: integer |
The minimum amount of memory in megabytes that the VM should support |
minDiskCount: integer |
The minimum number of data disks that the VM should support |
minDiskSizeInMB: integer |
The minimum amount of disk space in megabytes that the VM should support |
instanceCount: integer |
The default instance count provisioned for this VM. This value is used to perform quota check during deployment |
Note: If the VmSku parameter is attributed with hidden=”true” and the SKU provided for DefaultValue is not available for the user, the next one that fits requirements is automatically picked.
Guide
<Guide> tag allows pattern authors to use the content (README.md) in their “Solution How To Guide” without duplicating the same information in the Manifest.xml and Summary.md. When using <Guide> tag in the Manifest.xml, CIQS will parse the pre-defined tags in the md file (specified by “src” attribute) to grab the content that used to be grabbed from the Prerequisites \ EstimatedTime \ Summary …etc. tags in the Manifest.xml. That is to say, <Guide> tag is used in both Manifest.xml and markdown files for different purposes with different syntaxes.
Usage in Manifest.xml
A typical use case would be specifying the raw markdown url in the “Solution How To Guide”:
<Guide src="https://github.com/Azure/cortana-intelligence-energy-demand-forecasting/raw/master/Automated%20Deployment%20Guide/README.md" format="markdown"/>
It’s also possible to specify a markdown file in the core folder in case the content in the “Solution How To Guide” has not yet been published:
<Guide src="README.md" format="markdown"/>
Supported types in markdown file (README.md)
In markdown file (README.md) – tags around sections:
| Type | Required? | Tag | Counterpart in Manifest.xml |
|---|---|---|---|
| Prerequisites | N – will default to manifest (Not required in manifest as well) | <Guide type="Prerequisites"></Guide> |
<Prerequisites src="Prereqs.md" format="markdown"/> |
| EstimatedTime | Y | <Guide type="EstimatedTime"></Guide> |
<EstimatedTime>10 Minutes</Estimates> |
| Summary | Y | <Guide type="Summary"></Guide> |
<Summary src="Summary.md" format="markdown"/> |
| Description | Y | <Guide type="Description"></Guide> |
<Description>Short description of the solution.</Description> |
| PostDeploymentGuidance | N | <Guide type=”PostDeploymentGuidance” url=”[POST_DEPLOYMENT_GUIDANCE_URL]”/> |
N/A |
| Disclaimer | N – will default to standard disclaimer | <Guide type="Disclaimer"></Guide> |
N/A |
Supported sections in Post Deployment Guidance md file
Post Deployment Guidance will be generated as links in the deployment “Done” step.
In Post Deployment Guidance md file – tags around sections:
| Section | Required? | Heading |
|---|---|---|
| Visualization | N | # Visualization |
| Customization | N | # Customization |
| Scaling | N | # Scaling |
| Security | N | # Security |
Examples
Ingredients
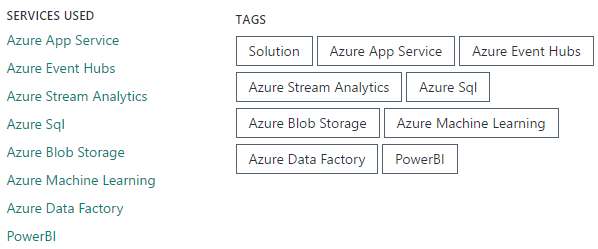
<Ingredients> tag allows pattern authors to specify Azure services they are using in the pattern. Ingredients will be translated to both “SERVICE USED” and “TAGS” sections on the CI Gallery page.
For example:
<Ingredients>
  <Ingredient>Web</Ingredient>
  <Ingredient>EventHub</Ingredient>
  <Ingredient>StreamAnalytics</Ingredient>
  <Ingredient>Sql</Ingredient>
  <Ingredient>StorageAccount</Ingredient>
  <Ingredient>MachineLearning</Ingredient>
  <Ingredient>DataFactory</Ingredient>
  <Ingredient>PowerBi</Ingredient>
</Ingredients>
It will be rendered as below in the CI Gallery:
Available Ingredients
| Ingredient | Full service name | Link |
|---|---|---|
| EventHub | Azure Event Hubs | https://azure.microsoft.com/en-us/services/event-hubs/ |
| StreamAnalytics | Azure Stream Analytics | https://azure.microsoft.com/en-us/services/stream-analytics/ |
| MachineLearning | Azure Machine Learning | https://azure.microsoft.com/en-us/services/machine-learning/ |
| DataFactory | Azure Data Factory | https://azure.microsoft.com/en-us/services/data-factory/ |
| HDInsight | Azure HDInsight | https://azure.microsoft.com/en-us/services/hdinsight/ |
| StorageAccount | Azure Blob Storage | https://azure.microsoft.com/en-us/services/storage/ |
| Sql | Azure Sql | https://azure.microsoft.com/en-us/services/sql-database/ |
| PowerBi | PowerBI | https://powerbi.microsoft.com/ |
| CognitiveServicesLuis | Azure Cognitive Service - LUIS | https://azure.microsoft.com/en-us/services/cognitive-services/language-understanding-intelligence-service/ |
| CognitiveServicesSpeech | Azure Bing Speech API | https://azure.microsoft.com/en-us/services/cognitive-services/speech/ |
| DataLakeAnalytics | Azure Data Lake Analytics | https://azure.microsoft.com/en-us/services/data-lake-analytics/ |
| DataLakeStore | Azure Data Lake Store | https://azure.microsoft.com/en-us/services/data-lake-store/ |
| DocumentDb | Azure Document DB | https://azure.microsoft.com/en-us/services/documentdb/ |
| Search | Azure Search Service | https://azure.microsoft.com/en-us/services/search/ |
| SqlDw | Azure SQL DataWarehouse | https://azure.microsoft.com/en-us/services/sql-data-warehouse/ |
| VirtualMachine | Azure Virtual Machine | https://azure.microsoft.com/en-us/services/virtual-machines/ |
| Web | Azure App Service | https://azure.microsoft.com/en-us/services/app-service/ |
| AppInsights | Application Insights | https://azure.microsoft.com/en-us/services/application-insights/ |
| Batch | Azure Batch | https://azure.microsoft.com/en-us/services/batch/ |
| AnalysisServices | Azure Analysis Services | https://azure.microsoft.com/en-us/services/analysis-services/ |
| TimeSeriesInsights | Time Series Insights | https://azure.microsoft.com/en-us/services/time-series-insights/ |
Please contact CIQS On-Call if you want to put any Azure service that is not covered in the table above.
Provisioning steps
ArmDeployment
CIQS relies on ARM (Azure Resource Management) to provision Azure resources into users’ private subscription on behalf of the user. ArmDeployment steps enable solution authors to easily deploy an ARM template (json) with a set of input parameters.
Attributes
| Name | Description |
|---|---|
source: string |
The relative path of an ARM template under “core” folder of solution source codes |
title: string |
The title which will be displayed in the deployment UX |
autoResolveParameters (Optional): string |
When this attribute is set to true, parameters in the target ARM template will be automatically resolved from either Inputs or Outputs from previous steps; this is a best effort resolving, which means that if the value of a parameter is not detected or not set, it won’t get resolved correctly |
retriable: bool |
True if the ARM deployment is retriable; otherwise, False. By default, all ArmDeployment steps are retriable. |
Properties
| Name | Description |
|---|---|
Parameters: array |
An array of Parameters consumed by the target ARM template. See details here. |
LocationProvidedFor: array |
An array of ResourceTypes whose locations are provided in the ARM template. This signifies CIQS that these resourceType has hardcoded locations. See details here. |
Examples
Here is one comprehensive exmaple showcasing some of the snippets:
<ArmDeployment source="arm\RetailOptimizationVmStage.json" title="Deploying Virtual Machine (Estimated time : 20 Minutes)">
  <LocationProvidedFor>
    <ResourceType>microsoft.datalakestore/accounts</ResourceType>
  </LocationProvidedFor>
  <Parameters>
    <Parameter name="userName" defaultValue="{Inputs.userName}" hidden="true" />
    <Parameter name="password" defaultValue="{Inputs.password}"  hidden="true" />
    <Parameter name="baseUrl" defaultValue="{PatternAssetBaseUrl}" hidden="true" />
    <Parameter name="storageAccountName" defaultValue="{Outputs.storageAccountName}"  hidden="true" />
    <Parameter name="storageAccountKey" defaultValue="{Outputs.storageAccountKey}"  hidden="true"/>
  </Parameters>
</ArmDeployment>
Please also explore Github samples here.
How do I get started with my first ARM template?
There are plenty of Azure quickstart templates available here.
Noteably, here are some sample patterns commonly seen in a Cloud Intelligence solution:
-
Create a Storage Account [here]
-
Create a Stream Analytics service [here]
-
Linux Virtual Machine [here]
-
Data Factory blob to sql copy [here]
-
HDInsight Spark Cluster [here]
In addition, you may want to discover more composite solution samples here, to explore how these services are wired together in ARM templates.
References
Azure Resource Manager Documentation
Azure Quickstart Templates - Github
LocationProvidedFor
In CIQS deployment creation page, users are asked to select one location/region for each deployment as shown below.
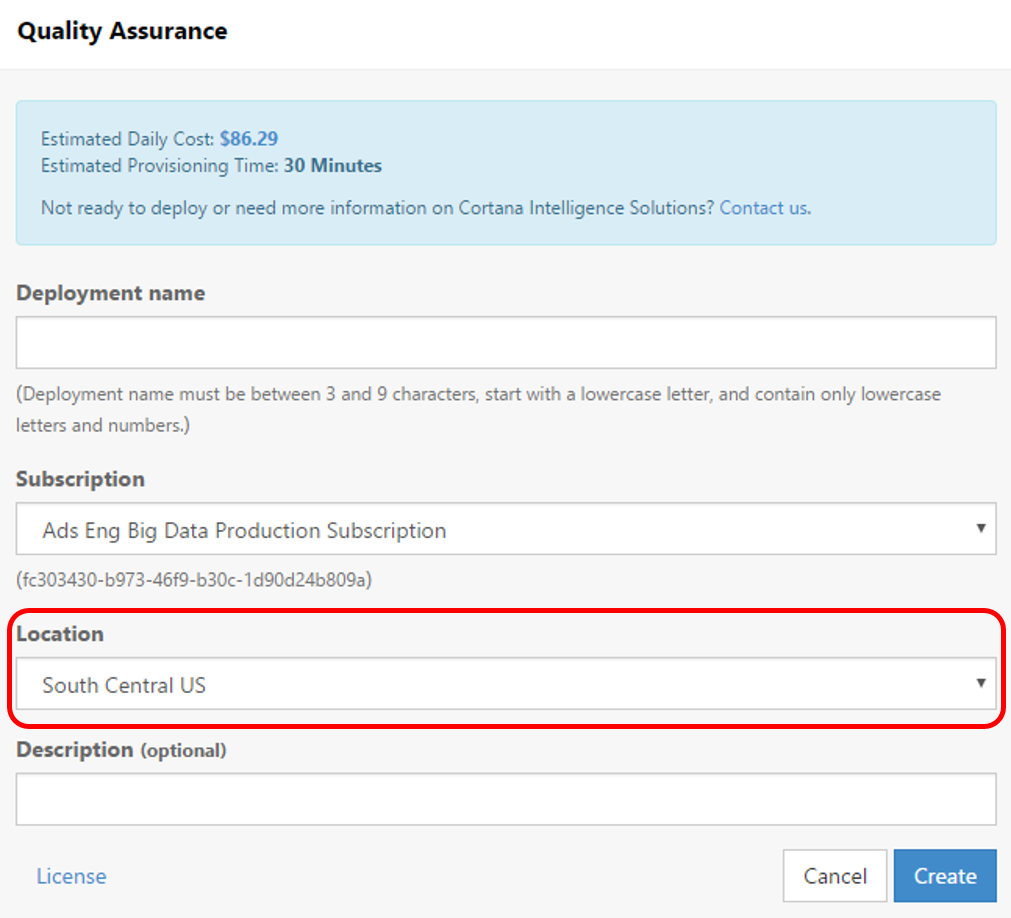
Note: The set of locations for a particular solution is computed as the intersection of available regions for each comprised Azure resources.
The selected location is used by the Resource Group creation and most of the time, is also used for underlying Azure resources provisioned with [resourceGroup().location] signature in ARM templates. For example:
{
    "name": "[variables('adlStoreName')]",
    "apiVersion": "[variables('adlsApiVersion')]",
    "type": "Microsoft.DataLakeStore/accounts",
    "location": "[resourceGroup().location]"
}
Given limited regional availability of Azure services, some services, such as Data Factory (microsoft.datafactory/datafactories), Application Insights (microsoft.insights/components) or Data Lake Store (microsoft.datalakestore/accounts), have very limited regions available. In this case, hardcoding the region in ARM template is strongly recommended to ensure better user experience; otherwise, the location intersection will be small or even empty. For example:
{
    "name": "[variables('adlStoreName')]",
    "apiVersion": "[variables('adlsApiVersion')]",
    "type": "Microsoft.DataLakeStore/accounts",
    "location": "East US 2"
}
Note: Given backward compatibility concern, CIQS will not check the regional availability of Data Factory (microsoft.datafactory/datafactories) so as to compute the available locations for your solution. Therefore, you MUST hardcode the region for Data Factory in your ARM template as the above example shows.
In the meantime, LocationProvidedFor MUST be specified in that particular ARM deployment step in the Manifest.xml, so that CIQS will skip checking the regional availability for those service(s). For example below, it signifies the CIQS deployment engine that, “location has been hardcoded for ‘microsoft.datalakestore/accounts’, and please ignore ‘microsoft.datalakestore/accounts’ when rendering the location dropdown list”:
<ArmDeployment source="arm\CreateADLS.json" title="Create ADLS" >
  <LocationProvidedFor>
    <ResourceType>microsoft.datalakestore/accounts</ResourceType>
  </LocationProvidedFor>
</ArmDeployment>
Manual
Manual steps are most typically used to display post-deployment instructions. For example:
<Manual title="Done">
  <Instructions src="Instructions.md" format="markdown" />
</Manual>
CIQS has no restrictions as to where Manual steps can appear inside the <ProvisioningSteps> section of the Manifest, nor is there any limit on their number.
The platform guarantees that no automated activities will be injected prior to the Manual steps that appear in the very beginning. This allows collecting all input parameters immediately after a deployment is created and performing the rest of the process without interruptions.
The two examples below demonstrate slightly different ways of collecting input parameters with Manual steps. The first one uses an ARM template as a parameter source and produces a configuration page exactly like <ArmDeployment>, except no deployment occurs afterwards. Instead, all parameters enter the {Inputs.*} variable pool.
<Manual parameterSource="armTemplate.json" title="Setup SQL server account">
  <Parameters>
    <Credential type="sql" username="sqlServerUsername" password="sqlServerPassword" />
  </Parameters>
</Manual>
If no parameterSource attribute is provided, all parameters need to be defined explicitly. This allows collecting arbitrary parameters and use them in various contexts like, for instance, as inputs of the Functions.
<Manual title="Configure Twitter listener">
  <Parameters>
    <Parameter name="twitterKeywords" description="Twitter topics" type="string"
      defaultValue="@MicrosoftR,@OpenAtMicrosoft,@Azure,#CloudIntelligence">
      <ExtraDescription>
        Comma-separated list of words, phrases, #hashtags and @mentions
      </ExtraDescription>
    </Parameter>
    <Parameter name="oauthConsumerKey" description="Consumer key (API key)" type="string" />
    <Parameter name="oauthConsumerSecret" description="Consumer secret (API secret)" type="string" />
    <Parameter name="oauthToken" description="Access token" type="string" />
    <Parameter name="oauthTokenSecret" description="Access token secret" type="string" />
  </Parameters>
</Manual>
Finally, if all parameters required to perform an ARM deployment are already present in the variable pool, {Inputs.*} or {Outputs.*}, it is not necessary to explicitly define them as part of the <ArmDeployment>. Instead, use autoResolveParameters. For example, assuming that a Manual step has been used to collect parameters for armTemplate.json, the subsequent <ArmDeployment> provisioning step can be defined as follows:
<ArmDeployment source="armTemplate.json" autoResolveParameters="true" title="Deploying..." />
A demonstration of this technique can be found in the twitterstreaming SAW sample.
Function
Below is a quick overview on things you need to do in order to move your web-jobs into Azure functions on CIS. The high-level steps are as follows:
- Create a
functionsfolder incorefolder of your solution. - Create an individual folder for each function that can be invoked.
- Each function folder will contain a projects.json & a run.csx (for C#).
- The
projects.jsonis used to indicate Nuget packages that you will be consuming as part of the function. - The
run.csxfile will be the entry point when your function is invoked and will contain all your source. The next few sections highlight typical scenarios to consider while migrating your source over to functions.
- The
Referencing App Settings or Passing Arguments to your Function
You might have parts of your webjob that references app settings that you loaded with any run-time arguments that you might have needed as part of the webjob. The good news is that you no longer have to store these in app settings and you can simply pass it as arguments when invoking the function via CIS.
When migrating the web job source over, you might find blocks like the following:
string sqlServer = ConfigurationManager.AppSettings["SqlDwServerName"];
Instead of reading these arguments from the app settings, read them from the incoming HttpRequestMessage passed in as part of invoking the function. i.e.
string sqlServer = parametersReader.GetParameter<string>("SqlDwServerName");
Also, be sure to pass in the relevant string as an argument when invoking the function in your Manifest.xml:
<Function name="initStoredProcs" title="Initialize stored procedures">
  <Parameters>
    <Parameter hidden="true" name="SqlDwServerName" type="string" defaultValue="{Outputs.SqlDwServerName}" />
  </Parameters>
</Function>
You might need to surface the relevant parameters up as an ARM output if these are generated by a previous ARM template.
Referencing Resource files from your function
If you have files stored as resources within your webjob, you can safely migrate these over to functions by moving the files/folders contained in your webjob project to the root of your function’s folder. For eg. if you had files a.txt, b.csv & c.dat under a Resources folder in your webjob project for webjob “A”, the path would like the following:
A\Resources\a.txt
A\Resources\b.csv
A\Resources\c.dat
To migrate these to functions, simply move this entire folder over to the folder for your specific function. i.e.
core\functions\A\Resources\a.txt
core\functions\A\Resources\b.csv
core\functions\A\Resources\c.dat
To access these files from your function, use the CiqsWebHostHelper.GetFunctionWebHostPath() utility function to access the root folder of the specific function. For eg. to get a path reference to a.txt:
var fileName = "a.txt";
var functionRootPath = CiqsWebHostHelper.GetFunctionWebHostPath("CreateBlob");
var filePath = string.Format(@"{0}\resources\{1}", functionRootPath, fileName);
Add Reference to Storage Account in Function App Declaration
This step is crucial to ensure you can view logs on the function app. Without this, the logs tab on the functions app will be effectively useless.
<AzureFunctionApp alwaysOn="true">
  <AppSettings>
    <Add key="AzureWebJobsStorage" value="DefaultEndpointsProtocol=https;AccountName={Outputs.storageAccountName};AccountKey={Outputs.storageAccountKey}" />
    <Add key="AzureWebJobsDashboard" value="DefaultEndpointsProtocol=https;AccountName={Outputs.storageAccountName};AccountKey={Outputs.storageAccountKey}" />
  </AppSettings>
</AzureFunctionApp>
Remove Unused Storage Accounts
Adding a function app will create a storage account for you. Consider referencing this storage account for your solution to avoid additional costs and reduce solution complexity.
Migrate Package References
Ensure you move any package references you may have in your webjob from packages.config to a new projects.json file in the function root. For eg. the following line in packages.config
<package id="Microsoft.Azure.KeyVault.Core" version="1.0.0" targetFramework="net45" />
would map to:
{
  "frameworks": {
    "net45":{
      "dependencies": {
        "Microsoft.Azure.KeyVault.Core": "1.0.0"
      }
    }
  }
}
FAQs
How do I view logs for function invocations ?
- Go to your function app under the resource group.
- Select the function you wish to debug.
- Go to
Monitorto view past HTTP requests and their trace logs. - Note that none of this will be visible until you pass the storage account into the AzureFunctionApp tag in the Manifest. Refer here for details on settings this up.
How do I debug a function ?
- Go to your function app under the resource group.
- Select the function you wish to debug.
- On the right pane, select
Testand enter aRequest Body. The request body is a json object holding parameters for your function. For eg. invoking function A with parameters :A(string v, string t, string m);will have a request body of:
{
  "v" : "xxxxx",
  "t" : "yyyyy",
  "m" : "zzzzz"
}
AzureMLWebService
AzureMlWebService is a first-party provisioning step that empowers solution authors provisioning an Azure Machine Learning experiment from gallery and then deploying as a web service easily. This feature empowers pattern authors to:
-
Provision an Azure ML experiment from Cloud Intelligence Gallery by simply providing the
GalleryUrl; -
Modify the Experiment Graph of the provisioned Azure ML experiment with a customized funciton plug-in;
-
Deploy multiple Azure ML web services;
-
Create high-throughput Azure ML web service as an option.
<AzureMlWebService/>
To use this feature, please specify <AzureMlWebService/> within <ProvisioningSteps/> in your solution Manifest.xml.
Attributes
| Name | Description |
|---|---|
title: string |
The title to be displayed in CIQS deployment page |
hiddenParameters: boolean |
Set to true if this step is supposed to be automated; otherwise false |
Properties
| Name | Description |
|---|---|
GalleryUrl: string |
The url of the experiment to be provisioned on Gallery, such as: https://gallery.azure.ai/Details/nyc-taxi-binary-classification-scoring-exp-2 |
Outputs (Optional): object |
Allows users to overwrite the outputs; This is useful when provisioning more than one Azure ML experiments so that the outputs of each other will not collide |
HighThroughputEndpoint (Optional): object |
Allows users to create a high-throughput Web service endpoint |
ModifyExperimentGraph (Optional): object |
Allows users to plug-in a custom function to modify the experiment graph of the provisioned experiment |
<Outputs/> (Optional)
This tag is used to overwrite the default output names, so that outputs from multiple AzureMlWebService provisionings will not overwrite each other.
Attributes
All properties below can be used as attributes in Camel Case. Please see a Github sample here.
Properties
| Name | Description |
|---|---|
ExperimentUrl: string |
Overwriting the output name of the Azure ML experiment url |
WebServiceApiUrl: string |
Overwriting the output name of the Azure ML web service api url |
WebServiceApiKey: string |
Overwriting the output name of the Azure ML web service api key |
WebServiceHelpUrl: string |
Overwriting the output name of the Azure ML web service help url |
<HighThroughputEndpoint/> (Optional)
This tag is used to create a high-throughput Web service endpoint as a result of this provisioning step.
Attributes
All properties below can be used as attributes in Camel Case. Please see a Github sample here.
Properties
| Name | Description |
|---|---|
EndpointName: string |
Endpoint names must be 24 character or less in length, and must be made up of lower-case letters or numbers; If not specified, the default value is “secondep” |
ThrottleLevel: string |
Allowed values: High or Low; If not specified, the default value is Low |
MaxConcurrentCalls: int |
The maximum concurrent calls for Azure ML Web service is between 1 and 200. See here for details; If not specified, the default value is 4 |
<ModifyExperimentGraph/> (Optional)
This tag is used to plug-in a customized function to modify the experiment graph of the provisioned experiment.
Attributes
| Name | Description |
|---|---|
name: string |
The name of the customized function to modify the ML experiment graph |
Properties
| Name | Description |
|---|---|
Parameters: array |
Array of <Parameter/>s that are used to modify the ML experiment graph in the customized function |
Examples
The sample code in Manifest.xml:
<AzureMlWebService title="Creating Energy Forecasting ML Web service" hiddenParameter="true">
  <GalleryUrl>https://gallery.azure.ai/Details/975ed028d71b490b9268d35094138358</GalleryUrl>
  <ModifyExperimentGraph name="<Custom_function_name>">
    <Parameters>
      <Parameter type="string" name="sqlServer" defaultValue="{Outputs.sqlServerName}" description="SQL Server Name"/>
      <Parameter type="string" name="sqlUser" defaultValue="{Outputs.sqlServerUserName}" description="SQL Server User Name"/>
      <Parameter type="string" name="sqlPassword" defaultValue="{Outputs.sqlServerPassword}" description="SQL Server Password"/>
      <Parameter type="string" name="sqlDatabase" defaultValue="{Outputs.databaseName}" description="SQL Server Database Name"/>
    </Parameters>
  </ModifyExperimentGraph>
</AzureMlWebService>
Besides, a custom function named “Custom_function_name” need to be added into the solution alongside with the above code snippet. In this custom function, all you need to do is to get the “graphJsonObject” parameter and then return the modified value as the function output.
/* Kudos to Richin Jain <rijai@microsoft.com> for contributing the sample code */

#load "..\CiqsHelpers\All.csx"
#r "System.Web"
#r "System.Web.Extensions"

using System.Text;
using System.Web.Script.Serialization;

public static async Task<object> Run(HttpRequestMessage req, TraceWriter log)
{
    var parametersReader = await CiqsInputParametersReader.FromHttpRequestMessage(req);
    JavaScriptSerializer serializer = new JavaScriptSerializer();
    dynamic graphJsonObject = serializer.Deserialize<object>(parametersReader.GetParameter<string>("graphJsonObject"));

    /* Do whatever is needed on the graph JsonObject and return the graph JsonObject */
    string sqlServerName = parametersReader.GetParameter<string>("sqlServer") + ".database.windows.net,1433";
    string sqlServerUserName = parametersReader.GetParameter<string>("sqlUser");
    string sqlServerPassword = parametersReader.GetParameter<string>("sqlPassword");
    string databaseName = parametersReader.GetParameter<string>("sqlDatabase");
    var moduleNodes = graphJsonObject["ModuleNodes"];
    foreach (var moduleNode in moduleNodes)
    {
        var moduleParameters = moduleNode["ModuleParameters"];
        foreach (var moduleParameter in moduleParameters)
        {
            string parameterName = moduleParameter["Name"];
            switch (parameterName)
            {
                case "Database Server Name":
                    moduleParameter["Value"] = sqlServerName;
                    break;
                case "Server User Account Name":
                    moduleParameter["Value"] = sqlServerUserName;
                    break;
                case "Server User Account Password":
                    moduleParameter["Value"] = sqlServerPassword;
                    break;
                case "Database Name":
                    moduleParameter["Value"] = databaseName;
                    break;
            }
        }
    }

    /* Return the modified graph JsonObject as the function output */
    return graphJsonObject;
}
Default Outputs
| Name | Description |
|---|---|
experimentUrl: string |
The Azure ML experiment url |
webServiceApiUrl: string |
The Azure ML web service api url |
webServiceApiKey: string |
The Azure ML web service api key |
webServiceHelpUrl: string |
The Azure ML web service help url |
mlListExperimentsUrl: string |
The Azure ML experiments list url |
Examples
Please see a Github sample here.
The simplest use case would be provisioning a single Azure ML experiment and deploying a default Web service endpoint:
<AzureMlWebService title="Copying and experiment from Gallery and deploy as Web Service" hiddenParameters ="true">
  <GalleryUrl>https://gallery.azure.ai/Details/nyc-taxi-binary-classification-scoring-exp-2</GalleryUrl>
</AzureMlWebService>
A slightly more complex use case would be creating a high-throughput Web service endpoint for the experiment:
<AzureMlWebService title="Copying and experiment from Gallery and deploy as Web Service" hiddenParameters ="true">
  <GalleryUrl>https://gallery.azure.ai/Details/nyc-taxi-binary-classification-scoring-exp-2</GalleryUrl>
  <HighThroughputEndpoint>
    <EndpointName>HighThroughputEndpoint</EndpointName>
    <ThrottleLevel>High</ThrottleLevel>
    <MaxConcurrentCalls>100</MaxConcurrentCalls>
  </HighThroughputEndpoint>
</AzureMlWebService>
Another common use case would be provisioning multiple Azure ML experiments, with output overwritten to avoid conflicts:
<AzureMlWebService title="Copying NYC taxi xperiment from Gallery and deploy as Web Service" hiddenParameters ="true">
  <GalleryUrl>https://gallery.azure.ai/Details/nyc-taxi-binary-classification-scoring-exp-2</GalleryUrl>
  <Outputs experimentUrl="mlFunctionEndpoint1" webServiceApiUrl="mlFunctionApiUrl1" webServiceApiKey="mlFunctionApiKey1" />
</AzureMlWebService>
<AzureMlWebService title="Copying connected car Experiment from Gallery and deploy as Web Service" hiddenParameters ="true">
  <GalleryUrl>https://gallery.azure.ai/Details/connected-cars-aml-v2-noreader-scoring-exp-2</GalleryUrl>
  <Outputs>
    <ExperimentUrl>mlFunctionEndpoint2</ExperimentUrl>
    <WebServiceApiUrl>mlFunctionApiUrl2</WebServiceApiUrl>
    <WebServiceApiKey>mlFunctionApiKey2</WebServiceApiKey>
    <WebServiceHelpUrl>mlFunctionHelpUrl2</WebServiceHelpUrl>
  </Outputs>
</AzureMlWebService>
<AzureMlWebService title="Copying predictive maintenance Experiment from Gallery and deploy as Web Service" hiddenParameters ="true">
  <GalleryUrl>https://gallery.azure.ai/Details/bcae226bc74a4cbbb0ff700ac97448bf</GalleryUrl>
</AzureMlWebService>