
End-to-End TLS Encryption with AKS App Routing and AFD
Introduction
When running globally distributed public applications in Kubernetes, having access to a global traffic management solution is critical to ensuring high availability and security at the edge. Fortunately, Azure Front Door provides an easy-to-use global traffic routing capability, with integrated Content Delivery Network and Web Application Firewall.
Since Azure Front Door is a global resource, it isn’t pinned to any one given region or Virtual Network, allowing it to connect to any endpoint globally. With support for Private Link as an origin target, you can deploy Azure Front Door in-front of private backend services, increasing the overall security of your hosting infrastructure and giving you access to all the capabilities of Front Door.
On the backend, Nginx Ingress is an easy-to-use Kubernetes ingress controller. AKS Application Routing provides a managed experience for deploying and managing Nginx Ingress in your AKS clusters. By pairing Azure Front Door with AKS App Routing, you get one of the easiest operational experiences for deploying and managing globally distributed web endpoints with content delivery optimization and security.
In this walkthrough we’ll deploy an app with end-to-end TLS encryption, using Azure Front Door as the Internet Facing TLS endpoint and AKS App Routing Ingress as the internal in-cluster ingress controller.
We’ll use Azure Key Vault to store the TLS certificate, and will use App Routing Key Vault integration to get the certificate secret into the ingress controller.
Note: We’ll be walking through step by step, showing the moving parts, via the Azure CLI. If you’d like to see a full implementation of a very similar deployment using Bicep, check out the link below:
End-to-end TLS with AKS, Azure Front Door, Azure Private Link Service, and NGINX Ingress Controller
Let’s get to it….
Prerequisites
- A working Azure subscription with the ability to deploy Resource Groups, AKS, Azure Front Door, Azure Key Vault, Virtual Networks and managed identities.
- Azure CLI
- Optional: If using certbot to create your certificate, you’ll need to be able to deploy a virtual machine with a public IP and public access to port 80.
Network Setup
First, we’ll need to establish the network where our AKS cluster will be deployed. Nothing special in our network design. Just a virtual network (Vnet) with a single subnet for the cluster.
# Set starting environment variables
RG=E2ETLSLab
LOC=eastus2

# Create the Resource Group
az group create -g $RG -l $LOC

# Get the resource group id
RG_ID=$(az group show -g $RG -o tsv --query id)

# Set environment variables for the VNet creation
VNET_NAME=lablab-vnet
VNET_ADDRESS_SPACE=10.140.0.0/16
AKS_SUBNET_ADDRESS_SPACE=10.140.0.0/24

# Create the Vnet along with the initial subnet for AKS
az network vnet create \
-g $RG \
-n $VNET_NAME \
--address-prefix $VNET_ADDRESS_SPACE \
--subnet-name aks \
--subnet-prefix $AKS_SUBNET_ADDRESS_SPACE

# Get a subnet resource ID, which we'll need when we create the AKS cluster
VNET_SUBNET_ID=$(az network vnet subnet show -g $RG --vnet-name $VNET_NAME -n aks -o tsv --query id)
Cluster Creation
Now, let’s create the AKS cluster. This will be a very plain AKS cluster, for simplicity, however we will deploy to our above created subnet and will enable the following features:
- AKS App Routing: This will deploy managed Nginx Ingress
- App Routing Default Nginx Controller: Type set to Internal which allows us to ensure that the default deployment of App Routing uses a private IP
- Key Vault CSI Driver: The Key Vault CSI driver will be used by App Routing to access our certificate in Azure Key Vault.
# NOTE: Make sure you give your cluster a unique name
CLUSTER_NAME=e2etlslab

# Cluster Creation Command
az aks create \
-g $RG \
-n $CLUSTER_NAME \
--node-count 2 \
--enable-app-routing \
--app-routing-default-nginx-controller Internal \
--enable-addons azure-keyvault-secrets-provider \
--vnet-subnet-id $VNET_SUBNET_ID \
--generate-ssh-keys

# Get the cluster identity
CLUSTER_IDENTITY=$(az aks show -g $RG -n $CLUSTER_NAME -o tsv --query identity.principalId)

# Get credentials
az aks get-credentials -g $RG -n $CLUSTER_NAME
Create the Azure Key Vault and Upload Certificate
Now, let’s create our Azure Key Vault and then create and upload our certificate.
# Create a key vault name
KEY_VAULT_NAME=e2elab$RANDOM

# Create the key value
az keyvault create --name $KEY_VAULT_NAME --resource-group $RG --location $LOC --enable-rbac-authorization false
For Azure Front door I’ll need a public certificate for my hostname. If I were doing this for a company, I would reach out to the team that owns public certificates, but in my case, I’ll just use Certbot to generate a free certificate from LetsEncrypt.
I’m not going to get into all the specifics of using CertBot with LetsEncrypt, but the basics are as follows. The domain I’ll be using is my ‘crashoverride.nyc’ domain.
- Get an internet reachable host capable of running a webserver on ports 80 and 443
- Install certbot: Install Steps
- Create an A-record for your target domain to the public IP of the server. This is required for hostname validation used by Certbot
- Run the certbot command as a privileged user on that web server host mentioned in #1 above
Here’s a sample of the command I used to create the certificate:
# Set Host name/FQDN for the certificate
HOST_NAME=e2elab.crashoverride.nyc

# Generate the certificate
sudo certbot certonly --key-type rsa --standalone -d $HOST_NAME
Certbot creates several files, all with the PEM file extension. This is misleading, as fullchain.pem is the ‘crt’ file and the privkey.pem is the ‘key’ file. To store these in Azure Key Vault as certs we’ll need to package these files up in a PFX format.
APP_CERT_NAME=crashoverride

# export to pfx
# skipping the Password prompt
openssl pkcs12 -export -passout pass: -in fullchain.pem -inkey privkey.pem  -out ${APP_CERT_NAME}.pfx
The final critical step is to import the certificate into our Azure Key Vault so that it can be accessed by both Azure Front Door and AKS.
# Import the certificate
az keyvault certificate import --vault-name $KEY_VAULT_NAME --name $APP_CERT_NAME --file $APP_CERT_NAME.pfx
Configure the Ingress Options
We have App Routing enabled, but for our scenario we want to configure the internal endpoint for the Nginx Ingress deployment and ensure that private link is enabled, which we’ll need for Azure Front Door to access the cluster ingress. This is enabled via the azure-load-balancer-internal and azure-pls-create annotations, which you may recognize from the standard load balancer Kubernetes service annotations. We’ll also use the azure-pls-auto-approval annotation so that the private link will auto approve when we attach it to Azure Front Door.
You apply these settings via the NginxIngressController CRD. We could modify the default NginxIngressController deployed with App Routing, but instead we’ll create a second instance. This will give us a new nginx ingress deployment specific to our needs. This allows you to have different ingress deployments with different options enabled.
# Get the Key Vault ID
KEYVAULT_ID=$(az keyvault show --name $KEY_VAULT_NAME --query "id" --output tsv)

# Link the Key Vault to App Routing
az aks approuting update --resource-group $RG --name $CLUSTER_NAME --enable-kv --attach-kv $KEYVAULT_ID

# Update the app routing config to enable internal
cat <<EOF | kubectl apply -f -
apiVersion: approuting.kubernetes.azure.com/v1alpha1
kind: NginxIngressController
metadata:
  name: nginx-private-link
spec:
  ingressClassName: nginx-private-link
  controllerNamePrefix: nginx-private-link
  loadBalancerAnnotations:
    service.beta.kubernetes.io/azure-load-balancer-internal: "true"
    service.beta.kubernetes.io/azure-pls-create: "true"
    service.beta.kubernetes.io/azure-pls-auto-approval: "*"
EOF
Deploy a Sample App
We’ll need a sample app to test our configuration. I personally like the ‘echoserver’ app from the cilium team. It’s nice, as it returns the HTTP headers as the web response, which can be very useful in http request testing.
cat <<EOF | kubectl apply -f -
apiVersion: apps/v1
kind: Deployment
metadata:
  name: aks-helloworld
spec:
  replicas: 1
  selector:
    matchLabels:
      app: aks-helloworld
  template:
    metadata:
      labels:
        app: aks-helloworld
    spec:
      containers:
      - name: aks-helloworld
        image: cilium/echoserver
        ports:
        - containerPort: 8080
        env:
        - name: PORT
          value: '8080'
---
apiVersion: v1
kind: Service
metadata:
  name: aks-helloworld
spec:
  type: ClusterIP
  ports:
  - port: 8080
  selector:
    app: aks-helloworld
EOF
Now we can deploy the ingress definition. Look out for the following:
- The ‘tls-cert-keyvault-uri’ annotation maps the inbound TLS request to the appropriate certificate secret
- The ‘rules’ section maps the target host name to the backend service that should be targeted
- The ‘tls’ section will include the target host name and it’s mapping to the correct certificate, which we created above
# Get the URI of the certificate
CERT_URI=$(az keyvault certificate show --vault-name $KEY_VAULT_NAME --name $APP_CERT_NAME --query "id" --output tsv)
HOST_NAME="e2elab.crashoverride.nyc"

cat <<EOF|kubectl apply -f -
apiVersion: networking.k8s.io/v1
kind: Ingress
metadata:
  annotations:
    kubernetes.azure.com/tls-cert-keyvault-uri: ${CERT_URI}
  name: aks-helloworld
  namespace: default
spec:
  ingressClassName: nginx-private-link
  rules:
  - host: ${HOST_NAME}
    http:
      paths:
      - backend:
          service:
            name: aks-helloworld
            port:
              number: 8080
        path: /hello-world
        pathType: Prefix
  tls:
  - hosts:
    - ${HOST_NAME}
    secretName: keyvault-aks-helloworld
EOF
Since we haven’t set up the Azure Front Door yet, we can’t access the app on the public IP yet. We can fake this out, however, with some curl magic. curl lets you call a local endpoint and pretend like you’re connecting to a different host name. We’ll need this for our ingress to match the hostname to the right certificate.
First, we port-forward and then we’ll curl with some special options.
Note: If you prefer, you can also just edit your local ‘hosts’ file to fake out the DNS lookup. Just create an entry that maps your local loopback address (127.0.0.1) to your DNS name.
# In terminal 1, port-forward to the ingress nginx service name
kubectl port-forward svc/nginx-private-link-0 -n app-routing-system 8443:443

# In terminal 2 run a curl like the following, changing out for your host name
curl -v https://${HOST_NAME}/hello-world --connect-to ${HOST_NAME}:443:127.0.0.1:8443
You should have seen a successful TLS handshake with your certificate and proper hostname.
# Example
* Server certificate:
*  subject: CN=e2elab.crashoverride.nyc
*  start date: Oct 31 16:35:44 2024 GMT
*  expire date: Jan 29 16:35:43 2025 GMT
*  subjectAltName: host "e2elab.crashoverride.nyc" matched cert's "e2elab.crashoverride.nyc"
*  issuer: C=US; O=Let's Encrypt; CN=R10
*  SSL certificate verify ok.
Create the Azure Front Door
Now that the backend is working, let’s wire up the Azure Front Door. Azure Front door will need to access our Key Vault to retrieve the certificate, so first we’ll create a managed identity and grant it rights on the Key Vault, and then we’ll assign that identity to the Front Door on creation.
# Create the managed identity
az identity create --name afd-identity --resource-group $RG --location $LOC

# Get identity client ID
export USER_ASSIGNED_CLIENT_ID=$(az identity show --resource-group $RG --name afd-identity --query 'clientId' -o tsv)
export USER_ASSIGNED_RESOURCE_ID=$(az identity show --resource-group $RG --name afd-identity --query 'id' -o tsv)

# Set the key vault access rights for the afd managed identity
az keyvault set-policy --name $KEY_VAULT_NAME -g $RG --secret-permissions get --spn "${USER_ASSIGNED_CLIENT_ID}"

# Create the Azure Front Door
az afd profile create \
--profile-name e2elab \
--resource-group $RG \
--identity-type UserAssigned \
--user-assigned-identities $USER_ASSIGNED_RESOURCE_ID \
--sku Premium_AzureFrontDoor
We’ll do the rest in our Azure Front Door instance in the Azure Portal, so open a browser to https://portal.azure.com and then navigate to your resource group and then your Azure Front Door Instance.
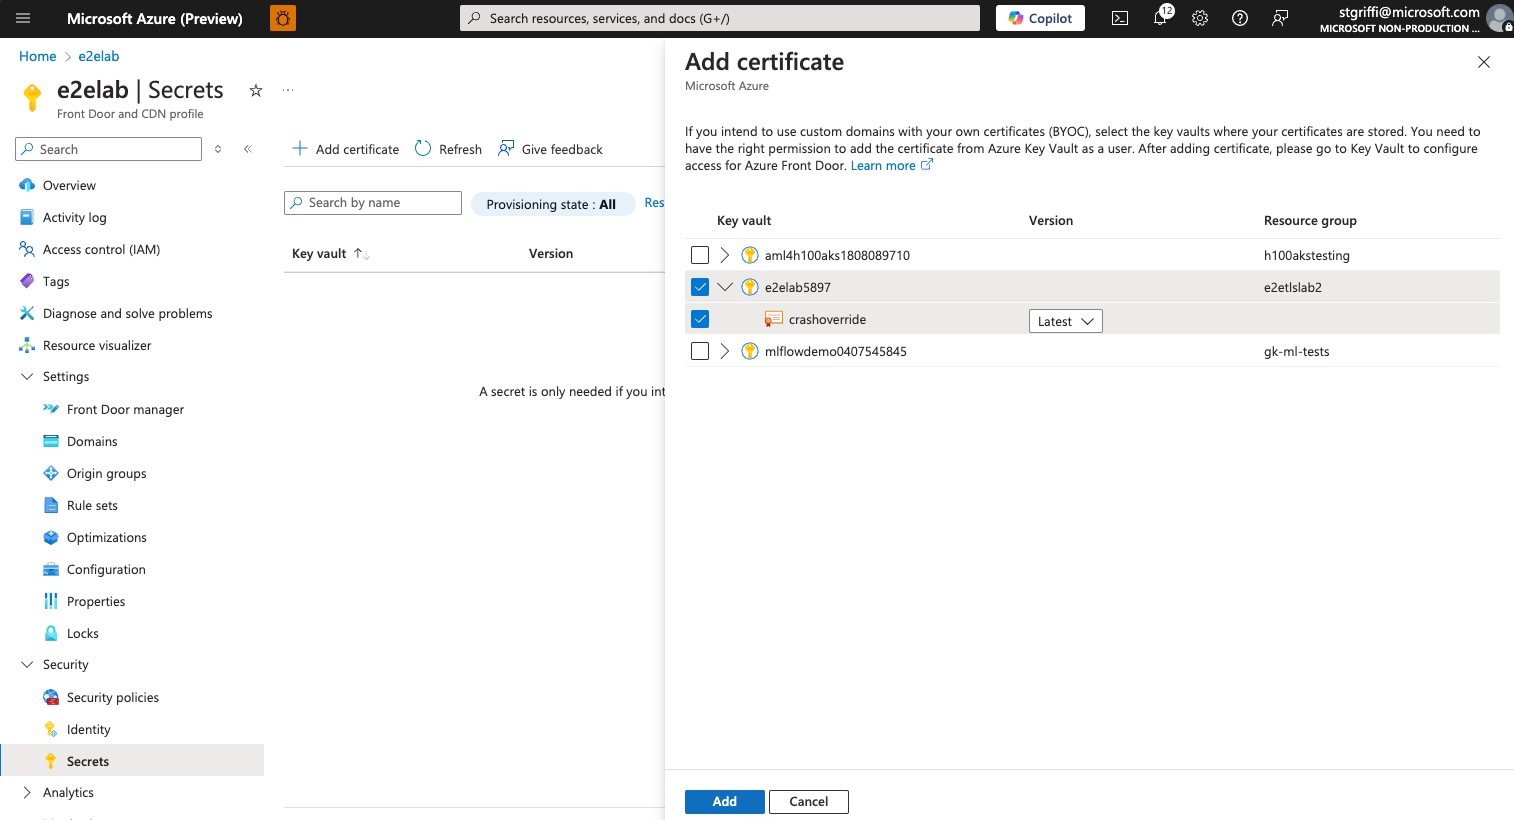
Link the certificate to the AFD.
To use our certificate with Azure Front Door, we need to attach the certificate in Azure Key Vault to a Front Door Secret. We do this in the ‘Secrets’ pane under ‘Security’.
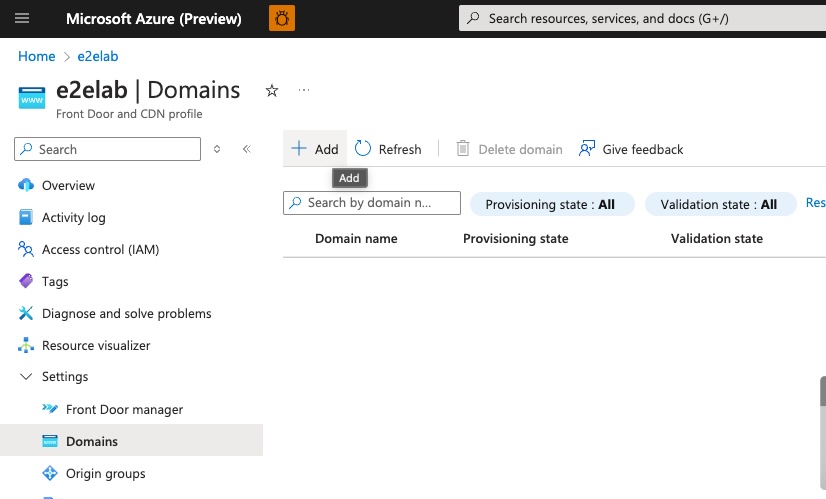
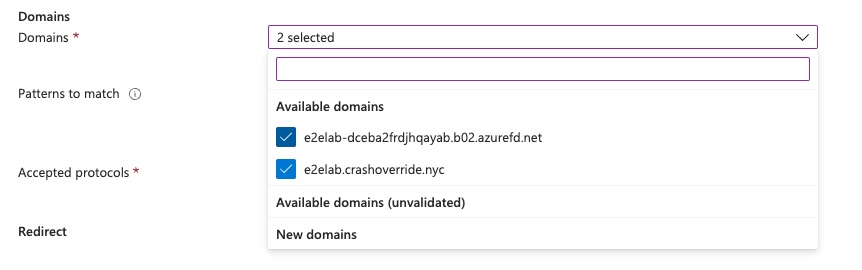
Create the Custom Domain Configuration
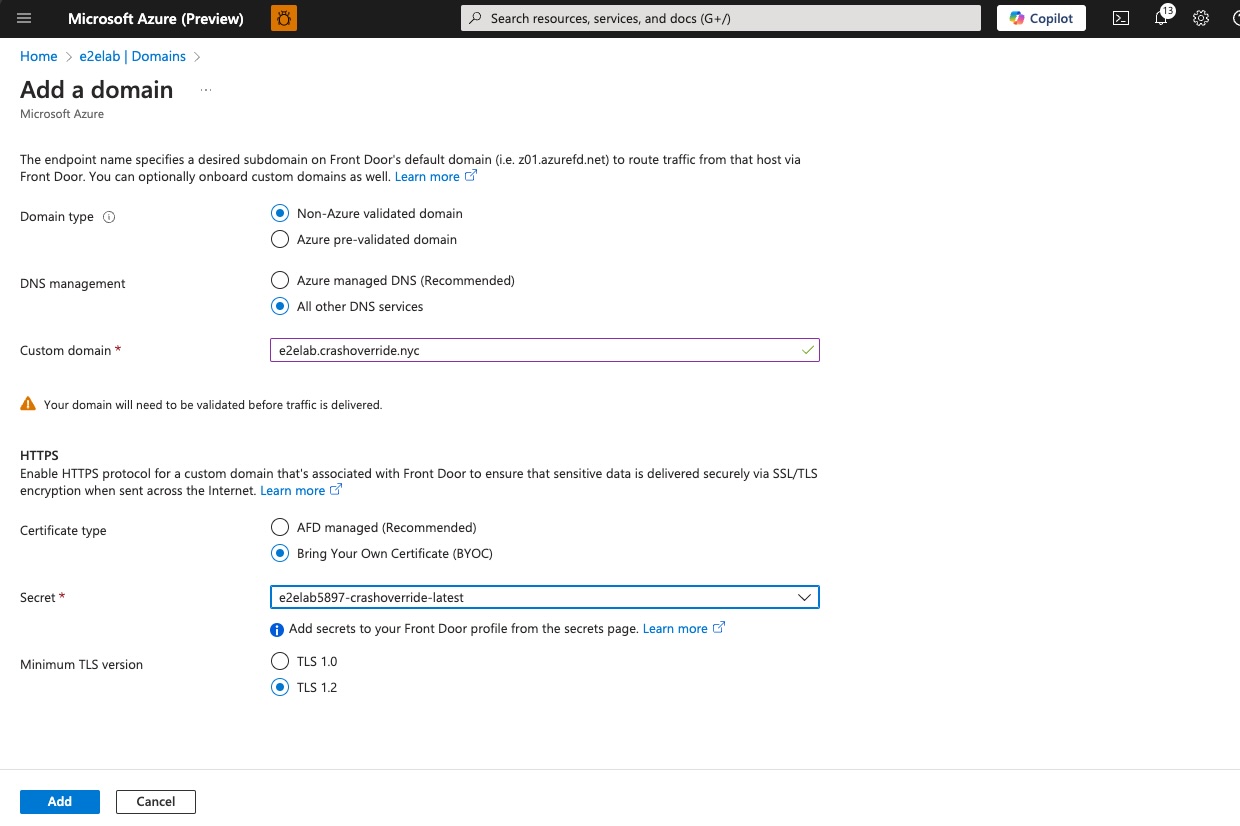
Now we tell AFD what domain we’d like to use and link that domain name to the associated secret that we just created for our certificate.
Next, we select the appropriate secret for our domain.
Finally, we see the domain entry created and pending association with an endpoint.

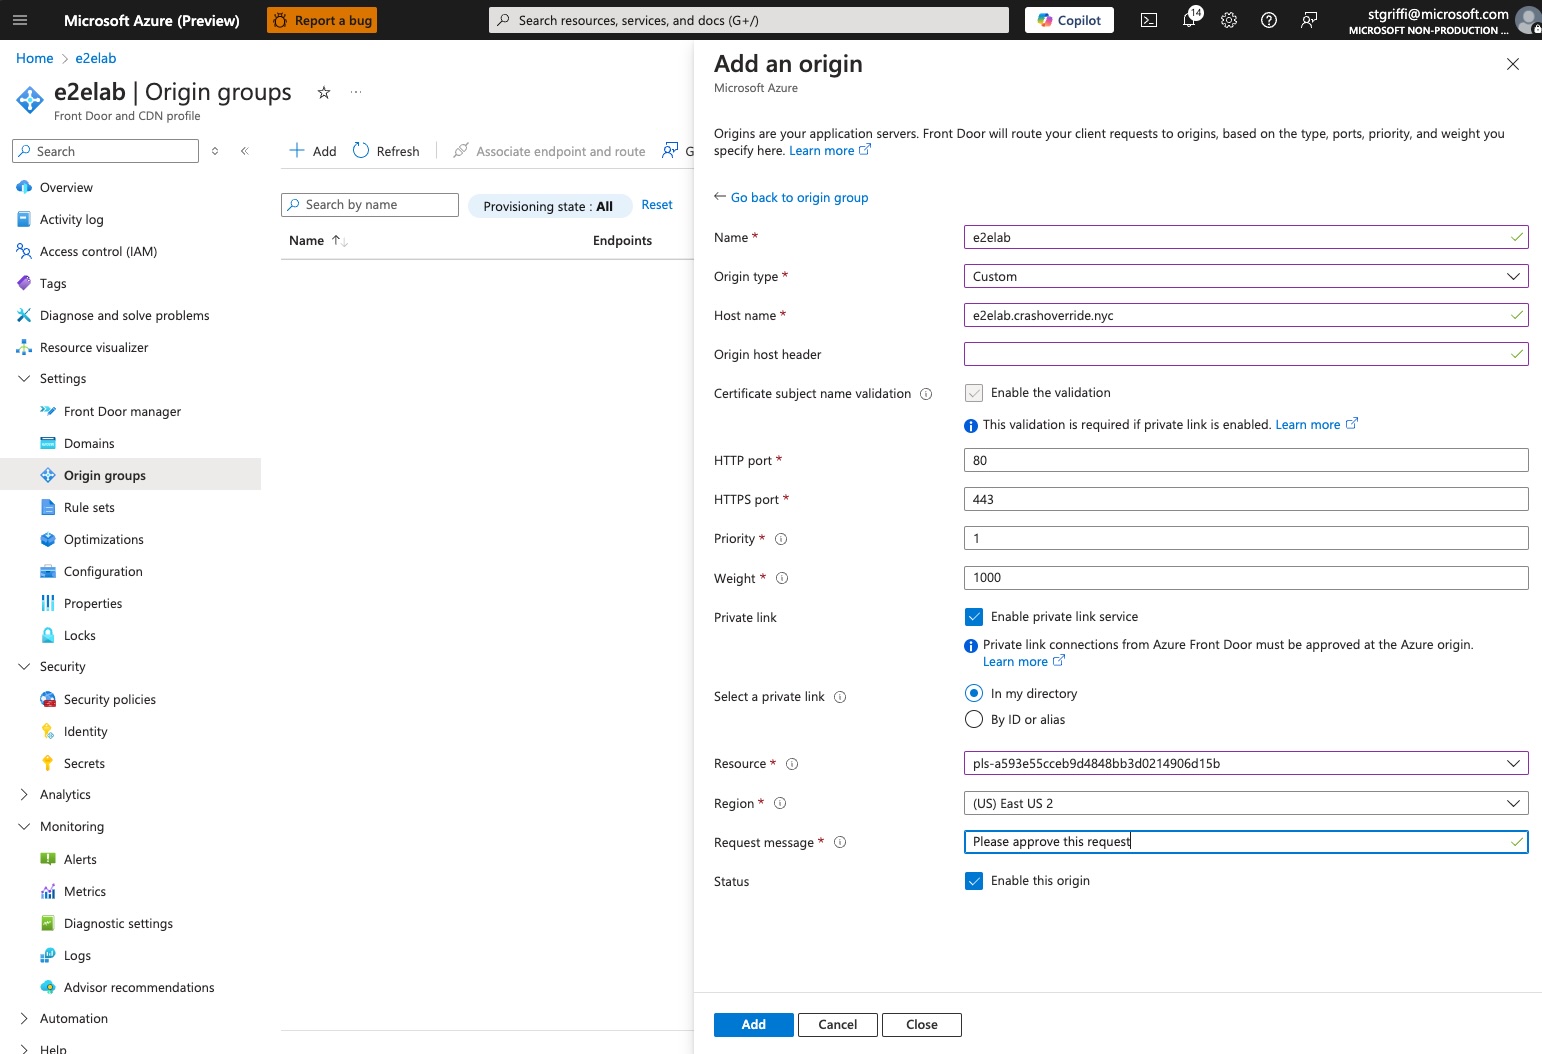
Create the Origin Group
Front Door is acting as the entry point to our backend, which is referred to as the ‘Origin’.
Creating the origin group is a two-step process. You create the origin group, but as part of that you also add the origin hostname configuration. As part of that origin hostname setup, you will check the ‘Enable Private Link Service’ option, which will allow you to select the private link that was automatically created by AKS for your ingress-nginx deployment. This is why the service annotations where so important when you deployed ingress-nginx.
You’ll provide a message that will show up on the private link approval side. This message can be whatever you want.
Now we complete our origin setup, making sure to set the right path to our ingress health probe. In our case, the URL will forward to ‘/hello-world’, as we know this will return an HTTP 200 response. If you have your own health endpoint, you can set that here. You’ll also want to set the protocol to HTTPS. This will tell Azure Front Door that it should re-encrypt traffic when sending it to the backend.
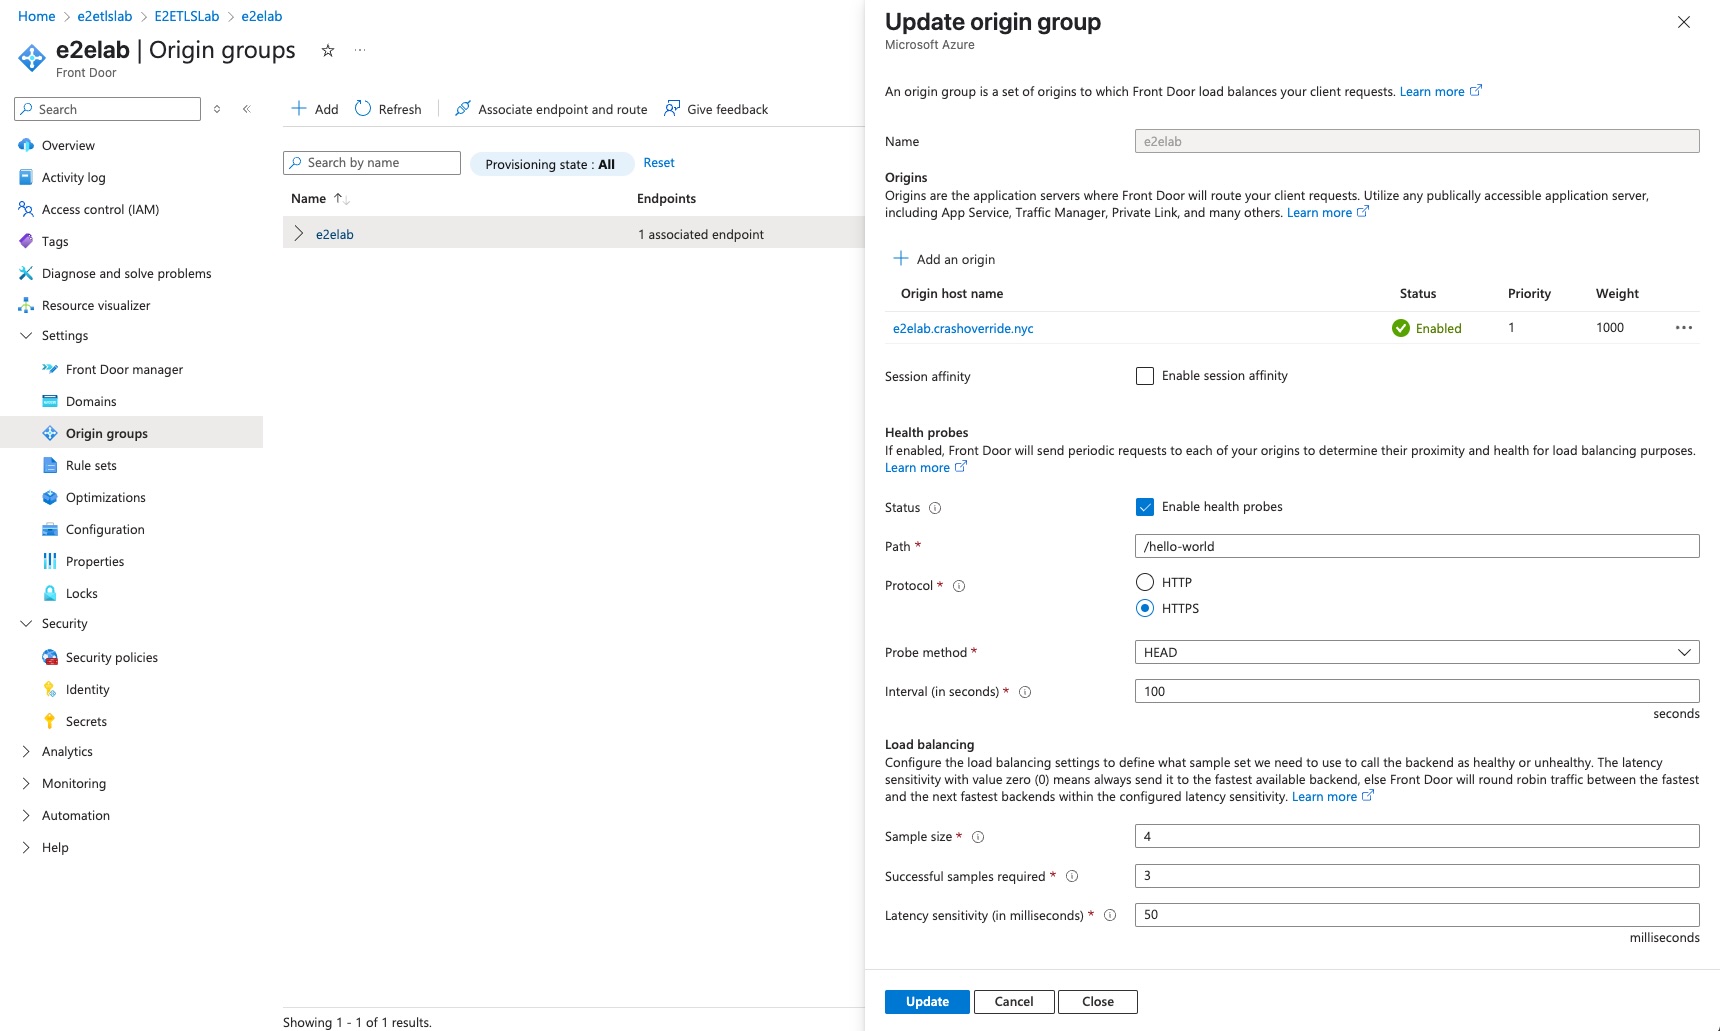
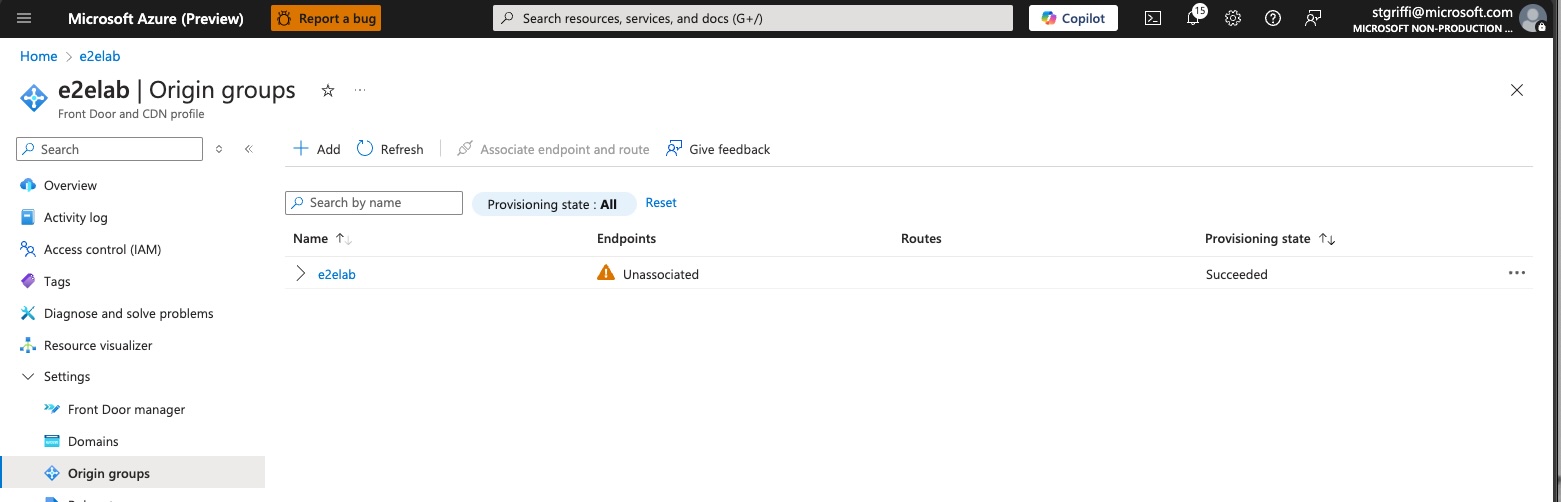
Now we see that our origin is created but still pending association with an endpoint.
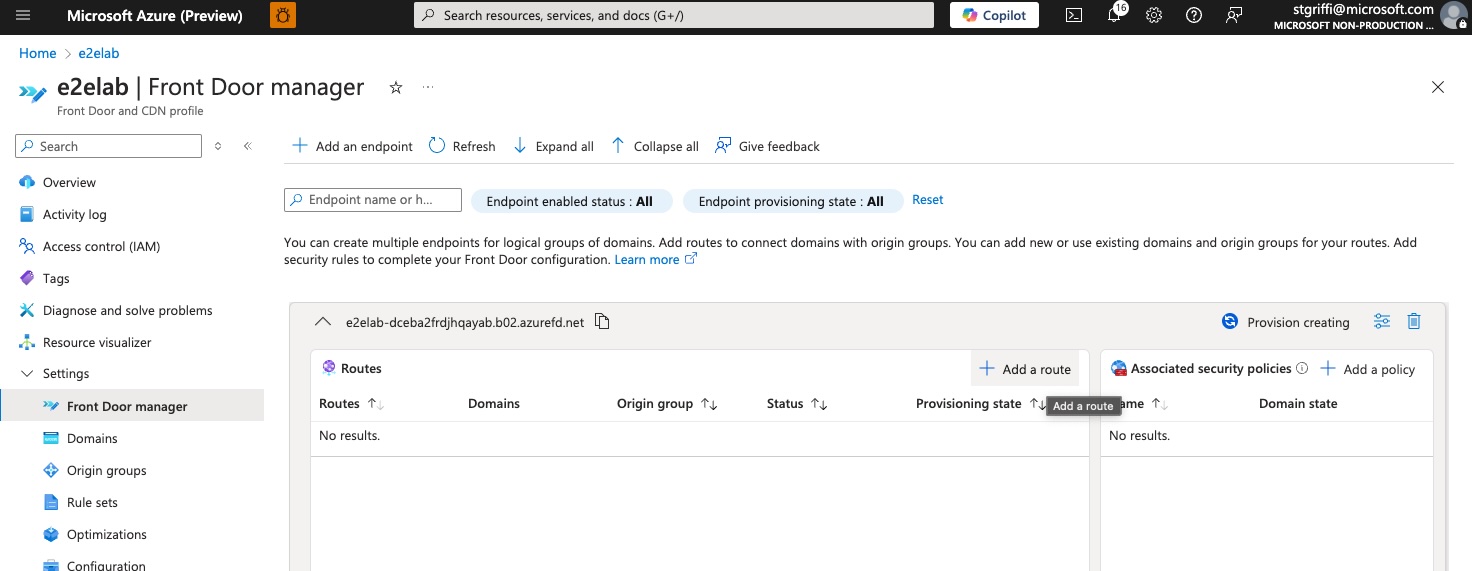
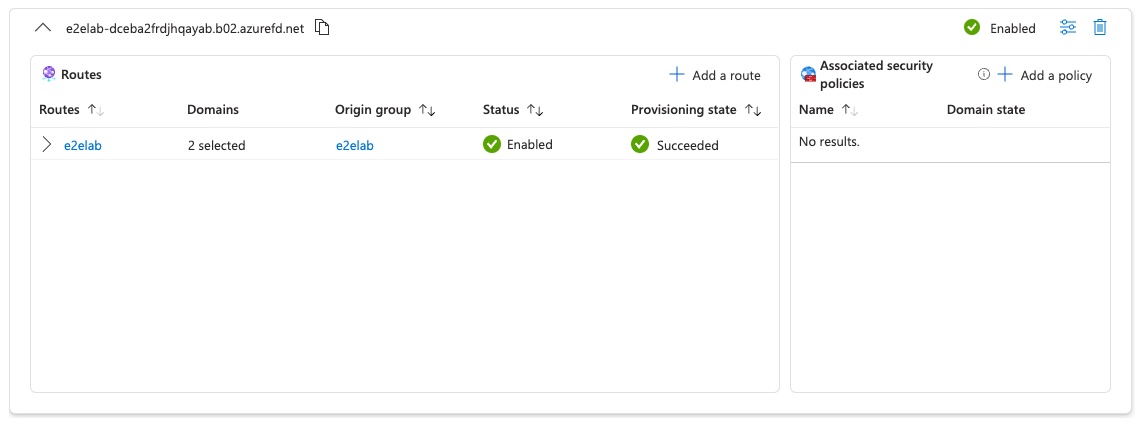
Create the AFD Endpoint
In ‘Front Door manager’ select ‘Add an endpoint’ and give the endpoint a name. Make note of the FQDN is provides. This will be used in our DNS for the CNAME.

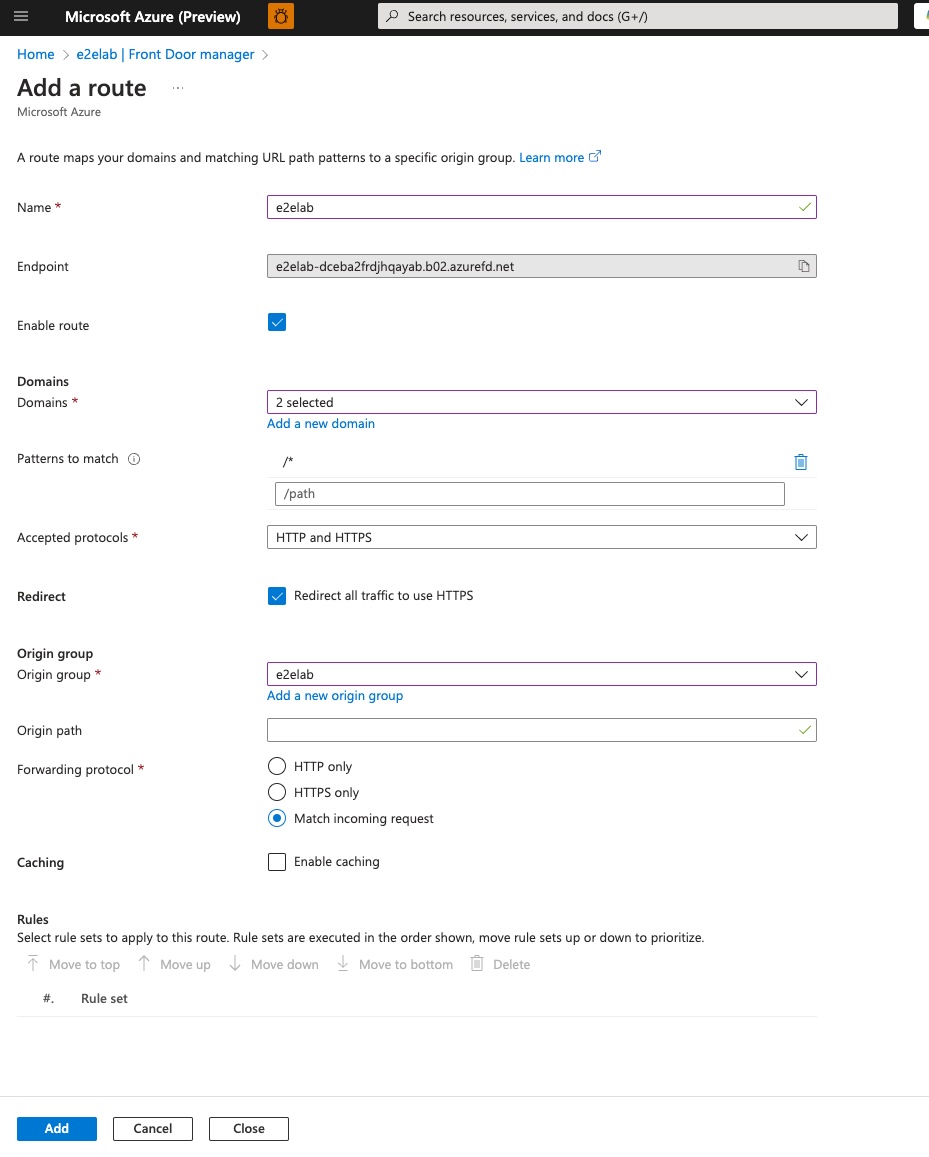
Now we’ll add a route by clicking ‘Add a route’.
In the ‘add route’ screen, we’ll select our origin and the associated domain and set any additional options. At this point, you should also make note of the endpoint FQDN, which we’ll need to use as our CNAME in our DNS for our host name.
When finished, your endpoint should look as follows.
Update your DNS
We need our DNS name to point to the Azure Front Door endpoint, so we’ll take that Front Door provided FQDN and create a CNAME record.

Test
You should now be able to open a browser and navigate to your URL. You can also test with curl.
curl https://e2elab.crashoverride.nyc/hello-world

##########################################
# Sample Output
##########################################
Hostname: aks-helloworld-fbdf59bf-qtdks

Pod Information:
	-no pod information available-

Server values:
	server_version=nginx: 1.13.3 - lua: 10008

Request Information:
	client_address=
	method=GET
	real path=/
	query=
	request_version=1.1
	request_scheme=http
	request_uri=http://e2elab.crashoverride.nyc:8080/

Request Headers:
	accept=*/*
	host=e2elab.crashoverride.nyc
	user-agent=curl/8.7.1
	via=HTTP/2.0 Azure
	x-azure-clientip=70.18.42.220
	x-azure-fdid=c7e0d3e0-830a-4770-acae-14d27c7726f8
	x-azure-ref=
	x-azure-requestchainv2=hops=2
	x-azure-socketip=
	x-forwarded-for=10.140.0.5
	x-forwarded-host=e2elab.crashoverride.nyc
	x-forwarded-port=443
	x-forwarded-proto=https
	x-forwarded-scheme=https
	x-original-forwarded-for=
	x-real-ip=10.140.0.5
	x-request-id=8f41e792d8f0f74e90ddca9d14ba896b
	x-scheme=https

Request Body:
	-no body in request-
Conclusion
Congrats! You should now have a working Azure Front Door directing TLS secured traffic to an in-cluster ingress controller!
Note: In this walk through we did not add encryption between the ingress controller and the backend deployment. This can be done by sharing the same, or different, certificate to the deployment pods. You then enable backend encryption on the ingress controller. Alternatively, you could use a service mesh between the ingress and the backend deployment.