
Using AKS-managed Istio External Ingress Gateway with Gateway API
Introduction
Kubernetes is great at orchestrating containers, but it can be a bit tricky to manage traffic routing. There are many options and implementations that you, as a cluster operator have probably had to deal with. We have the default Service resource that can be used to expose applications, but it is limited to routing based on layer 4 (TCP/UDP) and does not support more advanced traffic routing use cases. There’s also the Ingress controller, which enabled layer 7 (HTTP) routing, and securing the North-South traffic using TLS, but it was not standardized and each vendor implementation required learning a new set of resource annotations. When it comes to managing and securing East-West traffic between services, there’s Service Mesh which is yet another layer of infrastructure to manage on top of Kubernetes. And we’re in the same boat when it comes to resource management with each vendor having their own ways of doing things.
Rise of the Gateway API
There’s no doubt that Ingress and service mesh have greatly improved the way we manage and secure traffic in Kubernetes, but the subtle differences between implementations has made it difficult to standardize on a single way of doing things. This is where the Gateway API comes in. It is a Kubernetes add-on that aims to bring users an extensible, role-oriented, and protocol-aware services configuration mechanism. It is a new API that both Ingress and service mesh vendors can standardize on.
The API has been designed from the ground up, taking into account the lessons learned from the Ingress and service mesh APIs. To me, it’s a game-changer because it ensures that you can express traffic routing configurations that were previously only possible via custom Ingress annotations. It also offers role-oriented configuration, which means that cluster operators can configure gateways and app developers can manage routes through the gateway. This is a big win for organizations that have a separation of duties between cluster operators and app developers. And finally, the API is portable, meaning that the API specification is supported by many implementations including Istio.
Istio on AKS
If you haven’t heard of Istio yet, it is a CNCF-graduated service mesh project that provides a uniform way to connect, manage, and secure microservices. Istio is a fully-featured service mesh that supports managing traffic flows between services, enforcing access policies, and aggregating telemetry data. It not only provides East-West traffic management and security but also North-South traffic management and security through its Ingress Gateway. We can also thank Istio for much of the inspiration behind the Gateway API - if you’ve worked with Istio, you’ll see the similarities.
AKS is a managed Kubernetes offering and as such many popular open-source projects are available as managed add-ons and extensions. Istio is one of those add-ons that can be enabled on AKS. AKS also provides managed deployments of Istio Ingress Gateway, which can be used to route traffic into the cluster from both internal origins within a virtual network as well as external traffic from the public internet. In this article, I’ll show you how you can experiment with the Gateway API to manage the external Istio Ingress Gateway on AKS.
The Gateway API is not fully supported yet supported for the Istio-based managed add-on on AKS and this should be considered an experiment for now.
Gateway API in action with Istio on AKS
Here’s a high-level overview of what we’ll be doing to leverage the Gateway API to manage the Istio external ingress gateway on AKS:
- Provision AKS cluster with Istio enabled
- Provision AKS managed Istio external ingress gateway
- Install Gateway API CRDs
- Deploy a new Gateway resource in the
aks-istio-ingressnamespace and configure it to program the existing AKS-managed Istio Ingress Gateway - this is the key! - Deploy HTTPRoute resource that uses the new Gateway
Before you begin, you’ll need to make sure you have access to an Azure subscription and have the Azure CLI and kubectl installed.
Provision AKS cluster with Istio enabled
Start by setting some local variables.
RG_NAME=rg-istio-gtw-demo
AKS_NAME=aks-istio-gtw-demo
LOCATION=westus3
Create a resource group and an AKS cluster with Istio enabled. The --enable-asm flag enables the managed Istio add-on and the --revision asm-1-22 flag specifies the version of Istio to install.
az group create \
--name $RG_NAME \
--location $LOCATION

az aks create \
--resource-group $RG_NAME \
--name $AKS_NAME \
--enable-asm \
--kubernetes-version 1.30 \
--revision asm-1-22

az aks get-credentials \
--resource-group $RG_NAME \
--name $AKS_NAME
Enable the Istio external ingress gateway with the following command. This can take a few minutes to complete.
az aks mesh enable-ingress-gateway \
--resource-group $RG_NAME \
--name $AKS_NAME \
--ingress-gateway-type external
Deploy a demo application
To demo the Gateway API, we’ll deploy the AKS store demo app, a simple e-commerce application which consists of two services: store-front and store-admin. The store-front service is the customer facing e-commerce store, and the store-admin service is a back-end service that serves an admin dashboard for managing the store.
Create a namespace and optionally label it for Istio injection.
kubectl create namespace pets
kubectl label namespace pets istio.io/rev=asm-1-22
Deploy the AKS store demo app into the pets namespace using the aks-store-all-in-one YAML manifest.
kubectl apply -n pets -f https://raw.githubusercontent.com/Azure-Samples/aks-store-demo/main/aks-store-all-in-one.yaml
The aks-store-all-in-one.yaml manifest exposes the two services using LoadBalancer which assigns a public IP for each service. We want to use the Istio external ingress gateway as the application’s point of entry, so we can patch the store-front and store-admin services to use ClusterIP instead of LoadBalancer.
kubectl patch service -n pets store-admin -p '{"spec":{"type":"ClusterIP"}}'
kubectl patch service -n pets store-front -p '{"spec":{"type":"ClusterIP"}}'
Make sure all the pods and services are running before moving on.
kubectl get all -n pets
Implement Gateway API for Istio external ingress
The Gateway API is not yet included in the Kubernetes distribution by default, so you will need to install the Gateway API CRDs and controllers before you can use it. You can always find the latest releases on the Gateway API GitHub releases page.
kubectl apply -f https://github.com/kubernetes-sigs/gateway-api/releases/download/v1.1.0/standard-install.yaml
To use the Gateway API, we need to create a Gateway resource in the aks-istio-ingress namespace. It’s important that the Gateway resource is deployed into the same namespace as the Istio external ingress gateway; otherwise, the Gateway resource will not be programmed correctly.
The Gateway resource is a top-level resource that acts as a load balancer operating at the edge of the mesh. It can be used to leverage a particular GatewayClass, in our case, we will be using the Istio external ingress gateway.
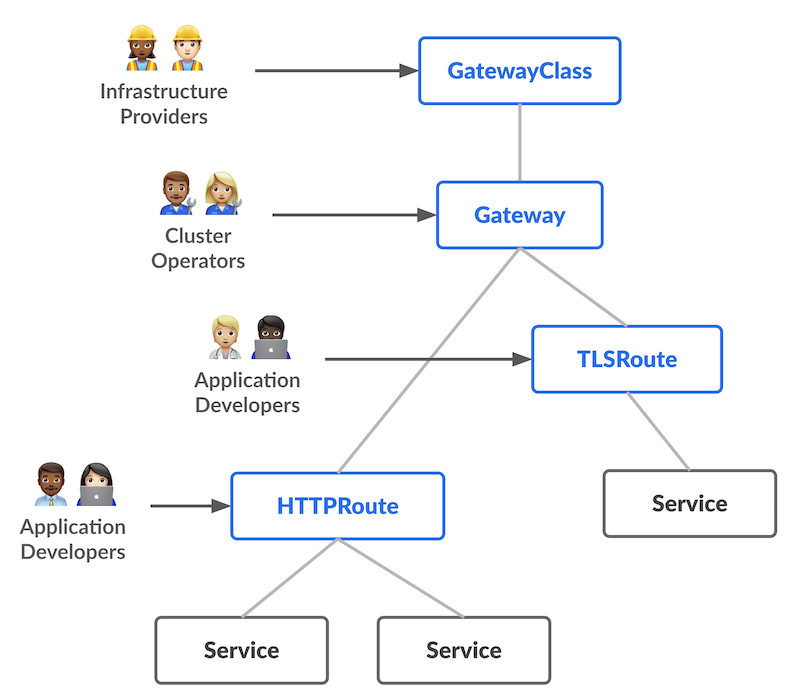
Source: https://gateway-api.sigs.k8s.io
Deploy the Gateway for our sample application in the aks-istio-ingress namespace.
kubectl apply -n aks-istio-ingress -f - <<EOF
apiVersion: gateway.networking.k8s.io/v1
kind: Gateway
metadata:
  name: gateway
spec:
  gatewayClassName: istio
  addresses:
  - value: aks-istio-ingressgateway-external
    type: Hostname
  listeners:
  - name: default
    hostname: "*.aks.rocks"
    protocol: HTTP
    port: 80
    allowedRoutes:
      namespaces:
        from: All
EOF
The critical implementation detail here is the gatewayClassName field with a value of istio and the addresses field with a value of aks-istio-ingressgateway-external. By default, the Gateway resource will automatically provision a Service and Deployment but we don’t need in this scenario. Instead, we can manually specify the DNS name of the Service that was deployed when AKS provisioned the Istio ingress gateway for you. Also, the allowedRoutes field specifies that the Gateway will accept routes from all namespaces. This can be restricted to specific namespaces if needed.
Next, deploy an HTTPRoute for the store-admin and store-front services in the pets namespace.
kubectl apply -n pets -f - <<EOF
apiVersion: gateway.networking.k8s.io/v1
kind: HTTPRoute
metadata:
  name: store-admin
spec:
  parentRefs:
  - name: gateway
    namespace: aks-istio-ingress
  hostnames: ["admin.aks.rocks"]
  rules:
  - matches:
    - path:
        type: PathPrefix
        value: /
    backendRefs:
    - name: store-admin
      port: 80
---
apiVersion: gateway.networking.k8s.io/v1
kind: HTTPRoute
metadata:
  name: store-front
spec:
  parentRefs:
  - name: gateway
    namespace: aks-istio-ingress
  hostnames: ["store.aks.rocks"]
  rules:
  - matches:
    - path:
        type: PathPrefix
        value: /
    backendRefs:
    - name: store-front
      port: 80
EOF
Here we have two routes that will be routed through the gateway. The store-admin route will route traffic to the store-admin service and the store-front route will route traffic to the store-front service. The hostnames field specifies the hostname that the route will match on and the rules field specifies the path that the route will match on.
Being able to deploy HTTPRoutes in application namespaces is a powerful feature of the Gateway API because it allows app developers to manage their own routes.
Let’s validate that the Gateway and HTTPRoute resources were created successfully. Grab the public IP address of the Istio external ingress gateway and test the store app using a curl command.
INGRESS_PUBLIC_IP=$(kubectl get svc -n aks-istio-ingress aks-istio-ingressgateway-external -o jsonpath='{.status.loadBalancer.ingress[0].ip}')
curl -IL "http://${INGRESS_PUBLIC_IP}" -H "Host: store.aks.rocks"
Note the -H "Host: store.aks.rocks" flag is used to specify the hostname in the request header. This is important because the Istio gateway is configured to route based on hostname.
Optionally, you could also add an entries to your /etc/hosts file.
echo "${INGRESS_PUBLIC_IP} admin.aks.rocks store.aks.rocks" | sudo tee -a /etc/hosts
With the host entries updated, you can test the app in your browser. Just be sure to remove the entries from your /etc/hosts file when you’re done.
Also, don’t forget to clean up the Azure resources when you’re done.
az group delete --name $RG_NAME
Summary
We can see that the Gateway API is a powerful new API that provides a standardized way to configure traffic routing in Kubernetes. It is a big step forward from the Ingress and service mesh APIs and provides a way to express traffic routing configurations that were previously only possible via custom Ingress annotations. The Gateway API is portable and can be used with many different implementations including Istio. In this article, you learned how you can install the Gateway API CRDs into your AKS cluster and use the Gateway API to manage the AKS-managed external Istio Ingress Gateway.
Many resource types and features of Gateway API have graduated to GA with other parts of the API still evolving. If you’d like to get involved in the Gateway API project, head over to the Gateway API GitHub repository for more information.
Happy traffic routing!