Step 1 - Set Up dev box customization for your team
In this articleTarget audience: Dev Center Administrator and Project Administrator
In this quickstart, we’ll walk you through the steps you need to follow to setup a team customization on a Dev Box Project.
- Prerequisite: make sure you have a catalog of tasks on your DevCenter.
- Attach a repository in AzDO or GitHub as a catalog
- Create a team customization file (imagedefinition.yaml) in a repository and sync it as a catalog
- Create or modify a pool to use this image definition
- Create a code-ready Dev Box that utilizes this image definition
Pre-requisite: attach Microsoft’s quickstart catalog or your own catalog of tasks.
Skip this step if you already have a catalog on your DevCenter that defines tasks. If you do not, you can follow these steps to attach Microsoft’s quickstart catalog, which provides a standard set of customization tasks to help get you started. Note: Attaching the quickstart catalog is sufficient; you do not need to follow any other instructions in that Microsoft doc page.
Enable Project-level catalogs and add an AzDO or GitHub repo as a Project-level catalog
Project level catalogs allow you to add new or existing AzDO or GitHub based repository as a catalog on the project, where that project can source shared team customizations from - this can be a new empty repository where you plan to store the configurations belonging to several teams, or it can be a repository that contains a team’s codebase. First, navigate to your Project after clicking this preview URL, and go to Settings->Catalogs on the menu on the left.
Under the catalogs section, click on sync settings, and turn on Image Definitions.
Now, click Add to attach a AzDO or GH repository. To learn more about attaching a repository as a catalog, you can refer to this doc.
Create a team customization file (imagedefinition.yaml)
At the core of creating a team customization is an Image Definition, that defines the base image you would like to use, and the customizations you would like to apply atop it. You can check out the reference specification, including images supported today.
- Download an example yaml configuration . This example configuration installs VS Code and a few other packages using the WinGet package manager. The file name must be iamgedefinition.yaml, but you may have multiple image definitions in different folders in your catalog. Note: at this time, the name of the folder cannot begin with a period.
- Commit this to the repository you attached above as a project-level catalog
- Sync the catalog
Your Project will now ingest this imagedefinition and make it available for you to use on Dev Box pools.
Note: To write and test your own imagedefinition.yaml, you can use the Dev Box VS Code extension from within a Dev Box. This gives you the ability to iterate on your files by hitting F5, without having to create a new dev box each time.
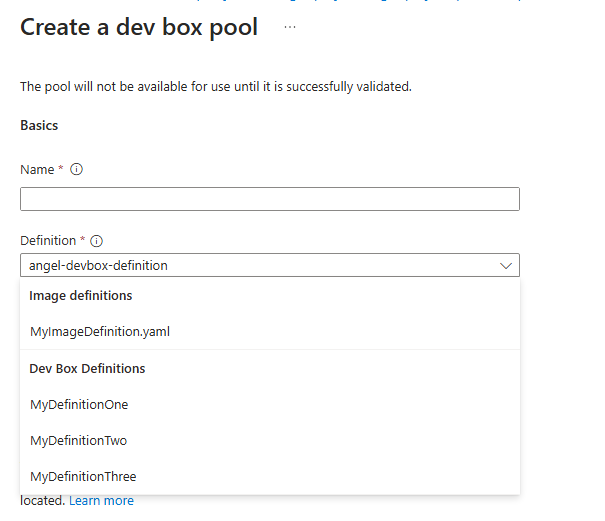
Create or modify a pool to use this image definition
Navigate to your Project using this special magic URL. You can now go to Pools, and create a new pool (or modify an existing pool). You should see the image definition that you created above among the definitions you can choose for this pool. Select it, and then pick a SKU for this pool, and click create.
Create a code-ready Dev Box that utilizes this image definition
You can now navigate to devportal.microsoft.com, and create a Dev box in the above pool. During the creation of your Dev Box, we will apply the configuration from the abovementioned imagedefinition.
Next Steps
The team customization you created are applied during Dev Box customizations. As you have more complex configurations that large teams inherit, the time taken to apply these customizations during Dev box creation can really start to add up. Click here to learn how to optimize it into an image without investing in a custom image generation pipeline.