Setup & Connect to your Dev Box via VS Code
In this article- Prerequisite: Register for the private preview of Open in VS Code Feature
- Steps to connect to Dev Box with Open in VS Code Feature
- FAQ
Target audience: Dev Box Users/Developers
In this doc, we’ll walk you through the steps to connect to Dev Box with Open in VS Code feature.
- Register for the private preview of Open in VS Code Feature
- Provision a new Dev Box with Dev Box Tunnel or create a Dev Box Tunnel on an existing Dev Box
- Enable the Dev Box Tunnel
- Connect to the Dev Box Tunnel
- Disable the Dev Box Tunnel
Prerequisite: Register for the private preview of Open in VS Code Feature
Please contact @Devdiv-VR or vedhar@microsoft.com for registration. Once registered, you’ll be able to use the Open in VS Code feature for your Dev Box.
Steps to connect to Dev Box with Open in VS Code Feature
1. Provision a Dev Box
You can skip this step if you already have a Dev Box.
Sign in to Developer Portal with your Microsoft account, and create a Dev Box in the project you have access to.
2. Install VS Code Extension
Search for Dev Box in the VS Code Extension Marketplace and install the latest version (2.0.0 as of 05/15/2025) in your local VS Code - NOT in the Dev Box you want to connect to.

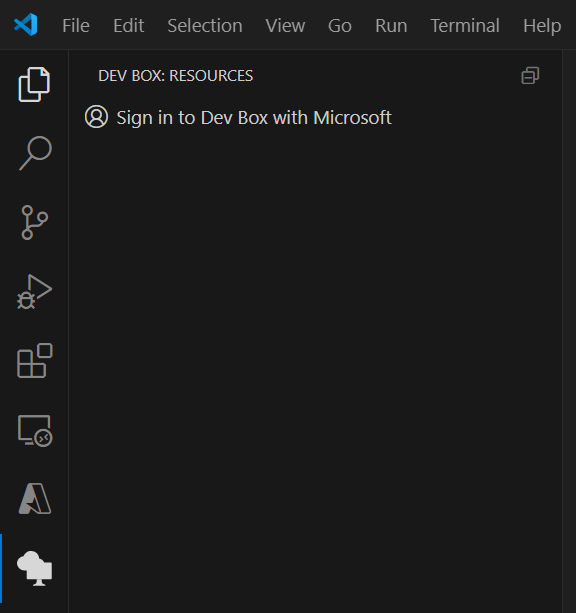
3. Sign in to Dev Box Extension
Click the Dev Box icon in the left sidebar, and select Sign In.
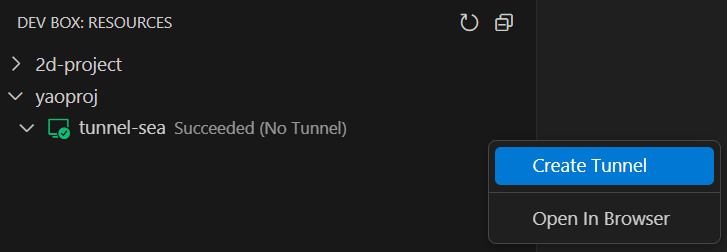
4. Create and Enable Dev Box Tunnel
After signing in, you will see all the projects you have access to. Choose the project where you created the Dev Box, and select the Dev Box you want to connect to.
If you see No Tunnel in the description, you will need to manually create a tunnel resource first.
Before enabling the tunnel, you MUST log into the Dev Box at least once using any client (e.g., browser, Windows App, Remote Desktop client). This step is mandatory after each shutdown and restart to establish the required user session for setting up the tunnel. Once logged in, you can disconnect from the Dev Box.
You DO NOT need to log in every time you enable or connect to the tunnel — only after a shutdown or restart.
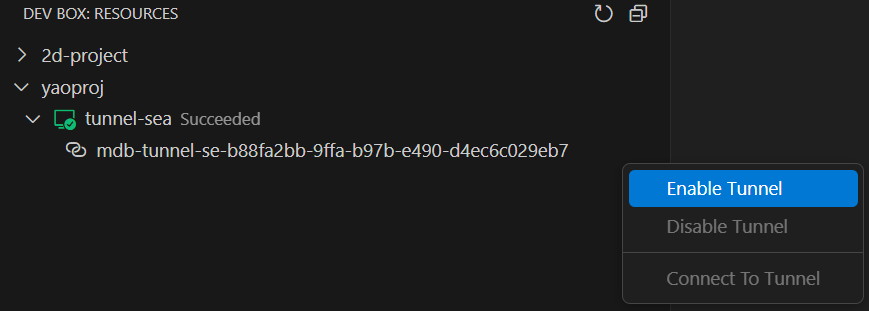
Then, you can enable the tunnel. This process may take up to 1-3 minutes, as it will install VS Code on the Dev Box (if not already installed) and set up the tunnel.
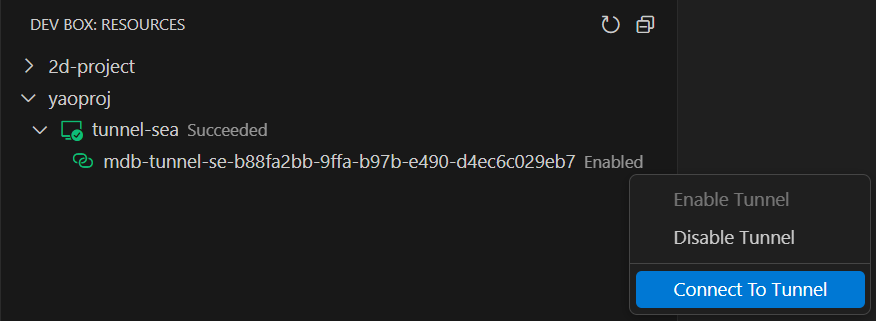
5. Connect to the Dev Box in VS Code
Once everything is set up, you can open the Dev Box in VS Code by clicking the Connect to Tunnel button.
6. Dev Box Remote experience in VS Code
You can open any any folder or workspace on the remote Dev Box using File > Open File/Folder/Workspace just as you would locally!
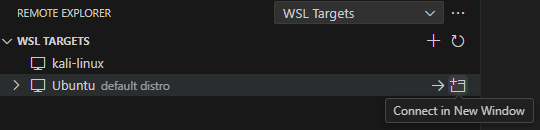
If you have WSL environment on the Dev Box, you can connect to it using Remote Explorer.
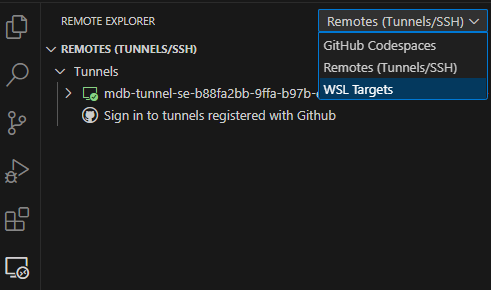
Select WSL targets from the dropdown and all the WSL distributions will be listed. You can open any WSL distribution in the current or new window.
For more information on the WSL development experience, please refer to the Remote - WSL and Set up a WSL development environment documentation.
FAQ
-
Why do I need to log in to the Dev Box before enabling the tunnel?
This step is required to establish a user session for setting up the tunnel. After the initial login, you can just disconnect from the Dev Box. Then you can enable or connect to the tunnel without logging in again, unless the Dev Box is shut down or restarted.
-
Why can’t I connect to the Dev Box even if the tunnel is enabled?
Refresh the Dev Box extension explorer view with the button on the top right corner to check the latest status of the tunnel. If the tunnel is enabled, but you still can’t connect, try disabling the tunnel, logging into the Dev Box, and then re-enabling the tunnel.