Microsoft OPC Publisher
OPC Publisher is a module that runs on Azure IoT Edge and bridges the gap between industrial assets and the Microsoft Azure cloud. It connects to OPC UA server systems and publishes telemetry data to Azure IoT Hub in various formats, including IEC62541 OPC UA PubSub standard format (not supported in versions < 2.7.x).
This documentation applies to version 2.9 or higher.
Here you find information about
Table Of Contents
- Overview
- Getting Started
- How OPC Publisher works
- Configuring OPC Publisher
- Publish to a Unified Namespace
- OPC Publisher Telemetry Formats
- Programming against OPC Publisher using the OPC Publisher API
- OPC UA Certificates
- OPC UA stack
- Performance and Memory Tuning OPC Publisher
Overview
Microsoft OPC Publisher runs on Azure IoT Edge and connects OPC UA-enabled servers to Azure. It can be configured using Azure IoT Hub, through MQTT/HTTPS locally (Preview) or via configuration file.
OPC Publisher is a feature rich OPC UA client/server to OPC UA Pub/Sub translator. Per configuration it sets up OPC UA subscriptions to monitor data (OPC UA nodes) using an integrated OPC UA stack. When a data value change or event of an OPC UA node is reported, it transcodes the OPC UA notification using the configured encoding and publishes it to IoT Hub or MQTT broker of choice.
With OPC Publisher you can also browse a server’s data model, read and write ad-hoc data, or call methods on your assets. This capability can be accessed programmatically from the cloud or through other applications running alongside. OPC Publisher also supports discovering OPC UA-enabled assets on the shop floor. When it finds an asset either through a discovery url or (optionally) active network scanning, it queries the assets endpoints (including its security configuration) and reports the results to IoT Hub or returns them from the respective API call as response.
Azure IoT Edge gateways support nested ISA 95 (Purdue) topologies. It needs to be placed where it has access to all industrial assets that are to be connected, and a IoT Edge device needs to be placed at every layer leading to the internet. Using OPC UA reverse connect is another option to bridge network layer.
Note that this might require configuring a specific route from IoT Edge to the public Internet through several on-premise routers. In terms of firewall configuration, IoT Edge just needs a single outbound port to operate, i.e., port 443.
Getting Started
Install IoT Edge
The industrial assets (machines and systems) are connected to Azure through modules running on an Azure IoT Edge industrial gateway.
While OPC Publisher can run outside of Azure IoT Edge, the only Microsoft supported hosting environment is Azure IoT Edge. If you want to use OPC Publisher outside of Azure IoT Edge, support is through GitHub issues and community only.
You can purchase industrial gateways compatible with IoT Edge. Please see our Azure Device Catalog for a selection of industrial-grade gateways. Alternatively, you can setup a local VM.
You can also manually create an IoT Edge instance for an IoT Hub and install the IoT Edge runtime following the IoT Edge setup documentation. The IoT Edge Runtime can be installed on Linux or Windows.
You can find out more about Azure IoT Edge here:
- Deploy and monitor Edge modules at scale
- Learn more about Azure IoT Edge for Visual Studio Code
- Run IoT Edge on Kubernetes
Deploy OPC Publisher from Azure Marketplace
Use the Microsoft supported docker containers for OPC Publisher available in the Microsoft Container Registry rather than building from sources:
docker pull mcr.microsoft.com/iotedge/opc-publisher:latest
We recommend to use a floating version tag (“2.9”) when deploying the OPC Publisher container images instead of “latest”. You can also use a fixed tag such as “2.9.11” but this will require you to manually update your edge deployment to keep up with the latest secure and supported version.
The easiest way to deploy OPC Publisher is through the Azure Marketplace.
Select the “Get It Now” button to log into the Azure portal and deploy OPC Publisher. The following steps are required:
- Pick the Azure subscription to use. If no Azure subscription is available, one must be created.
- Pick the IoT Hub the OPC Publisher is supposed to send data to. If no IoT Hub is available, one must be created.
- Pick the IoT Edge device OPC Publisher is supposed to run on. If no IoT Edge device exists, one must be created).
- Select “Create”. The “Set modules on Device” page for the selected IoT Edge device opens.
- Select on “OPCPublisher” to open the OPC Publisher’s “Update IoT Edge Module” page and then select “Container Create Options”.
- Validate “container create options” based on your usage of OPC Publisher. For more information, see next section.
Specifying Container Create Options in the Azure portal
Container create options are used to specify the container and configuration command line arguments of OPC Publisher. The docker create options can be specified in the “Update IoT Edge Module” page of OPC Publisher and must be in JSON format. Specifically the OPC Publisher command line arguments can be specified via the “Cmd” key. Here an example for a configuration on a Linux host system:
{
    "Cmd": [
        "-c", // 2.9+ only
        "--cl=5", // 2.9+ only
        "--PkiRootPath=/mount/pki",
        "--pf=/mount/published_nodes.json",
        "--cf", // 2.9+ only
        "--mm=PubSub",
        "--me=Json",
        "--fd=false",
        "--bs=100",
        "--bi=1000",
        "--aa"
    ],
    "HostConfig": {
        "Binds": [
            "/opcpublisher:/mount"
        ],
        "CapDrop": [
            "CHOWN",
            "SETUID"
        ]
    }
}
To not loose the OPC Publisher configuration across restarts all configuration files should be persisted. This requires a bind mount. A bind mound makes folders in the IoT Edge host file system available to the OPC Publisher. In above example the Mounts section maps the /mount folder inside the container to the folder /opcpublisher on the host file system. Without it all configuration changes will be applied to the container file system which lives in memory and thus will be lost when the OPC Publisher module is restarted. With above options specified however, OPC Publisher will use the configuration file published_nodes.json inside the /mount folder and thus on the /opcpublisher folder on IoT Edge host. The CertificateStores directory (used for OPC UA certificates) will also be created in the pki directory of the /mount folder.
IMPORTANT: The
/opcpublisherdirectory must be present on the host file system, otherwise OPC Publisher will fail to start. Also, the folder contains security sensitive information. Any username and password configured inside the configuration are stored in plain text. It must be ensured that the configuration file is protected by the file system access control of the host file system. The same must be ensured for the file system based certificate store, since it contains the certificate and private key of OPC Publisher.
The CapDrop option drops the CHOWN (user can’t makes arbitrary changes to file UIDs and GIDs) and SETUID (user can’t makes arbitrary manipulations of process UIDs) capabilities for security reason.
A connection to an OPC UA server using its hostname without a DNS server configured on the network can be achieved by adding an ExtraHosts entry to the HostConfig section:
"HostConfig": {
    "ExtraHosts": [
        "opctestsvr:192.168.178.26"
    ]
}
Deploy OPC Publisher using Azure CLI
-
Obtain the IoT Hub name and device id of the installed IoT Edge Gateway.
-
Install the Azure CLI. You must have at least
v2.0.24, which you can verify withaz --version. -
Add the IoT Edge Extension with the following commands:
az extension add --name azure-cli-iot-ext
To deploy all required modules using Az…
-
Save the following content into a
deployment.jsonfile:{ "modulesContent": { "$edgeAgent": { "properties.desired": { "schemaVersion": "1.1", "runtime": { "type": "docker", "settings": { "minDockerVersion": "v1.25", "loggingOptions": "", "registryCredentials": {} } }, "systemModules": { "edgeAgent": { "type": "docker", "settings": { "image": "mcr.microsoft.com/azureiotedge-agent:1.4", "createOptions": "" } }, "edgeHub": { "type": "docker", "status": "running", "restartPolicy": "always", "settings": { "image": "mcr.microsoft.com/azureiotedge-hub:1.4", "createOptions": "{\"HostConfig\":{\"PortBindings\":{\"5671/tcp\":[{\"HostPort\":\"5671\"}], \"8883/tcp\":[{\"HostPort\":\"8883\"}],\"443/tcp\":[{\"HostPort\":\"443\"}]}}}" }, "env": { "SslProtocols": { "value": "tls1.2" } } } }, "modules": { "publisher": { "version": "1.0", "type": "docker", "status": "running", "restartPolicy": "always", "settings": { "image": "mcr.microsoft.com/iotedge/opc-publisher:2.9", "createOptions": "{\"HostConfig\":{\"CapDrop\":[\"CHOWN\",\"SETUID\"]}}" } } } } }, "$edgeHub": { "properties.desired": { "schemaVersion": "1.0", "routes": { "publisherToUpstream": "FROM /messages/modules/publisher/* INTO $upstream", "leafToUpstream": "FROM /messages/* WHERE NOT IS_DEFINED($connectionModuleId) INTO $upstream" }, "storeAndForwardConfiguration": { "timeToLiveSecs": 7200 } } } } } -
Use the following command to apply the configuration to an IoT Edge device:
az iot edge set-modules --device-id [device id] --hub-name [hub name] --content ./deployment.jsonThe
device idparameter is case-sensitive. The content parameter points to the deployment manifest file that you saved.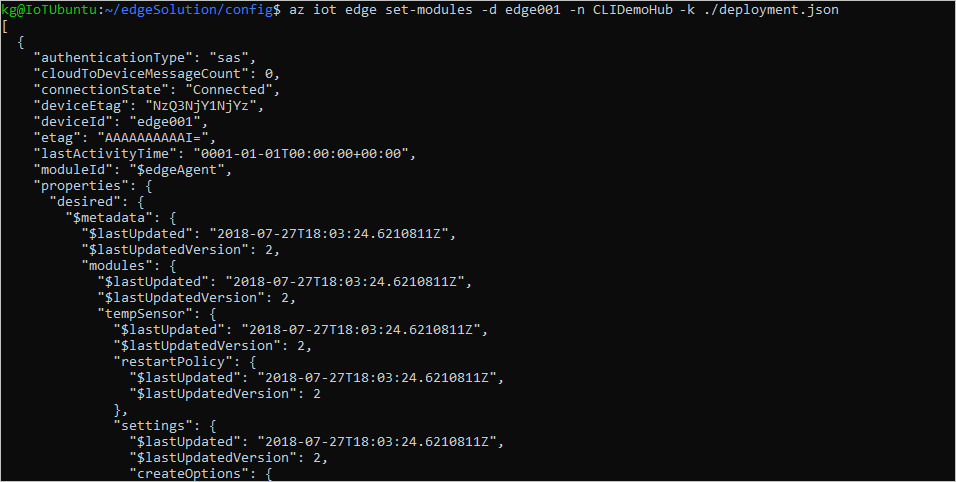
-
Once you’ve deployed modules to your device, you can view all of them with the following command:
az iot hub module-identity list --device-id [device id] --hub-name [hub name]The device id parameter is case-sensitive.

More information about az and IoT Edge can be found here.
Deploy OPC Publisher using the Azure Portal
To deploy OPC Puublisher to the IoT Edge Gateway using the Azure Portal…
-
Sign in to the Azure portal and navigate to the IoT Hub deployed earlier.
-
Select IoT Edge from the left-hand menu.
-
Click on the ID of the target device from the list of devices.
-
Select Set Modules.
-
In the Deployment modules section of the page, select Add and IoT Edge Module.
-
In the IoT Edge Custom Module dialog use
publisheras name for the module, then specify the container image URI asmcr.microsoft.com/iotedge/opc-publisher:2.9On Linux use the following create options if you intend to use the network scanning capabilities of the module:
{"NetworkingConfig":{"EndpointsConfig":{"host":{}}},"HostConfig":{"NetworkMode":"host","CapAdd":["NET_ADMIN"],
"CapDrop":["CHOWN", "SETUID"]}}
Fill out the optional fields if necessary. For more information about container create options, restart policy, and desired status see EdgeAgent desired properties. For more information about the module twin see Define or update desired properties.
-
Select Save and then Next to continue to the routes section.
-
In the routes tab, paste the following
 {
   "routes": {
     "publisherToUpstream": "FROM /messages/modules/publisher/* INTO $upstream",
     "leafToUpstream": "FROM /messages/* WHERE NOT IS_DEFINED($connectionModuleId) INTO $upstream"
   }
 }
and select Next
-
Review your deployment information and manifest. It should look like the deployment manifest found in the previous section. Select Submit.
-
Once you’ve deployed modules to your device, you can view all of them in the Device details page of the portal. This page displays the name of each deployed module, as well as useful information like the deployment status and exit code.
-
Add your own or other modules from the Azure Marketplace using the steps above.
For more in depth information check out the Azure IoT Edge Portal documentation.
How OPC Publisher works
The following diagram courtesy of the OPC Foundation’s Part 14 of the OPC UA specification illustrates the inner workings of the OPC Publisher process:
Publishing OPC UA telemetry from an OPC UA server works as follows:
-
An OPC UA server exposes variable nodes (also sometimes called “tags”) which make sensor readings accessible, or nodes that allow a client to subscribe to events.
-
The OPC Publisher can be configured to connect to one or more selected OPC UA server endpoints. Based on the configuration the OPC Publisher OPC UA client creates subscriptions requesting to be notified when the value of the specified nodes change or an event occurs.
-
The publisher groups nodes in the configuration into groups of
Dataset WriterscalledWriter Groupswhich are akin to OPC UA subscriptions. These subscriptions refer to node ids (in OPC UA also called monitored items). Nodes can be configured withSamplingInterval,PublishingInterval,DataSetWriterId, andDataSetWriterGroup.-
DataSetWriterId: A logical name of a subscription to an endpoint on a OPC UA server. A writer can only have 1 publishing interval and in case of event subscription, 1 event node. Should multiple be specified then the writer is broken into smaller writers. A data set writer writes data sets, which are a set of OPC UA data values or events inside a OPC UA PubSub network message. -
DataSetWriterGroup: A logical group of data set writers. These define the content of a OPC UA PubSub network message. -
SamplingInterval: The cyclic time in milliseconds, in which a node in a writer is sampled for updates. This is not applicable for events. -
PublishingInterval: The cyclic time in milliseconds, in which changes to a set of nodes (notifications) are sent to the subscriber (OPC Publisher). A small interval minimizes latency at the cost of network traffic and server load. For low latency it should be set to the smallest sampling interval and appropriate queue size values should be configured to avoid message loss.
-
-
Data change notifications or event notifications are published by the OPC UA server to OPC Publisher. OPC UA only sends value changes, that means, if a value has not changed in the publishing cycle it is not send. If you need all values in a message you can use the
DataSetKeyFrameCountorHeartbeatIntervaloptions or read the values usingUseCyclicReadoptions instead of subscriptions. OPC Publisher also emits meta data messages for all configured data sets inside a data set writer group unless disabled or not supported by the chosen message format. -
The OPC Publisher can be configured to send notifications as soon as they arrive or batch them before sending which saves bandwidth and increases throughput. Sending a batch is triggered by exceeding the threshold of a specified number of messages or by exceeding a specified time interval.
-
OPC Publisher groups and encodes the telemetry events using the specified messaging mode and message encoding format. More information can be found here.
-
The encoded telemetry events are sent over the configured transport as OPC UA network messages. The default transport is Azure IoT which has a message limit of 256kB. The publisher tries to split messages to avoid loosing data, but has a runtime cost. In case of PubSub encoding when strict mode is used (
--strict) or when--dm=falseis set, OPC Publisher also emits Metadata messages which can be used to learn more about the message content and support decoding in some cases. -
Azure IoT Hub stores messages using a configured retention time (default: 1 day, max: 7 days, dependent on the size of the ingested messages as well, see here for more details). Messages can be consumed by applications or other services from IoT Hub.
Configuring OPC Publisher
OPC Publisher has several interfaces that can be used to configure it.
- Configuration via configuration file
- Command Line options configuration
- Configuration via API
- Configuration via init file
- How to migrate from previous versions of OPC Publisher
Configuration via Configuration File
The simplest way to configure OPC Publisher is via a file. A basic configuration file looks like this:
[
  {
    "EndpointUrl": "opc.tcp://testserver:62541/Quickstarts/ReferenceServer",
    "UseSecurity": true,
    "OpcNodes": [
      {
        "Id": "i=2258",
        "OpcSamplingInterval": 2000,
        "OpcPublishingInterval": 5000,
        "DisplayName": "Current time"
      }
    ]
  }
]
This configuration can be placed in a JSON file, typically named publishednodes.json, and provided to OPC Publisher using the command line argument -f, --pf, --publishfile, e.g. --pf=/app/publishednodes.json.
Environment variables can also be used to configure OPC Publisher. This method is particularly useful when deploying at scale or in environments where you want to externalize configuration from the container image. An example is
PublishedNodesFile.
Example configuration files are here and here.
Configuration Schema
The configuration schema is used with the file based configuration, but also with the Api based configuration. The configuration consists a JSON array of entries containing arrays of nodes:
{
  "EndpointUrl": "string",
  "UseSecurity": "boolean",
  "DataSetWriterGroup": "string",
  "DataSetWriterId": "string",
  "WriterGroupTransport": "string",
  "WriterGroupQueueName":_ "string",
  "WriterGroupQualityOfService": "string",
  "WriterGroupMessageRetention": "boolean",
  "WriterGroupMessageTtlTimespan": "string",
  "WriterGroupPartitions": "integer",
  "EndpointSecurityMode": "string",
  "EndpointSecurityPolicy": "string",
  "OpcAuthenticationMode": "string",
  "OpcAuthenticationUsername": "string",
  "OpcAuthenticationPassword": "string",
  "DataSetClassId": "guid",
  "DataSetName": "string",
  "DataSetDescription": "string",
  "DataSetPublishingInterval": "integer",
  "DataSetPublishingIntervalTimespan": "string",
  "DataSetSamplingInterval": "integer",
  "DataSetSamplingIntervalTimespan": "string",
  "DataSetKeyFrameCount": "integer",
  "DataSetExtensionFields": "object",
  "DataSetFetchDisplayNames": "boolean",
  "DataSetWriterWatchdogBehavior": "string",
  "OpcNodeWatchdogTimespan": "string",
  "OpcNodeWatchdogCondition": "string",
  "UseReverseConnect": "boolean",
  "DisableSubscriptionTransfer": "boolean",
  "RepublishAfterTransfer": "boolean",
  "QueueName": "string",
  "MetaDataQueueName": "string",
  "MetaDataUpdateTime": "integer",
  "MetaDataUpdateTimeTimespan": "string",
  "SendKeepAliveDataSetMessages": "boolean",
  "QualityOfService": "string",
  "MessageRetention": "boolean",
  "MessageTtlTimespan": "string",
  "MessageEncoding": "string",
  "MessagingMode": "string",
  "BatchSize": "integer",
  "BatchTriggerInterval": "integer",
  "BatchTriggerIntervalTimespan": "string",
  "MaxKeepAliveCount": "integer",
  "Priority": "integer",
  "OpcNodes":
  [
    {
      "Id": "string",
      "ExpandedNodeId": "string",
      "BrowsePath": [ "string" ],
      "AttributeId": "string",
      "IndexRange": "string",
      "UseCyclicRead": "boolean",
      "RegisterNode": "boolean",
      "FetchDisplayName": "boolean",
      "OpcSamplingInterval": "integer",
      "OpcSamplingIntervalTimespan": "string",
      "OpcPublishingInterval": "integer",
      "OpcPublishingIntervalTimespan": "string",
      "DataSetFieldId ": "string",
      "DataSetClassFieldId ": "Guid",
      "DisplayName": "string",
      "SkipFirst": "boolean",
      "DiscardNew": "boolean",
      "HeartbeatInterval": "integer",
      "HeartbeatIntervalTimespan": "string",
      "QueueSize": "integer",
      "DataChangeTrigger": "string",
      "DeadbandType": "string",
      "DeadbandValue": "decimal",
      "ModelChangeHandling": {
        "RebrowseIntervalTimespan": "string"
      },
      "ConditionHandling": {
        "UpdateInterval": "integer",
        "SnapshotInterval": "integer",
        "RefreshRetainedConditionsOnStart": "boolean"
      },
      "EventFilter": {
        (*)
      }
    }
  ],
  "Version": "integer",
  "LastChangeTimespan": "string",
}
(*) To subscribe to OPC UA Alarms and Events you must configure the EventFilter attribute in OpcNodes as described here.
Each published nodes entry model has the following attributes:
| Attribute | Mandatory | Type | Default | Description |
|---|---|---|---|---|
Version |
No | Integer | null |
A monotonically increasing number identifying the change version. NOTE: At this point the version number is informational only, but should be provided in API requests if available. It is not used inside file based configuration. |
LastChangeTimespan |
No | String | null |
The time the Publisher configuration was last updated. Read only and informational only. |
EndpointUrl |
Yes | String | N/A | The OPC UA server endpoint URL |
UseReverseConnect |
No | Boolean | false |
Controls whether to use OPC UA reverse connect to connect to the OPC UA server. A publisher wide default value can be set using the command line |
DisableSubscriptionTransfer |
No | Boolean | false |
This setting allows you to disable subscription transfer on reconnect to fix interoperability issues with servers that do not support it. A publisher wide default value can be set using the command line |
UseSecurity |
No | Boolean | false |
Controls whether to use a secure OPC UA mode to establish a session to the OPC UA server endpoint.true corresponds to EndpointSecurityMode = SignAndEncrypt, false to EndpointSecurityMode = None |
EndpointSecurityMode |
No | Enum | null |
Enum to specify a requested security mode of the chosen session endpoint. Overrides UseSecurity value.Options: Sign, SignAndEncrypt, None, and Best (security mode possible which might include None) |
EndpointSecurityPolicy |
No | String | null |
String to specify a security policy the chosen endpoint must meet. Refines the endpoint chosen through EndpointSecurityMode and overrides UseSecurity value. |
OpcAuthenticationMode |
No | Enum | Anonymous |
Enum to specify the session authentication. Options: Anonymous, UsernamePassword, Certificate |
OpcAuthenticationUsername |
No | String | null |
The username for the session authentication if OpcAuthentication mode is UsernamePassword. Otherwise the subject name of a x509 certificate in the user certificate store. Ignored if the mode is Anonymous. |
OpcAuthenticationPassword |
No | String | null |
The password for the session authentication if OpcAuthentication mode is UsernamePassword. Otherwise the password to access the private key of the referenced certificate in the user certificate store. Ignored if the mode is Anonymous. |
DataSetWriterGroup |
No | String | "<<UnknownWriterGroup>>" |
The data set writer group collecting datasets defined for a certain endpoint uniquely identified by the above attributes. This attribute is used to identify the session opened into the server. The default value consists of the EndpointUrl string, followed by a deterministic hash composed of the EndpointUrl, UseSecurity, OpcAuthenticationMode, UserName and Password attributes. |
DataSetWriterId |
No | String | "<<UnknownDataSet>>" |
The unique identifier for a data set writer used to collect OPC UA nodes to be semantically grouped and published with the same publishing interval. When not specified a string representing the common publishing interval of the nodes in the data set collection. This attribute uniquely identifies a data set within a DataSetWriterGroup. The uniqueness is determined using the provided DataSetWriterId and the publishing interval of the grouped OpcNodes. An individual subscription is created for each DataSetWriterId. |
DataSetName |
No | String | null |
The optional name of the data set as it will appear in the dataset metadata. |
DataSetDescription |
No | String | null |
The optional description for the data set as it will appear in the dataset metadata. |
DataSetClassId |
No | Guid | Guid.Empty |
The optional dataset class id as it shall appear in dataset messages and dataset metadata. |
DataSetExtensionFields |
No | Object | null |
An optional JSON object with key value pairs where the value is a Variant in JSON encoding. This can be used to contextualize data set messages produced by the writer. Each item is added to key frame and meta data messages in the same data set, or in the extension section of samples messages (in samples messages the value is stringified). |
DataSetPublishingInterval |
No | Integer | null |
The publishing interval used for a grouped set of nodes under a certain DataSetWriter. Value expressed in milliseconds. Ignored when DataSetPublishingIntervalTimespan is present. Note: When a specific node underneath DataSetWriter defines OpcPublishingInterval (or Timespan), its value will overwrite publishing interval and potentially split the data set writer into more than one subscription. |
DataSetPublishingIntervalTimespan |
No | String | null |
The publishing interval used for a grouped set of nodes under a certain DataSetWriter. Value expressed as a Timespan string ({d.hh:mm:dd.fff}). When both Intervals are specified, the Timespan will win and be used for the configuration. Note: When a specific node underneath DataSetWriter defines OpcPublishingInterval (or Timespan), its value will overwrite publishing interval and potentially split the data set writer into more than one subscription. |
DataSetSamplingInterval |
No | Integer | null |
A default sampling interval for all monitored items that are sampled in the data set. Value expressed in milliseconds. This value will be overwritten if a sampling interval is defined for a node. The value is used as defined in the OPC UA specification. Ignored when DataSetSamplingIntervalTimespan is present.Defaults to the value configured via --oi command line option. |
DataSetSamplingIntervalTimespan |
No | String | null |
The default sampling interval for all monitored items that are sampled in the data set. Value expressed as Timespan string ({d.hh:mm:dd.fff}). This value is used if the sampling interval is not configured on an individual node. The value is used as defined in the OPC UA specification. |
DataSetKeyFrameCount |
No | Integer | null |
The optional number of messages until a key frame is inserted. Only valid if messaging mode supports key frames. |
DataSetFetchDisplayNames |
No | Boolean | null |
Whether to fetch the display name and use it as data set id for all opc node items in the data set. Defaults to the value configured via --fd command line option. |
MetaDataUpdateTime |
No | Integer | null |
The optional interval at which meta data messages should be sent even if the meta data has not changed. Only valid if messaging mode supports metadata or metadata is explicitly enabled. |
MetaDataUpdateTimeTimespan |
No | String | null |
Same as MetaDataUpdateTime but expressed as duration string.Takes precedence over the Integer value. |
SendKeepAliveDataSetMessages |
No | Boolean | false |
Whether to send keep alive data set messages for this data set when a subscription keep alive notification is received. Only valid if messaging mode supports keep alive messages. |
MessageEncoding |
No | String | null |
The message encoding to use when publishing the data sets. For the list of supported message type names see here |
MessagingMode |
No | String | null |
The messaging mode to use when publishing the data sets. For the list of supported messaging mode names see here |
WriterGroupTransport |
No | String | null |
The transport technology to use when publishing messages. For the list of supported transport names see here |
WriterGroupPartitions |
No | Integer | 1 |
Number of partitions to split the writer group into when publishing to target topics. |
WriterGroupQueueName |
No | String | null |
Writer group queue overrides the default writer group topic template to use. |
WriterGroupMessageRetention |
No | Boolean | null |
Message retention flag value for all messages sent through the writer group if the transport supports it. |
WriterGroupMessageTtlTimespan |
No | String | null |
Message time to live expressed as duration string for messages sent through the writer group if the transport supports it. |
WriterGroupQualityOfService |
No | String | null |
The quality of service for telemetry messages (if supported by transport). One of AtMostOnce, AtLeastOnce, or ExactlyOnce.Defaults to the value configured via --qos command line option or if not provided AtLeastOnce (QOS 1). |
Priority |
No | Integer | null |
Priority of the writer subscription. |
BatchSize |
No | Integer | null |
The optional number of notifications that are queued before a network message is generated. For historic reasons the default value is 50 unless otherwise configured via --bs command line option. |
BatchTriggerInterval |
No | Integer | null |
The network message publishing interval. Network and meta data messages are published cyclically from the notification queue when the specified duration has passed (or when the batch size configuration triggered a network message). For historic reasons the default value is 10 seconds unless otherwise configured via the --bi command line option. |
BatchTriggerIntervalTimespan |
No | String | null |
Same as BatchTriggerInterval but expressed as duration string.Takes precedence over the Integer value. |
DisableSubscriptionTransfer |
No | Boolean | false |
Disable subscription transfer on reconnect to override the default behavior per endpoint. |
RepublishAfterTransfer |
No | Boolean | true |
Republishes any missing values after a subscription is transferred on reconnect. |
MaxKeepAliveCount |
No | Integer | null |
When the publishing timer has expired this number of times without requiring any Notification to be sent, to the writer a keep-alive message is sent. |
QueueName |
No | String | null |
Writer queue overrides the writer group queue name. Network messages are split by different Qos settings. |
MessageRetention |
No | Boolean | null |
Message retention setting for messages sent by the writer if the transport supports it Network messages are split by differing retention flag values. |
MessageTtlTimespan |
No | String | null |
Message time to live expressed as duration string for messages sent by the writer. Network messages are split across different Ttl settings. |
QualityOfService |
No | String | null |
Quality of service to use for the writer. One of AtMostOnce, AtLeastOnce, or ExactlyOnce.Overrides the Writer group quality of service and together with queue name causes network messages to be split.. |
MetaDataQueueName |
No | String | null |
Meta data queue name to use for the writer. Overrides the default metadata topic template. |
DataSetWriterWatchdogBehavior |
No | String | null |
Determines what to do when the data set writer watchdog triggers. One of Diagnostic, Reset, FailFast, or ExitProcess.Defaults to the value configured via --dwb command line option. |
OpcNodeWatchdogTimespan |
No | String | null |
Determines the timeout of the monitored item watchdog that triggers the DataSetWriterWatchdogBehavior. Value is expressed as Timespan string ({d.hh:mm:dd.fff}). Defaults to the value configured via --mwt command line option. |
OpcNodeWatchdogCondition |
No | String | null |
Run the watchdog behavior for the writer subscription WhenAllAreLate or WhenAllAreLate.Defaults to the value configured via --mwc command line option. |
OpcNodes |
No (see notes) | List<OpcNode> |
empty | The DataSet collection grouping the nodes to be published for the specific DataSetWriter defined above. |
Note: OpcNodes field is mandatory for PublishNodes_V1. It is optional for CreateOrUpdateDataSetWriterEntry_V2, UnpublishNodes_V1 and AddOrUpdateEndpoints_V1. The OpcNodes field shouldn’t be specified for the rest of the direct methods taking an entry object.
Each OpcNode has the following attributes:
| Attribute | Mandatory | Type | Default | Description |
|---|---|---|---|---|
Id |
Yes* | String | N/A | The OPC UA NodeId in the OPC UA server whose data value changes should be published. Can be specified as NodeId or ExpandedNodeId as per OPC UA specification, or as ExpandedNodeId IIoT format {NamespaceUi}#{NodeIdentifier}. *Note: Id field may be omitted when ExpandedNodeId is present. |
ExpandedNodeId |
No | String | null |
Enables backwards compatibility. Must be specified as ExpandedNodeId as per OPC UA specification. *Note: when ExpandedNodeId is present Id field may be omitted. |
BrowsePath |
No | List<String> |
null |
The browse path from the Node configured in Id to the actual node to monitor.*Note: if the node Id is not provided, i=84 (root node) is assumed. |
AttributeId |
No | String | Value |
The node attribute to sample in case the node is a variable value (data item). The allowed values are defined in the OPC UA specification. Ignored when subscribing to events. |
IndexRange |
No | String | null |
The index range of the value to publish. Value expressed as a numeric range as defined in the OPC UA specification. Ignored when subscribing to events. |
OpcSamplingInterval |
No | Integer | 1000 |
The sampling interval for the monitored item to be published. Value expressed in milliseconds. The value is used as defined in the OPC UA specification. Ignored when OpcSamplingIntervalTimespan is present. |
OpcSamplingIntervalTimespan |
No | String | null |
The sampling interval for the monitored item to be published. Value expressed in Timespan string({d.hh:mm:dd.fff}). The value is used as defined in the OPC UA specification. |
OpcPublishingInterval |
No | Integer | null |
The publishing interval for the monitored item to be published. Value expressed in milliseconds. This value will overwrite the publishing interval defined in the DataSetWriter for the specified node. The value is used as defined in the OPC UA specification. Ignored when OpcPublishingIntervalTimespan is present. |
OpcPublishingIntervalTimespan |
No | String | null |
The publishing interval for the monitored item to be published. Value expressed in Timespan string ({d.hh:mm:dd.fff}). This value will overwrite the publishing interval defined in the DataSetWriter for the specified node. The value is used as defined in the OPC UA specification. |
DataSetFieldId |
No | String | null |
A user defined tag used to identify the field in the DataSet telemetry message when publisher runs in PubSub message mode. |
DataSetClassFieldId |
No | Guid | Guid.Empty |
A user defined Guid that identifies the field in the data set class of the DataSet telemetry message when publisher runs in PubSub message mode. This value is ignored when subscribing to events, in which case a DataSetClassFieldId can be applied to each select clause that select the content of the event dataset. |
DisplayName |
No | String | null |
A user defined tag to be added to the telemetry message when publisher runs in Samples message mode. |
HeartbeatInterval |
No | Integer | 0 |
The interval used for the node to publish a value (a publisher cached one) even if the value hasn’t been changed at the source. Value expressed in seconds. 0 means the heartbeat mechanism is disabled. This value is ignored when HeartbeatIntervalTimespan is present. |
HeartbeatIntervalTimespan |
No | String | null |
The interval used for the node to publish a value (a publisher cached one) even if the value hasn’t been changed at the source. Value expressed in Timespan string ({d.hh:mm:dd.fff}). |
SkipFirst |
No | Boolean | false |
Whether the first received data change for the monitored item should not be sent. This can avoid large initial messages since all values are sent by a server as the first notification. If an EventFilter is specified, this value is ignored |
QueueSize |
No | Integer | 1 |
The desired QueueSize for the monitored item to be published. |
FetchDisplayName |
No | Boolean | false |
Whether the server shall fetch display names of monitored variable nodes and use those inside messages as field names. Default is to use the DisplayName value if provided even if this option is set to true, if not provided or false, and no DisplayName specified, the node id is used. |
DiscardNew |
No | Boolean | false |
Whether the server shall discard new values when the queue is full. Default is false, it will discard values that have not been sent yet. |
UseCyclicRead |
No | Boolean | false |
Read the value periodically at the sampling rate instead of subscribing through subscriptions. Ignored when subscribing to events. |
RegisterNode |
No | Boolean | false |
Register the node to sample using the Register service call before accessing. Some servers then support faster reads, but this is not guaranteed. The service is defined in the OPC UA specification. Ignored when subscribing to events. |
DataChangeTrigger |
No | String | null |
The data change trigger to use. The default is "StatusValue" causing telemetry to be sent when value or statusCode of the DataValue change. "Status" causes messages to be sent only when the status code changes and "StatusValueTimestamp" causes a message to be sent when value, statusCode, or the source timestamp of the value change. A publisher wide default value can be set using the command line. This value is ignored if an EventFilter is configured. |
DeadbandType |
No | String | 1 |
The type of dead band filter to apply. "Percent" means that the DeadbandValue specified is a percentage of the EURange of the value. The value then is clamped to a value between 0.0 and 100.0 "Absolute" means the value is an absolute deadband range. Negative values are interpreted as 0.0. This value is ignored if an EventFilter is present. |
DeadbandValue |
No | Decimal | 1 |
The deaad band value to use. If the DeadbandType is not specified or an EventFilter is specified, this value is ignored. |
EventFilter |
No | EventFilter | null |
An event filter configuration to use when subscribing to events instead of data changes. |
ConditionHandling |
No | ConditionHandlingOptions | null |
Configures the special condition handling logic when subscribing to events. |
ModelChangeHandling |
No | ModelChangeHandlingOptions | null |
Configures model change tracking through this node (Experimental). |
The configuration file syntax has been enhanced over time. OPC Publisher reads old formats and converts them into the current format when persisting the configuration. OPC Publisher regularly persists the configuration file.
Writer group configuration
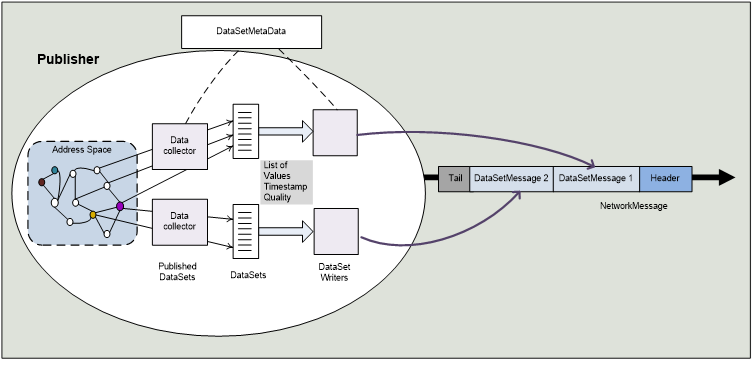
DataSets are a group of nodes within one OPC UA server. Datasets contain data value changes for nodes that all share a common publishing interval. A DataSetWriter emits DataSetMessages containing a DataSet. The Writer has all information to establish a connection to an OPC UA server.
A DataSetWriterGroup is used to group several DataSetWriter’s for a specific OPC UA server. A DataSetWriterGroup emits what is called a NetworkMessage containing the DataSetMessages. The following diagram courtesy of the OPC Foundation reference specification hows the relationship between these concepts and the messages emitted over the specified transport protocol:

In the implementation of OPC Publisher, a Writer group is defined by the DataSetWriterGroup name attribute in the configuration. Due to the limitations of the configuration schema, for attributes that apply to the Writer group the value of the first configuration entry object will be used. All other values in further entries with the same DataSetWriterGroup value are discarded. It is recommended to use the same values for all writer group related attributes in all entries for a consistent and deterministic behavior.
The following configuration properties of the published nodes entry model apply to the Writer group:
- Messaging profile (
MessageEncoding,MessagingMode) - Batch size and batch publishing interval (
BatchSize,BatchTriggerIntervalTimespan) - Desired transport (
WriterGroupTransport)
IMPORTANT: It is important to set a unique
DataSetWriterGroupname when configuring the above settings. Not doing so will yield unexpected behavior as all configurations with the same writer group name are collated into a single one with differing settings being clobbered.
A DataSetWriter is defined by its DataSetWriterId and the effective DataSetPublishingInterval of the writer. A group of nodes with the same publishing interval becomes a writer inside a writer group, regardless of using the same DataSetWriterId. If the same DataSetWriterId is used but with nodes that have different effective publishing intervals, then a postfix string is added to the name to further disambiguate.
IMPORTANT: Just like the writer group configuration, it is important to set a unique
DataSetWriterIdname when configuring multiple writers with different settings (publishing interval excluded). Not doing so will yield unexpected behavior as all configurations with the same dataset writer name are collated into a single one with differing settings being clobbered.
Due to historic reasons, by default a session is scoped to a writer group. That means for each endpoint url and security configuration inside a single writer group a single session is opened and the subscriptions are established inside the session. If you use more than one writer group in your configuration and each contain writers with the same endpoint information, multiple sessions will be created. This can be overridden using command line options.
OPC Publisher will try to re-use an existing OPC UA subscription or create a new one per DataSetWriter.
Configuration via init file
OPC Publisher can be configured remotely using its writer and node configuration API. This API can be invoked via HTTP, MQTT (RPC), in many cases through IoT Hub direct methods, but also using OPC Publisher’s init file feature.
The init file can be specified using the command line option --pi, --initfile. The file can be updated while OPC Publisher is running, in which case the new file content will be executed. The file will not be run if it has not changed. This applies also across restarts. However, this requires that the response file (see the --il, --initlog argument) is writeable.
The init file format follows the .http file format with the additional exception that scripting, variables, and `` templates are not supported.
While the method line can start with a HTTPMethod and end with a HTTPVersion, they are effectively discarded at the moment. The URL must be a direct method name as specified in the API documentation, e.g. AddOrUpdateEndpoint_V1. While headers can be provided, the only relevant one is Content-Type which defaults to application/json. In addition to the documented format, the init file format supported by OPC Publisher supports the following additional request directives which can be provided after a comment (# or //):
| Directive | Description |
|---|---|
| @no-log | Disable logging for this request after this directive. This directive must be applied for every request and on the first line so that nothing is emitted to the init log. |
| @timeout | Timeout for the request. If the request times out it will be an error and all further requests are not sent. |
| @retries | Retry this number of times in case of an error. An error is any request that returns with status code >= 400. |
| @delay | Delay before executing a request. If retries are specified the delay applies again before every retry. |
| @on-error | Invoke the request only when the previous request failed. If the previous request has @continue-on-error directive this request will not be executed. If the request succeeds the next request after is run. |
| @continue-on-error | Continue to next request even if the request failed. The default behavior is to stop execution of requests except for the next request with @on-error directive. |
The @on-error condition can be used as an error handler e.g. to call the Shutdown method. If the restart is immediate, the init file will be execute again after restart. A delay can throttle these restarts. An example init file is shown here:
###

// 3 retries in case of failure, with a delay of 5 seconds between
// @delay 5
// @retries 3

// Creates writer entries for all objects that implement the
// machine tool object type or one of its subtypes on this server
ExpandAndCreateOrUpdateDataSetWriterEntries_V2

{
    "entry": {
        "EndpointUrl": "opc.tcp://opcua.umati.app:4840",
        "UseSecurity": false,
        "DataSetWriterGroup": "MachineTools",
        "OpcNodes": [
            { "Id": "nsu=http://opcfoundation.org/UA/MachineTool/;i=13" }
        ]
    }
}

###

// Shutdown the publisher in case the expansion failed
// and let docker restart it. The Fail fast argument
// provided as json payload.
# @on-error
Shutdown_V2

true

###
More init file examples with explanations can be found here.
Sampling and Publishing Interval configuration
The OPC UA reference specification provides a detailed overview of the OPC UA monitored item and subscription service model.
A DataSetWriter is a group of (variable or event notifier) nodes inside an OPC UA server that constitute a data set. Several parameters can be configured for each node that tell the Server how the node is to be sampled, evaluated and reported. These attributes include
- Sampling interval (
OpcSamplingIntervalorOpcSamplingIntervalTimespanorDataSetSamplingIntervalTimespanat the entry level) - Filter definition (
DeadbandValue,DeadbandType, andDataChangeTriggerfor variables, or EventFilter in case the monitored item is an event notifier) - Queue mode (
DiscardNew) and - Queue length (
QueueSize)
The following overview diagram courtesy of the OPC Foundation shows how the server operates based on the configuration:
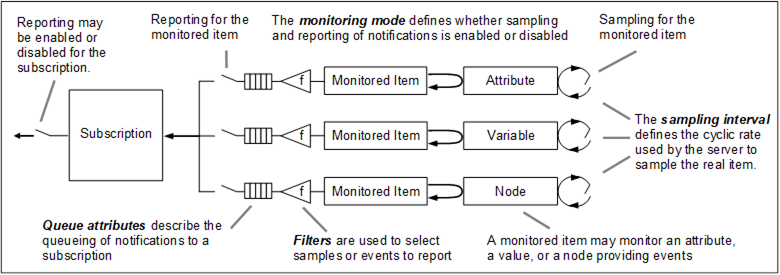
A subscription is created for a DataSetWriter if none with the same subscription settings already exists. The publishing interval (configured using the DataSetPublishingInterval or OpcPublishingInterval values) is an attribute of the subscription (hence multiple writers are instantiated if there are multiple different publishing intervals nodes under a data set writer configured). The publishing interval defines the cyclic rate at which it collects values from the monitored item queues. Each time it attempts to send a Notification Message to OPC Publisher containing new values or events of its monitored items.
A default OPC Publisher wide publishing interval can be provided using the command line option (--op) which is used when the interval is not configured. The default publishing interval used by OPC Publisher is 1 second. It is also possible to override all publishing intervals configured in the OPC Publisher configuration using the --ipi command line option. Setting the publishing interval to 0 instructs the server to choose the fastest publishing interval cycle it can manage. This can be useful if you have existing configuration specifying multiple publishing intervals but would like to avoid separate subscriptions to be created for each interval, or just put the server in charge. Note though that the --npd command line will still split a data set writer if more nodes than the configured amount are specified in the configuration file.
The diagnostics output and metrics contain a Server queue overflows instrument which captures the number of data values with overflow bit set and indicates data changes were lost. Increase the QueueSize of frequently sampled items until the instrument stays 0. You can also configure the publisher with the --aq command line option and let it calculate an appropriate queue size taking into account the (revised) publishing interval and sampling interval for a monitored item.
Notifications received by the writers in the writer group inside OPC Publisher are batched and encoded and published to the chosen transport sink.
The OPC UA server always sends the first data value to OPC Publisher when a monitored item is added to a subscription. To prevent publishing all of these values during startup, the SkipFirst value can be specified in the data item’s configuration:
"SkipFirst": true,
Key frames, delta frames and extension fields
OPC UA optimizes network bandwidth by only sending changes to OPC Publisher when the data item’s value has changed. These messages are sent as ua-deltaframe messages by the data set writer, and the resulting data set messages are sparse. It is desirable to send all other values that have not changed together with a value that changed as a key frame (ua-keyframe). To accomplish this a writer can be configured with a DataSetKeyFrameCount value other than 0. If this is the case, all values are sent in the first message, and then every DataSetKeyFrameCount number of messages later.
The DataSetExtensionFields object in the configuration can be used to insert additional fixed fields into these key frame messages which allows you to contextualize messages with data that is available in external systems only, or that allows your application to understand the context in which the message is produced. An example configuration is shown here:
[
    {
        ...
        "MessagingMode": "PubSub",
        "DataSetExtensionFields": {
            "EngineeringUnits": "mm/sec",
            "AssetId": 5,
            "Important": false,
            "Variance": {
              "Value": 0.4,
              "DataType": "Single"
            }
        },
        "DataSetKeyFrameCount": 3,
        "OpcNodes": [
            ...
        ]
    }
]
Values are formatted using the extended OPC UA Variant JSON format. This encoding is compliant with OPC UA Part 6, however it also allows to use simple JSON types which will be interpreted as Variant values using a simple heuristic, mapping the best OPC UA type possible to it.
IMPORTANT: Extension fields are only sent as part of key frame messages when using Pub Sub encoding. You must configure a key frame count for key frames to be sent as the default key frame count value is 0 and therefore key frames are disabled.
In addition to the periodic key frames controlled by DataSetKeyFrameCount, a key frame can be requested on demand through the diagnostics API. This is useful to serve a late joining consumer with the current state of all values without having to wait for the next value change or the configured key frame interval. The key frame is produced from the values already cached inside OPC Publisher, so no additional round trip to the OPC UA server is performed. Use POST /v2/diagnostics/writergroups/{dataSetWriterGroup}/keyframe to trigger a key frame for every data set writer in a writer group, or POST /v2/diagnostics/writergroups/{dataSetWriterGroup}/writers/{dataSetWriterId}/keyframe to trigger it for a single data set writer.
Status codes
The status code value is the integer received over the wire from the server (full one including all bits).
StatusCode “Good” is defined as 0 in OPC UA, which is omitted in JSON encoding (as per Part 6). The symbol in the encoding is what OPC Publisher is looking up from the standard defined codes (using the code bits which are the 16 bits defining the error code part of the status code).
The symbol can be Good and still show up in the message when other bits are set in the value, e.g., overflow status, or additional information status, etc. One such example is the value 1152 which indicates the overflow bit (the server monitored item queue was in an overflow condition, which means the queue size should be increased):
CodeBits = Value & 0xFFFF0000; --> This is used to look up the symbol which is "Good".
FlagBits = Value & 0x0000FFFF;

1152 == 0x480 == DataValueInfo | OverflowBit
You can find more information in Part 4 of the OPC UA reference.
Heartbeat
Some use cases require to publish data values in constant intervals. OPC Publisher has always supported a “heartbeat” option on the configured monitored node item. Heartbeat acts like a watchdog which fires after the heartbeat interval has passed and no new value has yet been received. It can be enabled by specifying the HeartbeatInterval key in an item’s configuration. The interval is specified in seconds (but can also be specified as a Timespan value):
"HeartbeatInterval": 60,
The behavior of heartbeat can be fine tuned using the --hbb, --heartbeatbehavior command line options or the
"HeartbeatBehavior": "...",
option of the node entry. The behavior can be set to watch dog behavior with Last Known Value (WatchdogLKV, which is the default) or Last Known Good (WatchdogLKG) semantics. A last known good value has either a status code of Good or a valid value (!= Null) and not a bad status code (which covers other Good or Uncertain status codes). Bad values are not causing heartbeat messages in LKG mode.
A continuous periodic sending of the last known value (PeriodicLKV) or last good value (PeriodicLKG) can also be selected. In some cases periodic reporting is all that is needed, and the actual value read that is reported out of period should be dropped. Use the PeriodicLKVDropValue or PeriodicLKGDropValue behavior to achieve this behavior. The outcome is similar to the cyclic read mode but using a periodic timer over server side sampled nodes.
The heartbeat behavior WatchdogLKVDiagnosticsOnly is special, it allows you to log heartbeat in the diagnostics output without sending heartbeats as part of the outgoing messages.
Timestamps
The OPC UA data value contains a source and server timestamp. These are reported by the server and are based on the OPC UA server clock. The server is free to send whatever timestamp it wants, including none even though the OPC Publisher is setting up all monitored items to report both timestamps.
When you want to analyze time series of data sets (where the value timestamps of every field in the data set will be different) or when you want to use Heartbeats (where the LKG or LKV are re-sent with the original timestamps), the Timestamp of the message should be used instead of the SourceTimestamp or ServerTimestamp values.
NOTE: The Timestamp property is not part of the regular legacy samples messages. You must set
--fm=Truefor them to be included.
The timestamp of the message is the time the notification was received from the OPC UA server. Using the --mts command line options other sources for this timestamp can be chosen, e.g., the time of encoding (which is shortly before sending to the data sink), or the PublishTime property of the subscription notification received from the server (provided by OPC UA server).
Note that if the
PublishTimeis selected as message timestamp, heartbeat messages will not have a message timestamp as they are generated locally and not as a result of a publish operation.
Legacy behavior
We still support a heartbeat behavior that mimics the behavior of heartbeat in 2.8 and below. Here the source timestamp of the value will be shifted by the time passed since receiving it. This behavior can be enabled by specifying --hbb=WatchdogLKVWithUpdatedTimestamps as command line argument during deployment.
This behavior only mimics the old behavior. In past versions of OPC Publisher the heartbeat option layered on top of the Keep Alive mechanism of the subscription and was similar to WatchdogLKVWithUpdatedTimestamps. In 2.9 and higher the heartbeat is emitted every heartbeat interval from the last received value until a new value is received following a watchdog pattern. Given that the previous mechanism resulted in unexpected behavior, the new mechanism has a simpler and more reliable pattern leading to the desired outcome. It is also better because heartbeats are also sent when OPC Publisher is not connected to the server (during intermittent disconnects).
Please be aware that when analyzing using
SourceTimestamporServerTimestampproperties, the values are provided by the server, not by OPC Publisher. They are therefore only as reliable as the server implementation. This also extends to heartbeats whenWatchdogLKVWithUpdatedTimestampsbehavior is used. When the server sends a data value without or invalid timestamps, these timestamps are shifted and can result in garbage. The best solution is to primarily rely on the message timestamp and onlySourceTimestampas secondary information.
Cyclic reading (Client side sampling)
Similar use cases require cyclic read based sampling using read service calls on a periodic timer. The UseCyclicRead property of a configured node tells OPC Publisher to sample the value periodically when the timer expires. Note that read operations of all nodes at the same sampling rate are batched together for efficiency. They only execute when no previous read operation is in progress when the period expires. While the sampler configures a timeout of half the sampling rate in case of high frequency sampling a value every time the sampling rate expires cannot be guaranteed.
"UseCyclicRead": true,
The diagnostics output and metrics contain a Server queue overflows instrument. In the case of cyclic reads these are the number of skipped value reads because a cycle was missed due to delays reading from the server. For example when configuring a 1 second sampling interval and the read operation takes 2.5 seconds, then 1 cycle will be missed and 1 overflow per value will be reported. Either set a less aggressive sampling interval (e.g., 3 seconds in the above case) or configure less items in the data set writer (if latency is due to the # of read operations in a single read request or the operation limits of the server).
Note that reads are batched into a single service call. Therefore slow nodes can impact other nodes that can be read faster. You can configure the caching mode and cache age to use when reading the node value using the CyclicReadMaxAgeTimespan property which must be below or equal the cyclic sampling rate chosen for the node. Set the duration to 0 (which is the default) to always use uncached reads. In addition it is possible to combine cyclic reads with registering the node to read (“registered read”) by setting the RegisterNode property of the node to true. This way some servers can optimize reading values from the backend for these nodes, however only a limited number of “registered nodes” are supported in such servers.
The OPC UA subscription/monitored items service due to its async model (server side sampling, queuing and publishing) is by far way more efficient than cyclically reading nodes from the server. Limits are reached relatively quickly compared to regular operation and heavily depend on the OPC UA server implementation and vendor.
Overcoming server limits and interop limitations
OPC UA servers can be limited with regards to the amount of sessions, subscriptions or publishing requests they support. By default OPC Publisher tries to bundle as many writers with the same subscription configuration (including the publishing interval) into a OPC UA subscription inside a (writer group) session. It uses the MaxMonitoredItemsPerSubscription limit provided by in the Server capabilities object read by OPC Publisher when the session is created to create the right number of subscriptions that hold as many monitored items as possible. If the limit a not provided by the server or is 0, OPC Publisher uses a default value of 65536. This value can be overridden using the --xmi --maxmonitoreditems command line option.
OPC Publisher has several options to overcome additional server limitations and that can be used to tune and overcome interoperability issues.
-
To minimize the number of sessions against a server, the default behavior of creating a session per writer group can be overridden using the
--dsg, --disablesessionpergroupcommand line option which results in a session per endpoint spanning multiple writer groups with the same endpoint url and configuration. -
To further limit the number of subscriptions avoid specifying different publishing intervals for the
OpcNodesitems in the OPC Publisher configuration. Each publishing interval will result in a subscription with the server inside the (writer group) session.-
You can use the
--ipi, --ignorepublishingintervalscommand line option to ignore publishing interval configuration in the JSON configuration and use the publishing interval configured using the--opcommand line option (default: 1 second). -
In addition you can set the
--op=0to let the server decide the smallest publishing interval it offers. -
You can also use the
--aq, --autosetqueuesizeoption to let OPC Publisher calculate the best queue size for monitored items in the subscription to limit data loss.
-
-
By default OPC Publisher tries to dispatch as many publishing requests to a server session as there are subscriptions in the session up to a maximum of
10. The OPC UA stack tries to gradually lower the number based on feedback from the server (BadTooManyPublishRequests). This behavior is not tolerated by some servers. To set a lower maximum that OPC Publisher should never exceed use the--xprcommand line option.
Configuring Security
IoT Edge automatically provides OPC Publisher with a secure configuration to access IoT Hub. OPC UA does use X.509 certificates fo mutual authentication of both OPC Publisher clients and the OPC UA server and to establish a secure channel between both. OPC Publisher can be configured to store these certificates in a file system based certificate store which root can be configured using the --pki command line argument. During startup, OPC Publisher checks if there’s already a private certificate it should use as its identity. If it cannot find one, a self-signed certificate is created.
Self-signed certificates don’t provide any trust value and we don’t recommend using them in production.
Encrypted communication between OPC Publisher and the OPC UA server can be enabled per endpoint via the "UseSecurity": true, flag in the configuration. In addition, a specific security mode and policy can be chosen using the EndpointSecurityMode and EndpointSecurityPolicy configuration properties which possibly override the UseSecurity value. If none of these are specified then OPC Publisher will connect to the endpoint URL using no security at all to support backwards compatibility to previous versions of OPC Publisher.
Use encrypted communication whenever possible. Do not use
BestasEndpointSecurityModeas this can mean thatNonecould be chosen if the server does not returns any secure endpoint descriptors during discovery. In this case it is better to fail connecting.
By default OPC Publisher connects to the endpoint using anonymous authentication. However, OPC Publisher also supports user authentication using username and password. These credentials can be specified using the configuration file as follows:
  "OpcAuthenticationMode": "UsernamePassword",
  "OpcAuthenticationUsername": "usr",
  "OpcAuthenticationPassword": "pwd",
OPC Publisher also supports X.509 Certificate based user authentication. A user certificate with private key must be added to the User certificate store of the PKI. The user name then refers to the subject name of the certificate and the password to the password that was used to protect the pfx blob representing the user certificate. For example:
  "OpcAuthenticationMode": "Certificate",
  "OpcAuthenticationUsername": "certificate-subject-name",
  "OpcAuthenticationPassword": "certificate-password",
If user credentials are configured you should always enable encrypted communication to ensure the secrets are not leaked. OPC Publisher does not force encrypted authentication if a password is specified.
OPC Publisher version 2.5 and below encrypts the username and password in the configuration file. Version 2.6 and above stores them in plain text. 2.9 allows you to force encryption of credentials at rest (--fce) or otherwise cause OPC Publisher to exit.
Using OPC UA reverse connect
You can let servers connect to OPC Publisher using the OPC UA reverse connect mode. This allows an OPC UA server to connect to OPC Publisher located in a higher layer network instead of opening up inbound ports to let OPC Publisher connect to it. Consequently only an outbound port needs to be opened in the lower layer network. You can find more information in OPC UA standard Part 6.
Reverse connect mode can be enabled per endpoint. This can be done using the UseReverseConnect property inside the published nodes configuration entry. An OPC Publisher-wide default for the case the property is missing can be configured using the --urc command line options.
Reverse connect is only supported for the opc.tcp scheme of endpoint urls. Reverse connecting other transports is not supported. If OPC Publisher cannot find a Url candidate with the opc.tcp scheme to use when reverse connecting it will try to establish a regular connection to any of the other candidate endpoints instead (see ConnectionModel for more information).
OPC Publisher will listen for reverse connect requests on port 4840, unless a different port is configured through the --rcp command line options. You must open the port on the OPC Publisher docker container for external OPC UA servers to be able to access it. This must be done in the IoT Edge deployment manifest’s create options. Add a port binding entry for port 4840 (or otherwise chosen port) container port and the host port you want to open (e.g., 4840):
"createOptions": "{\"User\":\"root\",\"HostConfig\":{\"PortBindings\":{\"4840/tcp\":[{\"HostPort\":\"4840\"}], ...
OPC Publisher opens the outbound port when the first reverse connection is required. This happens when at a published nodes entry with a reverse connected endpoint causes a subscription to be created, or by making an API call with a reverse connection model passed as part of the request, whichever happens first. Otherwise the port stays closed.
It is also important to note that the Endpoint URL presented by the server in the RHEL packet must match exactly the endpoint url used to create the OPC UA client inside OPC Publisher (either the EndpointUrl property in the published nodes entry or the Url inside the ConnectionModel). Otherwise connections from the server will be rejected by OPC Publisher. This is important because some OPC UA servers do not use a FQDN host name in the endpoint Url in the RHEL packet they send. In this case, do not specify the FQDN in the Endpoint Url either. Follow instructions to trouble shoot OPC Publisher and in particular enable stack logging using --sl to see the endpoint url presented by the server when the server connection is rejected, then update the OPC Publisher configuration to match.
Configuring event subscriptions
OPC Publisher supports two types of event filter configurations you can specify:
- Simple event filter configuration mode, where you specify the source node and the event type you want to filter on and then the OPC Publisher constructs the select and where clauses for you.
- Advanced event filter configuration mode where you explicitly specify the select and where clauses.
In the configuration file you can specify how many event configurations as you like and you can also combine events and data nodes for a single endpoint.
In addition you can configure optional Condition reporting where OPC Publisher reports retained conditions at a configured time periodic rate in seconds.
Simple event filter
As highlighted in the example above you can specify namespaces both by using the index or the full name for the namespace. Also look at how the BrowsePath can be configured.
Here is an example of a configuration file in simple mode:
[
    {
        "EndpointUrl": "opc.tcp://testserver:62563/Quickstarts/SimpleEventsServer",
        "OpcNodes": [
            {
                "Id": "i=2253",
                "DisplayName": "SimpleEventServerEvents",
                "EventFilter": {
                    "TypeDefinitionId": "ns=2;i=235"
                }
            }
        ]
    }
]
To subscribe to an event you specify the source node (in this case the server node which has node id i=2253) and the event type to monitor (in this case ns=2;i=235).
When you use the simple configuration option above, the OPC Publisher does two things:
- It looks at the TypeDefinitionId of the event type to monitor and traverses the inheritance tree for that event type, collecting all fields. Then it constructs a select clause with all the fields it finds.
- It creates a where clause that is OfType(TypeDefinitionId) to filter the events to just the selected event type.
Advanced event filter configuration
To configure an advanced event filter you have to specify a full event filter which at minimum consists of three things:
- The source node you want to receive events for (in the example below again the server node which has node id
i=2253). - A select clause specifying which fields should be in the reported event. This can include a data set class field id that is then used as identifier in the dataset metadata for the dataset class.
- A where clause specifying the filter AST.
Here is an example of a configuration file that selects events using an advanced event filter:
[
    {
        "EndpointUrl": "opc.tcp://testserver:62563/Quickstarts/SimpleEventsServer",
        "OpcNodes": [
            {
                "Id": "i=2253",
                "DisplayName": "SimpleEventServerEvents",
                "EventFilter": {
                    "SelectClauses": [
                        {
                            "TypeDefinitionId": "i=2041",
                            "DataSetClassFieldId ": "D3EB3722-E956-4E5E-925B-FB727B737520",
                            "BrowsePath": [
                                "EventId"
                            ]
                        },
                        {
                            "TypeDefinitionId": "i=2041",
                            "DataSetClassFieldId ": "A435F616-CE1E-4FBD-A819-03175EB49231",
                            "BrowsePath": [
                                "Message"
                            ]
                        },
                        {
                            "TypeDefinitionId": "ns=2;i=235",
                            "DataSetClassFieldId ": "BD236A98-8DA3-40A1-B8E8-00AB23A6B5E9",
                            "BrowsePath": [
                                "/2:CycleId"
                            ]
                        },
                        {
                            "TypeDefinitionId": "nsu=http://opcfoundation.org/Quickstarts/SimpleEvents;i=235",
                            "DataSetClassFieldId ": "9F9A420B-509E-488B-A7A4-F320F8223E9E",
                            "BrowsePath": [
                                "/http://opcfoundation.org/Quickstarts/SimpleEvents#CurrentStep"
                            ]
                        }
                    ],
                    "WhereClause": {
                        "Elements": [
                            {
                                "FilterOperator": "OfType",
                                "FilterOperands": [
                                    {
                                        "Value": "ns=2;i=235"
                                    }
                                ]
                            }
                        ]
                    }
                }
            }
        ]
    }
]
The exact syntax allowed can be found in the OPC UA reference documentation. Note that not all servers support all filter capabilities. You can troubleshoot issues using the OPC Publisher logs.
Condition handling options
This feature is in preview
In addition to event subscription, you can also configure events to enable condition handling.
When configured, OPC Publisher listens to ConditionType derived events, records unique occurrences of them and periodically sends out all condition events that have the Retain property set to True. This enables you to continuously get a snapshot view of all active alarms and conditions which can be very useful for dashboard-like scenarios.
Here is an example of a configuration for condition handling:
[
    {
        "EndpointUrl": "opc.tcp://testserver:62563/Quickstarts/AlarmConditionServer",
        "OpcNodes": [
            {
                "DisplayName": "AlarmConditions",
                "Id": "i=2253",
                "EventFilter": {
                    "TypeDefinitionId": "i=2915"
                },
                "ConditionHandling": {
                    "UpdateInterval": 10,
                    "SnapshotInterval": 20
                }
            }
        ]
    }
]
The ConditionHandling section consists of the following properties:
UpdateInterval- the interval, in seconds, which a message is sent if anything has been updated during this interval.SnapshotInterval- the interval, in seconds, that triggers a message to be sent regardless of if there has been an update or not.RefreshRetainedConditionsOnStart- a boolean that, when set totrue, issues a singleConditionRefreshwhen the event subscription is established (and again after a reconnect) so that conditions with theRetainflag already present on the server are delivered once. UnlikeSnapshotInterval/UpdateIntervalit does not cache conditions or periodically re-send snapshots, so no duplicate messages are produced. This is useful when you only want to pick up the alarms and conditions that already exist on the server at startup and then continue receiving new event changes normally. This option is ignored whenSnapshotIntervalis set, because snapshotting already performs the initial refresh.
For the snapshotting behavior, one or both of UpdateInterval and SnapshotInterval must be set for condition handling to be in effect. Alternatively, set RefreshRetainedConditionsOnStart to true for the one-time refresh behavior. You can use the condition handling configuration regardless if you are using advanced or simple event filters. If you specify theConditionHandling option property without an EventFilter property it is ignored, as condition handling has no effect for data change subscriptions.
Condition snapshots (produced through SnapshotInterval/UpdateInterval) are sent as ua-condition data set messages. This is a message type not part of the official standard but allows separating condition snapshots from regular ua-event data set messages. Retained conditions delivered through RefreshRetainedConditionsOnStart are surfaced once as regular ua-event messages (the RefreshStart/RefreshEnd envelope events are suppressed).
Publish to a Unified Namespace
This feature is in preview
OPC Publisher allows you to map values and events obtained from the OPC UA address space to MQTT topics up to the granularity of the subscribed node id (monitored item).
Specify topic templates at the level of WriterGroup, DataSetWriter or Node as part of the configuration to configure routing that meets your needs. Topic templates can apply not just to MQTT but to any transport supporting topic or queue name based routing, however, the default templates that apply use the MQTT topic format with / path delimiter and escape only MQTT topic reserved characters (using \x<ascii-code>).
For extra convenience use the automatic routing feature which leverages the OPC UA browse paths inside the address space to automatically create the topic structure. The browse paths from the root folder (i=84) is used as it maps well with how clients visualize the address space. To use this feature, configure the DataSetRouting option in the configuration or set a default on the command line. For example when configuring the UseBrowseNames option all Events and data changes are routed to topics that match the browse path of the source node effectively mapping the address space into the MQTT topic structure with limited configuration overhead.
When publishing value changes to topics best choose a Message format that has limited overhead, e.g., SingleRawDataSet or SingleDataSetMessage.
OPC Publisher Telemetry Formats
OPC Publisher version 2.6 and above supports standardized OPC UA PubSub network messages in JSON format as specified in part 14 of the OPC UA specification.
An example OPC UA PubSub message emitted by OPC Publisher version 2.9 and higher looks as follows:
{
  "MessageId": "18",
  "MessageType": "ua-data",
  "PublisherId": "uat46f9f8f82fd5c1b42a7de31b5dc2c11ef418a62f",
  "DataSetClassId": "78c4e91c-82cb-444e-a8e0-6bbacc9a946d",
  "Messages": [
    {
      "DataSetWriterId": 2,
      "SequenceNumber": 18,
      "MetaDataVersion": {
        "MajorVersion": 452345324,
        "MinorVersion": 234523542
      },
      "Timestamp": "2020-03-24T23:30:56.9597112Z",
      "Status": 0,
      "Payload": {
        "Temperature": {
          "Value": 99,
          "SourceTimestamp": "2020-03-24T23:30:55.9891469Z",
          "ServerTimestamp": "2020-03-24T23:30:55.9891469Z"
        },
        "Counter": {
          "Value": 251,
          "SourceTimestamp": "2020-03-24T23:30:55.9891469Z",
          "ServerTimestamp": "2020-03-24T23:30:55.9891469Z"
        }
      },
      "DataSetWriterName": "uat46f9f8f82fd5c1b42a7de31b5dc2c11ef418a62f"
    }
  ]
}
OPC Publisher 2.9 and above supports strict adherence to Part 6 and Part 14 of the OPC UA specification when it comes to network message encoding. To enable strict mode use the -c or --strict command line options. For backwards compatibility this option is off by default. Strict mode automatically enables all OPC UA Pub Sub features, including metadata messages. To disable metadata messages use the --dm=true flag. To enable metadata messages when strict mode is not used (compatible to 2.8), use --dm=false.
It is highly recommended to always run OPC Publisher with strict adherence turned on.
All versions of OPC Publisher also support a non-standard, simple JSON telemetry format (typically referred to as “Samples” format and which is the default setting). Samples mode is compatible with Azure Time Series Insights:
[
   {
      "EndpointUrl": "opc.tcp://192.168.178.3:49320/",
      "NodeId": "ns=2;s=Pump\\234754a-c63-b9601",
      "MonitoredItem": {
         "ApplicationUri": "urn:myfirstOPCServer"
      },
      "Value": {
         "Value": 973,
         "SourceTimestamp": "2020-11-30T07:21:31.2604024Z",
         "StatusCode": 0,
         "Status": "Good"
      }
  },
  {
      "EndpointUrl": "opc.tcp://192.168.178.4:49320/",
      "NodeId": "ns=2;s=Boiler\\234754a-c63-b9601",
      "MonitoredItem": {
         "ApplicationUri": "urn:mySecondOPCServer"
      },
      "Value": {
         "Value": 974,
         "SourceTimestamp": "2020-11-30T07:21:32.2625062Z",
         "StatusCode": 0,
         "Status": "Good"
      }
   }
]
Warning: The Samples format changed over time and is now deprecated
More detailed information about the supported message formats can be found here
Programming against OPC Publisher using the OPC Publisher API
OPC Publisher supports remote configuration through Azure IoT Hub direct methods. In addition to the configuration API, OPC Publisher 2.9 also supports additional APIs and a number of different transports that can be used to receive messages or invoke these API services. The transports can be configured using the command line arguments.
-
The API can be invoked through Azure IoT Hub direct methods from the cloud or from another IoT Edge module running alongside of OPC Publisher or inside a higher layer of a Purdue network setup. The method name is the operation name and request payload as documented in the API documentation.
-
The same API is exposed as REST API via the HttpHTTP Server built into OPC Publisher (Preview). The API supports browse and historian access streaming, which the other transports do not provide. All calls must be authenticated through an API Key which must be provided as a Api Key token in the Authorization header (
ApiKey <api-key>). The API key is generated at start up and can be read from the OPC Publisher module’s module twin (__apikey__property). -
The API can also be invoked through MQTT v5 RPC calls (Preview). The API is mounted on top of the method template (configured using the
--mttcommand line argument). The method name follows the topic. The caller provides the topic that receives the response in the topic specified in the corresponding MQTTv5 PUBLISH packet property.
Using IoT Edge Simulation environment
A handy way to program against OPC Publisher is inside the IoT Edge Development simulator. You can also use Azure IoT Edge for Visual Studio Code to program against OPC Publisher which provides an integrated development experience.
NOTE: IoTEdgeHubDev is a development tool and in maintenance mode. If you encounter issues please file an issue and we will aim to address.
Follow the instructions to install IoTEdgeHubDev. Make sure the docker daemon is started and accessible. You can now use the official OPC Publisher images on Microsoft container registry (mcr.microsoft.com/iotedge/opc-publisher:latest) or build a local version from the root of this repository as follows:
dotnet publish src/Azure.IIoT.OpcUa.Publisher.Module/src/Azure.IIoT.OpcUa.Publisher.Module.csproj --os linux --arch x64 /p:ContainerImageTags=debug
Doing this will produce the container image iotedge/opc-publisher:debug. The sample deployment manifest already points to the local container image. If you would like to use a different container image (e.g., the official one on MCR or from your private Azure Container Registry) update the image name in the manifest accordingly. To start the IoT Edge simulation run
iotedgehubdev start -d docs/opc-publisher/deployment.json -v
If you omit the
-vcommand line argument the simulation will run in the background. You can now interact with OPC Publisher the same way as if it was running on a production IoT Edge.
Calling the Direct Methods API
IoT Edge Hub Development simulator can be used to deploy other modules side by side with OPC Publisher which can then invoke OPC Publisher direct methods. The API Payload is described in the API and configuration documentation. While the API documentation is based on the OPC Publisher openapi.json (Swagger), the direct method API uses the same definitions for requests and responses.
The operation name in the the Open API JSON which is also the heading of the individual entry in the API documentation (e.g., AddOrUpdateEndpoint or GetConfiguredEndpoints) is the direct method name that must be placed into the IoT Edge / IoT Hub method call. You can try this using the az iot hub invoke-module-method command, e.g.,
az iot hub invoke-module-method -m publisher -n <hub name> -d <iotedgehubdev device name> --method-name GetConfiguredEndpoints
{
  "payload": {
    "endpoints": []
  },
  "status": 200
}
Direct methods have a payload size limit of 256KB. This means large requests or responses will fail if they are larger than the max payload allowed. It is therefore recommended to use MQTT or HTTP to access the API (locally) or use the SDK project inside this repository which supports transmitting and receiving payloads that are larger than the 256 KB payload limitation of Azure IoT Hub through compression and request/response chunking.
Calling the API over HTTP
This feature is in preview
You can now send HTTP requests to the publisher module http server at https://localhost (use port 8081 when not running as container). The unsecure endpoint is mounted at http://localhost for testing purposes (use port 8080 when not running as container). E.g. to get the swagger definition run:
curl http://localhost/swagger/v2/openapi.json
When you run inside IoT Edge and want to expose the REST API endpoint on the host network so other applications on the network or on the host sysytem can access it, you must configure port bindings. For example - as can be seen in the sample deployment manifest:
... "HostConfig\":{\"PortBindings\": ... \"443/tcp\":[{\"HostPort\":\"8081\"}]}, ...
WIth this setting the API can be securely accessed at https://localhost:8081 (replace localhost with the host name of the IoT Edge server).
NOTE: Do not expose port 80 on the host side as traffic over port 80 is unencrypted and insecure. It should only be used for testing and during development.
To call the API you must authenticate to the built in HTTP server endpoint using an API Key. You can obtain the API key needed to authenticate from the publisher module twin. e.g., using the AZ CLI tool you can run
az iot hub module-twin show -m publisher -n <hub name> -d <iotedgehubdev device name>
If the OPC Publisher has successfully started then this will produce e.g., output as follows:
      ...
      "$version": 3,
      "__apikey__": "<api-key>",
      "__certificate__": "...",
      "__type__": "OpcPublisher",
      "__version__": "2.9.11"
      ...
You can now send HTTP requests to the publisher module http server at https://localhost:8081 with the Authorization header ApiKey <api-key>. E.g., to call this API with the previously retrieved API Key run
curl -H "Authorization: ApiKey <api-key>" https://localhost:8081/v2/configuration
{"endpoints":[]}
The API key is a secret just like passwords or decryption keys. Therefore always use HTTPS in production scenarios since using HTTP endpoint makes the secret visible to everyone and verify the server certificate against the “certificate” value provided in the twin. It is also recommended to continuously update the API key (Rolling) which can be done by writing a new key to the module twin or deleting the entry so it is re-generated.
JSON encoding
The REST API uses OPC UA JSON reversible encoding as per standard defined in OPC UA specification 1.04, Part 6, with the exception that default scalar values and null values are not encoded except when inside of an array. A missing value implies null or the default of the scalar data type.
All primitive built-in values (integer, string, int32, double, etc.) and Arrays of them can be passed as JSON encoded Variant objects (as per standard) or as JSON Token. The twin module attempts to coerce the JSON Token in the payload to the expected built-in type of the Variable or Input argument.
The decoder will match JSON variable names case-insensitively. This means you can write a JSON object property name as "tyPeiD": "", "typeid": "", or "TYPEID": "" and all are decoded into a OPC UA structure’s "TypeId" member.
Node Ids
In addition to the standard string encoding using a namespace Index (e.g. ns=4;i=3) or the Expanded format (e.g. nsu=http://opcfoundation.org/UA/;i=3523). OPC Publisher also supports the use of (non-standards compliant) Uri encoded Node Ids and Qualified Names (see RFC 3986).
<namespace-uri>#<id-type>=<URL-encoded-id-value>
Examples are: http://opcfoundation.org/UA/#i=3523 or http://opcfoundation.org/UA/#s=tag1.
While the API supports any input format for node ids and qualified names (e.g., such as in browse paths), you can select the desired output namespace format through the header in the request and its property NamespaceFormat. You can also set a default on the command line using --nf. If the publisher is started in --strict the namespace format is Expanded, otherwise defaults to Uri.
The use of the
Uriformat is discouraged because it is not standards compliant. The use of theIndexformat is also discouraged as it does not allow configuring stable identifiers (the namespace table can change between sessions or when the server is updated, in which case the index might then point to a different namespace). Use theExpandedformat when possible. browse paths
Non Uri namespace Uri’s must always be encoded using the Index or Expanded syntax (e.g. nsu=taglist;i=3523). Expanded Node Identifiers should be encoded using the OPC UA Index or Expanded syntax (e.g. svu=opc.tcp://test;nsu=http://opcfoundation.org/UA/;i=3523). However, the Uri format is also possible. In this case the server URI is appended as
<namespace-uri>&srv=<URL-encoded-server-uri>#<id-type>=<URL-encoded-id-value>
Browse paths
A browse path is a set of browse names that the server should follow inside the address space to get to a node. The browse name is an attribute of a node and is a qualified name. Qualified Names are encoded as a single string the same way as Node Ids, where the name is the ID element of the URI. Examples of qualified names in Expanded format is nsu=http://microsoft.com/;Browse%20Name, in Index format 3:Browse%20Name and in Uri format http://opcfoundation.org/UA/#Browse%20Name.
The browse path starts by default from the root node. If this is not desired, the starting node id must also be provided.
The browse path format follows the documented browse path format in the OPC UA reference normative section. In all API and configuration the browse path is a JSON array containing the individual relative path element. The simplest example when using a browse path with browse names in the default namespace is:
[ "Objects", "Server", "ServerStatus", "CurrentTime" ]
In this example, the default References reference type is assumed linking the objects named by the browse path. The paths are forward traversed.
The relative path element by default must be a browse name formatted using one of the namespace formatting options (Index, Expanded, or Uri), e.g., the following are equivalent:
[  // Expanded
    "Objects",
    "nsu=http://opcfoundation.org/UA/Plc/Applications;OpcPlc",
    "nsu=http://opcfoundation.org/UA/Plc/Applications;Telemetry",
    "nsu=http://opcfoundation.org/UA/Plc/Applications;Fast",
    "nsu=http://opcfoundation.org/UA/Plc/Applications;FastUIntScalar1"
],
[ // Index
    "Objects", "17:OpcPlc", "17:Telemetry", "17:Fast", "17:FastUIntScalar1"
],
[  // Uri
    "Objects",
    "http://opcfoundation.org/UA/Plc/Applications#OpcPlc",
    "http://opcfoundation.org/UA/Plc/Applications#Telemetry",
    "http://opcfoundation.org/UA/Plc/Applications#Fast",
    "http://opcfoundation.org/UA/Plc/Applications#FastUIntScalar1"
]
The first option is the preferred and recommended model because it is the official formatting defined in the specification, and it is stable compared to the second option of using a namespace index, which can point to a different namespace in the namespace table than intended.
In addition each path element can be prefixed to narrow the reference or describe whether the path follow an inverse reference:
.: Short forAggregatesreference to select a property of a variable./: Short for aHierarchicalReferencereference.#: Whether to use the explicitly defined reference and do not consider subtypes of the reference type linking the elements.!: Whether the inverse of the reference should be used<{ReferenceTypeId}>: An explicit reference type to use, the well known reference types can be specified by name, otherwise use the node id of the reference type.
If the prefix is a valid character of the browse name it can be escaped by prefixing it with a & ampersand character, e.g. &<, &>, &/, &., &:, &&.
Note that in a filter query string the browse path is not specified as a JSON array but as a concatenation of the elements. In this case a prefix must be used. In addition the target can be then escaped by specifying it with brackets
[and]. However, this only applies to the query parser API.
Discovering OPC UA servers with OPC Publisher
This feature is in preview
Starting from version 2.9 OPC Publisher provides discovery services (formerly OPC Discovery) to find assets (OPC UA servers) on the local shop floor network where the IoT Edge device is deployed. This can be programmatically controlled using API calls documented here. The optional Web service subscribes to the events and registers the discovered assets in Azure IoT Hub as device identities.
Example use cases:
- An industrial solution wants to detect assets which are unknown by its asset management system.
- A customer wants to access an asset without looking up the connectivity information in his asset management database or Excel spreadsheet printout from 10 years ago!
- A customer wants to onboard an asset which was recently added to a production line without causing additional network load.
Discovery supports two modes of operation:
- Active Scan mode: The local network is actively scanned by the Discovery module.
- Targeted discovery mode: A list of asset addresses can be specified to be checked.
Discovery is based on native OPC UA server functionality as specified in the OPC UA specification, which allows discovery of endpoint information including security profile information without establishing an OPC UA authenticated and encrypted OPC UA session.
The results of the discovery process are sent to cloud via the IoT Edge Hub’s and IoT Hub’s telemetry path. The optional cloud web service processes the results and onboard the discovered entities as IoT Hub identities.
The Discovery can be configured via the OPC Registry REST API and allows a fine-grained configuration of the discovery process for recurring as well as one-time scans.
Discovery Configuration
The Discovery capability of OPC Publisher can be configured to do active network and port scanning. The following parameters can be configured for active scanning:
- address ranges (needed when hosted in a Docker context where the host interfaces are not visible)
- port ranges (to narrow or widen scanning to a list of known ports)
- number of workers and time between scans (Advanced)
Active scanning should be used with care since it causes load on the local network and might be identified by network security software as a threat.
For a targeted discovery, the configuration requires a specific list of discovery URLs. Please note that targeted discovery disables the use of address and port ranges as only the specific list of discovery URLs are checked.
One-time discovery
One-time discovery is supported by the OPC Publisher module and can be initiated through a API call over IoT Hub direct methods or MQTT/HTTPS (Preview). The API is documented here.
A discovery configuration is part of the API request payload. All one-time discovery requests are serialized in the Discovery module at the edge, i.e. will be performed one by one.
Using the targeted discovery mode, servers can be registered using a well-known discovery URL without active scanning.
Discovery Progress
The discovery progress as well as current request queue size is reported via the telemetry path and available in the cloud for applications by the Registry services REST interface.
OPC UA command and control (OPC Twin)
This feature is in preview
The control services (formerly OPC Twin services) are provided using IoT Hub device method API as well as Web API and MQTT based request response API (Preview).
Example use cases:
- A customer wants to gather the configuration of an asset by reading configuration parameters of the asset.
- A customer wants to browse an OPC UA server’s information model/address space for telemetry selection.
- An industrial solution wants to react on a condition detected in an asset by changing a configuration parameter in the asset.
The API enables you to write applications that invoke OPC UA server functionality on OPC server endpoints. The Payload is transcoded from JSON to OPC UA binary and passed on through the OPC UA stack to the OPC UA server. The response is re-encoded to JSON and passed back to the cloud service. This includes Variant encoding and decoding in a consistent JSON format.
Payloads that are larger than the Azure IoT Hub supported Device Method payload size are chunked, compressed, sent, then decompressed and reassembled for both request and response. This allows fast and large value writes and reads, as well as returning large browse results.
A single session is opened on demand per endpoint so the OPC UA server is not overburdened with 100’s of simultaneous requests. The client linger option can be configured using the command line option --cl so that clients stay open for a while after the service call completes avoiding re-establishment of the session.
OPC UA Certificates
OPC Publisher connects to OPC UA servers built into machines or industrial systems via OPC UA client/server. There is an OPC UA client built into the OPC Publisher Edge module. OPC UA Client/server uses an OPC UA Secure Channel to secure this connection. The OPC UA Secure Channel in turn uses X.509 certificates to establish trust between the client and the server. This is done through mutual authentication, i.e. the certificates must be “accepted” (or trusted) by both the client and the server.
The pki path of OPC Publisher can be configured using the PkiRootPath or --pki command line argument (the default folder is /pki). It is usually a good idea to specify a volume that is mounted to the host operating system and therefore persists during restarts of the OPC Publisher container. The individual stores are found under the PKI root path. These by default follow the layout guidance of the OPC UA standard.
By default, the OPC Publisher module will create a self signed x509 Application certificate with a 1 year expiration in the own store. This default, self signed cert includes the Subject Microsoft.Azure.IIoT. This certificate is fine as a demonstration, but for production systems customers may want to use their own certificate.
The biggest hurdle most OT admins need to overcome when deploying OPC Publisher is to configure the OPC UA server (equipment) to accept the OPC Publisher X.509 certificate (the other side of mutual trust). There is usually a configuration tool that comes with the built-in OPC UA server where certificates can be trusted. For example for KepServerEx, configure the trusted Client certificate as discussed here. To use the OPC PLC Server Simulator with mutual trust you can use the –-aa switch on the simulator to accept OPC Publisher’s certificate or copy the server certificate from the simulator to the pki trusted folder of OPC Publisher.
PKI management
The certificate stores in OPC Publisher live in the file system. They can be managed remotely using the Certificates Api (Preview). This API enables an application or user to list all certificates and add and remove certificates. There is also an API to move rejected certificates from the rejected store to the trusted store and list, add, remove certificate revocation lists.
By default, the OPC Publisher module will create a self signed x509 certificate with a 1 year expiration which is fine for demonstration. For real applications, customers may want to use their own certificate.
You can use openssl to create your own self-signed certificate, e.g., with a 2 year expiration and a custom subject. In the following example script, replace <application-name> and <subject-name> with the application name and subject name you desire:
# Create cert.pem and key.pem
openssl req -x509 -newkey rsa:2048 -keyout key.pem -out cert.pem -sha256 -days 730 -nodes \
-subj "/CN=<application-name>/O=<your-company-name>/DC=localhost" \
-addext "subjectAltName=URI:urn:localhost:<application-name>:microsoft:,DNS:<iot-edge-host-name>" \
-addext "keyUsage=nonRepudiation, digitalSignature, keyEncipherment, dataEncipherment, keyCertSign" \
-addext "extendedKeyUsage=clientAuth"

# Transform cert.pem to cert.der
openssl x509 -outform der -in cert.pem -out cert.der
# Transform key.pem and cert.pem to cert.pfx
openssl pkcs12 -export -out cert.pfx -inkey key.pem -in cert.pem

# Clean up keys
rm -f cert.pem
rm -f key.pem
The resulting .pfx file can now be copied to the own/private folder under pki root (or to an alternative application certificate folder configured) and the .der file to the own/certs and trusted/certs folders. Alternatively you can also push the pfx file content to OPC Publisher’s PKI through the OPC Publisher API.
As part of above script you will be prompted to enter and verify an export password to protect the PFX file. If you are copying the PFX file into the own folder, then by default the password should be blank (hit enter), unless you specify the password using the --apw=<pwd> command line options. In this case the password should be the same password.
OPC Publisher can retrieve the application Uri, application name, subject Name and Host name (DNS Domain name) from the first certificate found in the own/certs folder under the PKI root folder if you start it with the --cfa command line argument.
If you need to select a specific certificate in the own/certs store (e.g., because you configured more than one) or would like to have OPC Publisher generate a self-signed certificate with different content than the default, a application name can be provided using the --an command line argument (The default is Microsoft.Azure.IIoT). If you desire a different subject name than the default, the OPC Publisher must be started with --sn command line providing the desired subject name (for example CN=<application-name>,O=mycompany). If you desire a different application Uri than the default, it can be specified using the --au command line option. In this case, do not set the --cfa command line argument or it will override these settings from the first certificate found.
TIP: Using the
--cfacommand line option simplifies setting up OPC Publisher and also enables easier version to version upgrade without chances that a new application certificate is generated after the update because the desired certificate is not found.
If you intend to provide the certificate using the OPC Publisher API you must provide any password you choose as part of the API call so that the API server in OPC Publisher is able to export the key from the PFX blob. If the OPC Publisher was started using the --tm command line option any certificate added to the own store will also be added to the trusted store.
Auto Accept server certificates
To simplify the getting started experience, the OPC Publisher Edge module has a setting to automatically trust all untrusted server certificates presented to OPC Publisher (--aa). This does not mean OPC Publisher will accept any certificate presented. If Certificates are malformed or if certificates chains cannot be validated the certificate is considered broken (and not untrusted) and will be rejected as per OPC Foundation Security guidelines. In particular if a server does not provide a full chain it should be configured to do so, or the entire chain must be pre-provisioned in the OPC Publishers pki folder structure.
WARNING: Automatically trusting any server certificate provided by an endpoint exposes OPC Publisher to man in the middle attacks. Do not use OPC Publisher with auto accept mode in production.
OPC UA stack
The OPC UA .NET Standard reference stack of the OPC Foundation (contributed by Microsoft) is used for OPC UA secure communications by OPC Publisher. Modules and services consume the re-distributable NuGet package licensed by the OPC Foundation. The open source for the reference implementation is provided by the OPC Foundation on GitHub in this public repository.
Performance and Memory Tuning OPC Publisher
In production setups, network performance requirements (throughput and latency) and memory resources must be considered. OPC Publisher exposes the following command line parameters to help meet these requirements:
- Message queue capacity (
omsince version 2.7) - IoT Hub send interval (
si)
The om parameter controls the upper limit of the capacity of the internal message queue. This queue buffers all messages before they’re sent to IoT Hub. The default size of the queue is 4000 IoT Hub messages (for example: if the setting for the IoT Hub message size is 256 KB, the size of the queue will be up to 1 GB). If OPC Publisher isn’t able to send messages to IoT Hub fast enough, the number of items in this queue increases. In this case, one or both of the following can be done to mitigate:
- Decrease the IoT Hub send interval (
si) - Use latest OPC Publisher in standalone mode
- Use PubSub format (
--mm=PubSub).- Choose the smallest message providing the information you need. E.g., instead of
--mm=PubSubuse--mm=DataSetMessages, or event--mm=RawDataSets. You can find sample messages here. - If you are able to decompress messages back to json at the receiver side, use
--me=JsonGzipor--me=JsonReversibleGzipencoding. - If you are able to decode binary network messages at the receiver side, choose
--me=Uadpinstead of--me=Json,--me=JsonReversibleor a compressed form of Json
- Choose the smallest message providing the information you need. E.g., instead of
- When Samples format (
--mm=Samples) is required- Don’t use FullFeaturedMessage (
--mm=FullSamplesor--mm=Sampleswith--fm=false). You can find a sample of full featured telemetry message here.
- Don’t use FullFeaturedMessage (
- Use batching (
--bs=600) in combination with batch publishing interval (--si=20). - Increase Monitored Items Queue capacity (e.g.,
--mq=10) - Don’t use “fetch display name” (
--fd=false)
- Use PubSub format (
- General recommendations
- Try to use less different publishing intervals, rather aim to use the same for all nodes.
- Experiment with the command line and configuration. E.g., depending on the IoT Hub connectivity it seems to be better to have fewer messages with more OPC UA value changes in it (check OPC Publisher logs) but it could also be better to have more messages with fewer OPC UA value changes, this is specific to every application.
If the queue keeps growing even though the parameters have been adjusted, eventually the maximum queue capacity will be reached and messages will be lost. This is because all parameters have physical limits and the Internet connection between OPC Publisher and IoT Hub isn’t fast enough for the number of messages that must be sent in a given scenario. In that case, only setting up several, parallel OPC Publishers will help. The om parameter also has the biggest impact on the memory consumption by OPC Publisher.
It must be noted that IoT Hub also has limits in terms of how many messages it will accept, that is, there are quotas for a given IoT Hub SKU defined here. If this quota is exceeded, OPC Publisher will generate an error trying to send the message to IoT Hub and the message will be lost.
The si or bi parameter forces OPC Publisher to send messages to IoT Hub at the specified interval. A message is sent either when the maximum IoT Hub message size of 256 KB of data is available (triggering the send interval to reset) or when the specified interval time has passed.
The bs parameter enables batching of incoming OPC UA data change messages. When used without batching interval (bi), a message is sent to IoT Hub only once OPC Publisher receives specified number of incoming messages. That is why it is recommended to use batching together with batching interval to achieve consistent message delivery cadence to IoT Hub.
The ms parameter enables batching of messages sent to IoT Hub. In most network setups, the latency of sending a single message to IoT Hub is high, compared to the time it takes to transmit the payload. This is due to Quality of Service (QoS) requirements, since messages are acknowledged only once they’ve been processed by IoT Hub). Therefore, if a delay for the data to arrive at IoT Hub is acceptable, OPC Publisher should be configured to use the maximal message size of 256 KB by setting the ms parameter to 0. It’s also the most cost-effective way to use OPC Publisher.
The metric monitored item notifications enqueue failure in OPC Publisher version 2.5 and below and messages lost in OPC Publisher version 2.7 shows how many messages were lost.
When both si and ms parameters are set to 0, OPC Publisher sends a message to IoT Hub as soon as data is available. This results in an average IoT Hub message size of just over 200 bytes. However, the advantage of this configuration is that OPC Publisher sends the data from the connected asset without delay. The number of lost messages will be high for use cases where a large amount of data must be published and hence this isn’t recommended for these scenarios.