redis-on-azure-workshop
Data in Azure Cache for Redis
Learning Objective
Use Azure Cache for Redis to store frequently accessed data. Learn how to use ServiceStack.Redis to create transactions and manage data expiration.
Prerequisites
- Azure Cache for Redis instance - If you deleted your instance from the previous lab, please follow the steps here to create a new one.
Create a transaction in Azure Cache for Redis
-
Create a new .NET Core application, name it
redis-data-dotnet.dotnet new console --name redis-data-dotnet --use-program-main cd redis-data-dotnet code . -
We need to add the
ServiceStack.RedisNuGet package. This will enable us to connect to the Azure Cache for Redis, and issue commands in C#.dotnet add package ServiceStack.Redis -
Build and run the application to make sure it all compiles. It should output “Hello World!”
dotnet run -
ServiceStack.Redishas its own connection string format: “[password]@[hostname]:[sslport]?ssl=true”. Use theaz redis list-keyscommand to retrieve the access keys and output a correctly formatted connection string.REDIS_NAME=<redis-name> REDIS_KEY=$(az redis list-keys \ --name "$REDIS_NAME" \ --resource-group <resource-group> \ --query primaryKey \ --output tsv) echo "$REDIS_KEY"@"$REDIS_NAME".redis.cache.windows.net:6380?ssl=true -
Open
Program.csadd create the following field in theProgramclass and paste in your connection string as the value.static string redisConnectionString = "<connection string>";If you recreated your Redis instance, this won’t be the same connection string from Lab 1.
-
Add the following using statement to the top of the
Program.csfile.using ServiceStack.Redis; -
In the
Mainmethod, declare a variable to store the result of the transaction.bool transactionResult = false; -
Using the
redisConnectionStringvariable, create a new instance of theRedisClientclass. This class will be used to interact with the Azure Cache for Redis instance.using RedisClient redisClient = new RedisClient(redisConnectionString); -
Create a new instance of the
Transactionclass. This class will be used to create, manage, and commit a transaction.using var transaction = redisClient.CreateTransaction(); -
Add multiple operations to the transaction.
transaction.QueueCommand(c => c.Set("MyKey1", "MyValue1")); transaction.QueueCommand(c => c.Set("MyKey2", "MyValue2")); -
Commit the transaction and store the result in the
transactionResultvariable.transactionResult = transaction.Commit(); -
If the transaction was committed successfully, output a message to the console.
if (transactionResult) { Console.WriteLine("Transaction committed"); } else { Console.WriteLine("Transaction failed to commit"); } -
Run the application, and verify that the console says Transaction committed.
dotnet run -
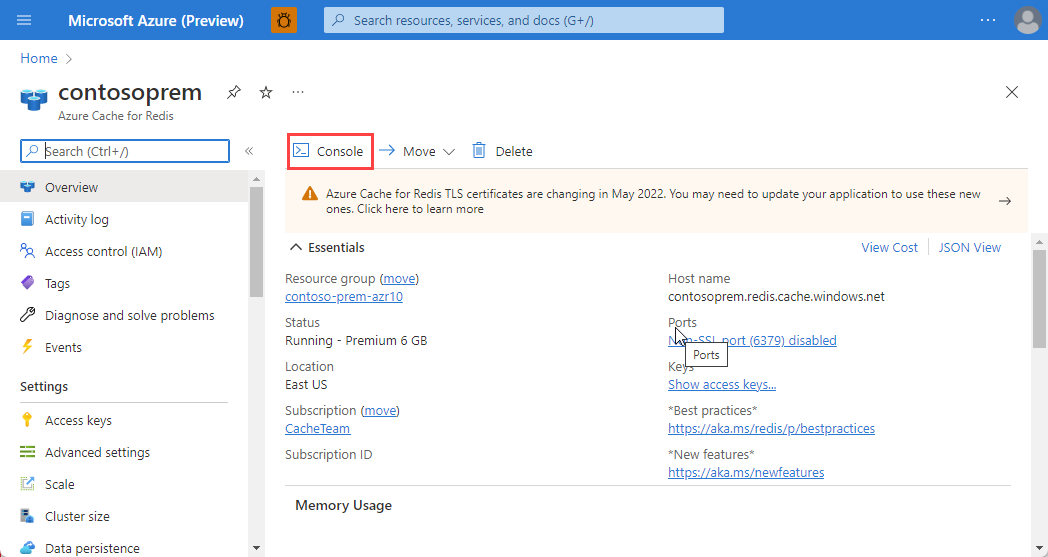
Let’s verify the data we added is in our Azure Cache for Redis instance. In the Azure portal, navigate to your Azure Cache for Redis instance.
-
In the Overview pane, select Console. This will open a Redis Console, which enables you to enter low-level Redis commands.
-
Run the command
get MyKey1. Verify that the value returned is “MyValue1”. -
Run the command
get MyKey2. Verify that the value returned is “MyValue2”.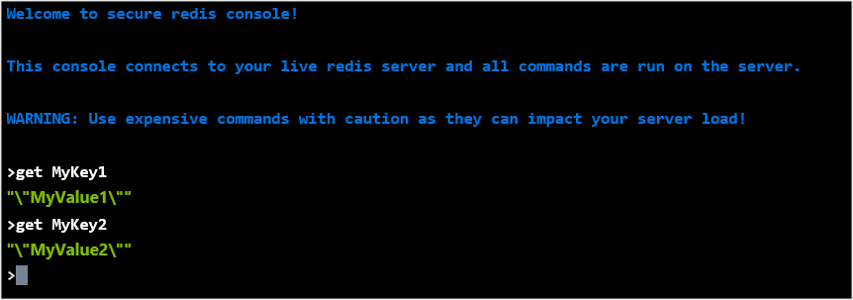
Implement data expiration
-
In the last exercise, we left off with the following code in
Program.cs.bool transactionResult = false; using RedisClient redisClient = new RedisClient(redisConnectionString); using var transaction = redisClient.CreateTransaction(); transaction.QueueCommand(c => c.Set("MyKey1", "MyValue1")); transaction.QueueCommand(c => c.Set("MyKey2", "MyValue2")); transactionResult = transaction.Commit(); if (transactionResult) { Console.WriteLine("Transaction committed"); } else { Console.WriteLine("Transaction failed to commit"); } -
Let’s add an expiration of 15 seconds to both “MyKey1” and “MyKey2”. Add the following code before you commit the transaction:
transaction.QueueCommand(c => ((RedisNativeClient)c).Expire("MyKey1", 15)); transaction.QueueCommand(c => ((RedisNativeClient)c).Expire("MyKey2", 15)); -
Now that we added the code to expire our data, let’s run the program and check that the data is removed from Azure Cache for Redis.
dotnet run -
Switch back to the Azure Cache for Redis console in the Azure portal.
-
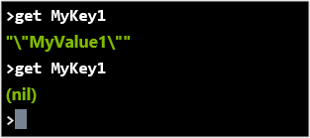
Run the command
get MyKey1. Verify that the value returned is “MyValue1”. -
After 15 seconds, run the command again. You should see that the data is no longer there.
Cache-aside pattern
When building an application, you want to provide a great user experience, and a part of that is quick data retrieval. Retrieving data from a database is typically a slow process, and if this data is read often, this could provide a poor user experience. The cache-aside pattern describes how you can implement a cache in conjunction with a database, to return the most commonly accessed data as quickly as possible.
Why not have a go at implementing cache-aside? You can read more about the pattern here.