co-op-translator
Co-op Translator GitHub Action ကို အသုံးပြုခြင်း (အဖွဲ့အစည်းအတွက် လမ်းညွှန်)
သုံးစွဲသူအမျိုးအစား: ဒီလမ်းညွှန်ကို Microsoft အတွင်းသားများ သို့မဟုတ် Co-op Translator GitHub App ကို အသုံးပြုရန် လိုအပ်သော အထောက်အထားများ ရရှိထားသူများ သို့မဟုတ် ကိုယ်ပိုင် GitHub App တစ်ခုကို ဖန်တီးနိုင်သူများအတွက် ရည်ရွယ်ထားပါသည်။
သင့်ရဲ့ repository မှာ documentation တွေကို အလိုအလျောက် ဘာသာပြန်ပေးနိုင်အောင် Co-op Translator GitHub Action ကို အသုံးပြုပါ။ ဒီလမ်းညွှန်မှာ source Markdown ဖိုင်များ သို့မဟုတ် image များ ပြောင်းလဲသွားတိုင်း ဘာသာပြန်ချက်အသစ်များပါဝင်တဲ့ pull request ကို အလိုအလျောက် ဖန်တီးပေးနိုင်အောင် စနစ်တကျ တပ်ဆင်နည်းကို ရှင်းပြထားပါတယ်။
မှတ်ချက်အရေးကြီး မှန်ကန်တဲ့ လမ်းညွှန်ကို ရွေးချယ်ပါ:
ဒီလမ်းညွှန်မှာ GitHub App ID နဲ့ Private Key ကို အသုံးပြုတဲ့ စနစ်ကို ရှင်းပြထားပါတယ်။ သင့်အဖွဲ့အစည်း သို့မဟုတ် repository မှာ GITHUB_TOKEN ရဲ့ default permissions ကို ကန့်သတ်ထားလျှင် ဒီ “Organization Guide” နည်းလမ်းကို အသုံးပြုဖို့ လိုအပ်နိုင်ပါတယ်။ အထူးသဖြင့် GITHUB_TOKEN ကို လိုအပ်တဲ့ write permissions (ဥပမာ contents: write သို့မဟုတ် pull-requests: write) မပေးထားလျှင် Public Setup Guide မှာ workflow က လိုအပ်တဲ့ permissions မရှိလို့ မအောင်မြင်နိုင်ပါ။ Permission ကို တိတိကျကျ ပေးထားတဲ့ GitHub App ကို အသုံးပြုせလျှင် ဒီကန့်သတ်ချက်ကို ကျော်လွှားနိုင်ပါတယ်။
အထက်ပါအခြေအနေ မရှိလျှင်:
သင့် repository မှာ standard GITHUB_TOKEN က လိုအပ်တဲ့ permissions ရှိနေပြီး (ဥပမာ အဖွဲ့အစည်းက ကန့်သတ်ထားခြင်း မရှိ) ဆိုရင် Public Setup Guide using GITHUB_TOKEN ကို အသုံးပြုပါ။ Public guide မှာ App ID သို့မဟုတ် Private Key မလိုအပ်ဘဲ standard GITHUB_TOKEN နဲ့ repository permissions ကိုသာ အခြေခံပါတယ်။
လိုအပ်ချက်များ
GitHub Action ကို တပ်ဆင်မည်မီ AI service credentials များကို ပြင်ဆင်ထားရန် လိုအပ်ပါသည်။
၁။ လိုအပ်သည်: AI Language Model Credentials Support လုပ်ထားတဲ့ Language Model တစ်ခုခုအတွက် credentials လိုအပ်ပါသည်။
- Azure OpenAI: Endpoint, API Key, Model/Deployment Names, API Version လိုအပ်သည်။
- OpenAI: API Key, (Optional: Org ID, Base URL, Model ID) လိုအပ်သည်။
- အသေးစိတ်အတွက် Supported Models and Services ကို ကြည့်ပါ။
- Setup Guide: Set up Azure OpenAI ကို အသုံးပြုပါ။
၂။ Optional: Computer Vision Credentials (Image Translation အတွက်)
- Image ထဲက စာသားကို ဘာသာပြန်ဖို့ လိုအပ်လျှင်သာ လိုအပ်သည်။
- Azure Computer Vision: Endpoint နဲ့ Subscription Key လိုအပ်သည်။
- မထည့်လျှင် Markdown-only mode ကို default အနေနဲ့ အသုံးပြုပါမည်။
- Setup Guide: Set up Azure Computer Vision ကို ကြည့်ပါ။
တပ်ဆင်ခြင်းနှင့် ပြင်ဆင်ခြင်း
Co-op Translator GitHub Action ကို သင့် repository မှာ တပ်ဆင်ရန် အောက်ပါအဆင့်များကို လိုက်နာပါ။
အဆင့် ၁: GitHub App Authentication ကို တပ်ဆင်ခြင်းနှင့် ပြင်ဆင်ခြင်း
Workflow က သင့် repository နဲ့ securely ဆက်သွယ်နိုင်ဖို့ (ဥပမာ pull request ဖန်တီးခြင်း) GitHub App authentication ကို အသုံးပြုပါတယ်။ အောက်ပါနည်းလမ်းတစ်ခုကို ရွေးပါ။
နည်းလမ်း A: Pre-built Co-op Translator GitHub App ကို တပ်ဆင်ခြင်း (Microsoft Internal Use အတွက်)
၁။ Co-op Translator GitHub App စာမျက်နှာသို့ သွားပါ။
၂။ Install ကို နှိပ်ပြီး သင့်ရဲ့ repository ရှိတဲ့ account သို့မဟုတ် organization ကို ရွေးပါ။
<img alt="Install app" src="../../../../translated_images/install-app.d0f0a24cbb1d6c93f293f002eb34e633f7bc8f5caaba46b97806ba7bdc958f27.my.png">
၃။ Only select repositories ကို ရွေးပြီး သင့်ရဲ့ repository (ဥပမာ PhiCookBook) ကို ရွေးပါ။ Install ကို နှိပ်ပါ။ Authenticate လုပ်ဖို့ တောင်းနိုင်ပါတယ်။
<img alt="Install authorize" src="../../../../translated_images/install-authorize.29df6238c3eb8f707e7fc6f97a946cb654b328530c4aeddce28b874693f076a0.my.png">
၄။ App Credentials ရယူခြင်း (Internal Process လိုအပ်သည်): Workflow ကို app အနေနဲ့ authenticate လုပ်နိုင်ဖို့ Co-op Translator team က ပေးတဲ့ အချက်အလက် ၂ ခု လိုအပ်ပါသည်။
- App ID: Co-op Translator app အတွက် unique identifier ဖြစ်သည်။ App ID သည်:
1164076ဖြစ်သည်။ - Private Key: Maintainer contact မှ
.pemprivate key ဖိုင်၏ အပြည့်အစုံ ကို ရယူရပါမည်။ ဒီ key ကို password တစ်ခုလို သေချာစောင့်ရှောက်ပါ။
၅။ အဆင့် ၂ သို့ ဆက်လက်လုပ်ဆောင်ပါ။
နည်းလမ်း B: ကိုယ်ပိုင် Custom GitHub App ကို အသုံးပြုခြင်း
- ကိုယ်ပိုင် GitHub App တစ်ခု ဖန်တီးပြီး ပြင်ဆင်နိုင်ပါသည်။ Contents နဲ့ Pull requests အတွက် Read & write access ရှိရပါမည်။ App ID နဲ့ generated Private Key လိုအပ်ပါမည်။
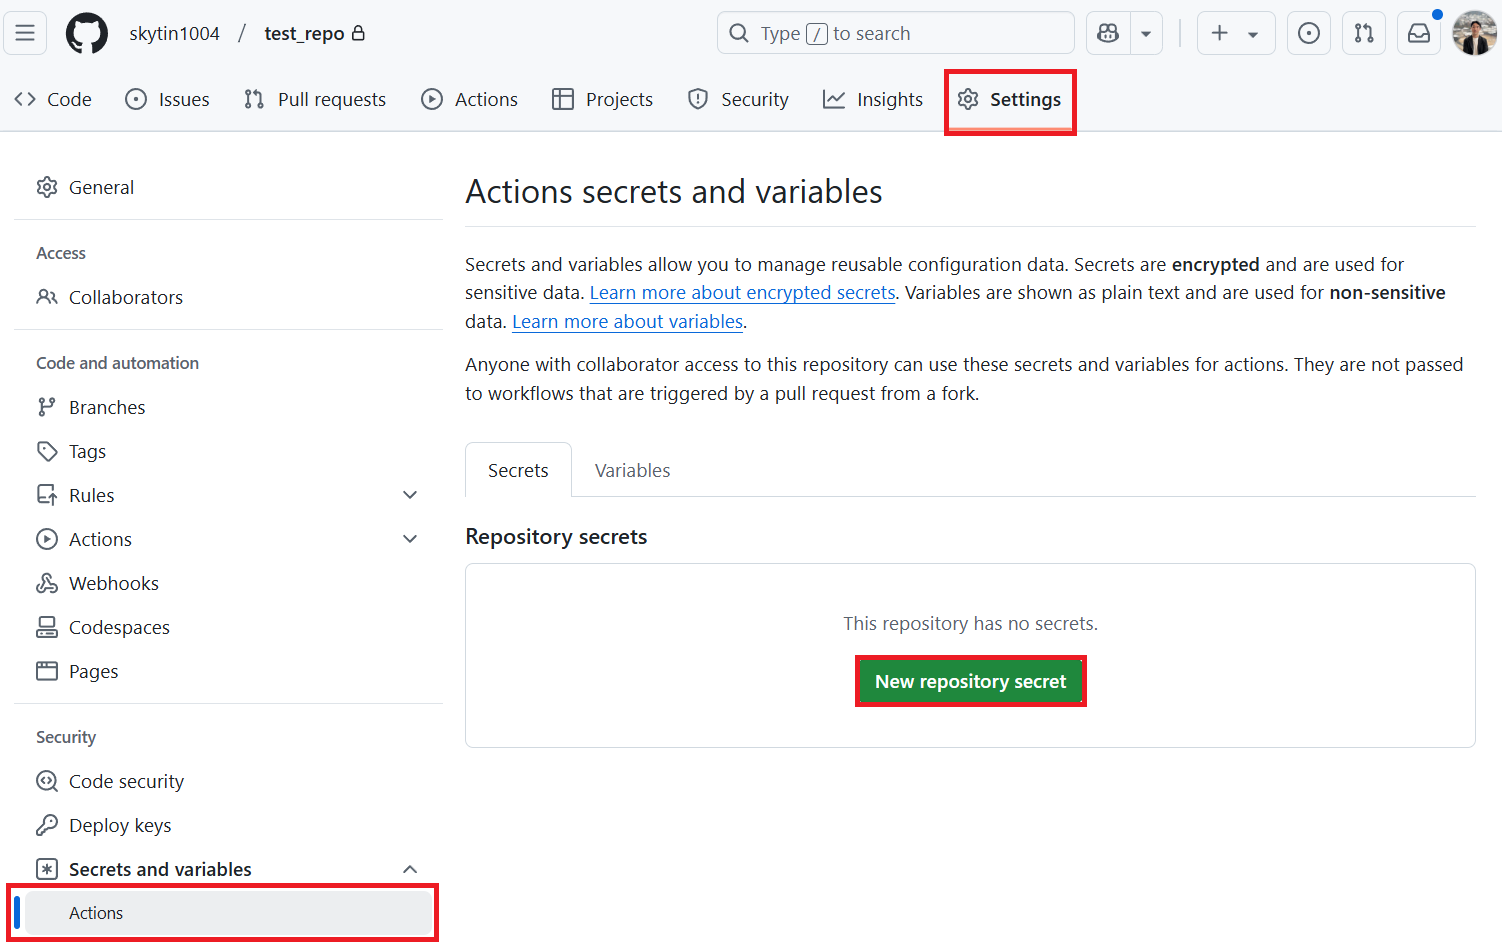
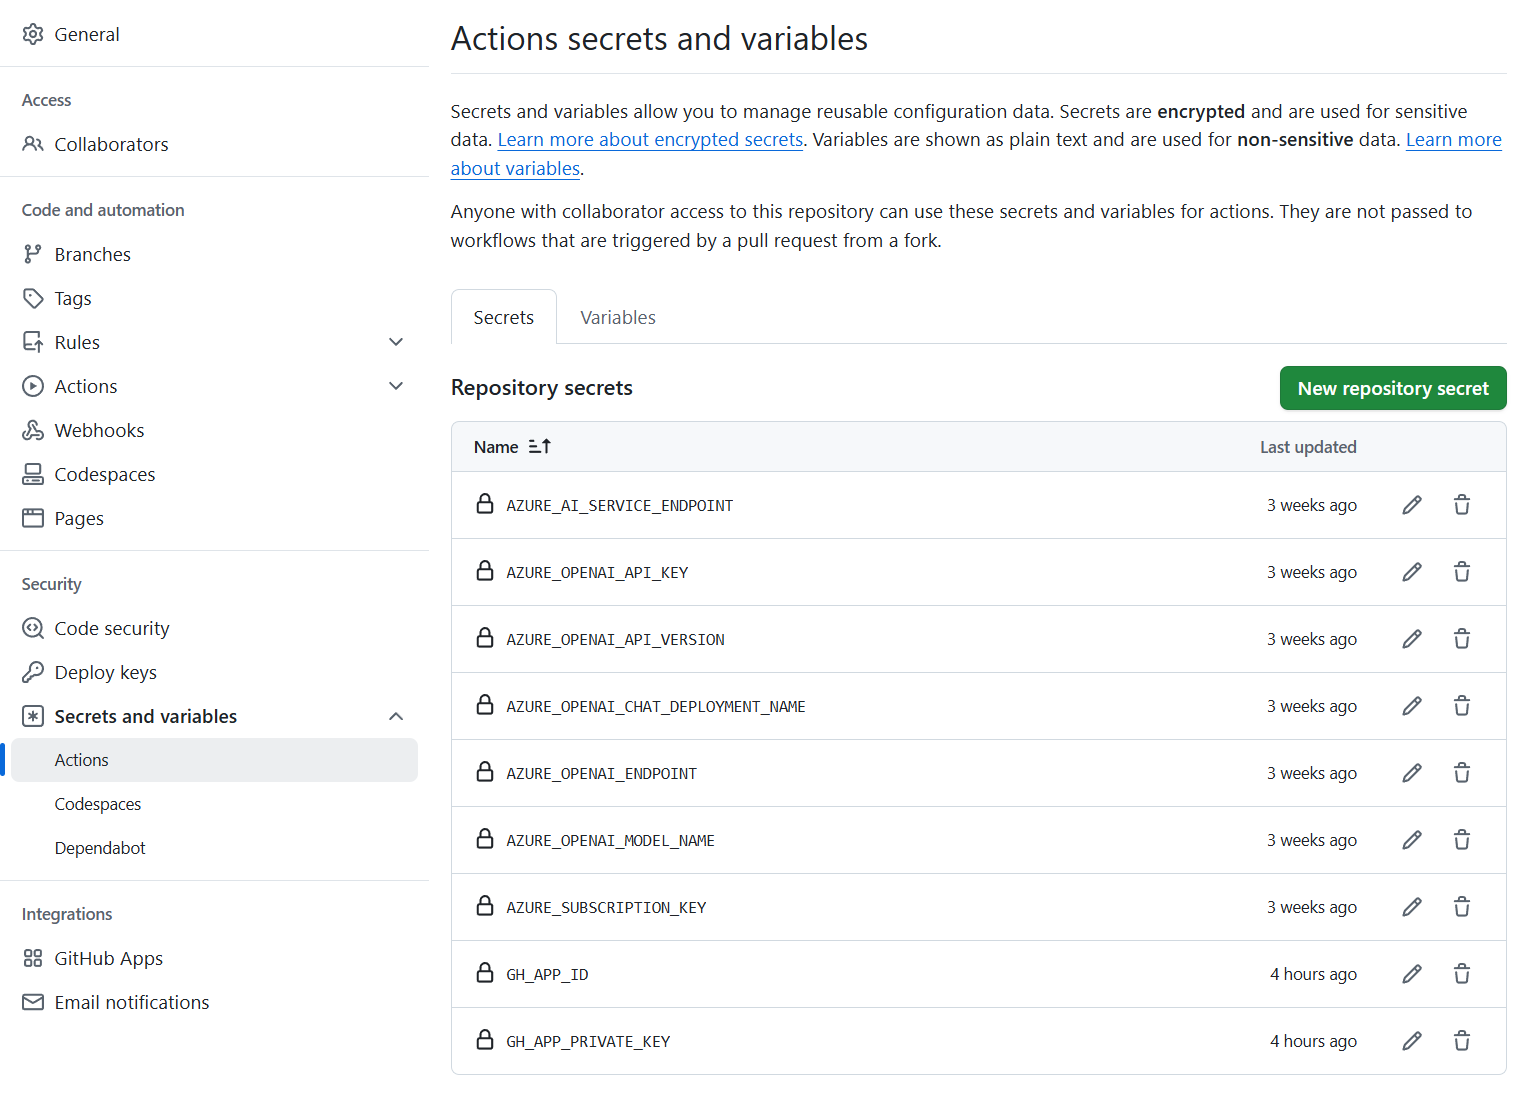
အဆင့် ၂: Repository Secrets များ ပြင်ဆင်ခြင်း
GitHub App credentials နဲ့ သင့် AI service credentials များကို repository settings မှာ encrypted secrets အနေနဲ့ ထည့်သွင်းရန် လိုအပ်ပါသည်။
၁။ သင့်ရဲ့ GitHub repository (ဥပမာ PhiCookBook) သို့ သွားပါ။
၂။ Settings > Secrets and variables > Actions သို့ သွားပါ။
၃။ Repository secrets အောက်မှာ အောက်ပါ secret တစ်ခုစီအတွက် New repository secret ကို နှိပ်ပါ။
GitHub App Authentication အတွက် လိုအပ်သော Secrets:
| Secret Name | Description | Value Source |
|---|---|---|
GH_APP_ID |
GitHub App ရဲ့ App ID (အဆင့် ၁ မှရယူပါ) | GitHub App Settings |
GH_APP_PRIVATE_KEY |
.pem ဖိုင်၏ အပြည့်အစုံ (အဆင့် ၁ မှရယူပါ) |
.pem file (အဆင့် ၁ မှရယူပါ) |
AI Service Secrets (လိုအပ်ချက်အရ အားလုံးထည့်ပါ):
| Secret Name | Description | Value Source |
|---|---|---|
AZURE_AI_SERVICE_API_KEY |
Azure AI Service (Computer Vision) အတွက် Key | Azure AI Foundry |
AZURE_AI_SERVICE_ENDPOINT |
Azure AI Service (Computer Vision) အတွက် Endpoint | Azure AI Foundry |
AZURE_OPENAI_API_KEY |
Azure OpenAI service အတွက် Key | Azure AI Foundry |
AZURE_OPENAI_ENDPOINT |
Azure OpenAI service အတွက် Endpoint | Azure AI Foundry |
AZURE_OPENAI_MODEL_NAME |
Azure OpenAI Model Name | Azure AI Foundry |
AZURE_OPENAI_CHAT_DEPLOYMENT_NAME |
Azure OpenAI Deployment Name | Azure AI Foundry |
AZURE_OPENAI_API_VERSION |
Azure OpenAI အတွက် API Version | Azure AI Foundry |
OPENAI_API_KEY |
OpenAI အတွက် API Key | OpenAI Platform |
OPENAI_ORG_ID |
OpenAI Organization ID | OpenAI Platform |
OPENAI_CHAT_MODEL_ID |
OpenAI model ID | OpenAI Platform |
OPENAI_BASE_URL |
OpenAI API Base URL | OpenAI Platform |
အဆင့် ၃: Workflow ဖိုင်ကို ဖန်တီးပါ
နောက်ဆုံးအနေနဲ့ automated workflow ကို သတ်မှတ်တဲ့ YAML ဖိုင်ကို ဖန်တီးပါ။
၁။ Repository ရဲ့ root directory မှာ .github/workflows/ directory မရှိသေးလျှင် ဖန်တီးပါ။
၂။ .github/workflows/ အတွင်း co-op-translator.yml ဆိုတဲ့ ဖိုင်တစ်ခု ဖန်တီးပါ။
၃။ အောက်ပါအကြောင်းအရာကို co-op-translator.yml ထဲ paste လုပ်ပါ။
name: Co-op Translator

on:
  push:
    branches:
      - main

jobs:
  co-op-translator:
    runs-on: ubuntu-latest

    permissions:
      contents: write
      pull-requests: write

    steps:
      - name: Checkout repository
        uses: actions/checkout@v4
        with:
          fetch-depth: 0

      - name: Set up Python
        uses: actions/setup-python@v4
        with:
          python-version: '3.10'

      - name: Install Co-op Translator
        run: |
          python -m pip install --upgrade pip
          pip install co-op-translator

      - name: Run Co-op Translator
        env:
          PYTHONIOENCODING: utf-8
          # Azure AI Service Credentials
          AZURE_AI_SERVICE_API_KEY: $
          AZURE_AI_SERVICE_ENDPOINT: $

          # Azure OpenAI Credentials
          AZURE_OPENAI_API_KEY: $
          AZURE_OPENAI_ENDPOINT: $
          AZURE_OPENAI_MODEL_NAME: $
          AZURE_OPENAI_CHAT_DEPLOYMENT_NAME: $
          AZURE_OPENAI_API_VERSION: $

          # OpenAI Credentials
          OPENAI_API_KEY: $
          OPENAI_ORG_ID: $
          OPENAI_CHAT_MODEL_ID: $
          OPENAI_BASE_URL: $
        run: |
          # =====================================================================
          # IMPORTANT: Set your target languages here (REQUIRED CONFIGURATION)
          # =====================================================================
          # Example: Translate to Spanish, French, German. Add -y to auto-confirm.
          translate -l "es fr de" -y  # <--- MODIFY THIS LINE with your desired languages

      - name: Authenticate GitHub App
        id: generate_token
        uses: tibdex/github-app-token@v1
        with:
          app_id: $
          private_key: $

      - name: Create Pull Request with translations
        uses: peter-evans/create-pull-request@v5
        with:
          token: $
          commit-message: "🌐 Update translations via Co-op Translator"
          title: "🌐 Update translations via Co-op Translator"
          body: |
            This PR updates translations for recent changes to the main branch.

            ### 📋 Changes included
            - Translated contents are available in the `translations/` directory
            - Translated images are available in the `translated_images/` directory

            ---
            🌐 Automatically generated by the [Co-op Translator](https://github.com/Azure/co-op-translator) GitHub Action.
          branch: update-translations
          base: main
          labels: translation, automated-pr
          delete-branch: true
          add-paths: |
            translations/
            translated_images/
၄။ Workflow ကို ကိုယ်တိုင် ပြင်ဆင်ပါ:
- Target Languages အရေးကြီး:
Run Co-op Translatorအဆင့်မှာtranslate -l "..." -ycommand ထဲ language code များကို သင့် project အတွက် သင့်တော်အောင် ပြင်ဆင်ရန် လိုအပ်ပါသည်။ ဥပမာအနေနဲ့ပါတဲ့ (ar de es...) ကို သင့်လိုအပ်ချက်အတိုင်း ပြောင်းပါ။ - Trigger (
on:): လက်ရှိ trigger ကmainbranch ကို push လုပ်တိုင်း run ဖြစ်ပါတယ်။ Repository ကြီးများအတွက်paths:filter (YAML မှာ comment နဲ့ ဥပမာပါ) ထည့်သုံးနိုင်ပါတယ်။ ဒါက source documentation ပြောင်းလဲတဲ့အခါသာ workflow ကို run ဖြစ်စေပြီး runner minutes ကို သိမ်းနိုင်ပါတယ်။ - PR Details:
Create Pull Requestအဆင့်မှာcommit-message,title,body,branchနာမည်နဲ့labelsများကို လိုအပ်သလို ပြင်ဆင်နိုင်ပါတယ်။
Credential ကို စီမံခန့်ခွဲခြင်းနှင့် သက်တမ်းတိုးခြင်း
- Security: Sensitive credentials (API keys, private keys) များကို GitHub Actions secrets အနေနဲ့သာ သိမ်းပါ။ Workflow ဖိုင် သို့မဟုတ် repository code မှာ မဖော်ပြပါနှင့်။
- Key Renewal (Microsoft Internal Users): Azure OpenAI key ကို Microsoft အတွင်းမှာ အသုံးပြုလျှင် သတ်မှတ်ထားတဲ့ သက်တမ်းတိုးစနစ် (ဥပမာ ၅ လတစ်ကြိမ်) ရှိနိုင်ပါတယ်။ GitHub secrets (
AZURE_OPENAI_...keys) မသက်တမ်းကုန်မီ update လုပ်ထားပါ။ Workflow fail ဖြစ်နိုင်ပါတယ်။
Workflow ကို အသုံးပြုခြင်း
GitHub-hosted Runner Time Limit:
GitHub-hosted runner များ (ဥပမာ ubuntu-latest) မှာ အများဆုံး run နိုင်တဲ့ အချိန်က ၆ နာရီ ဖြစ်ပါတယ်။
Documentation repository ကြီးများအတွက် ဘာသာပြန်လုပ်ငန်း ၆ နာရီကျော်သွားလျှင် workflow ကို အလိုအလျောက် ရပ်တန့်ပါမည်။
ဒီပြဿနာကို ရှောင်ရန်:
- self-hosted runner ကို အသုံးပြုပါ (အချိန်ကန့်သတ်မရှိ)
- တစ်ကြိမ် run တစ်ခါ target languages အရေအတွက်ကို လျှော့ပါ
co-op-translator.yml ဖိုင်ကို main branch (သို့မဟုတ် on: trigger မှ သတ်မှတ်ထားတဲ့ branch) ထဲ merge လုပ်ပြီးနောက်, အဲဒီ branch ကို changes push လုပ်တိုင်း (နဲ့ paths filter ကို သုံးထားလျှင် အဲဒီ filter ကို ကိုက်ညီတဲ့ changes ဖြစ်ရင်သာ) workflow က အလိုအလျောက် run ဖြစ်ပါမည်။
ဘာသာပြန်ချက်အသစ်များ ဖန်တီးသွားလျှင်, action က အလိုအလျောက် Pull Request တစ်ခု ဖန်တီးပေးပါမည်။ Review လုပ်ပြီး merge လုပ်နိုင်ပါသည်။
ဝေဖန်ချက်: ဤစာရွက်စာတမ်းကို AI ဘာသာပြန်ဝန်ဆောင်မှု Co-op Translator ကို အသုံးပြု၍ ဘာသာပြန်ထားပါသည်။ ကျွန်ုပ်တို့သည် တိကျမှုအတွက် ကြိုးစားနေသော်လည်း၊ အလိုအလျောက်ဘာသာပြန်မှုများတွင် အမှားများ သို့မဟုတ် မတိကျမှုများ ပါဝင်နိုင်သည်ကို သတိပြုပါ။ မူရင်းစာရွက်စာတမ်းသည် ၎င်း၏ မူလဘာသာစကားတွင် အာဏာရှိသော ရင်းမြစ်အဖြစ် ယူဆသင့်ပါသည်။ အရေးကြီးသော အချက်အလက်များအတွက် လူ့ဘာသာပြန်ပညာရှင်များမှ ဘာသာပြန်ခြင်းကို အကြံပြုပါသည်။ ဤဘာသာပြန်မှုကို အသုံးပြုခြင်းမှ ဖြစ်ပေါ်လာသော နားလည်မှုမှားခြင်း သို့မဟုတ် အနားလည်မှားခြင်းများအတွက် ကျွန်ုပ်တို့သည် တာဝန်ယူမည်မဟုတ်ပါ။