Azure AI Vision Face UI SDK for Android
The Azure AI Vision Face UI SDK for Android allows you to build Android applications to perform face liveness checks.
Prerequisites
An Azure Face API resource subscription.
A PC (Windows, Linux, Mac) with Android Studio installed.
An Android mobile device (API level 24 or higher).
Step 1: Set up the environment
Step 1.1 Get Access Token to SDK Artifact
The access token is used for maven authentication. Get the access token to access the release artifacts using the API: Liveness Session Operations - Get Client Assets Access Token. The solution uses azure maven repo artifact to add the binary enabling the liveness feature. You will need to set up azure maven repo with any username and valid "access token" as "password". This token will be used as mavenPassword in the Add Build Dependency section below.
Step 1.2 Add Credential
 You need to add credentials in
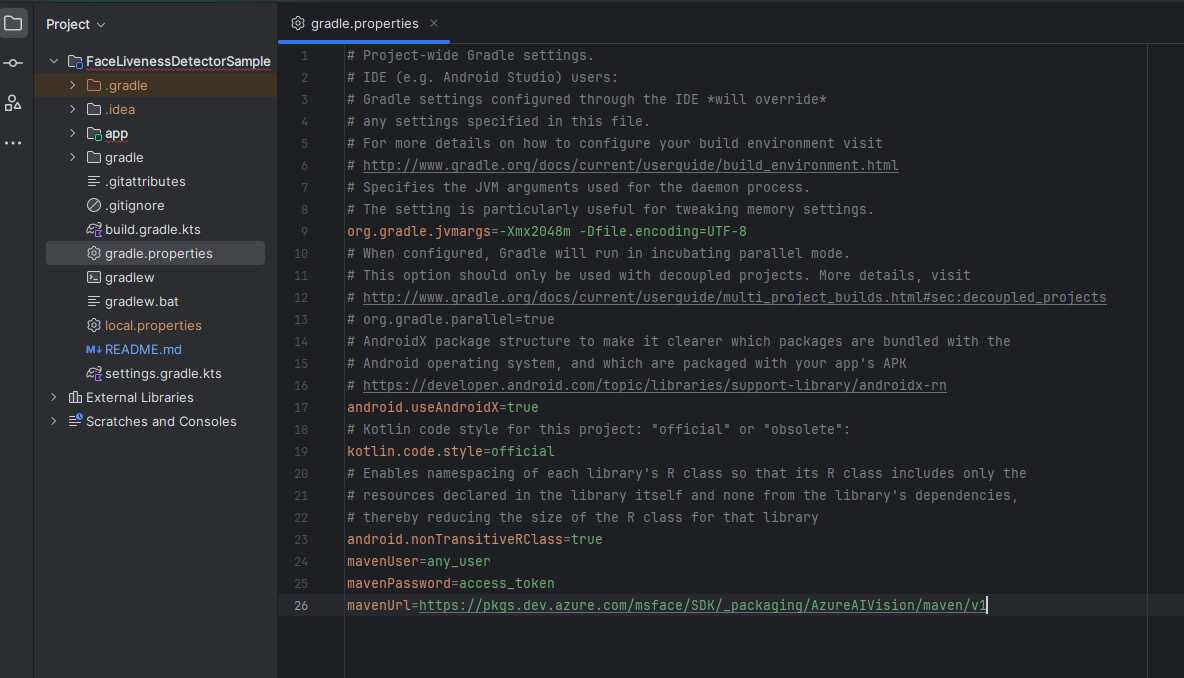
 gradle.properties to set up variable mavenUser and mavenPassword used above. These are obtained through azure command in sdk access. mavenPassword is the access token from above section.
The credential is going to look like:
mavenUser=any_username_string
mavenPassword=access_tokenStep 2 Integrate face liveness detection into your own application
Step 2.1 The overview of face recognition with liveness detection in Azure AI Vision SDK for Android
Here is the outline of the SDK sample and integration structure
The solution uses azure maven repo artifact to add the binary enabling the liveness feature. You will need to set up azure
mavenrepo with anyusernameand valid "access token" as "password. It is be mentioned inGet Access Token to SDK Artifactsection for getting the password, along with theAdd Build Dependenciesto set the repo in the solution files.The app requires camera permission. You will need to set it up in the app configuration and code. It will be mentioned below in
Add Camera PermissionandAdd Kotlin code to Request Camera Permissionsections for demonstration.There is an compose method called
FaceLivenessDetector. The compose component consists a one stop bundle for the liveness feature with UI code.The compose method takes a set of parameters launching it, the parameters defines the liveness session and callback behaviour. It will be mentioned below in
Add code to interpret the resultsection to demostrate how to use it.
Step 2.2 Add Camera Permissions
Face UI SDK requires access to the camera to perform liveness detection. You need to prompt the user to grant camera permission. Here is how to add camera permissions and activity data in the manifest: Add permission for the app in AndroidManifest.xml
    <uses-permission android:name="android.permission.INTERNET" />
    <uses-permission android:name="android.permission.CAMERA" />
    <uses-permission android:name="android.permission.VIBRATE" />
    <uses-feature android:name="android.hardware.camera" />
<uses-feature android:name="android.hardware.screen.portrait" />and now add proper code to request camera permission in kotlin as below
Step 2.3 Add Kotlin code to Request Camera Permission
You can look at MainActivity.kt for sample on how to achieve the same or follow the guidelines for Android. Camera permission needs to be ready before calling the liveness process. Here is part of the code piece that asks camera permission
    private fun requestPermissions() {
        if (ContextCompat.checkSelfPermission(applicationContext, android.Manifest.permission.CAMERA)
            != PackageManager.PERMISSION_GRANTED
        ) {
            ActivityCompat.requestPermissions(
                this,
                arrayOf(android.Manifest.permission.CAMERA),
                cAppRequestCode
            )
        }
}Step 2.4 Add Build Dependency
You need to add the following dependencies to apps' build.grade.kts
pluginssection.
plugins {
    id("com.android.application")
    id("org.jetbrains.kotlin.android")
    id("org.jetbrains.kotlin.plugin.serialization")
}You need to add the following dependencies to apps' build.grade.kts
dependenciessection.
    implementation("com.azure:azure-ai-vision-face-ui:+")
implementation("com.azure.android:azure-core-http-httpurlconnection:1.0.0-beta.10")You need to have mavenCentral in the repository.
mavenCentral()You need to add repository in the settings.gradle.kts for dependencyResolutionManagement
                maven {
                    url = uri("https://pkgs.dev.azure.com/msface/SDK/_packaging/AzureAIVision/maven/v1")
                    credentials {
                        username = mavenUser
                        password = mavenPassword
                    }
}You need to add credentials in gradle.properties to set up variable
mavenUserandmavenPasswordused above. These are obtained through azure command from aboveGet Access Token to SDK Artifactsection.
mavenUser=any_username_string
mavenPassword=access_tokenIf you use ProGuard or DexGuard, please refer to
ProGuard ExceptionsandDexGuard Exceptionsfor details.
Step 2.5 Add code to interpret the result
The activity takes a set of parameters launching it. The parameter defines the activity callback behaviour. The parameters for input are sessionAuthorizationToken, verifyImageFileContent, deviceCorrelationId, userCorrelationId.
sessionAuthorizationToken: session authorization token from the server
verifyImageFileContent: when choosing livenessWithVerify and setting verify image in the client, this is the ByteArray of the file content of the image. Otherwise it should be
null.deviceCorrelationId: when choosing not to set deviceCorrelationId in the token creation time, you can put the deviceCorrelationId here. Otherwise it should be
null.userCorrelationId: when choosing not to set userCorrelationId in the token creation time, you can put the userCorrelationId here. Otherwise it should be
null.
The parameters for the callback are OnSuccess and OnError method.
OnSuccess: Get called back when the session is completed successfully with
LivenessDetectionSuccess.LivenessDetectionSuccessshows the liveness session result.
Inside LivenessDetectionSuccess
digest The validation string to be used to verify the communication for this call is secure. For more information check section below
Add validation for the integrity of the service resultResultId The ID to be used to track the result submission process.
OnError: Get called back when the session is completed successfully with
LivenessDetectionError.LivenessDetectionErrorshows the liveness session error reasons.
    fun onSuccess(livenessDetectionSuccess: LivenessDetectionSuccess) {


    }

    fun onError(livenessDetectionError: LivenessDetectionError) {


}Step 2.6 Run liveness flow
Add FaceLivenessDetector in the compose UI.
"endpoint" is the url for the endpoint server address.
"session authorization token" should be obtained in App Server. A demo version on obtaining the token is in
MainScreenViewModel.ktfor the demo app to be built as an standalone solution, but this is not recommended. The session-authorization-token is required to start a liveness session. For more information on how to orchestrate the liveness flow by utilizing the Azure AI Vision Face service, visit: https://aka.ms/azure-ai-vision-face-liveness-tutorial.
Then the compose component can be called with the code:
FaceLivenessDetector(
            sessionAuthorizationToken = FaceSessionToken.sessionToken,
            verifyImageFileContent = FaceSessionToken.sessionSetInClientVerifyImage,
            deviceCorrelationId = null,
            userCorrelationId = null,
            onSuccess = viewModel::onSuccess,
            onError = viewModel::onError
)Please note that the detection result isn't present in the client code. You can retrieve it when calling the detectLiveness-sessions/<session-id> REST call. You can check API Reference
Step 2.7 Add validation for the integrity of the service result
We highly recommend leveraging the "digest" generated within the solution to validate the integrity of the communication between your application and the Azure AI Vision Face service. This is necessary to ensure that the final liveness detection result is trustworthy. "Digest" is provided in the following two locations:
"digest" property in LivenessDetectionSuccess shown in
Step 5 Add code to interpret the resultThe Azure AI Vision Face service.
The "digest" will be contained within the liveness detection result when calling the
detectLiveness-sessions/<session-id>REST call. Look for an example of the "digest" in the tutorial where the liveness detection result is shown.Digests must match between the application and the service. We recommend using these digests in conjunction with platform integrity APIs to perform the final validation. For more information on the Integrity APIs, please refer to:
Step 2.8 Configure Build Tools
Step 2.8.1 ProGuard Exceptions
If you plan to minify your application, you need to add following exceptions to your application's proguard-rules.pro file.
-dontwarn org.slf4j.impl.StaticLoggerBinder
-dontwarn org.slf4j.impl.StaticMDCBinder
-dontwarn org.slf4j.impl.StaticMarkerBinderAlternatively, follow the instructions in the build error message to copy the rules from "missing_rules.txt" file located in your app's build\outputs\mapping\{releaseVariant} folder to address these build errors.
Step 2.8.2 DexGuard Exceptions
If your application integrates with Dexguard using Gradle plugin, you don't have to do anything special. All the Face UI SDK consumer rules will be automatically picked up by DexGuard.
If your application is processed by Dexguard command line tool, make sure you include necassary keep rules for Face UI SDK by:
Locate the Face UI SDK aar
Extract the
proguard.txtfrom the Face UI SDK aar. For details about AAR, refer to Anatomy of an AAR file.Include the Face UI SDK consumer rules by adding the following line in your DexGuard configuration file. Make sure to replace
<Path to extracted proguard.txt>with the actual file path.-include <Path to extracted proguard.txt>Content copied to clipboard
FAQ
Q: How can I get the results of the liveness session?
Once the session is completed, for security reasons the client does not receive the outcome whether face is live or spoof.
You can query the result from your backend service by calling the sessions results API to get the outcome https://aka.ms/face/liveness-session/get-liveness-session-result
Q: How do I provide localization?
The SDK provides default localization for 75 locales. They should work automatically. It is provided through values- folder in the resources in aar. For more information, Localize your app.
Q: How do I override localization and customize the display strings?
Please refer to the localization FAQ answer above. See Localization.