Home | Deploy | User Guide | Tutorials | Administrator Guide | Application Integration | Support
- Overview
- Azure Pre-requisites
- Configure the toolchain
- Plan your networking IP range
- Define the environment
- Deploy your environment
- Installation
- Add Users
- Build Images
- Administrator Access
- How To
- How to use an existing VNET ?
- How to use DNS forwarders ?
- How to deploy ANF with Dual protocol
- Deploy in a locked down network environment
- Disable Public IP scenario
- Use your own SSL certificate
- Not deploy ANF
- Use an existing NFS mount point
- Use Azure Active Directory for MFA
- Use an existing Azure Database for MariaDB server
- Use an existing Active Directory
- Multi Region support
- Terraform and Bicep coverage table
- Helper Scripts
- Telemetry
Overview
Once the prerequisites are in place, deploying a greenfield azhop environment involves essentially these steps:
- Clone the repo:
git clone --recursive https://github.com/Azure/az-hop.git -b <version> - Copy the
examples/minimum_public_ip.ymltemplate file toconfig.ymland update it with your settings - Build the infrastructure on azure:
./build.sh -a apply - Create user passwords:
./create_passwords.sh - Install the software components on the provisioned infrastructure:
./install.sh
Once deployed, you can connect to the OnDemand web portal via:
- URL: get from
grep ondemand_fqdn playbooks/group_vars/all.yml - username:
clusteradmin - password: get from
./bin/get_secret clusteradmin
The following sections provide detailed instructions for each of these steps.
Azure Pre-requisites
- When using a user account
- you need to be Owner of the subscription
- When using a Service Principal Name, the service principal needs to be
- “Contributor” on the subscription
- “User Access Administrator” on the subscription
- When using a managed Identity on a deployer VM it needs to be a System/User Managed Identity with
- “Contributor” on the resource group
- “User Access Administrator” on the subscription
- “Reader” on the subscription
- Your subscription need to be registered for NetApp resource provider as explained here
- If using ANF Dual Protocol be aware of the limitation of one ANF account allow to be domain joined per region in the same subscription
- If AlmaLinux Marketplace image is used, the terms need to be accepted as well
az vm image terms accept --offer almalinux-hpc --publisher almalinux --plan 8_5-hpc-gen2 - When using the default configurations in order to build your environment, make sure you have enough quota for :
- 10 cores of Standard BS Family
- 5 x Standard_B2ms
- 4 cores of Standard DSv5 Family
- 1 x Standard_D4s_v5
- 10 cores of Standard BS Family
- For the compute and visualization nodes, you can adjust the maximum quota in your configuration file but make sure you have quota for these instances too :
- For Code Server :
- 10 cores of Standard FSv2 Family
- For Compute Nodes depending on your configuration and needs :
- 220 cores Standard_HC44rs
- and/or 600 cores of Standard HBrsv2 Family
- and/or 600 cores of Standard HBv3 Family
- and/or 96 cores of Standard NCADS_A100_v4 Family
- For Remote Visualization
- 24 cores of Standard NVs_v3 Family
- For Code Server :
Special circumstances
- When deploying in a zero-trust environment that automatically blocks access to high-risk TCP/UDP ports (e.g. 22) from the internet, follow the hub and spoke network architecture.
- In the hub, create:
- the VPN gateway and virtual network
- virtual machines for self-hosted Github Action runners
- Each
azhopdeployment will be a spoke.- See define the environment for how to automatically peer the virtual network of
azhopwith that of the hub, and for how to change the SSH port of the jumpbox.
- See define the environment for how to automatically peer the virtual network of
- In the hub, create:
Configure the toolchain
The toolchain can be setup either locally or from a deployer VM. See below for instructions regarding the installation.
From a local machine
The toolchain for deployment is built to be run only from Linux, and preferably Ubuntu 20.04+. So, if you are running a Windows desktop you should use WSL2 with an Ubuntu 20.04 environment. Run the following commands to install WSL2 (you will only need to do this once on your local device).
To install WSL2 in your Windows machine:
- Open PowerShell as administrator.
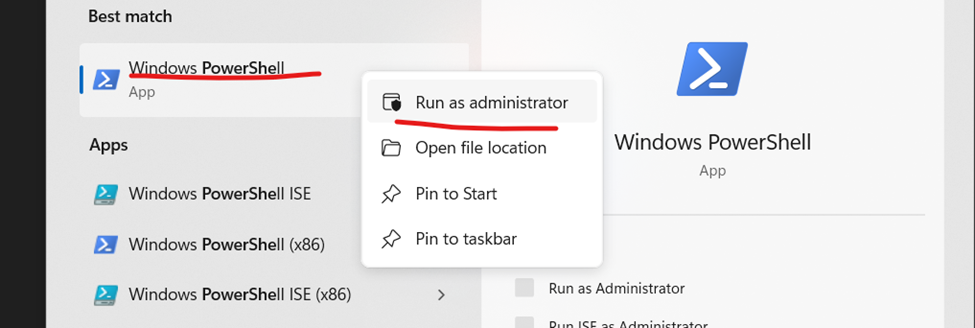
- Execute the following command to install WSL:
wsl --install
-
After installation is complete, restart your computer.
-
Once your computer turns back on, run WSL (search for it in your computuer’s Start menu if it doesn’t open automatically). The prompt is going to ask you to set up a username and password for your Ubuntu Linux Virtual machine.
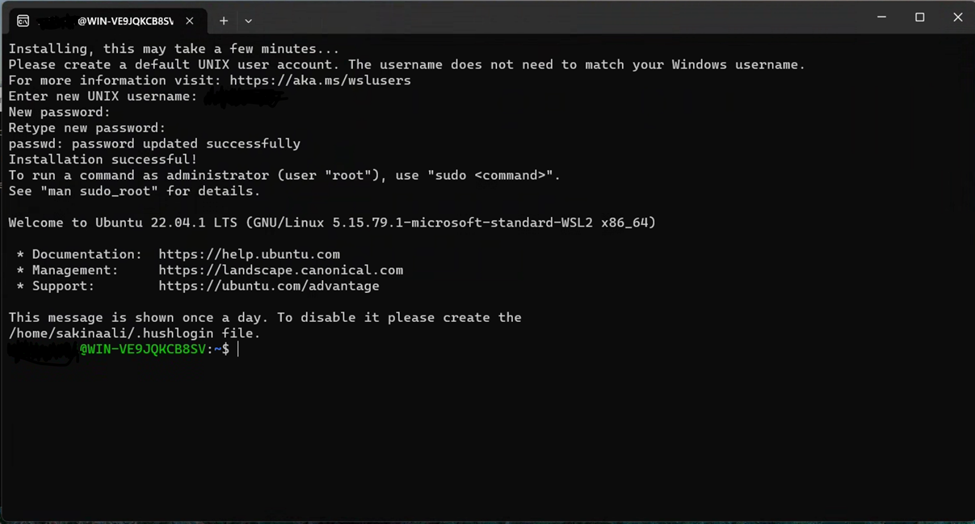
- Now, open your Linux shell (i.e. Command Prompt). Validate that you are running version 2 of WSL.
wsl --status

- Obtain root access with:
sudo su
Your WSL environment is now ready.
Clone the repo
Next, we will clone the Github repo into your working directory to acquire the necessary scripts for deployment. It is important to clone the repo with its submodule. You can do this with one of the two options:
Note : pick up the latest stable release from https://github.com/Azure/az-hop/releases and replace
<version>
- Option 1
git clone --recursive https://github.com/Azure/az-hop.git -b <version> - Option 2
git clone https://github.com/Azure/az-hop.git -b <version>
cd az-hop
git submodule init
git submodule update
Set up the toolchain on Ubuntu 20.04 (e.g. WSL2)
For Terraform to work properly on WSL2, on the C drive, make sure to have the “metadata mount” option enabled.
Afterwards, you can directly run the install.sh script:
./toolset/scripts/install.sh
Note : On Ubuntu you may have to run
apt-get update
From a deployer VM
az-hop can be deployed directly from an Ubuntu 20.04 VM on Azure.
Create a deployer VM
Create a deployer VM in its own isolated VNET and if required with an Azure Bastion. Once built, enable System/User Managed Identity and grant the following roles :
- “Contributor” on the subscription
- “User Access Administrator” on the subscription
- “Reader” on the subscription
Note: Contributor on the
Subscriptioncan be reduced toResource Groupon the specific Resource Group you will deploy in. This Resource Group must be created before granting this role.
Clone the repo
Connect to the VM and clone the repo with its submodule. You can do this with one of these two options.
Note : pick up the latest stable release from https://github.com/Azure/az-hop/releases and replace
<version>
- Option 1
git clone --recursive https://github.com/Azure/az-hop.git -b <version> - Option 2
git clone https://github.com/Azure/az-hop.git -b <version>
cd az-hop
git submodule init
git submodule update
Set up the toolchain
Run the install.sh script:
./toolset/scripts/install.sh
Note : On Ubuntu you may have to run
apt-get update
Plan your networking IP range
Az-hop needs several subnets to work, while some of these are optional like Bastion and the Gateway others are mandatory. When peering the az-hop vnet to others vnet or to your enterprise thru a VPN you have to plan accordingly your address range to avoid conflicts. Below are examples to help you defined these ranges based on how large you want to size your compute infrastructure.
Note: Be aware that for each subnet, Azure will reserve 5 IP addresses for it’s internal usage
59 nodes system => 10.0.0.0/25
| Subnet | CIDR | IP Range | Nb IPs | First IP | Usable IPs |
|---|---|---|---|---|---|
| frontend | 10.0.0.0/29 | 10.0.0.0 - 10.0.0.7 | 8 | 10.0.0.4 | 3 |
| ad | 10.0.0.8/29 | 10.0.0.8 - 10.0.0.15 | 8 | 10.0.0.12 | 3 |
| admin | 10.0.0.16/28 | 10.0.0.16 - 10.0.0.31 | 16 | 10.0.0.20 | 11 |
| netapp | 10.0.0.32/29 | 10.0.0.32 - 10.0.0.39 | 8 | 10.0.0.36 | 3 |
| database | 10.0.0.40/29 | 10.0.0.40 - 10.0.0.47 | 8 | 10.0.0.44 | 3 |
| gateway | 10.0.0.48/28 | 10.0.0.48 - 10.0.0.63 | 16 | 10.0.0.52 | 11 |
| compute | 10.0.0.64/26 | 10.0.0.64 - 10.0.0.127 | 64 | 10.0.0.68 | 59 |
Note: Bastion is not supported in this scenario because it requires a /26 subnet and there is not enough space for it in this configuration. outbounddns is not support too for lackof space. In that case, consider using a larger range.
In this configuration the number of IP addresses provided to NetApp will avoid creating multiple volumes. You may consider using a larger range.
123 nodes system => 10.0.0.0/24
| Subnet | CIDR | IP Range | Nb IPs | First IP | Usable IPs |
|---|---|---|---|---|---|
| frontend | 10.0.0.0/29 | 10.0.0.0 - 10.0.0.7 | 8 | 10.0.0.4 | 3 |
| ad | 10.0.0.8/29 | 10.0.0.8 - 10.0.0.15 | 8 | 10.0.0.12 | 3 |
| admin | 10.0.0.16/28 | 10.0.0.16 - 10.0.0.31 | 16 | 10.0.0.20 | 11 |
| netapp | 10.0.0.32/29 | 10.0.0.32 - 10.0.0.39 | 8 | 10.0.0.36 | 3 |
| database | 10.0.0.40/29 | 10.0.0.40 - 10.0.0.47 | 8 | 10.0.0.44 | 3 |
| gateway or outbounddns or lustre | 10.0.0.48/28 | 10.0.0.48 - 10.0.0.63 | 16 | 10.0.0.52 | 11 |
| bastion | 10.0.0.64/26 | 10.0.0.64 - 10.0.0.127 | 64 | 10.0.0.68 | 59 |
| compute | 10.0.0.128/25 | 10.0.0.128 - 10.0.0.255 | 128 | 10.0.0.132 | 123 |
Note : This configuration doesn’t support altogether gateway, bastion and outbounddns, you have to choose which one you need to deploy or use a larger IP range
In this configuration the number of IP addresses provided to NetApp will avoid creating multiple volumes. You may consider using a larger range.
251 nodes system => 10.0.0.0/23
| Subnet | CIDR | IP Range | Nb IPs | First IP | Usable IPs |
|---|---|---|---|---|---|
| frontend | 10.0.0.0/29 | 10.0.0.0 - 10.0.0.7 | 8 | 10.0.0.4 | 3 |
| ad | 10.0.0.8/29 | 10.0.0.8 - 10.0.0.15 | 8 | 10.0.0.12 | 3 |
| admin | 10.0.0.16/28 | 10.0.0.16 - 10.0.0.31 | 16 | 10.0.0.20 | 11 |
| netapp | 10.0.0.32/28 | 10.0.0.32 - 10.0.0.47 | 16 | 10.0.0.36 | 11 |
| outbounddns | 10.0.0.48/28 | 10.0.0.48 - 10.0.0.63 | 16 | 10.0.0.52 | 11 |
| bastion | 10.0.0.64/26 | 10.0.0.64 - 10.0.0.127 | 64 | 10.0.0.68 | 59 |
| lustre | 10.0.0.128/26 | 10.0.0.128 - 10.0.0.191 | 64 | 10.0.0.132 | 59 |
| gateway | 10.0.0.192/27 | 10.0.0.192 - 10.0.0.223 | 32 | 10.0.0.196 | 27 |
| database | 10.0.0.224/28 | 10.0.0.224 - 10.0.0.239 | 16 | 10.0.0.228 | 11 |
| empty | |||||
| compute | 10.0.1.0/24 | 10.0.1.0 - 10.0.1.255 | 256 | 10.0.1.4 | 251 |
507 nodes system => 10.0.0.0/22
| Subnet | CIDR | IP Range | Nb IPs | First IP | Usable IPs |
|---|---|---|---|---|---|
| frontend | 10.0.0.0/29 | 10.0.0.0 - 10.0.0.7 | 8 | 10.0.0.4 | 3 |
| ad | 10.0.0.8/29 | 10.0.0.8 - 10.0.0.15 | 8 | 10.0.0.12 | 3 |
| admin | 10.0.0.16/28 | 10.0.0.16 - 10.0.0.31 | 16 | 10.0.0.20 | 11 |
| netapp | 10.0.0.32/28 | 10.0.0.32 - 10.0.0.47 | 16 | 10.0.0.36 | 11 |
| outbounddns | 10.0.0.48/28 | 10.0.0.48 - 10.0.0.63 | 16 | 10.0.0.52 | 11 |
| bastion | 10.0.0.64/26 | 10.0.0.64 - 10.0.0.127 | 64 | 10.0.0.68 | 59 |
| lustre | 10.0.0.128/26 | 10.0.0.128 - 10.0.0.191 | 64 | 10.0.0.132 | 59 |
| gateway | 10.0.0.192/27 | 10.0.0.192 - 10.0.0.223 | 32 | 10.0.0.196 | 27 |
| database | 10.0.0.224/28 | 10.0.0.224 - 10.0.0.239 | 16 | 10.0.0.228 | 11 |
| empty | |||||
| compute | 10.0.2.0/23 | 10.0.2.0 - 10.0.3.255 | 512 | 10.0.2.4 | 507 |
1019 nodes system => 10.0.0.0/21
| Subnet | CIDR | IP Range | Nb IPs | First IP | Usable IPs |
|---|---|---|---|---|---|
| frontend | 10.0.0.0/29 | 10.0.0.0 - 10.0.0.7 | 8 | 10.0.0.4 | 3 |
| ad | 10.0.0.8/29 | 10.0.0.8 - 10.0.0.15 | 8 | 10.0.0.12 | 3 |
| admin | 10.0.0.16/28 | 10.0.0.16 - 10.0.0.31 | 16 | 10.0.0.20 | 11 |
| netapp | 10.0.0.32/28 | 10.0.0.32 - 10.0.0.47 | 16 | 10.0.0.36 | 11 |
| outbounddns | 10.0.0.48/28 | 10.0.0.48 - 10.0.0.63 | 16 | 10.0.0.52 | 11 |
| bastion | 10.0.0.64/26 | 10.0.0.64 - 10.0.0.127 | 64 | 10.0.0.68 | 59 |
| lustre | 10.0.0.128/26 | 10.0.0.128 - 10.0.0.191 | 64 | 10.0.0.132 | 59 |
| gateway | 10.0.0.192/27 | 10.0.0.192 - 10.0.0.223 | 32 | 10.0.0.196 | 27 |
| database | 10.0.0.224/28 | 10.0.0.224 - 10.0.0.239 | 16 | 10.0.0.228 | 11 |
| empty | |||||
| compute | 10.0.4.0/22 | 10.0.4.0 - 10.0.7.255 | 1024 | 10.0.4.4 | 1019 |
2043 nodes system => 10.0.0.0/20
| Subnet | CIDR | IP Range | Nb IPs | First IP | Usable IPs |
|---|---|---|---|---|---|
| frontend | 10.0.0.0/29 | 10.0.0.0 - 10.0.0.7 | 8 | 10.0.0.4 | 3 |
| ad | 10.0.0.8/29 | 10.0.0.8 - 10.0.0.15 | 8 | 10.0.0.12 | 3 |
| admin | 10.0.0.16/28 | 10.0.0.16 - 10.0.0.31 | 16 | 10.0.0.20 | 11 |
| netapp | 10.0.0.32/28 | 10.0.0.32 - 10.0.0.47 | 16 | 10.0.0.36 | 11 |
| outbounddns | 10.0.0.48/28 | 10.0.0.48 - 10.0.0.63 | 16 | 10.0.0.52 | 11 |
| bastion | 10.0.0.64/26 | 10.0.0.64 - 10.0.0.127 | 64 | 10.0.0.68 | 59 |
| lustre | 10.0.0.128/26 | 10.0.0.128 - 10.0.0.191 | 64 | 10.0.0.132 | 59 |
| gateway | 10.0.0.192/27 | 10.0.0.192 - 10.0.0.223 | 32 | 10.0.0.196 | 27 |
| database | 10.0.0.224/28 | 10.0.0.224 - 10.0.0.239 | 16 | 10.0.0.228 | 11 |
| empty | |||||
| compute | 10.0.8.0/21 | 10.0.8.0 - 10.0.15.255 | 2048 | 10.0.8.4 | 2043 |
4091 nodes system => 10.0.0.0/19
| Subnet | CIDR | IP Range | Nb IPs | First IP | Usable IPs |
|---|---|---|---|---|---|
| frontend | 10.0.0.0/29 | 10.0.0.0 - 10.0.0.7 | 8 | 10.0.0.4 | 3 |
| ad | 10.0.0.8/29 | 10.0.0.8 - 10.0.0.15 | 8 | 10.0.0.12 | 3 |
| admin | 10.0.0.16/28 | 10.0.0.16 - 10.0.0.31 | 16 | 10.0.0.20 | 11 |
| netapp | 10.0.0.32/28 | 10.0.0.32 - 10.0.0.47 | 16 | 10.0.0.36 | 11 |
| outbounddns | 10.0.0.48/28 | 10.0.0.48 - 10.0.0.63 | 16 | 10.0.0.52 | 11 |
| bastion | 10.0.0.64/26 | 10.0.0.64 - 10.0.0.127 | 64 | 10.0.0.68 | 59 |
| lustre | 10.0.0.128/26 | 10.0.0.128 - 10.0.0.191 | 64 | 10.0.0.132 | 59 |
| gateway | 10.0.0.192/27 | 10.0.0.192 - 10.0.0.223 | 32 | 10.0.0.196 | 27 |
| database | 10.0.0.224/28 | 10.0.0.224 - 10.0.0.239 | 16 | 10.0.0.228 | 11 |
| empty | |||||
| compute | 10.0.16.0/20 | 10.0.16.0 - 10.0.31.255 | 4096 | 10.0.16.4 | 4091 |
8187 nodes system => 10.0.0.0/18
| Subnet | CIDR | IP Range | Nb IPs | First IP | Usable IPs |
|---|---|---|---|---|---|
| frontend | 10.0.0.0/29 | 10.0.0.0 - 10.0.0.7 | 8 | 10.0.0.4 | 3 |
| ad | 10.0.0.8/29 | 10.0.0.8 - 10.0.0.15 | 8 | 10.0.0.12 | 3 |
| admin | 10.0.0.16/28 | 10.0.0.16 - 10.0.0.31 | 16 | 10.0.0.20 | 11 |
| netapp | 10.0.0.32/28 | 10.0.0.32 - 10.0.0.47 | 16 | 10.0.0.36 | 11 |
| outbounddns | 10.0.0.48/28 | 10.0.0.48 - 10.0.0.63 | 16 | 10.0.0.52 | 11 |
| bastion | 10.0.0.64/26 | 10.0.0.64 - 10.0.0.127 | 64 | 10.0.0.68 | 59 |
| lustre | 10.0.0.128/26 | 10.0.0.128 - 10.0.0.191 | 64 | 10.0.0.132 | 59 |
| gateway | 10.0.0.192/27 | 10.0.0.192 - 10.0.0.223 | 32 | 10.0.0.196 | 27 |
| database | 10.0.0.224/28 | 10.0.0.224 - 10.0.0.239 | 16 | 10.0.0.228 | 11 |
| empty | |||||
| compute | 10.0.32.0/19 | 10.0.32.0 - 10.0.63.255 | 8192 | 10.0.32.4 | 8187 |
Define the environment
An az-hop environment is defined in the config.yml configuration file. Before starting, copy the config.tpl.yml template to your own config.yml configuration file and update it accordingly to your requirements.
Deploy your environment
Azure infrastructure
Before deploying, make sure your are logged in to Azure, which will be done differently if you are logged in as a user or with a Service Principal Name.
Login with a user account
# Login to Azure
az login

# Review the current subscription
az account show

# Change your default subscription if needed
az account set -s <subid>
Login with a Managed Identity
# Login to Azure
az login -i
Login with a Service Principal Name
When using a Service Principal Name (SPN), you have to login to Azure with this SPN but also set the environment variables used by Terraform to build resources as explained here.
Note : The SPN need to have contributor and User Access Administrator roles on the subscription
# Login to Azure
az login --service-principal -u http://<spn_name> -p <spn_secret> --tenant <tenant_id>

# Set Terraform Environment variables
export ARM_CLIENT_ID=<spn_id>
export ARM_CLIENT_SECRET=<spn_secret>
export ARM_SUBSCRIPTION_ID=<subscription_id>
export ARM_TENANT_ID=<tenant_id>
Build the Azure infrastructure
Building the infrastructure is done thru the build.sh utility script, which reads the config.yml file and call terraform or bicep. Please see Terraform and Bicep coverage table to understand the differences.
$ ./build.sh
Usage build.sh
  Required arguments:
    -a|--action [plan, apply, destroy]
    -l|--language <tf, bicep>   - deployment language to use, default is tf

  Optional arguments:
    -f|-folder <relative path> - relative folder name containing the terraform files, default is ./tf
    --no-validate              - skip validation of config.yml
First, check which resources will be created/updated/deleted by running
./build.sh -a plan
Review the output and, if ok, apply the changes by running
./build.sh -a apply
Running this command for the first time will take a couple of minutes.
Note : If you need ANF to be configured for Dual Protocol (NFS+SMB) please see the How to deploy ANF with Dual protocol section
At the end of the build, there are several files created, which produce the state of a deployment. These are :
- az-hop config file
config.yml - Terraform state file
tf/terraform.tfstate - Ansible parameter files
playbooks/group_vars/all.yml,playbooks/inventory - SSH Key Pair
${ADMIN_USER}_id_rsaand${ADMIN_USER}_id_rsa.pub - Packer option file
packer/options.json - Utility scripts
bin/*
The URL to access the azhop web portal is in the inventory file, locate the ondemand_fqdn variable
grep ondemand_fqdn playbooks/group_vars/all.yml
Once the infrastructure is built you need to create the users.
Create users passwords for all users defined in the config.yml file
Create users is done thru the create_password.sh utility script, which will use the config.yml file to retrieve the list of users to be created. For each, a password will be generated and stored as a secret in the keyvault built by the build command.
./create_passwords.sh
To retrieve a user’s password from the key vault, use the ./bin/get_secret utility script
./bin/get_secret hpcuser
Installation
Once the whole infrastructure has been deployed you need to install and configure the software components. To do so the install.sh utility script is used.
Install and configure the deployed environment
The installation is done with Ansible playbooks and can be applied as a whole or by components, but there is an order to follow as playbooks have dependencies :
- ad
- linux
- add_users
- lustre
- ccportal
- cccluster => When using custom images, make sure your images have been pushed into the SIG otherwise this is going to failed
- scheduler
- ood
- ood-custom
- grafana
- telegraf
- chrony
The simplest is to just run
./install.sh
and let it go. The script will automatically skip playbooks that have been previously executed and completed successfully.
If you need to apply only a subset then run
./install.sh <target> # with a single target in the list above
When requesting the execution of a specific playbook, the script will force execution even if the playbook successfully completed on a previous run.
In case of a failure, the install script can be reapplied as most of the settings are idempotent. The script contains a checkpointing mechanism, each successful target will have a .ok file created in the playbooks directory. If you want to re-apply a target, delete this file and rerun the install script.
Tip: you can pass --tags in order to re-run just a specific role or task in an ansible playbook, e.g.
./install.sh ood --tags foo
Add Users
Adding users is done in three steps :
- Update your
config.ymlfile - run the
create_passwords.shscript - run the
add_usersAnsible playbook
You can specify in which groups users belongs to, but at least they are all in the Domain Users (gid: 5000) domain group. By default there are built-in groups you can’t change names otherwise things will break :
Domain Users: All users will be added to this one by defaultazhop-admins: For users with azhop admin privileges like starting/stopping nodes or editing Grafana dashboardsazhop-localadmins: For users with Linux sudo rights or Windows Local Admin rights on compute or viz nodes
Add users in the configuration file
Open the config.yml configuration file used to deploy your environment and add new users in the users dictionary, and configure usergroups if needed, like below :
users:
  - { name: hpcuser,   uid: 10001, groups: [6000] }
  - { name: adminuser, uid: 10002, groups: [5001, 5002, 6000, 6001] }
  - { name: user1, uid: 10004, groups: [6000] }
  - { name: user2, uid: 10005, groups: [6001] }

usergroups:
  - name: Domain Users # All users will be added to this one by default
    gid: 5000
  - name: azhop-admins # For users with azhop admin privilege
    gid: 5001
    description: "For users with azhop admin privileges"
  - name: azhop-localadmins # For users with sudo right on nodes
    gid: 5002
    description: "For users with sudo right or local admin right on nodes"
  - name: project1 # For project1 users
    gid: 6000
    description: Members of project1
  - name: project2 # For project2 users
    gid: 6001
    description: Members of project2
Create users passwords
Run the create_passwords.sh scripts. This will create a password for each new users, and store it in the key vault deployed in this environment, under a secret named using the pattern <user>-password
$./create_passwords.sh
Add users to the system
Run the add_users Ansible playbook to create these users in the Domain and generate their SSH keys.
$./install.sh add_users
Build Images
There are already pre-configured az-hop compute nodes and remote desktop images in the Azure marketplace. The default configuration file pre-set these images, but if you need to use a different supported OS or hardening methods or any extensions you want to have in your images, then this section explains how to build them for az-hop.
az-hop provides a set of pre-configured packer configuration files that can be used to build custom images. The utility script ./packer/build_image.sh is in charge of building these images with packer and push them into the Shared Image Gallery of the environment.
Pre-requisites
You need to be authenticated thru az login or from a VM with a System Assigned managed identity in order to build images. The script will automatically detect in which mode and will set the required values needed by Packer.
Image definition in the configuration file
Image definitions have to be specified in the config.yml configuration file. These values are used to map a packer image file and the image definition in the Shared Image Gallery. Below is an example of such configuration, note that the image name must match an existing packer file.
images:
  - name: azhop-centos79-v2-rdma
    publisher: azhop
    offer: CentOS
    sku: 7.9-gen2
    hyper_v: V2
    os_type: Linux
    version: 7.9
Build an image
Building an image is done by the utility script packer/build_image.sh and requires a packer input file. az-hop provides a set of pre-defined image files like :
azhop-centos79-v2-rdma-gpgpu.jsonthis is an CentOS 7.9 HPC image with the az-hop additions for compute nodesazhop-centos79-desktop3d.jsonthis is an CentOS 7.9 HPC image with the right GPU drivers configured for remote visualization nodes
Usage build_image.sh
  Required arguments:
    -i|--image <image_file.json> | image packer file

  Optional arguments:
    -o|--options <options.json>  | file with options for packer generated in the build phase
    -f|--force                   | overwrite existing image and always push a new version in the SIG
The build_image.sh script will :
- build a managed image with packer,
- tag this image with the checksum of the scripts called to build that image,
- tag it with a version,
- create the image definition in the Shared Image Gallery if it doesn’t exists
- push the managed image in the Shared Image Gallery
Overall this can take between 30 and 45 minutes and sometimes more.
For example, to build the compute nodes image, run this command
cd packer
./build_image.sh -i azhop-centos79-v2-rdma-gpgpu.json
Update the Cycle cluster template
NOTE: To be done only when updating a system already configured
Once all images have been built you need to update the configuration file to specify which images to use and then update the Cycle cluster template to match the exact image ID of the images pushed into the Shared Image Gallery.
To specify the new custom images to use, just comment the default image: azhpc:azhop-compute:centos-7_9:latest values and uncomment the line below which contains the image definition to use from the Shared Image Gallery.
Before the update
queues:
  - name: hpc
    vm_size: Standard_HB120rs_v3
    max_core_count: 1200
    image: azhpc:azhop-compute:centos-7_9:latest
#    image: /subscriptions//resourceGroups//providers/Microsoft.Compute/galleries//images/azhop-centos79-v2-rdma-gpgpu/latest
    # Queue dedicated to GPU remote viz nodes. This name is fixed and can't be changed
  - name: viz3d
    vm_size: Standard_NV12s_v3
    max_core_count: 24
    image: azhpc:azhop-desktop:centos-7_9:latest
#    image: /subscriptions//resourceGroups//providers/Microsoft.Compute/galleries//images/azhop-centos79-desktop3d/latest
    # Queue dedicated to non GPU remote viz nodes. This name is fixed and can't be changed
After the update
queues:
  - name: hpc
    vm_size: Standard_HB120rs_v3
    max_core_count: 1200
#    image: azhpc:azhop-compute:centos-7_9:latest
    image: /subscriptions//resourceGroups//providers/Microsoft.Compute/galleries//images/azhop-centos79-v2-rdma-gpgpu/latest
    # Queue dedicated to GPU remote viz nodes. This name is fixed and can't be changed
  - name: viz3d
    vm_size: Standard_NV12s_v3
    max_core_count: 24
#    image: azhpc:azhop-desktop:centos-7_9:latest
    image: /subscriptions//resourceGroups//providers/Microsoft.Compute/galleries//images/azhop-centos79-desktop3d/latest
Then update the Cycle project by running this playbook :
./install.sh cccluster
Once done your new images are ready to be used in azhop.
Note: For the new image to be used by new instances, make sure that all the existing one have been drained.
Adding new packages in a custom image
Sometimes you need to add missing runtime packages in the custom image built or change some settings. This can be done by either add a new script in the packer JSON configuration files or by updating one of the existing script called by packer.
For example, below is the content of the azhop-centos79-desktop3d.json packer file, if you want to add custom packages one way would be to change the zz-desktop-custom.sh located in the ./packer/scripts/centos directory.
    "provisioners": [
        {
            "type": "file",
            "source": "scripts/centos/",
            "destination": "/tmp"
        },
        {
            "execute_command": "chmod +x ;  sudo -E sh ''",
            "inline": [
                "chmod +x /tmp/*.sh",
                "/tmp/linux-setup.sh",
                "/tmp/lustreclient.sh 2.12.6",
                "/tmp/interactive-desktop-3d.sh",
                "/tmp/desktop-packages.sh",
                "/tmp/pbspro.sh",
                "/tmp/telegraf.sh",
                "/tmp/zz-desktop-custom.sh || exit 1",
                "echo ' This is the end '",
                "yum history sync",
                "rm -rf /tmp/scripts",
                "/usr/sbin/waagent -force -deprovision+user && export HISTSIZE=0 && sync"
            ],
            "inline_shebang": "/bin/sh -x",
            "type": "shell",
            "skip_clean": true
        }
    ]
Rebuilding a new image version is done by following the steps above.
Note: For the new image to be used by new instances, make sure that all the existing one have been drained.
Note: Starting from version v1.0.16 the jumpbox is now used as an ssh bastion for Packer and no public IP are created for the packer VMs.
As a consequence if you have customized packer files, you need to add these parameters in the
builderssection : “ssh_bastion_host”: “”, “ssh_bastion_port”: “”, “ssh_bastion_username”: “”, “ssh_bastion_private_key_file”: “”
Administrator Access
The jumpbox machine is used as an SSH bastion to access to Virtual Machines in the azhop environment. To do this a helper script ./bin/connect is provided and generated by the build script. See the Helper Scripts documentation for more details.
SSHing Linux VMs
This can be done by running this command
./bin/connect hpcadmin@<vm-name or private-ip-address>
Accessing the CycleCloud portal
By default every users can access the CycleCloud portal as a read only user. If you need admin access, then you have to create an ssh tunnel, but run it from the outside of the toolchain container as the container won’t allow port redirection.
./bin/connect cyclecloud
Browse to the cycle UI https://localhost:9443/cyclecloud
Connect to Cycle with the hpcadmin user, read the secret stored in the key vault by running the get_secret helper command.
./bin/get_secret hpcadmin
Accessing the AD VM
You need to create an ssh tunnel in order to access the AD VM, but run it from the outside of the toolchain container as the container won’t allow port redirection.
./bin/connect ad
Now, with the tunnel, you are able to connect using RDP to the AD VM via localhost on port 3390. Connect with the hpcadmin local account, for which you can retrieve the password from with the get_secret helper.
How To
How to use an existing VNET ?
Using an existing VNET can be done by specifying in the config.yml file the VNET ID that needs to be used as shown below.
network:
  vnet:
    id: /subscriptions/<subscription id>/resourceGroups/<vnet resource group>/providers/Microsoft.Network/virtualNetworks/<vnet name>
azhop subnet names can be mapped to existing subnets names in the provided vnet by specifying then as below.
Note : The same subnet name can be used multiple times if needed.
network:
  vnet:
    id: /subscriptions/<subscription id>/resourceGroups/<vnet resource group>/providers/Microsoft.Network/virtualNetworks/<vnet name>
    subnets:
      frontend:
        name: ondemand
      admin:
        name: itonly
      netapp:
        name: storage
      ad:
        name: domaincontroler
      compute:
        name: dynamic
Pre-requisities for using an existing VNET
- There is a need of a minimum of 5 IP addresses for the infrastructure VMs
- Delegate a subnet to Azure NetApp Files like documented here
- Look at the
tf/network_security_group.tfandtf/variables_local.tfto get the list of all ports and rules define between subnets
Creating a standalone VNET for AZ-HOP
There is a way to easily create a standalone VNET for azhop without doing a full deployment by following these steps :
- Create a configuration file with all the required values for creating a VNET
- run the build command specify the tf/network subdirectory
./build -a [plan, apply, destroy] -f tf/network - Save your config file and create a new one in which you now specify the VNET ID created above
- Build your azhop environment
How to use DNS forwarders ?
azhop rely on Azure DNS Private Resolver in order to forward DNS queries to external DNS servers thru an outbound endpoint which need to be created in it’s own subnet. You need to configure the outbounddns subnet with a minimum of /28 address space in your config.yml configuration file. If you use an existing subnet it has to be dedicated to the resolver and has to be delegated to Microsoft.Network/dnsResolvers as explained in documentation of the Azure DNS Private Resolver
Once the resolver has been created thru the ./build.sh command, you can configure the forwarders to sent request to, in the config.yml configuration file like below.
# Specify DNS forwarders available in the network
dns:
  forwarders:
    - { name: foo.bar.com, ips: "10.2.0.4" }
    - { name: foo.com, ips: "10.2.0.4, 10.2.0.5" }
To add these rules just run the dns Ansible playbook.
./install.sh dns
You can also add rules manually in the DNS forwarding ruleset built.
How to deploy ANF with Dual protocol
When using Windows nodes you may want to use SMB to mount ANF volumes, as a result ANF need to be configure to use dual protocol and the ANF account need to be domain joined. This imply to break out the deployment in two main steps because the Domain Controller need to be configured before provisioning ANF. Follow the steps below to deploy ANF with Dual Protocol enabled :
- Dual protocol must be enabled in the configuration file with this value :
# dual protocol
dual_protocol: true # true to enable SMB support. false by default
- Build the infrastructure and the Active Directory machine :
./build.sh -f tf/active_directory -a apply - Configure the Domain Controller
./install.sh ad - Build the remaining infrastructure VMs
./build.sh -a apply - Create users passwords
./create_passwords.sh - Install and configure all applications
./install.sh
Deploy in a locked down network environment
A locked down network environment avoid access from public IPs to the resources used by az-hop like storage accounts and key vault for example. To enable such configuration, uncomment and fill out the locked_down_network settings. Use the grant_access_from to grant access to specific internet public IPs as documented from here
locked_down_network:
  enforce: true
  grant_access_from: [a.b.c.d] # Array of CIDR to grant access from.
Allow traffic to list of external domains
In a locked network environment, traffic to some external domains needs to be allowed through firewall for the environment to work properly. Some of the families of domains include:
- The OS repositories
- Domains used when building the infrastructure and configuring the toolchain
- Domains used when configuring the environment (SLURM, CC, GRAFANA, OOD etc.)
- Domains used when building custom images
- Domains used when running the environment
| External domains that need to be allowed |
|---|
| *.almalinux.org |
| *.anaconda.com |
| *.anaconda.org |
| *.azure.com |
| *.azure.net |
| *.azure-api.net |
| *.azureedge.net |
| *.canonical.com |
| *.cern.ch |
| *.continuum.io |
| *.eggycrew.com |
| *.exp-tas.com |
| *.fedoraproject.org |
| *.fwupd.org |
| *.github.com |
| *.github.io |
| *.githubusercontent.com |
| *.grafana.com |
| *.grafana.org |
| *.hashicorp.com |
| *.influxdata.com |
| *.jfrog.io |
| *.math.uh.edu |
| *.microsoft.com |
| *.msecnd.net |
| *.mtu.edu |
| *.npmjs.org |
| *.nvidia.com |
| *.osc.edu |
| *.pythonhosted.org |
| *.r-project.org |
| *.scala-sbt.org |
| *.skype.com |
| *.snapcraft.io |
| *.sourceforge.net |
| *.spack.io |
| *.terraform.io |
| *.ubuntu.com |
| *.visualstudio.com |
| *.vsassets.io |
| *.windows.net |
| aka.ms |
| pypi.org |
| www.paraview.org |
| securitycheck.phusionpassenger.com |
Disable Public IP scenario
To deploy az-hop in a no public IP scenario you have to set the locked_down_network:public_ip value to false. The default value being true.
locked_down_network:
  public_ip: false
In such scenario you need to use a deployer VM, make sure that this VM can access the jumpbox over SSH and the keyvault created.
Note: One option is to provision that VM in the
adminsubnet and open an NSG rule for allowing SSH from that machine to thejumbox.
Use your own SSL certificate
In a no public IP scenario, you may provide your own SSL certificate. If not a self-signed will be generated for you.
Make sure to update your configuration file to specify the FQDN name of the on-demand portal and that you don’t want to generate a certificate.
# On demand VM configuration
ondemand:
  vm_size: Standard_D4s_v5
  fqdn: azhop.foo.com # When provided it will be used for the certificate server name
  generate_certificate: false
If you want to generate your own self signed certificate here is how to proceed
openssl req -nodes -new -x509 -keyout certificate.key -out certificate.crt
Copy both files certificate.key and certificate.crt in the ./playbooks directory and renamed them <ondemand_fqdn>.crt and <ondemand_fqdn>.key. The ondemand_fdqn variable value can be found in the ./playbooks/group_vars/all.yml file.
Note: If you have an intermediate or chain file make sure to name it
<ondemand_fqdn>_chain.crtThe playbook configuring OnDemand is expecting to find these files and will copy them in the OnDemand VM when the no PIP option is set.
Not deploy ANF
By default an Azure NetApp File account, pool and volume are created to host the users home directories, if you don’t need to deploy such resources then comment or remove the anf section of the configuration file like this. In this case you will have to provide an NSF share for the users home directories see Use an existing NFS mount point
# Define an ANF account, single pool and volume
# If not present assume that there is an existing NFS share for the users home directory
#anf:
  # Size of the ANF pool and unique volume
#  homefs_size_tb: 4
  # Service level of the ANF volume, can be: Standard, Premium, Ultra
#  homefs_service_level: Standard
  # dual protocol
#  dual_protocol: false # true to enable SMB support. false by default
Use an existing NFS mount point
If you already have an existing NFS share, then it can be used for the users home directories, you can specify this one in the mounts section of the configuration file like below.
mounts:
  # mount settings for the user home directory
  home:
    mountpoint: <mount point name> # /sharedhome for example
    server: <server name or IP> # Specify an existing NFS server name or IP, when using the ANF built in use ''
    export: <export directory> # Specify an existing NFS export directory, when using the ANF built in use ''
    options: "rw,hard,rsize=262144,wsize=262144,vers=3,tcp,_netdev" # Specify the mount options.
Use Azure Active Directory for MFA
You can use AAD to enabled Multi Factor Authentication when using the az-hop portal. This is enabled thru OpenId Connect for which you need to provide the settings in the config.yml file.
# Authentication configuration for accessing the az-hop portal
# Default is basic authentication. For oidc authentication you have to specify the following values
# The OIDCClient secret need to be stored as a secret named <oidc-client-id>-password in the keyvault used by az-hop
authentication:
  httpd_auth: oidc # oidc or basic
  # User mapping https://osc.github.io/ood-documentation/latest/reference/files/ood-portal-yml.html#ood-portal-generator-user-map-match
  # Domain users are mapped to az-hop users with the same name and without the domain name
  user_map_match: '^([^@]+)@mydomain.foo$'
  ood_auth_openidc:
    OIDCProviderMetadataURL: # for AAD use 'https://sts.windows.net//.well-known/openid-configuration'
    OIDCClientID: 'XXXXXXXX-XXXX-XXXX-XXXX-XXXXXXXXXXXX'
    OIDCRemoteUserClaim: # for AAD use 'upn'
    OIDCScope: # for AAD use 'openid profile email groups'
    OIDCPassIDTokenAs: # for AAD use 'serialized'
    OIDCPassRefreshToken: # for AAD use 'On'
    OIDCPassClaimsAs: # for AAD use 'environment'
The helper script configure_aad.sh can be used to
- Register an AAD application configured to the az-hop environment
- Create a secret for this AAD application and store it in the az-hop Key Vault
This script need to be run before the install.sh or at least before the ood step, and by a user with enough privilege to create an application in AAD (typically a subscription Owner)
Use an existing Azure Database for MariaDB server
An existing instance of an Azure Database for MariaDB server can be used to store the Slurm accounting data and/or the Windows Remote Desktop session requests. To enable it update the configuration file with these settings :
# If using an existing Managed MariaDB instance for Slurm accounting, specify these values
database:
  # Admin user of the database for which the password will be retrieved from the azhop keyvault
  user: sqladmin
  # FQDN of the managed instance
  fqdn:
  # IP of the managed private endpoint if the FQDN is not registered in a private DNS
  ip:
Store the database user password in the azhop keyvault as a secret with the name <database.user>-password
Use an existing Active Directory
By default azhop is deployed with it’s own sandboxed Active Directory Domain Service VM and it’s own domain. Starting from release 1.0.35 it is now possible to use an existing Active Directory Domain to allow a better enterprise integration. For linux user integration there are some pre-requisites to be satisfied in the target domain as well as on the network.
Network pre-requisites
For all subnets configured in azhop, the correct NSGs will be set to the external Domain Controllers (DC) IP addresses. However if the existing DCs are outside of the azhop subnets, which will be certainly the case in most scenarios, then you have to make sure that the following ports are open to and from the DCs :
- TCP ports 53 88 135 389 445 464 636 3268 3269 9389 49152-65535
- UDP ports 53 88 123 138 389 464 636
Domain pre-requisites
Prepare a user account which is allowed to domain join machines, store it’s password as a secret in an existing Azure KeyVault. Grant read access for this keyvault secrets to the identity used to deploy the azhop environment.
Ensure that domain users who will connect to this azhop environment have domain properties uidNumber and gidNumber set. Refer to this article on how to do it from the UI.
Create these global groups
azhop-userswithgidNumber5000azhop-adminswithgidNumber5001azhop-localadminswithgidNumber5002
Add the users who will connect to the azhop environment to the azhop-users group, and to the azhop-localadmins group to grant local admin privilege on compute and remote visualization nodes.
azhop configuration file
Remove or comment the ad subnet from the network.vnet.subnets list.
Remove or comment the ad virtual machine definition.
Add or update the domain configuration as below
domain:
  name: "azhop.local" # Name of the domain to join
  domain_join_ou: "OU=azhop" # OU in the target domain in which machines will be added
  use_existing_dc: true
  domain_join_user:
    username: <domain_join_user> # username with join domain privilege, used to domain join VMs
    password_key_vault_name: <key_vault> # name for the keyvault with the domain join password
    password_key_vault_resource_group_name: <key_vault_rg> # resource group name for the keyvault with the domain join password
    password_key_vault_secret_name: <secret> # keyvault secret name for the domain join password
  existing_dc_details:
    domain_controller_names: ["dc1", "dc2"] # list of domain controllers
    domain_controller_ip_addresses: ["ip1", "ip2"] # list of domain controllers IPs
    private_dns_servers: ["ip1", "ip2"] # list of the private DNS servers
- define user groups as follow in the
azhopconfiguration file ```yml usergroups:These group names could be changed but not the gids as names will be mapped by gids
- name: azhop-users # All users will be added to this group by default gid: 5000
- name: azhop-admins gid: 5001 description: “For users with azhop admin privileges”
- name: azhop-localadmins gid: 5002 description: “For users with sudo right or local admin right on nodes” ```
- define users in the config file fo which you want to grant admin access to the CycleCloud web portal. They should be part of the
azhop-adminsgroup defined above. ```yml users:- { name: user, uid: 10001, groups: [5001] } ```
Deploy and configure your environment
Once all the pre-requisites are satisfied, you can deploy the azhop environment as usual.
Multi Region support
Multi region supportt will allow the use of compute or remote visualization nodes in a different region than the one in which your azhop environment has been deployed. Because all shared resources will be accessed from a different region you have to make sure your application will work correctly with an increased latency for data access. Here are the steps to follow, some will be automated, others are manual.
Note : Multi-region is only supported for a single subscription mode
Networking configuration
The first step is to design your network for the remote region following the hub and spoke pattern. The hub will be the azhop network in the main region which will be then peered to the hub vnet in the remote region. Several spokes will be possible if needed. You can create the peering yourself or let azhop configure it for you by adding new values in the network.peering section and rerun the ./build.sh command. When designing the spoke vnet be sure to specify an IP range which is not overlapping the one from the hub.
Communication Rules
Make sure to allow all inbound/outbound communications between peered vnets, as the default azhop nsg nsg-common will block them. You may have to ovverride them manually. A quick way of doing it is to allow nsg-common inbound and outbound rules 3100.
Private DNS
To provide name resolutions across the peered vnets, you have to create a private dns zone. If you are using Active Directory deployed by azhop there is one already created for you. If not you can configure it in the config.yml file like this:
private_dns:
  create: true # Create a private DNS zone for the environment. Default to false
  name: hpc.azure # Name of the private DNS zone to be created. Default to hpc.azure
  registration_enabled: false # Enable auto-registration of VMs in the private DNS zone. Default to false
When using PBS registration_enabled should be false as PBS doesn’t support multi domain resolution.
- Add a A record in the private DNZ zone for the scheduler VM so it can be resolved from spokes.
- For spoke VNETs, add a virtual network link in the private DNS zone and enabled autoregistration
Update the CycleCloud VM managed identity
CycleCloud need to be granted the permissions to create resources in the spoke vnet. Update the managed idenity of the ccportal VM to grant the contributor role on the resource group hosting the spoke vnet.
Configure queues for other regions
Two new properties will allow you to specify the location and subnet of remote region to use. The subnet format to use is <Resource Group name>/<Vnet name>/<subnet name>. Do this only for remote ones, below is an example of a queue definition to provision nodes in eastus. You will have to apply this new configuration with the ./install.sh cccluster command.
- name: hpc
    vm_size: Standard_HB120rs_v3
    max_count: 10
    image: azhpc:azhop-compute:centos-7_9:latest
    ColocateNodes: true
    EnableAcceleratedNetworking: true
    location: eastus
    subnet: azhop_compute_eastus/azhop_eastus/compute
Note : Make sure that you have enough quota in the remote region for the VM type to use
PBS Only - Fix the autoscaler
The autoscaler for PBS need to be fixed to avoid a mismatch reverse dns lookup. On the scheduler VM in /opt/cycle/pbspro/venv/lib/python*/site-packages/pbspro/driver.py, locate the call to self._validate_reverse_dns, and comment the whole if section like below
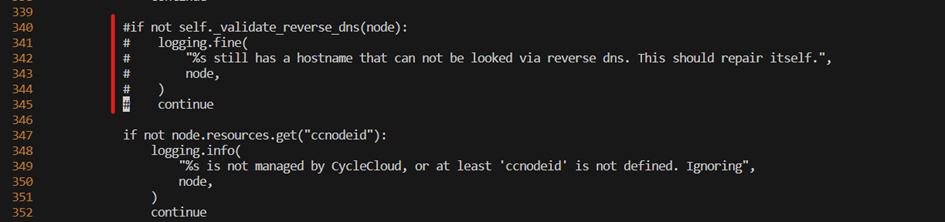
Make sure that the autoscaler is still running by tailing the log file.
tail -f /opt/cycle/pbspro/autoscale.log
There should be new lines written every minute, if not then rollback your change, check the syntax as any errors would break the autoscaler. Try again
Note: Be careful as this change could be ovewritten the next time you run the scheduler playbook.
Terraform and Bicep coverage table
As we made progress in using bicep as a deployment tool, the table below shows the difference in coverage between the two.
| Component | Terraform | Bicep |
|---|---|---|
| Use an existing VNET | [x] | [ ] |
| Monitoring | [x] | [ ] |
| Alerting | [x] | [ ] |
| Private DNS Resolver | [x] | [ ] |
| Optionally deploy a Bastion | [ ] | [x] |
| Create the deployer VM | [ ] | [x] |
| Assign Identities to Compute Nodes | [ ] | [x] |
Note : Please note that when using Bicep, resources won’t be destroyed as opposed to Terraform when resources are not sync with the terraform state file.
To automatically have bicep build a deployer VM and deploy from there, just rename the jumpbox section to deployer. This will create a deployer VM and deploy from there thru a cloud init script. After the bicep deployment is finished, connect to the deployer VM :
./bin/connect.sh deployer
Once connected in the deployer VM run the following command to display the cloud init log content
   tail -f /var/log/cloud-init-output.log

   Friday 21 October 2022  14:06:09 +0000 (0:00:02.071)       0:00:05.380 ********
   ===============================================================================
   chrony ------------------------------------------------------------------ 5.19s
   include_role ------------------------------------------------------------ 0.13s
   ~~~~~~~~~~~~~~~~~~~~~~~~~~~~~~~~~~~~~~~~~~~~~~~~~~~~~~~~~~~~~~~~~~~~~~~~~~~~~~~
   total ------------------------------------------------------------------- 5.32s
Once the cloud init script is finished you should have these 2 lines at the end of the log
   Cloud-init v. 22.3.4-0ubuntu1~20.04.1 running 'modules:final' at Fri, 21 Oct 2022 13:22:56 +0000. Up 22.03 seconds.
   Cloud-init v. 22.3.4-0ubuntu1~20.04.1 finished at Fri, 21 Oct 2022 14:06:09 +0000. Datasource DataSourceAzure [seed=/dev/sr0].  Up 2614.99 seconds
Note : The Cloud Init step is taking about 40 minutes
Confirm there are no errors in the playbooks execution by running this command
grep "failed=1" /var/log/cloud-init-output.log
Helper Scripts
- ansible_prereqs.sh
- azhop_states.sh
- build.sh
- create_passwords.sh
- install.sh
- packer/build_image.sh
- bin/connect
- bin/get_secret
ansible_prereqs.sh
This script contains all the pre-reqs needed to run the azhop playbooks, and is called by the install.sh script.
azhop_states.sh
This companion script allows you to upload/download all environment status files to/from blobs. Be aware that the Azure storage account and container should be created before running that script.
vscode@d0076264576c:/hpc$ ./azhop_state.sh
azhop_state command account container resource_group
    command        = download, upload, delete
    account        = azure storage account to read/write state
    container      = container to use
    resource group = resource group to use (only for download)
vscode@d0076264576c:/hpc$
build.sh
Script to build the resources needed for an azhop environment.
$ ./build.sh
Usage build.sh
  Required arguments:
    -a|--action [plan, apply, destroy] - Destroy will not applied with Bicep

  Optional arguments:
    -f|-folder <relative path> - relative folder name containing the terraform files, default is ./tf
    -l|--language <tf, bicep>  - deployment language to use, default is tf
    --no-validate              - skip validation of config.yml
At the end of the build, there are several files created, which produce the state of a deployment. These are :
- az-hop config file
config.yml - Terraform state file
tf/terraform.tfstate, unless Bicep is used - Ansible parameter files
playbooks/group_vars/all.yml,playbooks/inventory - SSH Key Pair
${ADMIN_USER}_id_rsaand${ADMIN_USER}_id_rsa.pub - Packer option file
packer/options.json - Utility scripts
bin/*
create_passwords.sh
This script will create a random password per user defined in the config.yml file and store each in the keyvault under a secret named <user>-password
install.sh
This script apply the applications configuration and settings on the azhop environment for all of these targets :
- ad
- linux
- add_users
- lustre
- ccportal
- cccluster
- scheduler
- ood
- grafana
- telegraf
- chrony
The simpler is just to run
./install.sh
and let it go
If you need to apply only a subset then run
./install.sh <target> # with a single target in the list above
In case of a transient failure, the install script can be reapplied as most of the settings are idempotent.
packer/build_image.sh
Script to build images defined the the config.yml file and in the packer/<image_file.json> packer files.
vscode@d0076264576c:/hpc/packer$ ./build_image.sh
Usage build_image.sh
  Required arguments:
    -i|--image <image_file.json> | image packer file

  Optional arguments:
    -o|--options <options.json>  | file with options for packer generated in the build phase
    -f|--force                   | overwrite existing image and always push a new version in the SIG
The build_image.sh script will :
- build a managed image with packer,
- tag this image with the checksum of the scripts called to build that image,
- tag it with a version,
- create the image definition in the Shared Image Gallery if it doesn’t exists
- push the managed image in the Shared Image Gallery
Please read the Build Images documentation for more details.
bin/connect
The bin/connect command will be created by terraform in the build phase. In addition to the specific cyclecloud and ad commands it can be a general wrapper for ssh in order to access resources on the vnet. This will handle proxy-ing through the jumpbox and so you can connect directly to the resources on the vnet. For example, to connect to the ondemand, you can run the following:
./bin/connect hpcadmin@ondemand
bin/get_secret
This utility command will retrieve a user password stored in the keyvault created during the build phase.
./bin/get_secret <username>
Telemetry
When you build your HPC environment on azure via azhop, Microsoft can identify the use of azhop with the deployed Azure resources. Microsoft collects this information to provide the best experiences with their products and to operate their business. The telemetry is collected through customer usage attribution. The data is collected and governed by Microsoft’s privacy policies.
If you do not wish to send usage data to Microsoft, you will need update your config file to include the following setting:
optout_telemetry: true
The setting can be applied by uncommenting this line from the config file.