Terraform - Solution Development
Introduction
Azure Verified Modules (AVM) for Terraform are a powerful tool that leverage the Terraform domain-specific language (DSL), industry knowledge, and an Open Source community, which altogether enable developers to quickly deploy Azure resources that follow Microsoft’s recommended practices for Azure.
In this article, we will walk through the Terraform specific considerations and recommended practices on developing your solution leveraging Azure Verified Modules. We’ll review some of the design features and trade-offs and include sample code to illustrate each discussion point.
Prerequisites
You will need the following tools and components to complete this guide:
- Visual Studio Code (VS Code) to develop your solution.
- Terraform CLI to deploy your Terraform modules. Make sure you have a recent version installed.
- Azure CLI to authenticate to Azure.
- Azure Subscription to deploy your resources.
Before you begin, ensure you have these tools installed in your development environment.
Planning
Good module development should start with a good plan. Let’s first review the architecture and module design prior to developing our solution.
Solution Architecture
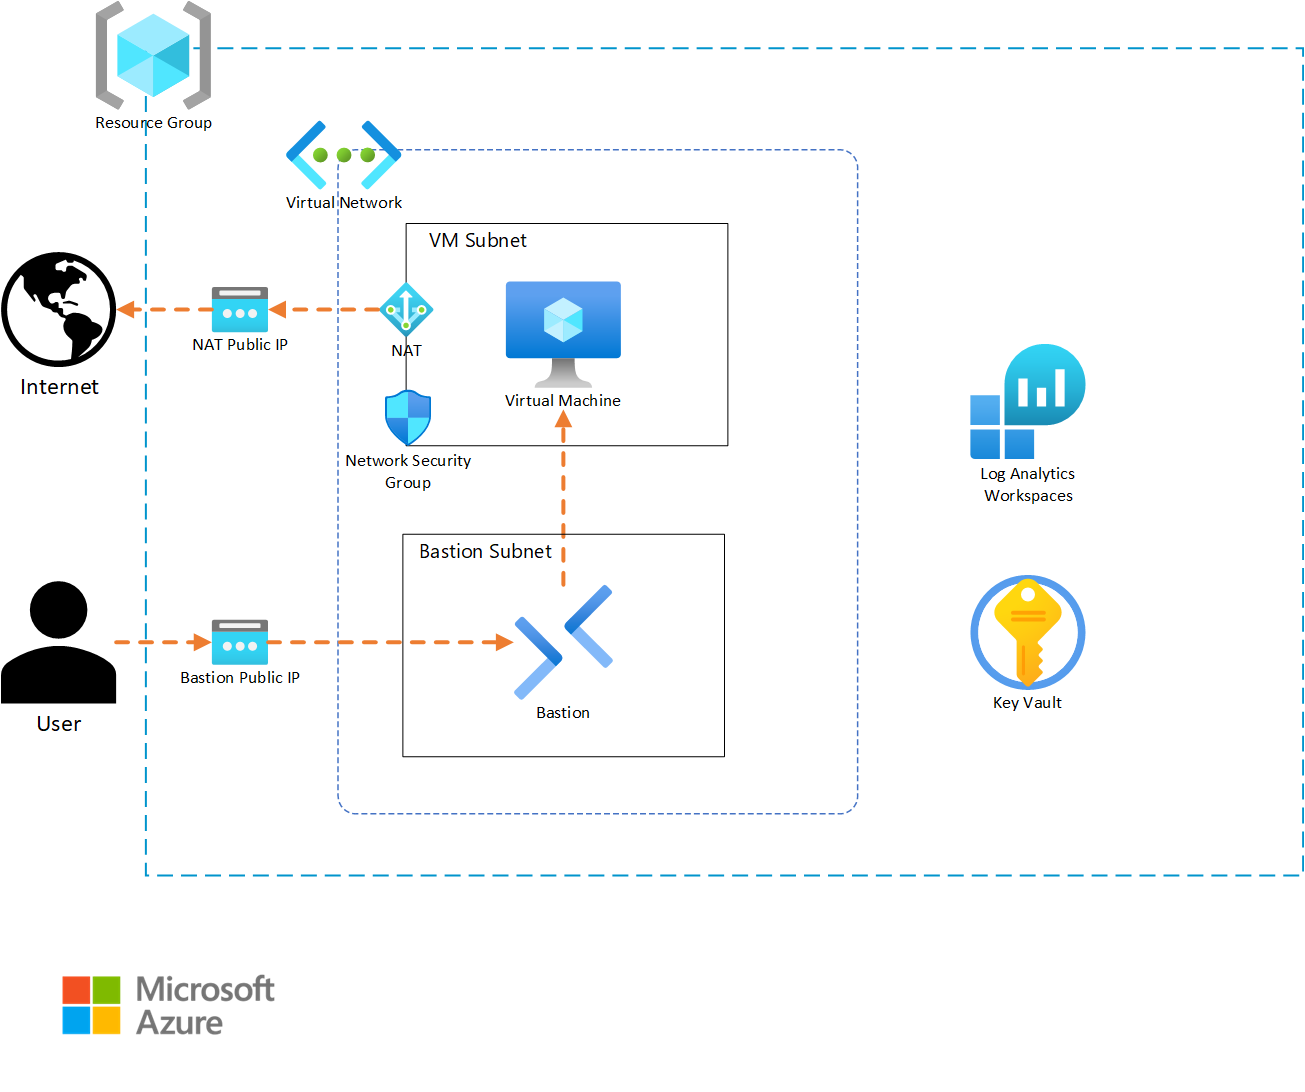
Before we begin coding, it is important to have details about what the infrastructure architecture will include. For our example, we will be building a solution that will host a simple application on a Linux virtual machine (VM).
In our design, the resource group for our solution will require appropriate tagging to comply with our corporate standards. Resources that support Diagnostic Settings must also send metric data to a Log Analytics workspace, so that the infrastructure support teams can get metric telemetry. The virtual machine will require outbound internet access to allow the application to properly function. A Key Vault will be included to store any secrets and key artifacts, and we will include a Bastion instance to allow support personnel to access the virtual machine if needed. Finally, the VM is intended to run without interaction, so we will auto-generate an SSH private key and store it in the Key Vault for the rare event of someone needing to log into the VM.
Based on this narrative, we will create the following resources:
- A resource group to contain all the resources with tagging
- A random string resource for use in resources with global naming (Key Vault)
- A Log Analytics workspace for diagnostic data
- A Key Vault with:
- Role-Based Access Control (RBAC) to allow data access
- Logging to the Log Analytics workspace
- A virtual network with:
- A virtual machine subnet
- A Bastion subnet
- Network Security Group on the VM subnet allowing SSH traffic
- Logging to the Log Analytics workspace
- A NAT Gateway for enabling outbound internet access
- Associated to the virtual machine subnet
- A Bastion service for secure remote access to the Virtual Machine
- Logging to the Log Analytics workspace
- A virtual machine resource with
- A single private IPv4 interface attached to the VM subnet
- A randomly generated admin account private key stored in the Key Vault
- Metrics sent to the log Analytics workspace
Solution template (root module) design
Since our solution template (root module) is intended to be deployed multiple times, we want to develop it in a way that provides flexibility while minimizing the amount of input necessary to deploy the solution. For these reasons, we will create our module with a small set of variables that allow for deployment differentiation while still populating solution-specific defaults to minimize input. We will also separate our content into variables.tf, outputs.tf, terraform.tf, and main.tf files to simplify future maintenance.
Based on this, our file system will take the following structure:
- Module Directory
terraform.tf- This file holds the provider definitions and versions.variables.tf- This file contains the input variable definitions and defaults.outputs.tf- This file contains the outputs and their descriptions for use by any external modules calling this root module.main.tf- This file contains the core module code for creating the solutions infrastructure.development.tfvars- This file will contain the inputs for the instance of the module that is being deployed. Content in this file will vary from instance to instance.
Note
Terraform will merge content from any file ending in a .tf extension in the module folder to create the full module content. Because of this, using different files is not required. We encourage file separation to allow for organizing code in a way that makes it easier to maintain. While the naming structure we’ve used is common, there are many other valid file naming and organization options that can be used.
In our example, we will use the following variables as inputs to allow for customization:
location- The location where our infrastructure will be deployed.name_prefix- This will be used to preface all of the resource naming.virtual_network_prefix- This will be used to ensure IP uniqueness for the deployment.tags- The custom tags to use for each deployment.
Finally, we will export the following outputs:
resource_group_name- This will allow for finding this deployment if there are multiples.virtual_machine_name- This can be used to find and login to the vm if needed.
Identifying AVM modules that match our solution
Now that we’ve determined our architecture and module configurations, we need to see what AVM modules exist for use in our solution. To do this, we will open the AVM Terraform pattern module index and check if there are any existing pattern modules that match our requirement. In this case, no pattern modules fit our needs. If this was a common pattern, we could open an issue on the AVM github repository to get assistance from the AVM project to create a pattern module matching our requirements. Since our architecture isn’t common, we’ll continue to the next step.
When a pattern module fitting our needs doesn’t exist for a solution, leveraging AVM resource modules to build our own solution is the next best option. Review the AVM Terraform published resource module index for each of the resource types included in your architecture. For each AVM module, capture a link to the module to allow for a review of the documentation details on the Terraform Registry website.
Note
Some of the published pattern modules cover multi-resource configurations that can sometimes be interpreted as a single resource. Be sure to check the pattern index for groups of resources that may be part of your architecture and that don’t exist in the resource module index. (e.g., Virtual WAN)
For our sample architecture, we have the following AVM resource modules at our disposal. Click on each module to explore its documentation on the Terraform Registry.
- Resource Group
- Log Analytics Workspace
- Key Vault
- Virtual Network
- Network Security Group
- NAT Gateway
- Bastion
- Virtual Machine
Develop the Solution Code
We can now begin coding our solution. We will create each element individually, to allow us to test our deployment as we build it out. This will also allow us to correct any bugs incrementally, so that we aren’t troubleshooting a large number of resources at the end.
Creating the terraform.tf file
Let’s begin by configuring the provider details necessary to build our solution. Since this is a root module, we want to include any provider and Terraform version constraints for this module. We’ll periodically come back and add any needed additional providers if our design includes a resource from a new provider.
Open up your development IDE (Visual studio code in our example) and create a file named terraform.tf in your root directory.
Add the following code to your terraform.tf file:
Note
Always click on the “Copy to clipboard” button in the top right corner of the Code sample area in order not to have the line numbers included in the copied code.
This specifies that the required Terraform binary version to run your module can be any version between 1.9 and 2.0. This is a good compromise for allowing a range of binary versions while also ensuring support for any required features that are used as part of the module. This can include things like newly introduced functions or support for new key words.
Since we are developing our solution incrementally, we should validate our code. To do this, we will take the following steps:
- Open up a terminal window if it is not already open. In some IDE’s this can be done as a function of the IDE.
- Change directory to the module directory by typing
cdand then the path to the module. As an example, if the module directory was namedexamplewe would runcd example. - Run
terraform initto initialize your provider file.
You should now see a message indicating that Terraform has been successfully initialized. This indicates that our code is error free and we can continue on. If you get errors, examine the provider syntax for typos, missing quotes, or missing brackets.
Creating a variables.tf file
Because our module is intended to be reusable, we want to provide the capability to customize each module call with those items that will differ between them. This is done by using variables to accept inputs into the module. We’ll define these inputs in a separate file named variables.tf.
Go back to the IDE, and create a file named variables.tf in the working directory.
Add the following code to your variables.tf file to configure the inputs for our example:
Note
Note that each variable definition includes a type definition to guide module users on how to properly define an input. Also note that it is possible to set a default value. This allows module consumers to avoid setting a value if they find the default to be acceptable.
We should now test the new content we’ve created for our module. To do this, first re-run terraform init on your command line. Note that nothing has changed and the initialization completes successfully. Since we now have module content, we will attempt to run the plan as the next step of the workflow.
Type terraform plan on your command line. Note that it now asks for us to provide a value for the var.virtual_network_cidr variable. This is because we don’t provide a default value for that input so Terraform must have a valid input before it can continue. Type 10.0.0.0/22 into the input and press enter to allow the plan to complete. You should now see a message indicating that Your infrastructure matches the configuration and that no changes are needed.
Creating a development.tfvars file
There are multiple ways to provide input to the module we’re creating. We will create a tfvars file that can be supplied during plan and apply stages to minimize the need for manual input. tfvars files are a nice way to document inputs as well as allow for deploying different versions of your module. This is useful if you have a pipeline where infrastructure code is deployed first for development, and then is deployed for QA, staging, or production with different input values.
In your IDE, create a new file named development.tfvars in your working directory.
Now add the following content to your development.tfvars file.
Note
Note that each variable has a value defined. Although, only inputs without default values are required, we include values for all of the inputs for clarity. Consider doing this in your environments so that someone looking at the tfvars files has a full picture of what values are being set.
Re-run the terraform apply, but this time, reference the .tfvars file by using the following command: terraform plan -var-file=development.tfvars. You should get a successful completion without needing to manually provide inputs.
Creating the main.tf file
Now that we’ve created the supporting files, we can start building the actual infrastructure code in our main file. We will add one AVM resource module at a time so that we can test each as we implement them.
Return to your IDE and create a new file named main.tf.
Add a resource group
In Azure, we need a resource group to hold any infrastructure resources we create. This is a simple resource that typically wouldn’t require an AVM module, but we’ll include the AVM module so we can take advantage of the Role-Based Access Control (RBAC) interface if we need to restrict access to the resource group in future versions.
First, let’s visit the Terraform registry documentation page for the resource group and explore several key sections.
- Note the
Provision Instructionsbox on the right-hand side of the page. This contains the module source and version details which allows us to copy the latest version syntax without needing to type everything ourselves. - Now review the
Readmetab in the middle of the page. It contains details about all required and optional inputs, resources that are created with the module, and any outputs that are defined. If you want to explore any of these items in detail, each element has a tab that you can review as needed. - Finally, in the middle of the page, there is a drop-down menu named
Examplesthat contains functioning examples for the AVM module. These showcase a good example of using copy/paste to bootstrap module code and then modify it for your specific purpose.
Now that we’ve explored the registry content, let’s add a resource group to our module.
First, copy the content from the Provision Instructions box into our main.tf file.
On the modules documentation page, go to the inputs tab. Review the Required Inputs tab. These are the values that don’t have defaults and are the minimum required values to deploy the module. There are additional inputs in the Optional Inputs section that can be used to configure additional module functionality. Review these inputs and determine which values you would like to define in your AVM module call.
Now, replace the # insert the 2 required variables here comment with the following code to define the module inputs. Our main.tf code should look like the following:
Note
Note how we’ve used the prefix variable and Terraform interpolation syntax to dynamically name the resource group. This allows for module customization and re-use. Also note that even though we chose to use the default module name of avm-res-resources-resourcegroup, we could modify the name of the module if needed.
After saving the file, we want to test our new content. To do this, return to the command line and first run terraform init. Notice how Terraform has downloaded the module code, as well as providers that the module requires. In this case, you can see the azurerm, random, and modtm providers were downloaded.
Let’s now deploy our resource group. First, let’s run a plan operation to review what will be created. Type terraform plan -var-file=development.tfvars and press enter to initiate the plan.
Add the features block
Notice that we get an error indicating that we are Missing required argument and that for the azurerm provider, we need to provide a features argument. The addition of the resource group AVM resource requires that the azurerm provider be installed to provision resources in our module. This provider requires a features block in its provider definition that is missing in our configuration.
Return to the terraform.tf file and add the following content to it. Note how the features block is currently empty. If we needed to activate any feature flags in our module, we could add them here.
Re-run terraform plan -var-file=development.tfvars now that we have updated the features block.
Set the subscription ID
Note that we once again get an error. This time, the error indicates that subscription_id is a required provider property for plan/apply operations. This is a change that was introduced as part of the version 4 release of the AzureRM provider. We need to supply the ID of the deployment subscription where our resources will be created.
First, we need to get the subscription ID value. We will use the portal for this exercise, but using the Azure CLI, PowerShell, or the resource graph will also work to retrieve this value.
- Open the Azure portal.
- Enter
Subscriptionsin the search field at the top middle of the page. - Select
Subscriptionsfrom the services menu in the search drop-down. - Select the subscription you wish to deploy to, from the list of subscriptions.
- Find the
Subscription IDfield on the overview page and click the copy button to copy it to the clipboard.
Secondly, we need to update Terraform so that it can use the subscription ID. There are multiple ways to provide a subscription ID to the provider including adding it to the features block or using environment variables. For this scenario we’ll use environment variables to set the values so that we don’t have to re-enter them on each run. This also keeps us from storing the subscription ID in our code since it is considered a sensitive value. Select a command from the list below based on your operating system.
- (Linux/MacOS) - Run the following command with your subscription ID:
export ARM_SUBSCRIPTION_ID=<your ID here> - (Windows) - Run the following command with your subscription ID:
set ARM_SUBSCRIPTION_ID=<your ID here>
Finally, we should now be able to complete our plan operation by re-running terraform plan -var-file=development.tfvars. Note that the plan will create three resources, two for telemetry and one for the resource group.
Deploy the resource group
We can complete testing by implementing the resource group. Run terraform apply -var-file="development.tfvars" and type yes and press enter when prompted to accept the changes. Terraform will create the resource group and notify you with a Apply complete message and a summary of the resources that were added, changed, and destroyed.
Deploy the Log Analytics Workspace
We can now continue by adding the Log Analytics Workspace to our main.tf file. We will follow a workflow similar to what we did with the resource group.
- Browse to the AVM Log Analytics Workspace module page in the Terraform Registry.
- Copy the module content from the
Provision Instructionsportion of the page into themain.tffile.
This time, instead of manually supplying module inputs, we will copy module content from one of the examples to minimize the amount of typing required. In most examples, the AVM module call is located at the bottom of the example.
- Navigate to the
Examplesdrop-down menu in the documentation and select thedefaultexample from the menu. You will see a fully functioning example code which includes the module and any supporting resources. Since we only care about the workspace resource from this example, we can scroll to the bottom of the code block and find themodule "log_analytics_workspace"line. - Copy the content between the module brackets with the exception of the line defining the module source. Because these examples are part of the testing methodology for the module, they use a dot reference value (
../..) for the module source value which will not work in our module call. To work around this, we copied those values from the provision instructions section of the module documentation in a previous step. - Update the location and resource group name values to reference outputs from the resource group module. Using implicit references such as these allow Terraform to determine the order in which resources should be built.
- Update the name field using the prefix variable to allow for customization using a similar pattern to what we used on the resource group.
The Log Analytics module content should look like the following code block. For simplicity, you can also copy this directly to avoid multiple copy/paste actions.
Again, we will need to run terraform init to allow Terraform to initialize a copy of the AVM Log Analytics module.
Now, we can deploy the Log Analytics workspace by running terraform apply -var-file="development.tfvars", typing yes and pressing enter. Note that Terraform will only create the new Log Analytics resources since the resource group already exists. This is one of the key benefits of deploying using Infrastructure as Code (IAC) tools like Terraform.
Note
Note that we ran the terraform apply command without first running terraform plan. Because terraform apply runs a plan before prompting for the apply, we opted to shorten the instructions by skipping the explicit plan step. If you are testing in a live environment, you may want to run the plan step and save the plan as part of your governance or change control processes.
Deploy the Azure Key Vault
Our solution calls for a simple Key Vault implementation to store virtual machine secrets. We’ll follow the same workflow for deploying the Key Vault as we used for the previous resource group and Log Analytics workspace resources. However, since Key Vaults require data roles to manage secrets and keys, we will need to use the RBAC interface and a data resource to configure Role-Based Access Control (RBAC) during the deployment.
Note
For this exercise, we will provision the deployment user with data rights on the Key Vault. In your environment, you will likely want to either provide additional roles as inputs or statically assign users, or groups to the Key Vault data roles. For simplicity we also set the Key Vault to have public access enabled due to us not being able to dictate a private deployment environment. In your environment where your deployment machine will be on a private network it is recommended to restrict public access for the Key Vault.
Before we implement the AVM module for the Key Vault, we want to use a data resource to read the client details about the user context of the current Terraform deployment.
Add the following line to your main.tf file and save it.
Key vaults use a global namespace which means that we will also need to add a randomization resource to allow us to randomize the name to avoid any potential name intersection issues with other Key Vault deployments. We will use Terraform’s random provider to generate the random string which we will append to the Key Vault name. Add the following code to your main module to create the random_string resource we will use for naming.
Now we can continue with adding the AVM Key Vault module to our solution.
- Browse to the AVM Key Vault resource module page in the Terraform Registry.
- Copy the module content from the
Provision Instructionsportion of the page into themain.tffile. - This time, we’re going to select relevant content from the
Create secretexample to fill out our module. - Copy the
name,location,enable_telemetry,resource_group_name,tenant_id, androle_assignmentsvalue content from the example and paste it into the new Key Vault module in your solution. - Update the name value to be
"${var.prefix}-kv-${random_string.name_suffix.result}" - Update the
locationandresource_group_namevalues to the same implicit resource group module references we used in the Log Analytics workspace. - Set the
enable_telemetryvalue to true. - Leave the
tenant_idandrole_assignmentsvalues to the same values that are in the example.
Our architecture calls for us to include a diagnostic settings configuration for each resource that supports it. We’ll use the diagnostic-settings example to copy this content.
- Return to the documentation page and select the
diagnostic-settingsoption from the examples drop-down. - Locate the Key Vault resource in the example’s code block and copy the
diagnostic_settingsvalue and paste it into the Key Vault module block we’re building inmain.tf. - Update the name value to use our prefix variable to allow for name customization.
- Update the
workspace_resource_idvalue to be an implicit reference to the output from the previously implemented Log Analytics module (module.avm-res-operationalinsights-workspace.resource_idin our code).
Finally, we will allow public access, so that our deployer machine can add secrets to the Key Vault. If your environment doesn’t allow public access for Key Vault deployments, locate the public IP address of your deployer machine (this may be an external NAT IP for your network) and add it to the network_acls.ip_rules list value using CIDR notation.
- Set the
network_aclsinput tonullin your module block for the Key Vault.
Your Key Vault module definition should now look like the following:
Note
One of the core values of AVM is the standard configuration for interfaces across modules. The Role Assignments interface we used as part of the Key Vault deployment is a good example of this.
Continue the incremental testing of your module by running another terraform init and terraform apply -var-file="development.tfvars" sequence.
Deploy the NAT Gateway
Our architecture calls for a NAT Gateway to allow virtual machines to access the internet. We will use the NAT Gateway resource_id output in future modules to link the virtual machine subnet.
- Browse to the AVM NAT Gateway resource module page in the Terraform Registry.
- Copy the module definition and source from the
Provision Instructionscard from the module main page. - Copy the remaining module content from the
defaultexample excluding the subnet associations map, as we will do the association when we build the vnet. - Update the
locationandresource_group_nameusing implicit references from our resource group module. - Then update each of the name values to use the
name_prefixvariables.
Review the following code to see each of these changes.
Continue the incremental testing of your module by running another terraform init and terraform apply -var-file="development.tfvars" sequence.
Deploy the Network Security Group
Our architecture calls for a Network Security Group (NSG) allowing SSH access to the virtual machine subnet. We will use the NSG AVM resource module to accomplish this task.
- Browse to the AVM Network Security Group resource module page in the Terraform Registry.
- Copy the module definition and source from the
Provision Instructionscard from the module main page. - Copy the remaining module content from the
example_with_NSG_ruleexample. - Update the
locationandresource_group_nameusing implicit references from our resource group module. - Update the name value using the
name_prefixvariable interpolation as we did with the other modules. - Copy the map entry labeled
rule02from the localsnsg_rulesmap and paste it between two curly braces to create thesecurity_rulesattribute in the NSG module we’re building. - Make the following updates to the rule details:
- Rename the map key to
"rule01"from"rule02". - Update the name to use the var.prefix interpolation and SSH to describe the rule.
- Update the
destination_port_rangeslist to be["22"].
- Rename the map key to
Upon completion the code for the NSG module should be as follows:
Continue the incremental testing of your module by running another terraform init and terraform apply -var-file="development.tfvars" sequence.
Deploy the Virtual Network
We can now continue the build-out of our architecture by configuring the virtual network (vnet) deployment. This will follow a similar pattern as the previous resource modules, but this time, we will also add some network functions to help us customize the subnet configurations.
- Browse to the AVM Virtual Network resource module page in the Terraform Registry.
- Copy the module definition and source from the
Provision Instructionscard from the module main page. - After looking through the examples, this time, we’ll use the
completeexample as a source to copy our content. - Copy the
resource_group_name,location,name, andaddress_spacelines and replace their values with our deployment specific variables or module references. - We’ll copy the
subnetsmap and duplicate thesubnet0map for each subnet. - Now we will update the map key and
namevalues for each subnet so that they are unique. - Then we’ll use the
cidrsubnetfunction to dynamically generate the CIDR range for each subnet. You can explore the function documentation for more details on how it can be used. - We will also populate the
nat_gatewayobject onsubnet0with theresource_idoutput from our NAT Gateway module. - To configure the NSG on the VM subnet we need to link it. Add a
network_security_groupattribute to thesubnet0definition and replace the value with theresource_idoutput from the NSG module. - Finally, we’ll copy the diagnostic settings from the example and update the implicit references to point to our previously deployed Log Analytics workspace.
After making these changes our virtual network module call code will be as follows:
Note
Note how the Log Analytics workspace reference ends in resource_id. Each AVM module is required to export its Azure resource ID with the resource_id name to allow for consistent references.
Continue the incremental testing of your module by running another terraform init and terraform apply -var-file="development.tfvars" sequence.
Deploy the Bastion service
We want to allow for secure remote access to the virtual machine for configuration and troubleshooting tasks. We’ll use Azure Bastion to accomplish this objective following a similar workflow to our other resources.
- Browse to the AVM Bastion resource module page in the Terraform Registry.
- Copy the module definition and source from the
Provision Instructionscard from the module main page. - Copy the remaining module content from the
Simple Deploymentexample. - Update the
locationandresource_group_nameusing implicit references from our resource group module. - Update the name value using the
name_prefixvariable interpolation as we did with the other modules. - Finally, update the
subnet_idvalue to include an implicit reference to thebastionkeyed subnet from our virtual network module.
Our architecture calls for diagnostic settings to be configured on the Azure Bastion resource. In this case, there aren’t any examples that include this configuration. However, since the diagnostic settings interface is one of the standard interfaces in Azure Verified Modules, we can just copy the interface definition from our virtual network module.
- Locate the virtual network module and copy the
diagnostic_settingsvalue from it. - Paste the
diagnostic_settingsvalue into the code for our Bastion module. - Update the diagnostic setting’s name value from vnet to Bastion.
The new code we added for the Bastion resource will be as follows:
Note
Pay attention to the subnet_id syntax. In the virtual network module, the subnets are created as a sub-module allowing us to reference each of them using the map key that was defined in the subnets input. Again, we see the consistent output naming with the resource_id output for the sub-module.
Continue the incremental testing of your module by running another terraform init and terraform apply -var-file="development.tfvars" sequence.
Deploy the virtual machine
The final step in our deployment will be our application virtual machine. We’ve had good success with our workflow so far, so we’ll use it for this step as well.
- Browse to the AVM Virtual Machine resource module page in the Terraform Registry.
- Copy the module definition and source from the
Provision Instructionscard from the module main page. - Copy the remaining module content from the
linux_defaultexample. - Update the
locationandresource_group_nameusing implicit references from our resource group module. - To be compliant with Well Architected Framework guidance we encourage defining a zone if your region supports it. Update the zone input to 1.
- Update the sku_size input to “Standard_D2s_v5”.
- Update the name values using the
name_prefixvariable interpolation as we did with the other modules and include the output from therandom_string.name_suffixresource to add uniqueness. - Set the
account_credentials.key_vault_configuration.resource_idvalue to reference theresource_idoutput from the Key Vault module. - Update the
private_ip_subnet_resource_idvalue to an implicit reference to thesubnet0subnet output from the virtual network module.
Because the default Linux example doesn’t include diagnostic settings, we need to add that content in a different way. Since the diagnostic settings interface has a standard schema, we can copy the diagnostic_settings input from our virtual network module.
- Locate the virtual network module in your code and copy the
diagnostic_settingsmap from it. - Paste the
diagnostic_settingscontent into your virtual machine module code. - Update the
namevalue to reflect that it applies to the virtual machine.
The new code we added for the virtual machine resource will be as follows:
Continue the incremental testing of your module by running another terraform init and terraform apply -var-file="development.tfvars" sequence.
Creating the outputs.tf file
The final piece of our module is to export any values that may need to be consumed by module users. From our architecture, we’ll export the resource group name and the virtual machine resource name.
- Create an
outputs.tffile in your IDE. - Create an output named
resource_group_nameand set the value to an implicit reference to the resource group modules name output. Include a brief description for the output. - Create an output named
virtual_machine_nameand set the value to an implicit reference to the virtual machine module’s name output. Include a brief description for the output.
The new code we added for the outputs will be as follows:
Because no new modules were created, we don’t need to run terraform init to test this change. Run terraform apply -var-file="development.tfvars" to see the new outputs that have been created.
Update the terraform.tf file
It is a recommended practice to define the required versions of the providers for your module to ensure consistent behavior when it is being run. In this case we are going to be slightly permissive and allow increases in minor and patch versions to fluctuate, since those are not supposed to include breaking changes. In a production environment, you would likely want to pin on a specific version to guarantee behavior.
- Run
terraform initto review the providers and versions that are currently installed. - Update your
terraform.tffile’s required providers field for each provider listed in the downloaded providers.
The updated code we added for the providers in the terraform.tf file will be as follows:
Conclusion
Congratulations on successfully implementing a solution using Azure Verified Modules! You were able to build out our sample architecture using module documentation and taking advantage of features like standard interfaces and pre-defined defaults to simplify the development experience.
Note
This was a long exercise and mistakes can happen. If you’re getting errors or a resource is incomplete and you want to see the final main.tf, expand the following code block to see the full file.
AVM modules provide several key advantages over writing raw Terraform templates:
- Simplified Resource Configuration: AVM modules handle much of the complex configuration work behind the scenes
- Built-in Recommended Practices: The modules implement many of Microsoft’s recommended practices by default
- Consistent Outputs: Each module exposes a consistent set of outputs that can be easily referenced
- Reduced Boilerplate Code: What would normally require hundreds of lines of Terraform code can be accomplished in a fraction of the space
As you continue your journey with Azure and AVM, remember that this approach can be applied to more complex architectures as well. The modular nature of AVM allows you to mix and match components to build solutions that meet your specific needs while adhering to Microsoft’s Well-Architected Framework.
By using AVM modules as building blocks, you can focus more on your solution architecture and less on the intricacies of individual resource configurations, ultimately leading to faster development cycles and more reliable deployments.
Additional exercises
For additional learning, it can be helpful to experiment with modifying this solution. Here are some ideas you can try if you have time and would like to experiment further.
- Use the
managed_identitiesinterface to add a system assigned managed identity to the virtual machine and give itKey Vault Administratorrights on the Key Vault. - Use the
tagsinterface to assign tags directly to one or more resources. - Add an Azure Monitoring Agent extension to the virtual machine resource.
- Add additional inputs like VM sku to your module to make it more customizable. Be sure to update the code and
tfvarsfiles to match.
Clean up your environment
Once you have completed this set of exercises, it is a good idea to clean up your resources to avoid incurring costs for them. This can be done typing terraform destroy -var-file=development.tfvars and entering yes when prompted.