Bicep - Solution Development

Introduction

Azure Verified Modules (AVM) for Bicep are a powerful tool that leverage the Bicep domain-specific language (DSL), industry knowledge, and an Open Source community, which altogether enable developers to quickly deploy Azure resources that follow Microsoft’s recommended practices for Azure.
In this article, we will walk through the Bicep specific considerations and recommended practices on developing your solution leveraging Azure Verified Modules. We’ll review some of the design features and trade-offs and include sample code to illustrate each discussion point.

In this tutorial, we will:

  • Deploy a basic Virtual Machine architecture into Azure
  • Explore recommended practices related to Bicep template development
  • Demonstrate the ease with which you can deploy AVM modules
  • Describe each of the development and deployment steps in detail

After completing this tutorial, you’ll have a working knowledge of:

  • How to discover and add AVM modules to your Bicep template
  • How to reference and use outputs across AVM modules
  • Recommended practices for parameterization and structure of your Bicep file
  • Configuration of AVM modules to meet Microsoft’s Well Architected Framework (WAF) principles
  • How to deploy your Bicep template into an Azure subscription from your local machine

Let’s get started!

Prerequisites

You will need the following tools and components to complete this guide:

Before you begin, make sure you have these tools installed in your development environment.

Solution Architecture

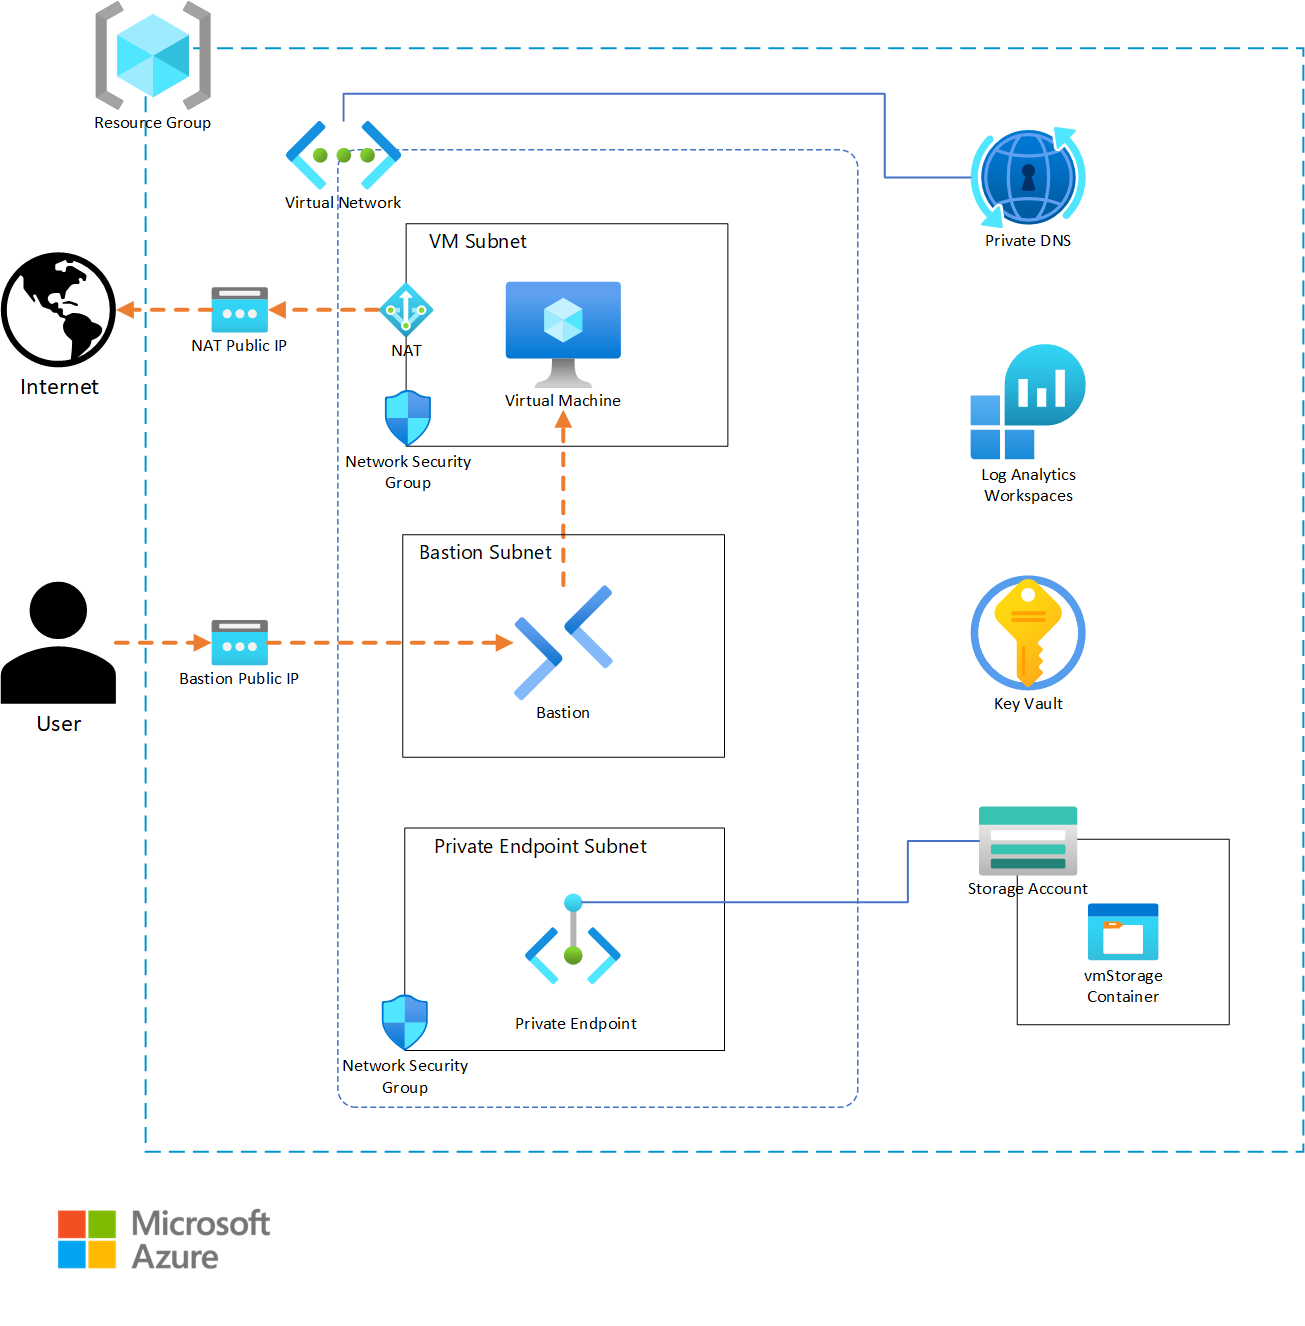
Before we begin coding, it is important to have details about what the infrastructure architecture will include. For our example, we will be building a solution that will host a simple application on a Linux virtual machine (VM). The solution must be secure and auditable. The VM must not be accessible from the internet and its logs should be easily accessible. All azure services should utilize logging tools for auditing purposes.

Azure VM Solution Architecture

Develop the Solution Code

Creating the main.bicep file

The architecture diagram shows all components needed for a successful solution deployment. Rather than building the complete solution at once, this tutorial takes an incremental approach building the Bicep file piece-by-piece and testing the deployment at each stage. This approach allows for discussion of each design decision along the way.

The development will start with core platform components: first the backend logging services (Log Analytics) and then the virtual network.

Let’s begin by creating our folder structure along with a main.bicep file. Your folder structure should be as follows:

VirtualMachineAVM_Example1/
└── main.bicep

After you have your folder structure and main.bicep file, we can proceed with our first AVM resources!

Log Analytics

Let’s start by adding a logging service to our main.bicep since all other deployed resources will use this service for their logs.

Tip

Always begin template development by adding resources that create dependencies for other downstream services. This approach simplifies referencing these dependencies within your other modules as you develop them. For example, starting with Logging and Virtual Network services makes sense since all other services will depend on these.

The logging solution depicted in our Architecture Diagram shows we will be using a Log Analytics workspace. Let’s add that to our template! Open your main.bicep file and add the following:

➕ Expand Code
1module logAnalyticsWorkspace 'br/public:avm/res/operational-insights/workspace:0.11.1' = {
2  name: 'logAnalyticsWorkspace'
3  params: {
4    // Required parameters
5    name: 'VM-AVM-Ex1-law'
6    // Non-required parameters
7    location: 'westus2'
8  }
9}
Note

Always click on the “Copy to clipboard” button in the top right corner of the Code sample area in order not to have the line numbers included in the copied code.

You now have a fully functional Bicep template that will deploy a working Log Analytics workspace! If you would like to try it, run the following in your console:

Note

For keeping the example below simple, we are using the traditional deployment commands, e.g., az deployment group create or New-AzResourceGroupDeployment. However, we encourage you to look into using Deployment Stacks instead by simply replacing the previous commands with az stack group create or New-AzResourceGroupDeploymentStack as well as the other required input parameters as shown here.

Deployment Stacks allow you to deploy a Bicep file as a stack, which is a collection of resources that are deployed together. This allows you to manage the lifecycle of the stack as a single unit, making it easier to deploy, update, and now even delete resources via Bicep. You can also implement RBAC Deny Assignments on your stacks deployed resources to prevent changes to the resources or specific actions on the resources to all but an excluded list of users, groups or other principals.

Deploy with
# Log in to Azure
Connect-AzAccount

# Select your subscription
Set-AzContext -SubscriptionId '<subscriptionId>'

# Deploy a resource group
New-AzResourceGroup -Name 'avm-bicep-vmexample1' -Location '<location>'

# Invoke your deployment
New-AzResourceGroupDeployment -DeploymentName 'avm-bicep-vmexample1-deployment' -ResourceGroupName 'avm-bicep-vmexample1' -TemplateFile '/<path-to>/VirtualMachineAVM_Example1/main.bicep'
# Log in to Azure
az login

# Select your subscription
az account set --subscription '<subscriptionId>'

# Deploy a resource group
az group create --name 'avm-bicep-vmexample1' --location '<location>'

# Invoke your deployment
az deployment group create --name 'avm-bicep-vmexample1-deployment' --resource-group 'avm-bicep-vmexample1' --template-file '/<path-to>/VirtualMachineAVM_Example1/main.bicep'

The above commands will log you in to your Azure subscription, select a subscription to use, create a resource group, then deploy the main.bicep template to your resource group.

AVM Makes the deployment of Azure resources incredibly easy. Many of the parameters you would normally be required to define are taken care of by the AVM module itself. In fact, the location parameter is not even needed in your template—when left blank, by default, all AVM modules will deploy to the location in which your target Resource Group exists.

Now we have a Log Analytics workspace in our resource group which doesn’t do a whole lot of good on its own. Let’s take our template a step further by adding a Virtual Network that integrates with the Log Analytics workspace.

Virtual Network

We will now add a Virtual Network to our main.bicep file. This VNet will contain subnets and Network Security Groups (NSGs) for any of the resources we deploy that require IP addresses.

In your main.bicep file, add the following:

➕ Expand Code
 1module logAnalyticsWorkspace 'br/public:avm/res/operational-insights/workspace:0.11.1' = {
 2  name: 'logAnalyticsWorkspace'
 3  params: {
 4    // Required parameters
 5    name: 'VM-AVM-Ex1-law'
 6    // Non-required parameters
 7    location: 'westus2'
 8  }
 9}
10
11module virtualNetwork 'br/public:avm/res/network/virtual-network:0.6.1' = {
12  name: 'virtualNetworkDeployment'
13  params: {
14    // Required parameters
15    addressPrefixes: [
16      '10.0.0.0/16'
17    ]
18    name: 'VM-AVM-Ex1-vnet'
19    // Non-required parameters
20    location: 'westus2'
21  }
22}

Again, the Virtual Network AVM module requires only two things: a name and an addressPrefixes parameter.

Configure Diagnostics Settings

There is an additional parameter available in most AVM modules named diagnosticSettings. This parameter allows you to configure your resource to send its logs to any suitable logging service. In our case, we are using a Log Analytics workspace.

Let’s update our main.bicep file to have our VNet send all of its logging data to our Log Analytics workspace:

➕ Expand Code
 1module logAnalyticsWorkspace 'br/public:avm/res/operational-insights/workspace:0.11.1' = {
 2  name: 'logAnalyticsWorkspace'
 3  params: {
 4    // Required parameters
 5    name: 'VM-AVM-Ex1-law'
 6    // Non-required parameters
 7    location: 'westus2'
 8  }
 9}
10
11module virtualNetwork 'br/public:avm/res/network/virtual-network:0.6.1' = {
12  name: 'virtualNetworkDeployment'
13  params: {
14    // Required parameters
15    addressPrefixes: [
16      '10.0.0.0/16'
17    ]
18    name: 'VM-AVM-Ex1-vnet'
19    // Non-required parameters
20    location: 'westus2'
21    diagnosticSettings: [
22      {
23        name: 'vNetDiagnostics'
24        workspaceResourceId: logAnalyticsWorkspace.outputs.resourceId
25      }
26    ]
27  }
28}

Notice how the diagnosticsSettings parameter needs a workspaceResourceId? All you need to do is add a reference to the built-in logAnalyticsWorkspaceId output of the logAnalyticsWorkspace AVM module. That’s it! Our VNet now has integrated its logging with our Log Analytics workspace. All AVM modules come with a set of built-in outputs that can be easily referenced by other modules within your template.

Info

All AVM modules have built-in outputs which can be referenced using the <moduleName>.outputs.<outputName> syntax.

When using plain Bicep, many of these outputs require multiple lines of code or knowledge of the correct object ID references to get at the desired output. AVM modules do much of this heavy lifting for you by taking care of these complex tasks within the module itself, then exposing them to you through the module’s outputs. Find out more about Bicep Outputs.

Add a Subnet and NAT Gateway

We can’t use a Virtual Network without subnets, so let’s add a subnet next. According to our Architecture, we will have three subnets: one for the Virtual Machine, one for the Bastion host, and one for Private Endpoints. We can start with the VM subnet for now. While we’re at it, let’s also add the NAT Gateway, the NAT Gateway’s Public IP, the attach the NAT Gateway to the VM subnet.

Add the following to your main.bicep:

➕ Expand Code
 1module logAnalyticsWorkspace 'br/public:avm/res/operational-insights/workspace:0.11.1' = {
 2  name: 'logAnalyticsWorkspace'
 3  params: {
 4    // Required parameters
 5    name: 'VM-AVM-Ex1-law'
 6    // Non-required parameters
 7    location: 'westus2'
 8  }
 9}
10
11module natGwPublicIp 'br/public:avm/res/network/public-ip-address:0.8.0' = {
12  name: 'natGwPublicIpDeployment'
13  params: {
14    // Required parameters
15    name: 'VM-AVM-Ex1-natgwpip'
16    // Non-required parameters
17    location: 'westus2'
18    diagnosticSettings: [
19      {
20        name: 'natGwPublicIpDiagnostics'
21        workspaceResourceId: logAnalyticsWorkspace.outputs.resourceId
22      }
23    ]
24  }
25}
26
27module natGateway 'br/public:avm/res/network/nat-gateway:1.2.2' = {
28  name: 'natGatewayDeployment'
29  params: {
30    // Required parameters
31    name: 'VM-AVM-Ex1-natGw'
32    zone: 1
33    // Non-required parameters
34    publicIpResourceIds: [
35      natGwPublicIp.outputs.resourceId
36    ]
37  }
38}
39
40module virtualNetwork 'br/public:avm/res/network/virtual-network:0.6.1' = {
41  name: 'virtualNetworkDeployment'
42  params: {
43    // Required parameters
44    addressPrefixes: [
45      '10.0.0.0/16'
46    ]
47    name: 'VM-AVM-Ex1-vnet'
48    // Non-required parameters
49    location: 'westus2'
50    diagnosticSettings: [
51      {
52        name: 'vNetDiagnostics'
53        workspaceResourceId: logAnalyticsWorkspace.outputs.resourceId
54      }
55    ]
56    subnets: [
57      {
58        name: 'VMSubnet'
59        addressPrefix: cidrSubnet('10.0.0.0/16', 24, 0) // first subnet in address space
60        natGatewayResourceId: natGateway.outputs.resourceId
61      }
62    ]
63  }
64}

The modification adds a subnets property to our virtualNetwork module. The AVM network/virtual-network module supports the creation of subnets directly within the module itself. We can also link our NAT Gateway directly to the subnet within this submodule.

A nice feature within Bicep are the various functions available. We use the cidrSubnet() function to declare CIDR blocks without having to calculate them on your own.

Switch to Parameters and Variables

See how we are reusing the same CIDR block 10.0.0.0/16 in multiple locations? You may have noticed we are defining the same location in two different spots as well. We’re now at a point in the development where we should leverage one of our first recommended practices: using parameters and variables!

Tip

Use Bicep variables to define values that will be constant and reused with your template; use parameters anywhere you may need a modifiable value.

Let’s enhance the template by adding variables for the CIDR block and prefix, then use a location parameter with a default value. We’ll then reference those in the module:

➕ Expand Code
 1param location string = 'westus2'
 2
 3var addressPrefix = '10.0.0.0/16'
 4var prefix = 'VM-AVM-Ex1'
 5
 6module logAnalyticsWorkspace 'br/public:avm/res/operational-insights/workspace:0.11.1' = {
 7  name: 'logAnalyticsWorkspace'
 8  params: {
 9    // Required parameters
10    name: '${prefix}-law'
11    // Non-required parameters
12    location: location
13  }
14}
15
16module natGwPublicIp 'br/public:avm/res/network/public-ip-address:0.8.0' = {
17  name: 'natGwPublicIpDeployment'
18  params: {
19    // Required parameters
20    name: '${prefix}-natgwpip'
21    // Non-required parameters
22    location: location
23    diagnosticSettings: [
24      {
25        name: 'natGwPublicIpDiagnostics'
26        workspaceResourceId: logAnalyticsWorkspace.outputs.resourceId
27      }
28    ]
29  }
30}
31
32module natGateway 'br/public:avm/res/network/nat-gateway:1.2.2' = {
33  name: 'natGatewayDeployment'
34  params: {
35    // Required parameters
36    name: '${prefix}-natgw'
37    zone: 1
38    // Non-required parameters
39    publicIpResourceIds: [
40      natGwPublicIp.outputs.resourceId
41    ]
42  }
43}
44
45module virtualNetwork 'br/public:avm/res/network/virtual-network:0.6.1' = {
46  name: 'virtualNetworkDeployment'
47  params: {
48    // Required parameters
49    addressPrefixes: [
50      addressPrefix
51    ]
52    name: '${prefix}-vnet'
53    // Non-required parameters
54    location: location
55    diagnosticSettings: [
56      {
57        name: 'vNetDiagnostics'
58        workspaceResourceId: logAnalyticsWorkspace.outputs.resourceId
59      }
60    ]
61    subnets: [
62      {
63        name: 'VMSubnet'
64        addressPrefix: cidrSubnet(addressPrefix, 24, 0) // first subnet in address space
65        natGatewayResourceId: natGateway.outputs.resourceId
66      }
67    ]
68  }
69}

We now have a good basis for the infrastructure to be utilized by the rest of the resources in our Architecture. We will come back to our networking in a future step, once we are ready to create some Network Security Groups. For now, let’s move on to other modules.

Key Vault

Key Vaults are one of the key components in most Azure architectures as they create a place where you can save and reference secrets in a secure manner (“secrets” in the general sense, as opposed to the secret object type in Key Vaults). The Key Vault AVM module makes it very simple to store secrets generated in your template. In this tutorial, we will use one of the most secure methods of storing and retrieving secrets by leveraging this Key Vault in our Bicep template.

The first step is easy: add the Key Vault AVM module to our main.bicep file. In addition, let’s also ensure it’s hooked into our Log Analytics workspace (we will do this for every new module from here on out).

➕ Expand Code
 1param location string = 'westus2'
 2
 3var addressPrefix = '10.0.0.0/16'
 4var prefix = 'VM-AVM-Ex1'
 5
 6module logAnalyticsWorkspace 'br/public:avm/res/operational-insights/workspace:0.11.1' = {
 7  name: 'logAnalyticsWorkspace'
 8  params: {
 9    // Required parameters
10    name: '${prefix}-law'
11    // Non-required parameters
12    location: location
13  }
14}
15
16module natGwPublicIp 'br/public:avm/res/network/public-ip-address:0.8.0' = {
17  name: 'natGwPublicIpDeployment'
18  params: {
19    // Required parameters
20    name: '${prefix}-natgwpip'
21    // Non-required parameters
22    location: location
23    diagnosticSettings: [
24      {
25        name: 'natGwPublicIpDiagnostics'
26        workspaceResourceId: logAnalyticsWorkspace.outputs.resourceId
27      }
28    ]
29  }
30}
31
32module natGateway 'br/public:avm/res/network/nat-gateway:1.2.2' = {
33  name: 'natGatewayDeployment'
34  params: {
35    // Required parameters
36    name: '${prefix}-natgw'
37    zone: 1
38    // Non-required parameters
39    publicIpResourceIds: [
40      natGwPublicIp.outputs.resourceId
41    ]
42  }
43}
44
45module virtualNetwork 'br/public:avm/res/network/virtual-network:0.6.1' = {
46  name: 'virtualNetworkDeployment'
47  params: {
48    // Required parameters
49    addressPrefixes: [
50      addressPrefix
51    ]
52    name: '${prefix}-vnet'
53    // Non-required parameters
54    location: location
55    diagnosticSettings: [
56      {
57        name: 'vNetDiagnostics'
58        workspaceResourceId: logAnalyticsWorkspace.outputs.resourceId
59      }
60    ]
61    subnets: [
62      {
63        name: 'VMSubnet'
64        addressPrefix: cidrSubnet(addressPrefix, 24, 0) // first subnet in address space
65        natGatewayResourceId: natGateway.outputs.resourceId
66      }
67    ]
68  }
69}
70
71module keyVault 'br/public:avm/res/key-vault/vault:0.12.1' = {
72  name: 'keyVaultDeployment'
73  params: {
74    // Required parameters
75    name: '${uniqueString(resourceGroup().id)}-kv'
76    // Non-required parameters
77    location: location
78    diagnosticSettings: [
79      {
80        name: 'keyVaultDiagnostics'
81        workspaceResourceId: logAnalyticsWorkspace.outputs.resourceId
82      }
83    ]
84  }
85}

The name of the Key Vault we will deploy uses the uniqueString() Bicep function. Key Vault names must be globally unique. We will therefore deviate from our standard naming convention thus far and make an exception for the Key Vault. Note how we are still adding a suffix to the Key Vault name, so its name remains recognizable; you can use a combination of concatenating unique strings, prefixes, or suffixes to follow your own naming standard preferences.

When we generate our unique string, we will pass in the resourceGroup().id as the seed for the uniqueString() function so that every time you deploy this main.bicep to the same resource group, it will use the same randomly generated name for your Key Vault (since resourceGroup().id will be the same).

Tip

Bicep has many built-in functions available. We used two here: uniqueString() and resourceGroup(). The resourceGroup(), subscription(), and deployment() functions are very useful when seeding uniqueString() or guid() functions. Just be cautious about name length limitations for each Azure service! Visit this page to learn more about Bicep functions.

We will use this Key Vault later on when we create a VM and need to store its password. Now that we have it, a Virtual Network, Subnet, and Log Analytics prepared, we should have everything we need to deploy a Virtual Machine!

Info

In the future, we will update this guide to show how to generate and store a certificate in the Key Vault, then use that certificate to authenticate into the Virtual Machine.

Virtual Machine

Warning

The AVM Virtual Machine module enables the EncryptionAtHost feature by default. You must enable this feature within your Azure subscription successfully deploy this example code. To do so, run the following:

Deploy with
# Wait a few minutes after running the command to allow it to propagate
Register-AzProviderFeature -FeatureName "EncryptionAtHost" -ProviderNamespace "Microsoft.Compute"
az feature register --namespace Microsoft.Compute --name EncryptionAtHost

# Propagate the change
az provider register --namespace Microsoft.Compute

For our Virtual Machine (VM) deployment, we need to add the following to our main.bicep file:

➕ Expand Code
  1param location string = 'westus2'
  2
  3// START add-password-param
  4@description('Required. A password for the VM admin user.')
  5@secure()
  6param vmAdminPass string
  7// END add-password-param
  8
  9var addressPrefix = '10.0.0.0/16'
 10var prefix = 'VM-AVM-Ex1'
 11
 12module logAnalyticsWorkspace 'br/public:avm/res/operational-insights/workspace:0.11.1' = {
 13  name: 'logAnalyticsWorkspace'
 14  params: {
 15    // Required parameters
 16    name: '${prefix}-law'
 17    // Non-required parameters
 18    location: location
 19  }
 20}
 21
 22module natGwPublicIp 'br/public:avm/res/network/public-ip-address:0.8.0' = {
 23  name: 'natGwPublicIpDeployment'
 24  params: {
 25    // Required parameters
 26    name: '${prefix}-natgwpip'
 27    // Non-required parameters
 28    location: location
 29    diagnosticSettings: [
 30      {
 31        name: 'natGwPublicIpDiagnostics'
 32        workspaceResourceId: logAnalyticsWorkspace.outputs.resourceId
 33      }
 34    ]
 35  }
 36}
 37
 38module natGateway 'br/public:avm/res/network/nat-gateway:1.2.2' = {
 39  name: 'natGatewayDeployment'
 40  params: {
 41    // Required parameters
 42    name: '${prefix}-natgw'
 43    zone: 1
 44    // Non-required parameters
 45    publicIpResourceIds: [
 46      natGwPublicIp.outputs.resourceId
 47    ]
 48  }
 49}
 50
 51module virtualNetwork 'br/public:avm/res/network/virtual-network:0.6.1' = {
 52  name: 'virtualNetworkDeployment'
 53  params: {
 54    // Required parameters
 55    addressPrefixes: [
 56      addressPrefix
 57    ]
 58    name: '${prefix}-vnet'
 59    // Non-required parameters
 60    location: location
 61    diagnosticSettings: [
 62      {
 63        name: 'vNetDiagnostics'
 64        workspaceResourceId: logAnalyticsWorkspace.outputs.resourceId
 65      }
 66    ]
 67    subnets: [
 68      {
 69        name: 'VMSubnet'
 70        addressPrefix: cidrSubnet(addressPrefix, 24, 0) // first subnet in address space
 71        natGatewayResourceId: natGateway.outputs.resourceId
 72      }
 73    ]
 74  }
 75}
 76
 77module keyVault 'br/public:avm/res/key-vault/vault:0.12.1' = {
 78  name: 'keyVaultDeployment'
 79  params: {
 80    // Required parameters
 81    name: '${uniqueString(resourceGroup().id)}-kv'
 82    // Non-required parameters
 83    location: location
 84    diagnosticSettings: [
 85      {
 86        name: 'keyVaultDiagnostics'
 87        workspaceResourceId: logAnalyticsWorkspace.outputs.resourceId
 88      }
 89    ]
 90    // START add-keyvault-secret
 91    secrets: [
 92      {
 93        name: 'vmAdminPassword'
 94        value: vmAdminPass
 95      }
 96    ]
 97    // END add-keyvault-secret
 98  }
 99}
100
101module virtualMachine 'br/public:avm/res/compute/virtual-machine:0.13.1' = {
102  name: 'linuxVirtualMachineDeployment'
103  params: {
104    // Required parameters
105    adminUsername: 'localAdminUser'
106    adminPassword: vmAdminPass
107    imageReference: {
108      offer: '0001-com-ubuntu-server-jammy'
109      publisher: 'Canonical'
110      sku: '22_04-lts-gen2'
111      version: 'latest'
112    }
113    name: '${prefix}-vm1'
114    // START vm-subnet-reference
115    nicConfigurations: [
116      {
117        ipConfigurations: [
118          {
119            name: 'ipconfig01'
120            subnetResourceId: virtualNetwork.outputs.subnetResourceIds[0] // VMSubnet
121          }
122        ]
123        nicSuffix: '-nic-01'
124      }
125    ]
126    // END vm-subnet-reference
127    osDisk: {
128      caching: 'ReadWrite'
129      diskSizeGB: 128
130      managedDisk: {
131        storageAccountType: 'Standard_LRS'
132      }
133    }
134    osType: 'Linux'
135    vmSize: 'Standard_B2s_v2'
136    zone: 0
137    // Non-required parameters
138    location: location
139  }
140}

The VM module is one of the more complex modules in AVM—behind the scenes, it takes care of a lot of heavy lifting that, without AVM, would require multiple Bicep resources to be deployed and referenced.

For example, look at the nicConfigurations parameter: normally, you would need to deploy a separate NIC resource, which itself also requires an IP resource, then attach them to each other, and finally, attach them all to your VM.

With the AVM VM module, the nicConfigurations parameter accepts an object, allowing you to create any number of NICs to attach to your VM from within the VM resource deployment itself. It handles all the naming, creation of other necessary dependencies, and attaches them all together, so you don’t have to. The osDisk parameter is similar, though slightly less complex. There are many more parameters within the VM module that you can leverage if needed, that share a similar ease-of-use.

Since this is the real highlight of our main.bicep file, we need to take a closer look at some of the other changes that were made.

  • VM Admin Password Parameter

    1@description('Required. A password for the VM admin user.')
    2@secure()
    3param vmAdminPass string

    First, we added a new parameter. The value of this will be provided when the main.bicep template is deployed. We don’t want any passwords stored as text in code; for our purposes, the safest way to do this is to prompt the end user for the password at the time of deployment.

    Warning

    The supplied password must be between 6-72 characters long and must satisfy at least 3 of password complexity requirements from the following: Contains an uppercase character; Contains a lowercase character; Contains a numeric digit; Contains a special character. Control characters are not allowed

    Also note how we are using the @secure() decorator on the password parameter. This will ensure the value of the password is never displayed in any of the deployment logs or in Azure. We have also added the @description() decorator and started the description with “Required.” It’s a good habit and recommended practice to document your parameters in Bicep. This will ensure that VS Code’s built-in Bicep linter can provide end-users insightful information when deploying your Bicep templates.

    Info

    Always use the @secure() decorator when creating a parameter that will hold sensitive data!

  • Add the VM Admin Password to Key Vault

    1    secrets: [
    2      {
    3        name: 'vmAdminPassword'
    4        value: vmAdminPass
    5      }
    6    ]

    The next thing we have done is save the value of our vmAdminPass parameter to our Key Vault. We have done this by adding a secrets parameter to the Key Vault module. Adding secrets to Key Vaults is very simple when using the AVM module.

    By adding our password to the Key Vault, it will ensure that we never lose the password and that it is stored securely. As long as a user has appropriate permissions on the vault, the password can be fetched easily.

  • Reference the VM Subnet

     1    nicConfigurations: [
     2      {
     3        ipConfigurations: [
     4          {
     5            name: 'ipconfig01'
     6            subnetResourceId: virtualNetwork.outputs.subnetResourceIds[0] // VMSubnet
     7          }
     8        ]
     9        nicSuffix: '-nic-01'
    10      }
    11    ]

    Here, we reference another built-in output, this time from the AVM Virtual Network module. This example shows how to use an output that is part of an array. When the Virtual Network module creates subnets, it automatically creates a set of pre-defined outputs for them, one of which is an array that contains each subnet’s subnetResourceId. Our VM Subnet was the first one created which is position [0] in the array.

    Other AVM modules may make use of arrays to store outputs. If you are unsure what type of outputs a module provides, you can always reference the Outputs section of each module’s README.md.

Storage Account

The last major component we need to add is a Storage Account. Because this Storage Account will be used as a backend storage to hold blobs for the hypothetical application that runs on our VM, we’ll also create a blob container within it using the same AVM Storage Account module.

➕ Expand Code
  1param location string = 'westus2'
  2
  3@description('Required. A password for the VM admin user.')
  4@secure()
  5param vmAdminPass string
  6
  7var addressPrefix = '10.0.0.0/16'
  8var prefix = 'VM-AVM-Ex1'
  9
 10module logAnalyticsWorkspace 'br/public:avm/res/operational-insights/workspace:0.11.1' = {
 11  name: 'logAnalyticsWorkspace'
 12  params: {
 13    // Required parameters
 14    name: '${prefix}-law'
 15    // Non-required parameters
 16    location: location
 17  }
 18}
 19
 20module natGwPublicIp 'br/public:avm/res/network/public-ip-address:0.8.0' = {
 21  name: 'natGwPublicIpDeployment'
 22  params: {
 23    // Required parameters
 24    name: '${prefix}-natgwpip'
 25    // Non-required parameters
 26    location: location
 27    diagnosticSettings: [
 28      {
 29        name: 'natGwPublicIpDiagnostics'
 30        workspaceResourceId: logAnalyticsWorkspace.outputs.resourceId
 31      }
 32    ]
 33  }
 34}
 35
 36module natGateway 'br/public:avm/res/network/nat-gateway:1.2.2' = {
 37  name: 'natGatewayDeployment'
 38  params: {
 39    // Required parameters
 40    name: '${prefix}-natgw'
 41    zone: 1
 42    // Non-required parameters
 43    publicIpResourceIds: [
 44      natGwPublicIp.outputs.resourceId
 45    ]
 46  }
 47}
 48
 49module virtualNetwork 'br/public:avm/res/network/virtual-network:0.6.1' = {
 50  name: 'virtualNetworkDeployment'
 51  params: {
 52    // Required parameters
 53    addressPrefixes: [
 54      addressPrefix
 55    ]
 56    name: '${prefix}-vnet'
 57    // Non-required parameters
 58    location: location
 59    diagnosticSettings: [
 60      {
 61
 62        name: 'vNetDiagnostics'
 63        workspaceResourceId: logAnalyticsWorkspace.outputs.resourceId
 64      }
 65    ]
 66    subnets: [
 67      {
 68        name: 'VMSubnet'
 69        addressPrefix: cidrSubnet(addressPrefix, 24, 0) // first subnet in address space
 70        natGatewayResourceId: natGateway.outputs.resourceId
 71      }
 72    ]
 73  }
 74}
 75
 76module keyVault 'br/public:avm/res/key-vault/vault:0.12.1' = {
 77  name: 'keyVaultDeployment'
 78  params: {
 79    // Required parameters
 80    name: '${uniqueString(resourceGroup().id)}-kv'
 81    // Non-required parameters
 82    location: location
 83    diagnosticSettings: [
 84      {
 85        name: 'keyVaultDiagnostics'
 86        workspaceResourceId: logAnalyticsWorkspace.outputs.resourceId
 87      }
 88    ]
 89    enablePurgeProtection: false // disable purge protection for this example so we can more easily delete it
 90    secrets: [
 91      {
 92        name: 'vmAdminPassword'
 93        value: vmAdminPass
 94      }
 95    ]
 96  }
 97}
 98
 99module virtualMachine 'br/public:avm/res/compute/virtual-machine:0.13.1' = {
100  name: 'linuxVirtualMachineDeployment'
101  params: {
102    // Required parameters
103    adminUsername: 'localAdminUser'
104    adminPassword: vmAdminPass
105    imageReference: {
106      offer: '0001-com-ubuntu-server-jammy'
107      publisher: 'Canonical'
108      sku: '22_04-lts-gen2'
109      version: 'latest'
110    }
111    name: '${prefix}-vm1'
112    nicConfigurations: [
113      {
114        ipConfigurations: [
115          {
116            name: 'ipconfig01'
117            subnetResourceId: virtualNetwork.outputs.subnetResourceIds[0] // VMSubnet
118          }
119        ]
120        nicSuffix: '-nic-01'
121      }
122    ]
123    osDisk: {
124      caching: 'ReadWrite'
125      diskSizeGB: 128
126      managedDisk: {
127        storageAccountType: 'Standard_LRS'
128      }
129    }
130
131    osType: 'Linux'
132    vmSize: 'Standard_B2s_v2'
133    zone: 0
134    // Non-required parameters
135    location: location
136  }
137}
138
139module storageAccount 'br/public:avm/res/storage/storage-account:0.19.0' = {
140  name: 'storageAccountDeployment'
141  params: {
142    // Required parameters
143    name: '${uniqueString(resourceGroup().id)}sa'
144    // Non-required parameters
145    location: location
146    skuName: 'Standard_LRS'
147    diagnosticSettings: [
148      {
149        name: 'storageAccountDiagnostics'
150        workspaceResourceId: logAnalyticsWorkspace.outputs.resourceId
151      }
152    ]
153    blobServices: {
154      containers: [
155        {
156          name: 'vmstorage'
157          publicAccess: 'None'
158        }
159      ]
160    }
161  }
162}

We now have all the major components of our Architecture diagram built!

The last steps we need to take to meet our requirements is to ensure our networking resources are secure and that we are using least privileged access by leveraging Role-Based Access Control (RBAC). Let’s get to it!

Network Security Groups

We’ll add a Network Security Group (NSG) to our VM subnet. This will act as a layer 3 and layer 4 firewall for networked resources. This implementation includes an appropriate inbound rule to allow SSH traffic from the Bastion host:

➕ Expand Code
  1param location string = 'westus2'
  2
  3@description('Required. A password for the VM admin user.')
  4@secure()
  5param vmAdminPass string
  6
  7var addressPrefix = '10.0.0.0/16'
  8var prefix = 'VM-AVM-Ex1'
  9
 10module logAnalyticsWorkspace 'br/public:avm/res/operational-insights/workspace:0.11.1' = {
 11  name: 'logAnalyticsWorkspace'
 12  params: {
 13    // Required parameters
 14    name: '${prefix}-law'
 15    // Non-required parameters
 16    location: location
 17  }
 18}
 19
 20module natGwPublicIp 'br/public:avm/res/network/public-ip-address:0.8.0' = {
 21  name: 'natGwPublicIpDeployment'
 22  params: {
 23    // Required parameters
 24    name: '${prefix}-natgwpip'
 25    // Non-required parameters
 26    location: location
 27    diagnosticSettings: [
 28      {
 29        name: 'natGwPublicIpDiagnostics'
 30        workspaceResourceId: logAnalyticsWorkspace.outputs.resourceId
 31      }
 32    ]
 33  }
 34}
 35
 36module natGateway 'br/public:avm/res/network/nat-gateway:1.2.2' = {
 37  name: 'natGatewayDeployment'
 38  params: {
 39    // Required parameters
 40    name: '${prefix}-natgw'
 41    zone: 1
 42    // Non-required parameters
 43    publicIpResourceIds: [
 44      natGwPublicIp.outputs.resourceId
 45    ]
 46  }
 47}
 48
 49module virtualNetwork 'br/public:avm/res/network/virtual-network:0.6.1' = {
 50  name: 'virtualNetworkDeployment'
 51  params: {
 52    // Required parameters
 53    addressPrefixes: [
 54      addressPrefix
 55    ]
 56    name: '${prefix}-vnet'
 57    // Non-required parameters
 58    location: location
 59    diagnosticSettings: [
 60      {
 61        name: 'vNetDiagnostics'
 62        workspaceResourceId: logAnalyticsWorkspace.outputs.resourceId
 63      }
 64    ]
 65    subnets: [
 66      {
 67        name: 'VMSubnet'
 68        addressPrefix: cidrSubnet(addressPrefix, 24, 0) // first subnet in address space
 69        natGatewayResourceId: natGateway.outputs.resourceId
 70        networkSecurityGroupResourceId: nsgVM.outputs.resourceId
 71      }
 72    ]
 73  }
 74}
 75
 76module nsgVM 'br/public:avm/res/network/network-security-group:0.5.1' = {
 77  name: 'nsgVmDeployment'
 78  params: {
 79    name: '${prefix}-NSG-VM'
 80    location: location
 81    securityRules: [
 82      {
 83        name: 'AllowBastionSSH'
 84        properties: {
 85          access: 'Allow'
 86          direction: 'Inbound'
 87          priority: 100
 88          protocol: 'Tcp'
 89          sourceAddressPrefix: 'virtualNetwork'
 90          sourcePortRange: '*'
 91          destinationAddressPrefix: '*'
 92          destinationPortRange: '22'
 93        }
 94      }
 95    ]
 96  }
 97}
 98
 99module keyVault 'br/public:avm/res/key-vault/vault:0.12.1' = {
100  name: 'keyVaultDeployment'
101  params: {
102    // Required parameters
103    name: '${uniqueString(resourceGroup().id)}-kv'
104    // Non-required parameters
105    location: location
106    diagnosticSettings: [
107      {
108        name: 'keyVaultDiagnostics'
109        workspaceResourceId: logAnalyticsWorkspace.outputs.resourceId
110      }
111    ]
112    enablePurgeProtection: false // disable purge protection for this example so we can more easily delete it
113    secrets: [
114      {
115        name: 'vmAdminPassword'
116        value: vmAdminPass
117      }
118    ]
119  }
120}
121
122module virtualMachine 'br/public:avm/res/compute/virtual-machine:0.13.1' = {
123  name: 'linuxVirtualMachineDeployment'
124  params: {
125    // Required parameters
126    adminUsername: 'localAdminUser'
127    adminPassword: vmAdminPass
128    imageReference: {
129      offer: '0001-com-ubuntu-server-jammy'
130      publisher: 'Canonical'
131      sku: '22_04-lts-gen2'
132      version: 'latest'
133    }
134    name: '${prefix}-vm1'
135    nicConfigurations: [
136      {
137        ipConfigurations: [
138          {
139            name: 'ipconfig01'
140            subnetResourceId: virtualNetwork.outputs.subnetResourceIds[0] // VMSubnet
141          }
142        ]
143        nicSuffix: '-nic-01'
144      }
145    ]
146    osDisk: {
147      caching: 'ReadWrite'
148      diskSizeGB: 128
149      managedDisk: {
150        storageAccountType: 'Standard_LRS'
151      }
152    }
153
154    osType: 'Linux'
155    vmSize: 'Standard_B2s_v2'
156    zone: 0
157    // Non-required parameters
158    location: location
159  }
160}
161
162module storageAccount 'br/public:avm/res/storage/storage-account:0.19.0' = {
163  name: 'storageAccountDeployment'
164  params: {
165    // Required parameters
166    name: '${uniqueString(resourceGroup().id)}sa'
167    // Non-required parameters
168    location: location
169    skuName: 'Standard_LRS'
170    diagnosticSettings: [
171      {
172        name: 'storageAccountDiagnostics'
173        workspaceResourceId: logAnalyticsWorkspace.outputs.resourceId
174      }
175    ]
176    blobServices: {
177      containers: [
178        {
179          name: 'vmstorage'
180          publicAccess: 'None'
181        }
182      ]
183    }
184  }
185}

Disable Public Access to Storage Account

Since the Storage Account serves as a backend resource exclusively for the Virtual Machine, it will be secured as much as possible. This involves adding a Private Endpoint and disabling public internet access. AVM makes creation and assignment of Private Endpoints to resources incredibly easy. Take a look:

➕ Expand Code
  1param location string = 'westus2'
  2
  3@description('Required. A password for the VM admin user.')
  4@secure()
  5param vmAdminPass string
  6
  7var addressPrefix = '10.0.0.0/16'
  8var prefix = 'VM-AVM-Ex1'
  9
 10module logAnalyticsWorkspace 'br/public:avm/res/operational-insights/workspace:0.11.1' = {
 11  name: 'logAnalyticsWorkspace'
 12  params: {
 13    // Required parameters
 14    name: '${prefix}-law'
 15    // Non-required parameters
 16    location: location
 17  }
 18}
 19
 20module natGwPublicIp 'br/public:avm/res/network/public-ip-address:0.8.0' = {
 21  name: 'natGwPublicIpDeployment'
 22  params: {
 23    // Required parameters
 24    name: '${prefix}-natgwpip'
 25    // Non-required parameters
 26    location: location
 27    diagnosticSettings: [
 28      {
 29        name: 'natGwPublicIpDiagnostics'
 30        workspaceResourceId: logAnalyticsWorkspace.outputs.resourceId
 31      }
 32    ]
 33  }
 34}
 35
 36module natGateway 'br/public:avm/res/network/nat-gateway:1.2.2' = {
 37  name: 'natGatewayDeployment'
 38  params: {
 39    // Required parameters
 40    name: '${prefix}-natgw'
 41    zone: 1
 42    // Non-required parameters
 43    publicIpResourceIds: [
 44      natGwPublicIp.outputs.resourceId
 45    ]
 46  }
 47}
 48
 49module virtualNetwork 'br/public:avm/res/network/virtual-network:0.6.1' = {
 50  name: 'virtualNetworkDeployment'
 51  params: {
 52    // Required parameters
 53    addressPrefixes: [
 54      addressPrefix
 55    ]
 56    name: '${prefix}-vnet'
 57    // Non-required parameters
 58    location: location
 59    diagnosticSettings: [
 60      {
 61        name: 'vNetDiagnostics'
 62        workspaceResourceId: logAnalyticsWorkspace.outputs.resourceId
 63      }
 64    ]
 65    subnets: [
 66      {
 67        name: 'VMSubnet'
 68        addressPrefix: cidrSubnet(addressPrefix, 24, 0) // first subnet in address space
 69        natGatewayResourceId: natGateway.outputs.resourceId
 70        networkSecurityGroupResourceId: nsgVM.outputs.resourceId
 71      }
 72      {
 73        name: 'PrivateEndpointSubnet'
 74        addressPrefix: cidrSubnet(addressPrefix, 24, 1) // second subnet in address space
 75      }
 76    ]
 77  }
 78}
 79
 80module nsgVM 'br/public:avm/res/network/network-security-group:0.5.1' = {
 81  name: 'nsgVmDeployment'
 82  params: {
 83    name: '${prefix}-NSG-VM'
 84    location: location
 85    securityRules: [
 86      {
 87        name: 'AllowBastionSSH'
 88        properties: {
 89          access: 'Allow'
 90          direction: 'Inbound'
 91          priority: 100
 92          protocol: 'Tcp'
 93          sourceAddressPrefix: 'virtualNetwork'
 94          sourcePortRange: '*'
 95          destinationAddressPrefix: '*'
 96          destinationPortRange: '22'
 97        }
 98      }
 99    ]
100  }
101}
102
103module keyVault 'br/public:avm/res/key-vault/vault:0.12.1' = {
104  name: 'keyVaultDeployment'
105  params: {
106    // Required parameters
107    name: '${uniqueString(resourceGroup().id)}-kv'
108    // Non-required parameters
109    location: location
110    diagnosticSettings: [
111      {
112        name: 'keyVaultDiagnostics'
113        workspaceResourceId: logAnalyticsWorkspace.outputs.resourceId
114      }
115    ]
116    enablePurgeProtection: false // disable purge protection for this example so we can more easily delete it
117    secrets: [
118      {
119        name: 'vmAdminPassword'
120        value: vmAdminPass
121      }
122    ]
123  }
124}
125
126module virtualMachine 'br/public:avm/res/compute/virtual-machine:0.14.0' = {
127  name: 'linuxVirtualMachineDeployment'
128  params: {
129    // Required parameters
130    adminUsername: 'localAdminUser'
131    adminPassword: vmAdminPass
132    imageReference: {
133      offer: '0001-com-ubuntu-server-jammy'
134      publisher: 'Canonical'
135      sku: '22_04-lts-gen2'
136      version: 'latest'
137    }
138    name: '${prefix}-vm1'
139    nicConfigurations: [
140      {
141        ipConfigurations: [
142          {
143            name: 'ipconfig01'
144            subnetResourceId: virtualNetwork.outputs.subnetResourceIds[0] // VMSubnet
145          }
146        ]
147        nicSuffix: '-nic-01'
148      }
149    ]
150    osDisk: {
151      caching: 'ReadWrite'
152      diskSizeGB: 128
153      managedDisk: {
154        storageAccountType: 'Standard_LRS'
155      }
156    }
157    osType: 'Linux'
158    vmSize: 'Standard_B2s_v2'
159    zone: 0
160    // Non-required parameters
161    location: location
162  }
163}
164
165module storageAccount 'br/public:avm/res/storage/storage-account:0.19.0' = {
166  name: 'storageAccountDeployment'
167  params: {
168    // Required parameters
169    name: '${uniqueString(resourceGroup().id)}sa'
170    // Non-required parameters
171    location: location
172    skuName: 'Standard_LRS'
173    diagnosticSettings: [
174      {
175        name: 'storageAccountDiagnostics'
176        workspaceResourceId: logAnalyticsWorkspace.outputs.resourceId
177      }
178    ]
179    publicNetworkAccess: 'Disabled'
180    allowBlobPublicAccess: false
181    blobServices: {
182      containers: [
183        {
184          name: 'vmstorage'
185          publicAccess: 'None'
186        }
187      ]
188    }
189    privateEndpoints: [
190      {
191        service: 'Blob'
192        subnetResourceId: virtualNetwork.outputs.subnetResourceIds[1] // Private Endpoint Subnet
193        privateDnsZoneGroup: {
194          privateDnsZoneGroupConfigs: [
195            {
196              privateDnsZoneResourceId: privateDnsBlob.outputs.resourceId
197            }
198          ]
199        }
200      }
201    ]
202  }
203}
204
205module privateDnsBlob 'br/public:avm/res/network/private-dns-zone:0.7.1' = {
206  name: '${prefix}-privatedns-blob'
207  params: {
208    name: 'privatelink.blob.${environment().suffixes.storage}'
209    location: 'global'
210    virtualNetworkLinks: [
211      {
212        name: '${virtualNetwork.outputs.name}-vnetlink'
213        virtualNetworkResourceId: virtualNetwork.outputs.resourceId
214      }
215    ]
216  }
217}

This implementation adds a dedicated subnet for Private Endpoints following the recommended practice of isolating Private Endpoints in their own subnet.

The addition of just a few lines of code in the privateEndpoints parameter handles the complex tasks of creating the Private Endpoint, associating it with the VNet, and attaching it to the resource. AVM drastically simplifies the creation of Private Endpoints for just about every Azure Resource that supports them.

The implementation also disables all public network connectivity to the Storage Account, ensuring it only accepts traffic via the Private Endpoint.

Finally, a Private DNS zone is added and linked to the VNet, enabling the VM to resolve the Private IP address associated with the Storage Account.

Bastion

To securely access the Virtual Machine without exposing its SSH port to the public internet, we’ll create an Azure Bastion host. The Bastion Host requires a subnet with the exact name AzureBastionSubnet which cannot contain anything other than Bastion Hosts.

➕ Expand Code
  1param location string = 'westus2'
  2
  3@description('Required. A password for the VM admin user.')
  4@secure()
  5param vmAdminPass string
  6
  7var addressPrefix = '10.0.0.0/16'
  8var prefix = 'VM-AVM-Ex1'
  9
 10module logAnalyticsWorkspace 'br/public:avm/res/operational-insights/workspace:0.11.1' = {
 11  name: 'logAnalyticsWorkspace'
 12  params: {
 13    // Required parameters
 14    name: '${prefix}-law'
 15    // Non-required parameters
 16    location: location
 17  }
 18}
 19
 20module natGwPublicIp 'br/public:avm/res/network/public-ip-address:0.8.0' = {
 21  name: 'natGwPublicIpDeployment'
 22  params: {
 23    // Required parameters
 24    name: '${prefix}-natgwpip'
 25    // Non-required parameters
 26    location: location
 27    diagnosticSettings: [
 28      {
 29        name: 'natGwPublicIpDiagnostics'
 30        workspaceResourceId: logAnalyticsWorkspace.outputs.resourceId
 31      }
 32    ]
 33  }
 34}
 35
 36module natGateway 'br/public:avm/res/network/nat-gateway:1.2.2' = {
 37  name: 'natGatewayDeployment'
 38  params: {
 39    // Required parameters
 40    name: '${prefix}-natgw'
 41    zone: 1
 42    // Non-required parameters
 43    publicIpResourceIds: [
 44      natGwPublicIp.outputs.resourceId
 45    ]
 46  }
 47}
 48
 49module virtualNetwork 'br/public:avm/res/network/virtual-network:0.6.1' = {
 50  name: 'virtualNetworkDeployment'
 51  params: {
 52    // Required parameters
 53    addressPrefixes: [
 54      addressPrefix
 55    ]
 56    name: '${prefix}-vnet'
 57    // Non-required parameters
 58    location: location
 59    diagnosticSettings: [
 60      {
 61        name: 'vNetDiagnostics'
 62        workspaceResourceId: logAnalyticsWorkspace.outputs.resourceId
 63      }
 64    ]
 65    subnets: [
 66      {
 67        name: 'VMSubnet'
 68        addressPrefix: cidrSubnet(addressPrefix, 24, 0) // first subnet in address space
 69        natGatewayResourceId: natGateway.outputs.resourceId
 70        networkSecurityGroupResourceId: nsgVM.outputs.resourceId
 71      }
 72      {
 73        name: 'PrivateEndpointSubnet'
 74        addressPrefix: cidrSubnet(addressPrefix, 24, 1) // second subnet in address space
 75      }
 76      {
 77        name: 'AzureBastionSubnet' // Azure Bastion Host requires this subnet to be named exactly "AzureBastionSubnet"
 78        addressPrefix: cidrSubnet(addressPrefix, 24, 2) // third subnet in address space
 79      }
 80    ]
 81  }
 82}
 83
 84module nsgVM 'br/public:avm/res/network/network-security-group:0.5.1' = {
 85  name: 'nsgVmDeployment'
 86  params: {
 87    name: '${prefix}-NSG-VM'
 88    location: location
 89    securityRules: [
 90      {
 91        name: 'AllowBastionSSH'
 92        properties: {
 93          access: 'Allow'
 94          direction: 'Inbound'
 95          priority: 100
 96          protocol: 'Tcp'
 97          sourceAddressPrefix: 'virtualNetwork'
 98          sourcePortRange: '*'
 99          destinationAddressPrefix: '*'
100          destinationPortRange: '22'
101        }
102      }
103    ]
104  }
105}
106
107module keyVault 'br/public:avm/res/key-vault/vault:0.12.1' = {
108  name: 'keyVaultDeployment'
109  params: {
110    // Required parameters
111    name: '${uniqueString(resourceGroup().id)}-kv'
112    // Non-required parameters
113    location: location
114    diagnosticSettings: [
115      {
116        name: 'keyVaultDiagnostics'
117        workspaceResourceId: logAnalyticsWorkspace.outputs.resourceId
118      }
119    ]
120    enablePurgeProtection: false // disable purge protection for this example so we can more easily delete it
121    secrets: [
122      {
123        name: 'vmAdminPassword'
124        value: vmAdminPass
125      }
126    ]
127  }
128}
129
130module virtualMachine 'br/public:avm/res/compute/virtual-machine:0.14.0' = {
131  name: 'linuxVirtualMachineDeployment'
132  params: {
133    // Required parameters
134    adminUsername: 'localAdminUser'
135    adminPassword: vmAdminPass
136    imageReference: {
137      offer: '0001-com-ubuntu-server-jammy'
138      publisher: 'Canonical'
139      sku: '22_04-lts-gen2'
140      version: 'latest'
141    }
142    name: '${prefix}-vm1'
143    nicConfigurations: [
144      {
145        ipConfigurations: [
146          {
147            name: 'ipconfig01'
148            subnetResourceId: virtualNetwork.outputs.subnetResourceIds[0] // VMSubnet
149          }
150        ]
151        nicSuffix: '-nic-01'
152      }
153    ]
154    osDisk: {
155      caching: 'ReadWrite'
156      diskSizeGB: 128
157      managedDisk: {
158        storageAccountType: 'Standard_LRS'
159      }
160    }
161    osType: 'Linux'
162    vmSize: 'Standard_B2s_v2'
163    zone: 0
164    // Non-required parameters
165    location: location
166  }
167}
168
169module storageAccount 'br/public:avm/res/storage/storage-account:0.19.0' = {
170  name: 'storageAccountDeployment'
171  params: {
172    // Required parameters
173    name: '${uniqueString(resourceGroup().id)}sa'
174    // Non-required parameters
175    location: location
176    skuName: 'Standard_LRS'
177    diagnosticSettings: [
178      {
179        name: 'storageAccountDiagnostics'
180        workspaceResourceId: logAnalyticsWorkspace.outputs.resourceId
181      }
182    ]
183    publicNetworkAccess: 'Disabled'
184    allowBlobPublicAccess: false
185    blobServices: {
186      containers: [
187        {
188          name: 'vmstorage'
189          publicAccess: 'None'
190        }
191      ]
192    }
193    privateEndpoints: [
194      {
195        service: 'Blob'
196        subnetResourceId: virtualNetwork.outputs.subnetResourceIds[1] // Private Endpoint Subnet
197        privateDnsZoneGroup: {
198          privateDnsZoneGroupConfigs: [
199            {
200              privateDnsZoneResourceId: privateDnsBlob.outputs.resourceId
201            }
202          ]
203        }
204      }
205    ]
206  }
207}
208
209module privateDnsBlob 'br/public:avm/res/network/private-dns-zone:0.7.1' = {
210  name: '${prefix}-privatedns-blob'
211  params: {
212    name: 'privatelink.blob.${environment().suffixes.storage}'
213    location: 'global'
214    virtualNetworkLinks: [
215      {
216        name: '${virtualNetwork.outputs.name}-vnetlink'
217        virtualNetworkResourceId: virtualNetwork.outputs.resourceId
218      }
219    ]
220  }
221}
222
223// Note: Deploying a Bastion Host will automatically create a Public IP and use the subnet named "AzureBastionSubnet"
224// within our VNet. This subnet is required and must be named exactly "AzureBastionSubnet" for the Bastion Host to work.
225module bastion 'br/public:avm/res/network/bastion-host:0.6.1' = {
226  name: 'bastionDeployment'
227  params: {
228    name: '${prefix}-bastion'
229    virtualNetworkResourceId: virtualNetwork.outputs.resourceId
230    skuName: 'Basic'
231    location: location
232    diagnosticSettings: [
233      {
234        name: 'bastionDiagnostics'
235        workspaceResourceId: logAnalyticsWorkspace.outputs.resourceId
236      }
237    ]
238  }
239}

This simple addition of the bastion-host AVM module completes the secure access component of our architecture. You can now access the Virtual Machine by way of the Bastion Host in the Azure Portal.

Role-Based Access Control

To complete our solution, we have one final task: to apply Role-Based Access Control (RBAC) restrictions on our services, namely the Key Vault and Storage Account. The goal is to explicitly allow only the Virtual Machine to have Create, Read, Update, or Delete (CRUD) permissions on these two services.

This is accomplished by enabling a System-assigned Managed Identity on the Virtual Machine, then granting the VM’s Managed Identity appropriate permissions on the Storage Account and Key Vault:

➕ Expand Code
  1param location string = 'westus2'
  2
  3@description('Required. A password for the VM admin user.')
  4@secure()
  5param vmAdminPass string
  6
  7var addressPrefix = '10.0.0.0/16'
  8var prefix = 'VM-AVM-Ex1'
  9
 10module logAnalyticsWorkspace 'br/public:avm/res/operational-insights/workspace:0.11.1' = {
 11  name: 'logAnalyticsWorkspace'
 12  params: {
 13    // Required parameters
 14    name: '${prefix}-law'
 15    // Non-required parameters
 16    location: location
 17  }
 18}
 19
 20module natGwPublicIp 'br/public:avm/res/network/public-ip-address:0.8.0' = {
 21  name: 'natGwPublicIpDeployment'
 22  params: {
 23    // Required parameters
 24    name: '${prefix}-natgwpip'
 25    // Non-required parameters
 26    location: location
 27    diagnosticSettings: [
 28      {
 29        name: 'natGwPublicIpDiagnostics'
 30        workspaceResourceId: logAnalyticsWorkspace.outputs.resourceId
 31      }
 32    ]
 33  }
 34}
 35
 36module natGateway 'br/public:avm/res/network/nat-gateway:1.2.2' = {
 37  name: 'natGatewayDeployment'
 38  params: {
 39    // Required parameters
 40    name: '${prefix}-natgw'
 41    zone: 1
 42    // Non-required parameters
 43    publicIpResourceIds: [
 44      natGwPublicIp.outputs.resourceId
 45    ]
 46  }
 47}
 48
 49module virtualNetwork 'br/public:avm/res/network/virtual-network:0.6.1' = {
 50  name: 'virtualNetworkDeployment'
 51  params: {
 52    // Required parameters
 53    addressPrefixes: [
 54      addressPrefix
 55    ]
 56    name: '${prefix}-vnet'
 57    // Non-required parameters
 58    location: location
 59    diagnosticSettings: [
 60      {
 61        name: 'vNetDiagnostics'
 62        workspaceResourceId: logAnalyticsWorkspace.outputs.resourceId
 63      }
 64    ]
 65    subnets: [
 66      {
 67        name: 'VMSubnet'
 68        addressPrefix: cidrSubnet(addressPrefix, 24, 0) // first subnet in address space
 69        natGatewayResourceId: natGateway.outputs.resourceId
 70        networkSecurityGroupResourceId: nsgVM.outputs.resourceId
 71      }
 72      {
 73        name: 'PrivateEndpointSubnet'
 74        addressPrefix: cidrSubnet(addressPrefix, 24, 1) // second subnet in address space
 75      }
 76      {
 77        name: 'AzureBastionSubnet' // Azure Bastion Host requires this subnet to be named exactly "AzureBastionSubnet"
 78        addressPrefix: cidrSubnet(addressPrefix, 24, 2) // third subnet in address space
 79      }
 80    ]
 81  }
 82}
 83
 84module nsgVM 'br/public:avm/res/network/network-security-group:0.5.1' = {
 85  name: 'nsgVmDeployment'
 86  params: {
 87    name: '${prefix}-NSG-VM'
 88    location: location
 89    securityRules: [
 90      {
 91        name: 'AllowBastionSSH'
 92        properties: {
 93          access: 'Allow'
 94          direction: 'Inbound'
 95          priority: 100
 96          protocol: 'Tcp'
 97          sourceAddressPrefix: 'virtualNetwork'
 98          sourcePortRange: '*'
 99          destinationAddressPrefix: '*'
100          destinationPortRange: '22'
101        }
102      }
103    ]
104  }
105}
106
107module keyVault 'br/public:avm/res/key-vault/vault:0.12.1' = {
108  name: 'keyVaultDeployment'
109  params: {
110    // Required parameters
111    name: '${uniqueString(resourceGroup().id)}-kv'
112    // Non-required parameters
113    location: location
114    diagnosticSettings: [
115      {
116        name: 'keyVaultDiagnostics'
117        workspaceResourceId: logAnalyticsWorkspace.outputs.resourceId
118      }
119    ]
120    enablePurgeProtection: false // disable purge protection for this example so we can more easily delete it
121    secrets: [
122      {
123        name: 'vmAdminPassword'
124        value: vmAdminPass
125      }
126    ]
127    roleAssignments: [
128      {
129        principalId: virtualMachine.outputs.systemAssignedMIPrincipalId
130        principalType: 'ServicePrincipal'
131        roleDefinitionIdOrName: 'Key Vault Secrets User' // Allows read access to secrets
132      }
133    ]
134  }
135}
136
137module virtualMachine 'br/public:avm/res/compute/virtual-machine:0.14.0' = {
138  name: 'linuxVirtualMachineDeployment'
139  params: {
140    // Required parameters
141    adminUsername: 'localAdminUser'
142    adminPassword: vmAdminPass
143    imageReference: {
144      offer: '0001-com-ubuntu-server-jammy'
145      publisher: 'Canonical'
146      sku: '22_04-lts-gen2'
147      version: 'latest'
148    }
149    name: '${prefix}-vm1'
150    nicConfigurations: [
151      {
152        ipConfigurations: [
153          {
154            name: 'ipconfig01'
155            subnetResourceId: virtualNetwork.outputs.subnetResourceIds[0] // VMSubnet
156          }
157        ]
158        nicSuffix: '-nic-01'
159      }
160    ]
161    osDisk: {
162      caching: 'ReadWrite'
163      diskSizeGB: 128
164      managedDisk: {
165        storageAccountType: 'Standard_LRS'
166      }
167    }
168    osType: 'Linux'
169    vmSize: 'Standard_B2s_v2'
170    zone: 0
171    // Non-required parameters
172    location: location
173    managedIdentities: {
174      systemAssigned: true
175    }
176  }
177}
178
179module storageAccount 'br/public:avm/res/storage/storage-account:0.19.0' = {
180  name: 'storageAccountDeployment'
181  params: {
182    // Required parameters
183    name: '${uniqueString(resourceGroup().id)}sa'
184    // Non-required parameters
185    location: location
186    skuName: 'Standard_LRS'
187    diagnosticSettings: [
188      {
189        name: 'storageAccountDiagnostics'
190        workspaceResourceId: logAnalyticsWorkspace.outputs.resourceId
191      }
192    ]
193    publicNetworkAccess: 'Disabled'
194    allowBlobPublicAccess: false
195    blobServices: {
196      containers: [
197        {
198          name: 'vmstorage'
199          publicAccess: 'None'
200        }
201      ]
202      roleAssignments:[
203        {
204          principalId: virtualMachine.outputs.systemAssignedMIPrincipalId
205          principalType: 'ServicePrincipal'
206          roleDefinitionName: 'Storage Blob Data Contributor' // Allows read/write/delete on blob containers
207        }
208      ]
209    }
210    privateEndpoints: [
211      {
212        service: 'Blob'
213        subnetResourceId: virtualNetwork.outputs.subnetResourceIds[1] // Private Endpoint Subnet
214        privateDnsZoneGroup: {
215          privateDnsZoneGroupConfigs: [
216            {
217              privateDnsZoneResourceId: privateDnsBlob.outputs.resourceId
218            }
219          ]
220        }
221      }
222    ]
223  }
224}
225
226module privateDnsBlob 'br/public:avm/res/network/private-dns-zone:0.7.1' = {
227  name: '${prefix}-privatedns-blob'
228  params: {
229    name: 'privatelink.blob.${environment().suffixes.storage}'
230    location: 'global'
231    virtualNetworkLinks: [
232      {
233        name: '${virtualNetwork.outputs.name}-vnetlink'
234        virtualNetworkResourceId: virtualNetwork.outputs.resourceId
235      }
236    ]
237  }
238}
239
240// Note: Deploying a Bastion Host will automatically create a Public IP and use the subnet named "AzureBastionSubnet"
241// within our VNet. This subnet is required and must be named exactly "AzureBastionSubnet" for the Bastion Host to work.
242module bastion 'br/public:avm/res/network/bastion-host:0.6.1' = {
243  name: 'bastionDeployment'
244  params: {
245    name: '${prefix}-bastion'
246    virtualNetworkResourceId: virtualNetwork.outputs.resourceId
247    skuName: 'Basic'
248    location: location
249    diagnosticSettings: [
250      {
251        name: 'bastionDiagnostics'
252        workspaceResourceId: logAnalyticsWorkspace.outputs.resourceId
253      }
254    ]
255  }
256}
Info

The Azure Subscription owner will have CRUD permissions for the Storage Account but not for the Key Vault. The Key Vault requires explicit RBAC permissions assigned to a user to grant them access: Provide access to Key Vaults using RBAC. Important!: at this point, you will only be able to access the Storage Account from the Bastion Host. Remember, public internet access has been disabled!

The RBAC policies have been successfully applied using a System-assigned Managed Identity on the Virtual Machine. This identity has been granted permissions on both the Key Vault and Storage Account. Now the VM can read secrets from the Key Vault and Read, Create, or Delete blobs in the Storage Account.

In a real production environment, the principle of least privileged access should be applied, providing only the exact permissions each service needs to carry out its functions. Learn more about Microsoft’s recommendations for identity and access management.

Conclusion

In this tutorial, we’ve explored how to leverage Azure Verified Modules (AVM) to build a secure, well-architected solution in Azure. AVM modules significantly simplify the deployment of Azure resources by abstracting away much of the complexity involved in configuring individual resources.

Your final, deployable Bicep template file should now look like this:

➕ Expand Code
  1param location string = 'westus2'
  2
  3@description('Required. A password for the VM admin user.')
  4@secure()
  5param vmAdminPass string
  6
  7var addressPrefix = '10.0.0.0/16'
  8var prefix = 'VM-AVM-Ex1'
  9
 10module logAnalyticsWorkspace 'br/public:avm/res/operational-insights/workspace:0.11.1' = {
 11  name: 'logAnalyticsWorkspace'
 12  params: {
 13    // Required parameters
 14    name: '${prefix}-law'
 15    // Non-required parameters
 16    location: location
 17  }
 18}
 19
 20module natGwPublicIp 'br/public:avm/res/network/public-ip-address:0.8.0' = {
 21  name: 'natGwPublicIpDeployment'
 22  params: {
 23    // Required parameters
 24    name: '${prefix}-natgwpip'
 25    // Non-required parameters
 26    location: location
 27    diagnosticSettings: [
 28      {
 29        name: 'natGwPublicIpDiagnostics'
 30        workspaceResourceId: logAnalyticsWorkspace.outputs.resourceId
 31      }
 32    ]
 33  }
 34}
 35
 36module natGateway 'br/public:avm/res/network/nat-gateway:1.2.2' = {
 37  name: 'natGatewayDeployment'
 38  params: {
 39    // Required parameters
 40    name: '${prefix}-natgw'
 41    zone: 1
 42    // Non-required parameters
 43    publicIpResourceIds: [
 44      natGwPublicIp.outputs.resourceId
 45    ]
 46  }
 47}
 48
 49module virtualNetwork 'br/public:avm/res/network/virtual-network:0.6.1' = {
 50  name: 'virtualNetworkDeployment'
 51  params: {
 52    // Required parameters
 53    addressPrefixes: [
 54      addressPrefix
 55    ]
 56    name: '${prefix}-vnet'
 57    // Non-required parameters
 58    location: location
 59    diagnosticSettings: [
 60      {
 61        name: 'vNetDiagnostics'
 62        workspaceResourceId: logAnalyticsWorkspace.outputs.resourceId
 63      }
 64    ]
 65    subnets: [
 66      {
 67        name: 'VMSubnet'
 68        addressPrefix: cidrSubnet(addressPrefix, 24, 0) // first subnet in address space
 69        natGatewayResourceId: natGateway.outputs.resourceId
 70        networkSecurityGroupResourceId: nsgVM.outputs.resourceId
 71      }
 72      {
 73        name: 'PrivateEndpointSubnet'
 74        addressPrefix: cidrSubnet(addressPrefix, 24, 1) // second subnet in address space
 75      }
 76      {
 77        name: 'AzureBastionSubnet' // Azure Bastion Host requires this subnet to be named exactly "AzureBastionSubnet"
 78        addressPrefix: cidrSubnet(addressPrefix, 24, 2) // third subnet in address space
 79      }
 80    ]
 81  }
 82}
 83
 84module nsgVM 'br/public:avm/res/network/network-security-group:0.5.1' = {
 85  name: 'nsgVmDeployment'
 86  params: {
 87    name: '${prefix}-NSG-VM'
 88    location: location
 89    securityRules: [
 90      {
 91        name: 'AllowBastionSSH'
 92        properties: {
 93          access: 'Allow'
 94          direction: 'Inbound'
 95          priority: 100
 96          protocol: 'Tcp'
 97          sourceAddressPrefix: 'virtualNetwork'
 98          sourcePortRange: '*'
 99          destinationAddressPrefix: '*'
100          destinationPortRange: '22'
101        }
102      }
103    ]
104  }
105}
106
107module keyVault 'br/public:avm/res/key-vault/vault:0.12.1' = {
108  name: 'keyVaultDeployment'
109  params: {
110    // Required parameters
111    name: '${uniqueString(resourceGroup().id)}-kv'
112    // Non-required parameters
113    location: location
114    diagnosticSettings: [
115      {
116        name: 'keyVaultDiagnostics'
117        workspaceResourceId: logAnalyticsWorkspace.outputs.resourceId
118      }
119    ]
120    enablePurgeProtection: false // disable purge protection for this example so we can more easily delete it
121    secrets: [
122      {
123        name: 'vmAdminPassword'
124        value: vmAdminPass
125      }
126    ]
127    roleAssignments: [
128      {
129        principalId: virtualMachine.outputs.systemAssignedMIPrincipalId
130        principalType: 'ServicePrincipal'
131        roleDefinitionIdOrName: 'Key Vault Secrets User' // Allows read access to secrets
132      }
133    ]
134  }
135}
136
137module virtualMachine 'br/public:avm/res/compute/virtual-machine:0.14.0' = {
138  name: 'linuxVirtualMachineDeployment'
139  params: {
140    // Required parameters
141    adminUsername: 'localAdminUser'
142    adminPassword: vmAdminPass
143    imageReference: {
144      offer: '0001-com-ubuntu-server-jammy'
145      publisher: 'Canonical'
146      sku: '22_04-lts-gen2'
147      version: 'latest'
148    }
149    name: '${prefix}-vm1'
150    nicConfigurations: [
151      {
152        ipConfigurations: [
153          {
154            name: 'ipconfig01'
155            subnetResourceId: virtualNetwork.outputs.subnetResourceIds[0] // VMSubnet
156          }
157        ]
158        nicSuffix: '-nic-01'
159      }
160    ]
161    osDisk: {
162      caching: 'ReadWrite'
163      diskSizeGB: 128
164      managedDisk: {
165        storageAccountType: 'Standard_LRS'
166      }
167    }
168    osType: 'Linux'
169    vmSize: 'Standard_B2s_v2'
170    zone: 0
171    // Non-required parameters
172    location: location
173    managedIdentities: {
174      systemAssigned: true
175    }
176  }
177}
178
179module storageAccount 'br/public:avm/res/storage/storage-account:0.19.0' = {
180  name: 'storageAccountDeployment'
181  params: {
182    // Required parameters
183    name: '${uniqueString(resourceGroup().id)}sa'
184    // Non-required parameters
185    location: location
186    skuName: 'Standard_LRS'
187    diagnosticSettings: [
188      {
189        name: 'storageAccountDiagnostics'
190        workspaceResourceId: logAnalyticsWorkspace.outputs.resourceId
191      }
192    ]
193    publicNetworkAccess: 'Disabled'
194    allowBlobPublicAccess: false
195    blobServices: {
196      containers: [
197        {
198          name: 'vmstorage'
199          publicAccess: 'None'
200        }
201      ]
202      roleAssignments:[
203        {
204          principalId: virtualMachine.outputs.systemAssignedMIPrincipalId
205          principalType: 'ServicePrincipal'
206          roleDefinitionName: 'Storage Blob Data Contributor' // Allows read/write/delete on blob containers
207        }
208      ]
209    }
210    privateEndpoints: [
211      {
212        service: 'Blob'
213        subnetResourceId: virtualNetwork.outputs.subnetResourceIds[1] // Private Endpoint Subnet
214        privateDnsZoneGroup: {
215          privateDnsZoneGroupConfigs: [
216            {
217              privateDnsZoneResourceId: privateDnsBlob.outputs.resourceId
218            }
219          ]
220        }
221      }
222    ]
223  }
224}
225
226module privateDnsBlob 'br/public:avm/res/network/private-dns-zone:0.7.1' = {
227  name: '${prefix}-privatedns-blob'
228  params: {
229    name: 'privatelink.blob.${environment().suffixes.storage}'
230    location: 'global'
231    virtualNetworkLinks: [
232      {
233        name: '${virtualNetwork.outputs.name}-vnetlink'
234        virtualNetworkResourceId: virtualNetwork.outputs.resourceId
235      }
236    ]
237  }
238}
239
240// Note: Deploying a Bastion Host will automatically create a Public IP and use the subnet named "AzureBastionSubnet"
241// within our VNet. This subnet is required and must be named exactly "AzureBastionSubnet" for the Bastion Host to work.
242module bastion 'br/public:avm/res/network/bastion-host:0.6.1' = {
243  name: 'bastionDeployment'
244  params: {
245    name: '${prefix}-bastion'
246    virtualNetworkResourceId: virtualNetwork.outputs.resourceId
247    skuName: 'Basic'
248    location: location
249    diagnosticSettings: [
250      {
251        name: 'bastionDiagnostics'
252        workspaceResourceId: logAnalyticsWorkspace.outputs.resourceId
253      }
254    ]
255  }
256}

AVM modules provide several key advantages over writing raw Bicep templates:

  1. Simplified Resource Configuration: AVM modules handle much of the complex configuration work behind the scenes
  2. Built-in Recommended Practices: The modules implement many of Microsoft’s recommended practices by default
  3. Consistent Outputs: Each module exposes a consistent set of outputs that can be easily referenced
  4. Reduced Boilerplate Code: What would normally require hundreds of lines of Bicep code can be accomplished in a fraction of the space

As you continue your journey with Azure and AVM, remember that this approach can be applied to more complex architectures as well. The modular nature of AVM allows you to mix and match components to build solutions that meet your specific needs while adhering to Microsoft’s Well-Architected Framework.

By using AVM modules as building blocks, you can focus more on your solution architecture and less on the intricacies of individual resource configurations, ultimately leading to faster development cycles and more reliable deployments.

Clean up your environment

When you are ready, you can remove the infrastructure deployed in this example. Key Vaults are set to a soft-delete state so you will also need to purge the one we created in order to fully delete it. The following commands will remove all resources created by your deployment:

Clean up with
# Delete the resource group
Remove-AzResourceGroup -Name "avm-bicep-vmexample1" -Force

# Purge the Key Vault
Remove-AzKeyVault -VaultName "<keyVaultName>" -Location "<location>" -InRemovedState -Force
# Delete the resource group
az group delete --name 'avm-bicep-vmexample1' --yes --no-wait

# Purge the Key Vault
az keyvault purge --name '<keyVaultName>' --no-wait

Congratulations, you have successfully leveraged AVM Bicep modules to deploy resources in Azure!

Tip

We welcome your contributions and feedback to help us improve the AVM modules and the overall experience for the community!